Aio Streamer Firestick Edition Overview
In this article, we will be divulging important details on how to install Aio Streamer on Firestick and other devices that run on the android platform.

Are you having trouble finding a compatible adult streaming application to the Amazon Firestick? Worry no more because here at Reviewvpn.com, we already tested more than a dozen porn apps and we only feature ones that are truly working for the Firestick.

How to Install Aio Streamer on Android
- Launch Filelinked on your device.
- Input the code 67664537
- Search for Aio Streamer
- Click on the Drop-down button to download
- Press on the play button to install on your device
- Select Install
- Choose Open
How To Install Aio Streamer Firestick Version
- Go to Settings and select Device.
- Choose Developer Options
- Turn on the ADB Debugging and Apps From Unknown Sources
- After turning these options on, launch the Amazon App Store on your device
- Search and Download Downloader
- Install Downloader and launch it after installing it.
- Choose Allow and Select Ok
- Type in get.filelinked.com and select Go
- Wait for it to finish and then select Filelinked
- Select Done
- This will automatically take you back to Downloader. Select Delete
- Choose Delete one more time
- Head back to the home screen and under the Your Apps & Channels select Choose All
- Scroll down and select Filelinked and select the Options.
- Then select Move to Front
- Filelinked will be moved forward to Your Apps and Channels
- After this, you will see Filelinked and click it to launch.
- Type in the code 67664537 and wait for it to load.
- On the search box, type in Aio Streamer
- Download Aio Streamer by clicking on the drop-down button.
- Once the download finishes, click on the play button to install Aio Streamer.
- Select Install
- Click Open to launch Aio Streamer on your Firestick.
Note: For the best file linked codes, please read our Best Filelinked Codes Review.

If your Firestick still has the older interface, read this article to learn how to update it: Update Firestick Interface.
Install Aio Streamer on Firestick with Screenshots
1. Install the Downloader app and jailbreak your firestick by enabling unknown sources. To learn more about the procedure, you may read How to Install the Downloader App and Enable Unknown Sources.
2. Open Downloader App. Type https://get.filelinked.com and click Go.

3. Click Install.
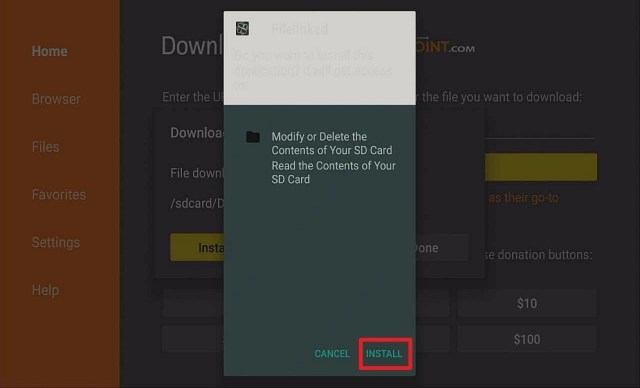
4. Click Open.

5. Click Enter Code.

6. Type Code Number and Click Next.

7. Click Continue.

8. Click on the search bar.

9. On the search box, type in AIO Streamer. Then select Next.

10. Download Aio Streamer by clicking on the drop-down button.

11. Once the download finishes, click on the play button to install AIO Streamer.

12. Select Install.

13. Click Open to launch AIO Streamer on your Firestick.

ReviewVPN cannot attest to the legality, security and privacy of the applications discussed on this site. It is highly recommended that you use a VPN service while streaming or using Kodi. Currently, your IP 216.73.216.51 is visible to everyone and your Browser is being tracked by Advertisers & ISP Provider. Here are the main reasons why you must use a VPN: A VPN works be replacing your ISP-assigned IP address and creating an encrypted tunnel. We recommend the no log service offered by IPVanish. It works well on a Firestick and offers the fastest possible speeds.
YOUR INTERNET ACTIVITY IS BEING WATCHED
Legal Disclaimer: ReviewVPN.com does not encourage or endorse any illegal activity involved in the usage of services and applications referenced on this site. We do not verify the licensing agreements of services. The end-user is wholly responsible for ensuring that any media accessed through these services does not violate copyright and/or licensing laws. ReviewVPN does not promote, link to, or receive compensation from any Apps and IPTV services.
Install Surfshark on Firestick

Is It Any Good?
Aio Streamer is unlike any browser out there. Even though it works much like the browser version of PornHub and XNXX, you will be pleased to know that it is superior when it comes to working on a firestick. It has a lot of featured websites and more than a dozen categories to choose from.
Note: Read our Mouse Toggle Review for details as Aio Streamer requires one to work on the Firestick.
Aio Streamer Features
Hamburger Menu
- Settings – This section will allow you to integrate your Premium Porn Hub Account (if you have one), Log in to your Aio Streamer Premium Account, Set Up and an external player like MX Player Pro, Set the Home tab which lets you choose what website is used upon startup, Activate Pin Lock, and Set your Pin Code.
- Downloads – This portion will give you access to all the videos you have downloaded for offline streaming.
- Favorites – This area will show you all of the videos you have tagged as your favorite.
- Global Search – This function will allow you to search for any type of content you want to watch.
- News – This section informs you of the updates made to each featured website.
- FAQ – This area provides tutorials on how to select a category, Get Premium Ponr Hub for free, Why do some sites take time to load, and what is the fast forward time function.
- Premium – This part will let you either sign up or log in to a premium account.
Featured Premium HD Websites
– Porn Hub, HQporner, Porn Trex, Spank Bang, Sexy Pron, Just Full Porn, Plus One 8, Trendy Porn, Bingato, Laid Hub, Porn4Days, likuoo, ePorner, DaftSex, laetsjerk.to, xGogi, and Porn ECCO
Featured Live Porn Website
– Chaturbate
Featured Amateur Porn Websites
– YouPorn, NSFW247.to, Tube8, XNXX, XVideos, XHamster, RedTube, YouJizz, Dupose, Cliphunter, and BitPorno.
Featured Family Porn Websites
– MilfZR, TabooPorns, Incestflix, and TabooTube.
Featured Japanese Porn Websites
– JavFinder, JAVDoe, JavBangers, BestJAVPorn, JavHihi, and JAVtiful
Featured Hentai Porn Websites
– HentaiMama, Hanime.tv, and HentaiGasm.
Other Featured Websites
– GameofPorn, PerfectGirls, GotPorn, VQTube, vPorn, Sextvx, XoZilla, PornGo, PornXio, and DirtyShip.
Interface
There is a search box where you can sort out videos according to their video quality, production, categories, and order. You will also notice at the bottom of the screen that you can sort our streams to the newest, hottest, most searched, and category listings.
Videos
Aio Streamer features short clips up to full-length videos that usually run for 20 minutes. There are also a lot of HD videos, so you are assured of high-quality videos.
Playing/Loading Time
Before you can play a video, you will choose the video quality. After that, you will see how fast the video loads and plays. Aio Streamer is by far one of the fastest when it comes to this aspect.
In-App Player Interface
Once you select the video quality, the player will pop up and there are other functions that you can use inside like choose the screen orientation, mute audio, download, set the video to 3D, choose an external player, and close the video.
Categories
– 1080p Porn, 4k Porn, 60fps Porn, Amateur, Anal Sex Hd, Asian, Babe, BDSM, Beach Porn, Big Ass, Big Dick, Big Tits, Bisexual, Blonde, Bondage, Blowjob, Brunette, Casting, Creampie, Cumshot, Deepthroat, Ebony, Fetish, Fingering, Fisting, Gangbang, Group Sex, Hairy Pussy, Handjob, Hentai, Interracial, Latina, Japanese Girls Porn, Latina, Lesbian, Masturbation, Mature, MILF, Moaning, Old And Young, Orgasm, Orgy, Pickup, Outdoor, Public, Pussy Licking, Redhead, Russian, Porn Massage, Sex Parties, Shaved Pussy, Small Tits, Squeezing Tits, Squirt, Stockings, Tattooed, Teen Porn, Threesome, Undressing, Uniforms, Vibrator, And Vintage.
Pros and Cons
Pros
- 3D Application – you can set any video into 3D.
- Fast Loading/Playing Time
- Downloadable Content
- HD Videos (720p and 1080p)
- Huge Library
- Full-Screen Mode on the Firestick
Cons
- When you set a video into 3D, you will find it hard to revert it back to the original setting.
Should I use a VPN?
A premium VPN service like Surfshark is required when viewing adult content. Aside from cloaking your online activity and identity, one of the benefits of having one is the assurance of a smooth viewing experience. It will block all attempts to throttle down your speed done by your ISP.
Note: If you want to know more about the perks of having a premium VPN service, please read our Surfshark Review.
How to Install Surfshark VPN on Firestick
If your Firestick still has the older interface, read this article to learn how to update it: Update Firestick Interface.
Follow our screenshots below to install the SurfShark VPN app on your Fire TV stick.
1. Go to the Home screen of your Firestick.

2. Navigate towards the Find tab. Press the Search button from the resulting dropdown.

3. Type in the keyword of SurfShark and select from the suggestions that will appear.

4. Click the official SurfShark icon from your search results.

5. Press the Download (You own it) button.

6. The SurfShark VPN installer will download on your device.

7. SurfShark VPN’s app will automatically install itself on your Fire TV stick.

8. Press the Open button after completing SurfShark VPN’s installation process.

9. Please wait for the SurfShark VPN to load its user interface.

10. You can now log in with your SurfShark VPN account credentials.

Learn more about Surfshark and Grab the Best Surfshark Deal Now!
Install Surfshark on Firestick


For more VPN discounts, go to ReviewVPN Deals and purchase the best VPN for you.
Click here to get the lowest price on Surfshark through our exclusive limited-time offer.
FAQ
Is it safe to download?
Aio Streamer is safe to download on your device.
Is it legal or grey?
Aio Streamer is 100% legal to install on a Firestick.
Is it free?
Aio Streamer is free.
Are there ADS?
Ad Guard is not required because Aio Streamer is Ad-free.
Is there a premium version?
Yes, Aio Streamer offers a premium account.
Is it a Terrarium Clone?
Aio Streamer is not a terrarium clone.
Is there an official website?
Aio Streamer has none.
What other devices does it work on?
Aio Streamer will work on android devices and Amazon Fire Tablets 7 and 10.
How does the app work?
The installation guide we have provided above will show you how Aio Streamer works on the Firestick.
Minimum Version Required
Your device needs to be at least version 5.0 and above for Aio Streamer to work.
How long has it been around?
Aio Streamer is relatively new. It was launched this year, 2020.
Alternatives
We know how hard it is to find a WORKING adult streaming application on the firestick. We did our research, reviews, and tests to make life easier for you. The following apps are guaranteed to work on the firestick.
APPS REVIEW DOWNLOAD Stremio Media Lounge Jizztagram XVideos Pron4Droid
ReviewVPN.com does not host any of these files. They are hosted on Archive.org.
Note: Kindly read our How to Watch Porn using a Firestick for more details.
Our Opinion
We will never get tired of stressing out how rare it is to find a WORKING porn app that is compatible with the Firestick. You will be pleased to know that Aio Streamer not only works for the Firestick but also has great assets that will make other porn apps a run for their money. With its great features and compatibility, we believe that Aio Streamer will be one of the best apps you can use to watch porn on a Firestick.
Note: Read our ultimate guide on how to watch porn on a Firestick by clicking here.
Final Thoughts
Please let us know if this article on how to install Aio Streamer Firestick Edition worked out for you by leaving comments down below. Thank you for reading and stay safe!
Note: ReviewVPN.com does not own or operate any app nor does it endorse any. The main purpose of this article is strictly for educational purposes only.