In this quick guide, we cover a fundamental item of maintenance with Kodi. We talk briefly about what a cache is and why it’s important to clear it, and 3 great tools to clear the cache on Kodi whatever device you use.
Legal Disclaimer: ReviewVPN.com does not encourage or endorse any illegal activity involved in the usage of services and applications referenced on this site. We do not verify the licensing agreements of services. The end-user is wholly responsible for ensuring that any media accessed through these services does not violate copyright and/or licensing laws. ReviewVPN does not promote, link to, or receive compensation from any Apps and IPTV services.
What is a Cache?
When you think of a cache, you think of a web browser. Just like the web, Kodi caches or saves snippets of media so that the second time you load a page, piece of content, or cover art you don’t have to wait.
Caching is crucial to allow you to have a smooth and seamless experience on all your addons.
Why is Clearing Cache Important?
These media snippets will build up over time, and each piece takes up memory. Some caches are bigger than others, as they take up storage space on your device. Your cache is going to be much bigger on an Nvidia Shield than on an Amazon Firestick.
Clearing cache is important as fewer images stored means faster content, loading, and speed for your device. Also left too long your Kodi device will start throwing off error messages, and in the worst case, your addons may be slow, freeze or even stop working once your cache is full.
Often the most space in your cache will be taken up by images, old thumbnails, and addons you no longer use.
Good maintenance every month will ensure Kodi works the best it can, all the time.
3 Tools to Clear Cache on Kodi
Unlike your web browser Kodi, doesn’t have an inbuilt function to clear cache, so here are three great addons you can install to get your Kodi back up to speed.
Indigo Addon
Indigo is the most popular maintenance addon on Kodi, so should be your first port of call.
Install Indigo from this URL: http://fusion.tvaddons.co , if you don’t know how to install addons you can read our in-depth guide here <LINK>
Once installed run Indigo
Click on Maintenance Tools
You are looking for “Clear Cache” which will list the size of the file within your cache and easily allow you to clear and permanently delete the files
If you need to free up space you can also delete thumbnails which tend to take up a huge amount of space, and even run “Auto Maintenance” to get the best out of your Kodi
YOUR INTERNET ACTIVITY IS BEING WATCHED
ReviewVPN cannot attest to the legality, security and privacy of the applications discussed on this site. It is highly recommended that you use a VPN service while streaming or using Kodi.
Currently, your IP 216.73.216.109 is visible to everyone and your Browser is being tracked by Advertisers & ISP Provider.
Your activities are hidden from your ISP, the government, and from the apps you are using.
You can access additional movies and TV streams.
ISP attempts to throttle are thrwarted thus reducing buffering issues.
Geographically restricted content like Netflix and Hulu can be unblocked.
A VPN works be replacing your ISP-assigned IP address and creating an encrypted tunnel. We recommend the no log service offered by IPVanish. It works well on a Firestick and offers the fastest possible speeds.
Supreme is a great wizard which has several good builds as well as an in-depth maintenance section we love because you also get the option to “Fresh Start” reinstall Kodi if nothing else is working.
When running through the Install ignore the Builds Menu
Click on Supreme Builds through the addons menu and navigate to the Maintenance section
There’s a tonne of the great section here, we want cleaning tools, but you also have lots of miscellaneous fixes, and the ability to show all areas that need maintenance and turn on Auto Clean which will run whenever you start Kodi
In the Cleaning Tools section click “Clear Cache”, as well as “Clear Thumbnails”
Merlin Wizard
Merlin Auto Cleaner has been around for a few years, and Supreme Builds also offers an automatic cleaning function whenever you launch Kodi.
Install Merlin Auto Cleaner from: http://srp.nu
Run the addon and select from all the great sections, you also get a free data backup tool with Merlin, we find it to be the best highly specialized Kodi cleaning addon around. For people who like to tinker.
Use a VPN
We always recommend using a VPN such as Surfshark to ensure your safety and privacy while doing any activities online. This VPN is one of the most reliable and fastest VPNs that you can rely on. It also offers you a list of impressive features to enjoy. For more information about Surfshark, please read our Surfshark Review.
Here are the reasons why it is our VPN of choice:
Bypass restrictions and geo-blocks to access lots of content.
This VPN service has 3,200 VPN servers in 65 locations to choose from.
Military-grade AES-256 encryption follows FIPS (Federal Information Processing Standards) that oversees the handling of sensitive data.
It follows a strict No-Logs Policy
No Bandwidth limits – you can enjoy a full-speed VPN connection without any throttling.
Click here to get the lowest price on Surfshark through our exclusive limited-time offer.
How to Install Surfshark VPN on Firestick
If your Firestick still has the older interface, read this article to learn how to update it: Update Firestick Interface.
You can download Surfshark directly from the Amazon App store. It will be easy for you to find Surfshark with your Firestick’s Find feature. Refer to our screenshots below.
1. Go to the Home screen of your Firestick.
2. Navigate towards the Find tab. Press the Search button from the resulting dropdown.
3. Type in the keyword of SurfShark and select from the suggestions that will appear.
4. Click the official SurfShark icon from your search results.
5. Press the Download (You own it) button.
6. The SurfShark VPN installer will download on your device.
7. SurfShark VPN’s app will automatically install itself on your Fire TV stick.
8. Press the Open button after completing SurfShark VPN’s installation process.
9. Please wait for the SurfShark VPN to load its user interface.
10. You can now log in with your SurfShark VPN account credentials.
In this article, we will help you with adding subtitles to your Kodi on any device.
In this guide, we look at why you need to add subtitles to Kodi, and 3 methods that should allow you to watch any content with subtitles in almost any language you can think of.
Why do I Need to Add Subtitles to Kodi?
Kodi isn’t like a DVD, with such a massive range of content and add-ons, chances are everything will be fine if you are an English speaker. But for everybody else, you’ll want some subtitles to help you out.
There is no subtitles function you can simply switch on, you need to use an addon alongside Kodi, which is easy enough to install and gives you access to a massive range of foreign language subtitles.
Installing Open Subtitles
Without a doubt, the best subtitles addon that you can install and use. Driven by a massive community of volunteers, Open Subtitles is always adding new subs for the latest movies and TV shows.
However, unlike installing Subscene, you will need to register an account, so it is a bit more involved than our other options. But very much worth it.
Go to https://www.opensubtitles.org and follow the registration instruction to get an account. You cannot use the Open Subtitles addon without one
Startup Kodi and from the side menu on the Home screen go to addons
Then click on the open box at the top of the left-hand screen, which is your package installer
Click install from the repository
Click Kodi addon repository, unlike many other addons you might have, Open Subtitles is an officially recognized and supported addon from Kodi
Click subtitles
Select OpenSubtitles.org from the long list of addons
Click install, when finished you will get a notification box in the top right-hand corner of your screen
Click Open Subtitles again, and then “Configure”
You will now be prompted to enter the username and password for your account
Go back to the Kodi home screen and click settings (The cog icon)
Click Player
Under the left-hand menu, click “Language”
Under download services, you can select the languages to download subtitles for
Click Default TV Show service
Click “Get More” and select Open Subtitles
Repeat for Default Movies service
Open Subtitles should now display subtitles in all your Movies and TV Shows in the language of your choice. If this does not work in some addons, refer to Part 3.
YOUR INTERNET ACTIVITY IS BEING WATCHED
ReviewVPN cannot attest to the legality, security and privacy of the applications discussed on this site. It is highly recommended that you use a VPN service while streaming or using Kodi.
Currently, your IP 216.73.216.109 is visible to everyone and your Browser is being tracked by Advertisers & ISP Provider.
Your activities are hidden from your ISP, the government, and from the apps you are using.
You can access additional movies and TV streams.
ISP attempts to throttle are thrwarted thus reducing buffering issues.
Geographically restricted content like Netflix and Hulu can be unblocked.
A VPN works be replacing your ISP-assigned IP address and creating an encrypted tunnel. We recommend the no log service offered by IPVanish. It works well on a Firestick and offers the fastest possible speeds.
Legal Disclaimer: ReviewVPN.com does not encourage or endorse any illegal activity involved in the usage of services and applications referenced on this site. We do not verify the licensing agreements of services. The end-user is wholly responsible for ensuring that any media accessed through these services does not violate copyright and/or licensing laws. ReviewVPN does not promote, link to, or receive compensation from any Apps and IPTV services.
Subscene is not as good as Open Subtitles but means you can get going straight away without having to register for an account anywhere.
From the Kodi home screen go to Settings
Click Language, and set your default language
Now we want to set the default TV Show and Movie service, click on both, and when it says “Get More…” scroll down until you see Subscene
It’s worth saying that one addon does not override another, you can use multiple subtitle providers and Kodi will search for the most complete or best-rated subtitles and translation to use for your chosen title.
Enabling Subtitles Within Individual Addons
Some addons have their own inbuilt subtitle addon. Often it is Open Subtitles, however, you may need to adapt the subtitle settings within the addon.
You can do this by:
Go to addons and then find the addon where you need to amend the subtitles settings
On the addon click Tools or Settings
There should be a section called subtitles, then go to “Enable Subtitles”
By enabling subtitles within the addon should fix any issues.
Use Kodi with a VPN
Accessing geo-restricted apps can be seen by your internet service provider (ISP). Streaming high-resolution videos can intensify your internet bandwidth demand. Your IP requests additional loads from the main server that results in lags, stuttering, and buffering. These activities may become an inconvenient streaming experience. We recommend having a powerful VPN like Surfshark to mitigate such difficulties. Surfshark is created for your protection while streaming TV shows and quality media content. Surfshark is the best VPN for streaming purposes.
Here is a list of advantages that Surfshark may offer you:
Adds a cyber shield that prevents your ISP from keeping tabs on your online activities.
Creates digital tunnels in cyberspace that neutralize the limits placed by geo-blocks preventing you from accessing exclusive media content.
Cloaks your identity from several online threats like hackers that want to steal your credentials, personal data, and valuable information.
Secures your information and crucial documents from malware and ransomware.
Keeps you anonymous while using the internet.
Increases your connectivity rate.
Torrent downloads are faster and easily accessible.
Prevents Firestick buffering and Kodi buffering.
Note: For more information about SurfShark, please read our SURFSHARK REVIEW.
If your Firestick still has the older interface, read this article to learn how to update it: Update Firestick Interface.
You can download Surfshark directly from the Amazon App store. It will be easy for you to find Surfshark with your Firestick’s Find feature. Refer to our screenshots below.
1. Go to the Home screen of your Firestick.
2. Navigate towards the Find tab. Press the Search button from the resulting dropdown.
3. Type in the keyword of SurfShark and select from the suggestions that will appear.
4. Click the official SurfShark icon from your search results.
5. Press the Download (You own it) button.
6. The SurfShark VPN installer will download on your device.
7. SurfShark VPN’s app will automatically install itself on your Fire TV stick.
8. Press the Open button after completing SurfShark VPN’s installation process.
9. Please wait for the SurfShark VPN to load its user interface.
10. You can now log in with your SurfShark VPN account credentials.
In this article, we will help you with adding music to your Kodi on any device.
Kodi Leia, the 18th version of the globally popular home entertainment software has brought a whole host of music files that can now be supported. Opening the door for an even better experience, in these short but in-depth guides, we are covering everything you need to know to learn how to add music to Kodi.
Adding a Music Section to the Kodi Home Menu
First, if you love music, and want to use Kodi as your main library to listen to music at home or on the go, then you want to make sure you can quickly access your music from the home menu.
This instruction guide is for Kodi 18’s default skin Estuary, each skin should have a simple way to add a music section on your home screen.
Make sure “Estuary” is your active skin, you can do this by going to: Settings > Interface Settings > Skin > Skin (right-hand side – click) > Choose Estuary
Now to turn on the Music icon, return to the Kodi Home screen, or just back to the Skin Menu, now you want to click “Configure Skin”
Click “Pick Main Menu Items”
You’ll see several categories including Music, slide the toggle bar so the Music section appears white
Music will now appear on the home screen next to Movies and TV
First Time Adding Music to Kodi
Now you have the music section button on your home screen, you’re ready to start adding all your favorite tunes.
Prior to doing this, you will need to copy across any music you want to be uploaded onto Kodi, on your Kodi device.
Click on your Music icon on the Home screen
Click “Add Music”
Then, click “Browse for music”, Kodi will now scan your device for any applicable audio files which can then be uploaded
Once Kodi has finished scanning and uploading your library, you can return to the Home screen and click Music
Kodi will fetch all relevant cover art and you can easily navigate your titles by Genres, Artists, Albums, Singles, and much more
Adding New Music Sources to Kodi
After you’ve started your initial library when it comes to adding more sources you need to follow some slightly different steps to add more sources.
Go to the Kodi home menu, then Music, and scroll the top categories icons which are displayed above your music collection, you are looking for a category called “Files” between Roles and Music addons
After clicking files, you will see a familiar pop up where you can add and remove music sources as well as browse for more music to upload
Once uploaded your music will be categorized and added to your existing library
YOUR INTERNET ACTIVITY IS BEING WATCHED
ReviewVPN cannot attest to the legality, security and privacy of the applications discussed on this site. It is highly recommended that you use a VPN service while streaming or using Kodi.
Currently, your IP 216.73.216.109 is visible to everyone and your Browser is being tracked by Advertisers & ISP Provider.
Your activities are hidden from your ISP, the government, and from the apps you are using.
You can access additional movies and TV streams.
ISP attempts to throttle are thrwarted thus reducing buffering issues.
Geographically restricted content like Netflix and Hulu can be unblocked.
A VPN works be replacing your ISP-assigned IP address and creating an encrypted tunnel. We recommend the no log service offered by IPVanish. It works well on a Firestick and offers the fastest possible speeds.
Legal Disclaimer: ReviewVPN.com does not encourage or endorse any illegal activity involved in the usage of services and applications referenced on this site. We do not verify the licensing agreements of services. The end-user is wholly responsible for ensuring that any media accessed through these services does not violate copyright and/or licensing laws. ReviewVPN does not promote, link to, or receive compensation from any Apps and IPTV services.
Once your library is set up it’s easy, to re-scan files using the method above or highlight songs and albums that you want to remove.
We also recommend you install some additional music addons, so you never have to pay for music again, and can easily find complementary music to add to your collection.
Here are a few recommended music addons for Kodi:
All Kinds of Music: As the title suggests this has a huge range of music and genres, as well as the latest tunes from the Billboard Top 100.
MP3 Streams: A massive back catalog of music, be aware that some songs may only be 30-second snippets, so check the length before downloading.
Thunderstruck: Primarily concentrates on classic rock and country music, but has a massive back catalog of tunes, and makes it easy to search by artist.
Use Kodi with a VPN
Accessing geo-restricted apps can be seen by your internet service provider (ISP). Streaming high-resolution videos can intensify your internet bandwidth demand. Your IP requests additional loads from the main server that results in lags, stuttering, and buffering. These activities may become an inconvenient streaming experience. We recommend having a powerful VPN like Surfshark to mitigate such difficulties. Surfshark is created for your protection while streaming TV shows and quality media content. Surfshark is the best VPN for streaming purposes.
Here is a list of advantages that Surfshark may offer you:
Adds a cyber shield that prevents your ISP from keeping tabs on your online activities.
Creates digital tunnels in cyberspace that neutralize the limits placed by geo-blocks preventing you from accessing exclusive media content.
Cloaks your identity from several online threats like hackers that want to steal your credentials, personal data, and valuable information.
Secures your information and crucial documents from malware and ransomware.
Keeps you anonymous while using the internet.
Increases your connectivity rate.
Torrent downloads are faster and easily accessible.
Prevents Firestick buffering and Kodi buffering.
Note: For more information about Surfshark, please read our Surfshark Review.
You’ve searched through endless titles on your shiny new Kodi add-on and finally found the one you’ve been looking for.
Then you click on the best link available and get a no stream error. You resist the urge to grab your TV and rip it out of the wall.
No stream errors are common, and if you haven’t come across one yet then you will.
In this guide, we’ll identify a no stream error, and then give you 3 simple working methods to fix Kodi streaming errors, as well as 3 additional fixes just in case those don’t work.
What is a No Stream Error?
No stream errors can come in a variety of formats. The video just not playing at all and displaying a clear error message. To occasional jumpy buffering with interminable frustrating minutes in between.
Worst of all when you are halfway through a show and at that vital moment it drops the connection and doesn’t work again no matter how many times you refresh and reconnect.
The good news is, a no-stream error is one of the first and most common problems that Kodi users come across, and they’re a lot of common fixes.
How to Fix No Stream Available Kodi Error
These fixes should be done in order, so if the first doesn’t work, try the second, and so on.
Check your Internet Connection
Any time you are connecting to anything online when you get a connectivity issue the first thing you want to check is your internet connection.
Check Your Internet Speed
You can just Google “speed test” and use Google’s internal tool or go to a website like www.speedtest.net, if your internet is registering download speeds of less than 10Mbps, then you may just have a slow internet problem.
The next thing you can do is simply restart your router.
If your internet speed stays slow again after you restart your router, then you may need to move your device closer to the router and use a cabled connection. A CAT cable connection is always faster than Wi-Fi.
If the problem persists then use a laptop to check your cabled connection speed, if you still see slow speeds, then contact your Internet Service Provider, and find out why you are not getting the speeds advertised.
As most internet speeds are fast these days, chances are you have good speed, just poor connection. So, might be worth buying a Wi-Fi repeater or an extender.
Click here to get the lowest price on Surfshark through our exclusive limited-time offer.
Clear Kodi Cache
Having a full cache can be a big problem, particularly with devices with a small amount of memory and RAM like the Amazon Firestick. These devices are great because they are cheap, but they lack disk space.
Every program you watch on Kodi is cached to a disk. This means over time your disk gets full of old shows and needs to be cleared. In the same way, you would clear the cache on your internet browser.
Follow these steps to clear cache and providers, and give your system a clean slate to start again at maximum speed and space:
Scroll to Tools on your Add on (Bear in mind not all add ons will have a clear cache function as this isn’t built into Kodi, or some add ons. You can alternatively download Supreme Builds: http://repo.supremebuilds.com/and run their cleaning tools. Or go through the Amazon menu if you have an Amazon Fire Device.)
Click clear providers
Click clear cache
Restart Kodi
Clearing cache varies by device. So, you can look further through Google to find your device settings, or just use the cleaning tools in Supreme Builds.
YOUR INTERNET ACTIVITY IS BEING WATCHED
ReviewVPN cannot attest to the legality, security and privacy of the applications discussed on this site. It is highly recommended that you use a VPN service while streaming or using Kodi.
Currently, your IP 216.73.216.109 is visible to everyone and your Browser is being tracked by Advertisers & ISP Provider.
Your activities are hidden from your ISP, the government, and from the apps you are using.
You can access additional movies and TV streams.
ISP attempts to throttle are thrwarted thus reducing buffering issues.
Geographically restricted content like Netflix and Hulu can be unblocked.
A VPN works be replacing your ISP-assigned IP address and creating an encrypted tunnel. We recommend the no log service offered by IPVanish. It works well on a Firestick and offers the fastest possible speeds.
Add ons have a short shelf life. Many will simply be abandoned by their developers and fall into disuse. If an addon is not maintained and updated, then over time streams will stop working.
Add ons need to be connected to working scrapers and source providers, these links change regularly and if they are not updated then you will get repeated no stream available messages.
This is worth bearing in mind if you find you are regularly getting this problem while using an add-on.
We recommend using add ons like:
Exodus Redux
Yoda
Deceit
7 of 9
Numbers
Of just Google “best working addons Kodi” for an up-to-date list of add ons that are up and working.
Other Fixes
Hopefully, the 3 fixes we provided will have fixed most of the no-stream errors you’ve gotten, but if the problem persists then you can work through the next 4 fixes.
Troubleshooting the Add On
Some add ons will have an inbuilt troubleshooter function, but otherwise, it can be as simple as checking you have the latest version of the add-on and see if an update is available.
Are You Using a VPN?
We cannot stress enough how important it is that you use a VPN with Kodi, and any add ons. Your Internet Service Provider may let you stream unprotected on Kodi for a few weeks. But once they realize the source you are using, they will start blocking your connection to IP addresses that give you access to copyrighted materials.
A VPN helps to maintain your anonymity and privacy online. As well as encrypting your connection making what you do online purely between you and your target website.
If your Firestick still has the older interface, read this article to learn how to update it: Update Firestick Interface.
You can download Surfshark directly from the Amazon App store. It will be easy for you to find Surfshark with your Firestick’s Find feature. Refer to our screenshots below.
1. Go to the Home screen of your Firestick.
2. Navigate towards the Find tab. Press the Search button from the resulting dropdown.
3. Type in the keyword of SurfShark and select from the suggestions that will appear.
4. Click the official SurfShark icon from your search results.
5. Press the Download (You own it) button.
6. The SurfShark VPN installer will download on your device.
7. SurfShark VPN’s app will automatically install itself on your Fire TV stick.
8. Press the Open button after completing SurfShark VPN’s installation process.
9. Please wait for the SurfShark VPN to load its user interface.
10. You can now log in with your SurfShark VPN account credentials.
For more VPN discounts, go to ReviewVPN Deals and purchase the best VPN for you.
Click here to get the lowest price on Surfshark through our exclusive limited-time offer.
Change Sources
This is a simple solution. For any form of media, you’ll get provided with multiple sources. Sometimes it may be a case of just clicking through a couple of sources. If one hosting provider is being blocked on that day.
Use Real Debrid
For $4 a month save yourself ever having to put up with a no stream available error message every again. Real Debrid pulls high-quality links from 50+ providers and can be synchronized with most Kodi add ons. Meaning you’ll always be served a high-quality working link.
In this article, I will be teaching you how to install Destiny Kodi Addon on your Amazon Firestick.
Destiny Kodi Addon
Destiny Kodi addon is currently one of the best that is available with a dizzying array of features and can be found in the Egg man repo.
What is Kodi?
Kodi is a free and legal piece of open-source software that acts as a media player. Its popularity stems from not only being one of the oldest around, dating back from 2002.
But also, because it’s very feature-rich, it will play almost any type of media and has a 10-foot interface allowing it to be integrated easily with your TV through your device.
You can also access thousands of unofficial add ons allowing you to watch anything, anywhere, and mostly for free.
What is an Add On?
An add-on is just an added feature stand-alone application that gives you added functionality within Kodi.
Think of it as an optional upgrade.
Add ons allow you to access certain types of media, channels, or categories that may not be provided with Kodi. Most add ons aren’t in the official application store as they aren’t endorsed by Kodi. Which only endorses add ons which do not stream illicit copyrighted material or content which does not have the owner’s permission.
YOUR INTERNET ACTIVITY IS BEING WATCHED
ReviewVPN cannot attest to the legality, security and privacy of the applications discussed on this site. It is highly recommended that you use a VPN service while streaming or using Kodi.
Currently, your IP 216.73.216.109 is visible to everyone and your Browser is being tracked by Advertisers & ISP Provider.
Your activities are hidden from your ISP, the government, and from the apps you are using.
You can access additional movies and TV streams.
ISP attempts to throttle are thrwarted thus reducing buffering issues.
Geographically restricted content like Netflix and Hulu can be unblocked.
A VPN works be replacing your ISP-assigned IP address and creating an encrypted tunnel. We recommend the no log service offered by IPVanish. It works well on a Firestick and offers the fastest possible speeds.
Legal Disclaimer: ReviewVPN.com does not encourage or endorse any illegal activity involved in the usage of services and applications referenced on this site. We do not verify the licensing agreements of services. The end-user is wholly responsible for ensuring that any media accessed through these services does not violate copyright and/or licensing laws. ReviewVPN does not promote, link to, or receive compensation from any Apps and IPTV services.
Destiny Kodi Addon is a rich multi-feature add on and one of the most popular on Kodi
Features
Simple and easy to use UI
Torrent streaming
Series tracking without Trakt
Movies
TV Shows
Kids TV
NBA
Live Sports
Live TV
Real Debrid compatible
Clear cache
Trakt.tv compatible
Last played
Check ratings
Update scraper sources
Ace streams
M3U8 Playlists for Live TV
Import Kodi scrapers
How to Install Destiny Kodi Addon
It’s quick and easy to get going with Destiny following these steps.
Make sure Kodi is open and on the home screen
Go to settings and then system
Switch on Unknown sources which let you access and install add ons from non-approved third-party sources
Go back and click on File Manager
Click add source and then “Add None”
In the URL bar that pops up type in: http://repo.mreggman.xyz(Sometimes repository links go down, if that happens you’ll get an unrecognized error message. Just use Google to search for a working link, but it comes from the Mr. Egg Man repo)
Name the source Destiny, click ok to add it to your file manager
Then, click Addons and install from .zip file
Select your Destiny file and then install it from the repository
You want to also allow any additional add ons to be installed with Destiny
Now when you return to your Kodi Home Screen you’ll see Destiny installed
FAQ
Is it Safe to Use Destiny Kodi Addon?
Destiny is one of the longest-running add ons on Kodi and is safe to use.
Your biggest danger will be downloading the file from a copycat file host that isn’t from the Egg Man repo. Always be careful of copycats and make sure the file comes from the right source.
Nonetheless, if you aren’t sure you can always pop the URL into your browser to check or scan the file before you open it.
Is Destiny Kodi Addon Legal or Grey?
Destiny is a grey area but barely. Let’s face it if you are using Destiny then you are probably trying to get your hands on something you don’t want to pay for.
Though the add on isn’t banned and is pretty popular you’ll find that if you use Destiny over your regular internet connection without encryption, then after a while it may become less stable and then stop working altogether.
Should I Use Destiny Kodi Addon With a VPN?
We recommend using a VPN for anything you do online and especially when you are using Destiny or Kodi. There are several reasons:
Without a VPN, Destiny may not even work. Media companies work with your Internet Service Provider to ban any IP addresses which allow the distribution of their content for free
A VPN prevents you from being tracked by your ISP. Depending on the country you live in, your ISP may keep your browsing history for up to a year, as well as potentially pass these details on to third parties. A gross breach of your right to privacy
Using a VPN, you can access region-restricted content which may not be viewable from an IP address based in your home country. A VPN gives you access to thousands of servers across a number of countries and regions. Nonetheless, using a VPN, you can log onto any of their servers around the world and circumvent any restrictions on your watching content.
Note: For more information about SurfShark, please read our SurfShark REVIEW.
How to Install Surfshark on Firestick with Screenshots
If your Firestick still has the older interface, read this article to learn how to update it: Update Firestick Interface.
You can download Surfshark directly from the Amazon App store. It will be easy for you to find Surfshark with your Firestick’s Find feature. Refer to our screenshots below.
Follow our screenshots below to install the SurfShark VPN app on your Fire TV stick.
1. Go to the Home screen of your Firestick.
2. Navigate towards the Find tab. Press the Search button from the resulting dropdown.
3. Type in the keyword of SurfShark and select from the suggestions that will appear.
4. Click the official SurfShark icon from your search results.
5. Press the Download (You own it) button.
6. The SurfShark VPN installer will download on your device.
7. SurfShark VPN’s app will automatically install itself on your Fire TV stick.
8. Press the Open button after completing SurfShark VPN’s installation process.
9. Please wait for the SurfShark VPN to load its user interface.
10. You can now log in with your SurfShark VPN account credentials.
For more VPN discounts, go to ReviewVPN Deals and purchase the best VPN for you.
Is it Free?
Yes
History
When Was It Released?
Destiny Kodi Addon was originally released in 2017, it has been a top Kodi add on for much of that time as well.
Best Alternatives
Destiny is fantastic and feature-rich add on which features much more than most comparable add ons as well as having been updated and stable for some time.
We always recommend you have a number of add ons downloaded in case one goes down unexpectedly:
Yoda
Deathstar of Destiny
7 of 9
The Magic Dragon
Numbers
Seren
Exodus Redux
Nonetheless, if for any reason multiple add ons go down, you can search Google and easily find the latest working add ons.
Our Opinion
Destiny Kodi Addon has some great features which really make it stand out.
The M3U8 list means that you can continuously update your Live TV channels to find the best working lists. Nonetheless, importing and updating scrapers means you can find the best server hosts to find working streams.
Free torrent caching is also a great bonus and integrated with Real Debrid means you don’t have to trawl through endless dead or low-quality links. Real Debrid is a paid-for service, costing around $4 a month. In return you get access to high-quality links from 50 different hosting providers, meaning top links will always work and be of high quality.
ES File Explorer is one of the most popular free file managers available online. Downloaded over 300 million times it provides easy navigation and file management service for your documents and applications on devices that may not have this service or have poor imitation software.
ES File Explorer can be easily searched, organized, and navigated, as well as synced with a wide variety of cloud storage devices to massively increase your storage capacity. Very useful on low storage devices like an Amazon Firestick.
Features
An easy to use and navigate file and application manager
Compatible with Google Drive, OneDrive, Dropbox, Ubuntu One, SkyDrive, Sugarsync, Yandex, Amazon S3, and a wide variety of other cloud storage clients. Great if you have limited storage on your device for file
Browse a wide variety of multimedia including pictures, videos, music, and several other file formats
Install or uninstall apps and view compressed files
Used as an FTP and LAN Samba client
Allows you easy access to your images, music, videos, files, and documents
Lightweight application coming in at under 20MB
Supports more than 30 languages
Easy to filter files using search
Allows login using sftp key file
You can search by document type settings
Can be opened and shared in browser menu in web view
Allows users to analyze directory in property
The design is clean and easy to use, much like Windows File Explorer
Why Should I Use it?
ES File Explorer is a simple and lightweight application to organize your files and applications as well as sideload applications using their Downloader application.
It is an incredibly useful utility application that helps to bring order and usability as your file store gets larger. Tying it into a cloud storage account will also allow you to download masses of content to view offline that you wouldn’t otherwise be able to store on a physical device.
Their Tools function alone gives you access to any Android application you can find which is downloadable online.
Legal Disclaimer: ReviewVPN.com does not encourage or endorse any illegal activity involved in the usage of services and applications referenced on this site. We do not verify the licensing agreements of services. The end-user is wholly responsible for ensuring that any media accessed through these services does not violate copyright and/or licensing laws. ReviewVPN does not promote, link to, or receive compensation from any Apps and IPTV services.
YOUR INTERNET ACTIVITY IS BEING WATCHED
ReviewVPN cannot attest to the legality, security and privacy of the applications discussed on this site. It is highly recommended that you use a VPN service while streaming or using Kodi.
Currently, your IP 216.73.216.109 is visible to everyone and your Browser is being tracked by Advertisers & ISP Provider.
Your activities are hidden from your ISP, the government, and from the apps you are using.
You can access additional movies and TV streams.
ISP attempts to throttle are thrwarted thus reducing buffering issues.
Geographically restricted content like Netflix and Hulu can be unblocked.
A VPN works be replacing your ISP-assigned IP address and creating an encrypted tunnel. We recommend the no log service offered by IPVanish. It works well on a Firestick and offers the fastest possible speeds.
There are 3 simple ways you can download and install ES File Explorer on your device:
Amazon App Store
Direct from ES App Groups
From APK Pure or Aptoide
Amazon App Store
Click search from the Home Screen of Amazon TV on your device
Search “ES” and the auto-prompt will come up with ES File Explorer
Click Download and then Open
Installation complete! You can now access the app from the Home tab
Direct from ES App Group
You can download the iOS and Android versions of the app directly from the web by going to http://www.estrongs.com/#/ and clicking on the corresponding link.
You may need to make sure that your device and OS allows you to download files from unknown sources before you download the file.
From APK Pure of Aptoide
In 2016, Google accused DO Global who is the company behind the ES software line of carrying out irregular ad clicks from their user’s applications. It was alleged that DO has programmed a script to click ads on user’s phones which they had no knowledge of and drive up ad revenue on their applications.
DO Global carried out an investigation and admitted their guilt and promised to rectify the situation. However, since 2016, Google hasn’t allowed them back on the Play Store.
You can download ES File Explorer from 2 great alternatives, the smaller APK Pure, or the third largest and largely unknown global app store. Aptoide. With well over a million apps on their store, as opposed to Apple with 1.6M and Google Play with 2M+.
This article will give you an overview of Helix IPTV Service.
Is it any Good?
Helix is a relatively new IPTV provider which has been receiving good reviews for its stability and pricing. They offer several paid packages that allow you to choose regionally between over 6,500+ channels.
They offer a massive choice of channels and honestly the number of Videos on Demand (VOD) can be quite overwhelming at first.
Nonetheless, Helix also has one of the biggest ranges of adult channels for an IPTV provider, giving you a choice of over 100 channels to watch.
What Does it Do?
Helix IPTV delivers paid cable channels from all around the world. You can choose from 5 different packages:
UK Helix – 7 Euros Per Month
Choose from a wide range of UK content only, doesn’t include Pay Per View and 3 PM (Live Premier League Football
US/CA Helix – 7 Euros Per Month
Content from the US and Canada only. Include Fox, NBC Sports, local US, and Canada TV Channels, as well as PPV and 3 PM
Single Helix – 9.50 Euros Per Month
Includes all content from the UK, US, and Canada as well as Video on Demand
Double Helix – 10.50 Euros Per Month
Content from UK, US, Canada as well as all international channels and VOD
Triple Helix – 11.50 Euros Per Month
All content as well as Adult channels
All packages are for 1 connection only, but you can purchase up to 3 additional connections for the Single, Double, and Triple Helix packages. Nonetheless, each additional connection costs an added 5.75 Euros per month.
Also, packages are discounted, if bought as a quarterly, biannual, or annual package.
Discounts work out about the following
Quarterly – 10% discount
Biannual – 20% discount
Yearly – 33% discount
YOUR INTERNET ACTIVITY IS BEING WATCHED
ReviewVPN cannot attest to the legality, security and privacy of the applications discussed on this site. It is highly recommended that you use a VPN service while streaming or using Kodi.
Currently, your IP 216.73.216.109 is visible to everyone and your Browser is being tracked by Advertisers & ISP Provider.
Your activities are hidden from your ISP, the government, and from the apps you are using.
You can access additional movies and TV streams.
ISP attempts to throttle are thrwarted thus reducing buffering issues.
Geographically restricted content like Netflix and Hulu can be unblocked.
A VPN works be replacing your ISP-assigned IP address and creating an encrypted tunnel. We recommend the no log service offered by IPVanish. It works well on a Firestick and offers the fastest possible speeds.
Disclaimer: ReviewVPN does not encourage or endorse any illegal activity involved in the usage of services and applications referenced on this site. We do not verify the licensing agreements of services. The end-user is wholly responsible for ensuring that any media accessed through these services does not violate copyright and/or licensing laws. However, ReviewVPN does not host the applications and addons mentioned herein and all material presented on the site is for educational purposes only.
One of the biggest plusses for Helix is that it seems to work on almost anything:
Android
iOS
Enigma
Formuler
GSE
Kodi
Perfect Player
Firestick
Smart IPTV
Features
6,500+ channels from 50+ countries
Good Electronic Programming Guide (EPG)
Minimal Lag
Good uptime for almost all channels
Easily navigate channels by groups i.e. Sports, Adult, etc.
100+ adult channels including 24/7 streams
HD channels available
Compatible with a wide range of Operating Systems
Compatible with VPNs
Good customer service which will reply within hours if you raise a ticket
Keep up to date with announcements through their Twitter feed
EPG automatically updates regularly
Reasonably priced
FAQs
Is it Safe to Use?
Yes, Helix TV is widely used and pretty popular. There have been quite a few positive reviews posted on Reddit, and they have been going since September 2018 if their Twitter is anything to go by.
Is it Legal or Grey?
It’s a gray area but not by much. Like with all Live TV providers they are streaming content that is meant for a particular country or provider. So, it is certainly not legal or being given by the consent of the TV producers. This is why we recommend that you use a VPN.
Should I Use This App With a VPN?
We think its best to use Helix IPTV with a VPN for several reasons:
If you are wanting to watch international channels, then you may be restricted by your geographic location. Say for example you wanted to watch the NFL in the US, from the UK. Helix may provide a channel to watch but your service will be blocked if your IP is found to originate from the UK. Using a VPN, you can alter your IP address to a server in the US from your VPN provider.
Your Internet Service Provider will actively be looking for connections that have a high amount of data usage and are accessing content that is suspect or could be illegal. Your connection may then be flagged, those IPs distributing the content blocked and your internet may be slowed down, leading to greater lag and longer buffering
A VPN can afford you absolute privacy and anonymity depending on your provider. Using a Tier 1 Provider like SurfShark will allow you to remain untraceable with not even your ISP able to discern where your traffic is going, as your data will be encrypted using military-grade 256-bit AES encryption.
Note: For more information about SurfShark, please read our SurfShark REVIEW.
How to Install Surfshark on Firestick with Screenshots
If your Firestick still has the older interface, read this article to learn how to update it: Update Firestick Interface.
You can download Surfshark directly from the Amazon App store. It will be easy for you to find Surfshark with your Firestick’s Find feature. Refer to our screenshots below.
Follow our screenshots below to install the SurfShark VPN app on your Fire TV stick.
1. Go to the Home screen of your Firestick.
2. Navigate towards the Find tab. Press the Search button from the resulting dropdown.
3. Type in the keyword of SurfShark and select from the suggestions that will appear.
4. Click the official SurfShark icon from your search results.
5. Press the Download (You own it) button.
6. The SurfShark VPN installer will download on your device.
7. SurfShark VPN’s app will automatically install itself on your Fire TV stick.
8. Press the Open button after completing SurfShark VPN’s installation process.
9. Please wait for the SurfShark VPN to load its user interface.
10. You can now log in with your SurfShark VPN account credentials.
For more VPN discounts, go to ReviewVPN Deals and purchase the best VPN for you.
Is it Free?
Helix IPTV isn’t free, some reviews refer to a 1 Euro trial for 48 hours, but we weren’t able to find it on their website at this time.
Are There Ads? (If it has ads is there a modded version)
There are no adverts served within the application, though adverts will be served in the channels, depending on the channel provider. Nonetheless, this has no relation to Helix.
Is There a Premium Version?
Yes, there are 5 premium subscriptions, covered in detail at the start of this article.
Is There an Official Website?
Yes
What Other Devices Does it Work on?
Helix works on a wide range of devices and there are several setup guides provided on the website.
With helix, just download and install following the setup guides provided
What is the Minimum Version of Android I Need?
Android 5.0
History
How Long Has it Been Around?
Based on their Twitter page, since September 2018
Is it a Terrarium Clone?
No
What is the Development Team Like?
We couldn’t get any information about the team, but they seem super responsive to support tickets, and also their Twitter feed is a nice touch for ongoing updates.
If you are looking for a free alternative then you can plum for Mobdro or Red Box, which have about 1000 channels apiece. But it’s worth saying the quality and range of channels available is never going to compare to a paid service.
Nonetheless, the biggest paid IPTV service is Player’s Klub which offers 2,500+ channels, mainly based around the US, UK, and Canada for around $8 a month.
Our Opinion
Helix is solid and impressive. The reviews consistently say that it’s well-priced, and the programming is stable. Nonetheless, the development team seems to be highly responsive and we think this is a great intro IPTV premium player for anyone looking to experiment and wanting better quality than free providers can give.
In this article, we will show you How to Cast Free Movies to Firestick.
What is an Amazon Firestick?
The Firestick is the most popular Android streaming device in the world, followed closely by Roku and Chromecast. It packs a powerful punch for a device that costs less than $50 to buy. Plus, unlike the incredibly frustrating Roku, the Firestick is based on Android and incredibly easy to cast.
Android is free-to-use, and open software made by Google which means that it is widely adopted by a lot of hardware makers. Making it easy to find devices that are compatible with the Firestick.
In this guide, we are going to cover what casting is, why we don’t just mean plugging it into your TV, various ways on how to cast free movies to firestick, and finally a series of casting troubleshooting questions to help you with any problems that you may find along the way.
What Does Cast Mean?
When we say casting, we mean taking the image from device 1 and projecting it onto device 2. The casting in this case is done by the Firestick which transmits the image from device 1 onto device 2.
This would probably be casting from a phone, tablet, or laptop onto a TV.
For the Firestick, you can cast any Android Device which has at least Android 4.2 and supports Miracast.
Why Don’t I just Plug it Into My TV?
An Amazon Firestick is versatile, unlike other closed-loop devices like the Roku, there really isn’t very much you can’t do with it.
Using Downloader, you can pretty much install any software you like, and it’s simple to get Kodi up and running.
Of course, you may just want to use the Amazon store which has over 3,000 channels and a massive array of media.
There may come a time when you just can’t be arsed.
That’s the technical term, for finding a movie or seeing something on YouTube, and just going “Wow this is cool” and wanting to flash it up on your big TV and show everyone else.
Or you might just have a slideshow of pictures, a document, PPT, or anything else that you can think of, that you want to project from a smaller onto a bigger device. Plus, you could cast whatever is on your phone to your Firestick if it’s plugged into your TV.
How to cast free movies to firestick?
For those who have tried to cast with a Roku or even a Chromecast the Firestick is a dream. Choose from any one of the following three methods:
From Home
By far the simplest method:
Hold down the Home button on your remote for up to 5 seconds. A Window will pop up with some applications silhouetted. There will be 4 saying “Apps, Sleep, Mirroring, Settings”
Click on Mirroring Tab to open it
You will see a Window pop up saying “While this screen is open, guest devices can wirelessly mirror their display to: <Your Device’s Name>
On your guest device, you just need to seek out the Device and start mirroring
From Settings
Almost as simple:
From the Firestick home screen go to Settings
Click Displays and Sound
Scroll down to enable display mirroring
Click on it, and the same mirroring screen will come up, making the Firestick searchable by other devices
From Android Device
Turn the tables and say that you find something fun on your Android phone that you want to cast to your Firestick. Bear in mind settings may vary based on the manufacturer
Go to settings on your phone
Find Bluetooth and Device Connections
Go to Connection Preferences
Click on Cast and you should see your Firestick come up
YOUR INTERNET ACTIVITY IS BEING WATCHED
ReviewVPN cannot attest to the legality, security and privacy of the applications discussed on this site. It is highly recommended that you use a VPN service while streaming or using Kodi.
Currently, your IP 216.73.216.109 is visible to everyone and your Browser is being tracked by Advertisers & ISP Provider.
Your activities are hidden from your ISP, the government, and from the apps you are using.
You can access additional movies and TV streams.
ISP attempts to throttle are thrwarted thus reducing buffering issues.
Geographically restricted content like Netflix and Hulu can be unblocked.
A VPN works be replacing your ISP-assigned IP address and creating an encrypted tunnel. We recommend the no log service offered by IPVanish. It works well on a Firestick and offers the fastest possible speeds.
The Firestick is so easy to use, but there are common problems that can occur.
Is Mirroring Enabled?
If you can’t find your Firestick, remember that before you try to cast or do anything else, that mirroring must be switched on.
Do that either by pressing down the home button or through the Firestick settings menu.
Are You Using a VPN?
A Virtual Private Network can sometimes interfere with casting. To double-check, switch it off while you try again and refresh the source if it is online.
Note: For more information about SurfShark, please read our SURFSHARK REVIEW.
If your Firestick still has the older interface, read this article to learn how to update it: Update Firestick Interface.
You can download Surfshark directly from the Amazon App store. It will be easy for you to find Surfshark with your Firestick’s Find feature. Refer to our screenshots below.
1. Go to the Home screen of your Firestick.
2. Navigate towards the Find tab. Press the Search button from the resulting dropdown.
3. Type in the keyword of SurfShark and select from the suggestions that will appear.
4. Click the official SurfShark icon from your search results.
5. Press the Download (You own it) button.
6. The SurfShark VPN installer will download on your device.
7. SurfShark VPN’s app will automatically install itself on your Fire TV stick.
8. Press the Open button after completing SurfShark VPN’s installation process.
9. Please wait for the SurfShark VPN to load its user interface.
10. You can now log in with your SurfShark VPN account credentials.
There is only one company’s product where you are going to have difficulty here, Google. The reason has nothing to do with technology as both run on Android, and everything to do with a fierce rivalry for hearts and minds.
Google Home and Google Pixel won’t work with Firestick when it comes to casting.
Alternatively, you may be using an Apple device or one that does not support Miracast. We suggest you read on about Air Screen.
Is Your Firestick and Applications Up To Date?
Sometimes applications and your Firestick OS may not be up to date. Bear in mind this is set to automatically update when you first set up your Firestick, so it could only be down to something you had changed previously.
Using Air Screen
If you’re looking for an application that can help to unify all devices, which support Miracast, AirPlay (Apple), and Google Cast then we suggest looking up Air Screen. You can install it using these simple steps:
From the home screen go to the looking glass icon and type in Air screen
Download, install and open
Start Now, go to settings
Go to Device Name
Here you can create a name for your Firestick device
Now from any device, you can see your Firestick, whether it be a Google Pixel, an Apple iPhone
Air Screen is a great simple device in a day and age when we are increasingly device agnostic and may have devices from any big technology brand.
Something else that’s great is that you can record or connect using DLNA.
You can also go in and further tweak the setting depending on the operating system and choose from Windows, Android, and iOS.
Conclusion
We hope we provided you with the correct information you needed on how to cast free movies to firestick. If you have any thoughts about the article “How to Cast Free Movies to Firestick,” please let us know in the comment section.
Have you ever been wary of someone finding out what you do on the internet?
Afraid that you might get caught due to your online activities?
These concerns usually arise whenever you download media for free and when you are watching adult content.
But what if there was a way for you to do all of these without getting caught? Yes, you heard it right!
We would like to introduce to you Duck Duck Privacy Web Browser.
In this article, we will be showing you how it works, how to install it, and if it is worth your time.
Is It Any Good?
There is a lot of nasty stuff hidden on the internet with Duck Duck Go Privacy Web Browser, you are assured that none of these threats will ever be allowed to your system. With its unique features, you will be confident that you have a problem-free and seamless browsing experience.
Is Duck Duck Go Privacy Web Browser Safe and Virus-free?
We tested this app using VirusTotal and found no threats or any malicious files and malware.
Despite having good results, we still need to be vigilant in protecting our privacy while streaming.
A Virtual Private Network or VPN will definitely help us maintain our security and anonymity while using Duck Duck Go Privacy Web Browser.
Note: ReviewVPN.com does not host this APK file. It is hosted on Archive.org.
Installation Guide on a Firestick
On the home screen, go to “Settings”.
Select My Fire TV.
Select Developer Options.
Open Apps from Unknown Sources.
Click Turn On.
Head back to the home screen and select “Search”.
Search Downloader and click “Downloader”. It will appear under the keyboard.
Choose the “Downloader app”.
Download it.
Choose Open.
Select Allow.
Choose OK.
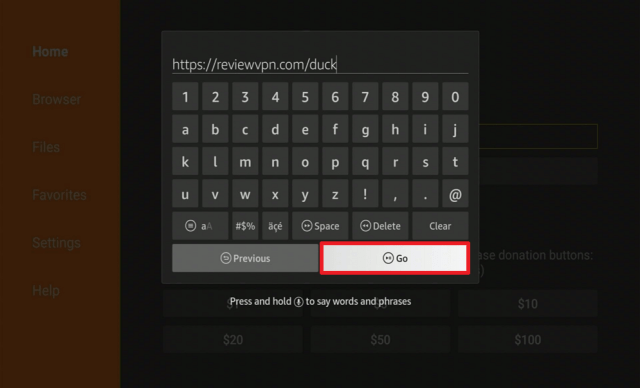
Type http://reviewvpn.com/duckand select Go.
Wait for it to finish.
Install Duck Duck Go.
Select Done.
This will automatically take you back to Downloader. Select Delete.
Choose Delete Again.
Head back to the home screen and under the “Your Apps & Channels” choose See All.
Scroll down and choose Duck Duck Go select the “Options”. Then select “Move to front”.
Duck Duck Go will be moved forward to “Your Apps and Channels”.
Open Duck Duck Go.
There you go, it is now installed on your device.
YOUR INTERNET ACTIVITY IS BEING WATCHED
ReviewVPN cannot attest to the legality, security and privacy of the applications discussed on this site. It is highly recommended that you use a VPN service while streaming or using Kodi.
Currently, your IP 216.73.216.109 is visible to everyone and your Browser is being tracked by Advertisers & ISP Provider.
Your activities are hidden from your ISP, the government, and from the apps you are using.
You can access additional movies and TV streams.
ISP attempts to throttle are thrwarted thus reducing buffering issues.
Geographically restricted content like Netflix and Hulu can be unblocked.
A VPN works be replacing your ISP-assigned IP address and creating an encrypted tunnel. We recommend the no log service offered by IPVanish. It works well on a Firestick and offers the fastest possible speeds.
2. Open Downloader App. Type https://reviewvpn.com/duck and click Go.
3. Select INSTALL.
4. Select OPEN.
5. Click on the “Let’s Do It!” button.
6. Choose Maybe Later.
7. There you go, Duck Duck Browser is now installed on your device.
YOUR INTERNET ACTIVITY IS BEING WATCHED
ReviewVPN cannot attest to the legality, security and privacy of the applications discussed on this site. It is highly recommended that you use a VPN service while streaming or using Kodi.
Currently, your IP 216.73.216.109 is visible to everyone and your Browser is being tracked by Advertisers & ISP Provider.
Your activities are hidden from your ISP, the government, and from the apps you are using.
You can access additional movies and TV streams.
ISP attempts to throttle are thrwarted thus reducing buffering issues.
Geographically restricted content like Netflix and Hulu can be unblocked.
A VPN works be replacing your ISP-assigned IP address and creating an encrypted tunnel. We recommend the no log service offered by IPVanish. It works well on a Firestick and offers the fastest possible speeds.
Legal Disclaimer: ReviewVPN.com does not encourage or endorse any illegal activity involved in the usage of services and applications referenced on this site. We do not verify the licensing agreements of services. The end-user is wholly responsible for ensuring that any media accessed through these services does not violate copyright and/or licensing laws. ReviewVPN does not promote, link to, or receive compensation from any Apps and IPTV services.
Duck Duck Go provides a secured browsing experience by blocking unwanted trackers. It also gives the website you visit a letter grade (A being the highest) depending on the security, and shows you what trackers it blocked. It is very simple yet powerful in providing you safe browsing experience.
Compatible Platforms
You can use it with the Amazon Firestick and Android Devices. You can use it as a stand-alone browser but you can also integrate it into Chrome, Firefox, Internet Explorer, Microsoft Edge, and Safari.
App Features
Interactive Tutorial Guide
Tracker Blocker
Upgrades the security of your connection
Smart Encryption
Private Search
Anonymous Search
Pros and Cons
Pros
Can be integrated with other browsers like Firefox, Internet Explorer, Microsoft Edge, Opera, and Safari
It tells you who is tracking you while blocking them out.
Gives you a letter grading to know how secure they made the website for you.
Privacy crash courses help you understand more what privacy means on the world wide web.
Is It Safe To Use? Duck Duck Go is very safe to use.
Is It Legal Or Grey? It is 100% legal to use.
Should I Use A VPN? Duck Duck Go only protects you from being tracked by websites. It does not afford you any protection against your ISP so you must secure yourself by using a VPN. A good VPN service will hide all of your online activity from your ISP and it will also help you in fully utilizing your internet speed as it blocks internet throttling done by your ISP. If you are in need of a VPN service, you can follow our step-by-step guide by clicking on thislink.
Note: For more information about Surfshark, please read our Surfshark Review.
If your Firestick still has the older interface, read this article to learn how to update it: Update Firestick Interface.
You can download Surfshark directly from the Amazon App store. It will be easy for you to find Surfshark with your Firestick’s Find feature. Refer to our screenshots below.
1. Go to the Home screen of your Firestick.
2. Navigate towards the Find tab. Press the Search button from the resulting dropdown.
3. Type in the keyword of SurfShark and select from the suggestions that will appear.
4. Click the official SurfShark icon from your search results.
5. Press the Download (You own it) button.
6. The SurfShark VPN installer will download on your device.
7. SurfShark VPN’s app will automatically install itself on your Fire TV stick.
8. Press the Open button after completing SurfShark VPN’s installation process.
9. Please wait for the SurfShark VPN to load its user interface.
10. You can now log in with your SurfShark VPN account credentials.
Is It Free? Yes, it is free to download and install on your device.
Are There ADS? Yes, ads will appear depending on the website you visit but fear not, the ads that will show are not that intrusive and will go away by just closing them.
Is There A Premium Version? No, there is no premium version.
Is There An Official Website? Its official website is https://duckduckgo.com/. You visit the website for additional information regarding the browser.
What Other Devices Does It Work On? Duck Duck Go can be used on devices that already have pre-existing web browsers like Chrome, Firefox, and many more. Almost all devices can run these other browsers so in short, you can also use Duck Duck Go with any type of device.
How Does The App Work? You can go tohttps://duckduckgo.com// and download/integrate it on your device.
Minimum Version Required
Any Android device that has version 4.1 and above
History
How Long Has It Been Around?
Its been around since early 2008 and has been running ever since.
What Is The Development Team Like? They are very active in accommodating questions from users. We also found that they are very active on social media. They have Twitter, blogs, and Reddit pages. You can visit them at these websites using these links:
We really find Duck Duck Go a very useful browser when it comes to safe and secure browsing. It totally blocks trackers from seeing your online activity so you can browse anything to your heart’s content. What we liked about it is that it can be integrated with most browsers. It does not interfere with the browsers you use but adds an extra layer of protection when you browse the web. We also find that the ads that do appear are non-intrusive and don’t really affect you a lot. Showing what trackers are blocked also gives you an idea of which websites are really harmful to your system. It allows you to assess which ones are risky and which ones are safe to visit. We also find their website very educational as it gives you information regarding technical stuff in simplified terms. Having a very active support system is also a plus to its already impressive resume. Given all of these reasons, we are putting Duck Duck Go as one of our top web browsers here at ReviewVPN.
If we were able to help out, please do leave us a comment down below. Thank you for reading and stay safe!
Firestick Remote Not Working? – How to Fix, Pair, Troubleshoot
The Amazon Firestick is the most popular Android TV streaming device in the world. The newest version features an improved remote control. Still, with inbuilt voice control from Alexa, you also can adjust the volume and mute. Nonetheless, this article aims to help you troubleshoot and fix Firestick remote not working issue.
Problems with the Firestick remote are common and in this guide, we show you different ways to fix Firestick remote, and also a comprehensive troubleshooting guide to find out what’s wrong with your Firestick remote, what alternative you can use, and when it might just be time to buy a new one.
Truthfully, you are also probably just better off using the free Firestick remote application on your phone and saving yourself all the trouble!
No remote means no TV, so before we get into how to fix Firestick remote, let’s find out what are the most likely causes to stop your Firestick remote working.
Connection
The problem is not always with the remote, it could just be that your Amazon Fire device is on the fritz and needs a look at, or just a simple restart to get it going again.
Batteries
This is probably the biggest offender. You may chortle, but Firestick remotes are notoriously picky about having brand new batteries. No point nicking some out of the seldom-used DVD remote as it still may not work. No batteries mean no ability to connect and control your device.
Pairing
You may come across this problem with a brand-new replacement remote, or when you first get your Amazon Firestick. If the remote hasn’t been paired with your device then it won’t work. In rare cases, this problem could also be related to your Wi-Fi channel.
Obstructions
Just like a normal remote, your Firestick remote needs a direct and unobstructed line of sight with your device when it first pair. So, if you cannot see your Firestick because it’s tucked behind the TV then that would explain why your remote isn’t working. This could well be related to your pairing problem, particularly if you’re having this problem as a first-time user.
Distance
Your remote works using Bluetooth so loses connectivity if you’re sitting more than 10 metres away from the device. So, if your TV is all the way at the other end of a large room, it may be out of range to control your device.
Interference
An increasingly common problem with Bluetooth devices is interference. Bluetooth devices “talk” to each other on a 2.4Ghz bandwidth. Problem is, if you have a smart device close to your remote or the TV, then that devices signal may be interfering with your Firestick remote.
Compatibility
If you’re using a different brand of remote to the Firestick remote, then always make sure it is compatible with the version of your device. Firestick releases a new model every year, and some older remote may not be compatible with newer devices.
Damage
Perhaps your Firestick remote has just had too much of a beating, from being dropped, kicked and eaten by pets. Always a possibility in family homes where your Firestick remote may have been facing down in a glass of coke the night before.
YOUR INTERNET ACTIVITY IS BEING WATCHED
ReviewVPN cannot attest to the legality, security and privacy of the applications discussed on this site. It is highly recommended that you use a VPN service while streaming or using Kodi.
Currently, your IP 216.73.216.109 is visible to everyone and your Browser is being tracked by Advertisers & ISP Provider.
Your activities are hidden from your ISP, the government, and from the apps you are using.
You can access additional movies and TV streams.
ISP attempts to throttle are thrwarted thus reducing buffering issues.
Geographically restricted content like Netflix and Hulu can be unblocked.
A VPN works be replacing your ISP-assigned IP address and creating an encrypted tunnel. We recommend the no log service offered by IPVanish. It works well on a Firestick and offers the fastest possible speeds.
The reason why Firestick users need a Virtual Private Network or VPN for their devices is to stay protected on the internet. Firestick users can then safely & securely stream movies, TV shows, and more through streaming platforms, such as BeeTV, Kodi, CyberFlix TV, and many more. Also, you need a VPN to access apps or streams that are otherwise not available in your region. These include BBC iPlayer, US Netflix, Disney Plus, ITV Hub, HBO, and lots more.
Surfshark has a strict no-logs policy so you can feel secure while you stream entertainment content on your FireStick. But, with just one Surfshark account, you’ll be able to connect 10 devices at the same time.
How to Install Surfshark VPN on Firestick
If your Firestick still has the older interface, read this article to learn how to update it: Update Firestick Interface.
Follow our screenshots below to install the SurfShark VPN app on your Fire TV stick.
1. Go to the Home screen of your Firestick.
2. Navigate towards the Find tab. Press the Search button from the resulting dropdown.
3. Type in the keyword of SurfShark and select from the suggestions that will appear.
4. Click the official SurfShark icon from your search results.
5. Press the Download (You own it) button.
6. The SurfShark VPN installer will download on your device.
7. SurfShark VPN’s app will automatically install itself on your Fire TV stick.
8. Press the Open button after completing SurfShark VPN’s installation process.
9. Please wait for the SurfShark VPN to load its user interface.
10. You can now log in with your SurfShark VPN account credentials.
For more VPN discounts, go to ReviewVPN Deals and purchase the best VPN for you.
Click here to get the lowest price on Surfshark through our exclusive limited-time offer.
What Do You Do if Your Firestick Remote is Not Working? How to fix Firestick remote?
Luckily all these problems are dealt with in this guide, from simply changing batteries. As we move down through the checklist you can figure out what’s really going wrong.
We look at using the Firestick remote application on your phone instead, or even buying a Bluetooth keyboard if you want additional functionality and a keyboard.
Finally, if all else fails, and you just want the Firestick remote, it may be time to buy a new one, though be warned it will set you back about $20, so check if there is a newer Firestick available. That won’t cost you much more than just buying the remote rather than learning how to Fix Firestick Remote.
Step 1: Reset the Power and the Connection
The greatest technology fix of our time. If in doubt turn it off and back on again. You can do this from the remote (to check if it works) by holding down the home and play button for 5 seconds.
Or just disconnect the Fire TV device and give it 2 minutes before plugging it back in.
The Technology Gods have yet to explain to us why this seems to have a 50/50 chance of working, but it’s always a good idea to try first.
This also helps us to check if the Firestick remote problem, is not just simply a Fire device problem.
Step 2: Batteries
This is the most probable cause for your Firestick remote not working. Make sure you replace the old batteries with brand new out of the box AAAs. If your remote still won’t connect then move onto the next step.
Note: There’s a reason why Duracell cost more than other batteries. You may have used cheap AAA batteries which leak battery acid and then corrode the metal connectors the battery fits into. If this happens you can use a screwdriver to scrape away the residue build-up on the connectors and the batteries should connect properly to the device.
Step 3: Pairing
The next most common problem for people who have never used a Firestick, is they haven’t paired their remote with their device yet. Once it’s done, the remote should remain paired.
How to Pair Your Firestick Remote?
Use these simple steps to pair your Firestick remote:
Turn on your Amazon Firestick and your TV, so you can see the Amazon TV Home Screen
On your Firestick remote hold down the Home Button for 20 seconds
One your TV message should see a message pop up in the bottom right-hand corner telling you that pairing is successful
If there is no message, try for another 20 seconds. Be warned it can take as many as 10 attempts to pair, but this is rare
If the device still doesn’t pair after 10 attempts, we advise returning the device to Amazon for a replacement and registering it as faulty
Checking if Your Firestick Remote is Paired With Your Device
You may want to check later when your Firestick remote isn’t working, whether it’s still paired to your device.
Follow these steps:
Turn on your Amazon Firestick and navigate from the home screen
Go to setting
Click Controllers and Bluetooth Devices
Then click Amazon Fire TV Remotes
From here you can see what devices are currently paired.
Note: In rarer cases, there have been some reports that the pairing problem was coming from their home Wi-Fi router. If you go through all the steps and still come up blank, it may be worth trying this before buying a new remote.
Login to your router from a laptop and find your Wi-Fi Channel, then change to a different channel to see if that makes any difference. If Google doesn’t hurt, or you’re a technophobe, then just look for “Wi-Fi analyser” in the app store and get an app to do it for you!
Step 4: Obstructions and Distance
The Firestick remote is no different from a regular tv remote. They both use infra-red beams which must have a direct straight line to the receiving device.
So just make sure there is nothing in the way between the couch and the Firestick. It could be anything from a vase to some papers. Clear the path and try again
As far as distance goes, the optimal distance to view your TV is 1.5-2.5 times the distance of the diagonal size of your TV (This is the size manufacturers always quote in terms of a 40-inch TV)
So, for your 40-inch TV, the best distance is 60 – 100 inches away (1.5 -2.5m away), even jumbo 80-inch TVs would only need you to be a maximum of 5 metres away.
If needs to get a tape measure out and check, but honestly who sits more than 10 metres away from the TV?
NOTE: Your Amazon Firestick Remote only need a line of sight for the initial pairing. After that, all communication between remote and device is done through Bluetooth.
Step 5: Interference
Smart Homes are upon us. However, the chances are if you have a Bluetooth 3.0 device which was manufactured after 2010, you are unlikely to have this problem. An older Bluetooth device may be the cause for interfering with your signal. Around TV that would probably be Bluetooth speakers.
Worth moving these devices away from the Firestick and seeing if that does the trick.
Step 6: Compatibility and Damage
If after all these steps your Firestick remote isn’t working, then it’s our last step, before trying the app or another remote.
First, if your remote didn’t come with the Firestick, refer to the manual to see if it is compatible with that version. If it’s meant to work with your Fire device and isn’t then you may want to return and buy a replacement Amazon remote.
Lastly, if all else fails then your device is either faulty or damaged. Return in the hoped the refund Gods grant you a replacement or suffer the cost and buy yourself a new remote or use the Firestick remote app instead.
Using the Firestick Remote App Instead
What happens if you have tried everything to fix your Firestick remote and it still doesn’t work. Are you doomed to spend the next 2-3 days in limbo while you wait for a replacement?
Luckily there is a solution, which is also handy for checking whether your physical remote is paired with your device.
The free Firestick remote application.
You can find it on Google Play or Apple App Store and download it onto your phone or tablet. To be honest you may just find it easier to use than your remote, as its one less device to worry about and your phone is touch screen capable.
You also don’t lose Alexa, as the phone app has an Alexa button.
You get all the buttons that you would with your physical remote including:
Alexa voice button
Home
Play/Pause
Back
Rewind / Fast Forward
Honestly, there isn’t much difference, between this and the real thing. We love the phone app and can’t really understand why you’d want to use anything else.
Oh, one other thing. You get a fully functioning keyboard on your phone for when you’re looking for media, instead of five minutes to type out one title.
Just like the Firestick remote, the application needs to be paired with your device using these simple steps:
From the app on your phone choose the Fire device that you want to pair with
The Fire Device should be turned as well as your TV
On the TV a 4-digit code will appear
Enter that code into the application on your phone
Once accepted the devices have now been paired
You can also easily see applications within the Amazon store. The app on the phone, kind of makes you wonder why you wanted a physical remote in the first place.
But if your old school and you just like to hold a chunk of plastic in your hands then we have a good alternative remote for you.
Buying a Bluetooth Keyboard Instead
Some people just like having a physical keyboard, luckily there are a few great remotes out there, but our favourite is theiPazzPort Mini Wireless Keyboard.
The keyboard will set you back less than buying a replacement Firestick remote. Though, you get tonnes more functionality from the device.
You can also use the keyboard on all your devices. The keyboard is platform-agnostic working with Windows, Android, iOS and Mac OS. And can then be used on TVs, PCs, TV Boxes and DVD and HD Players.
Useful mini backlit Qwerty keyboard that can be charged from the mains. Includes an automatic sleep mode after 3 minutes.
Conclusion
We hope we provided you with the correct information you needed on how to fix firestick remote. If you have any thoughts about the article “How to Fix Firestick Remote,” please let us know in the comment section.
Special offer
Get 80% Off for 29-Month Subscription + 5 Months Free on Surfshark VPN!