Planet MMA Kodi Addon


Source: http://www.onenation.info/
Planet MMA is your number 1 add on when it comes to everything UFC. Previously known as UFC Finest, the add on went dark and then was renamed and rebranded with a better UI and even more sections and streams.
Up until recently, Planet MMA was hosted on the well-known Supremacy repo, until the man in charge was arrested in the UK. But you can now find it in the excellent One Nation repo.
This is another add on just like Golden Gloves or WWE on Demand which has been made by a fan for the fans. You can see just how much this developer loves the UFC with the depth of content and the tonnes of old and classic fights.
Common Errors
Find out how to fix the 3 most common errors that you might come across with WWE on Demand:
- Add on won’t install/start: Planet MMA is not long back from a period of being offline after the Supremacy repo went down. If the add on doesn’t start, then try and wait or give it a fresh install. Otherwise, you may just need to be patient or find an alternative. If Planet MMA doesn’t install, then first check the URL has been typed correctly and that you have linked to the One Nation repository. That is the official source for this add on. For more fixes read our guide linked above.
- Source not working/slow/frozen: When dealing with Live TV and PPV matches you are going to have to contend with links that just don’t seem to work. Planet MMA tends to be good for the quality of the links, so here are a few simple steps. First, give it 10 seconds for the link to fully load, connect and buffer. Second, if the match is popular you may need to reload the stream a few times to get a connection. Also, check your internet connection and that you are trying to access the link using an encrypted connection with a VPN. Otherwise, your ISP may be blocking your content. Check here for the best VPN deal. For more fixes read our guide linked above.
- Kodi check log error: Everything that you stream is cached, generally the first couple of seconds of each program, so you can easily start it next time around. Over time all these caches build up. This is the most probable reason for a check log error. To find out how to clear cache and other fixes read our guide linked above.

Review
Planet MMA is a fantastic add on with a great selection of content, including a What’s new section and a UFC calendar so you can see what fights are coming up. Great addition on any fight nuts Kodi installation.
What makes Planet MMA particularly attractive is that its been going for so long, the add on is almost 3 years old including the time it was UFC Finest and has kept up to date and relevant as many add ons have come and gone. You’re always going to get a working stream with Planet MMA.
You might get a wider selection of Sport on Sportowa TV or Sports Devil but nowhere are you going to get the depth and level of focus on MMA that you get with this add on.
Planet MMA has the following categories:
- What’s new
- Search
- UFC Calendar
- Fight Night Live
- The Pioneers of MMA
- MMA Movies
- UFC Retro
- Ultimate Fighter
- YouTube
- Documentaries
- UFC Open load
- MMA Open load
- UFC Fight Night
- MMA Fight Night
- Fights Spotlight
- Fighters Collection
- Where Are They Now
ReviewVPN cannot attest to the legality, security and privacy of the applications discussed on this site. It is highly recommended that you use a VPN service while streaming or using Kodi. Currently, your IP 216.73.216.84 is visible to everyone and your Browser is being tracked by Advertisers & ISP Provider. Here are the main reasons why you must use a VPN: A VPN works be replacing your ISP-assigned IP address and creating an encrypted tunnel. We recommend the no log service offered by IPVanish. It works well on a Firestick and offers the fastest possible speeds.
YOUR INTERNET ACTIVITY IS BEING WATCHED
Legal Disclaimer: ReviewVPN.com does not encourage or endorse any illegal activity involved in the usage of services and applications referenced on this site. We do not verify the licensing agreements of services. The end-user is wholly responsible for ensuring that any media accessed through these services does not violate copyright and/or licensing laws. ReviewVPN does not promote, link to, or receive compensation from any Apps and IPTV services.
Install Surfshark on Firestick

How to Install Planet MMA Addon on Kodi with Screenshots
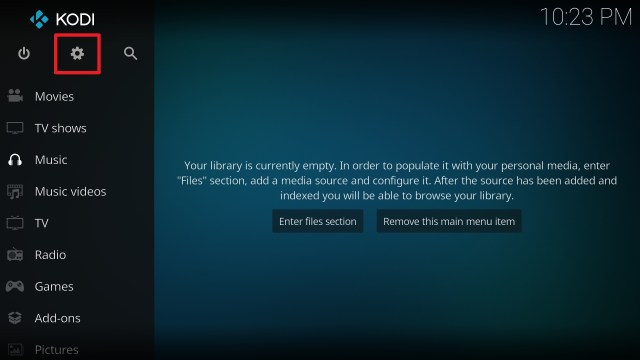
- From the home screen, select the cogwheel at the upper left.
2. Select System in the bottom right corner.

3. Select Add-ons on the left side of the screen.

4. Select Unknown sources.

5. Click Yes to allow unknown sources.

6. Select File manager.

7. Click Add source.

8. Click on <None>.

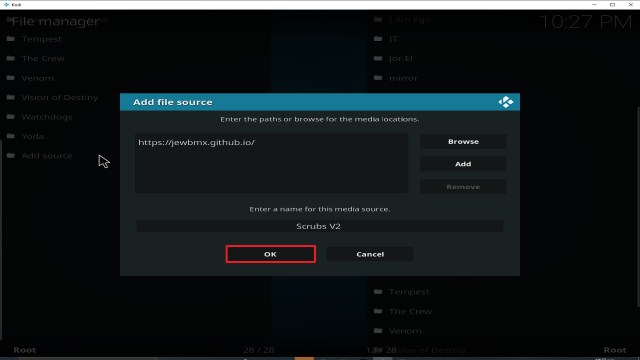
9. Type exactly: http://www.onenation.info/

10. Click on OK.

11. Select enter a name for this media source.

12. Name is Planet MMA (this part isn’t critical as long as you remember the name).

13. Click on OK.

14. Click on OK.

15. Take one step back and click on Add-ons.

16. Select install from zip file.

17. Click on Planet MMA (or whatever you named the source).

18. Select Repo.

19. Click on repository.onenation-1.0.5.zip.

20. Select on Install from repository.

21. Click on OneNation Repo

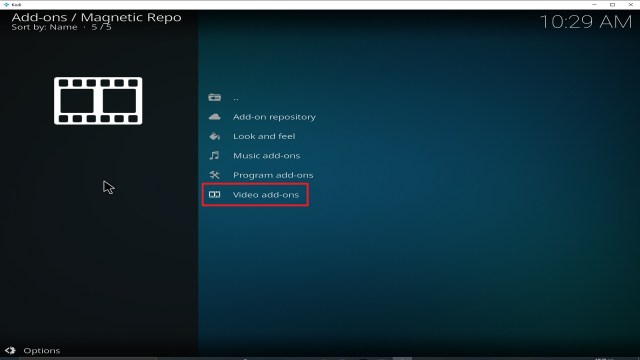
22. Pick Video add-ons.

23. Select Planet MMA again.

24. Click on Install.

25. Select Version 4.3 (OneNation Repo)

26. Select OK after reviewing the add-ons that will be installed.

27. You should see a popup in the upper right corner saying Planet MMA has installed. There will actually be multiple popups for the various components.

28. Click on Open to start the Planet MMA add-on.

Should I use a (VPN)?
A VPN on your device offers many benefits, such as the security and privacy you needed. A VPN also reduces the risk of being hacked and monitored online by various potential hackers. As a result, whenever you do anything online, it is much safer to use a VPN.
The Surchshark is one of the top VPNs that we highly recommend because it is known for being the most reliable with high-quality security features. Surfshark also employs a high level of encryption to protect your web traffic and personal information, ensuring that you keep it secure online.
Note: For more information about Surfshark, please read our Surfshark Review.
Install Surfshark on Firestick
How to Install Surfshark VPN on Firestick
If your Firestick still has the older interface, read this article to learn how to update it: Update Firestick Interface.
Follow our screenshots below to install the SurfShark VPN app on your Fire TV stick.
1. Go to the Home screen of your Firestick.

2. Navigate towards the Find tab. Press the Search button from the resulting dropdown.

3. Type in the keyword of SurfShark and select from the suggestions that will appear.

4. Click the official SurfShark icon from your search results.

5. Press the Download (You own it) button.

6. The SurfShark VPN installer will download on your device.

7. SurfShark VPN’s app will automatically install itself on your Fire TV stick.

8. Press the Open button after completing SurfShark VPN’s installation process.

9. Please wait for the SurfShark VPN to load its user interface.

10. You can now log in with your SurfShark VPN account credentials.

Learn more about Surfshark and Grab the Best Surfshark Deal Now!
Install Surfshark on Firestick


For more VPN discounts, go to ReviewVPN Deals and purchase the best VPN for you.