Overview
In this tutorial, you will learn how to install the Cryptonite Kodi addon.
Cryptonite Kodi addon has a large database of entertainment such as movies, tv-series, tv shows, tv podcasts, music, Kids’ shows, and lots more. Cryptonite is a Kodi add-on within the TEAM FALCON REPOSITORY. Cryptonite Kodi addon has an ON-DEMAND movie and SPORTS section. This add-on also has a LIVE TV section; however, not all the live channels on the LIVE TV section are playing.

Legal Disclaimer: ReviewVPN.com does not encourage or endorse any illegal activity involved in the usage of services and applications referenced on this site. We do not verify the licensing agreements of services. The end-user is wholly responsible for ensuring that any media accessed through these services does not violate copyright and/or licensing laws. ReviewVPN does not promote, link to, or receive compensation from any Apps and IPTV services.

Features of Cryptonite Kodi Addon
Cryptonite Kodi addon has a large database of movies, music, sports, cartoons, tv shows, tv-series, and lots more. This add-on does not need Real Debrid integration and offers high-definition streaming quality. Cryptonite Kodi addon has a customizable search bar for trending, rating, and new releases. Cryptonite Kodi addon has a huge collection of IMDB movies and a LIVE TV section. This add-on has a user-friendly interface and standard layout.
YOUR INTERNET ACTIVITY IS BEING WATCHED
ReviewVPN cannot attest to the legality, security and privacy of the applications discussed on this site. It is highly recommended that you use a VPN service while streaming or using Kodi.
Currently, your IP 216.73.216.51 is visible to everyone and your Browser is being tracked by Advertisers & ISP Provider.
Here are the main reasons why you must use a VPN:
- Your activities are hidden from your ISP, the government, and from the apps you are using.
- You can access additional movies and TV streams.
- ISP attempts to throttle are thrwarted thus reducing buffering issues.
- Geographically restricted content like Netflix and Hulu can be unblocked.
A VPN works be replacing your ISP-assigned IP address and creating an encrypted tunnel. We recommend the no log service offered by IPVanish. It works well on a Firestick and offers the fastest possible speeds.
Click here to get the lowest price on Surfshark through our exclusive limited-time offer.
How to Install Cryptonite Kodi Addon
The installation process of Cryptonite Kodi addon involves the following:
- Ensuring that the unknown source is enabled
- Installing Falcon repository and then downloading Cryptonite Kodi addon from the repository.
Ensuring that the unknown source is enabled
Before you run any add-on installation on Kodi, figure out if the unknown sources are enabled. If it’s not enabled, follow the below steps to enable it.
Step 1. Open your Kodi app.
Step 2. From the start menu or home menu, scroll up to the setting logo or icon which is located at the top left side of your screen, and click on it.
Step 3. Next, on the new window, scroll down to SYSTEM and select it.
Step 4. On the SYSTEM window, scroll down to add-ons and navigate to an unknown source.
Step 5. Once you click an unknown source, a warning message will appear, select YES to enable the unknown source.
Step 6. Once you are done with turning ON the unknown sources, hit the back button on your remote or the backspace or escape key on your keyboard to go back to the home menu or start menu.
Installing falcon repository and then downloading Crytonite Kodi addon
Step 1. From the home menu or start menu, navigate up and locate the setting icon found at the left corner of your Kodi screen and click on it
Step 2. On the new window that will come up, scroll to file manager, and then click on it.
Step 3. On the file manager menu, scroll down to Add source and click on it.
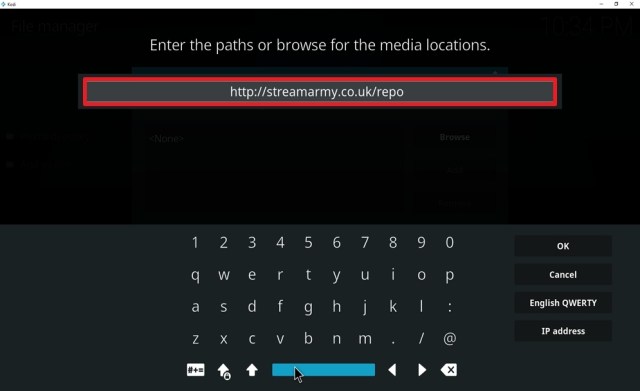
Step 4. Next, on the new pop-up window, click on <NONE> and enter the media source URL: http://teamfalcon.exposed/repository
Note:
Double-check the URL to ensure there’s no typo error.
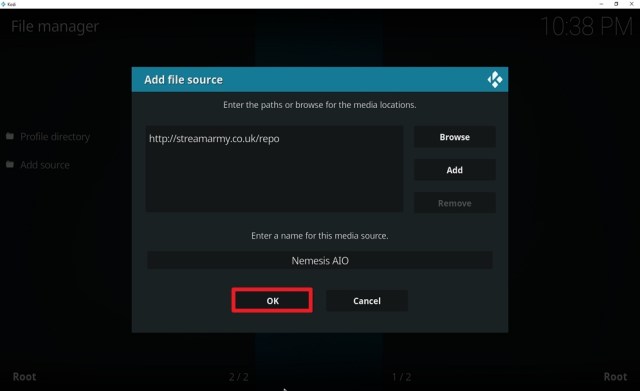
Step 5. Enter a name for this media source. If Kodi already auto-populated a name, just click OK, but if not, enter any name that is easy to remember and then click OK.
Step 6. Hit the backspace or escape key on your keyboard or the back button on your remote to return to the home menu or start menu.
Step 7. From the start menu or home menu, scroll down to add-ons and click on it.
Step 8. Next, on the add-ons window, navigate up to locate the add-on icon and click on it.
Step 9. On the new window that will appear, scroll down to install from and click on it. Navigate to locate the name in which you saved the media source earlier and click on it. Here we used Falcon
Step 10. click on repository.FalconRepo.zip and wait for the repository to complete the installation. A notification will appear at the top right corner of your screen.
Step 11. Select the install from the repository, and click on Falcon Repo
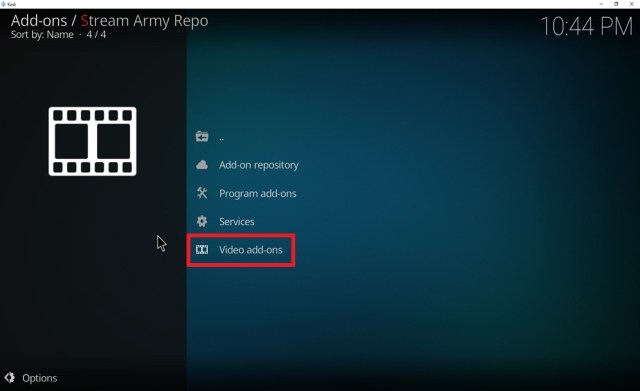
Step 12. Next, on the new window that will appear, click on video add-ons
Step 13. click on Cryptonite on the new dialog that will appear
Step 14. Select Install on the new window. If you are using a Kodi Leia 18, a pop-up dialog box will appear with “THE FOLLOWING ADDITIONAL ADD-ONS WILL BE INSTALLED” click on OK.
Step 15. Wait for the installation to complete.
Install Cryptonite Kodi addon with Screenshots
1. From the home screen, select the cogwheel at the upper left.

2. Select System in the bottom right corner.

3. Hover Add-ons on the left side of the screen. Select Unknown sources.

4. Click Yes to allow unknown sources.

5. Take one step back, Select File manager.

6. Click Add source.

7. Click on <None>.

8. Type in http:/teamfalcon.exposed/repository

9. Click on OK.

10. Select Enter a name for this media source.

11. The name is Cryptonite. (You may choose a different name that is suitable for you).

12. Click on OK.

13. Click on OK again.

14. Select Addons.

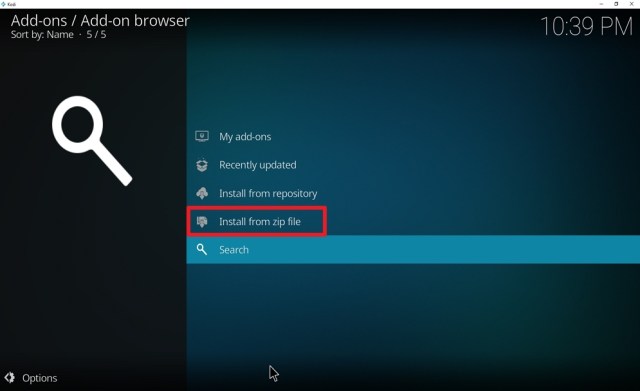
15. Select install from zip file.

16. Click on Cryptonite (or whatever you named the source).

17. Click on repository.FalconRepo.zip

18. Once the installation is completed, a pop message will appear.

19. Select on Install from repository.

20. Click on Falcon Repo.

21. Pick Video add-ons.

22. Select Cryptonite.

23. Click on Install.

24. Select OK after reviewing the addons that will be installed.

25. You should see a popup in the upper right corner saying Cryptonite has installed. There will actually be multiple popups for the various components.

26. Click on Cryptonite.

27. Click on Open to start the Cryptonite addon.

Install Surfshark on Firestick
Use a VPN
we recommend using a VPN whenever you are accessing the internet or streaming with Kodi. VPN helps to keep your IP address secure and private. The best VPN that will ensure your online privacy and security is.
Don’t Use Kodi Without a VPN
Streaming content online on Kodi without a VPN makes your online information public on the ISP network. We recommend using Surfshark as it offers the highest online security and privacy.
How to Install Surfshark VPN on Firestick
If your Firestick still has the older interface, read this article to learn how to update it: Update Firestick Interface.
Follow our screenshots below to install the SurfShark VPN app on your Fire TV stick.
1. Go to the Home screen of your Firestick.

2. Navigate towards the Find tab. Press the Search button from the resulting dropdown.

3. Type in the keyword of SurfShark and select from the suggestions that will appear.

4. Click the official SurfShark icon from your search results.

5. Press the Download (You own it) button.

6. The SurfShark VPN installer will download on your device.

7. SurfShark VPN’s app will automatically install itself on your Fire TV stick.

8. Press the Open button after completing SurfShark VPN’s installation process.

9. Please wait for the SurfShark VPN to load its user interface.

10. You can now log in with your SurfShark VPN account credentials.

Learn more about Surfshark and Grab the Best Surfshark Deal Now!
Install Surfshark on Firestick


For more VPN discounts, go to ReviewVPN Deals and purchase the best VPN for you.
Click here to get the lowest price on Surfshark through our exclusive limited-time offer.