Install Strikes Movie Zone Kodi Addon

Strikes Movie Zone Kodi Addon

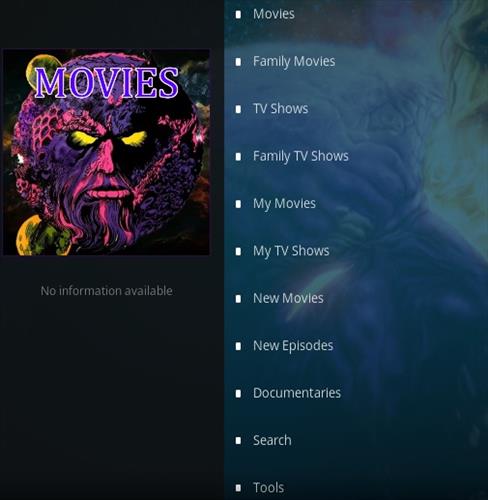
Strikes Movie Zone Image

Source: http://rockodi.com 

Strike’s Movie Zone Kodi Addon is a new add on to hit the scene in 2019, he’s also making waves with his new All Sports Recap and Motor zone. The developer is active on twitter and you can follow him here: https://twitter.com/strike0408 

Strike offers some great content, films only and like Nole Cinema offers curated lists of content, with a Halloween section recently added. This means the add on may not have the biggest amount of content added, but it also saves you the hassle of having to trawl through acres of content to find what you are looking for.

A great add on for people who just like to be shown a great playlist and work their way through it. Strike also curates all their content from legal and free sources. So much like Tubi TV you don’t need to worry about where the content is coming from. But now you don’t have to worry about the adverts.
 

Common Errors

Here are some of the most common errors you might come across when installing or running Strike Movie Zone:

  • Script Error: A script error means that there is a vital script missing in either the add-on or the Kodi add-on. Check that you have downloaded the Kodi add-on from the right source. Delete the installation, reinstall and make sure it is a fresh install. If the problem persists then the problem may be with your Kodi installation, which either needs updating or re-installing. To find out how to re-install Kodi and other fixes read our guide linked above.
  • Could not connect to URL/Download: Being unable to connect to the URL to download Strike Movie Zone is common. The most common fix is to double-check the URL that you have written out. Next check the repository that the source is coming from. Make sure it’s the one we have given, and not another repository that may be hosting a corrupted file. Also try the URL again if correctly typed, to check that there just isn’t a blip on the server where the file is located. If the problem persists read other methods that you can try to fix the error linked above.
  • Source not working/slow/frozen: While you are watching movies on Strike you may get the source, that either doesn’t work, are slow, or freeze intermittently giving you a pixelated screen. If the source doesn’t connect at all, give it 10-15 seconds to connect and begin to buffer. You can also try to reload the source again, to see if that does the trick. Also just try a few other sources and see if you still get the same trouble. If none of the source’s work and the add-on is working, then read more fixes linked above.


ANONYMOUSLY


Review

The developer behind Strike has put together a cracking add on which offers some well-curated content and all free and legal.

We really like add ons that offer content you can’t find anywhere else because it shows some real thought has gone into the curation. This is a useful and original add on. Not just another copy of someone else’s add on.

It’s a bonus to watch the content without adverts, even if you might not find the most recent titles. For the latest releases, you’d be better off using Cyberflix or Cinema HD.

Strikes Movies Zone categories include: 

  • Film Is Now Movie Trailers
  • Gringo – Western Movies
  • Wild West Stories
  • Movie Mix
  • Action Movies
  • Kings of Horror
  • Horror Movies
  • Kids Movie Playlists
  • Kids Animated Movies
  • Maverick Movies
  • Classic Movies Channel
  • Superhero Movies
  • Marvel Movies
  • Popcorn Flix


YOUR INTERNET ACTIVITY IS BEING WATCHED

ReviewVPN cannot attest to the legality, security and privacy of the applications discussed on this site. It is highly recommended that you use a VPN service while streaming or using Kodi.

Currently, your IP 216.73.217.150 is visible to everyone and your Browser is being tracked by Advertisers & ISP Provider.

Save 65% Now

Limited Time Offer

Here are the main reasons why you must use a VPN:

  • Your activities are hidden from your ISP, the government, and from the apps you are using.
  • You can access additional movies and TV streams.
  • ISP attempts to throttle are thrwarted thus reducing buffering issues.
  • Geographically restricted content like Netflix and Hulu can be unblocked.

A VPN works be replacing your ISP-assigned IP address and creating an encrypted tunnel. We recommend the no log service offered by IPVanish. It works well on a Firestick and offers the fastest possible speeds.

Special Limited Time Offer - Get IPVanish


How to Install Strikes Movie Zone Addon on Kodi with Screenshots

  1. From the home screen, select the cogwheel at the upper left.

Step 1 Installing Strikes Movie Zone addon on Kodi

2. Select System in the bottom right corner.

Step 2 Installing Strikes Movie Zone addon on Kodi


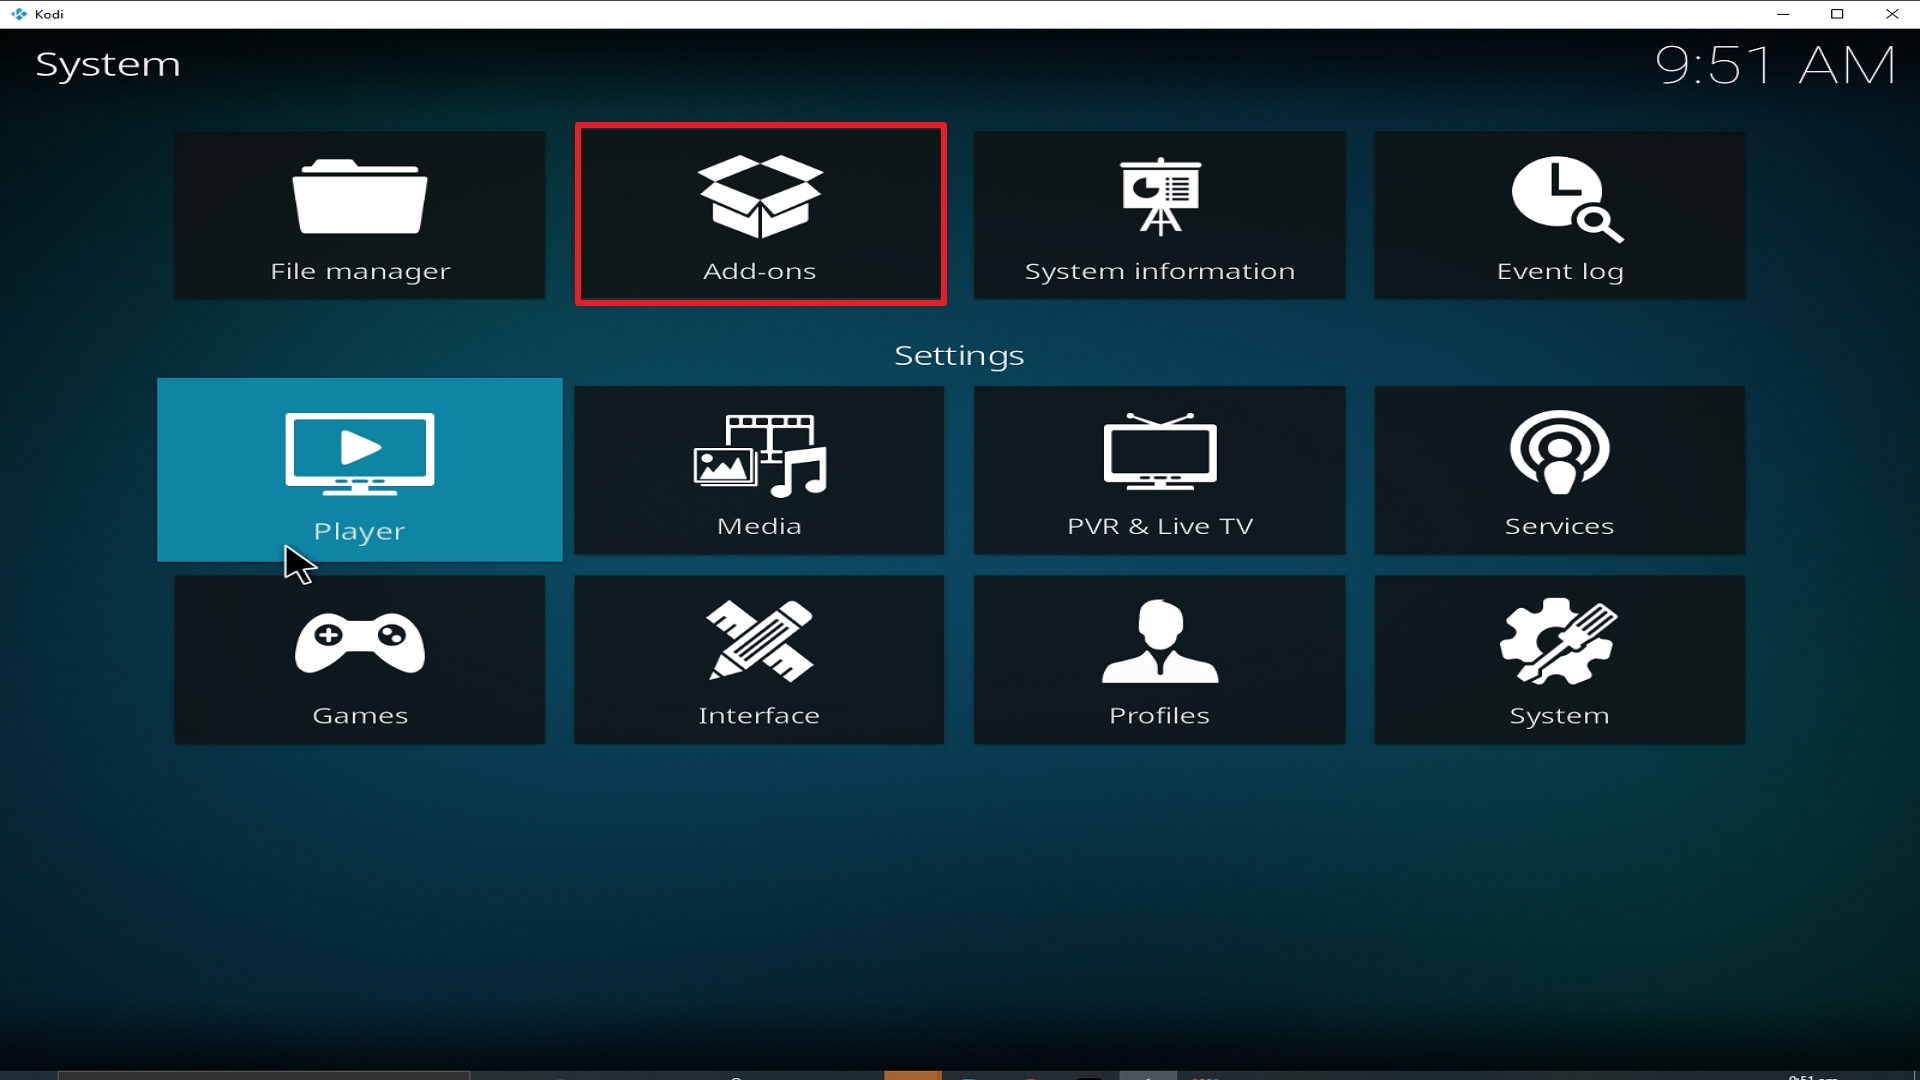
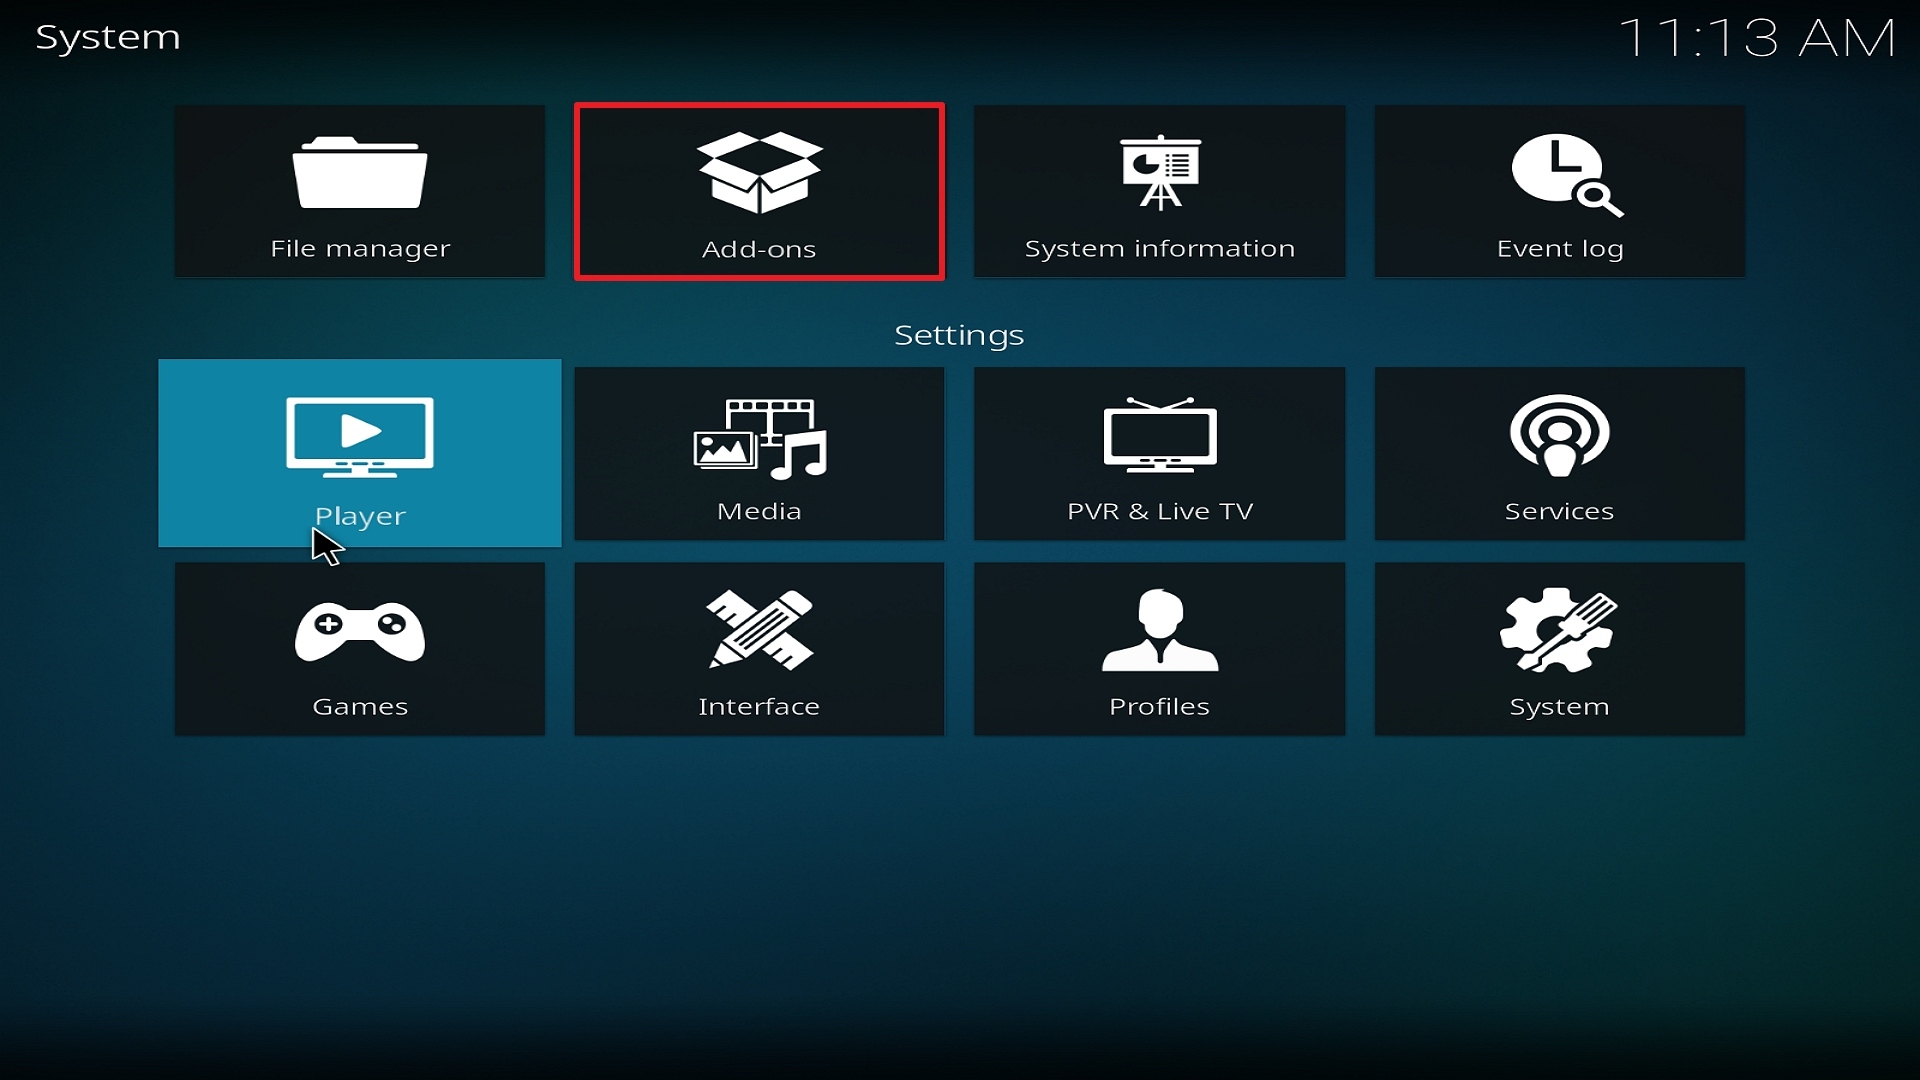
3. Select Add-ons on the left side of the screen.

Step 3 Installing Strikes Movie Zone addon on Kodi


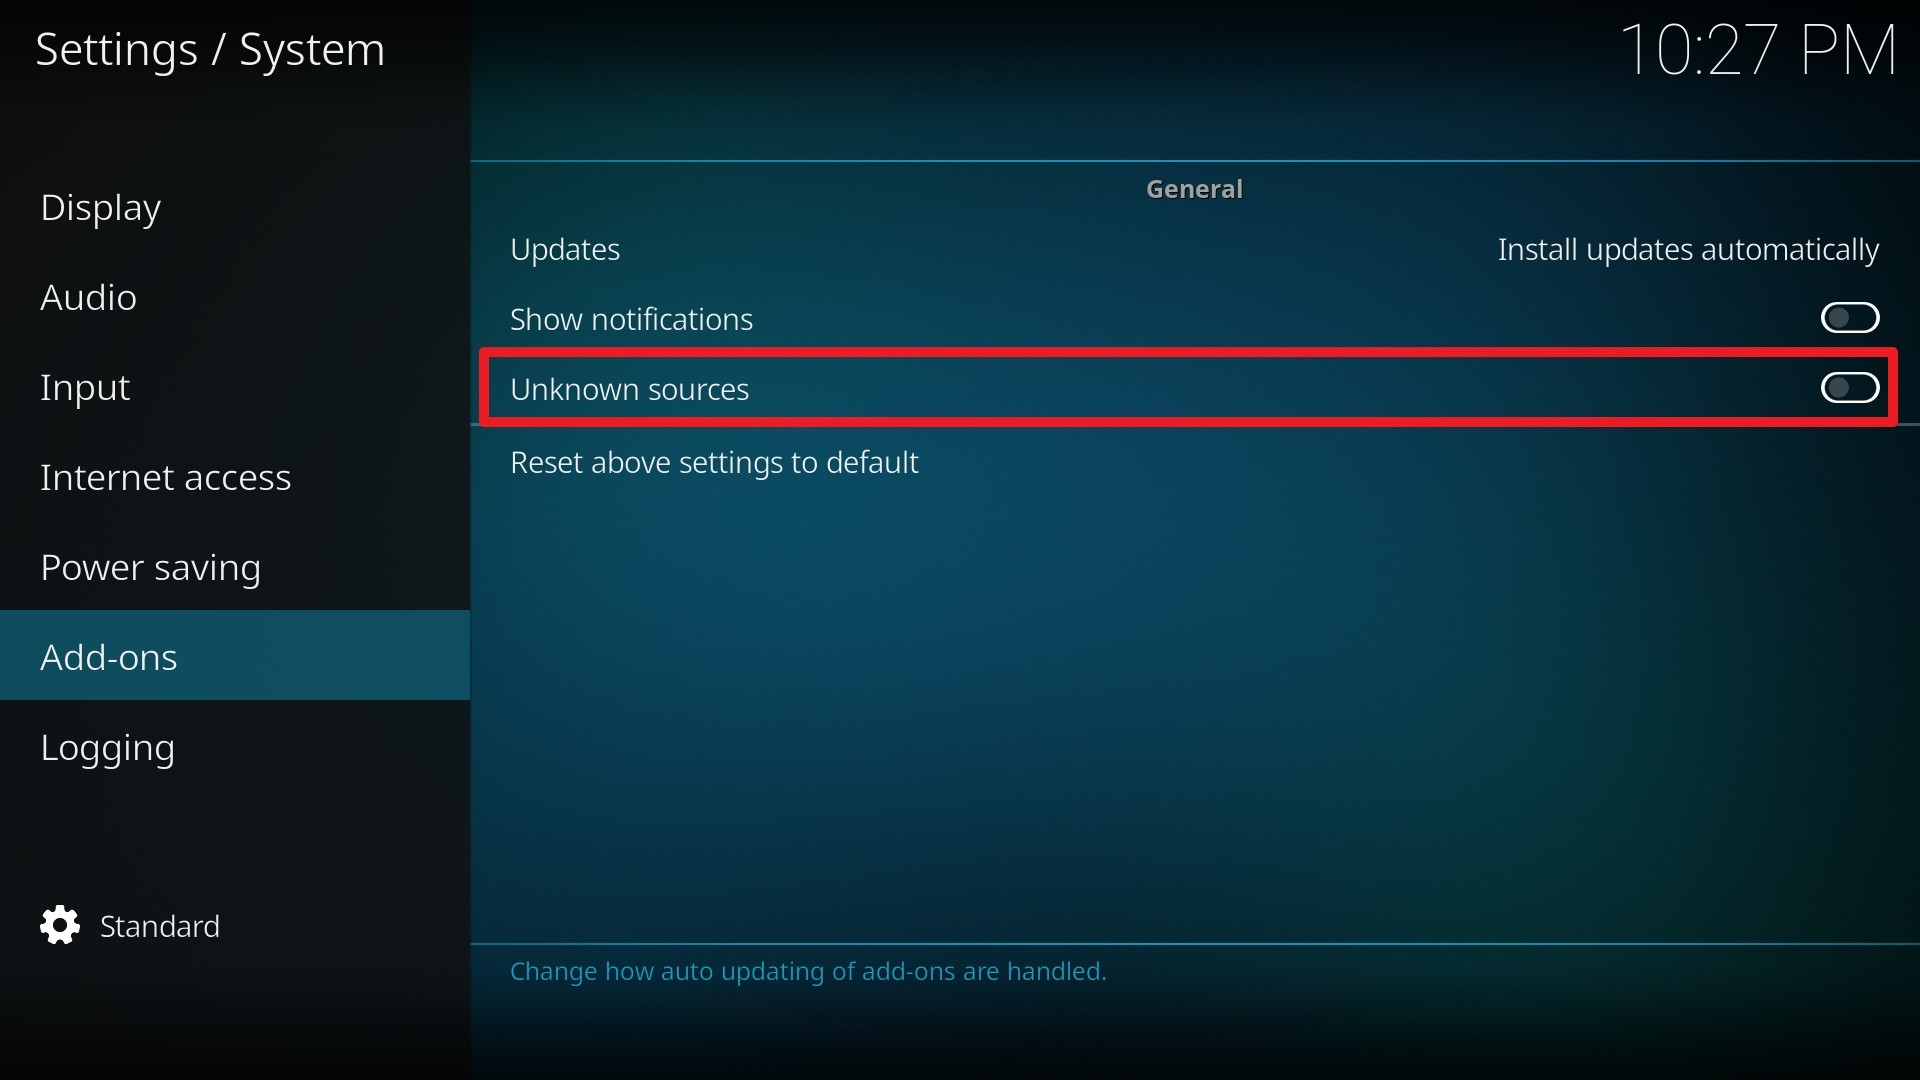
4. Select Unknown sources.

Step 4 Installing Strikes Movie Zone addon on Kodi


5. Click Yes to allow unknown sources.

Step 5 Installing Strikes Movie Zone addon on Kodi


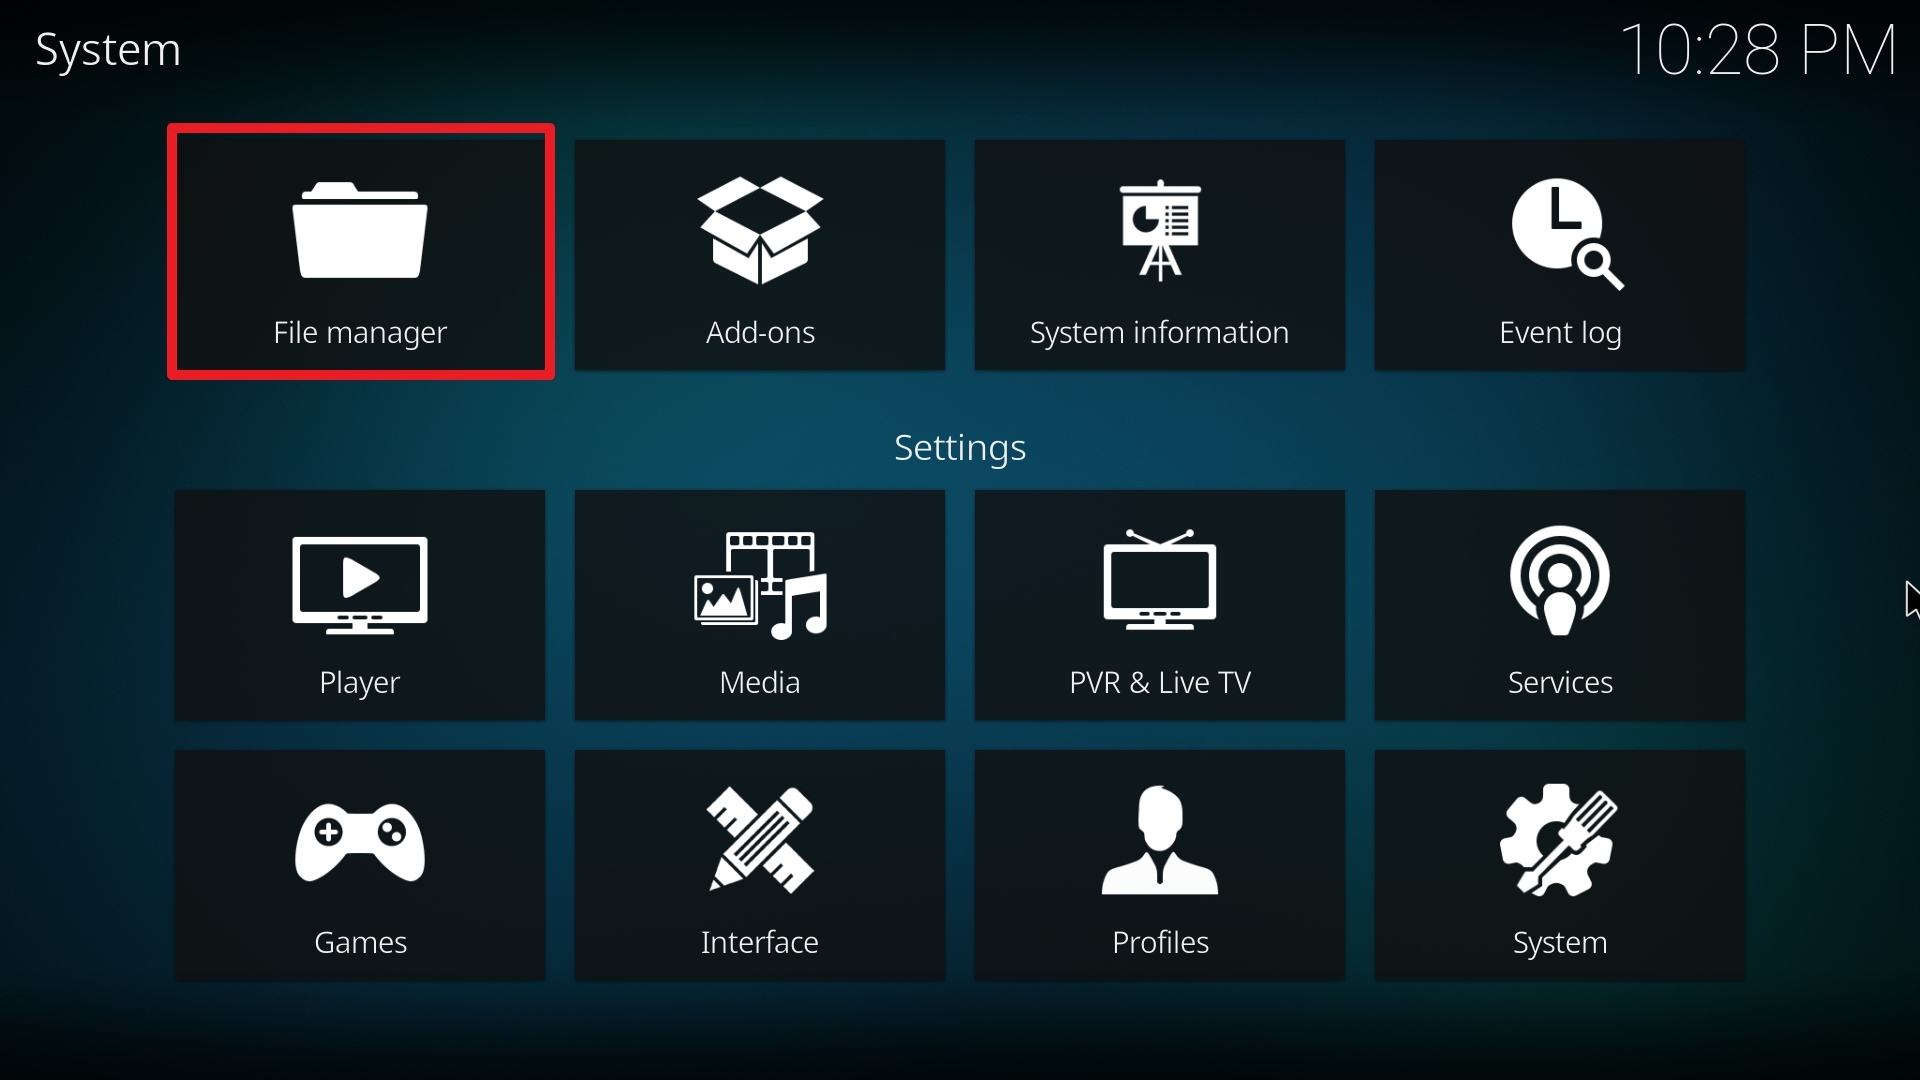
6. Select File manager.

Step 6 Installing Strikes Movie Zone addon on Kodi


7. Click Add source.

Step 7 Installing Strikes Movie Zone addon on Kodi


8. Click on <None>.

Step 8 Installing Strikes Movie Zone addon on Kodi


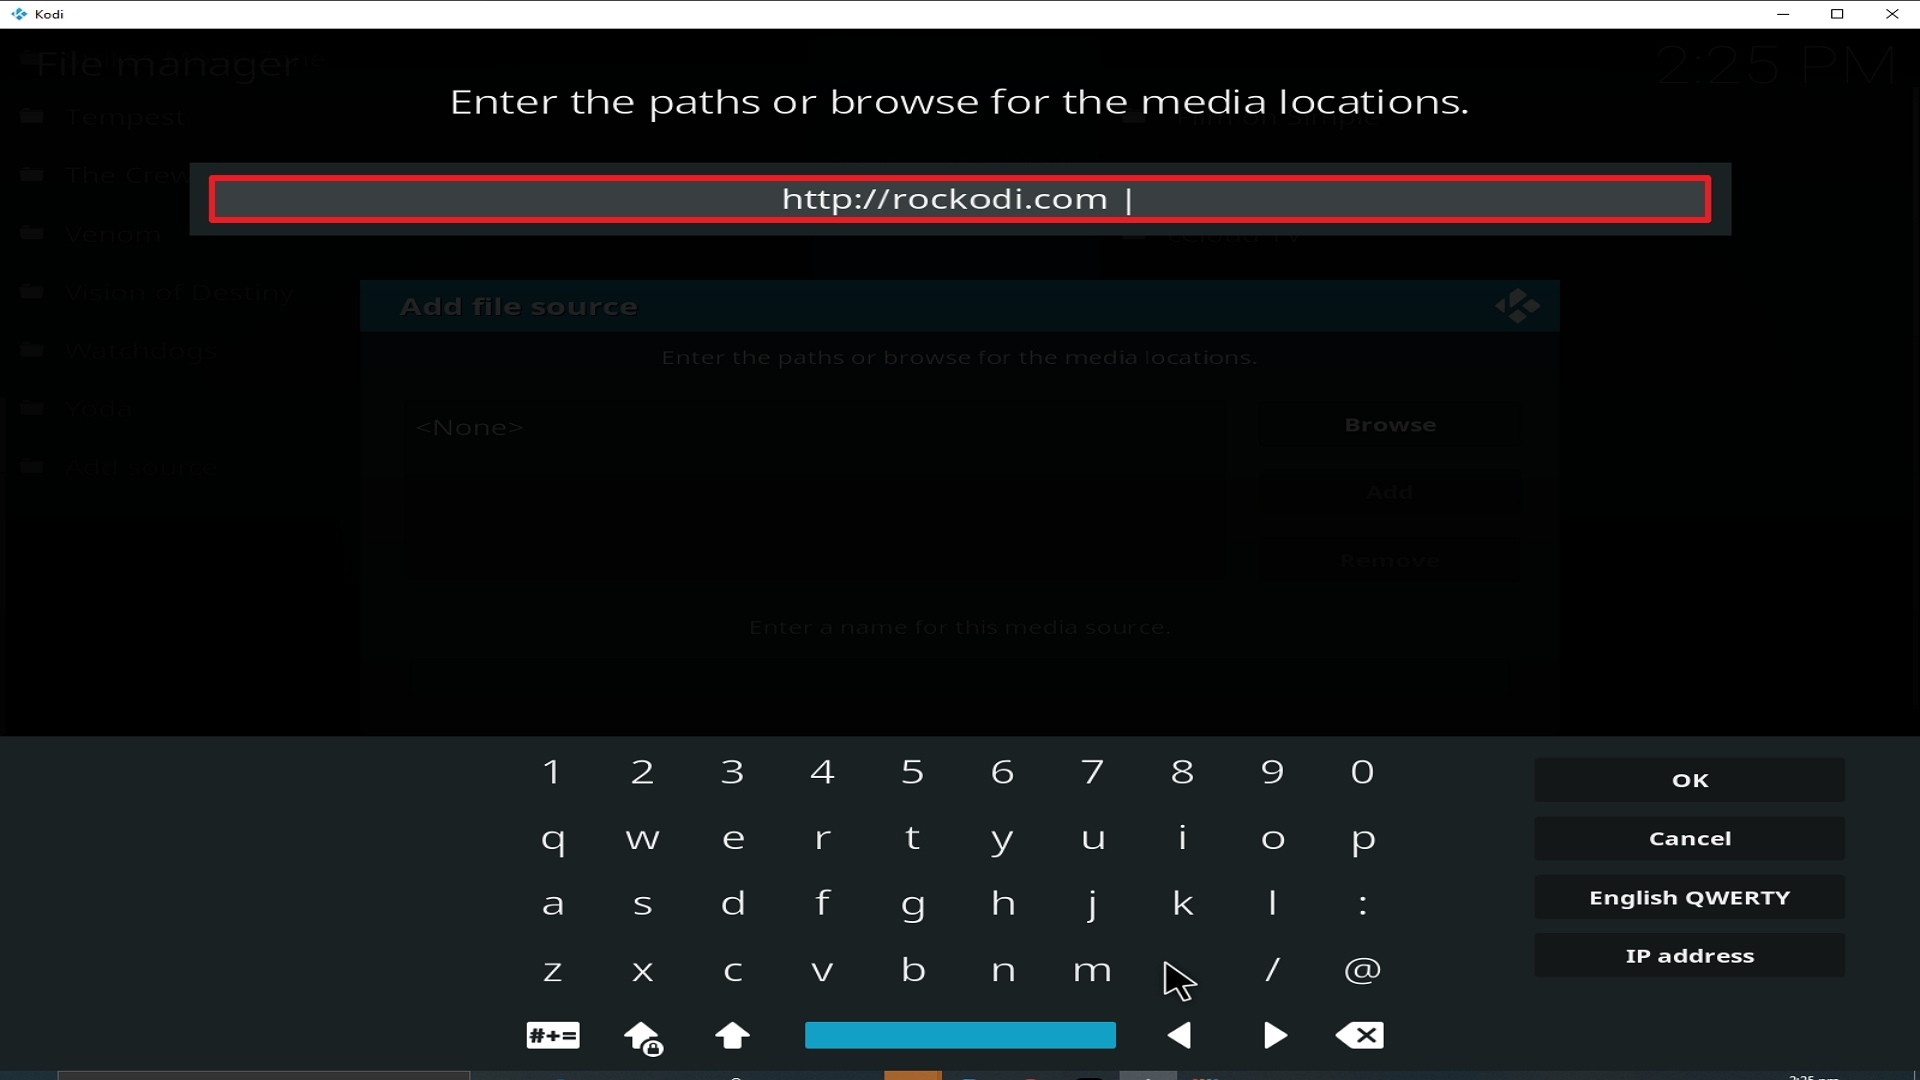
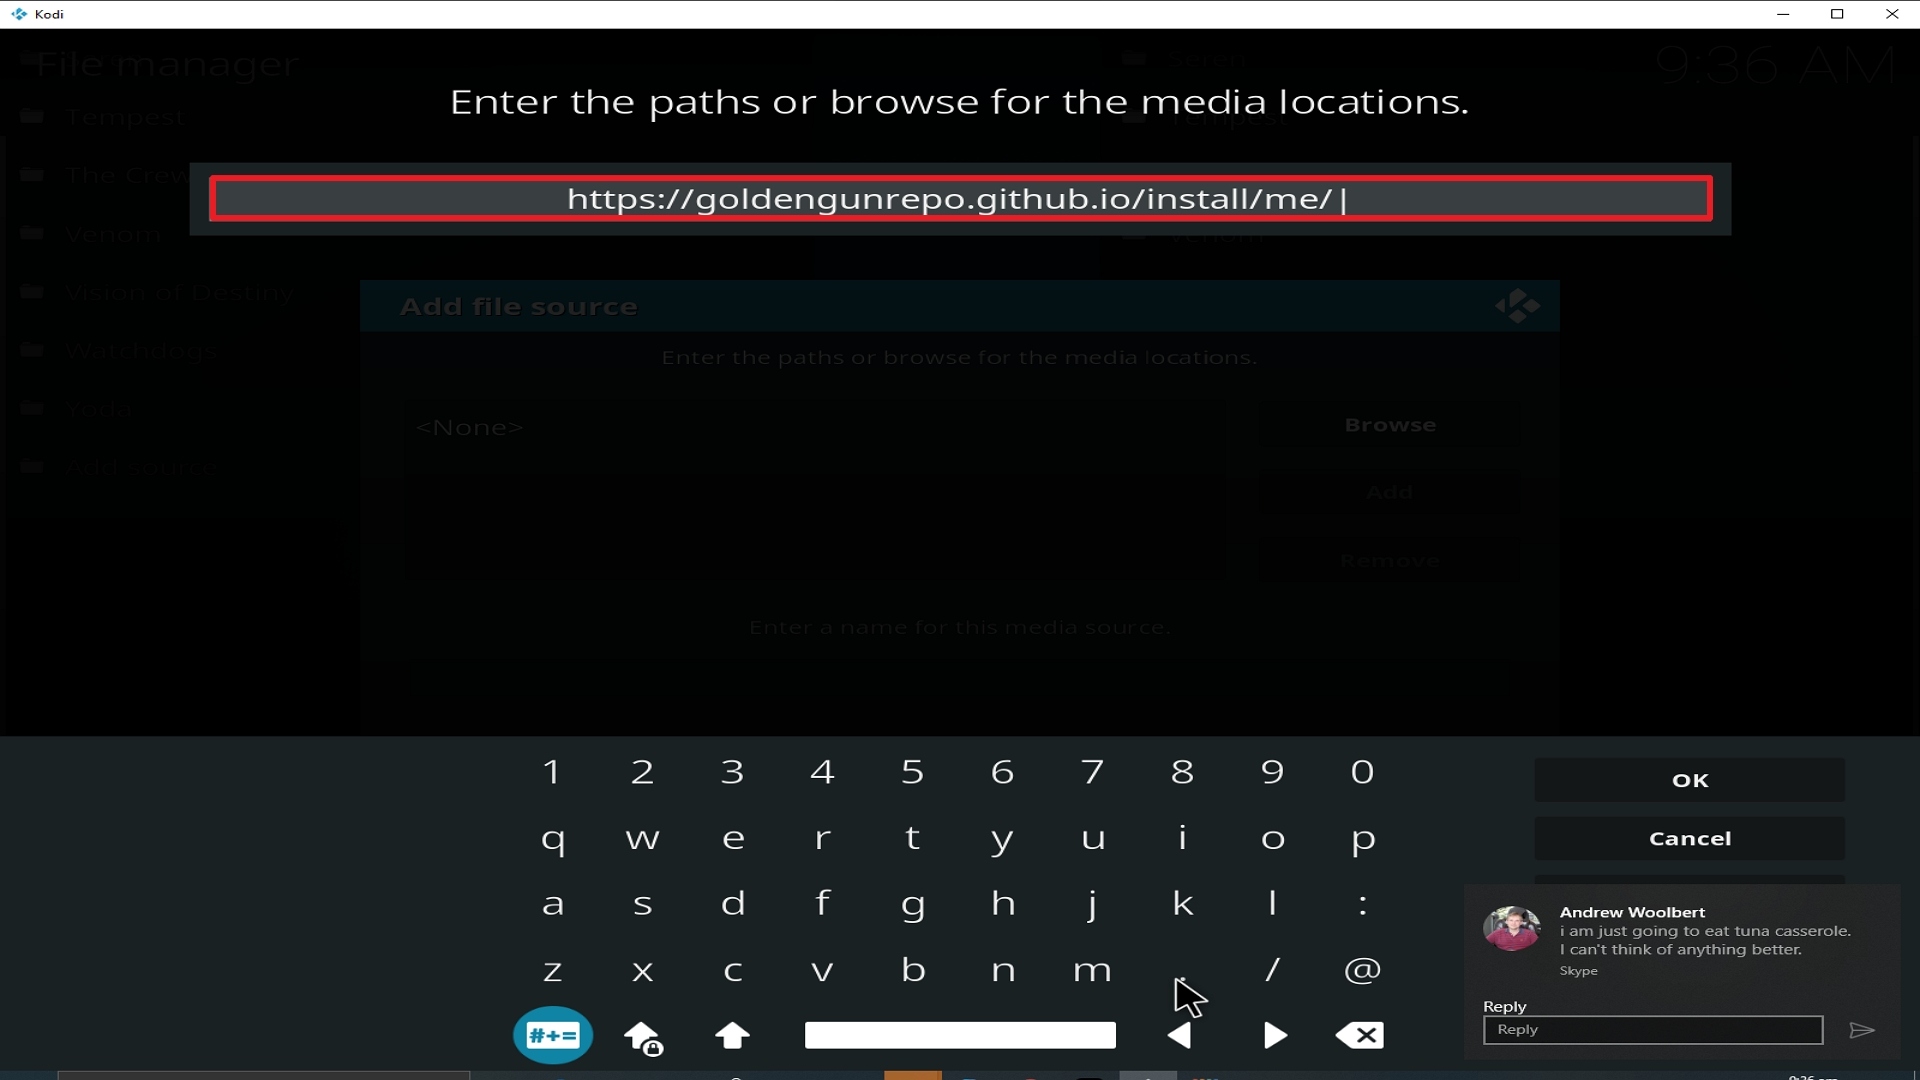
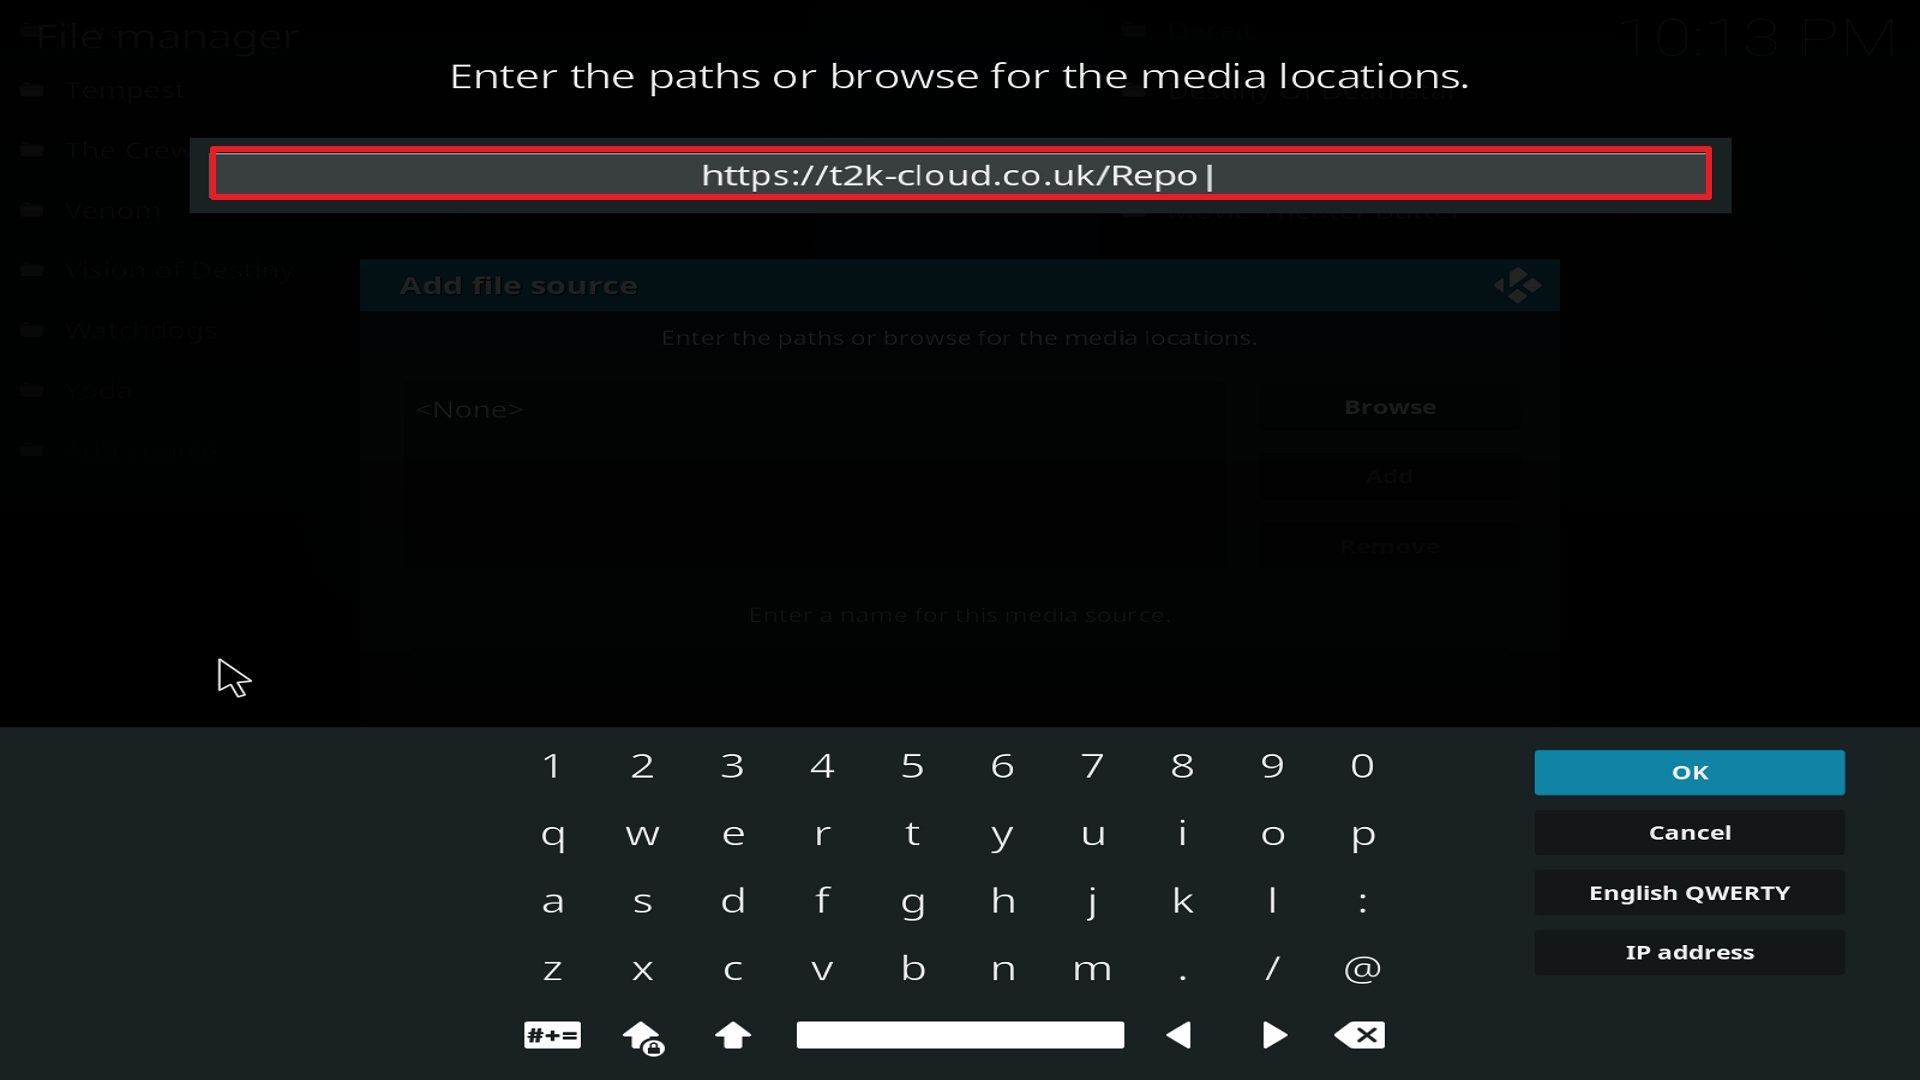
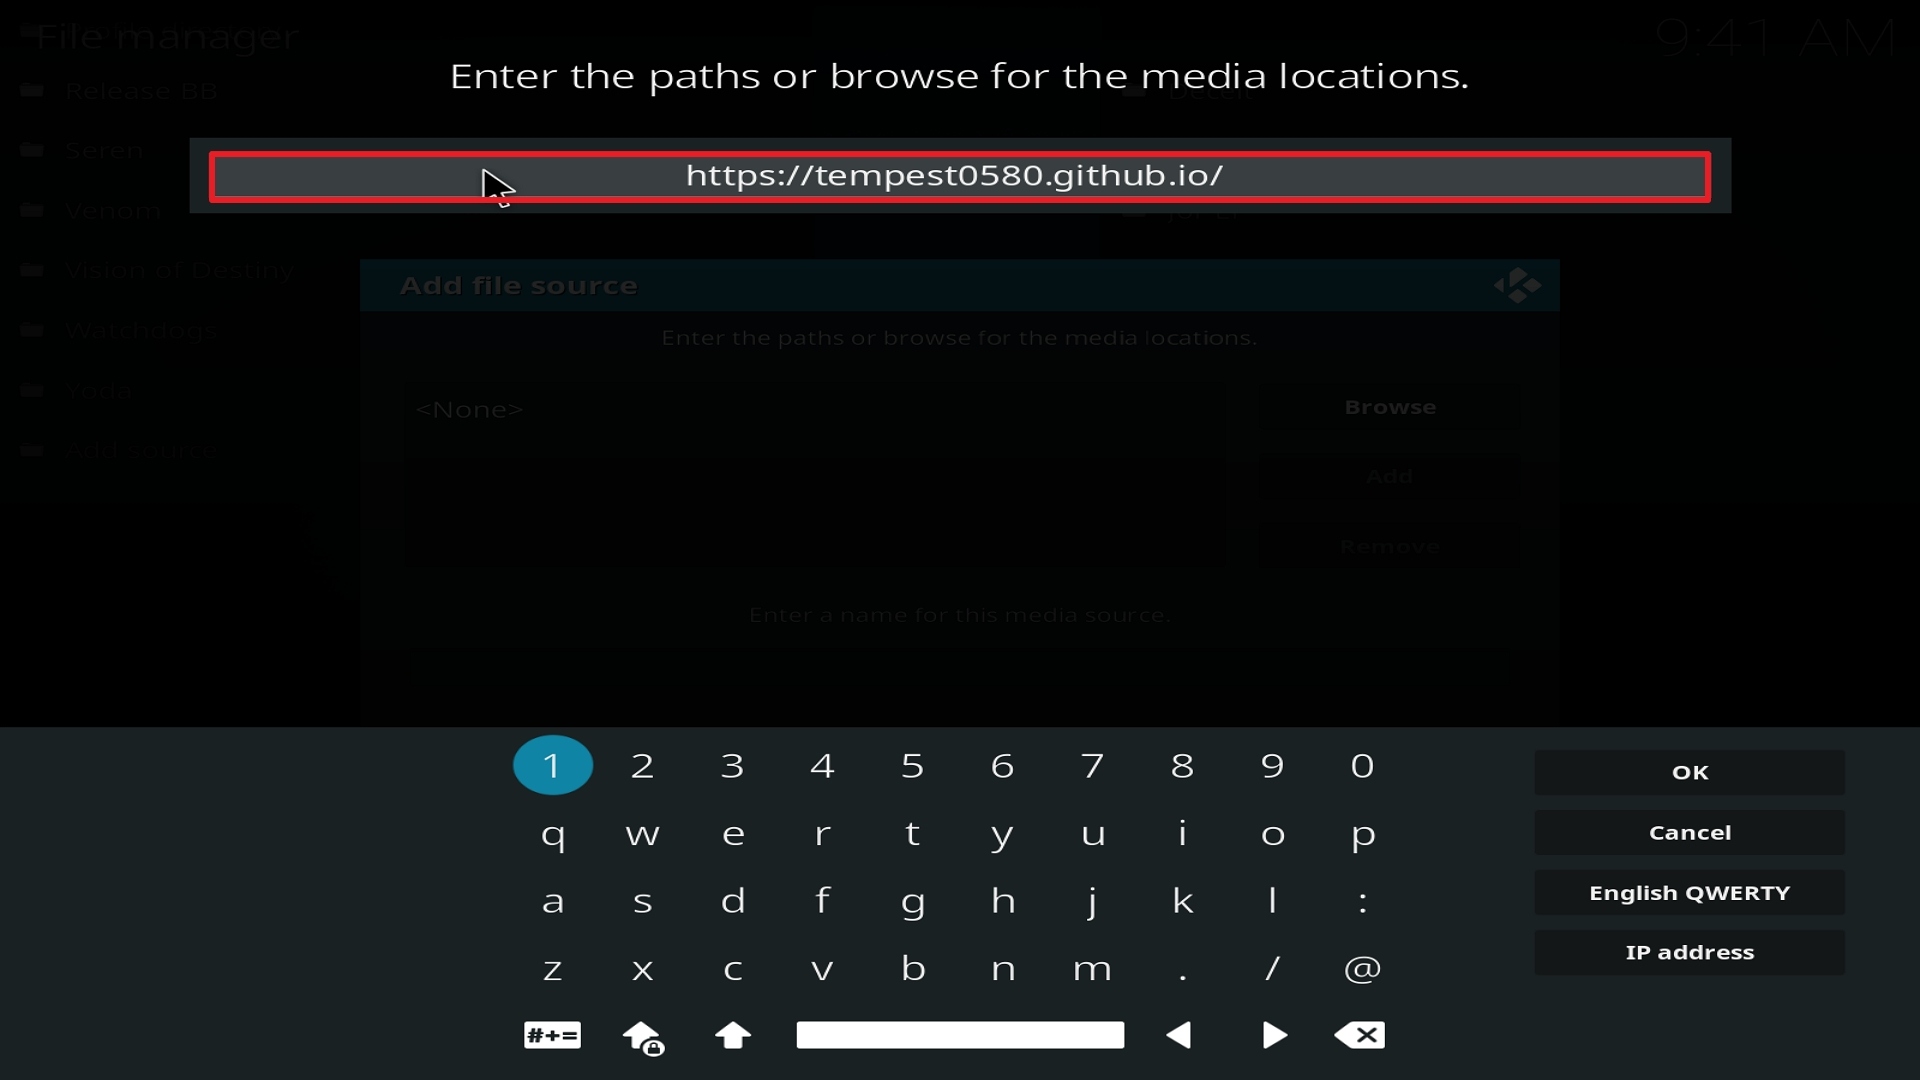
9. Type exactly: http://rockodi.com

Step 9 Installing Strikes Movie Zone addon on Kodi


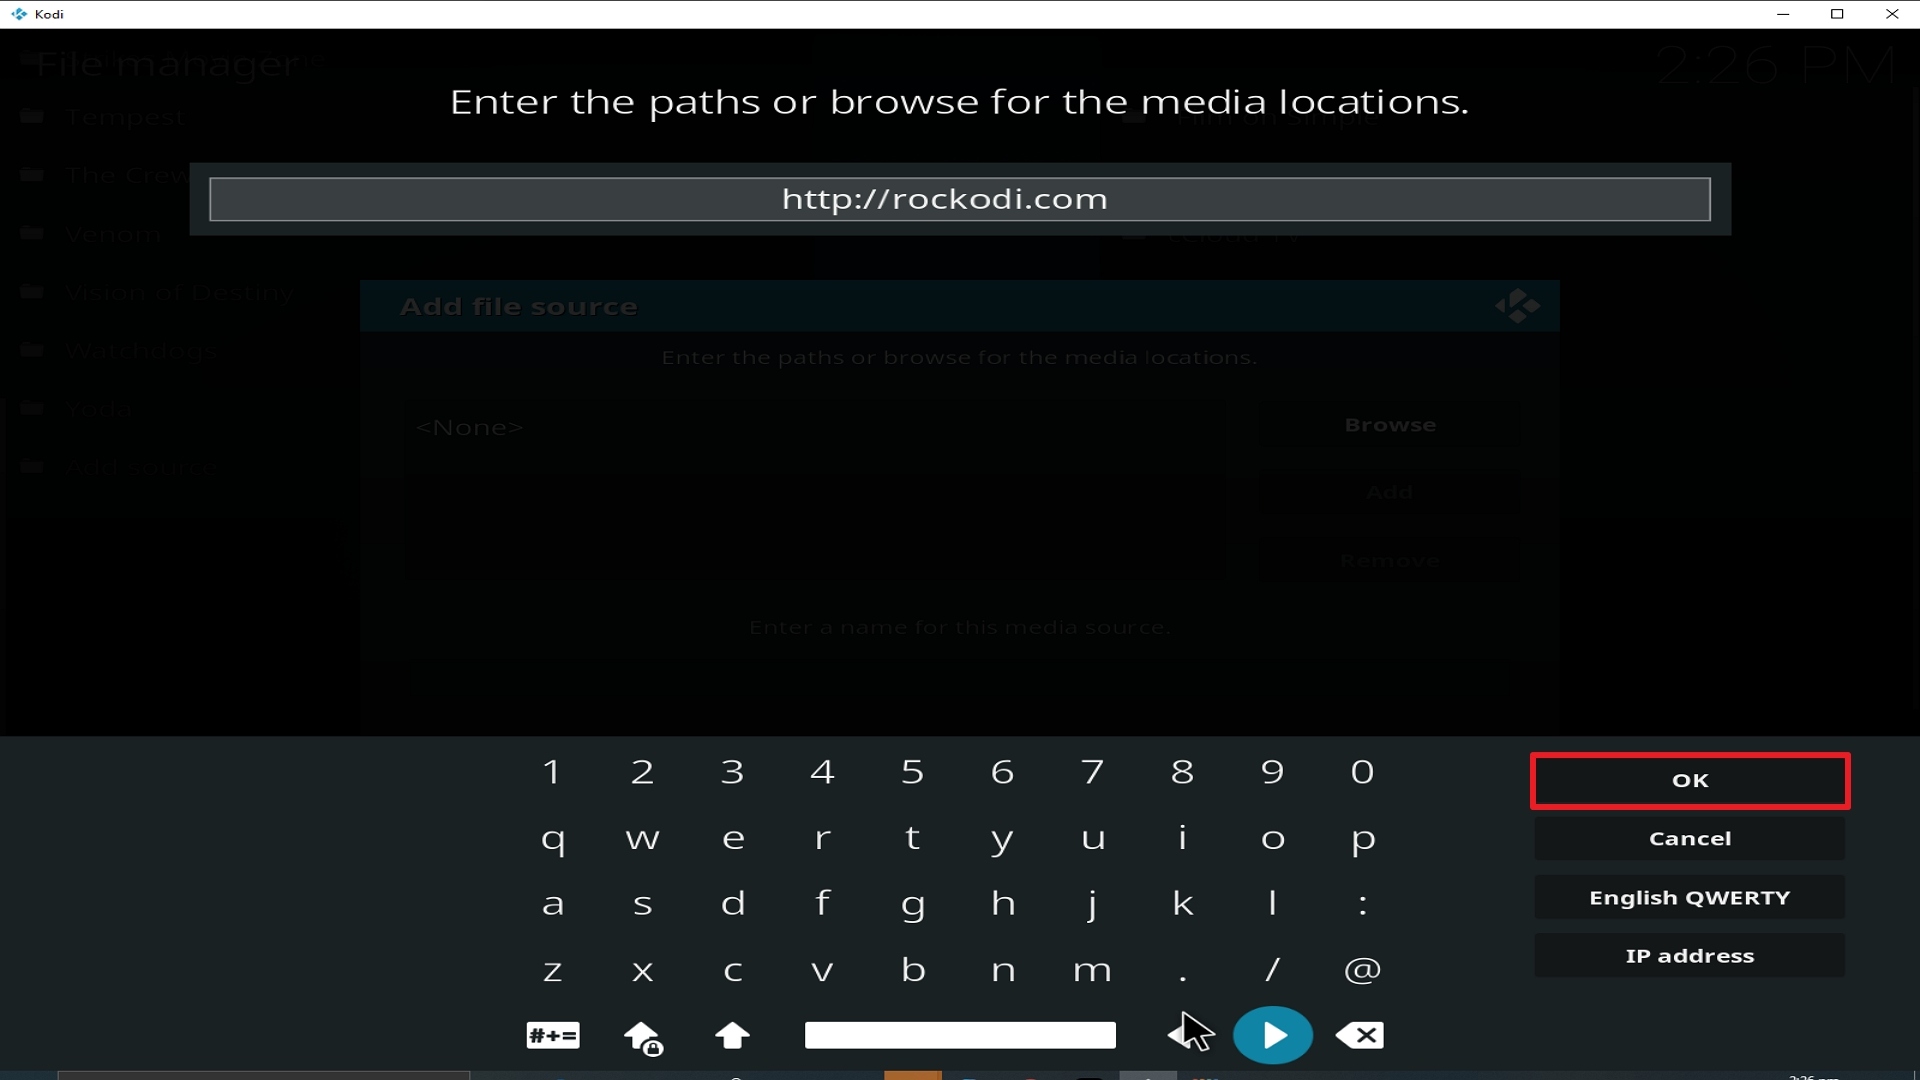
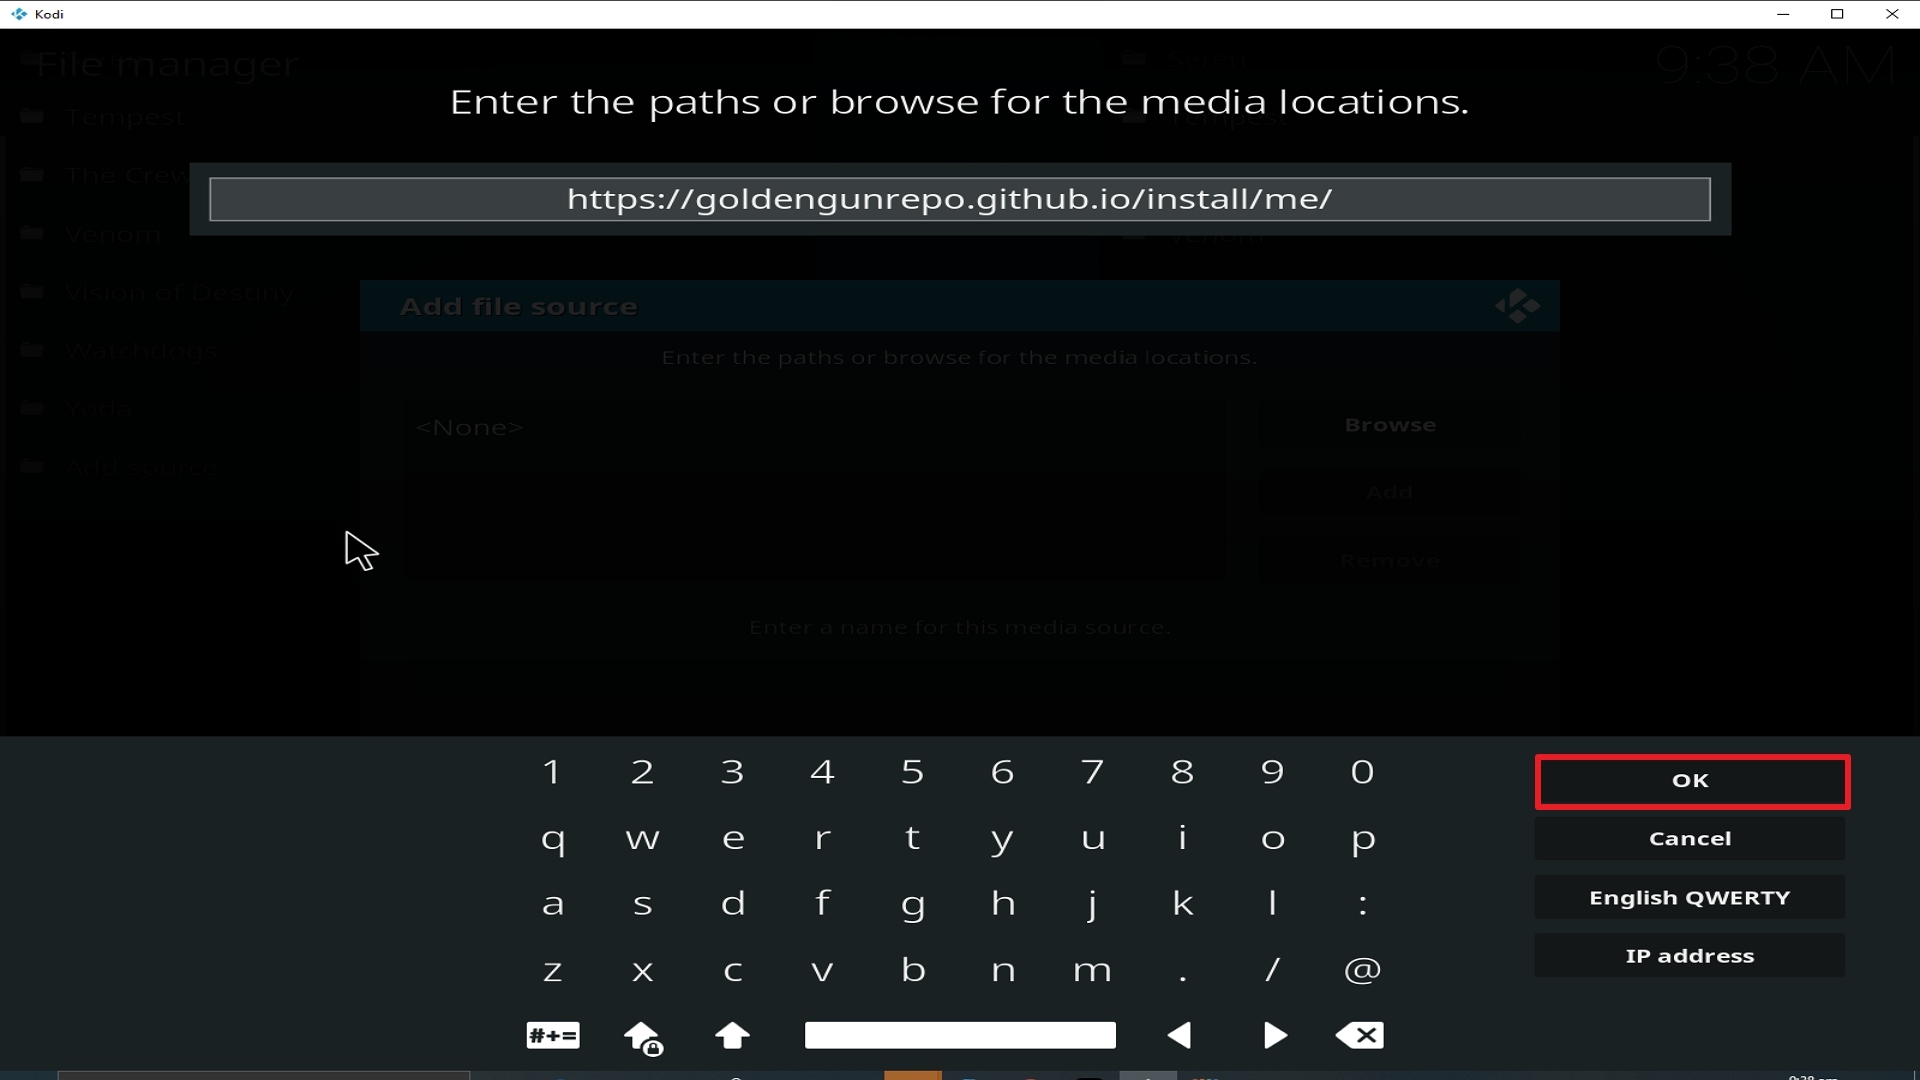
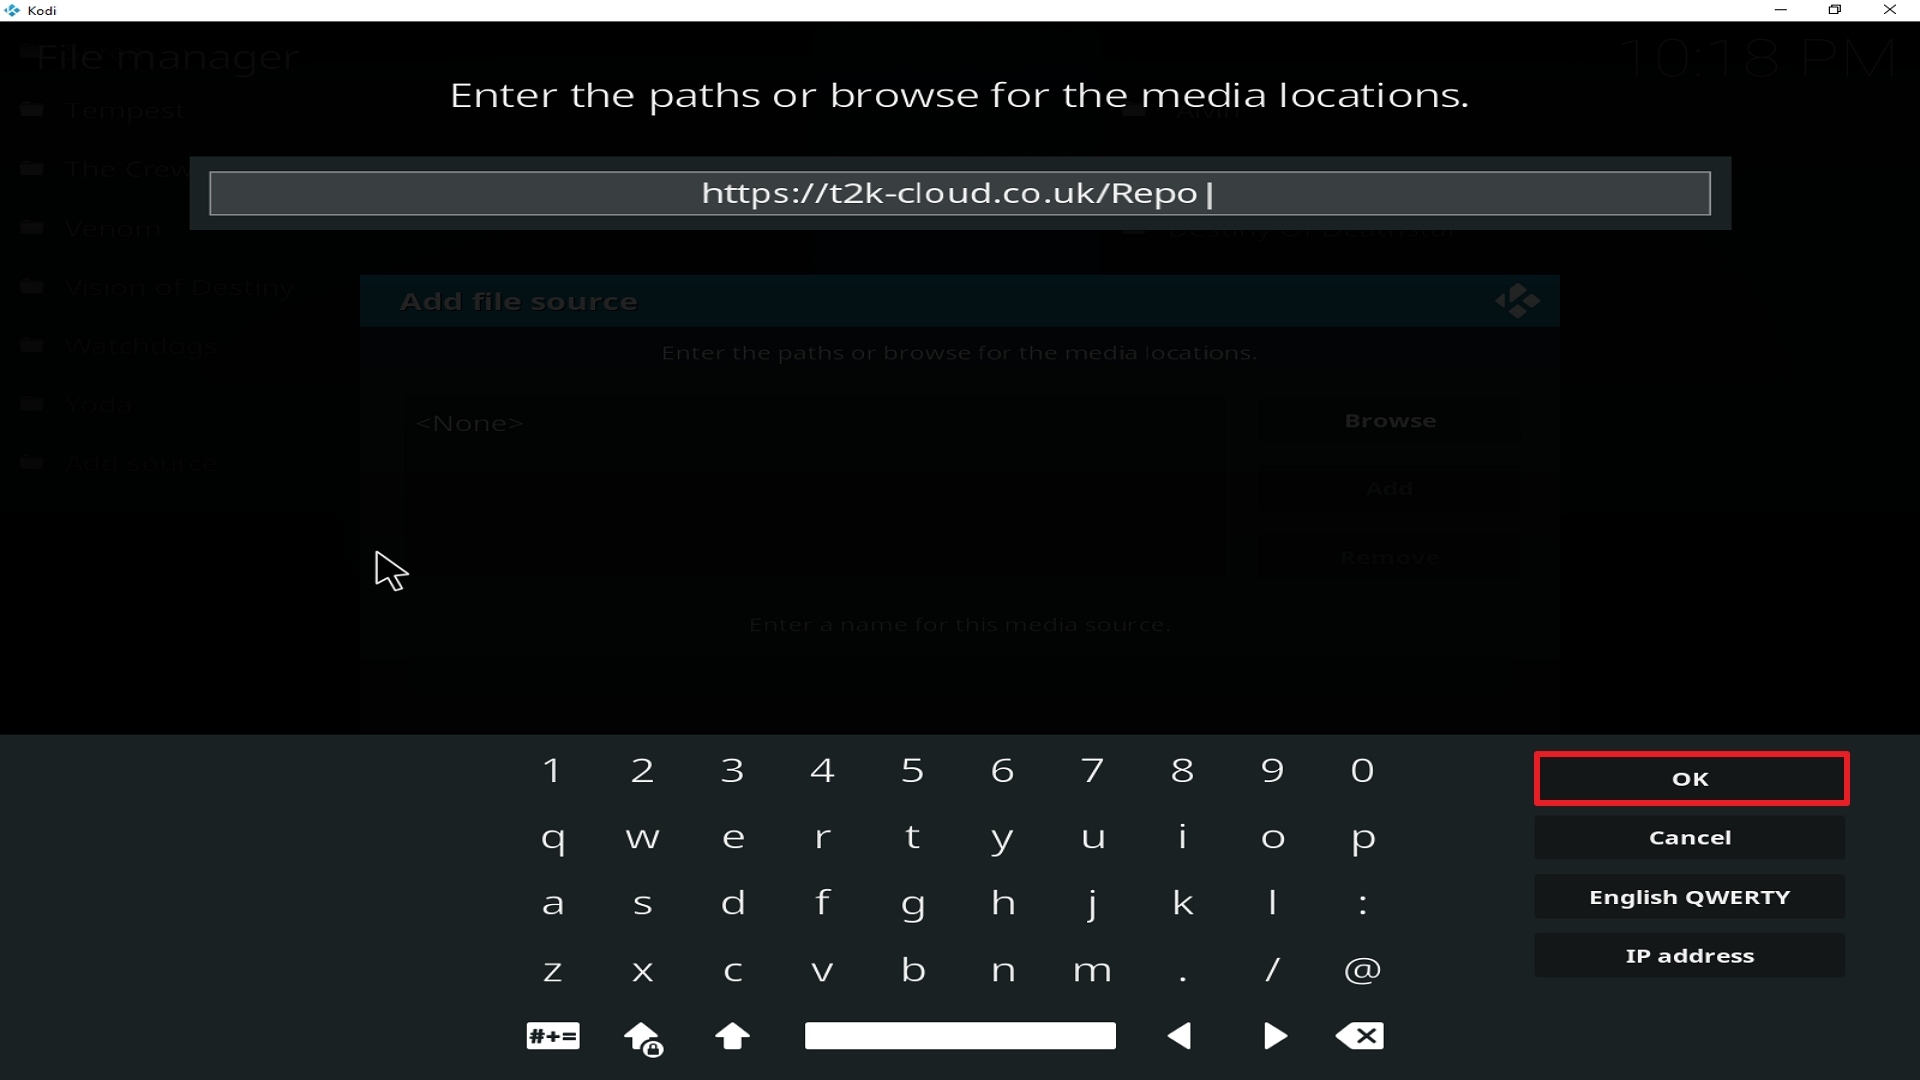
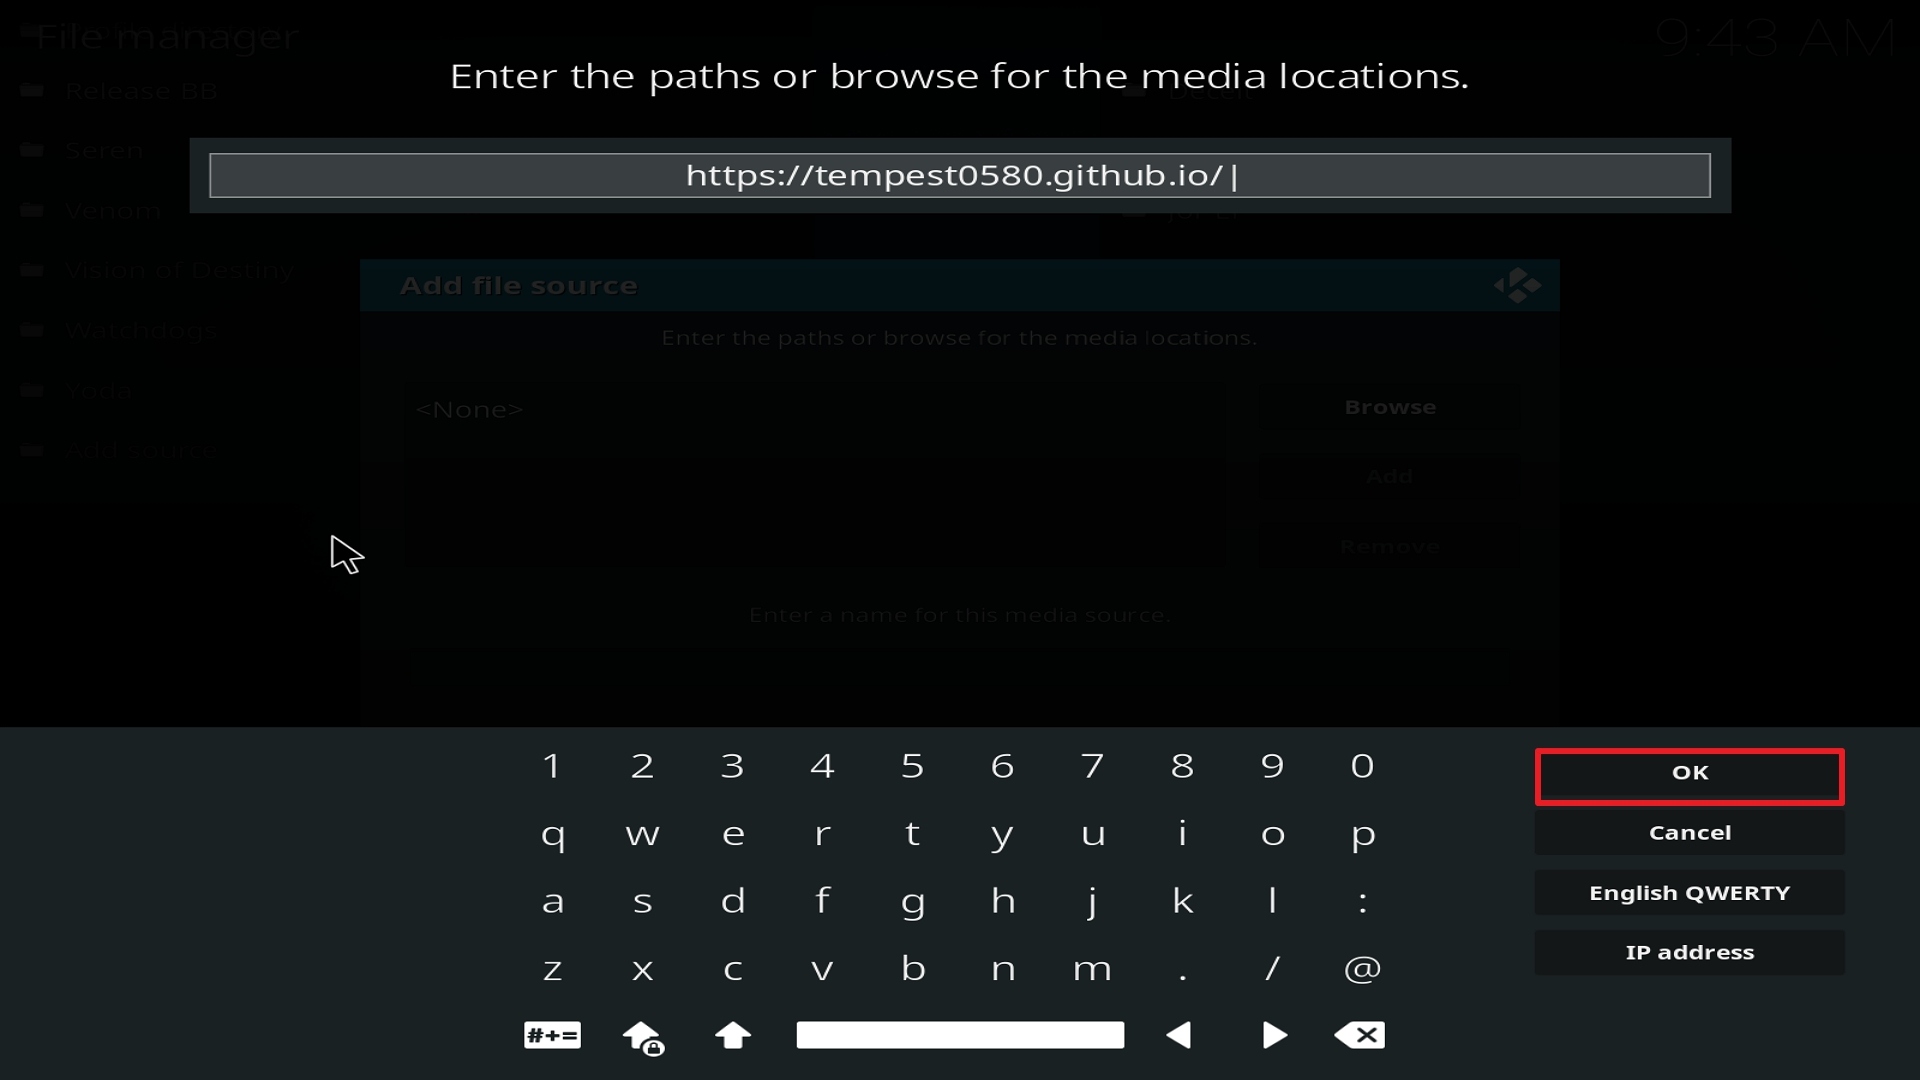
10. Click on OK.

Step 10 Installing Strikes Movie Zone addon on Kodi

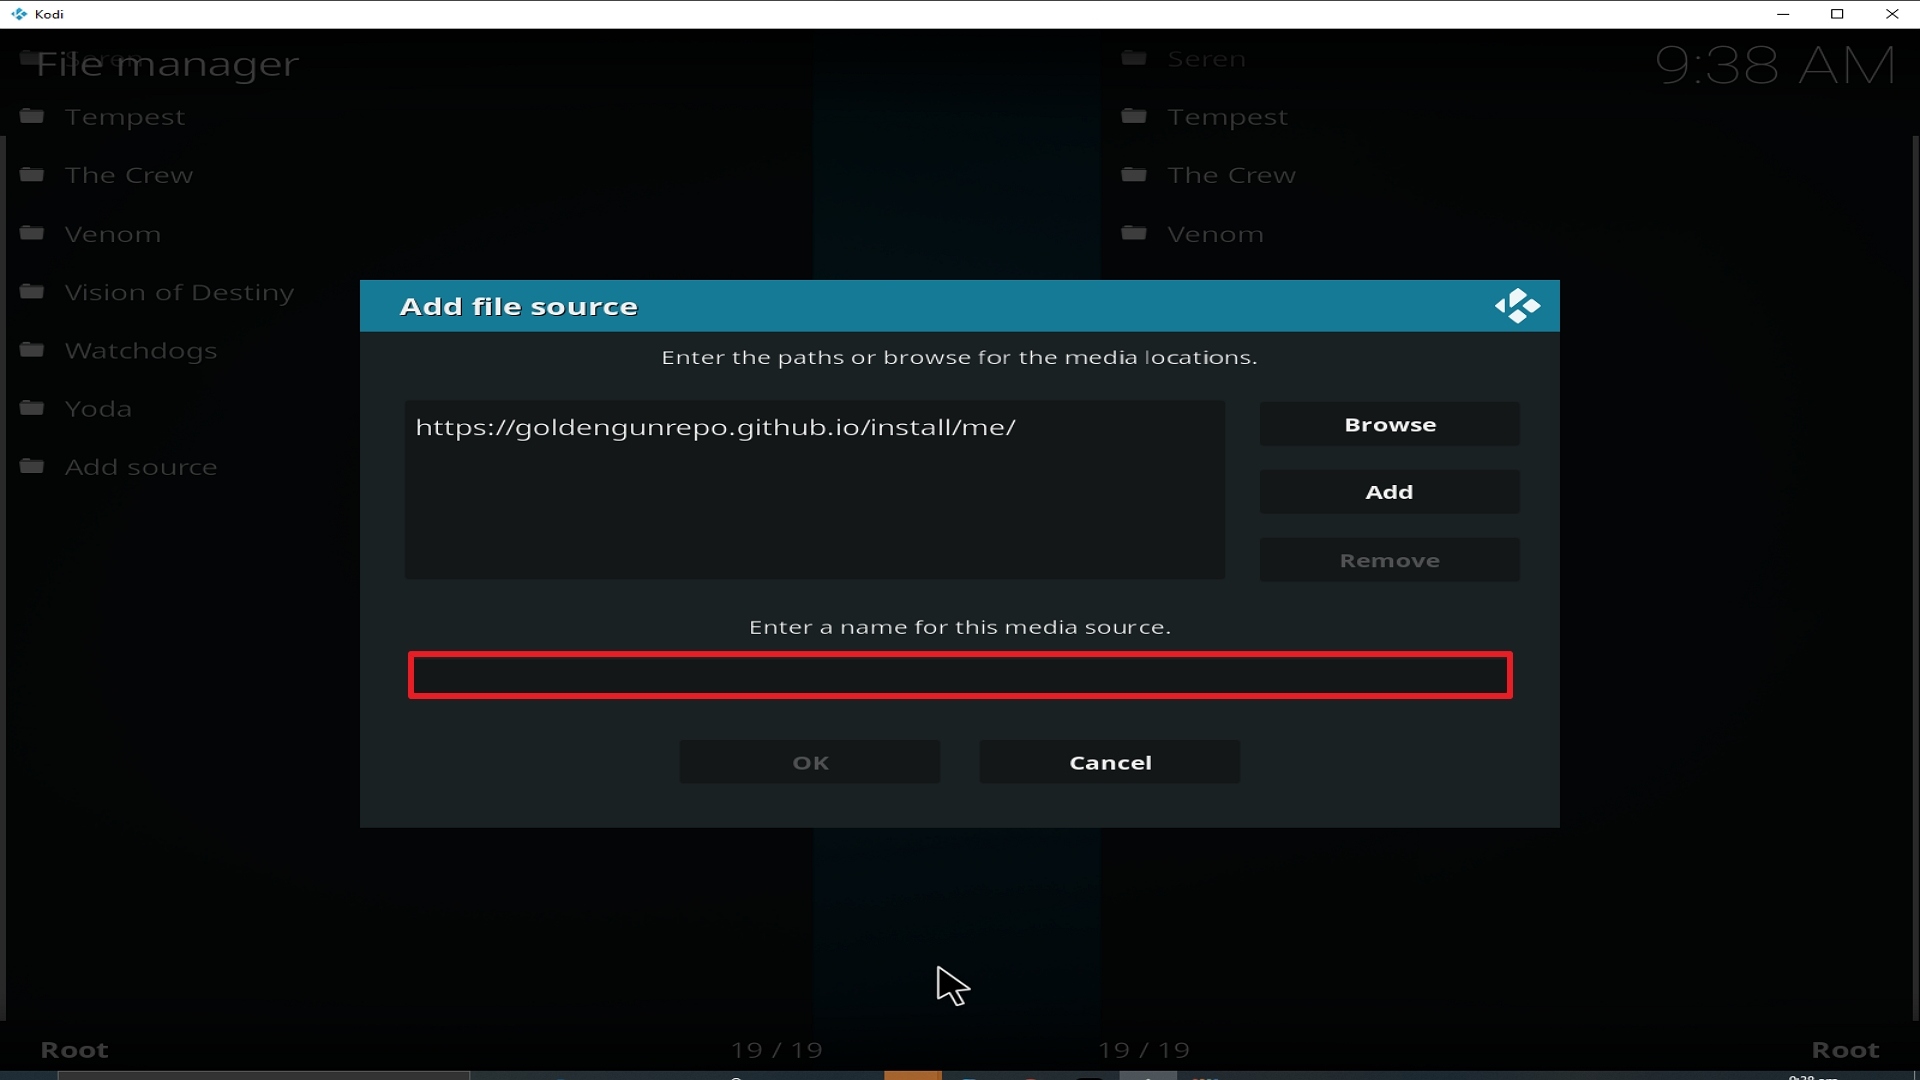
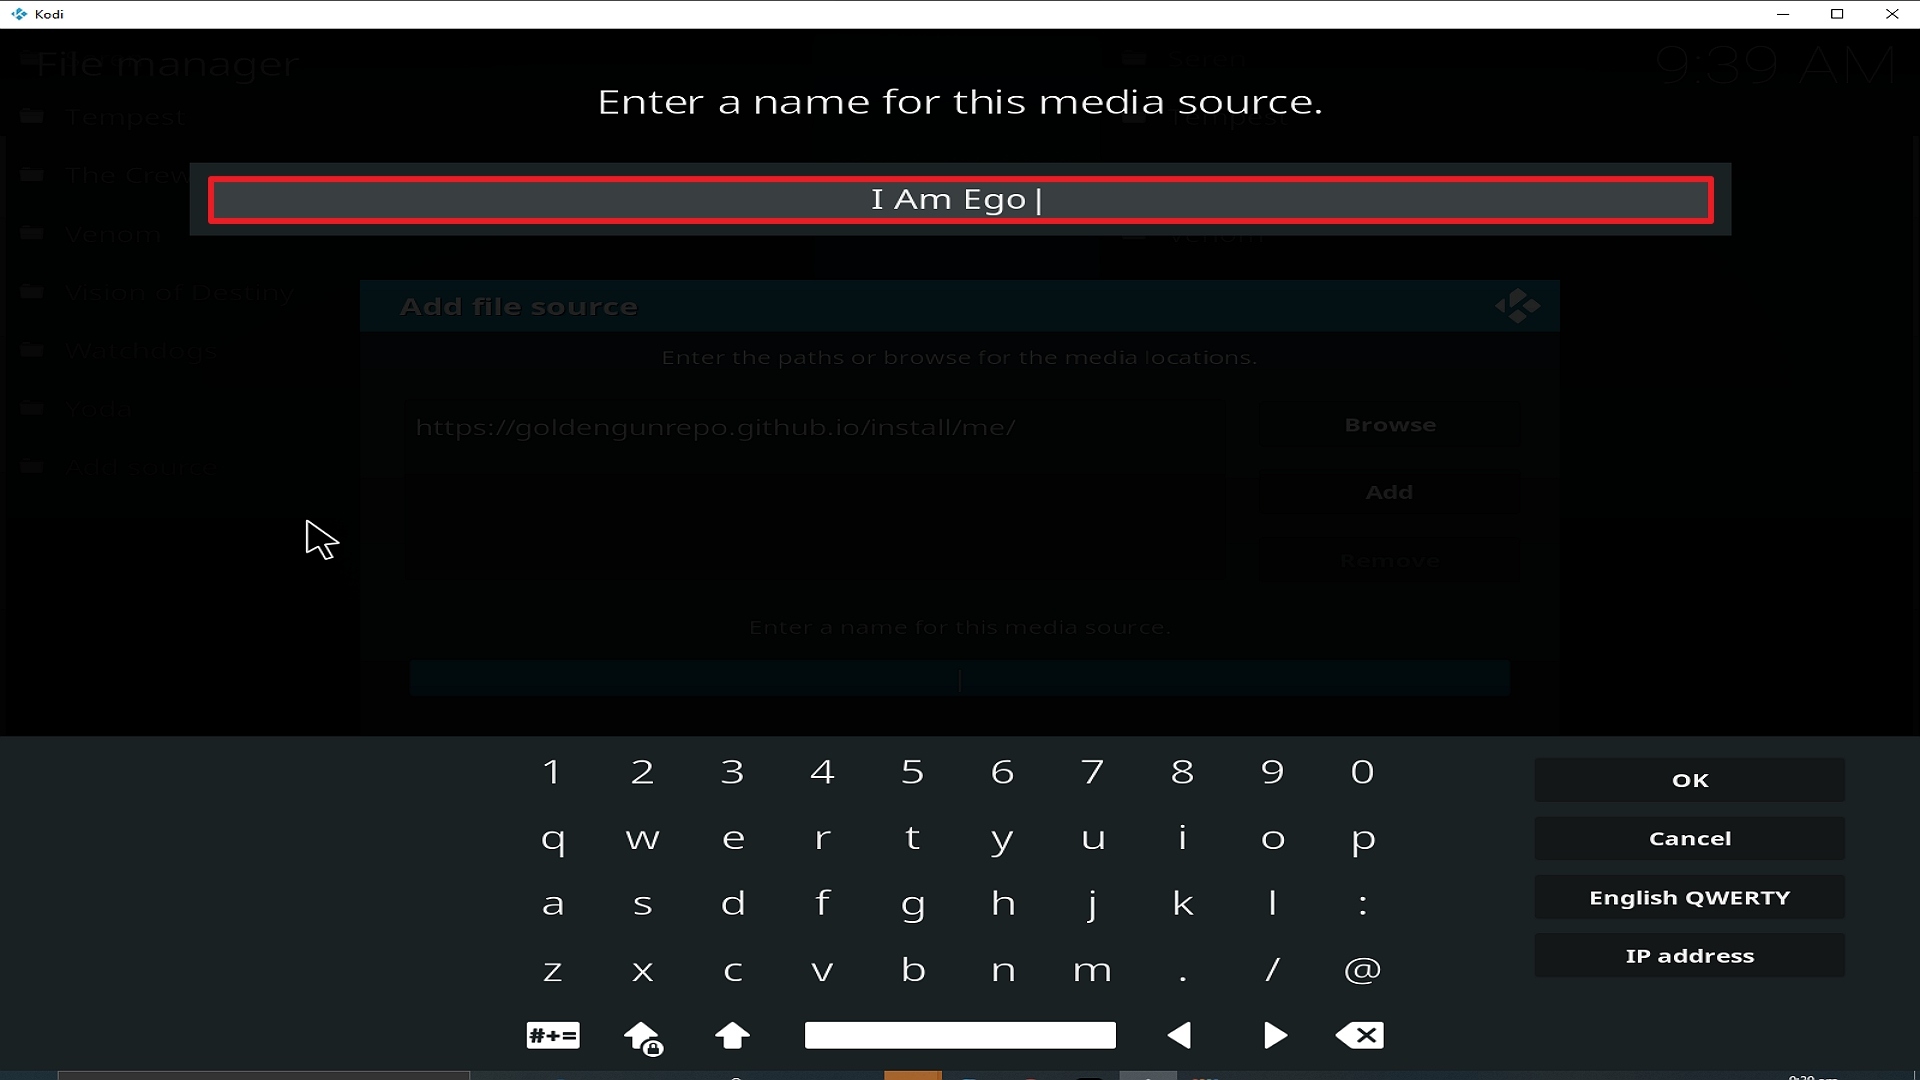
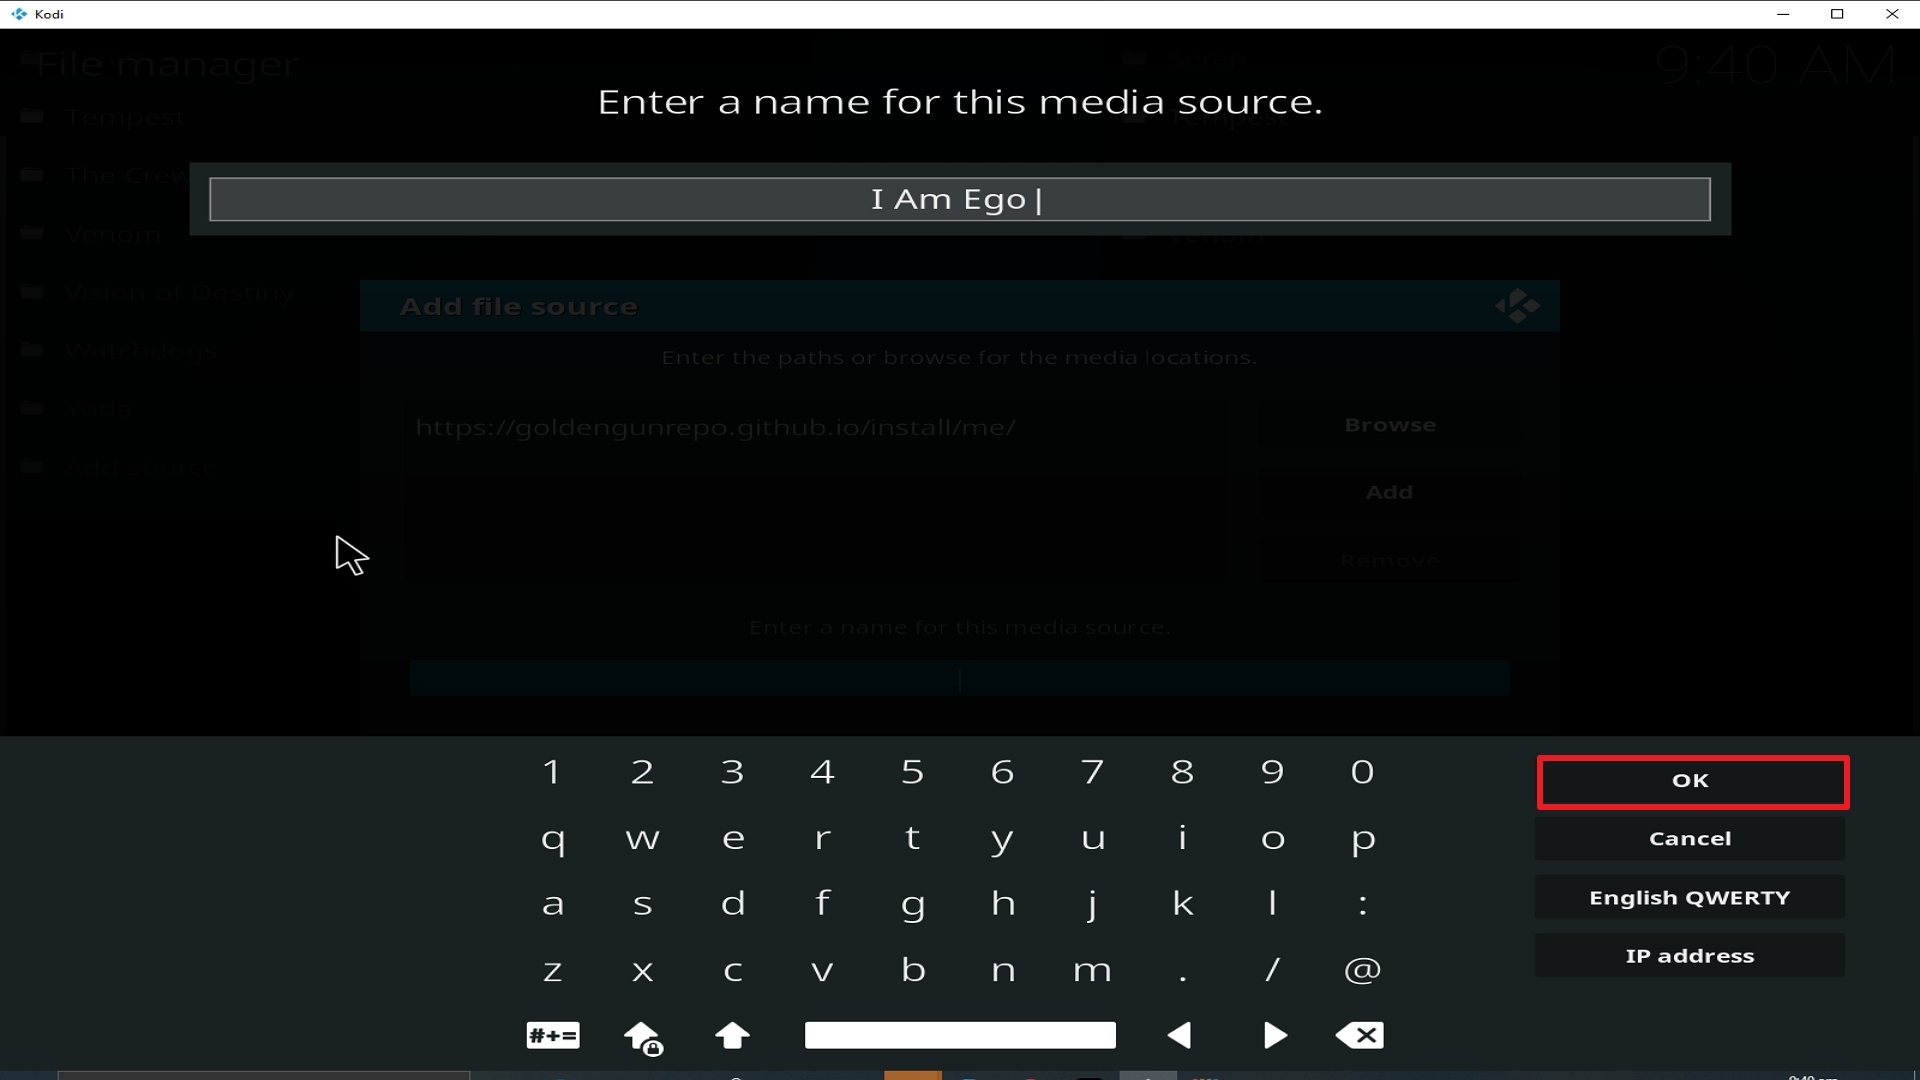
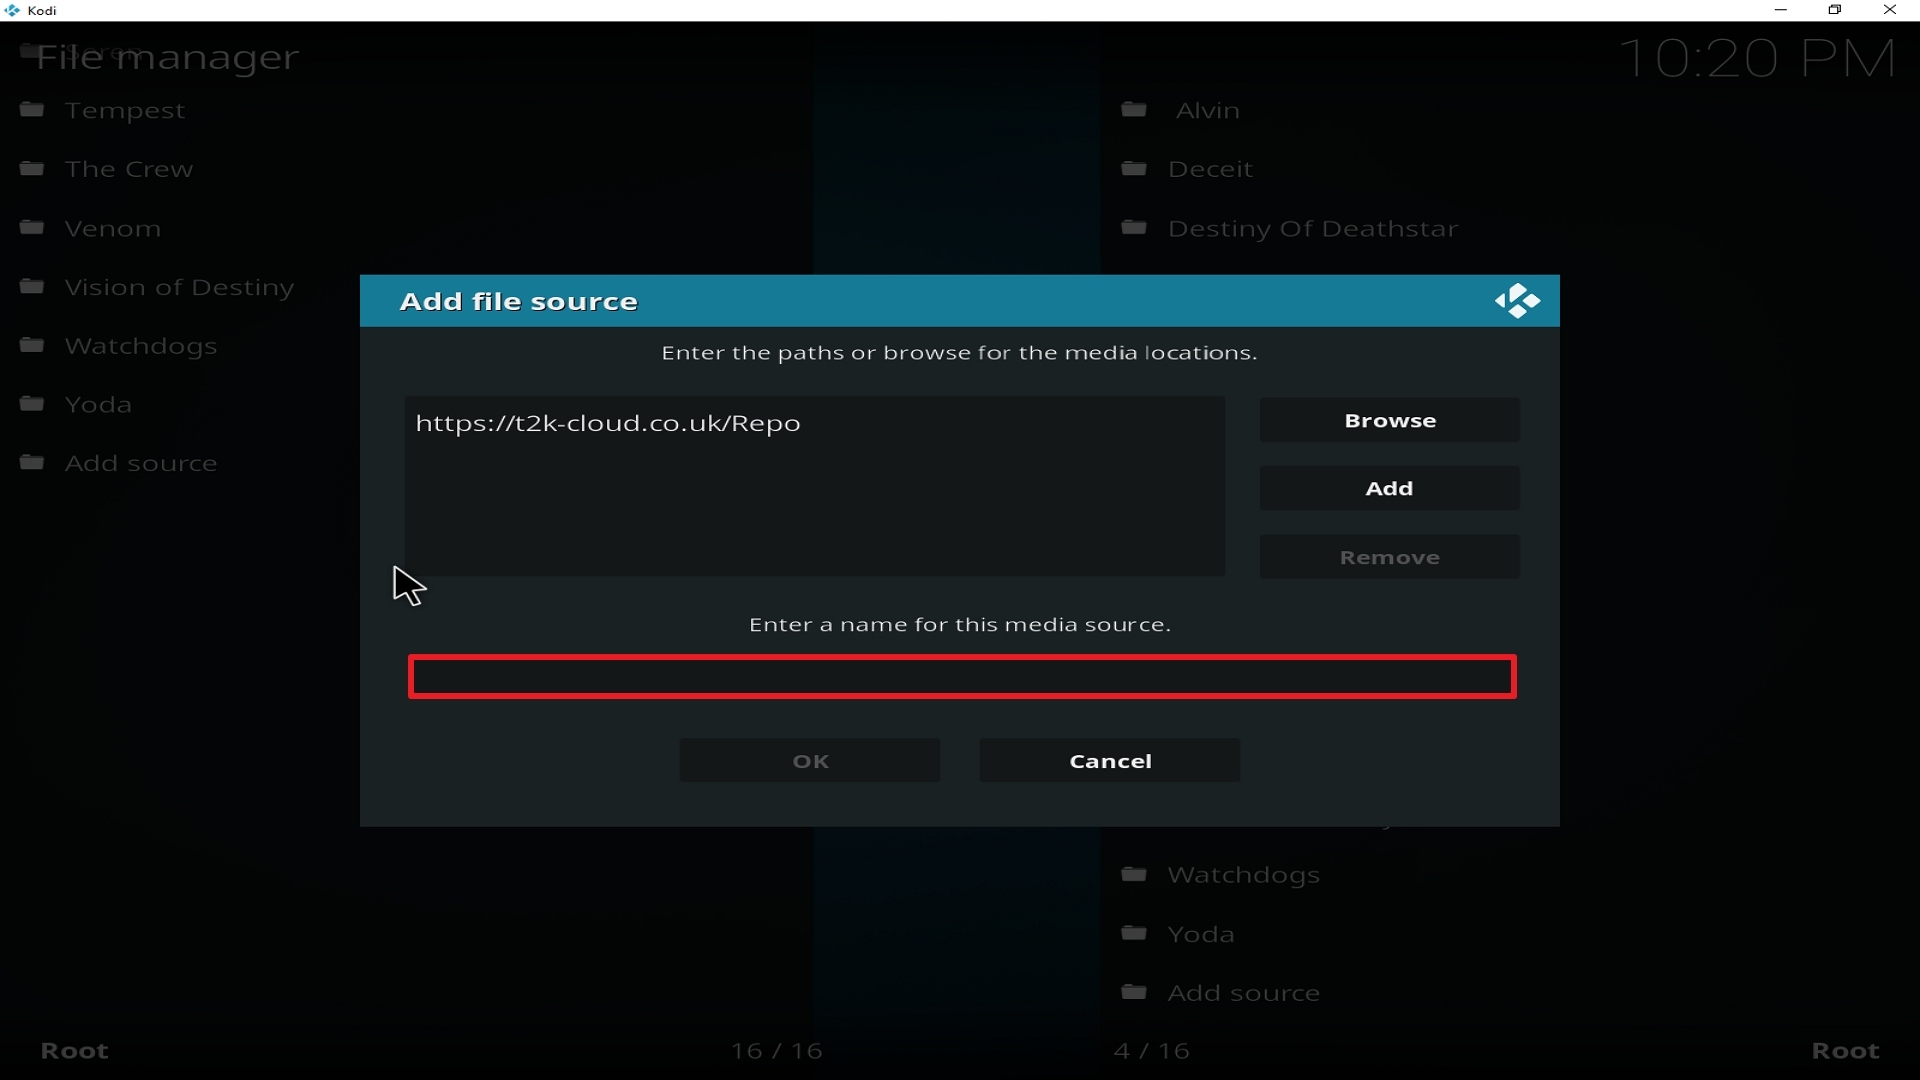
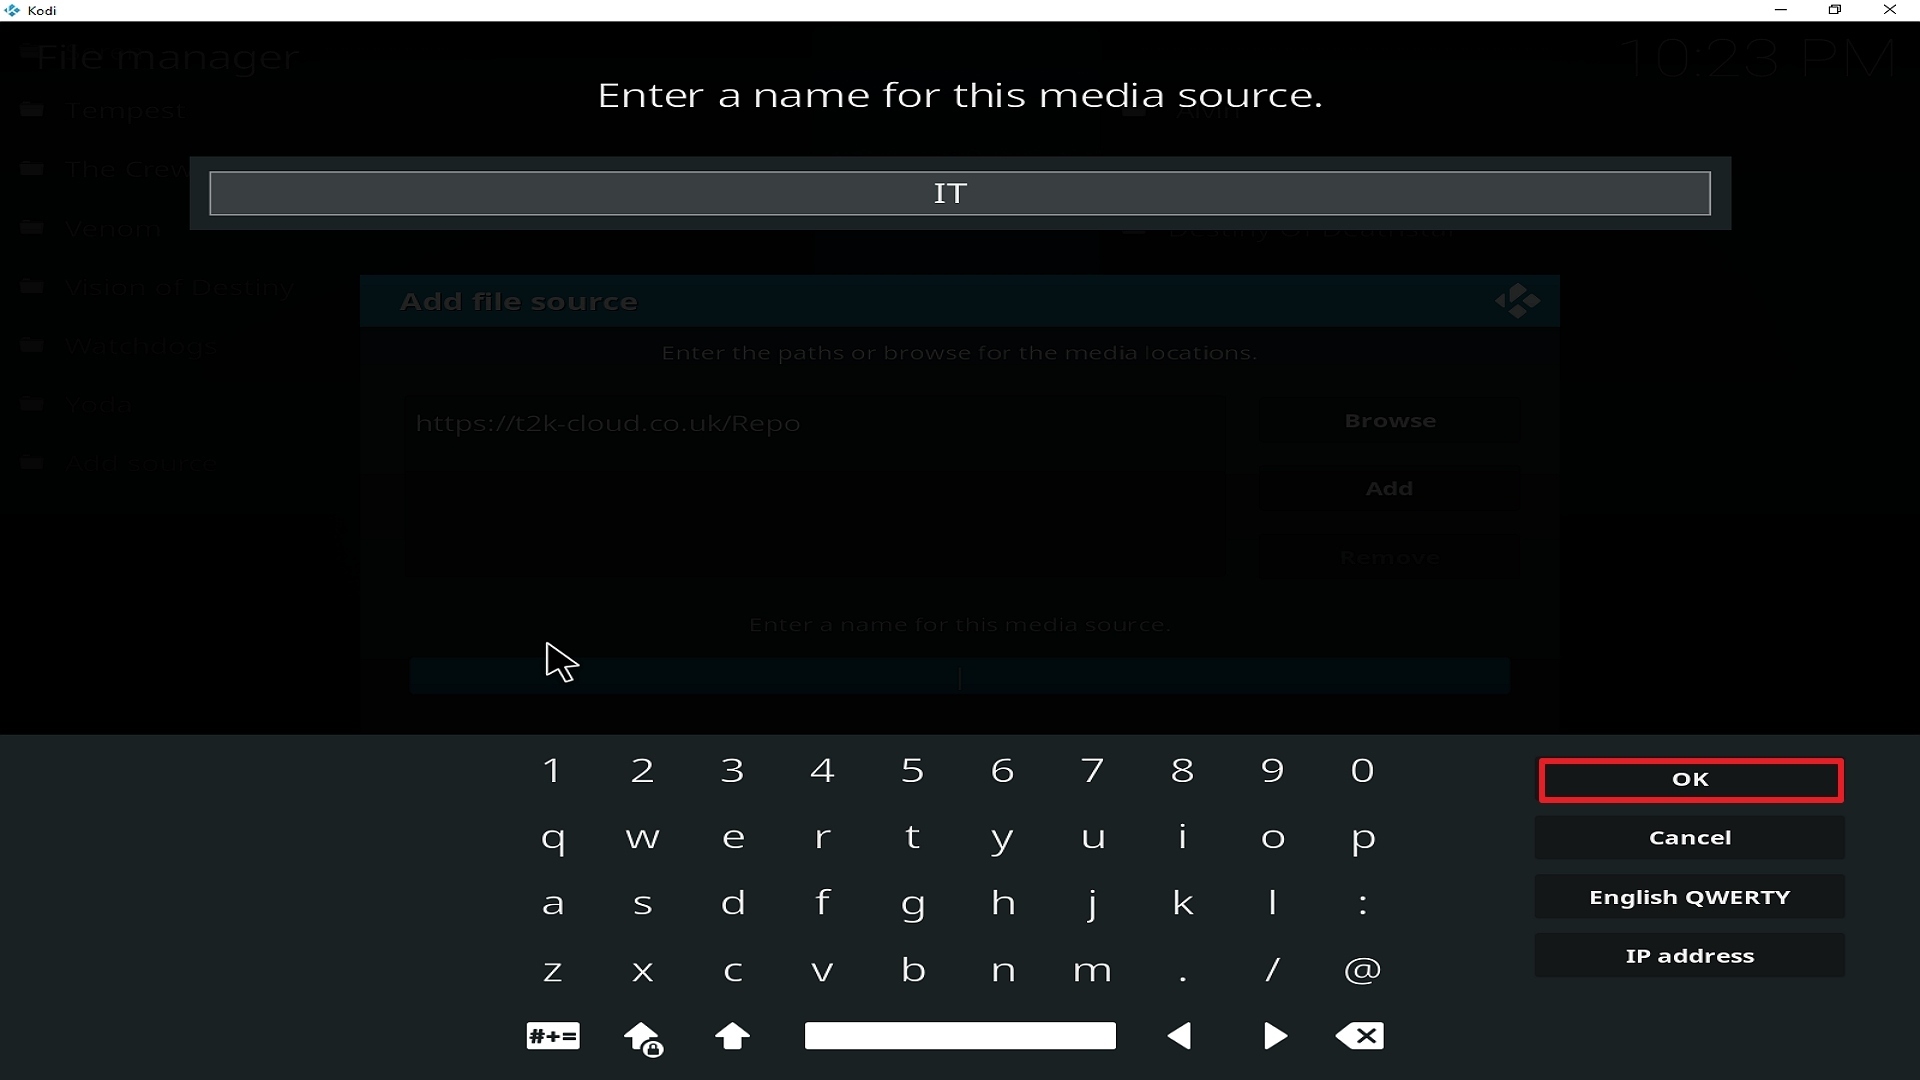
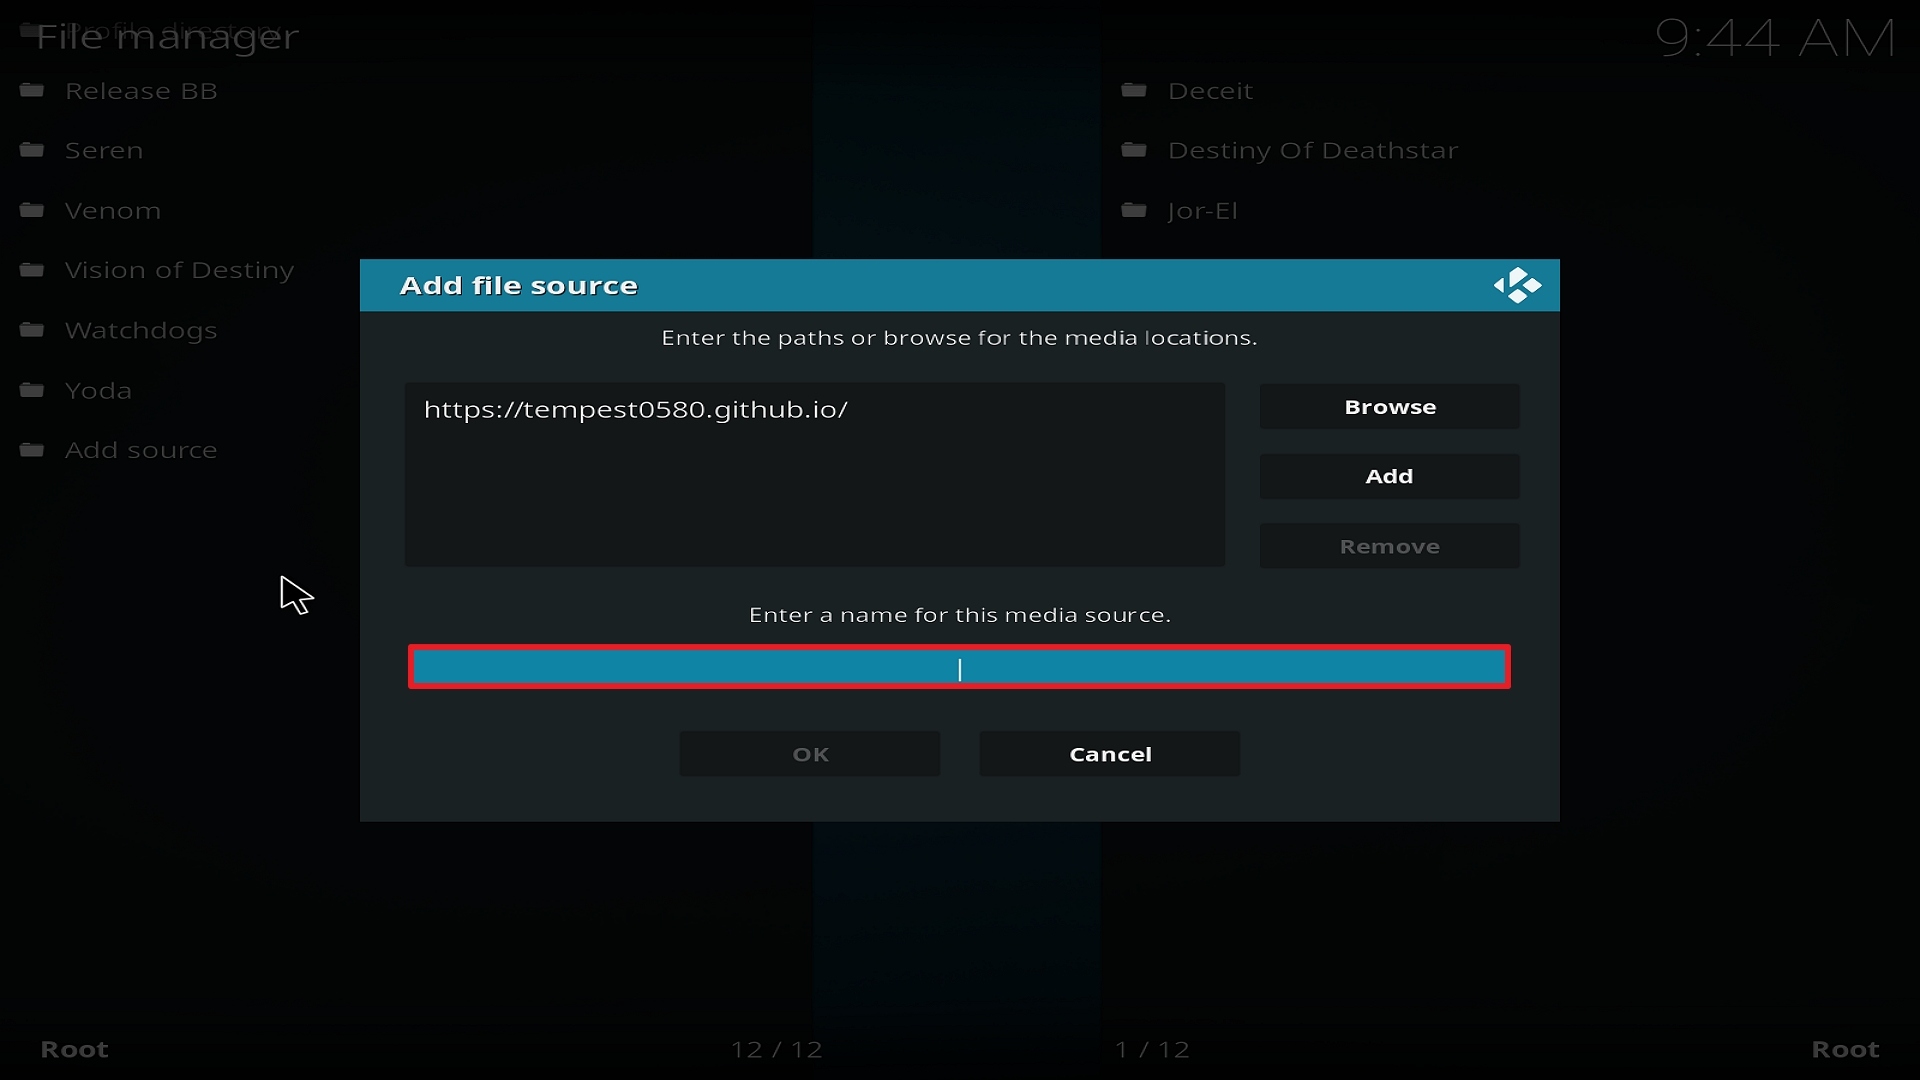
11. Select enter a name for this media source.
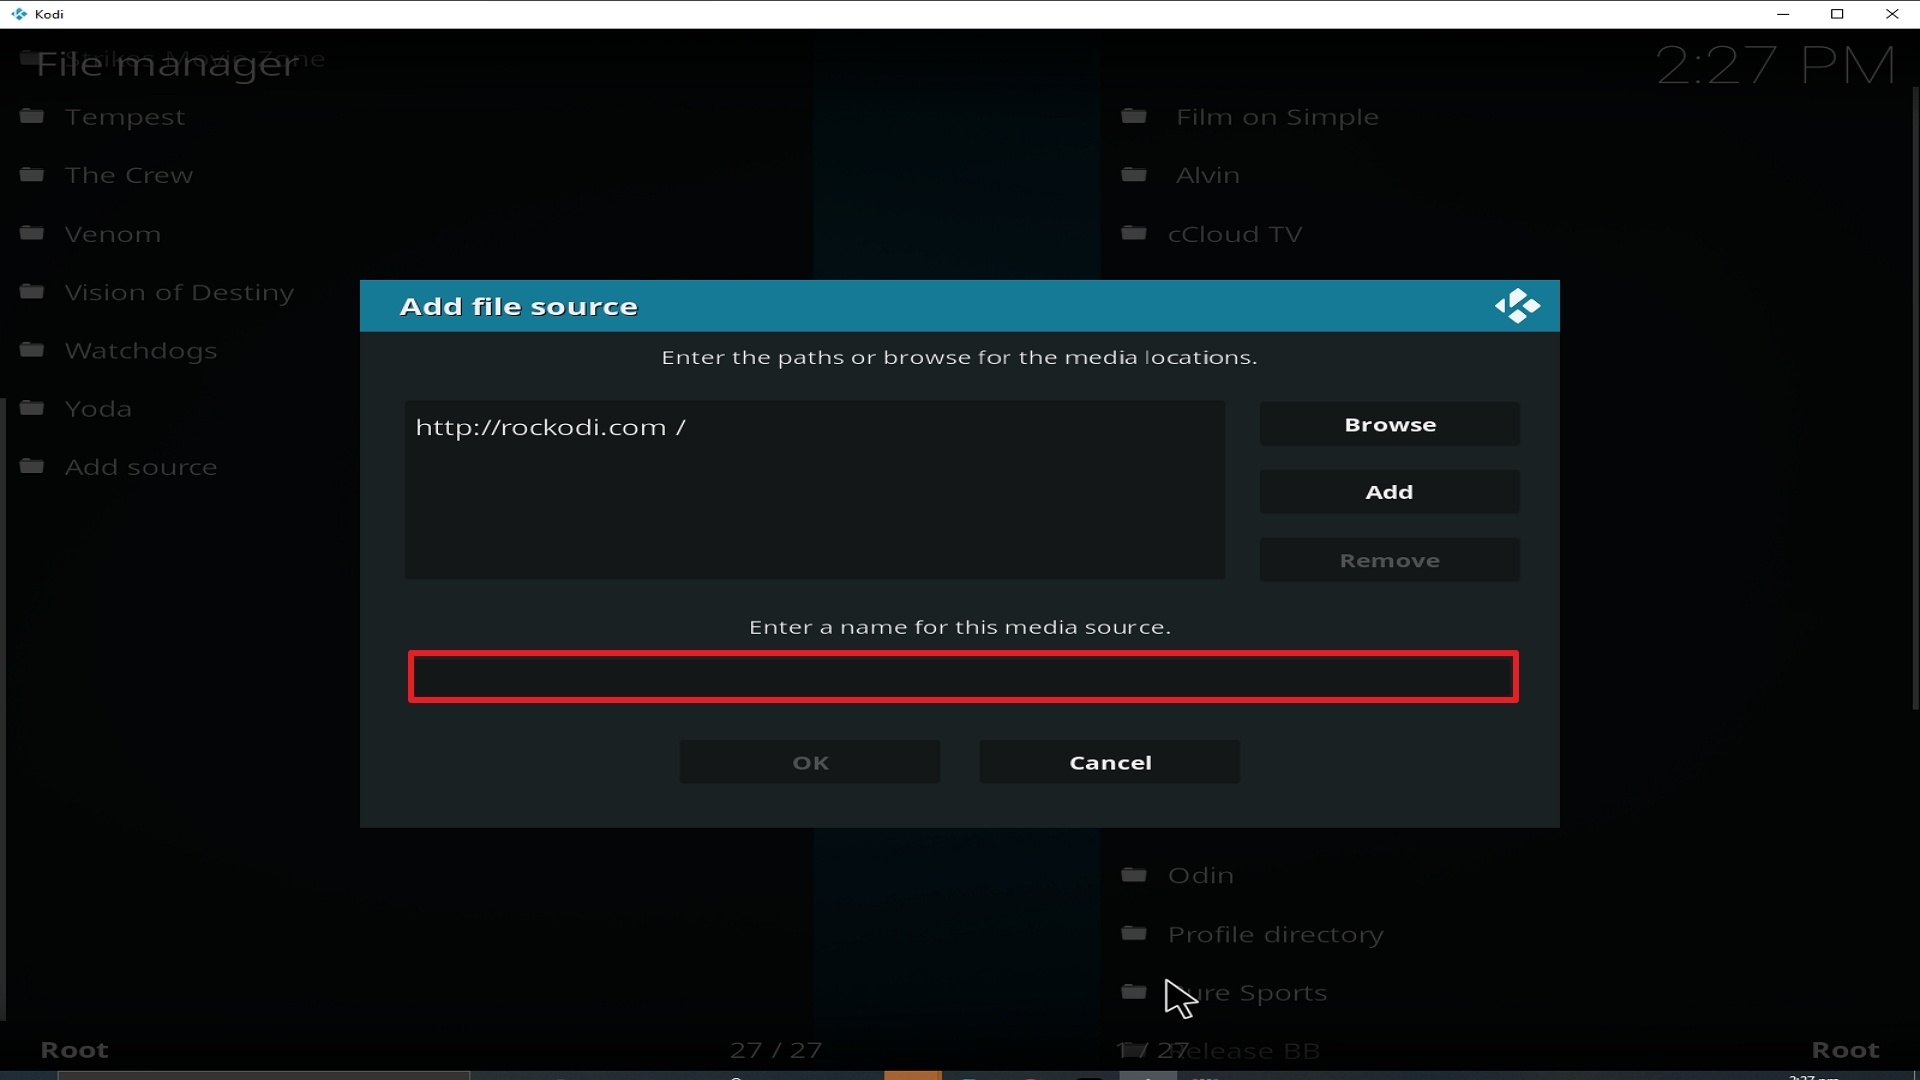
Step 11 Installing Strikes Movie Zone addon on Kodi


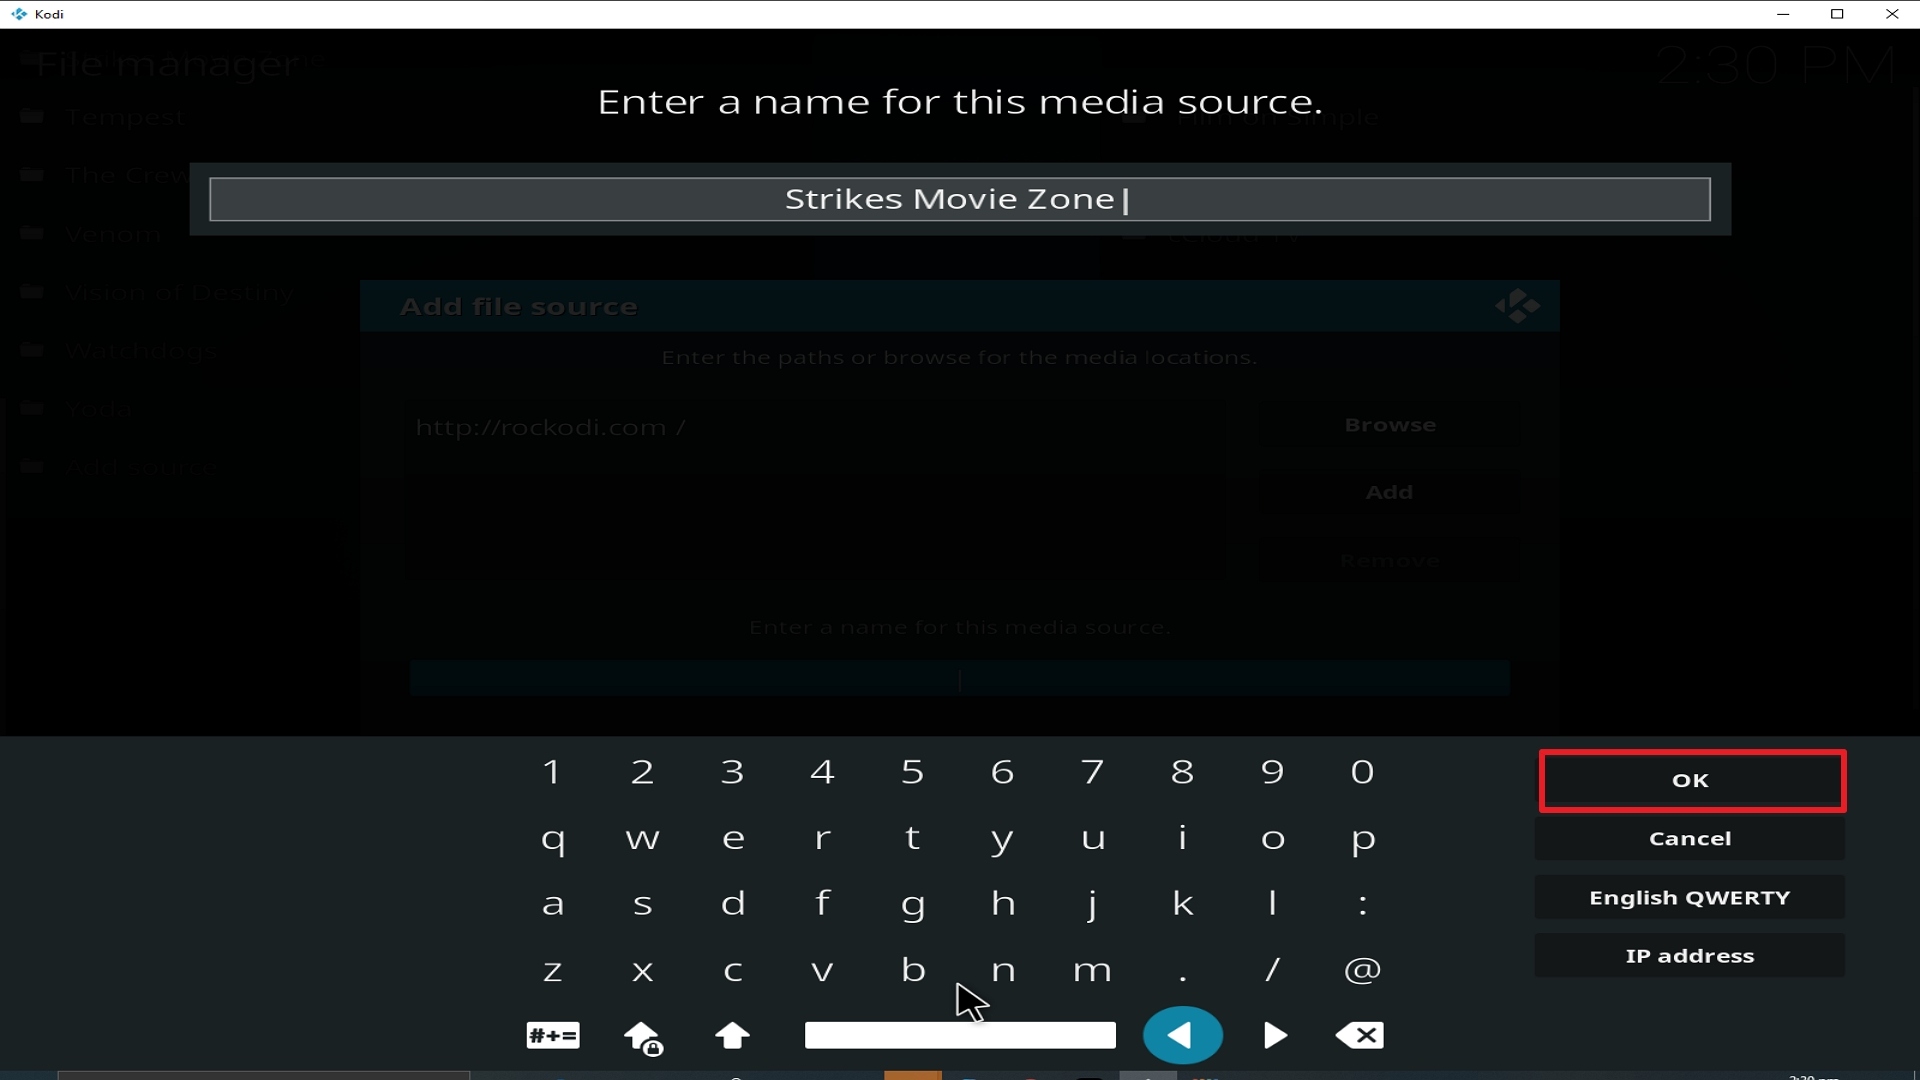
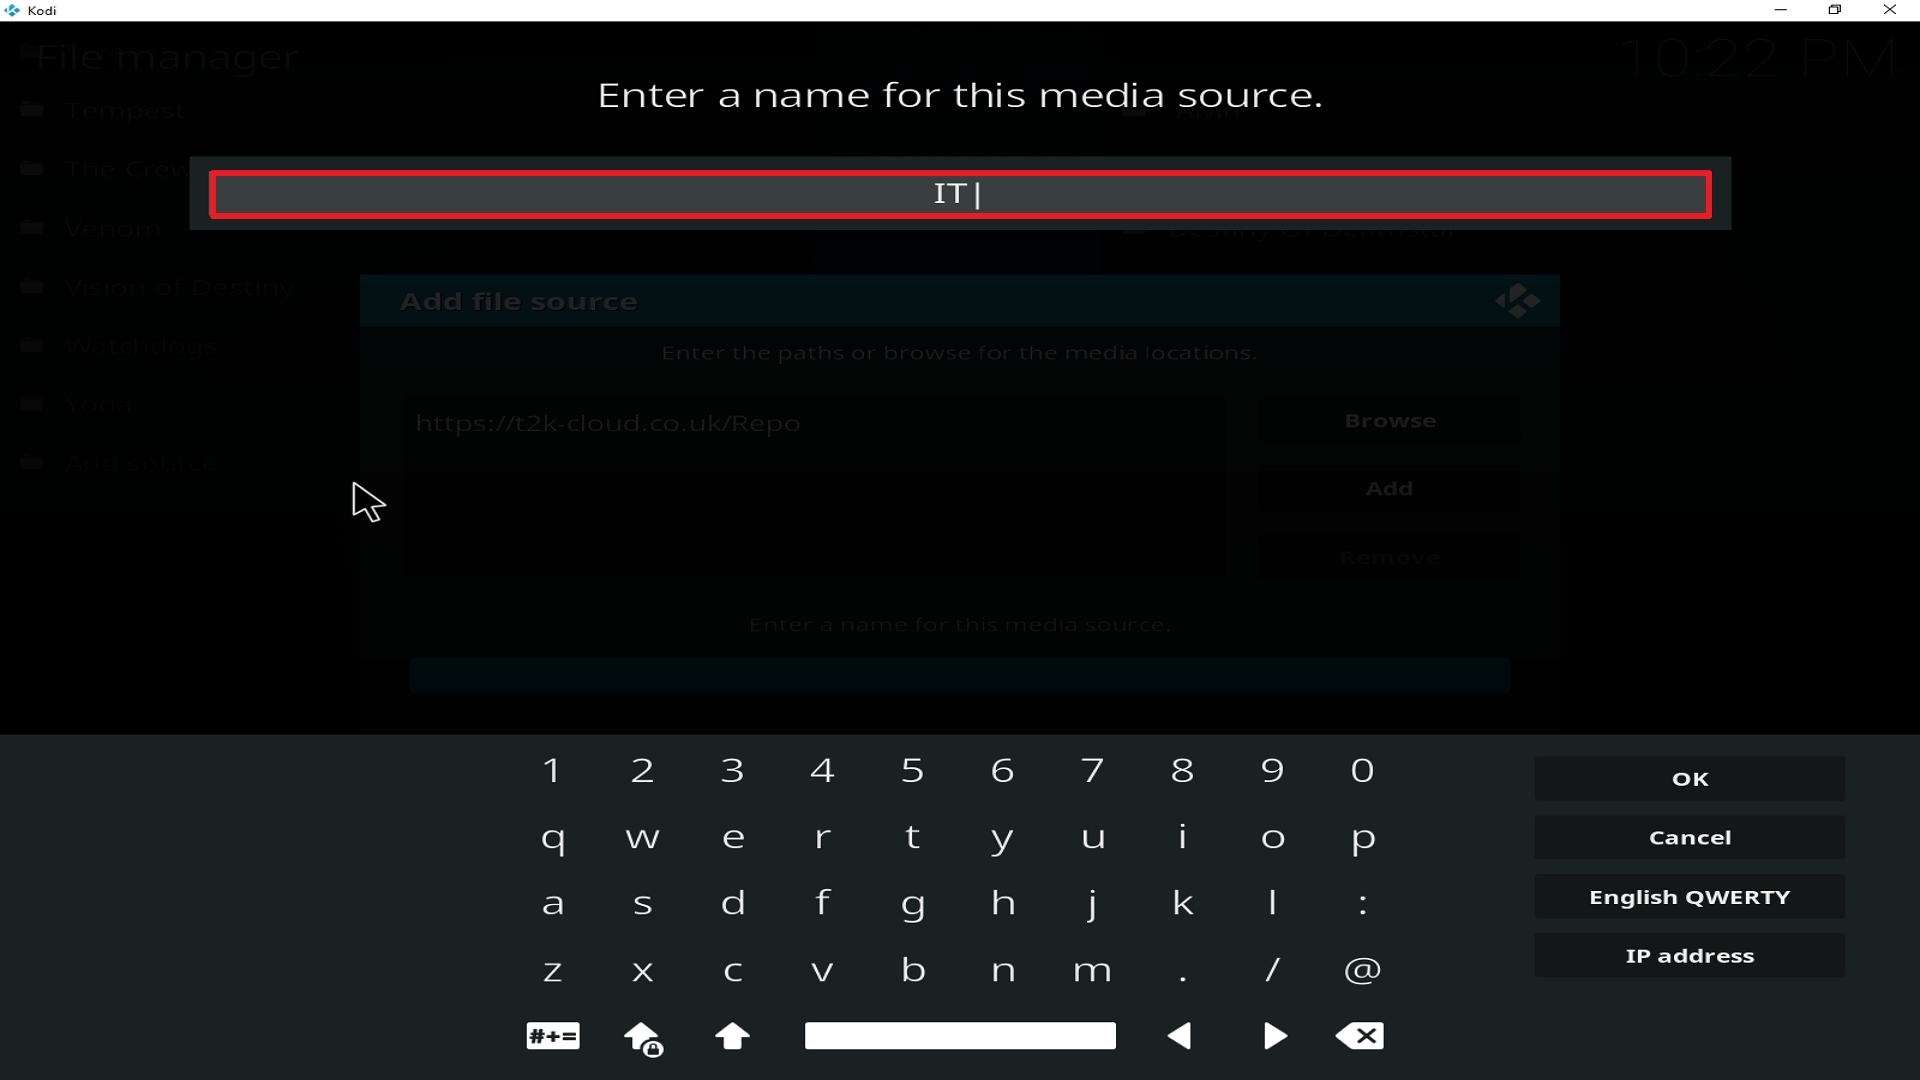
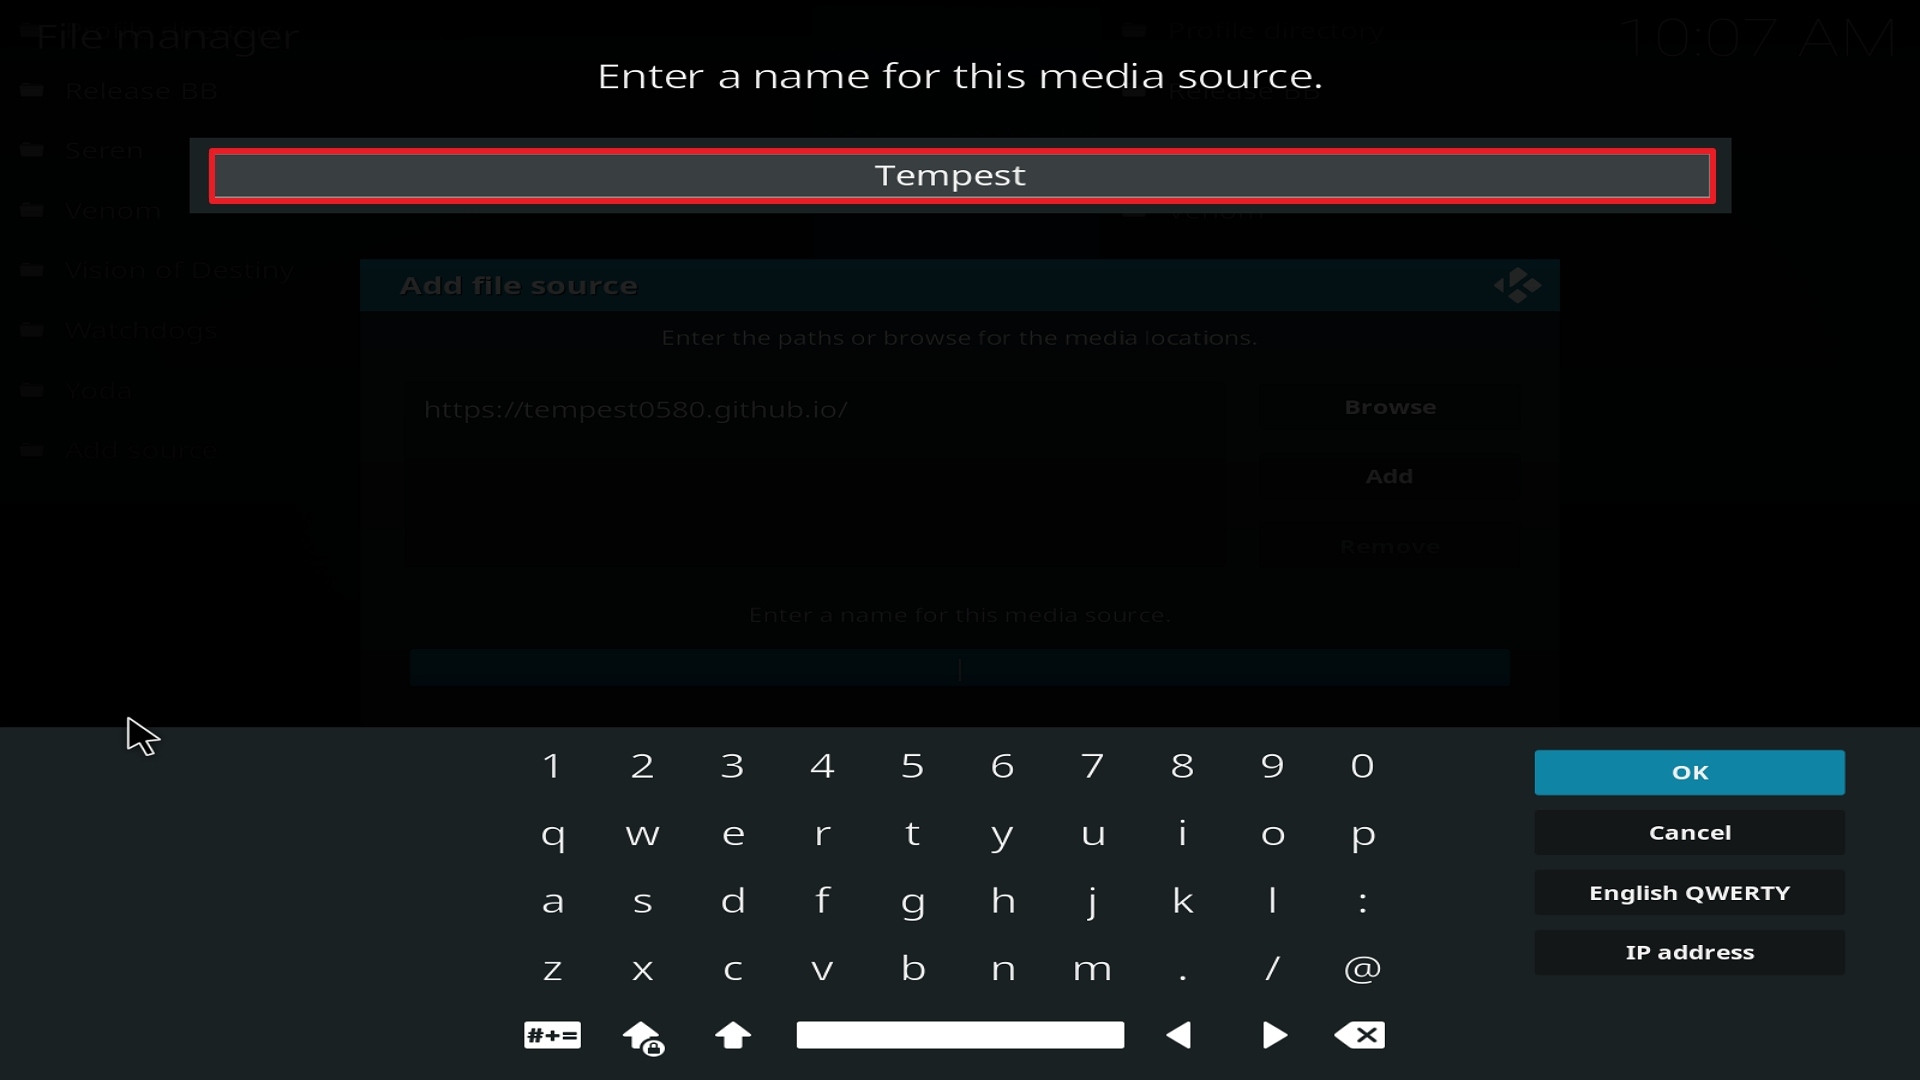
12. Name is Strikes Movie Zone (this part isn’t critical as long as you remember the name).
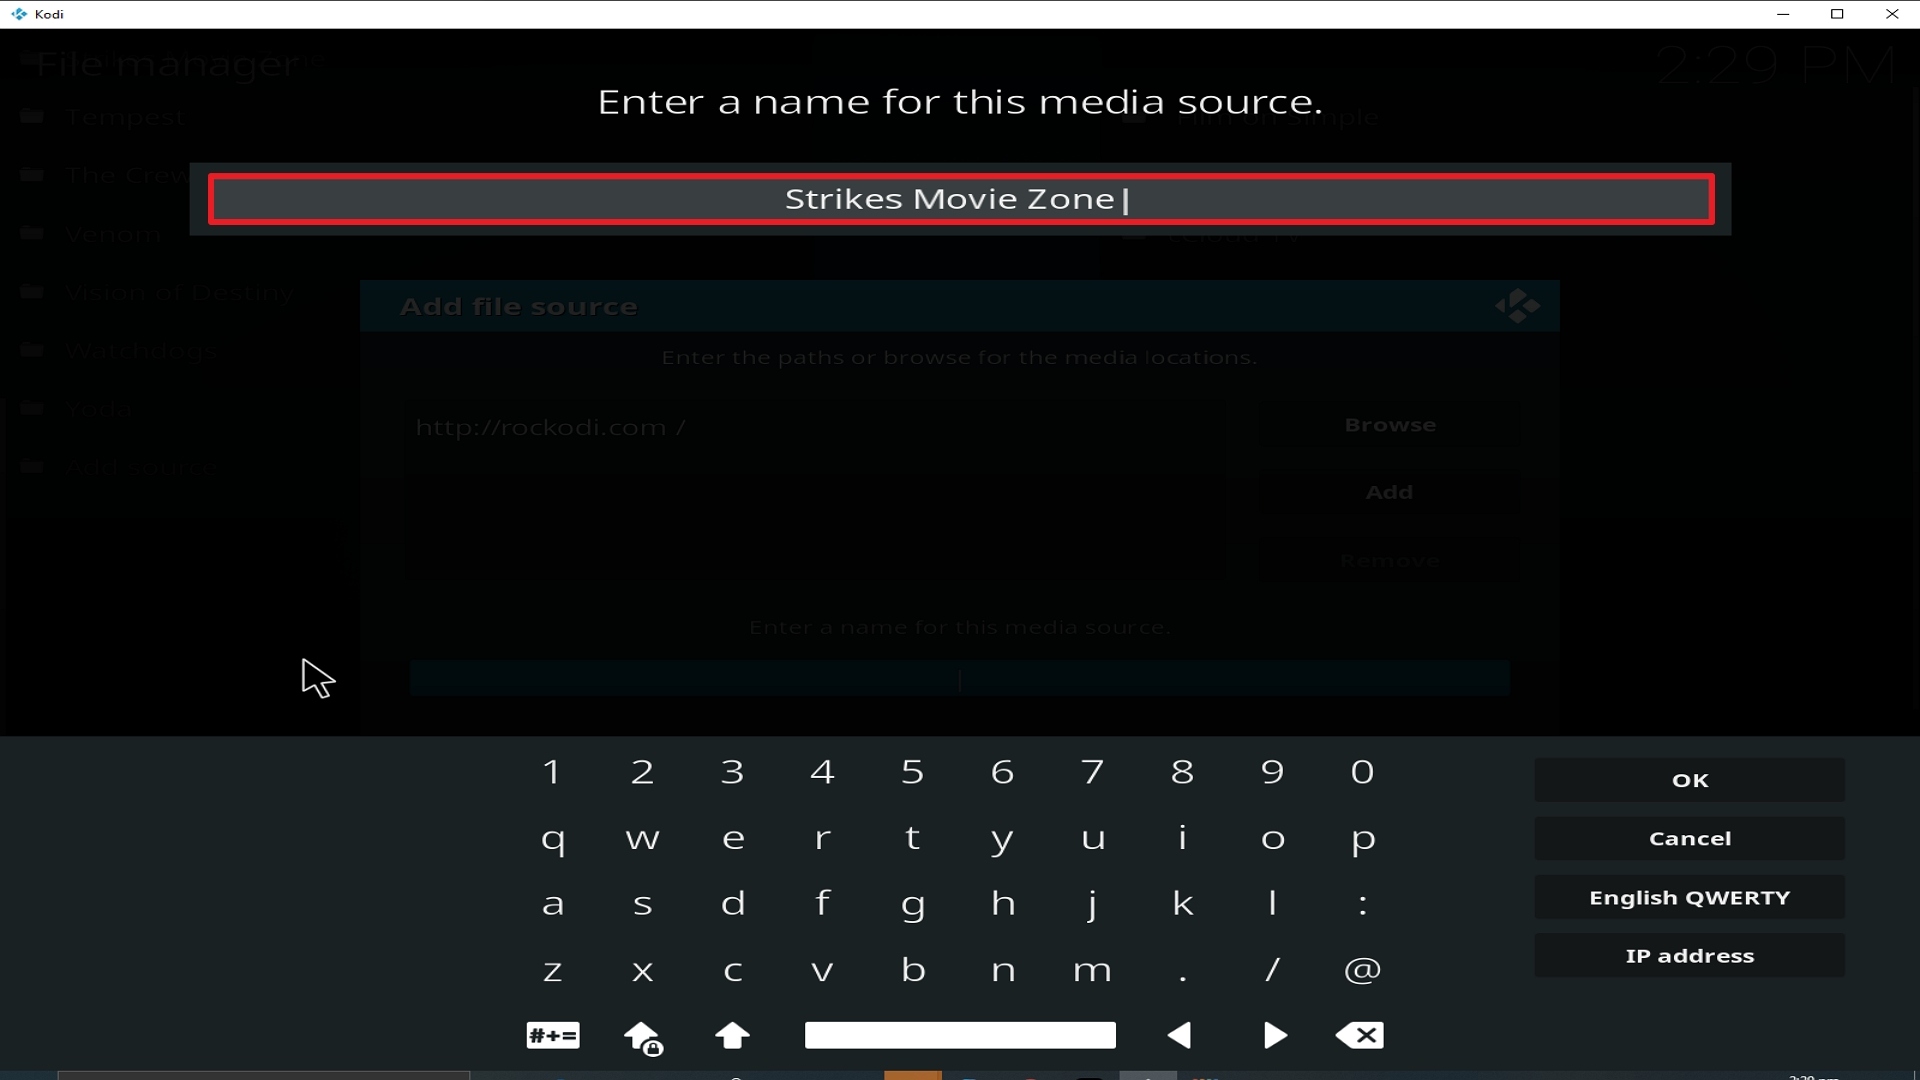
Step 12 Installing Strikes Movie Zone addon on Kodi


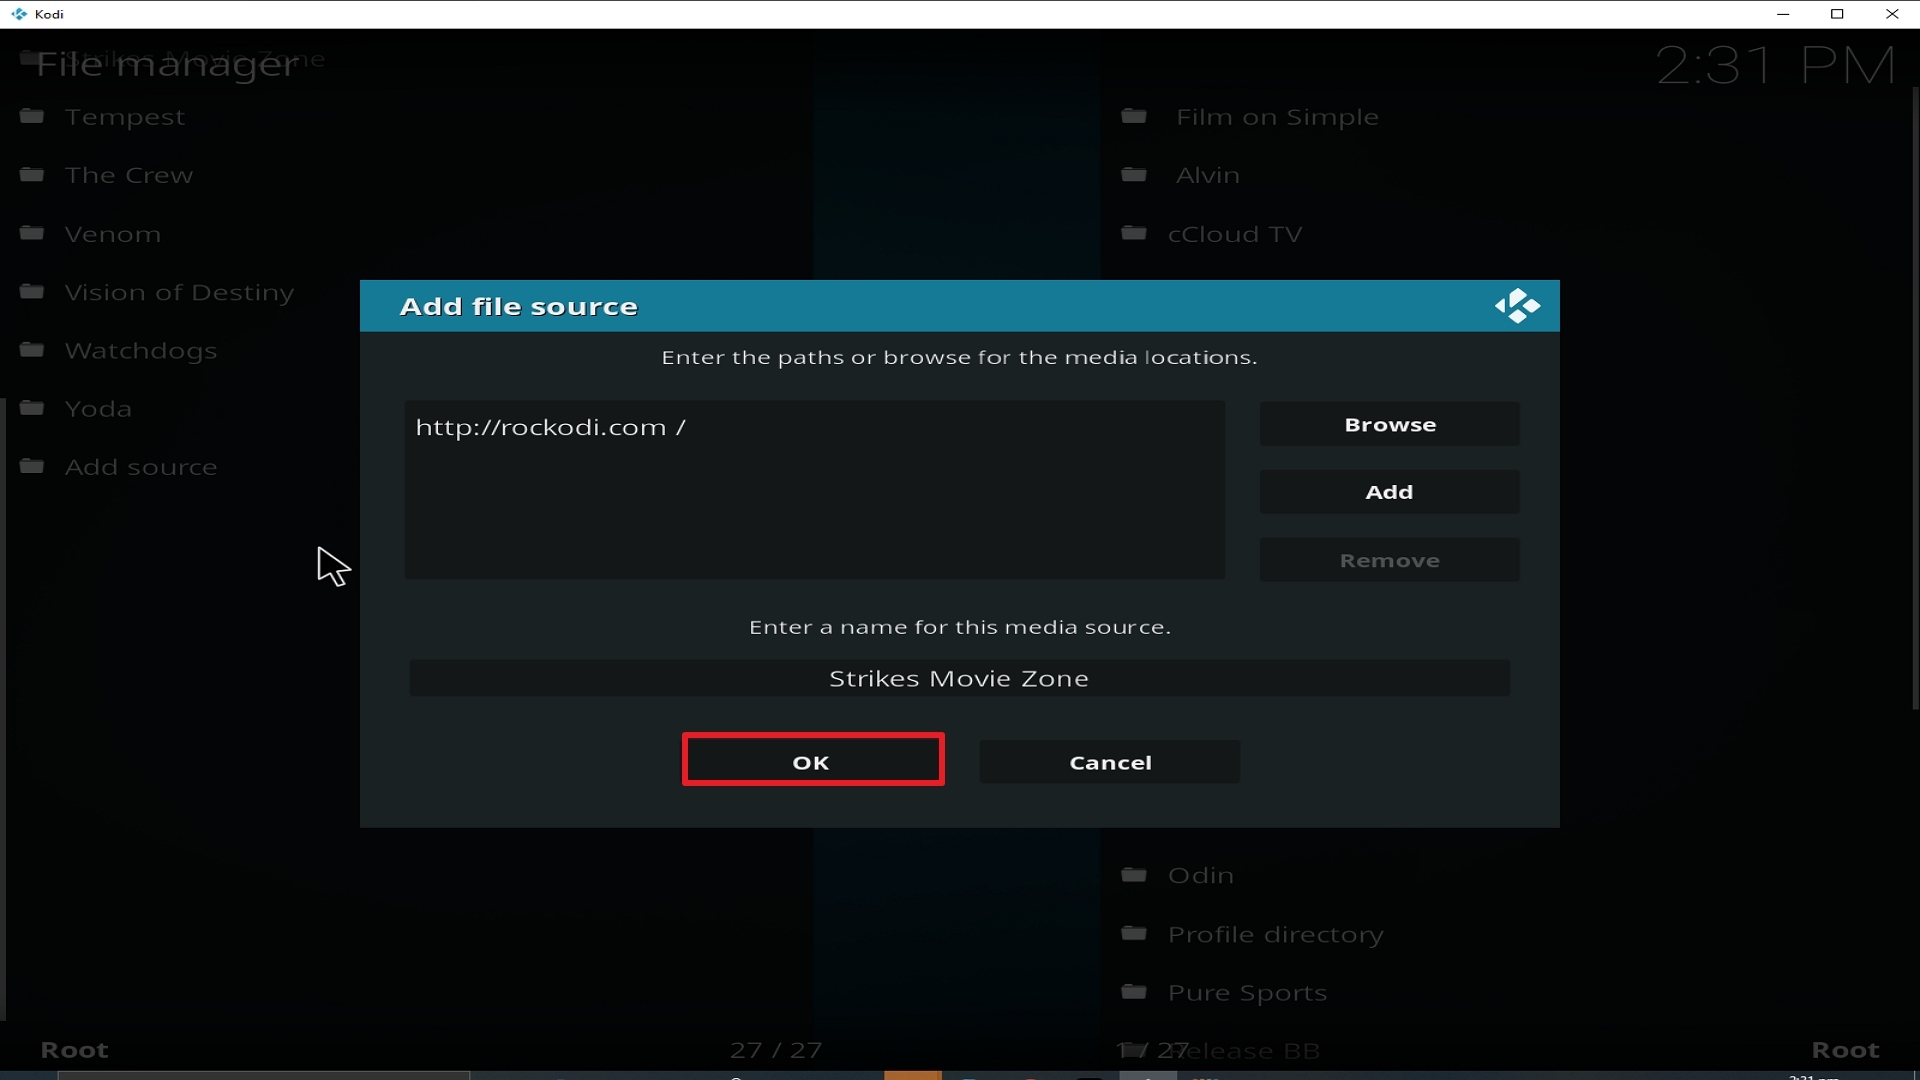
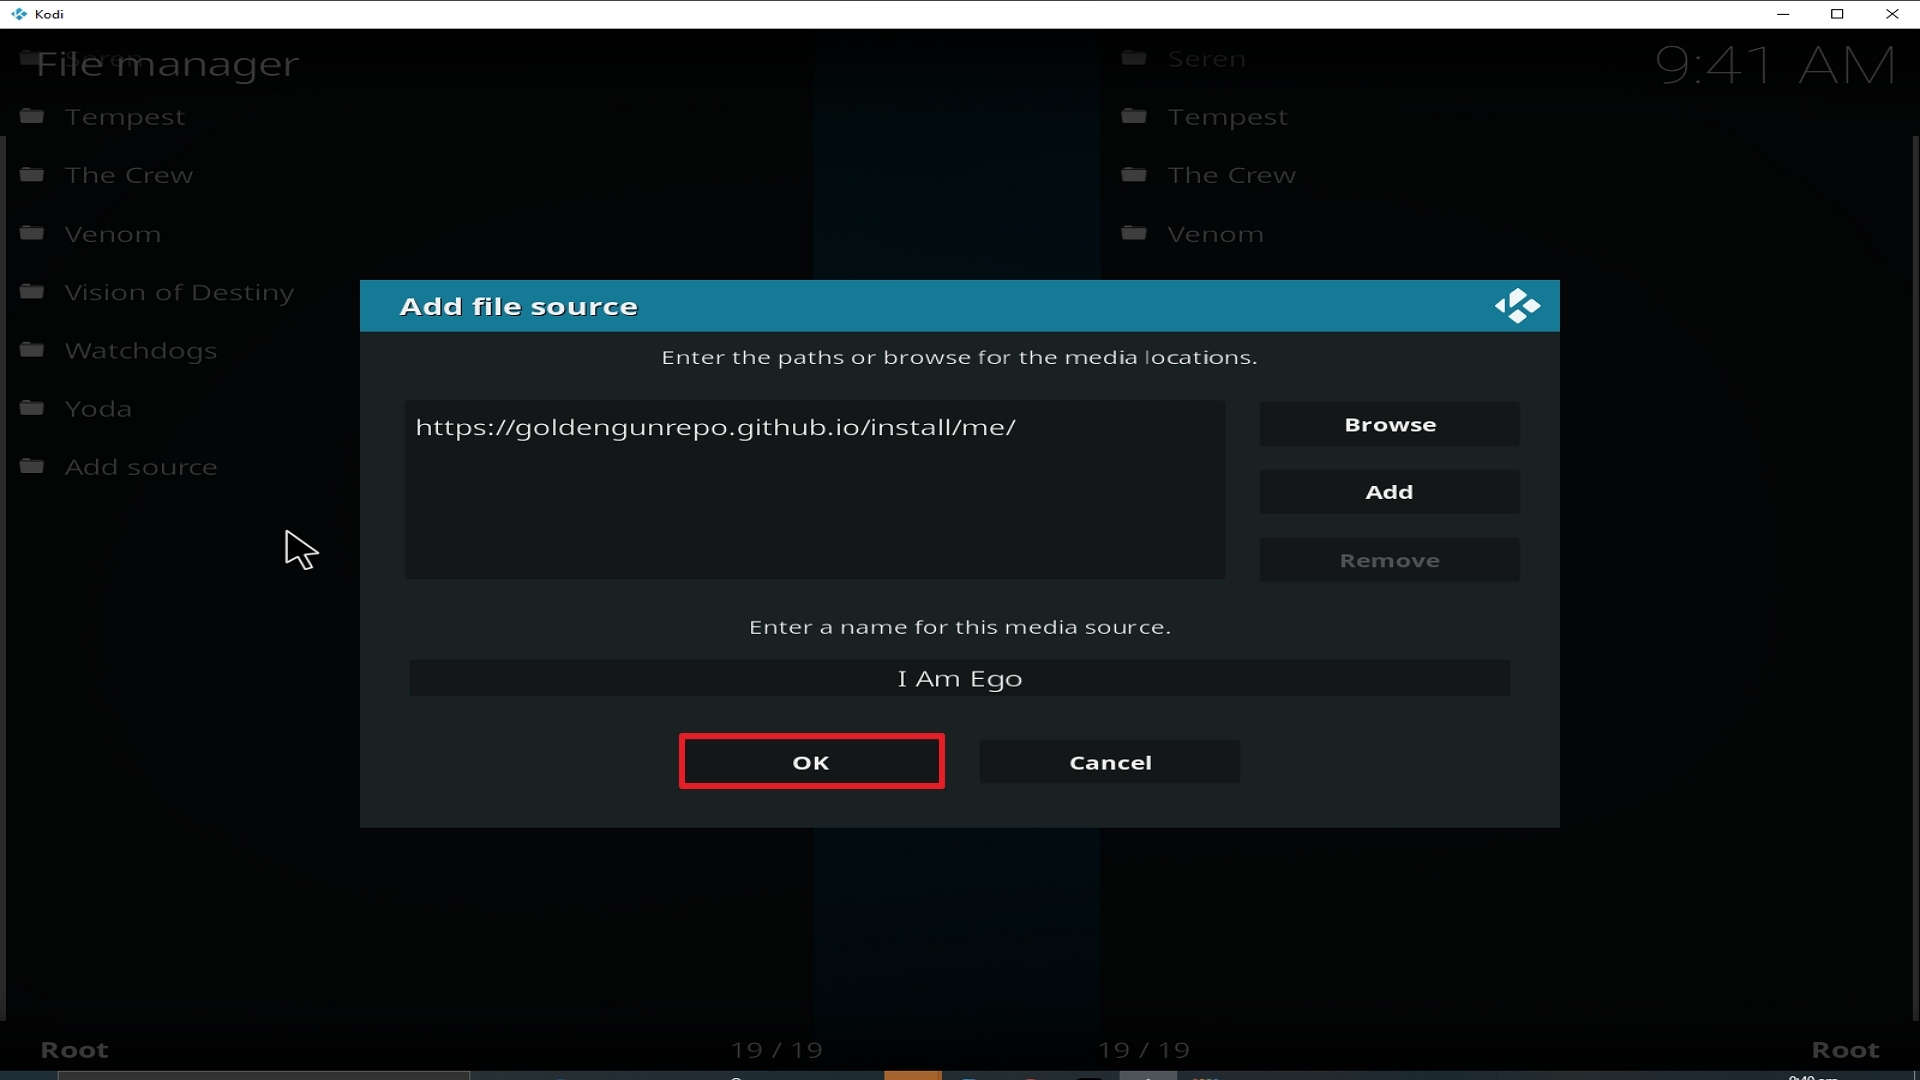
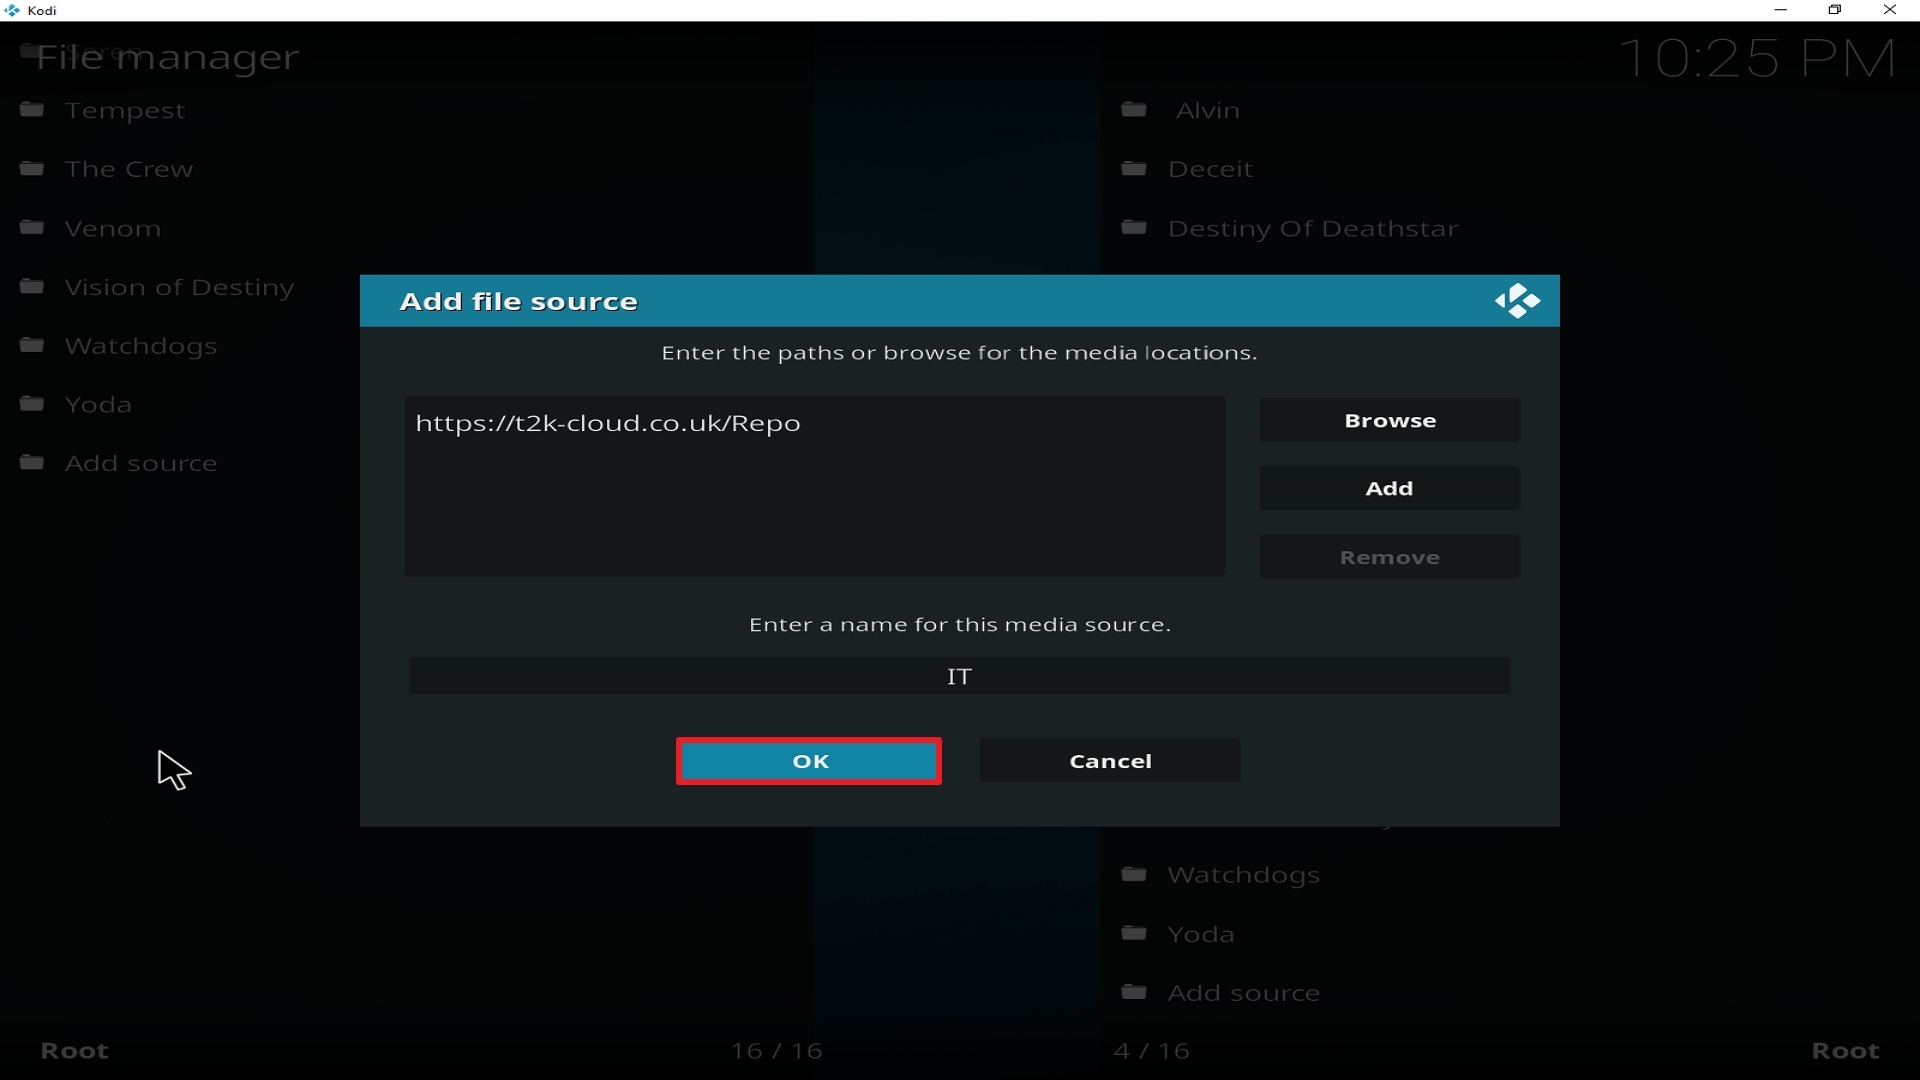
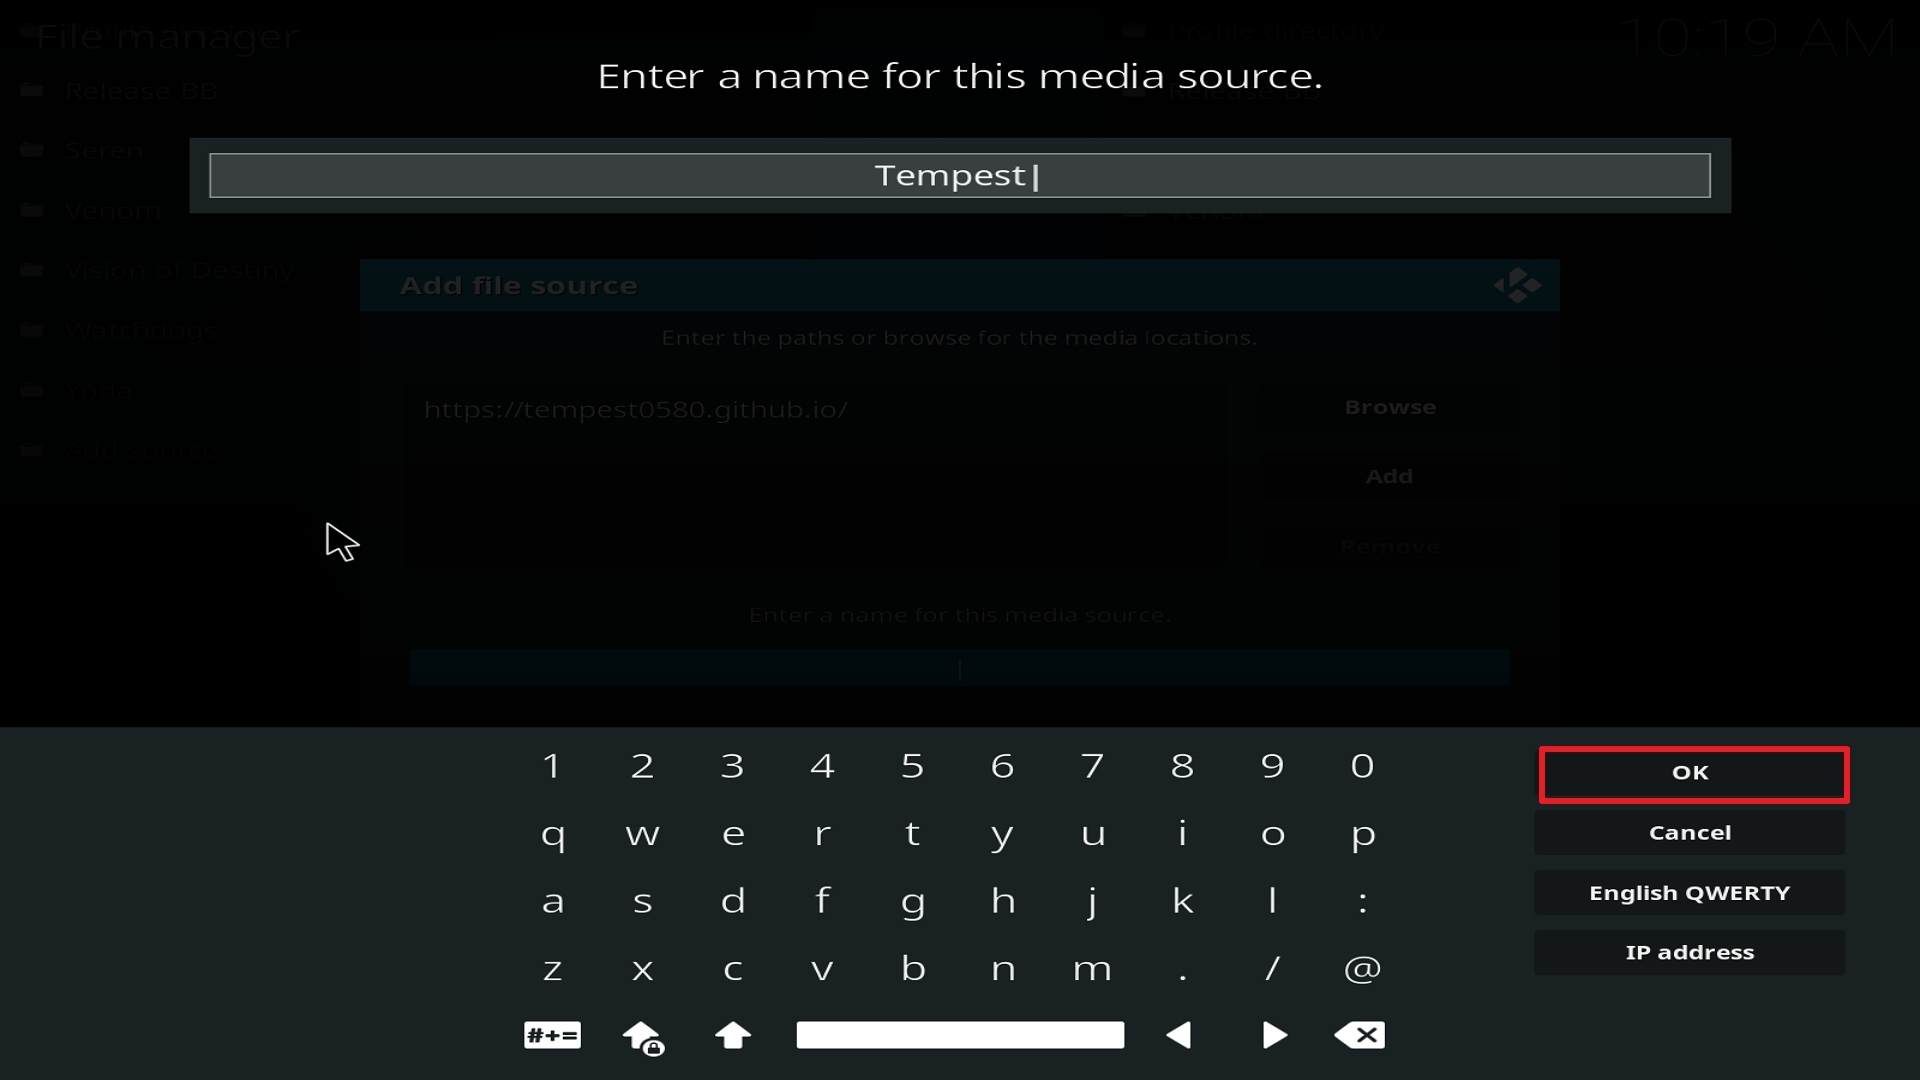
13. Click on OK.

Step 13 Installing Strikes Movie Zone addon on Kodi


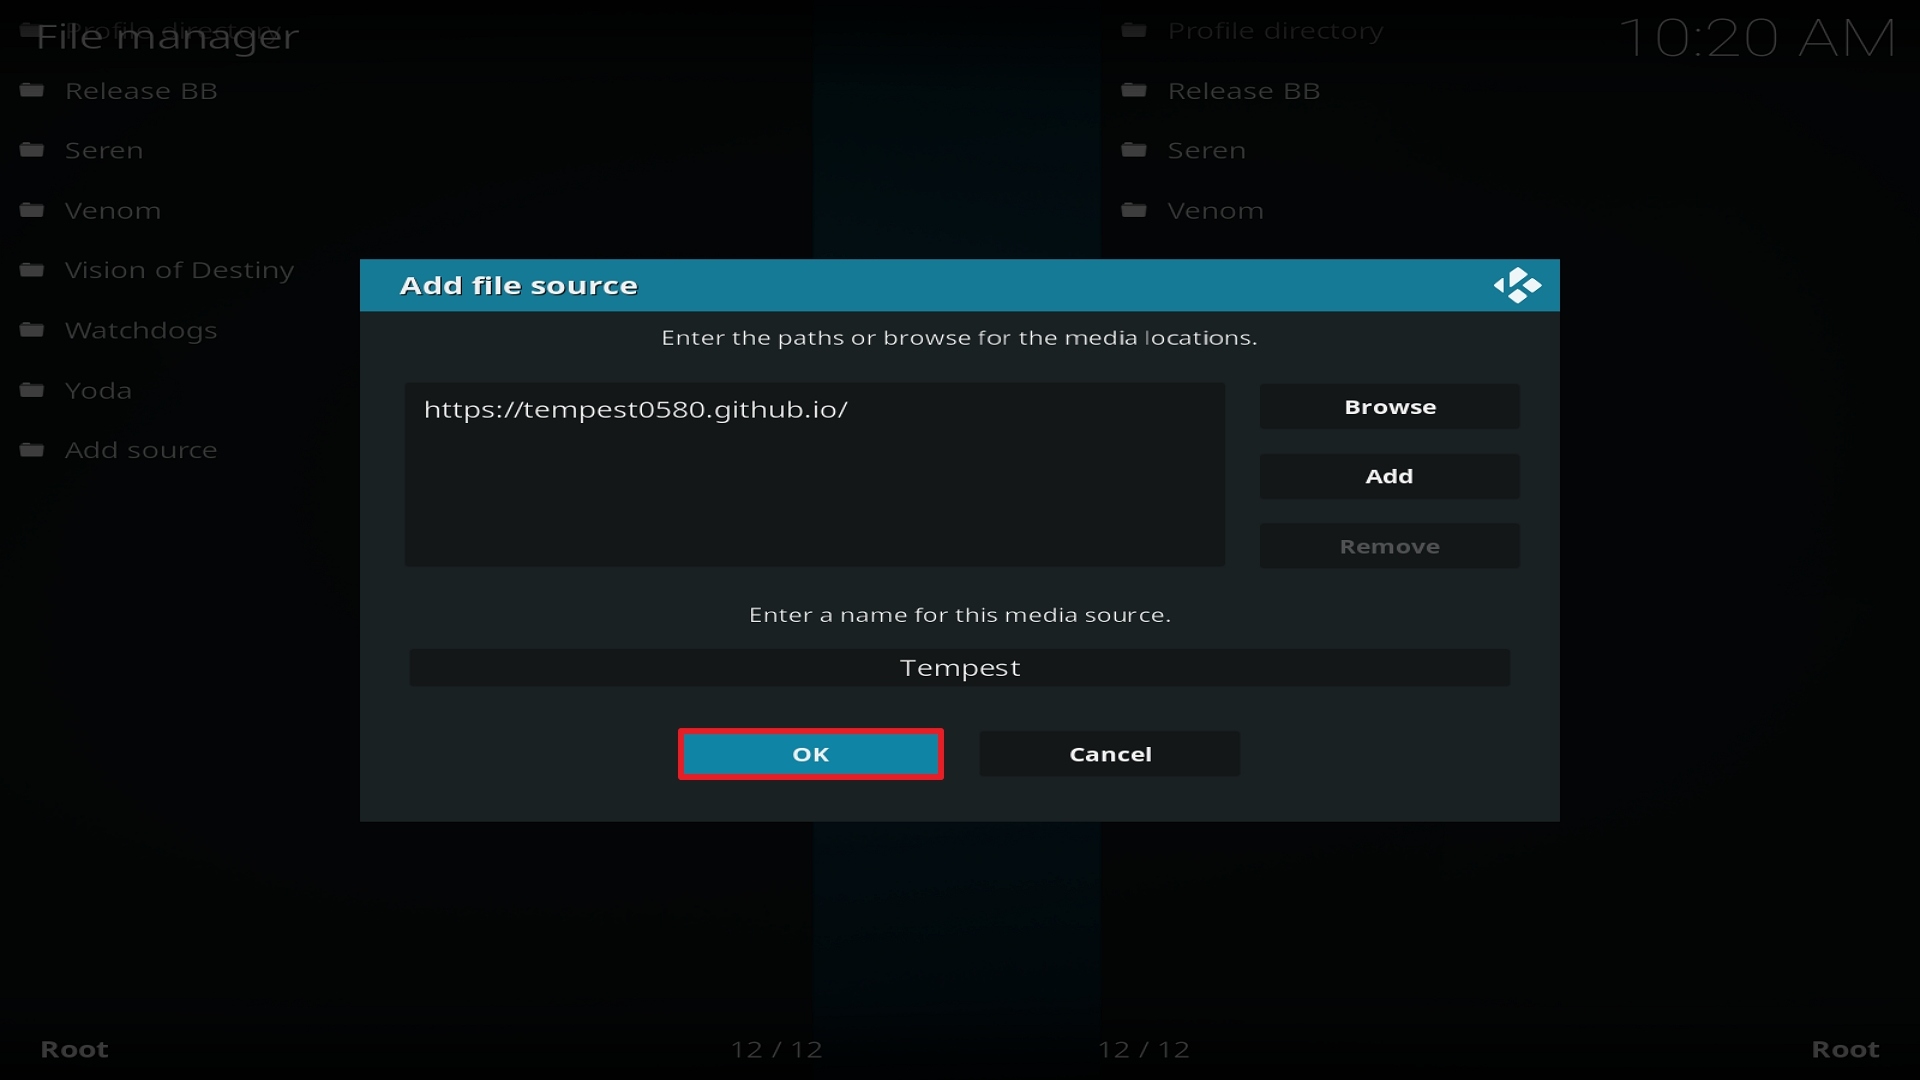
14. Click on OK.

Step 14 Installing Strikes Movie Zone addon on Kodi


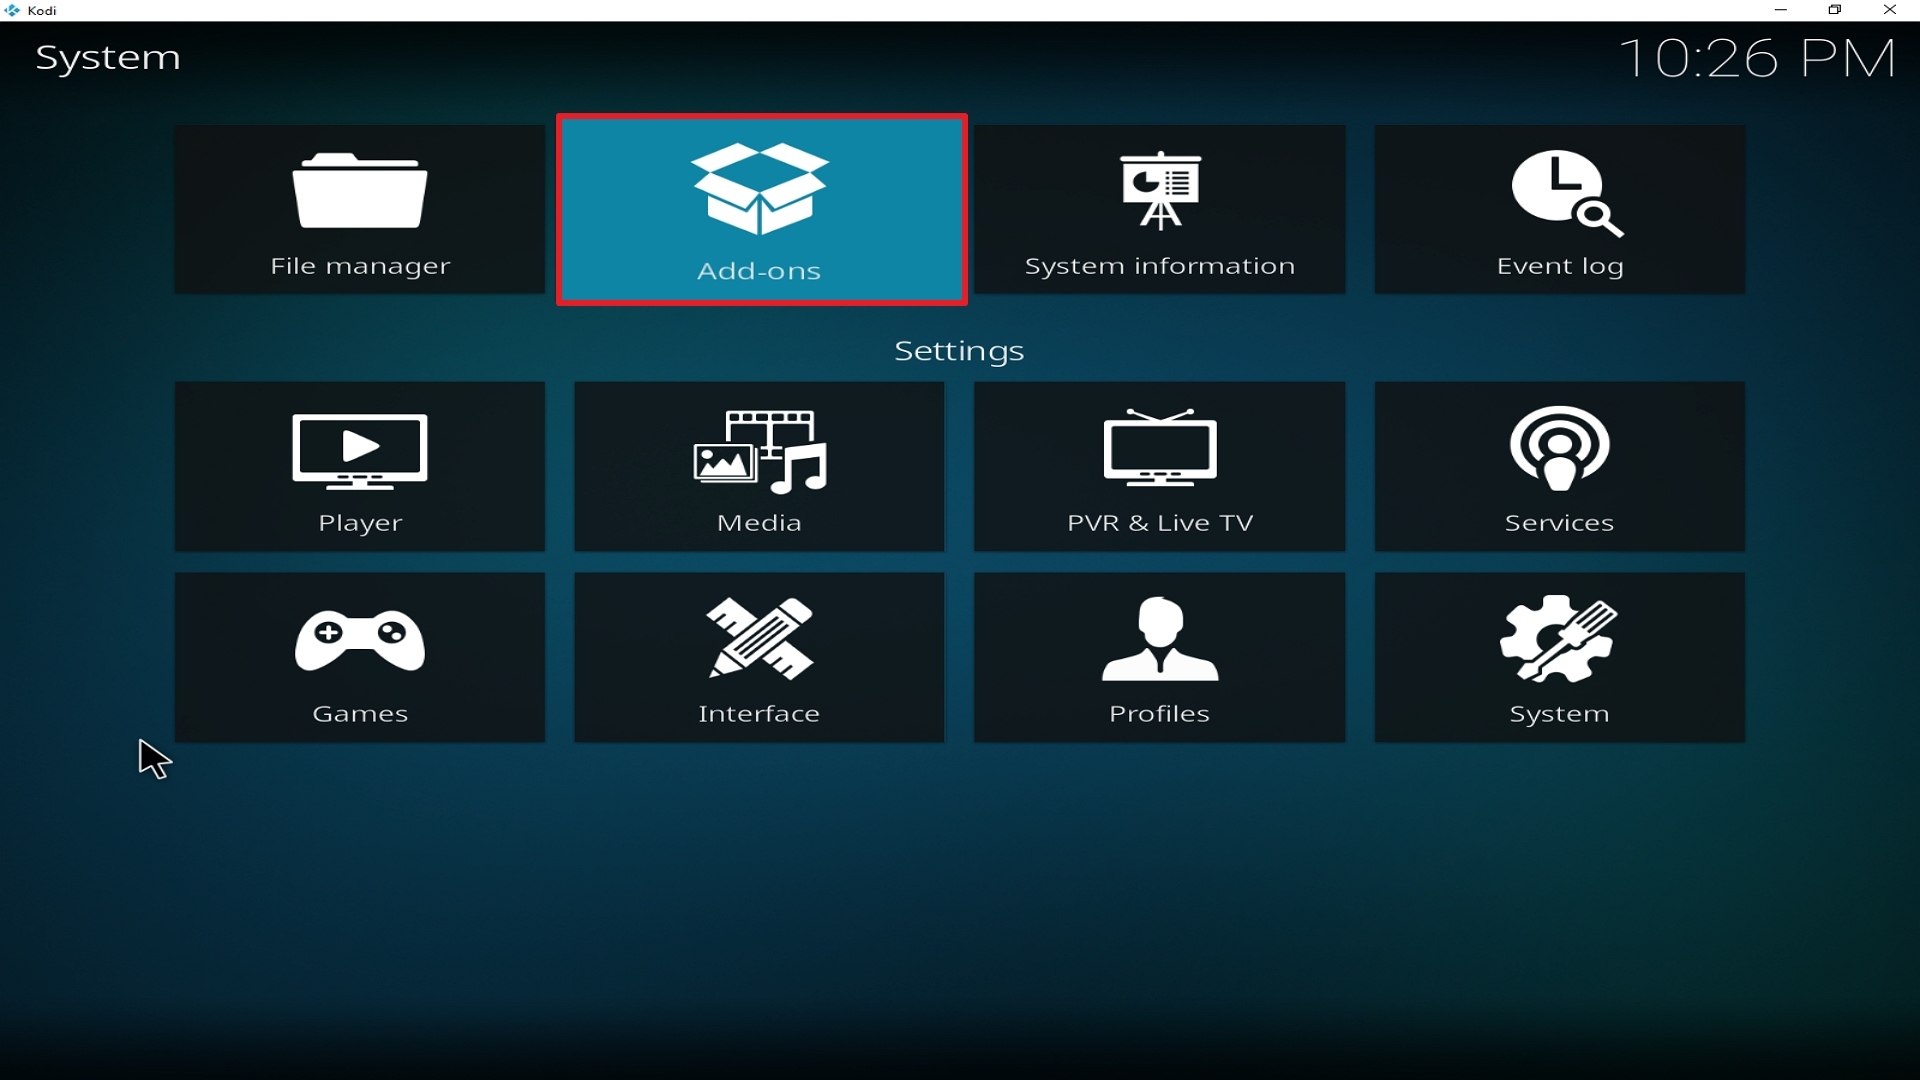
15. Take one step back and click on Add-ons.
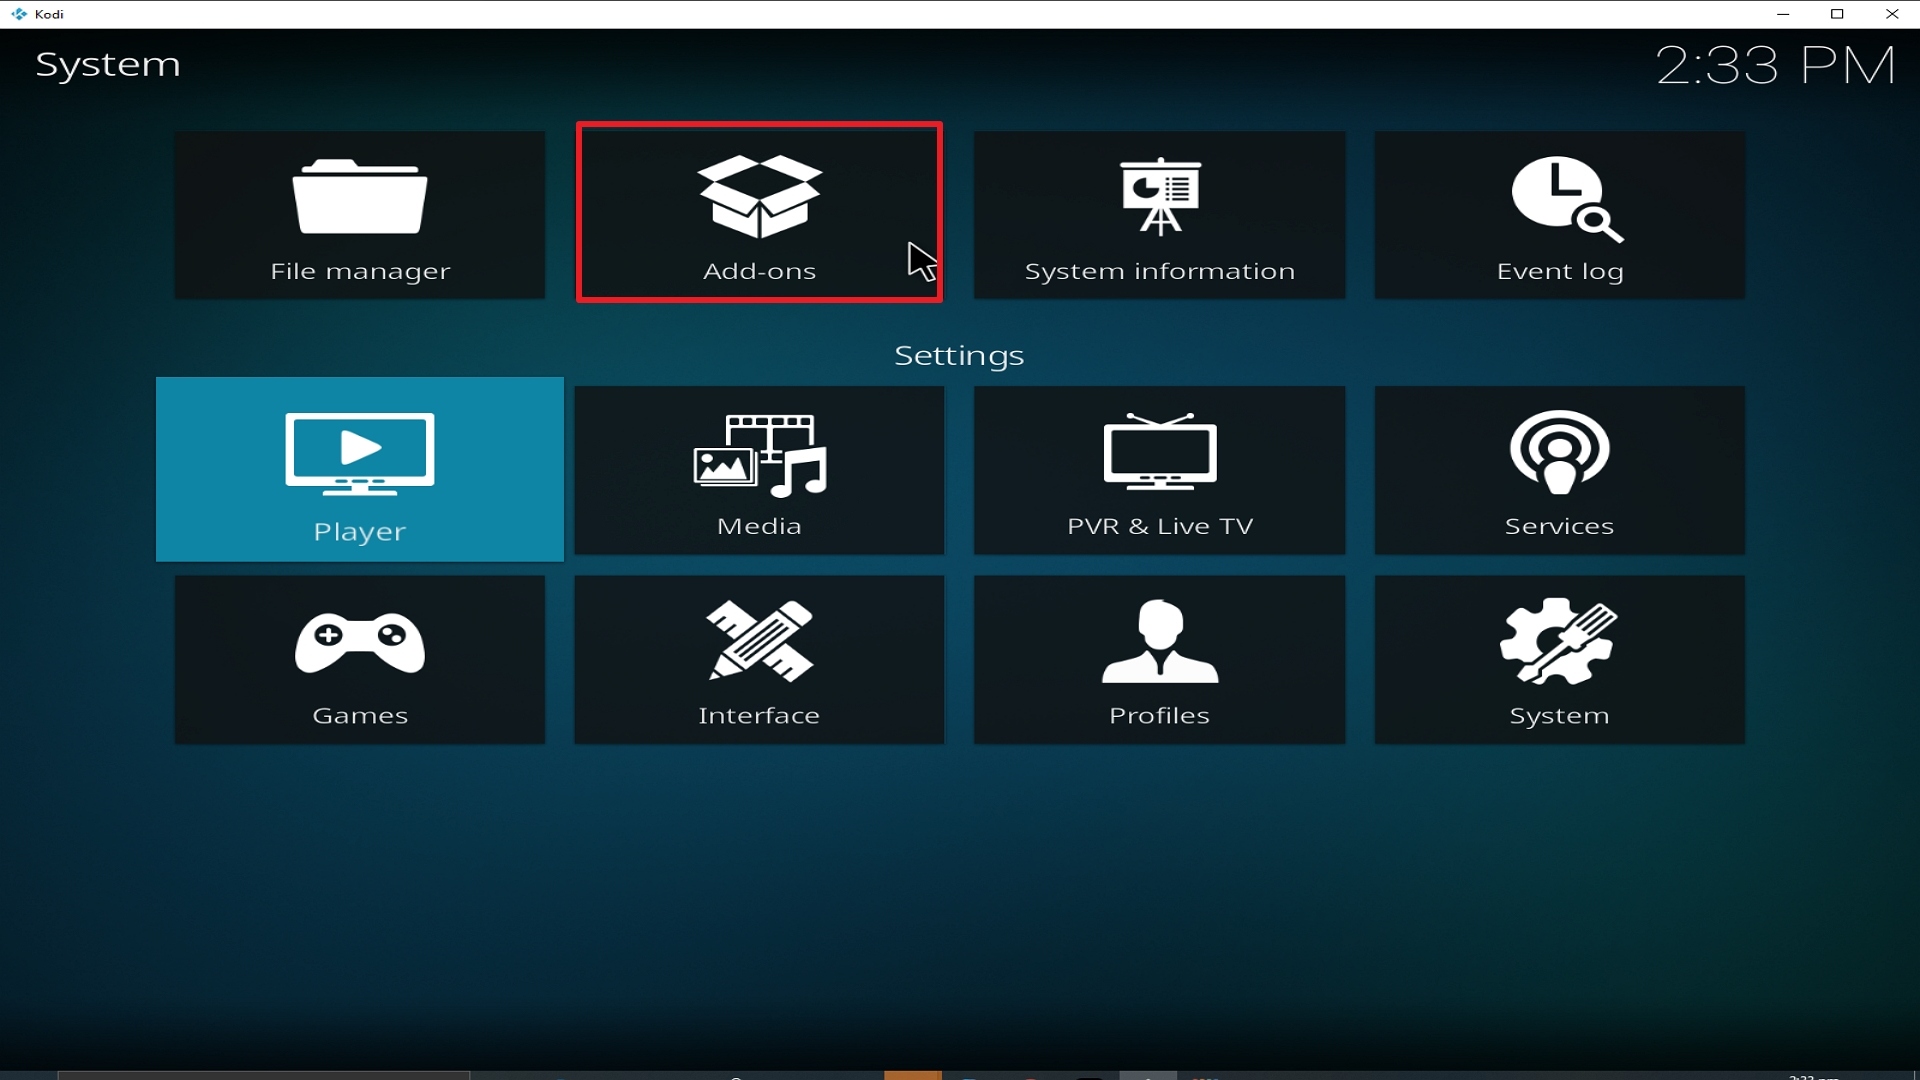
Step 15 Installing Strikes Movie Zone addon on Kodi


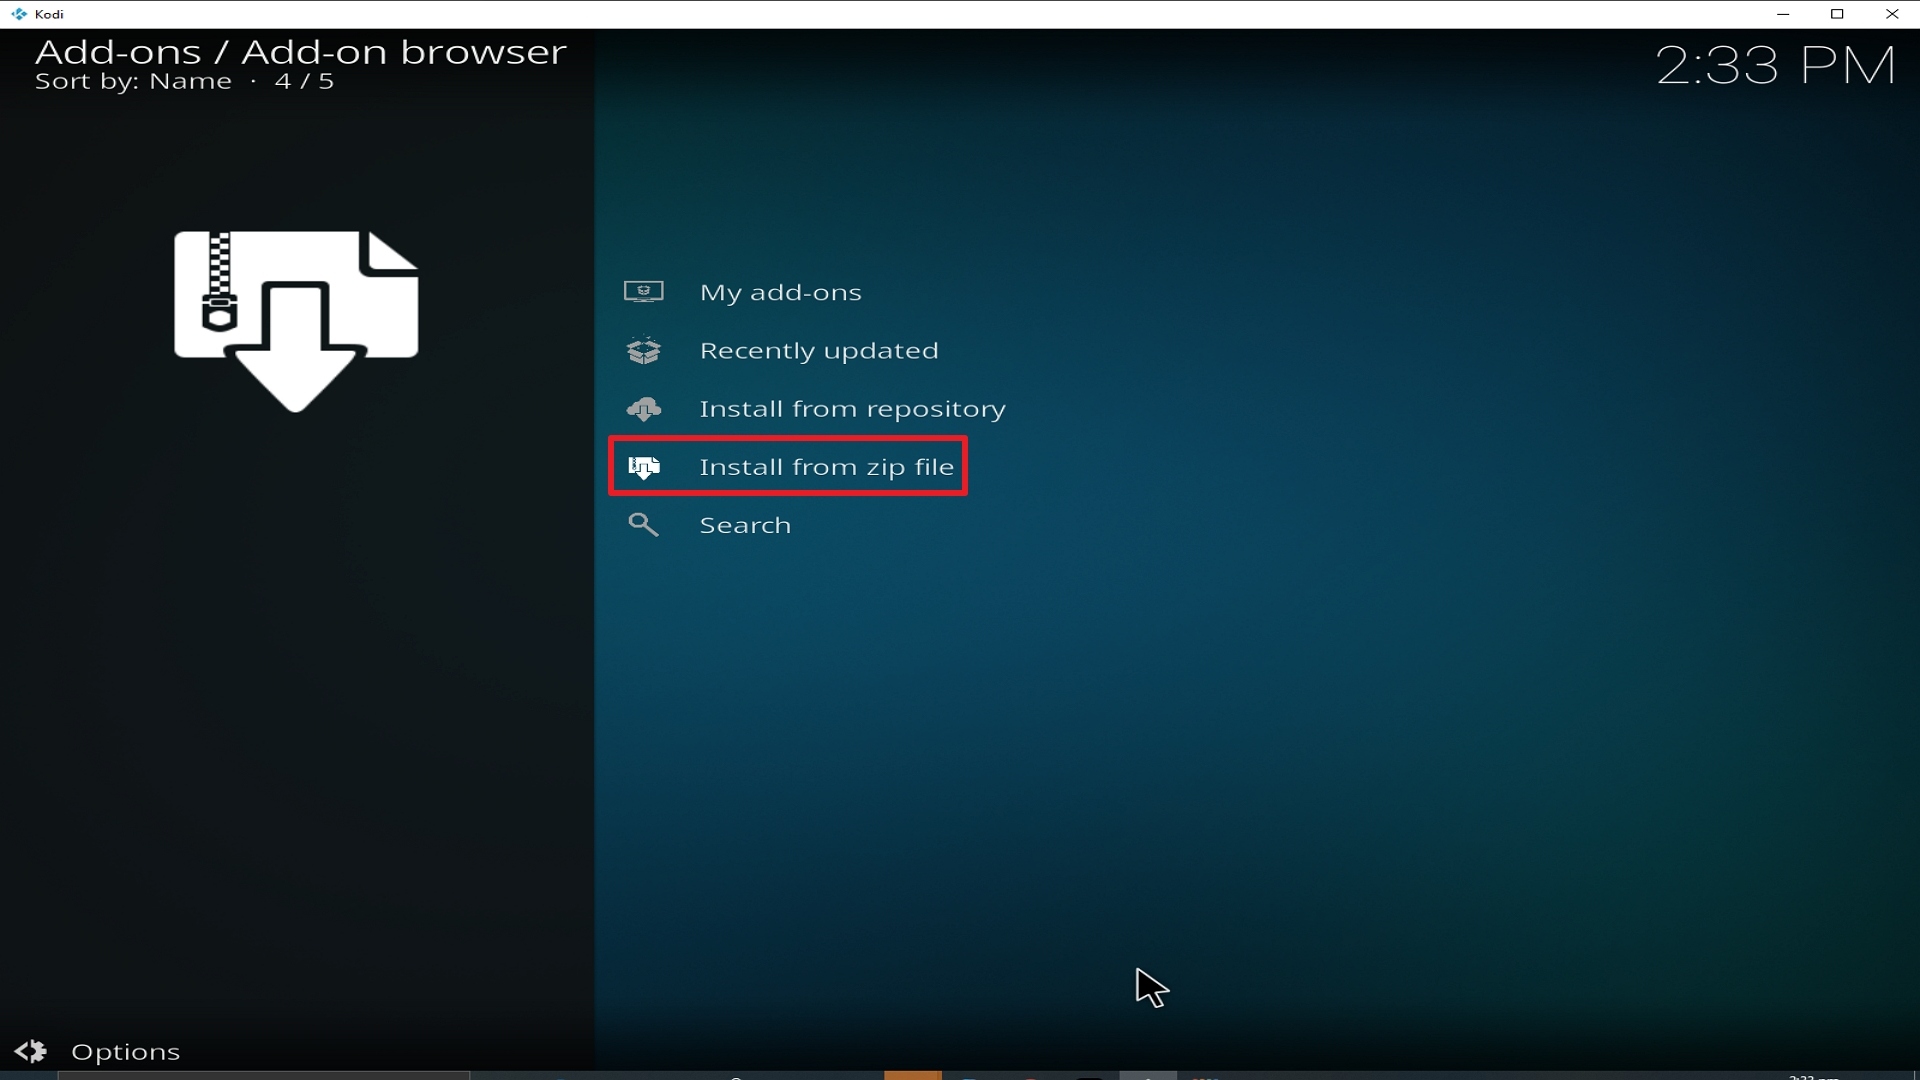
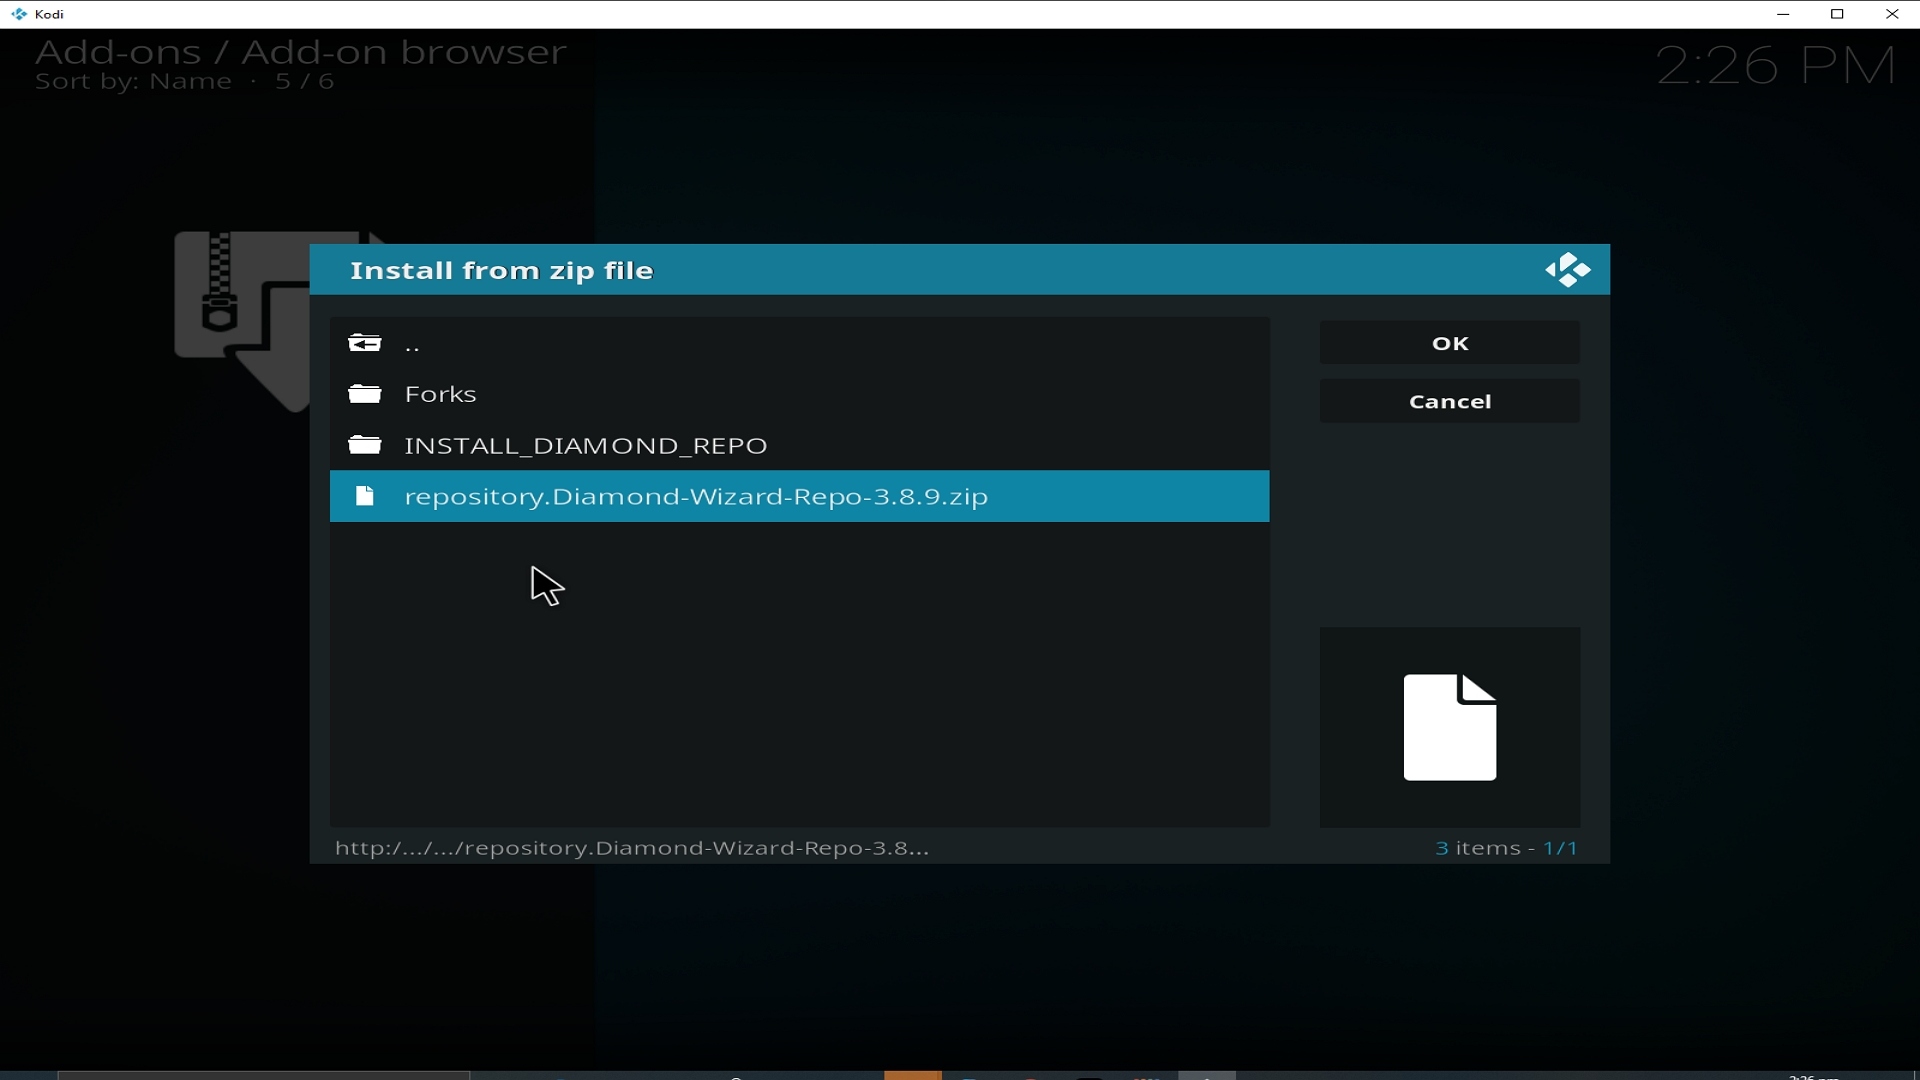
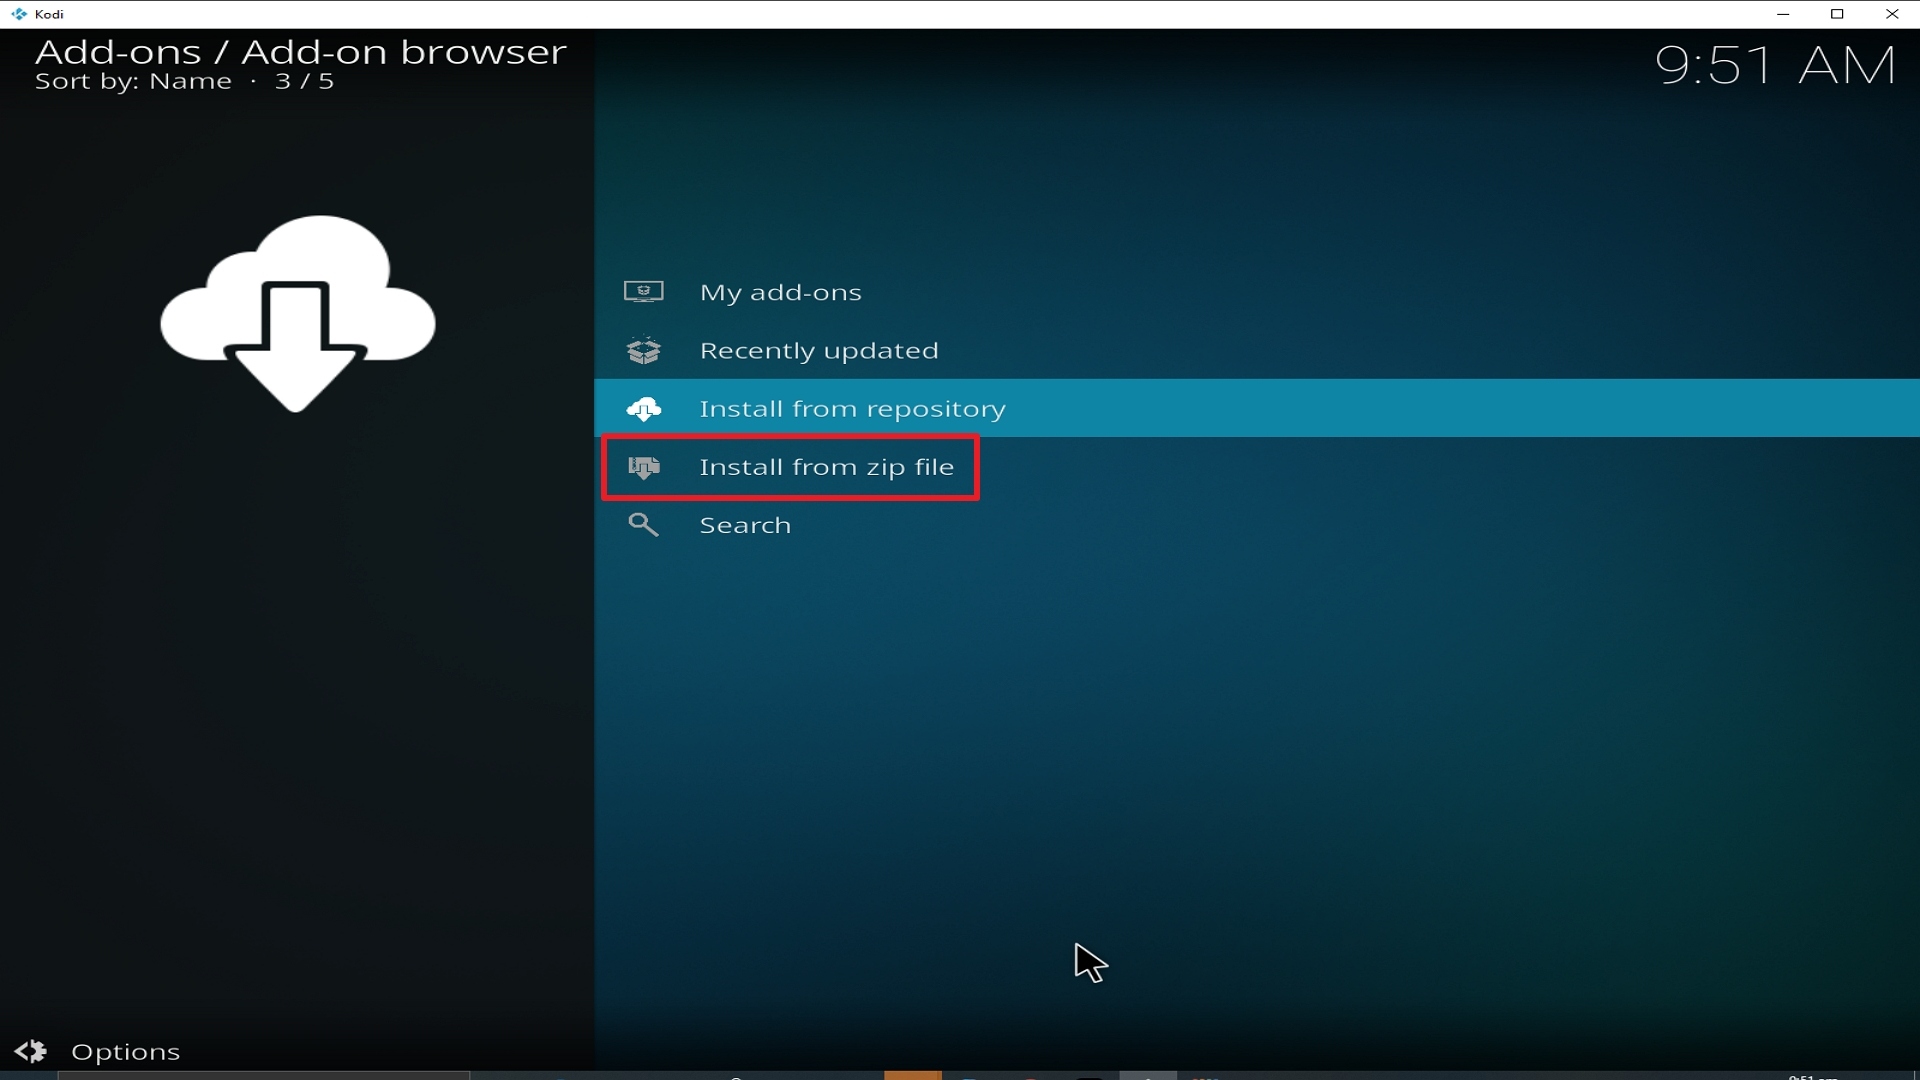
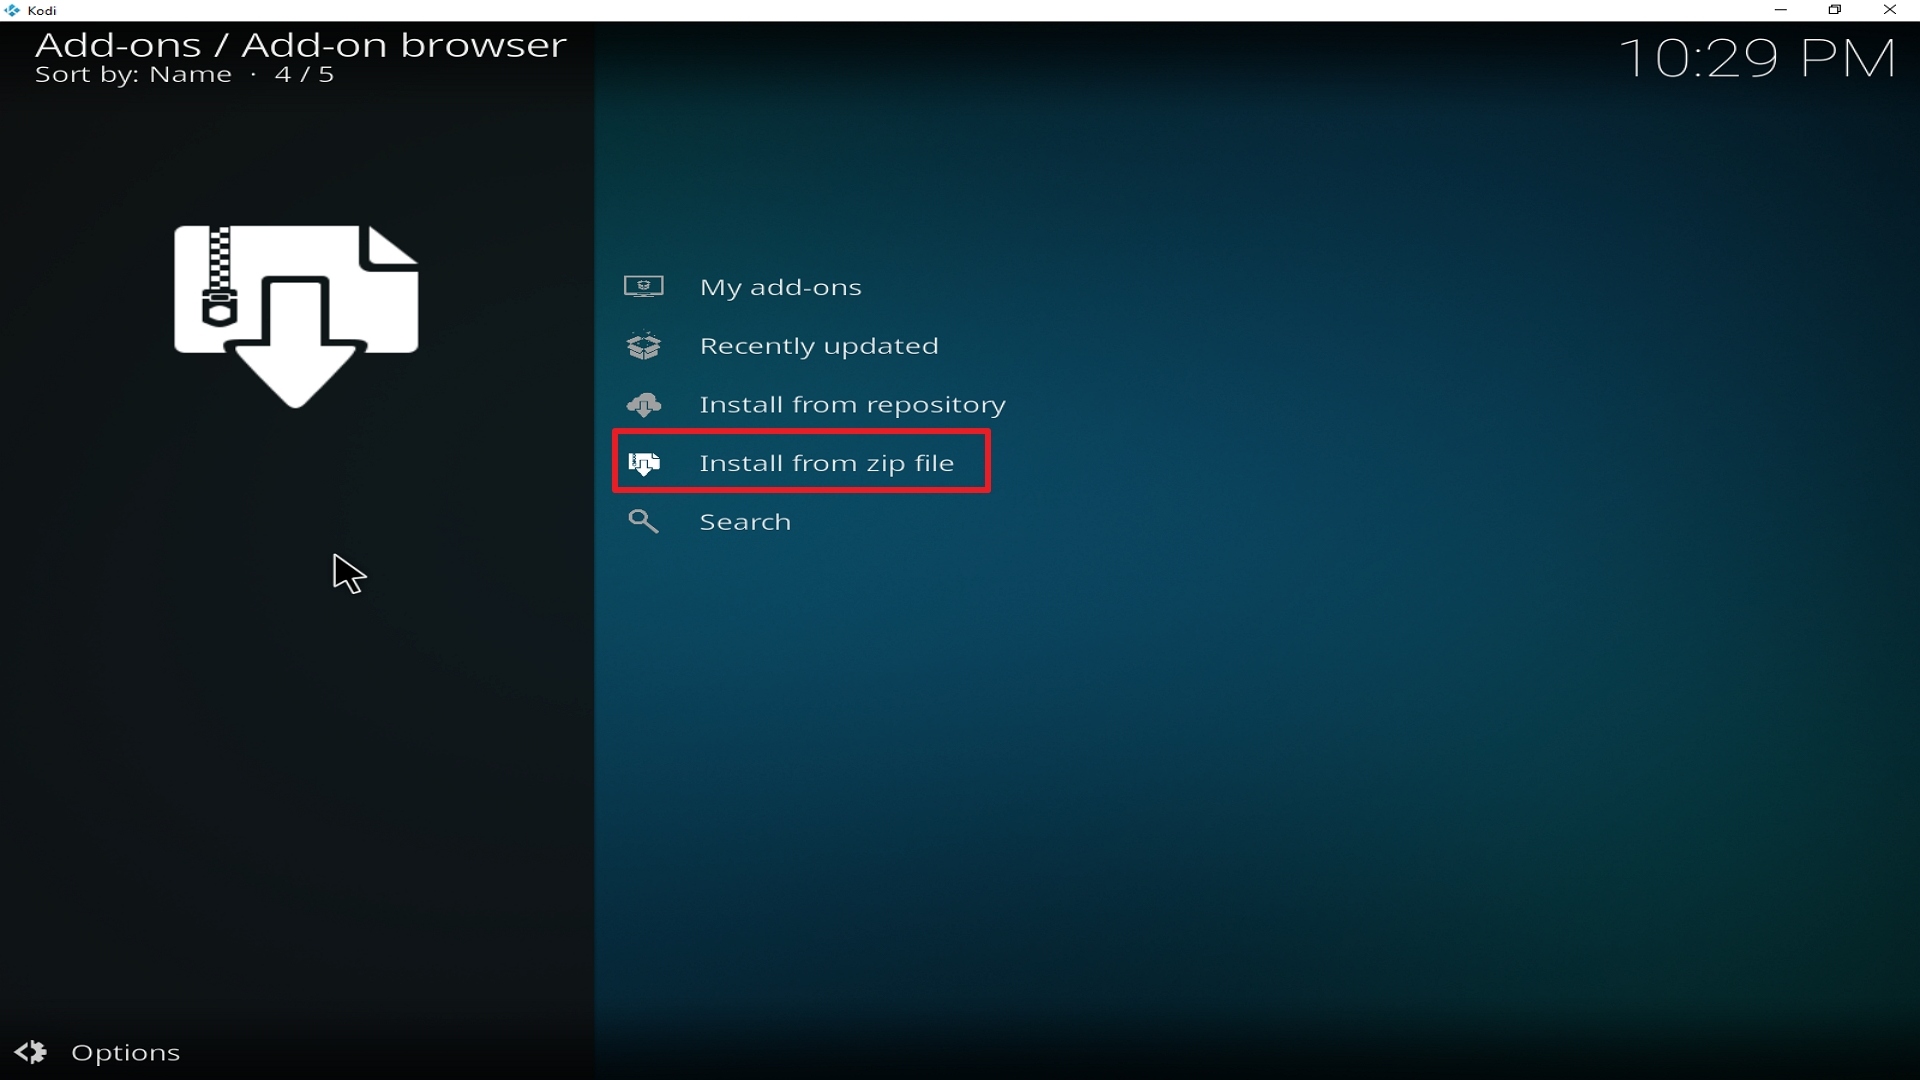
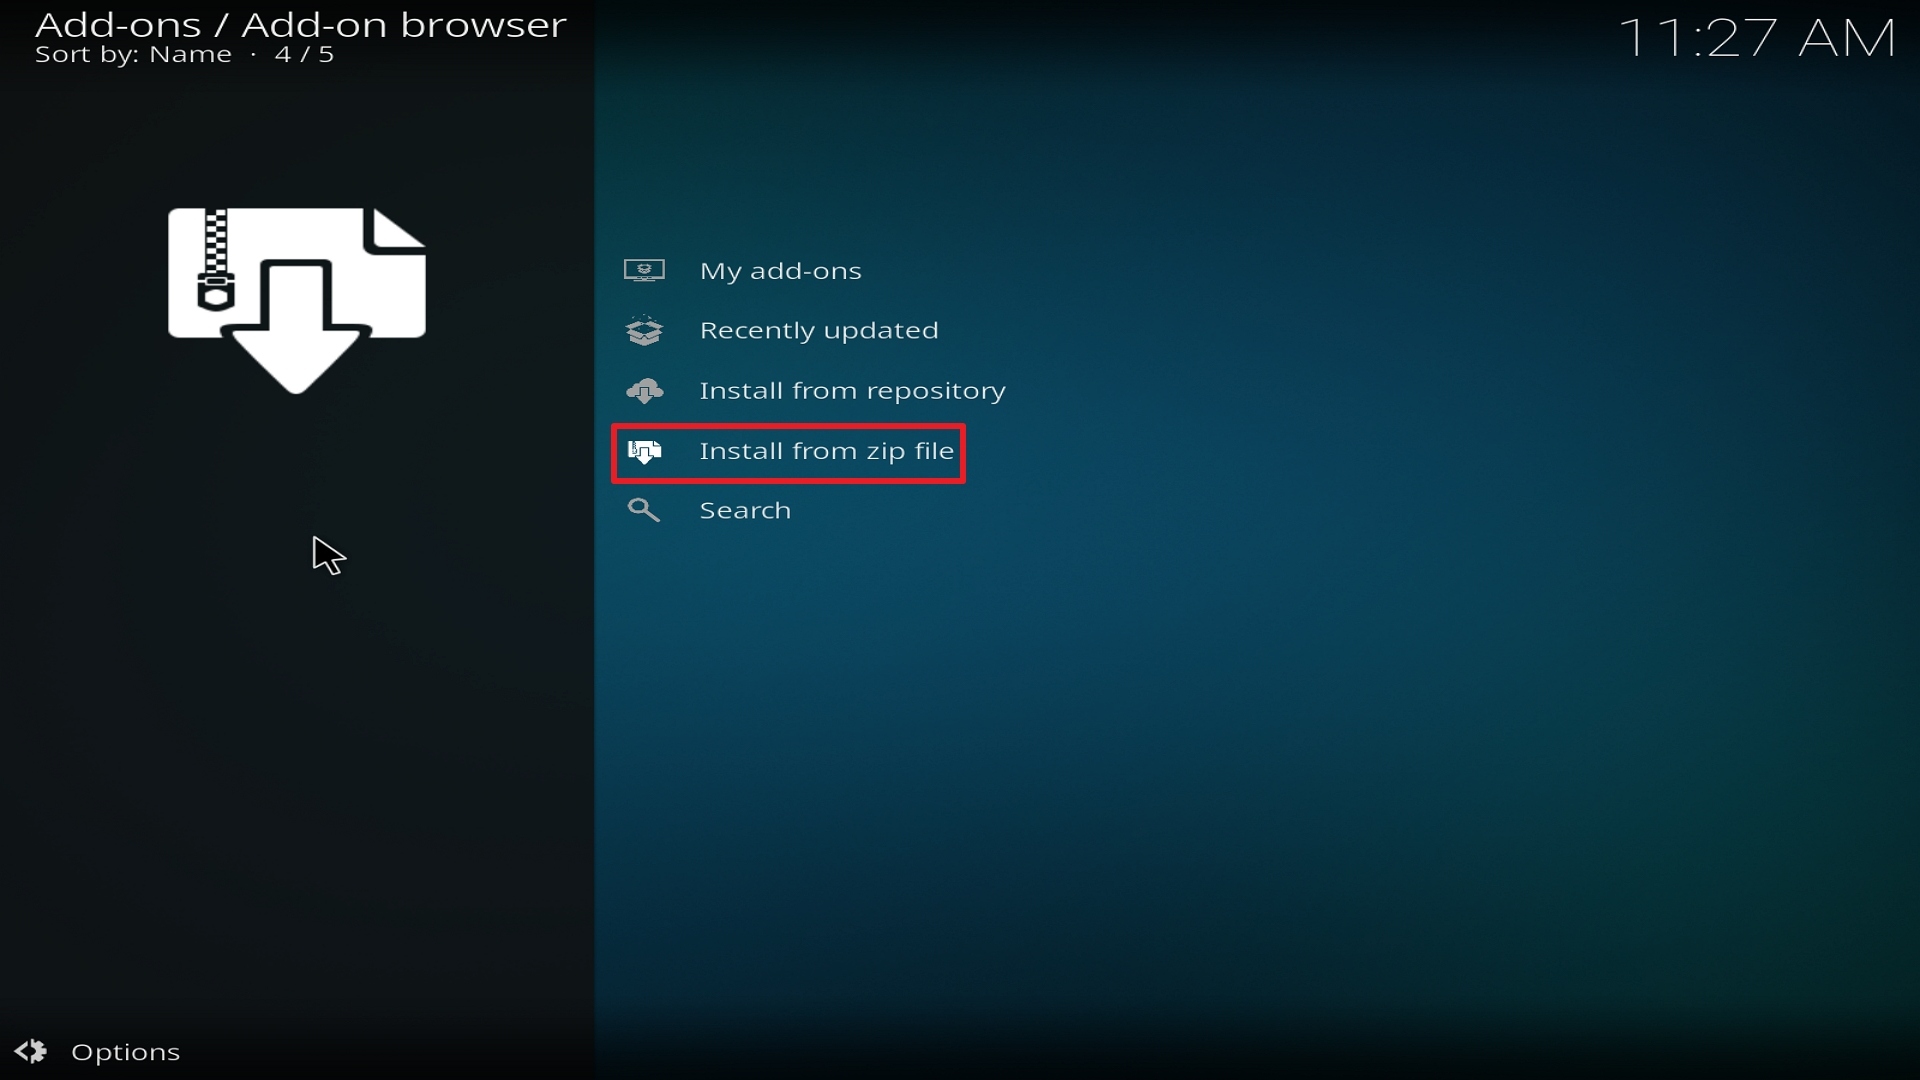
16. Select install from zip file.

Step 16 Installing Strikes Movie Zone addon on Kodi


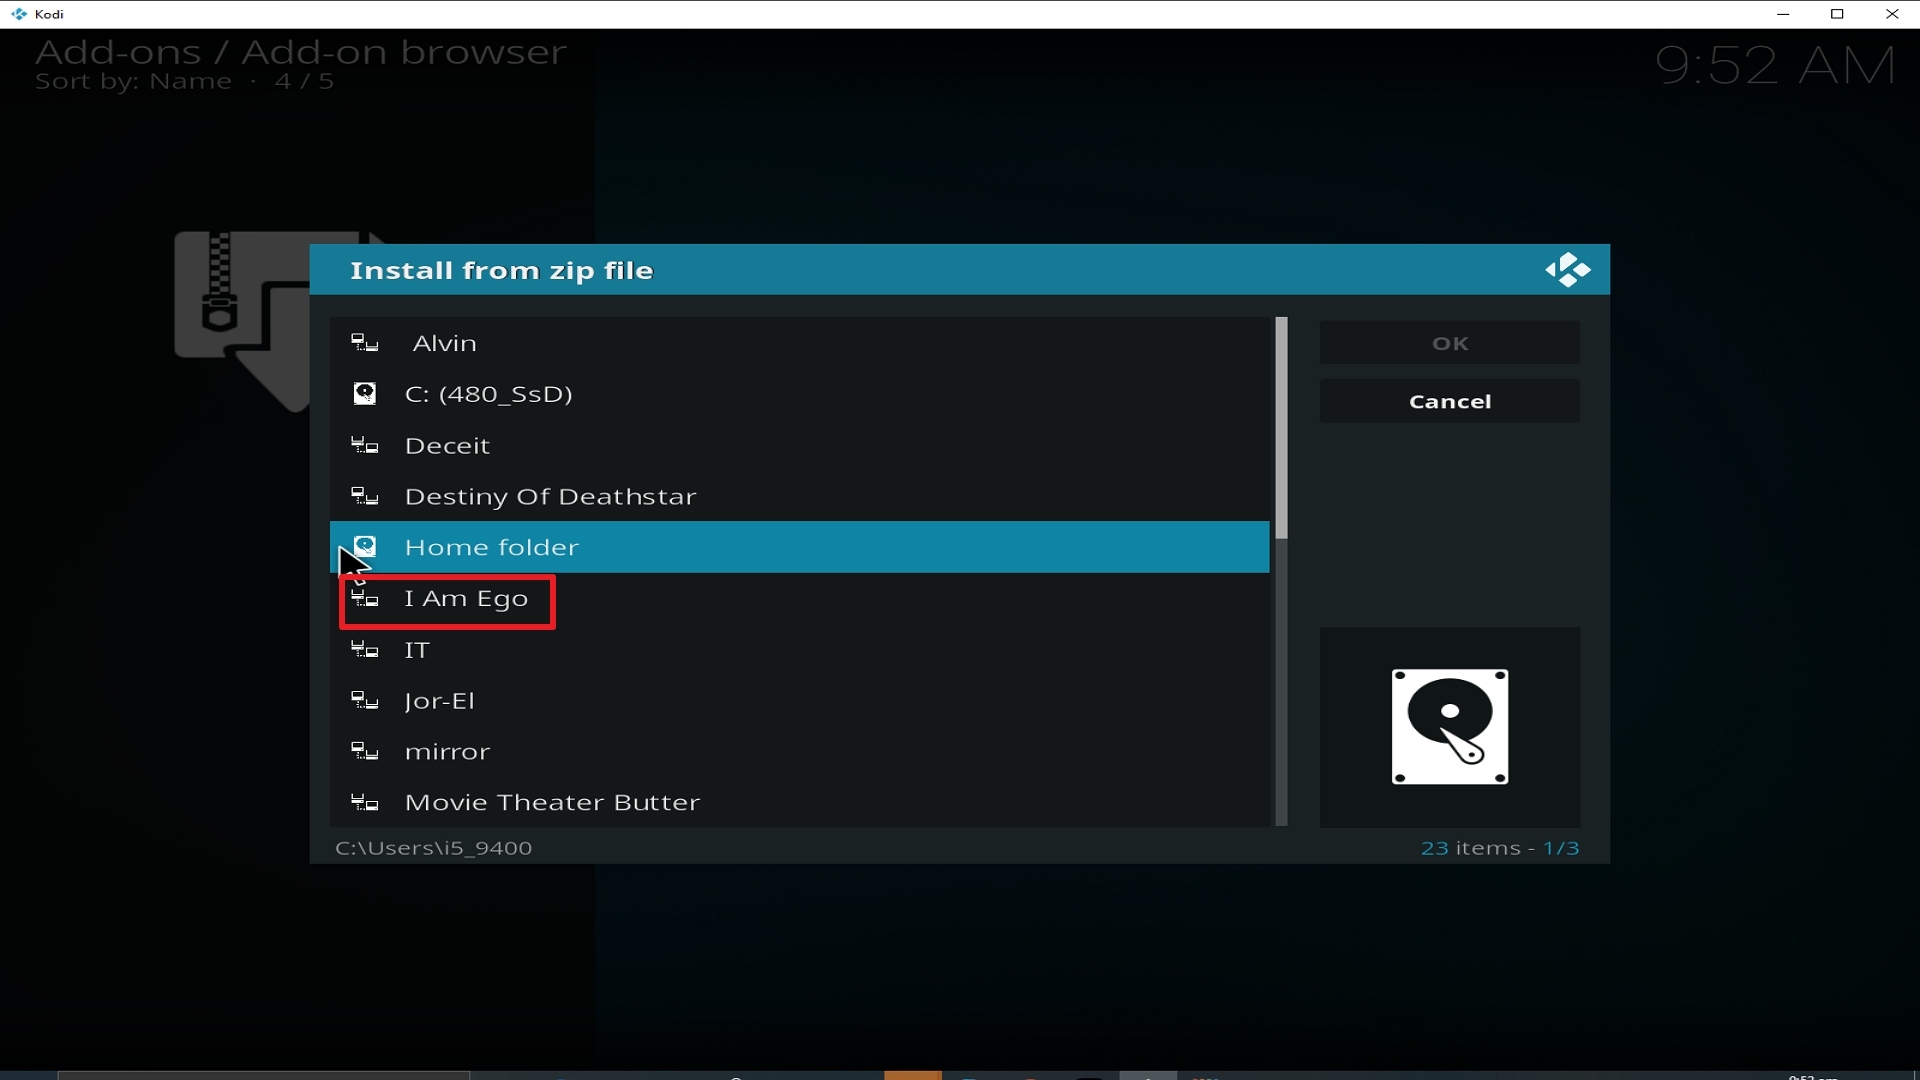
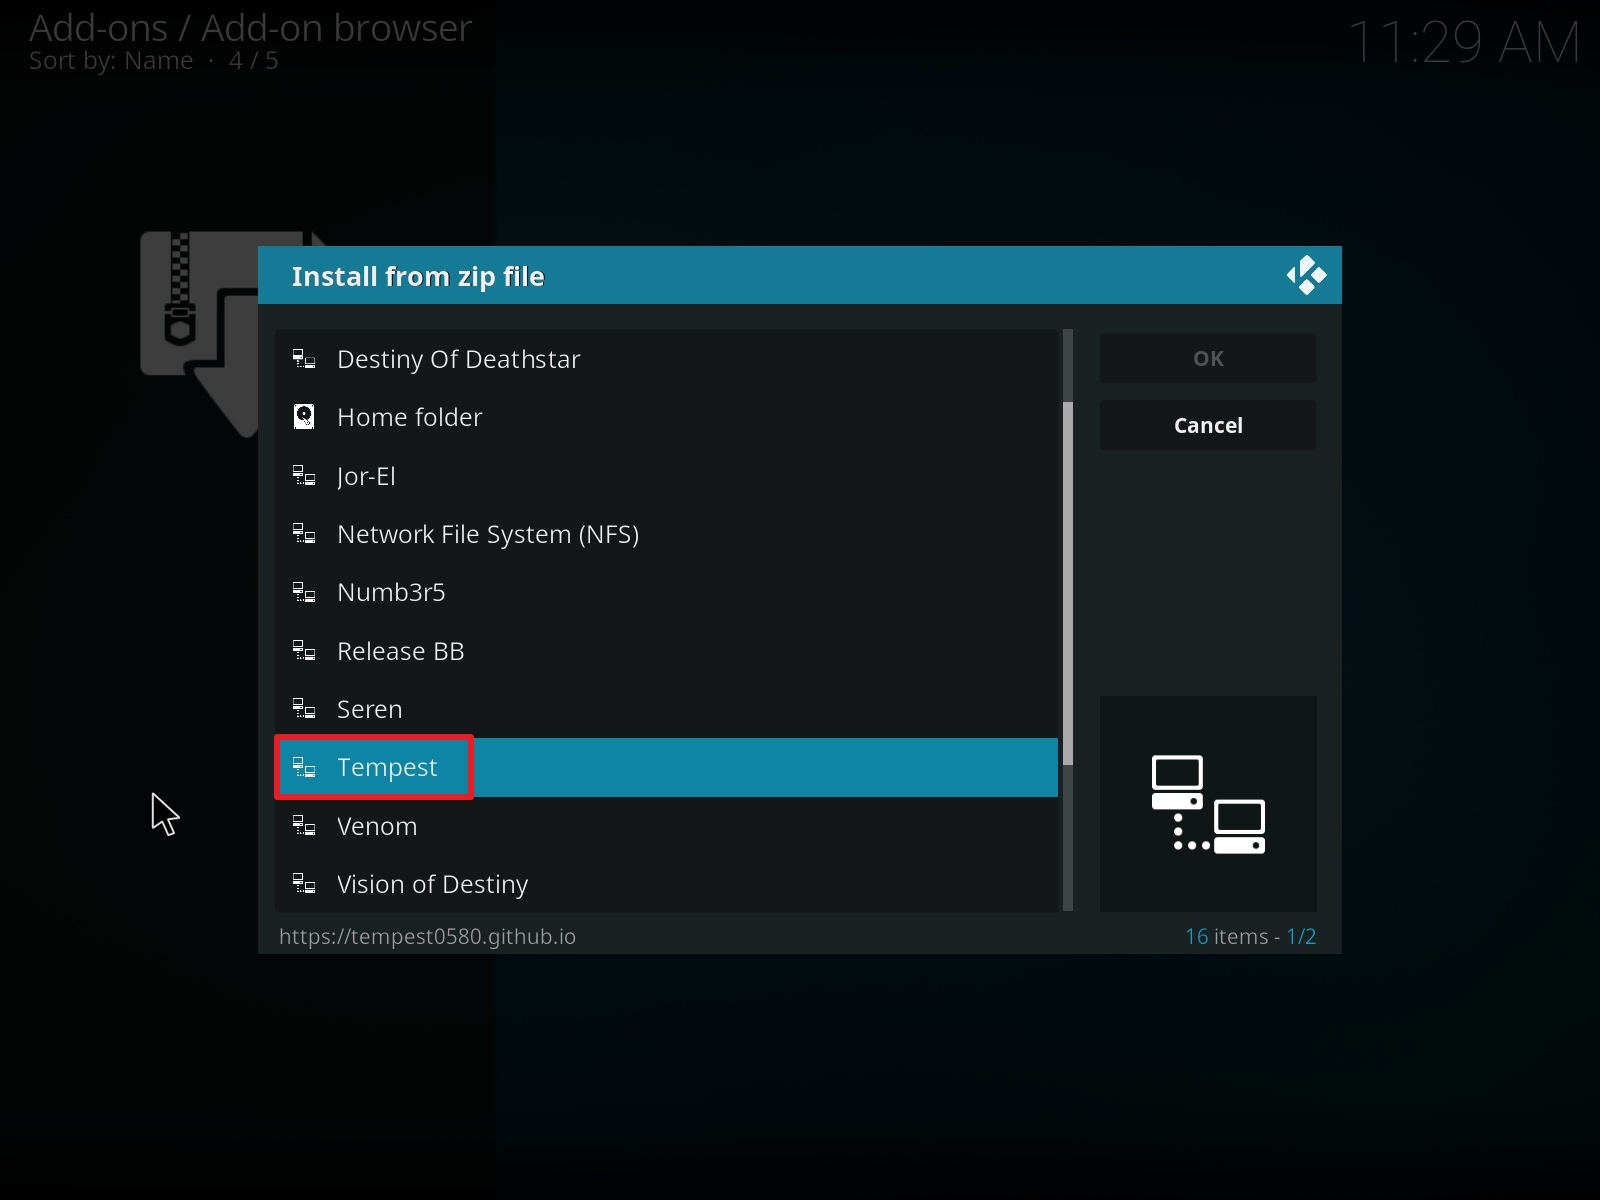
17. Click on Strikes Movie Zone (or whatever you named the source).
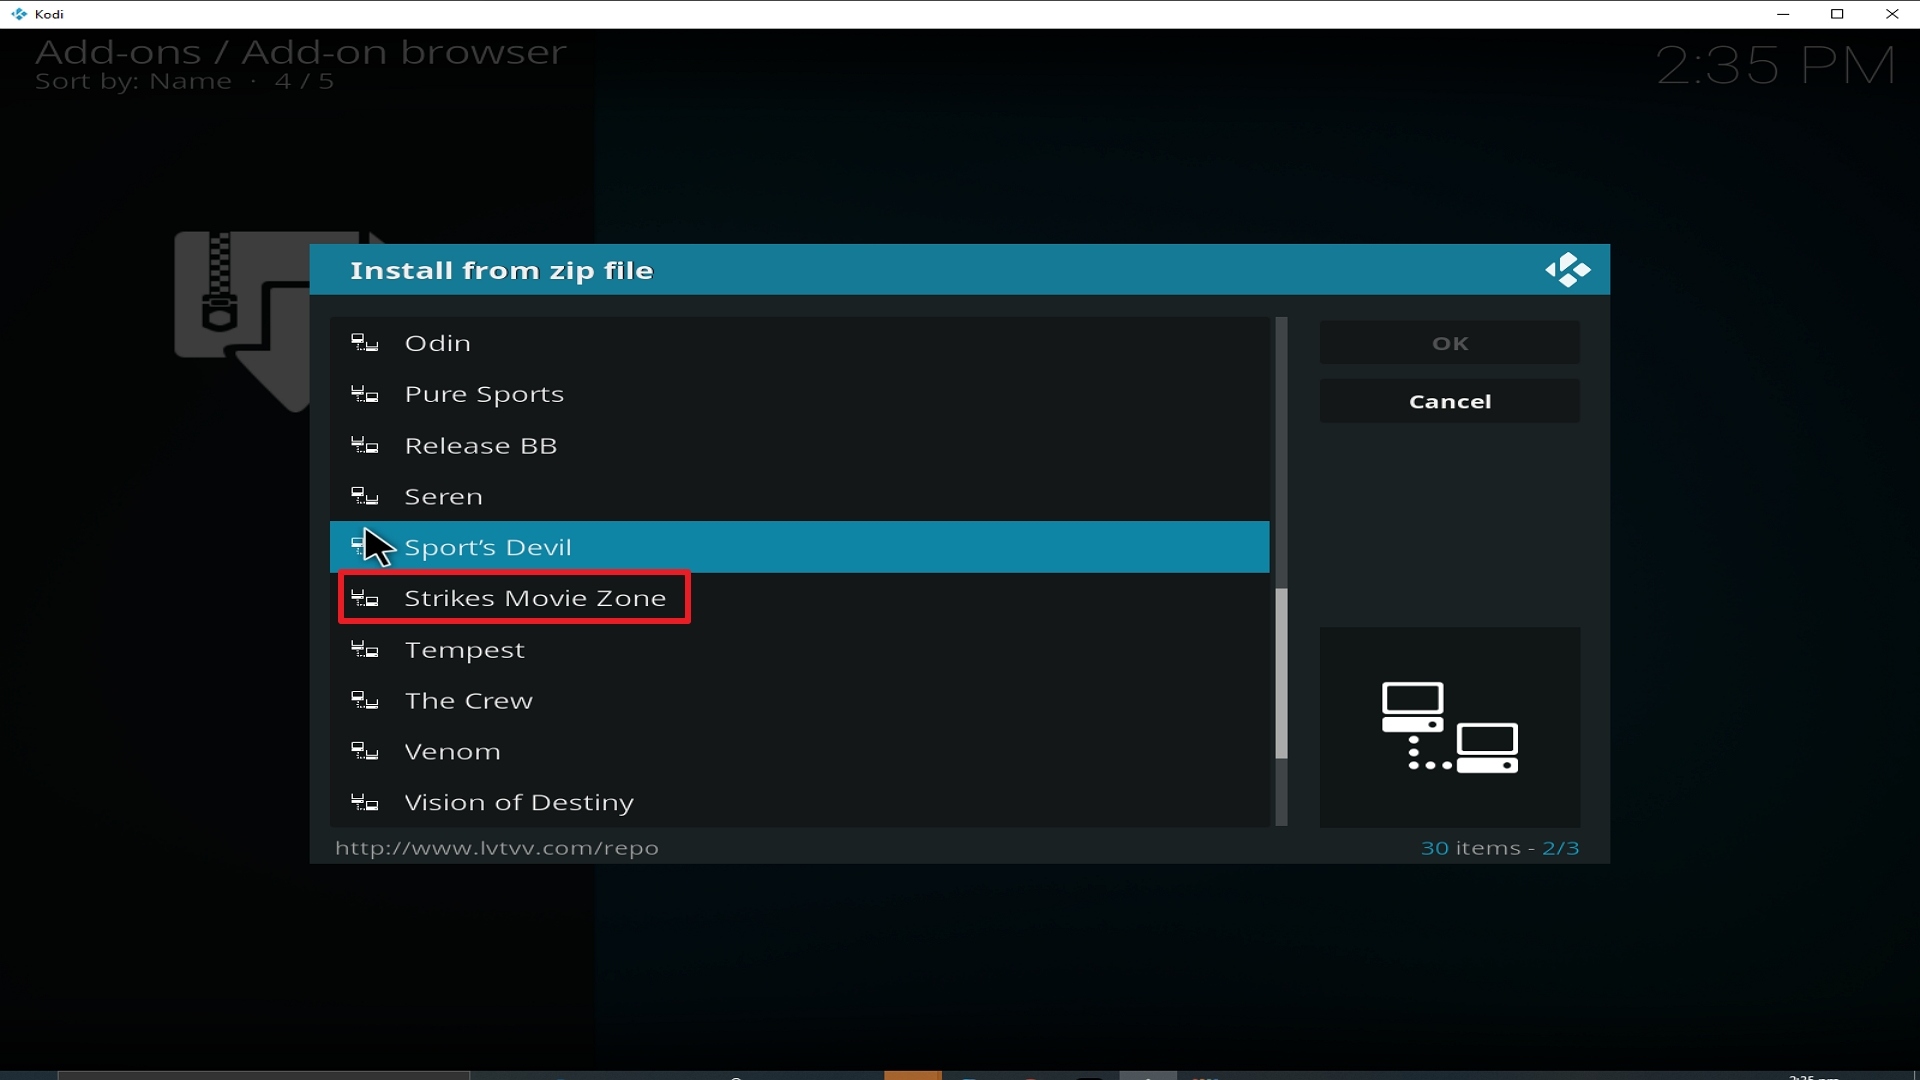
Step 17 Installing Strikes Movie Zone addon on Kodi


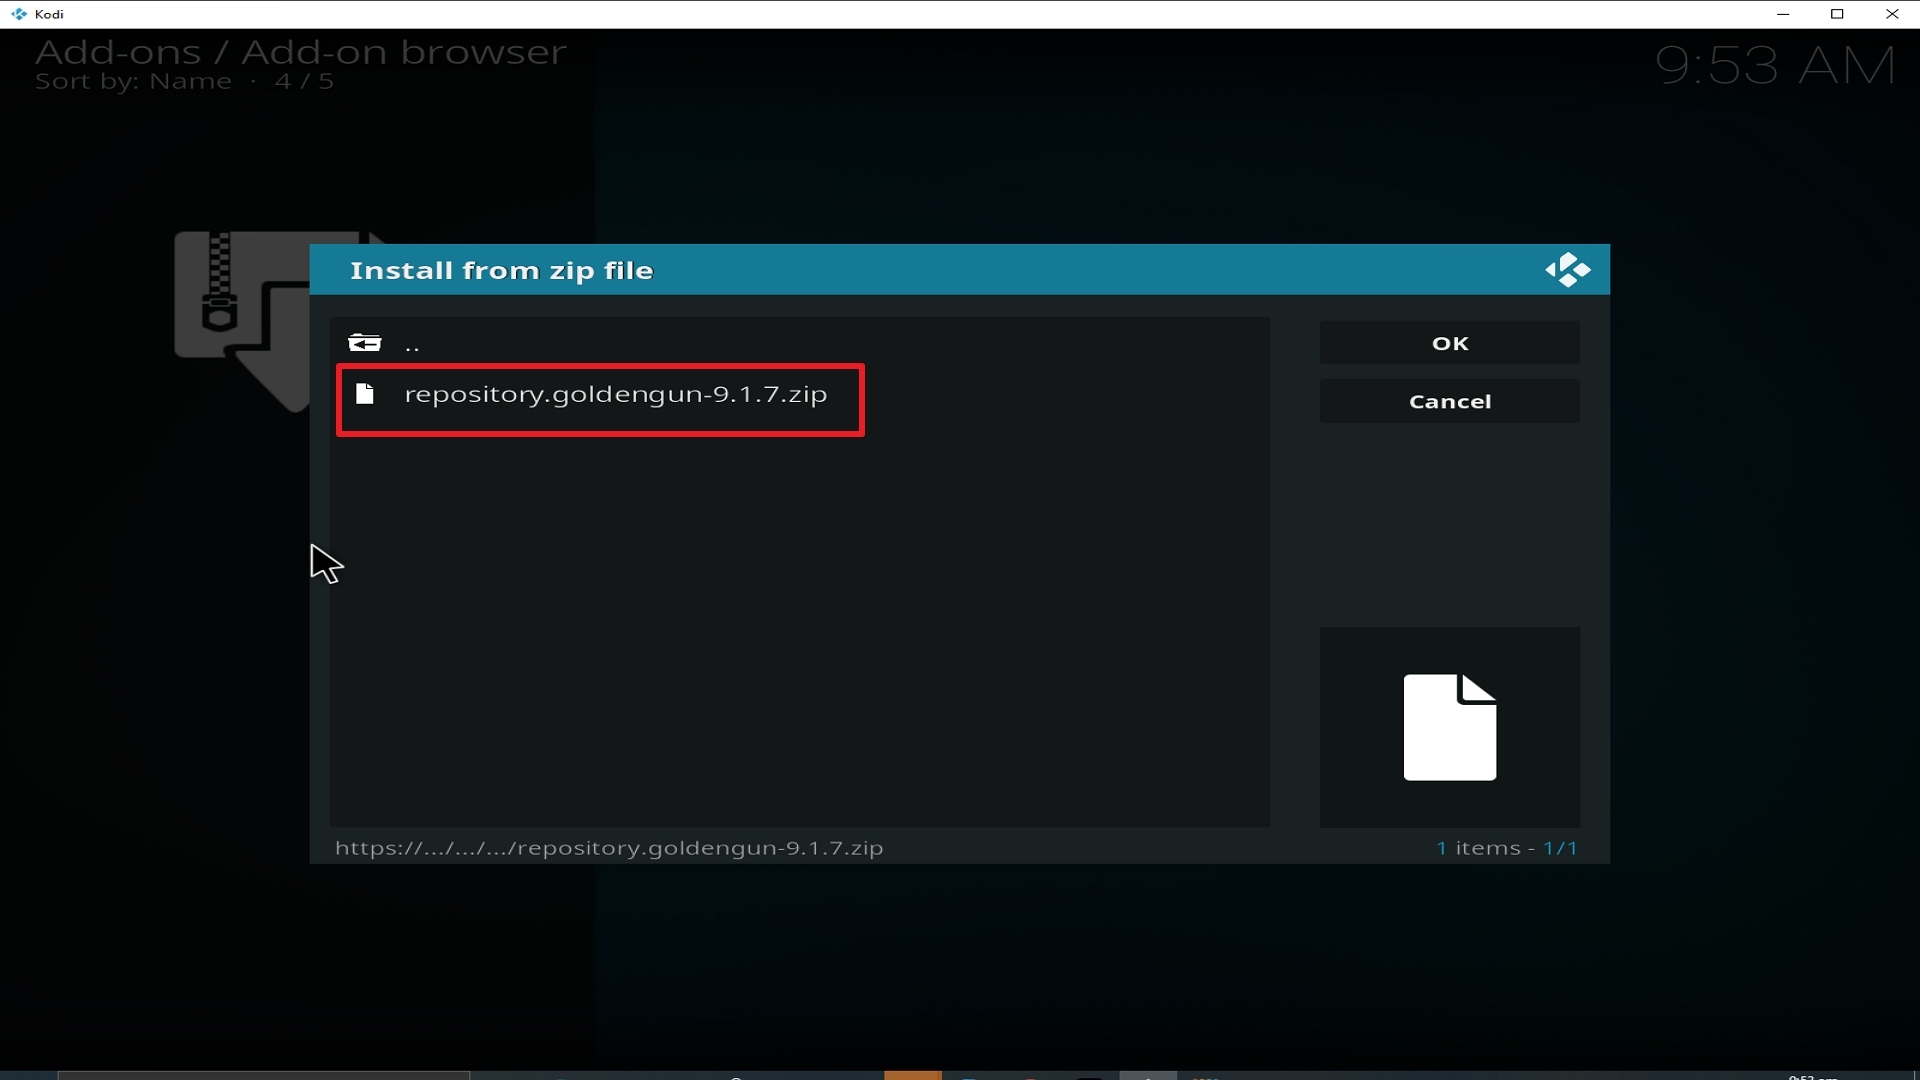
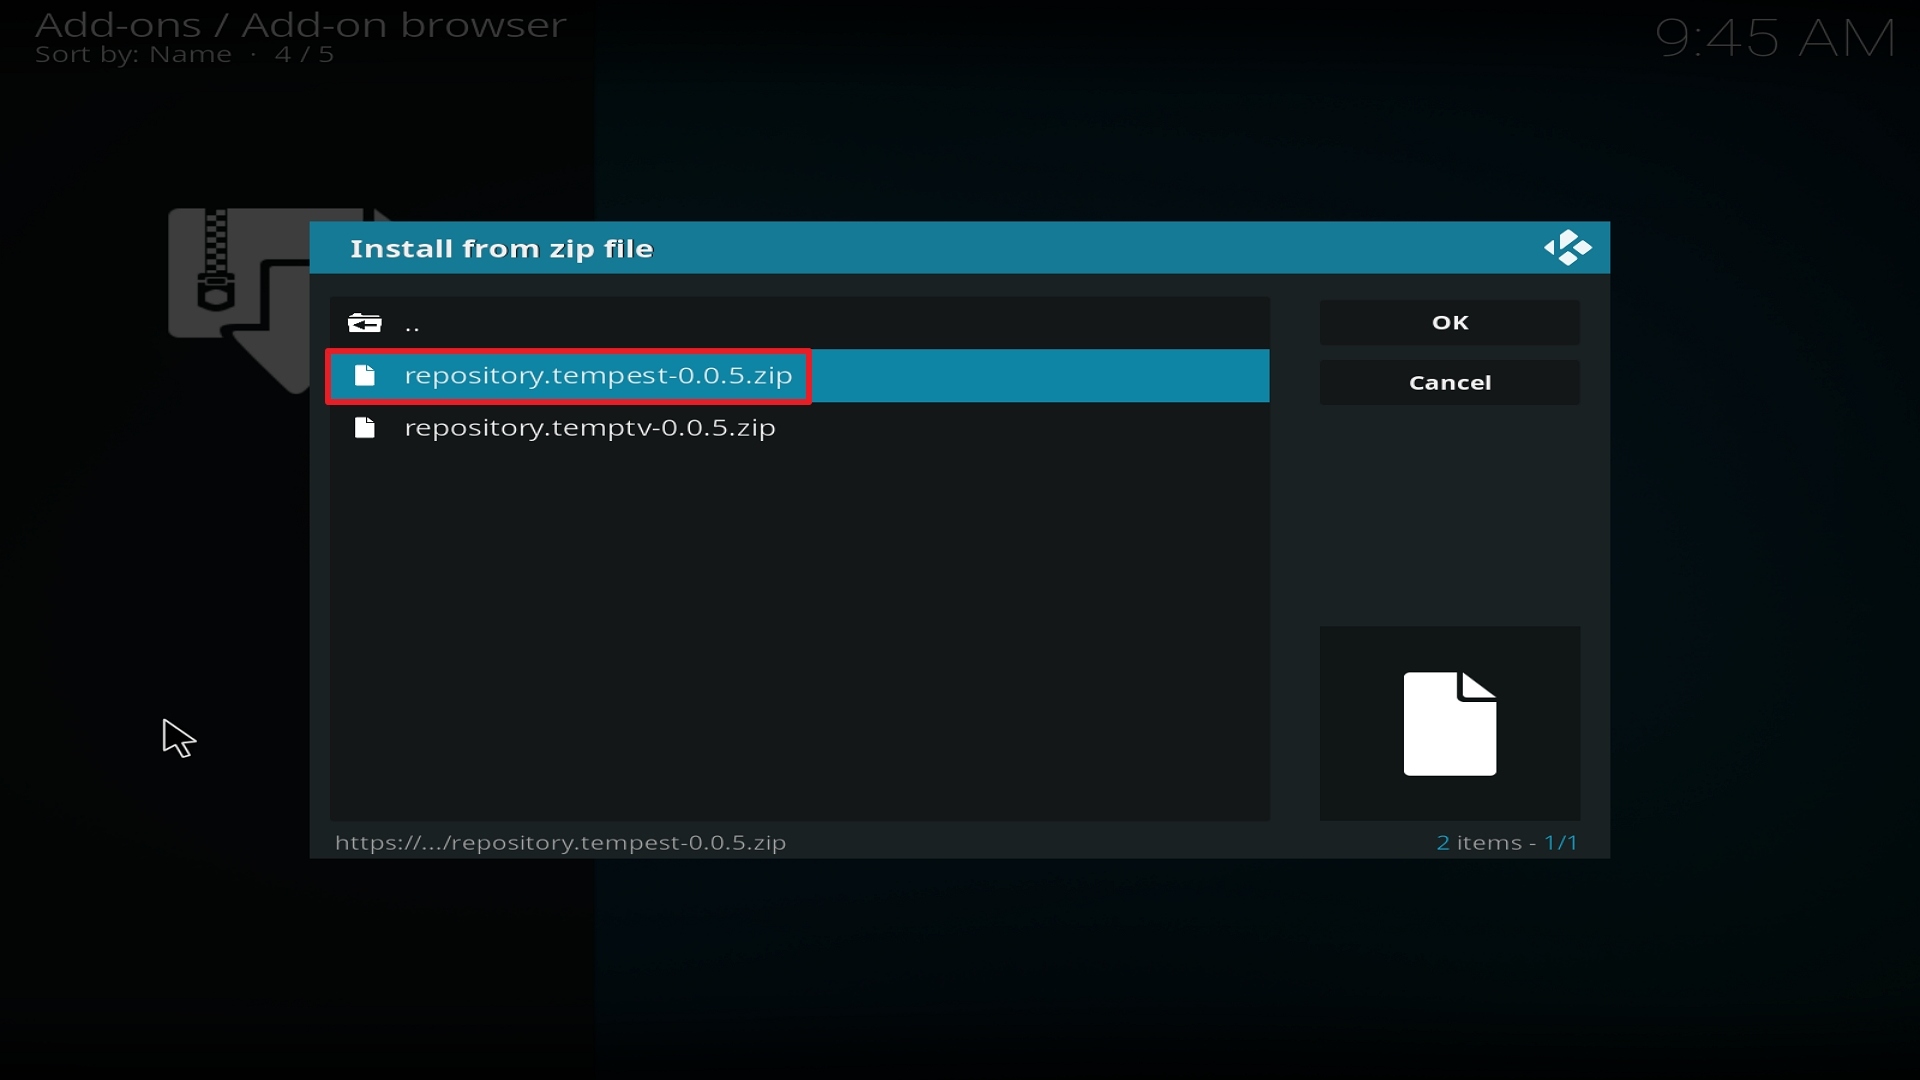
18. Click on repository.Rockcrusher-2.2.zip.
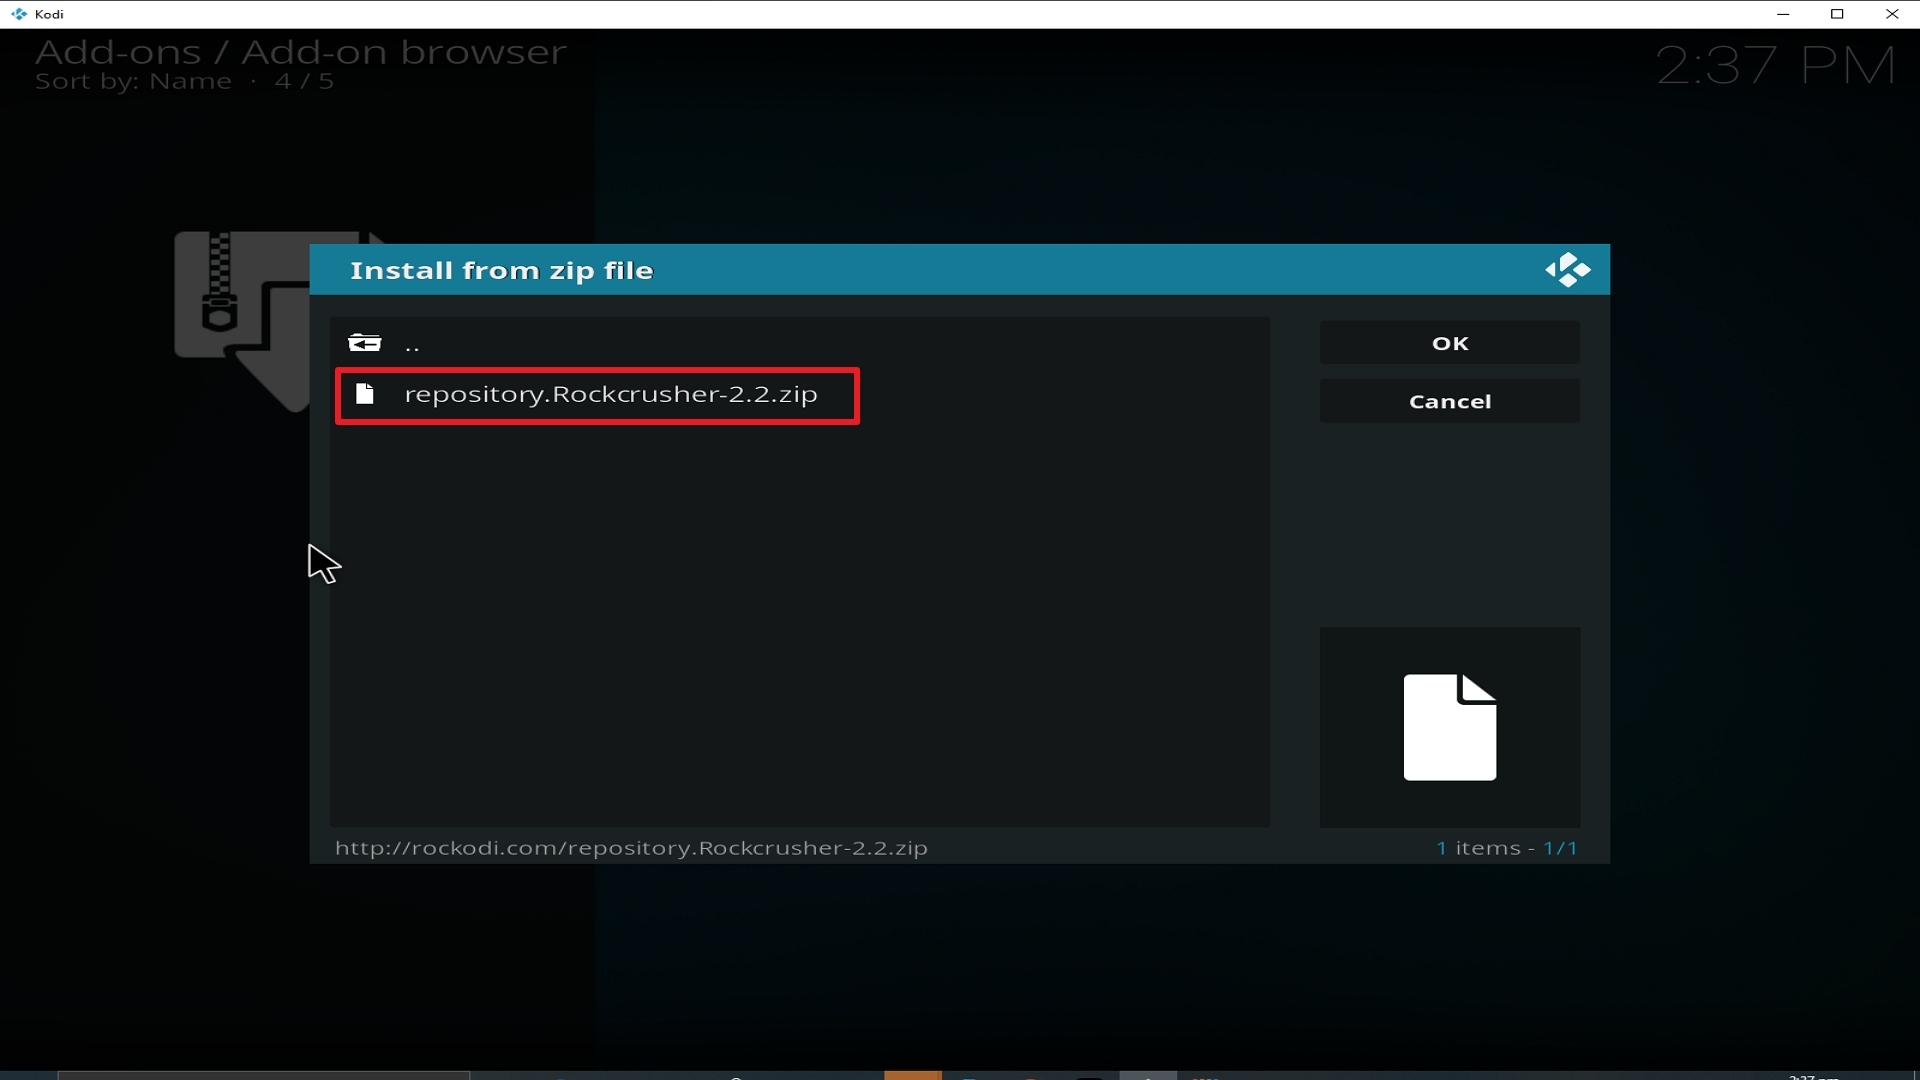
Step 18 Installing Strikes Movie Zone addon on Kodi


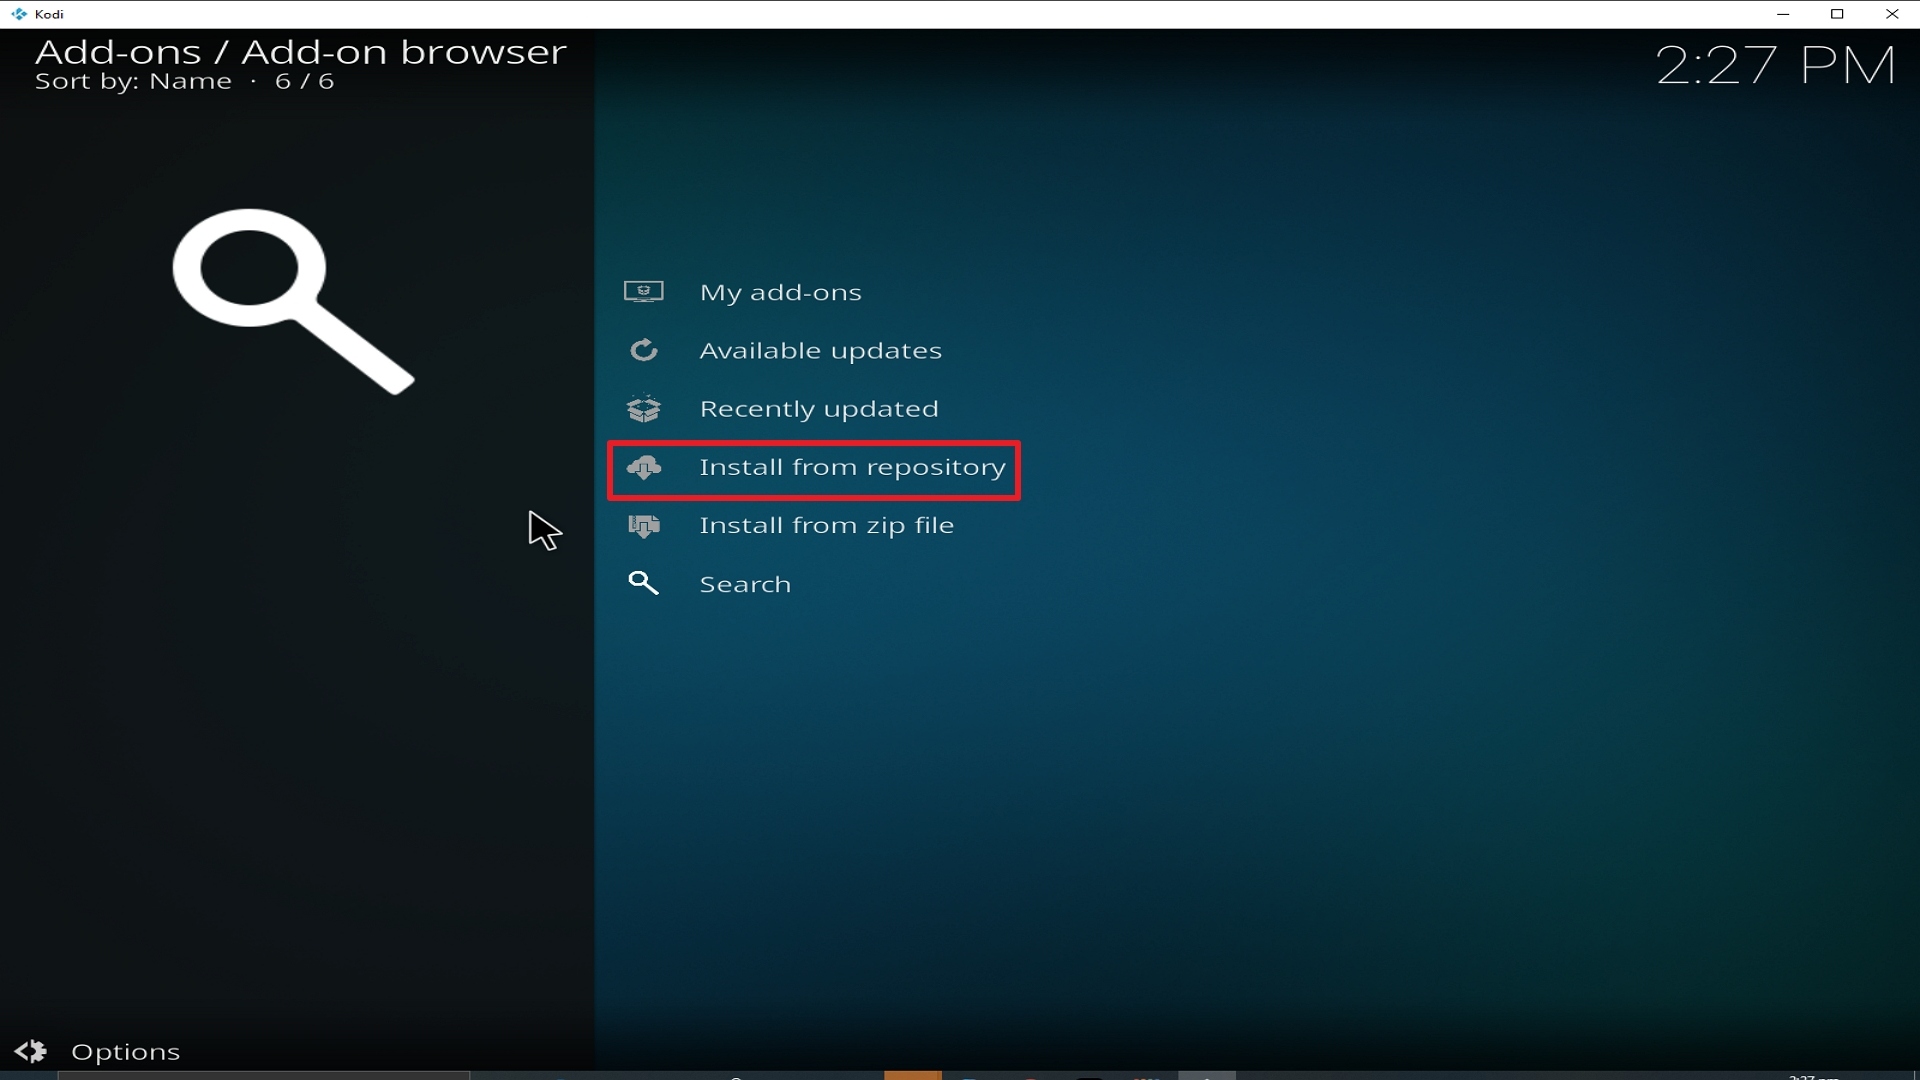
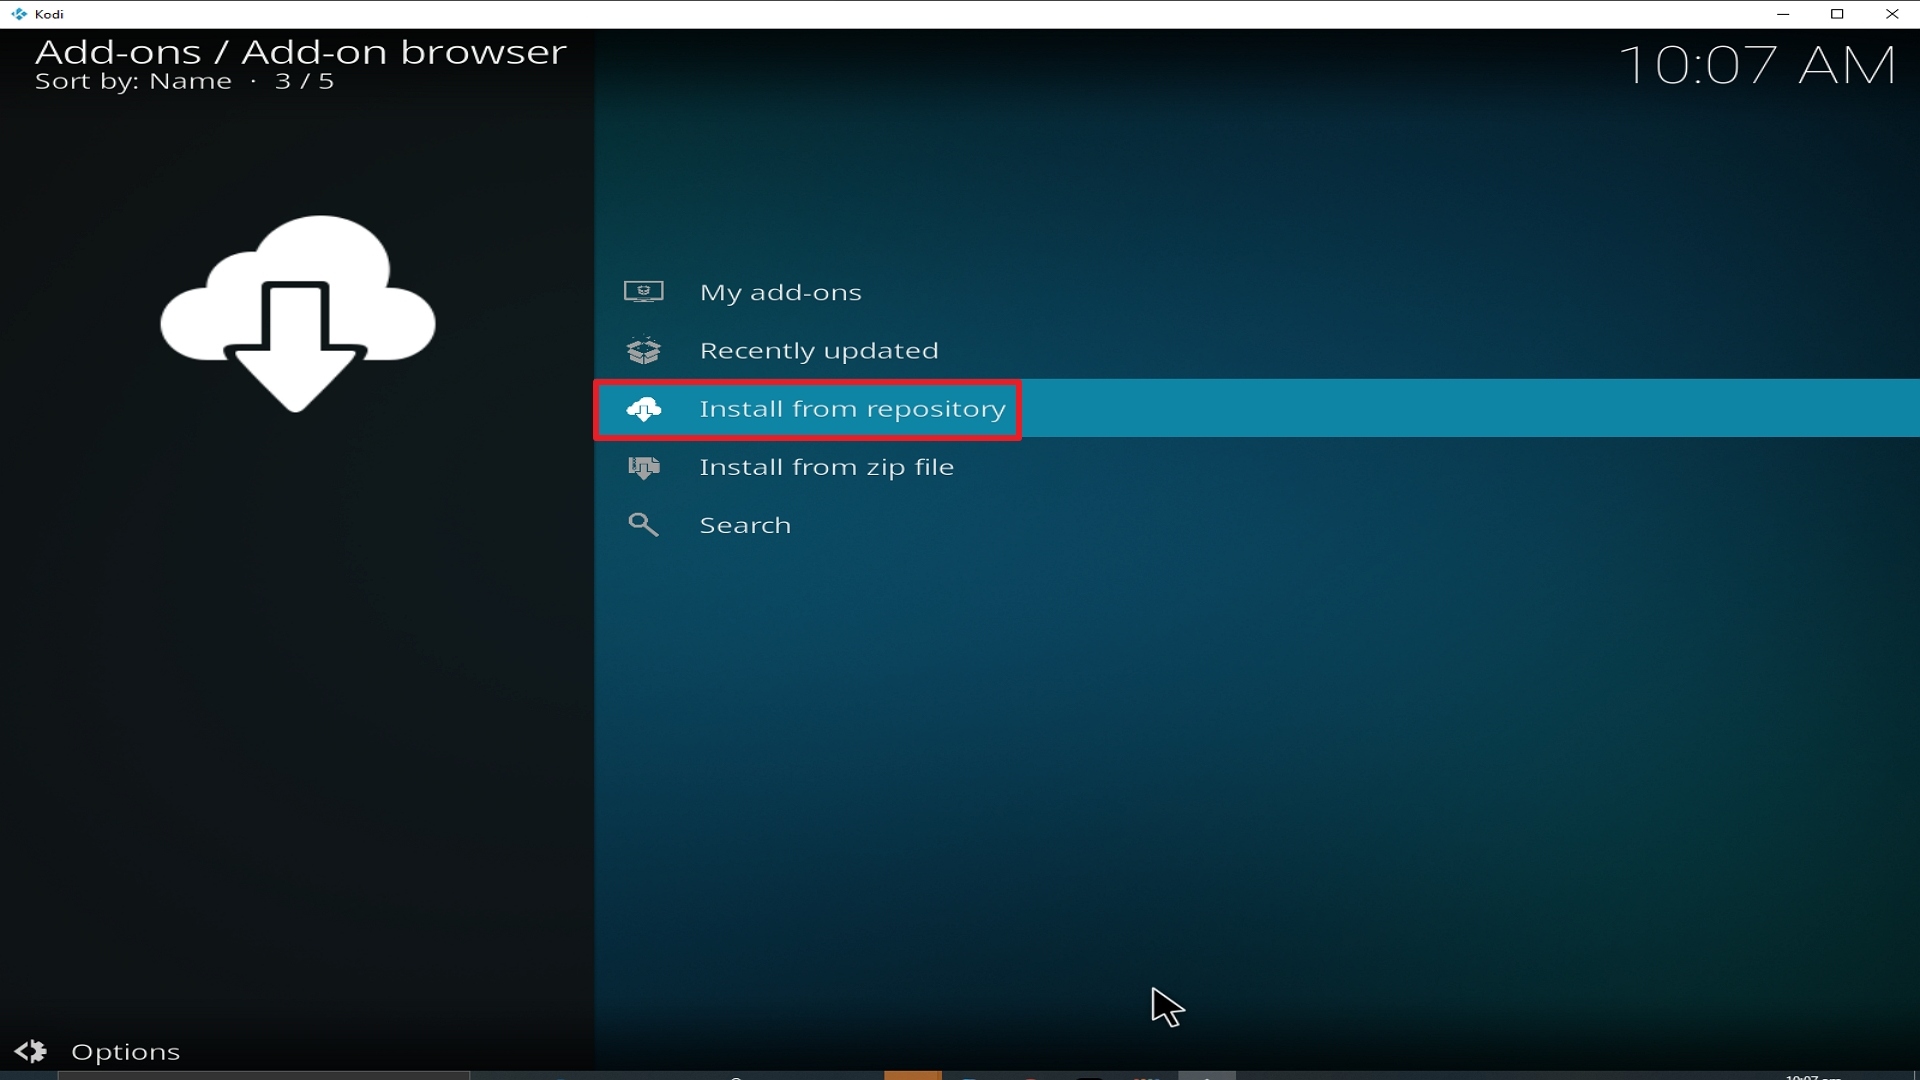
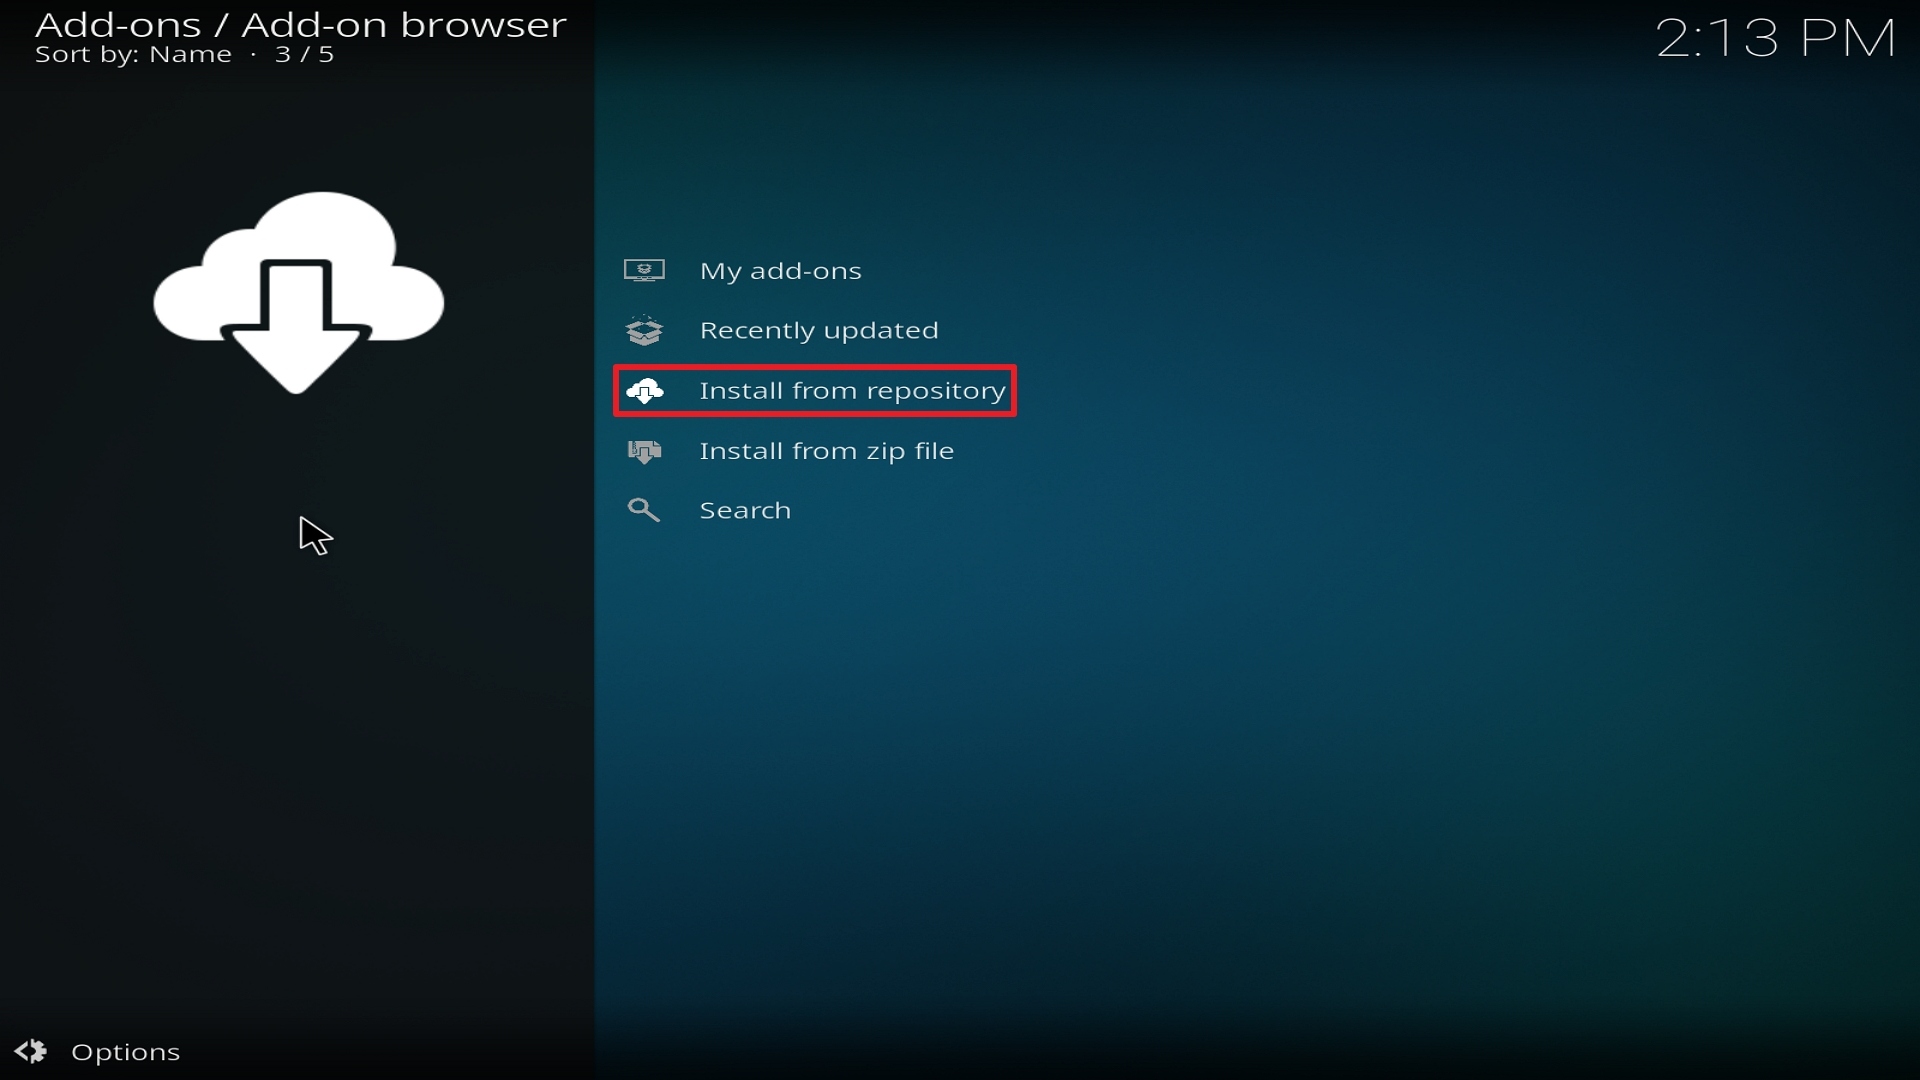
19. Select on Install from repository.
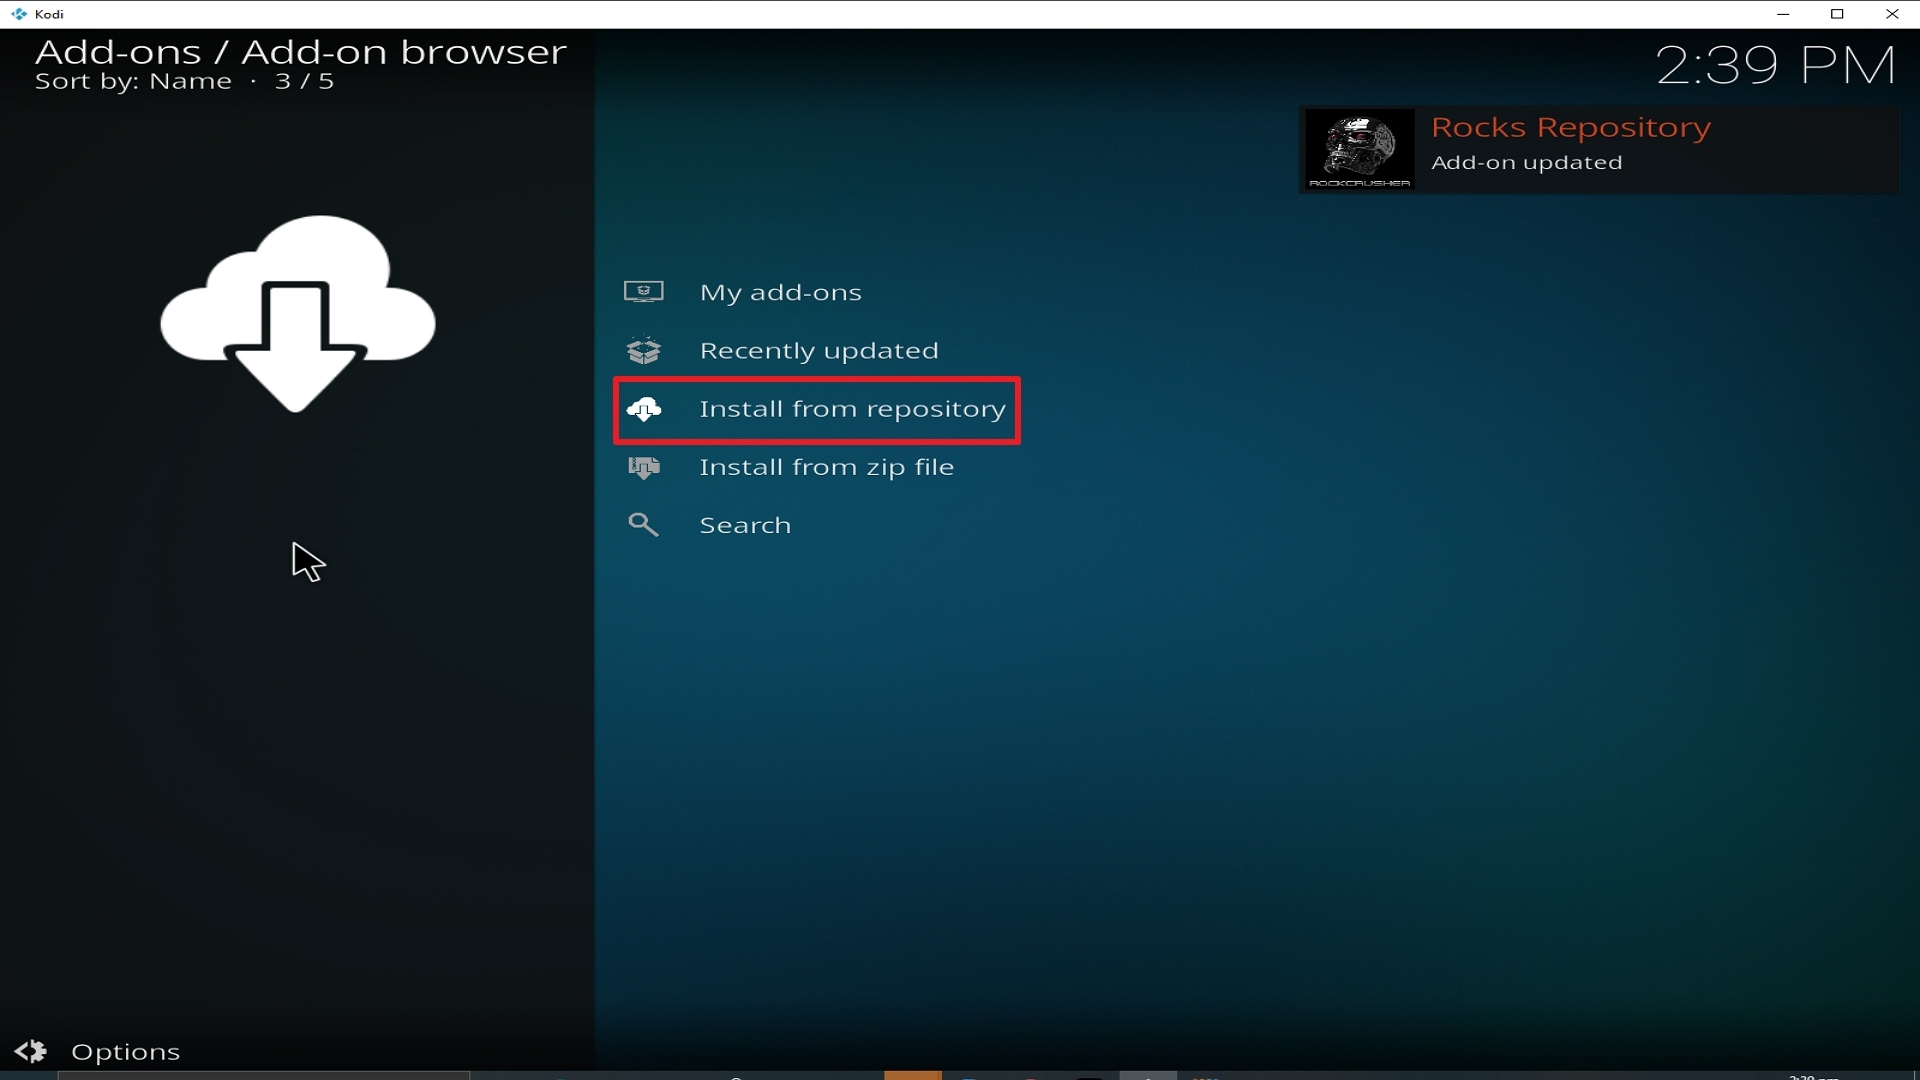
Step 19 Installing Strikes Movie Zone addon on Kodi


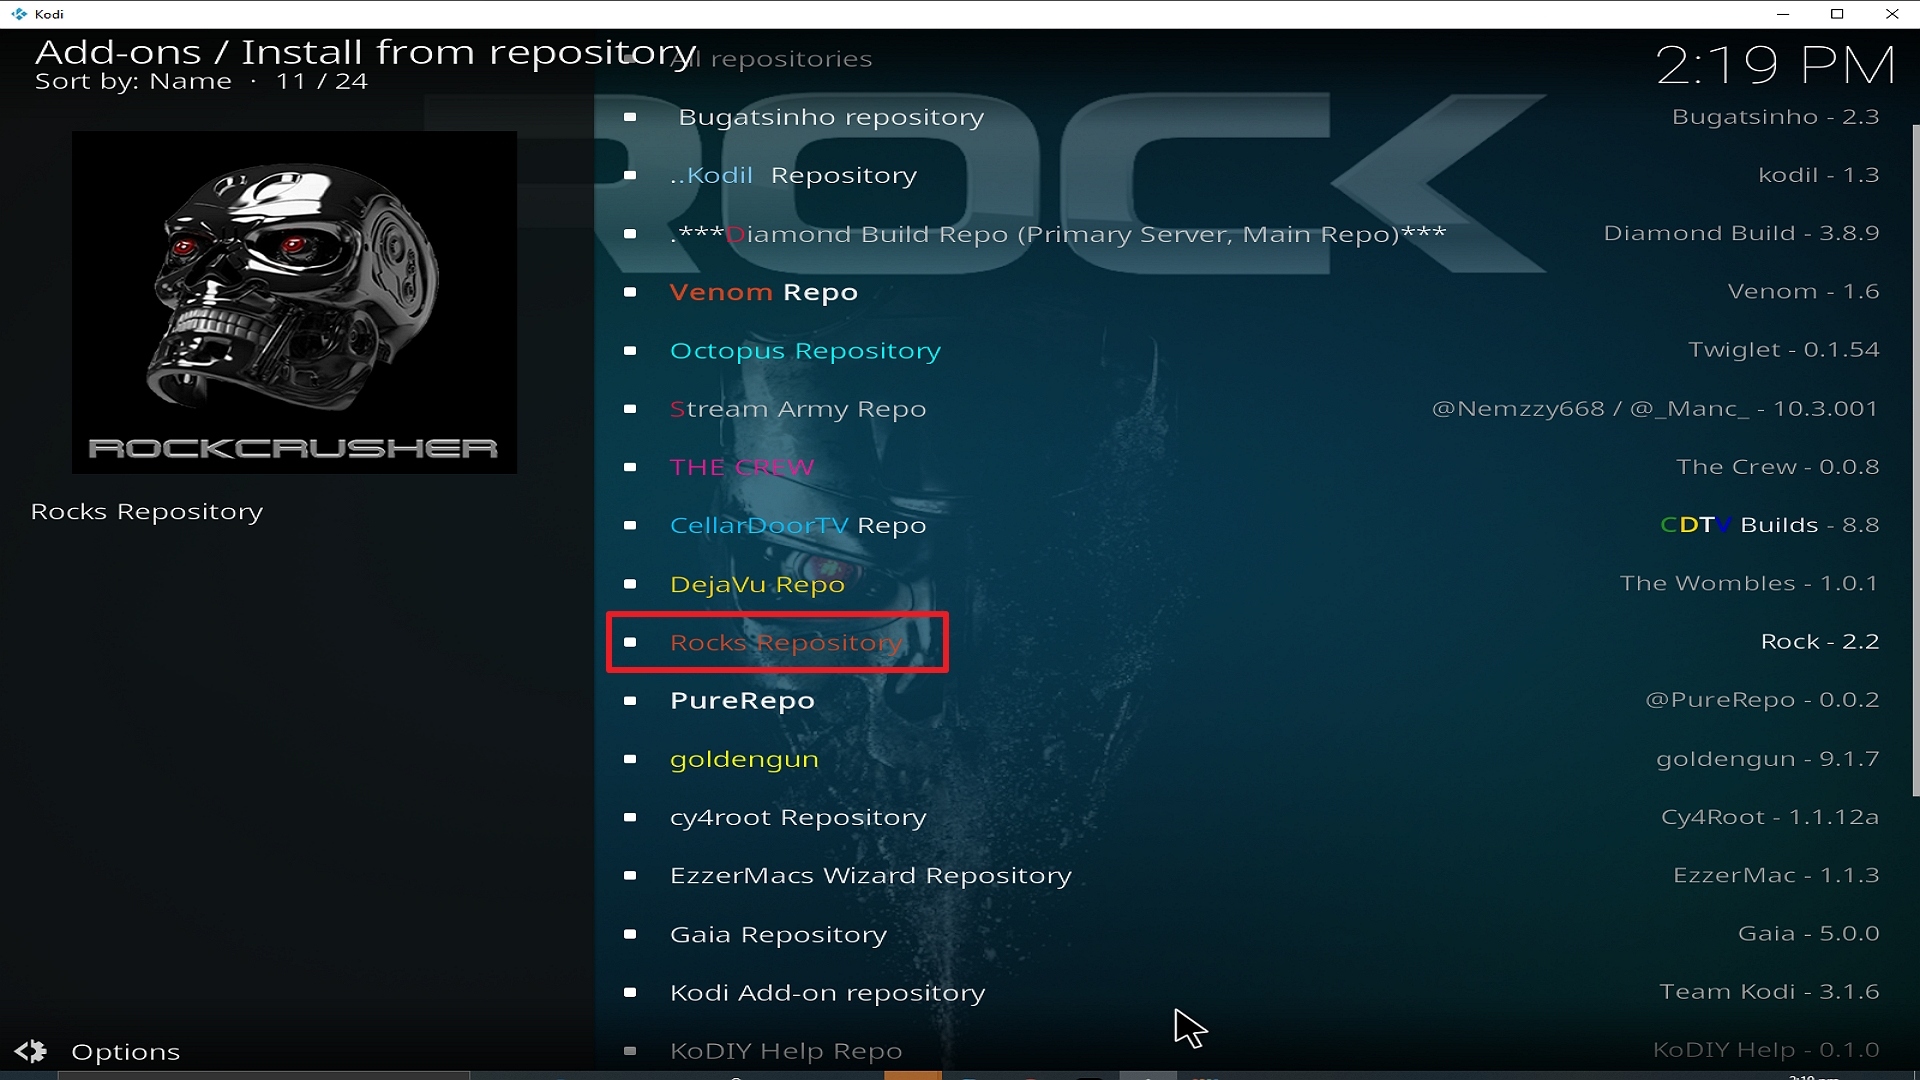
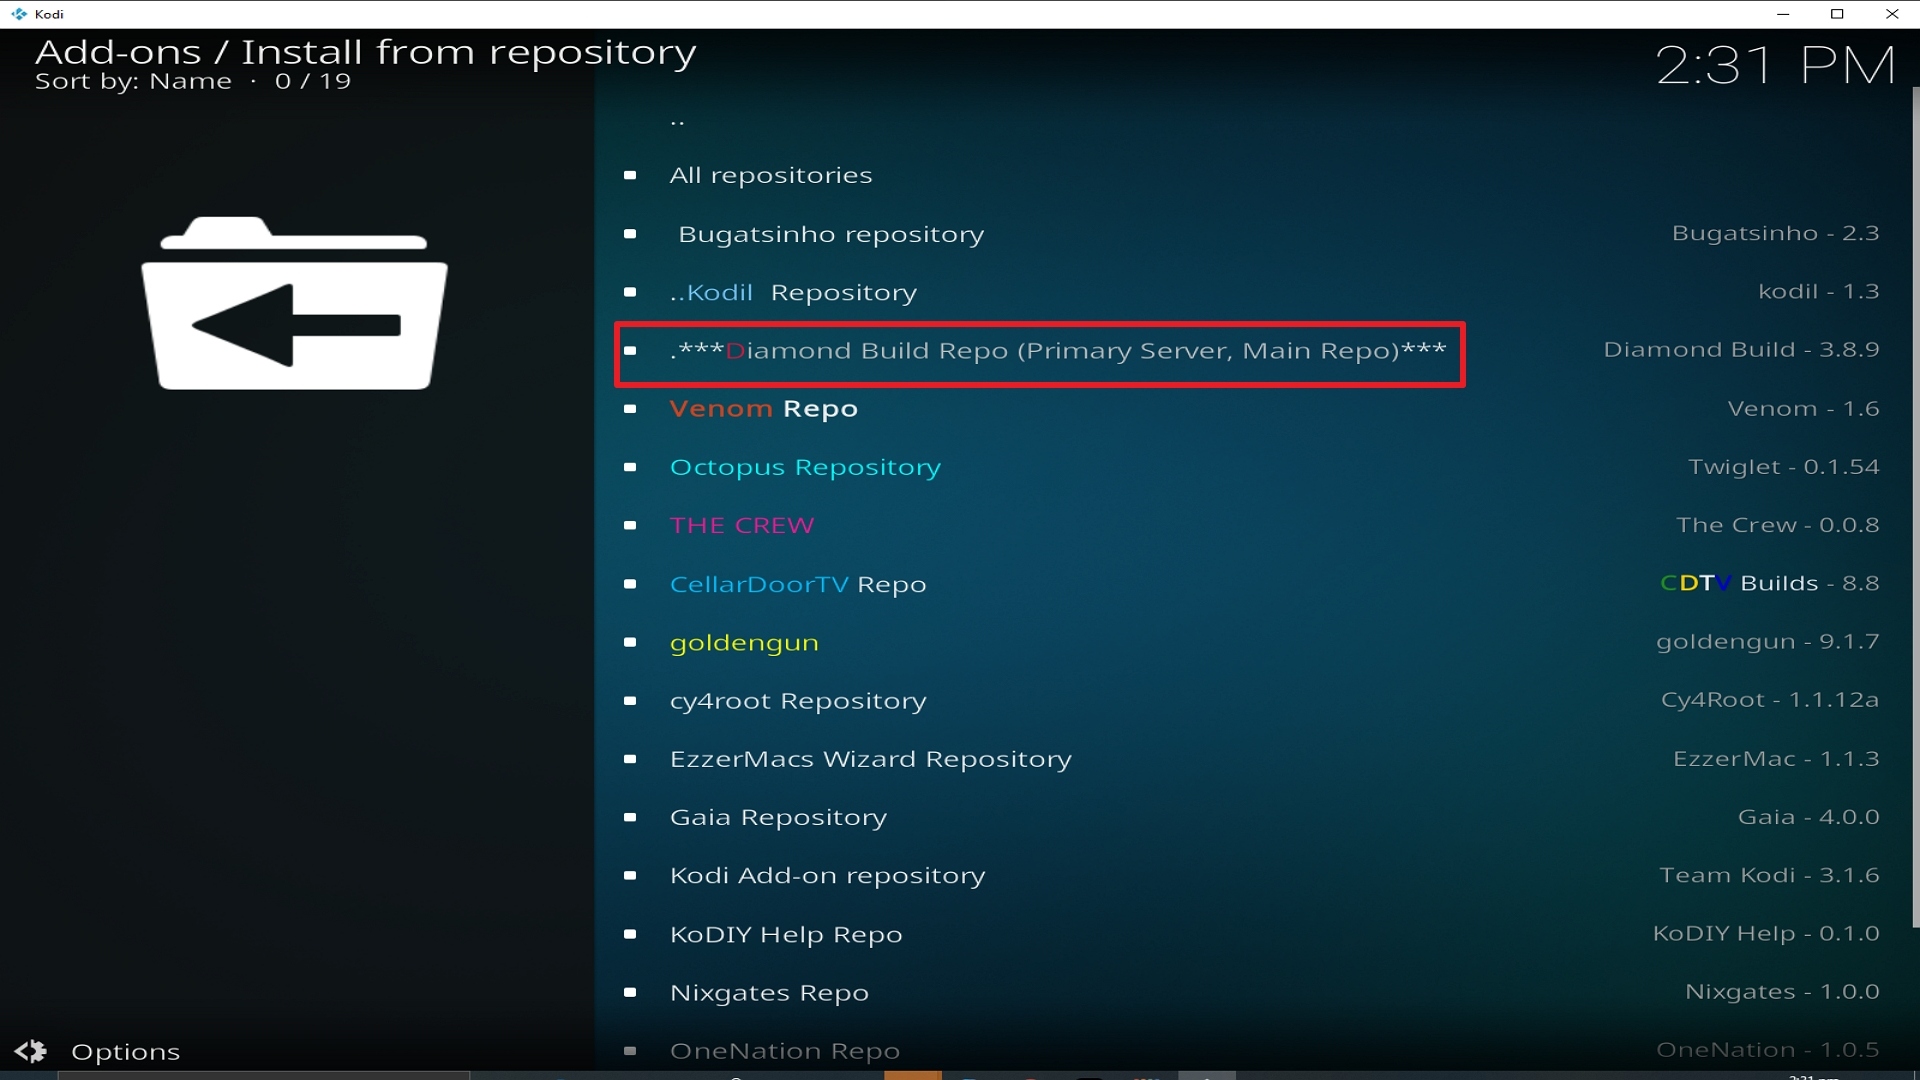
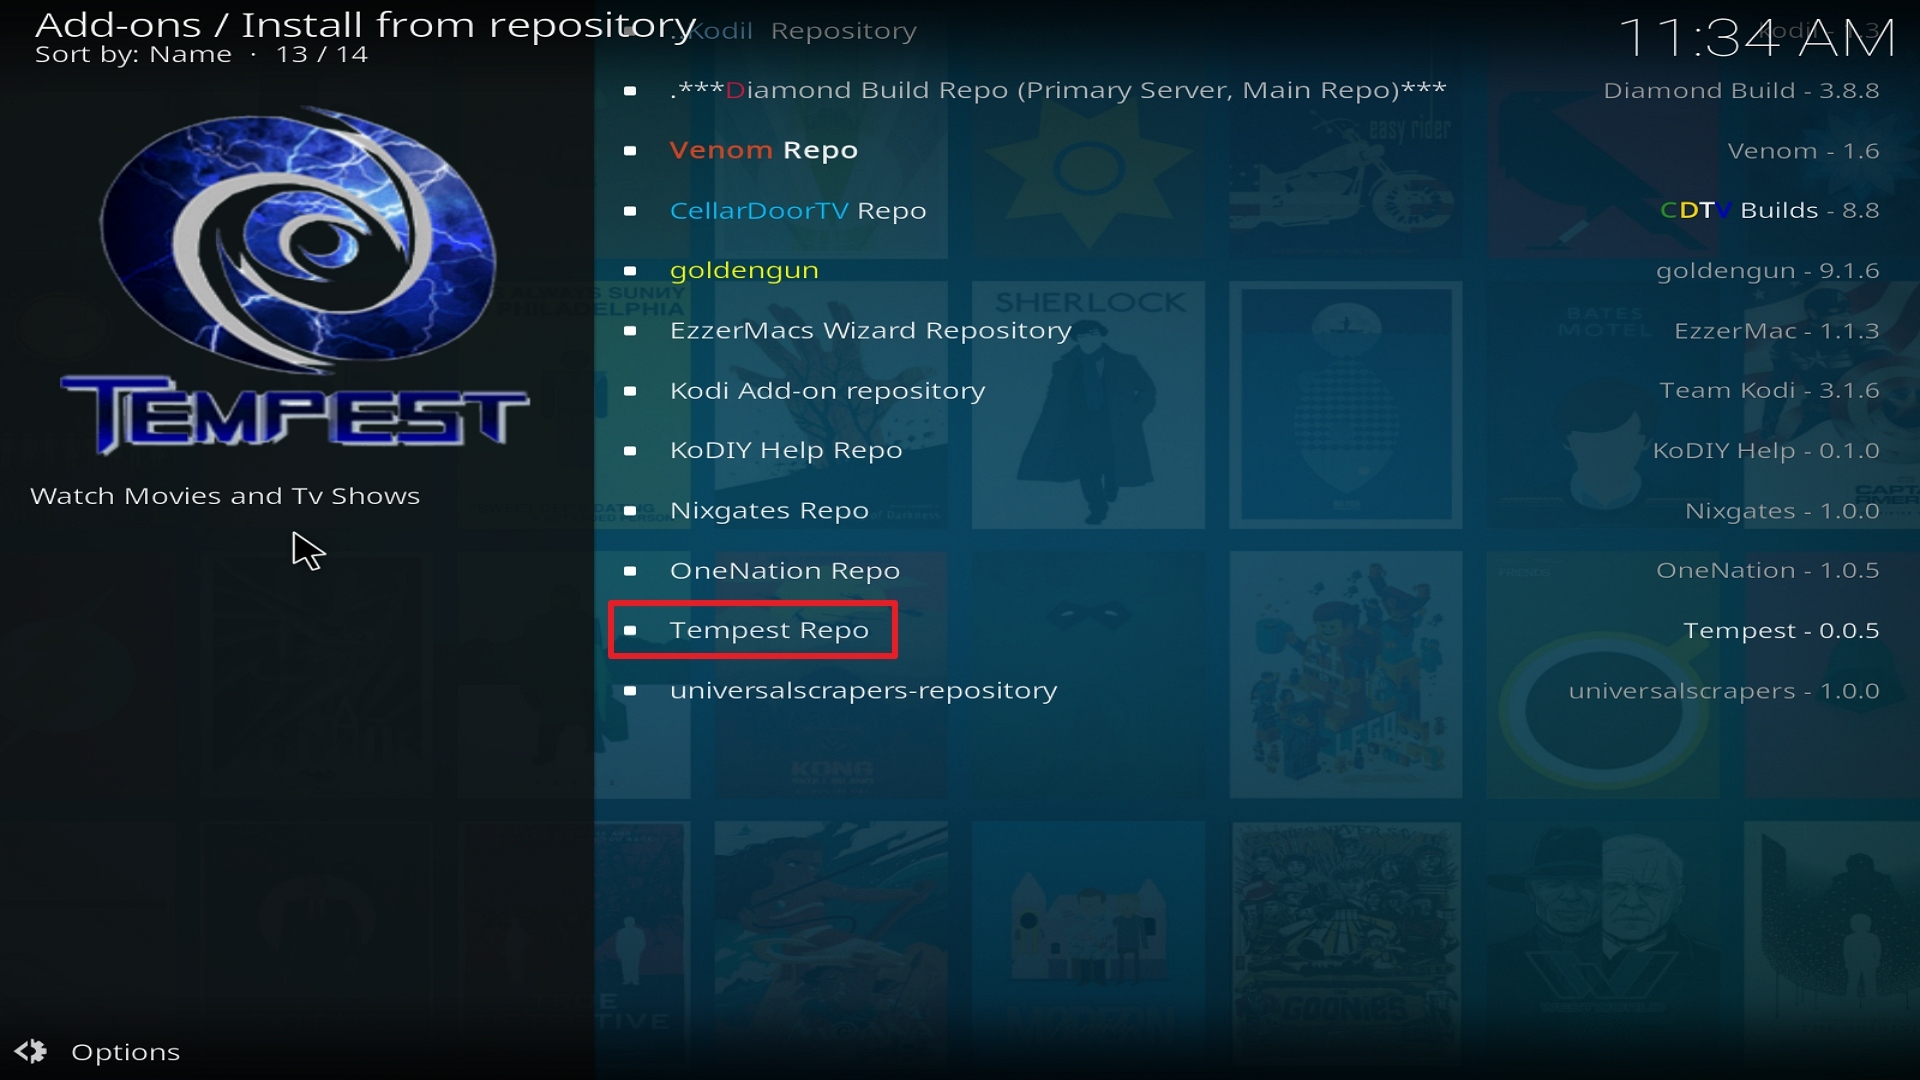
20. Click on Rocks Repo

Step 20 Installing Strikes Movie Zone addon on Kodi


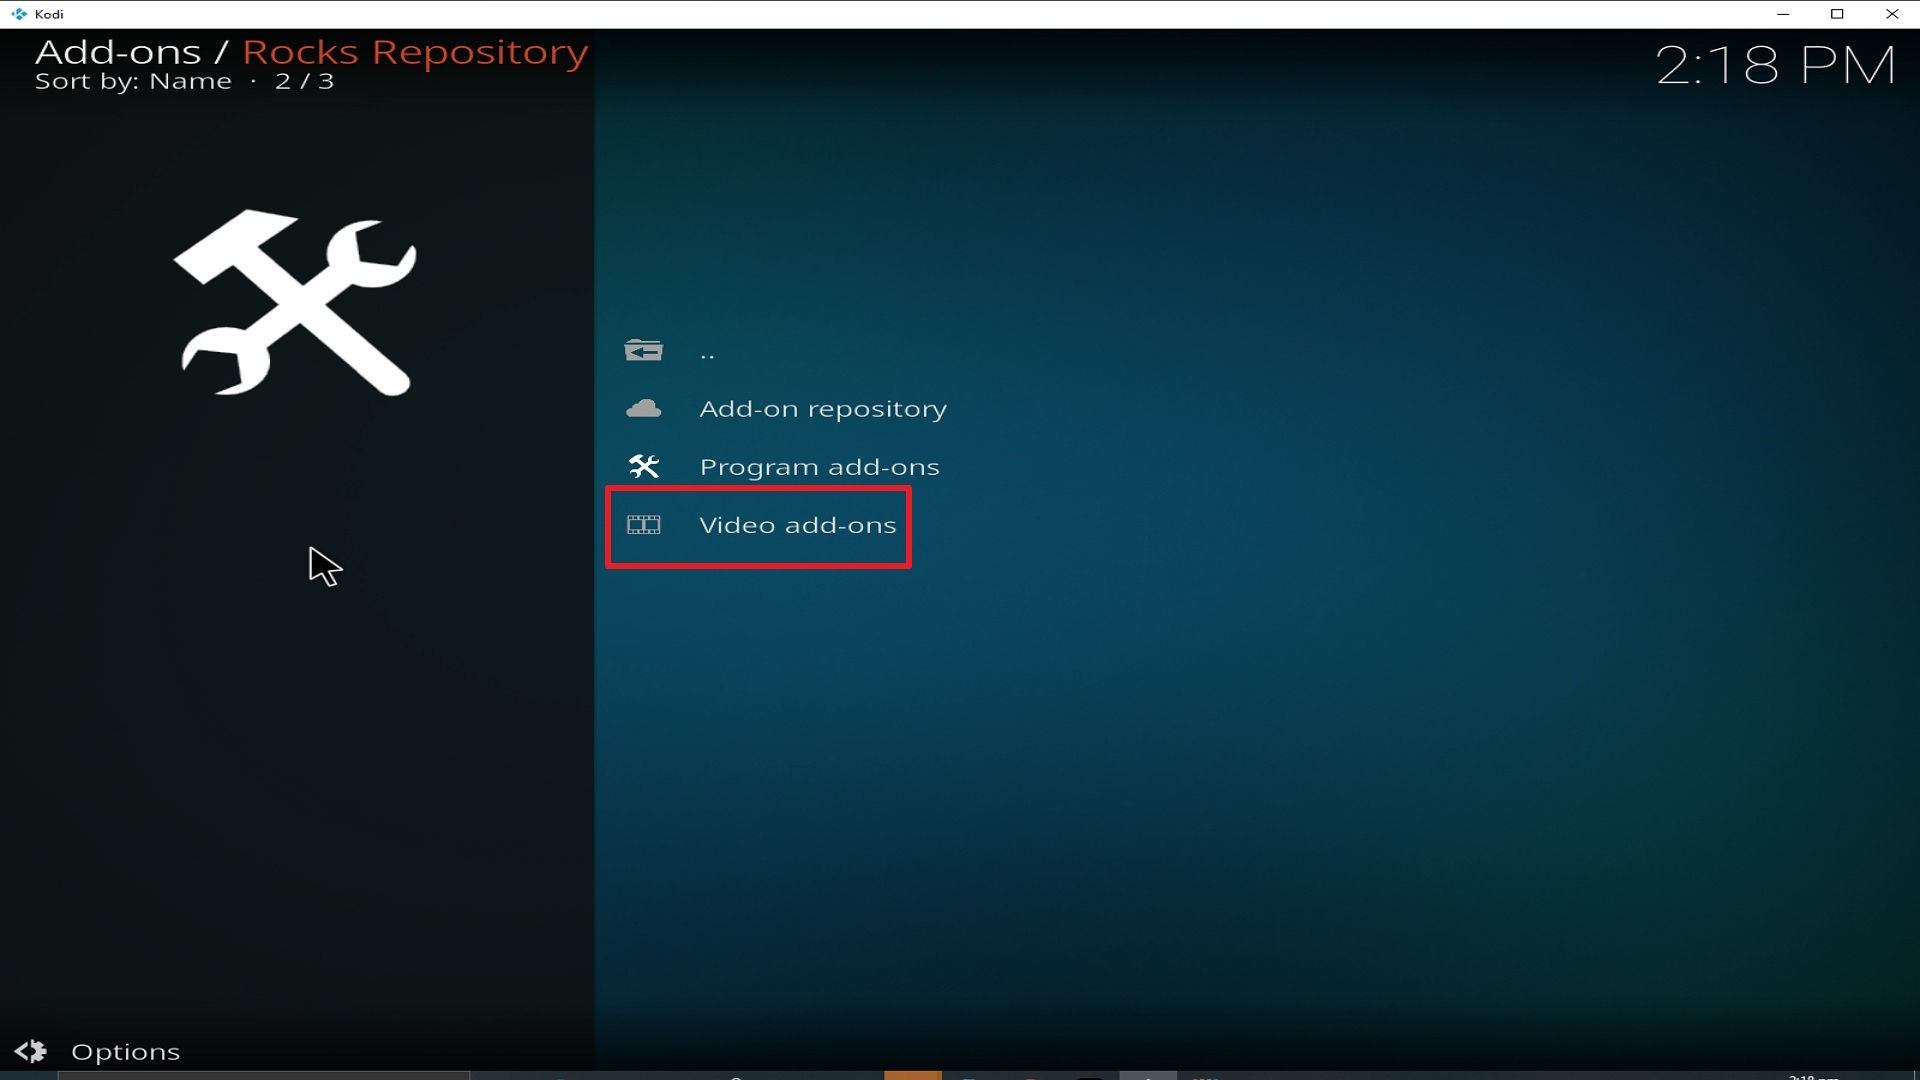
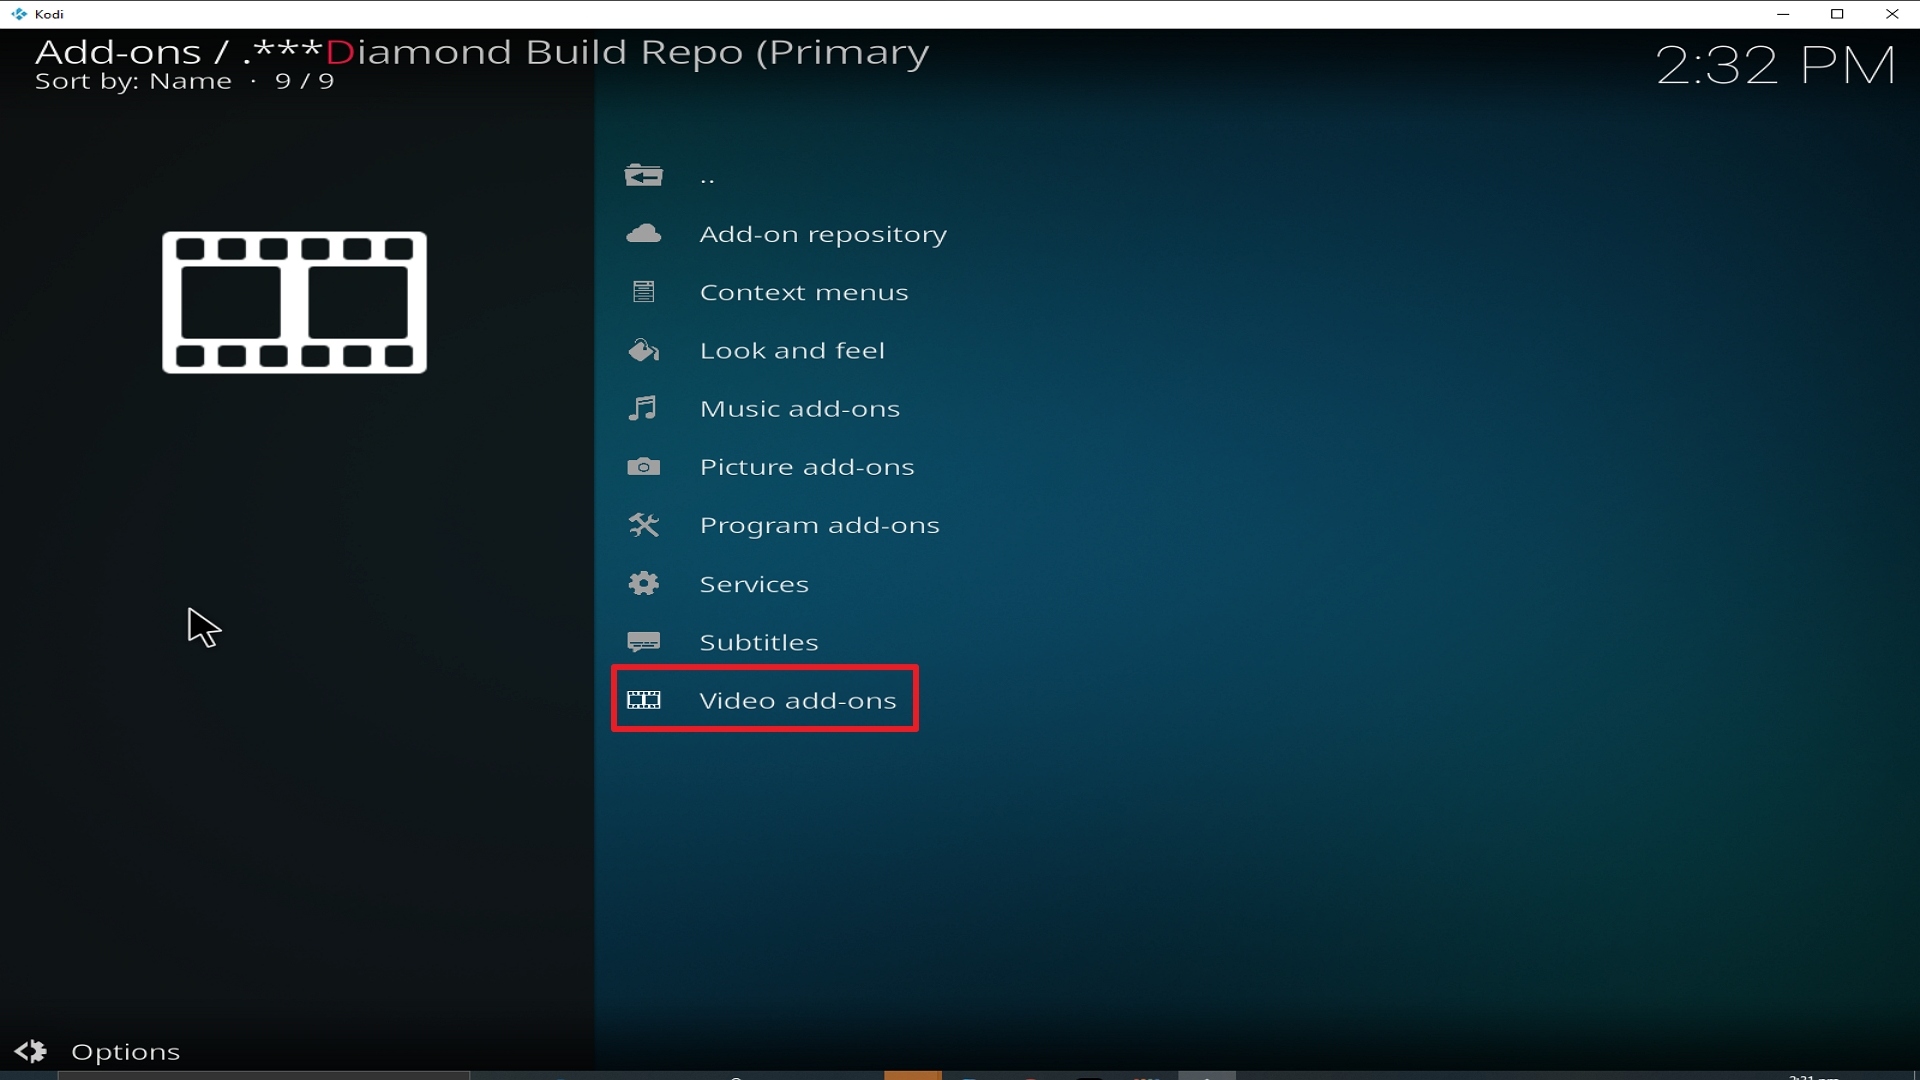
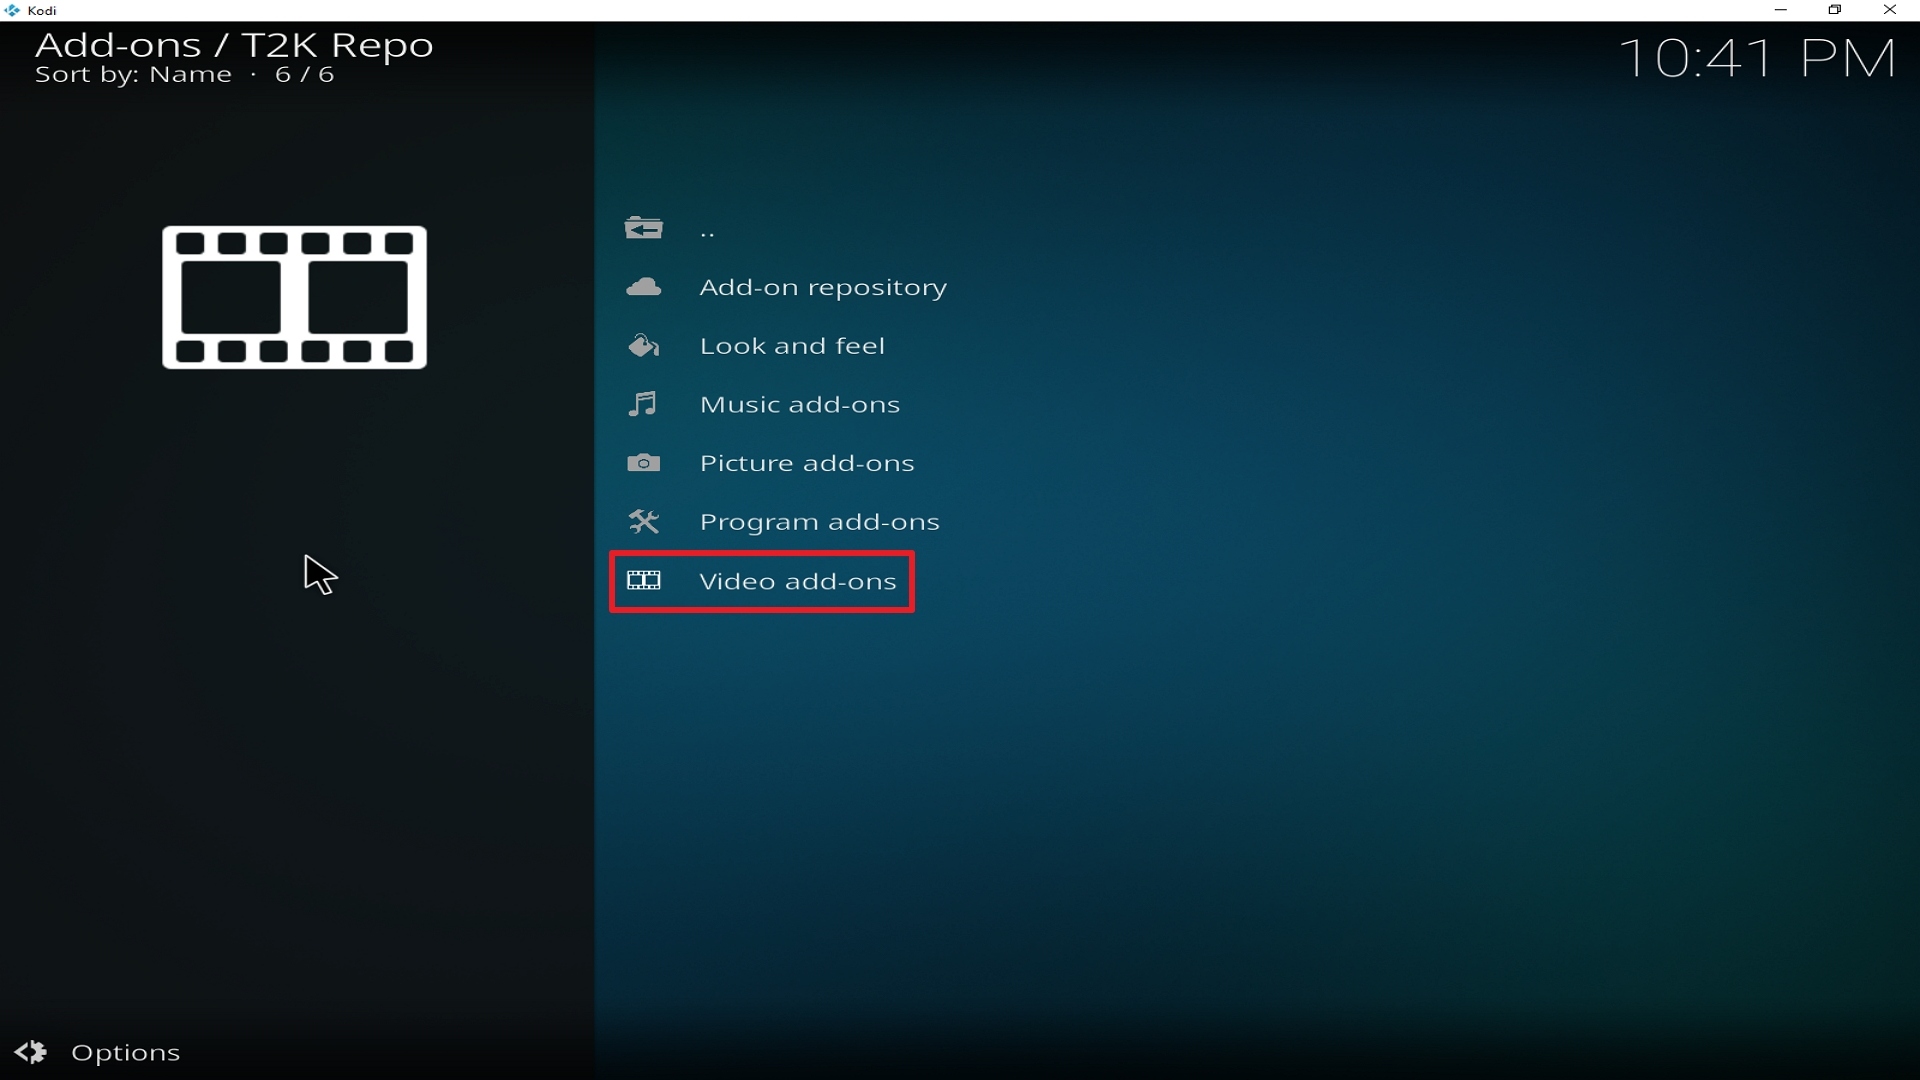
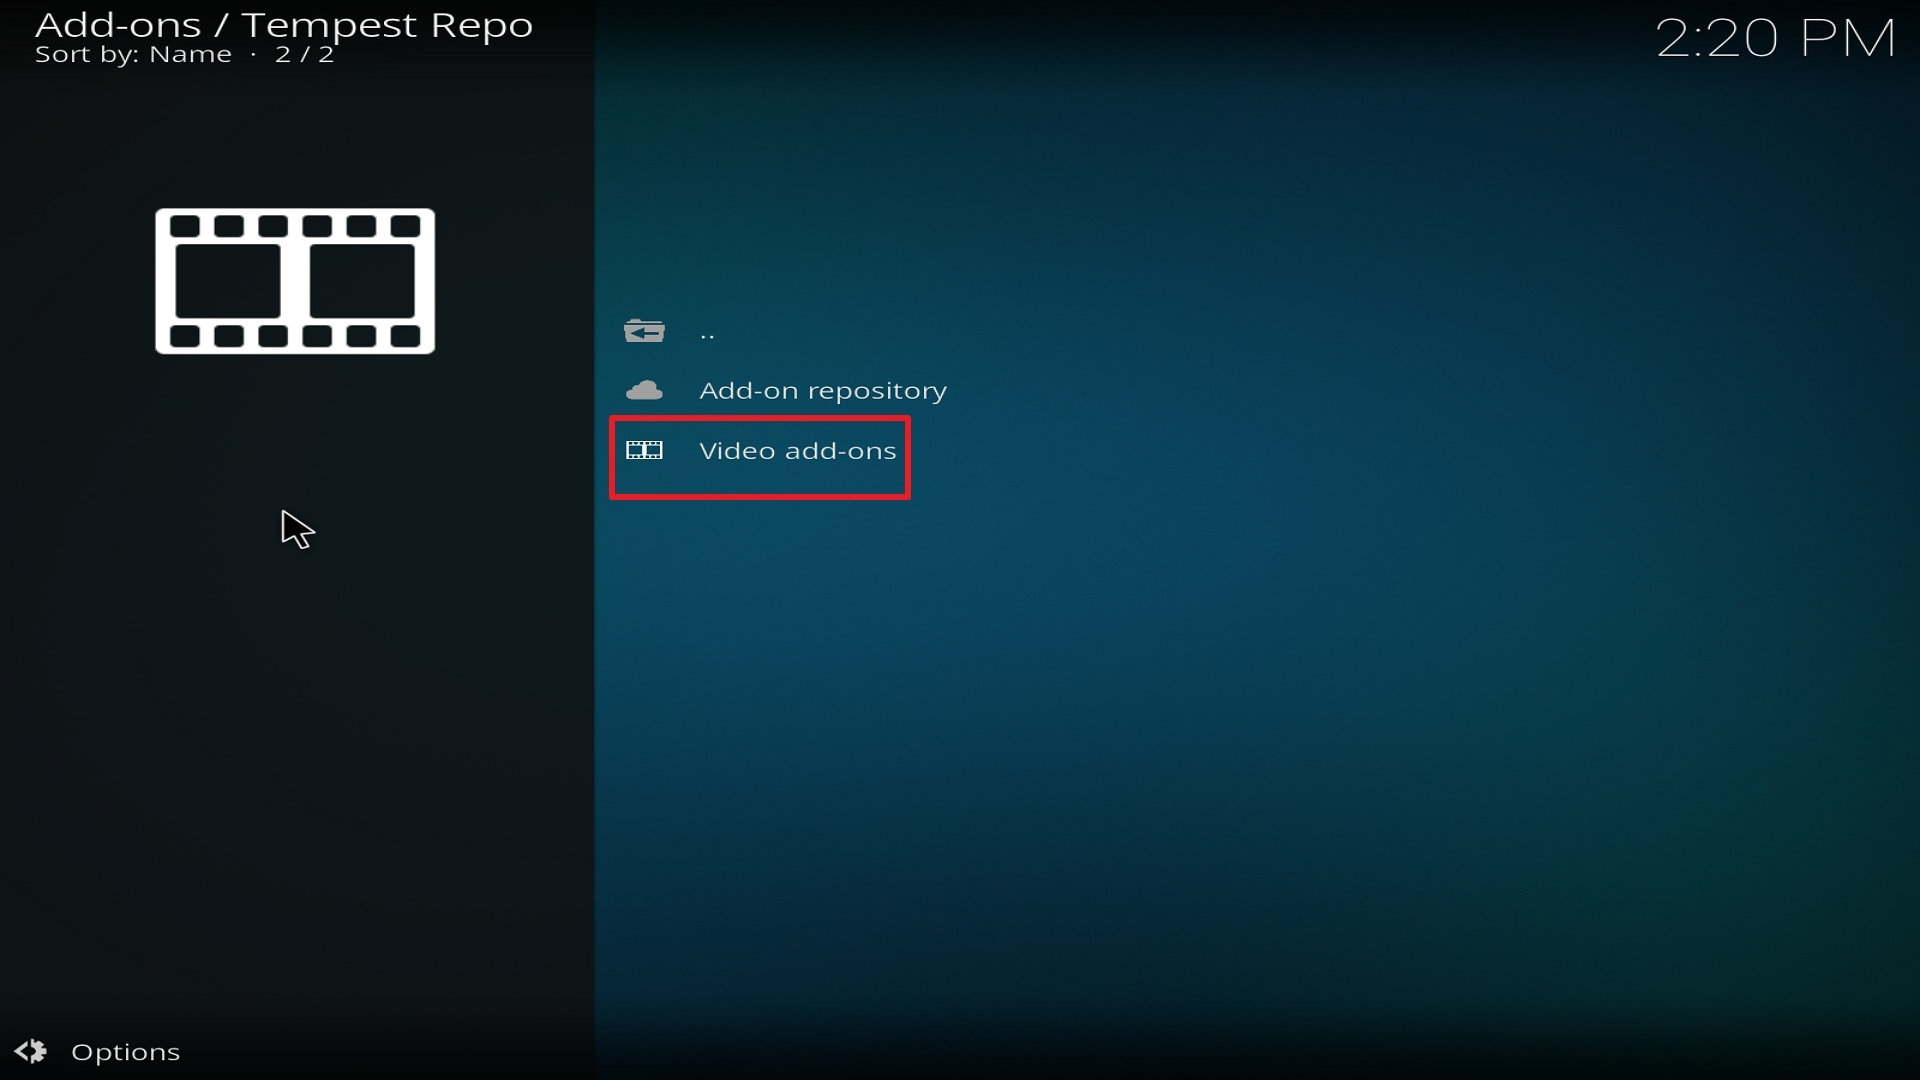
21. Pick Video add-ons.

Step 21 Installing Strikes Movie Zone addon on Kodi


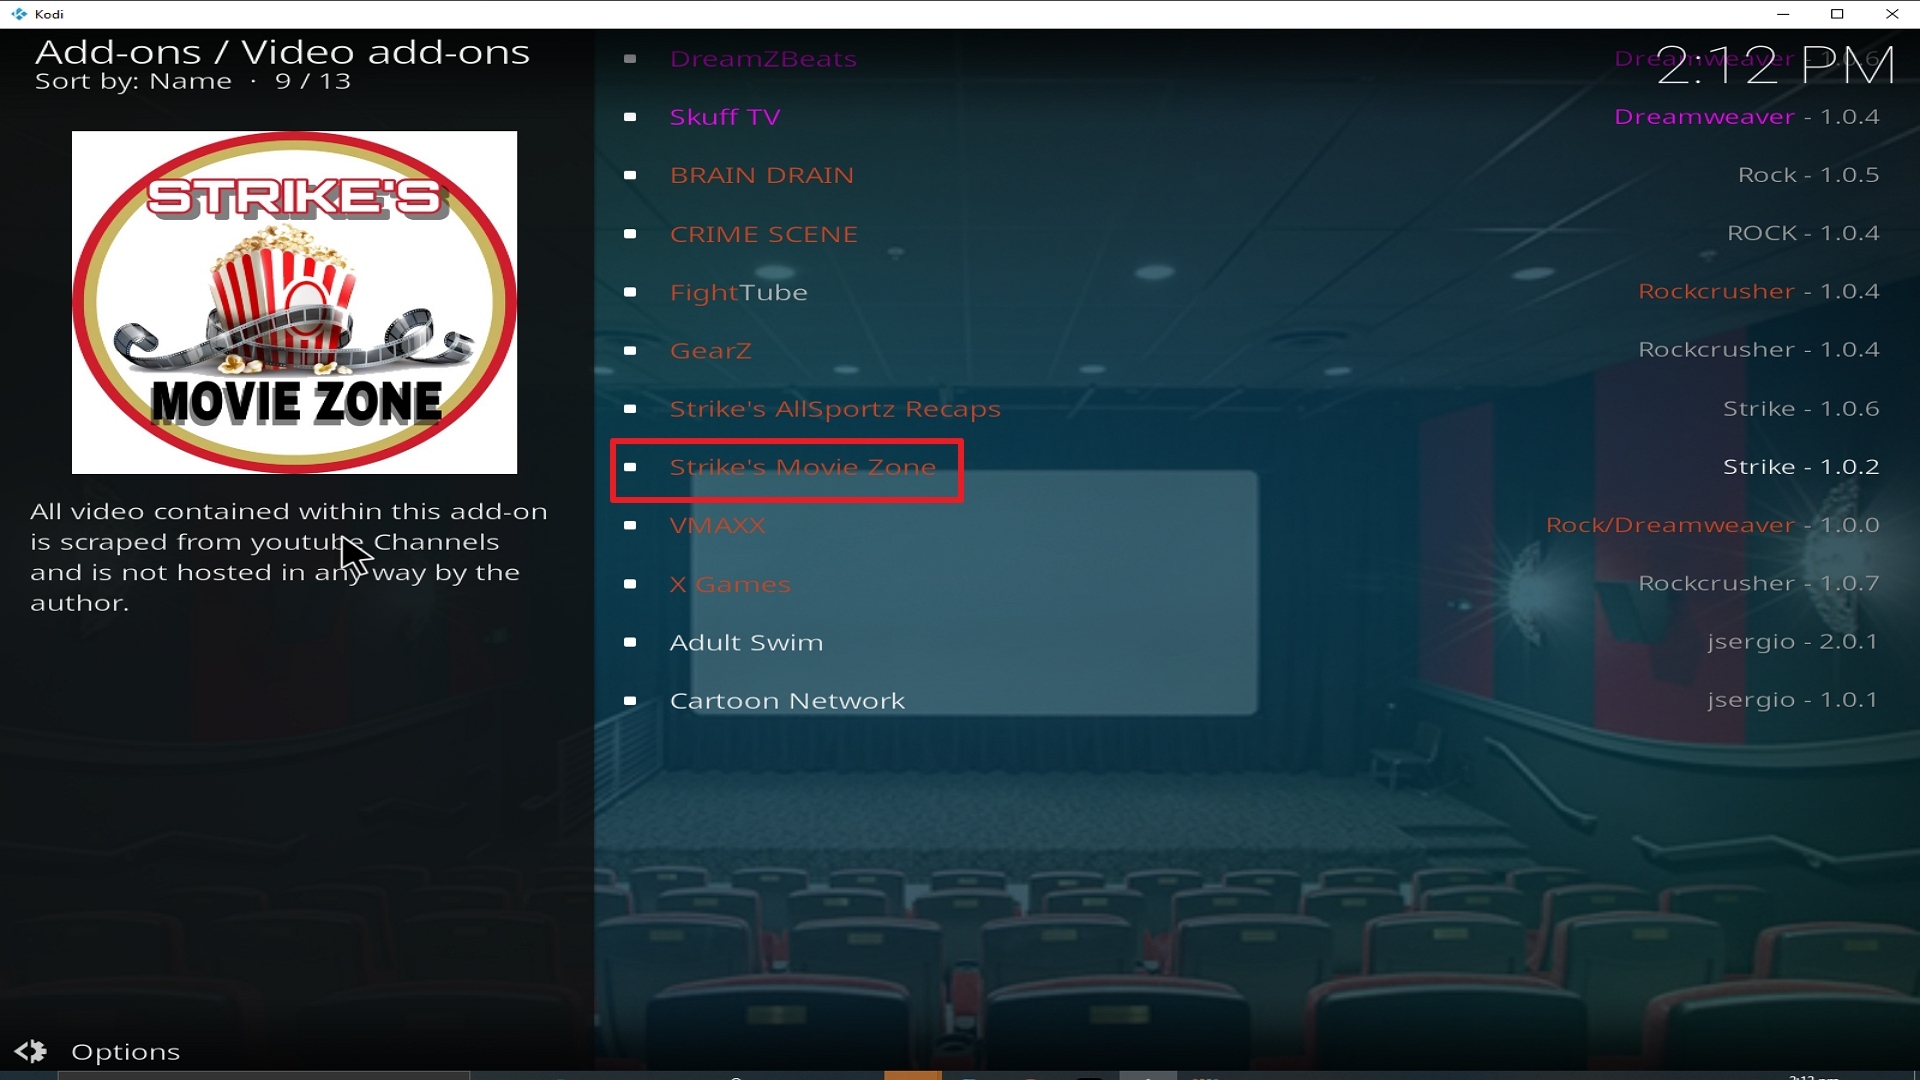
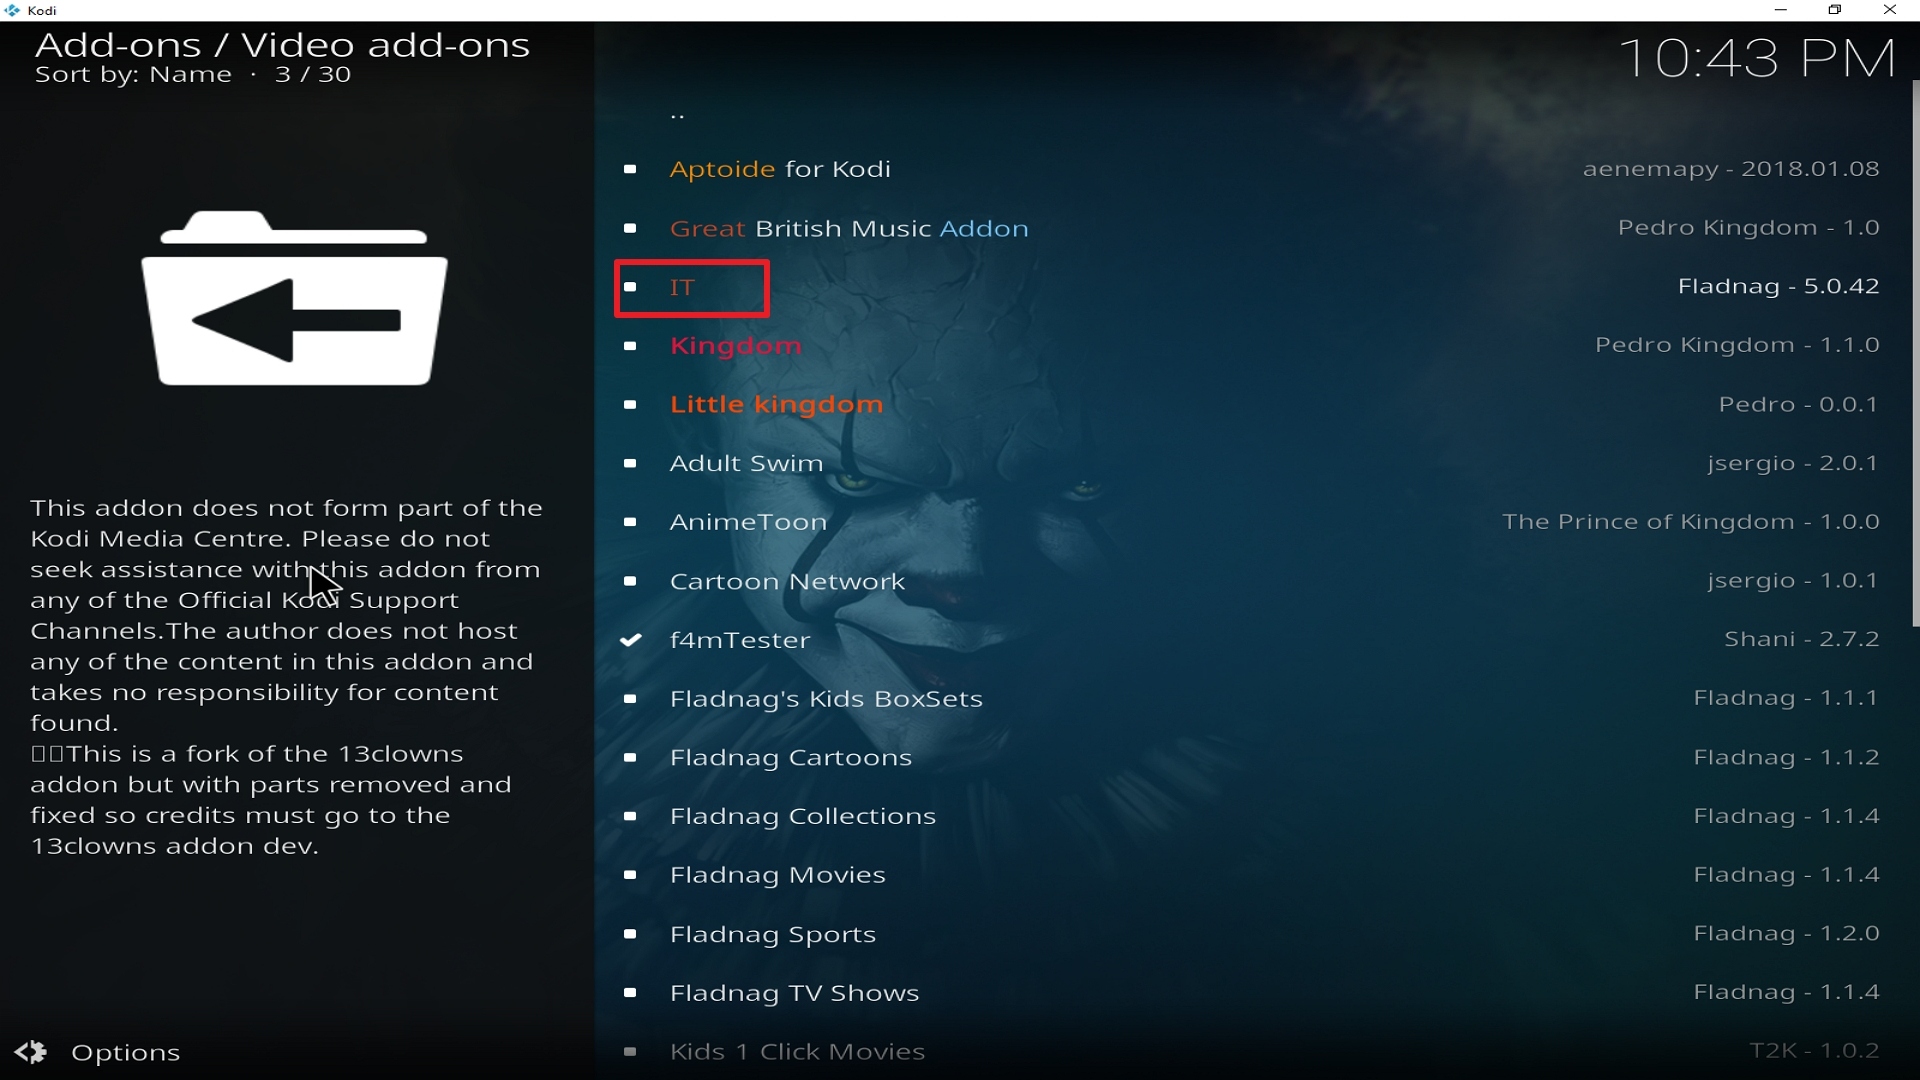
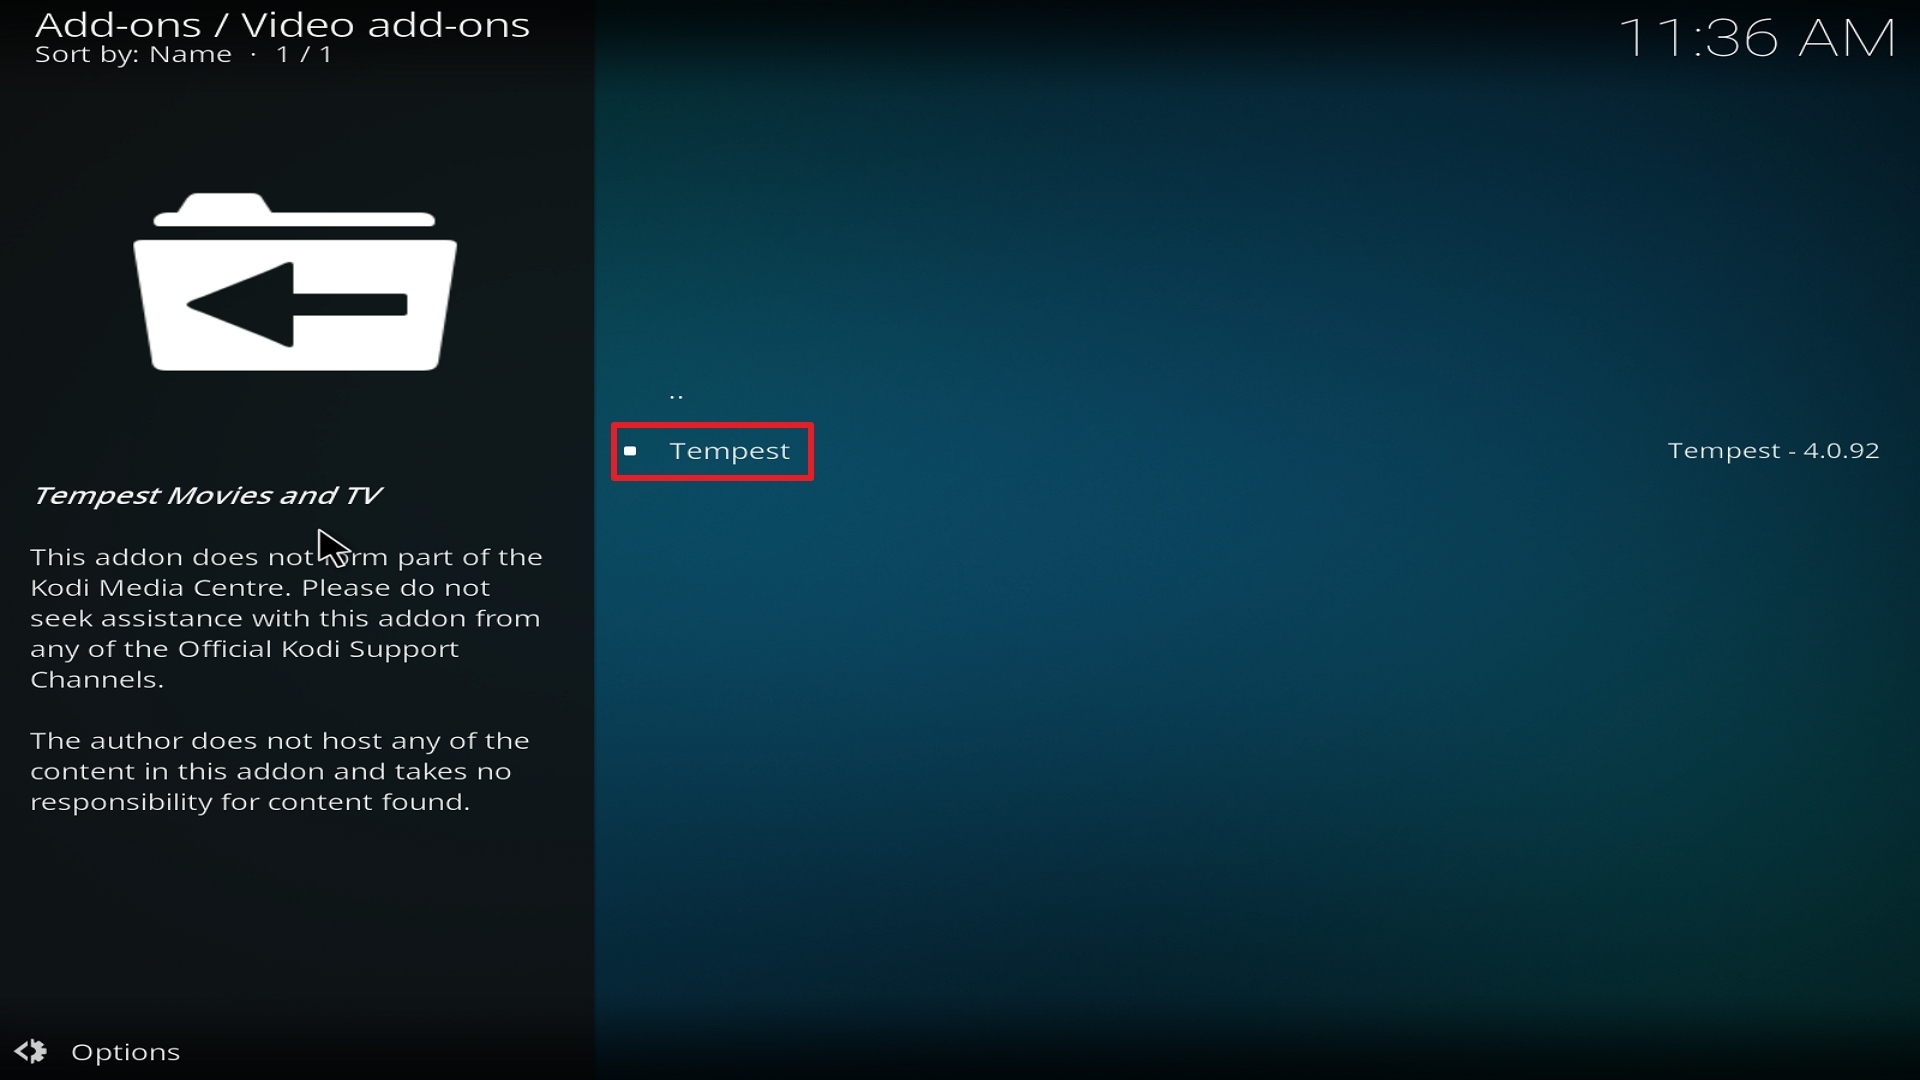
22. Select Strikes Movie Zone again.

Step 22 Installing Strikes Movie Zone addon on Kodi


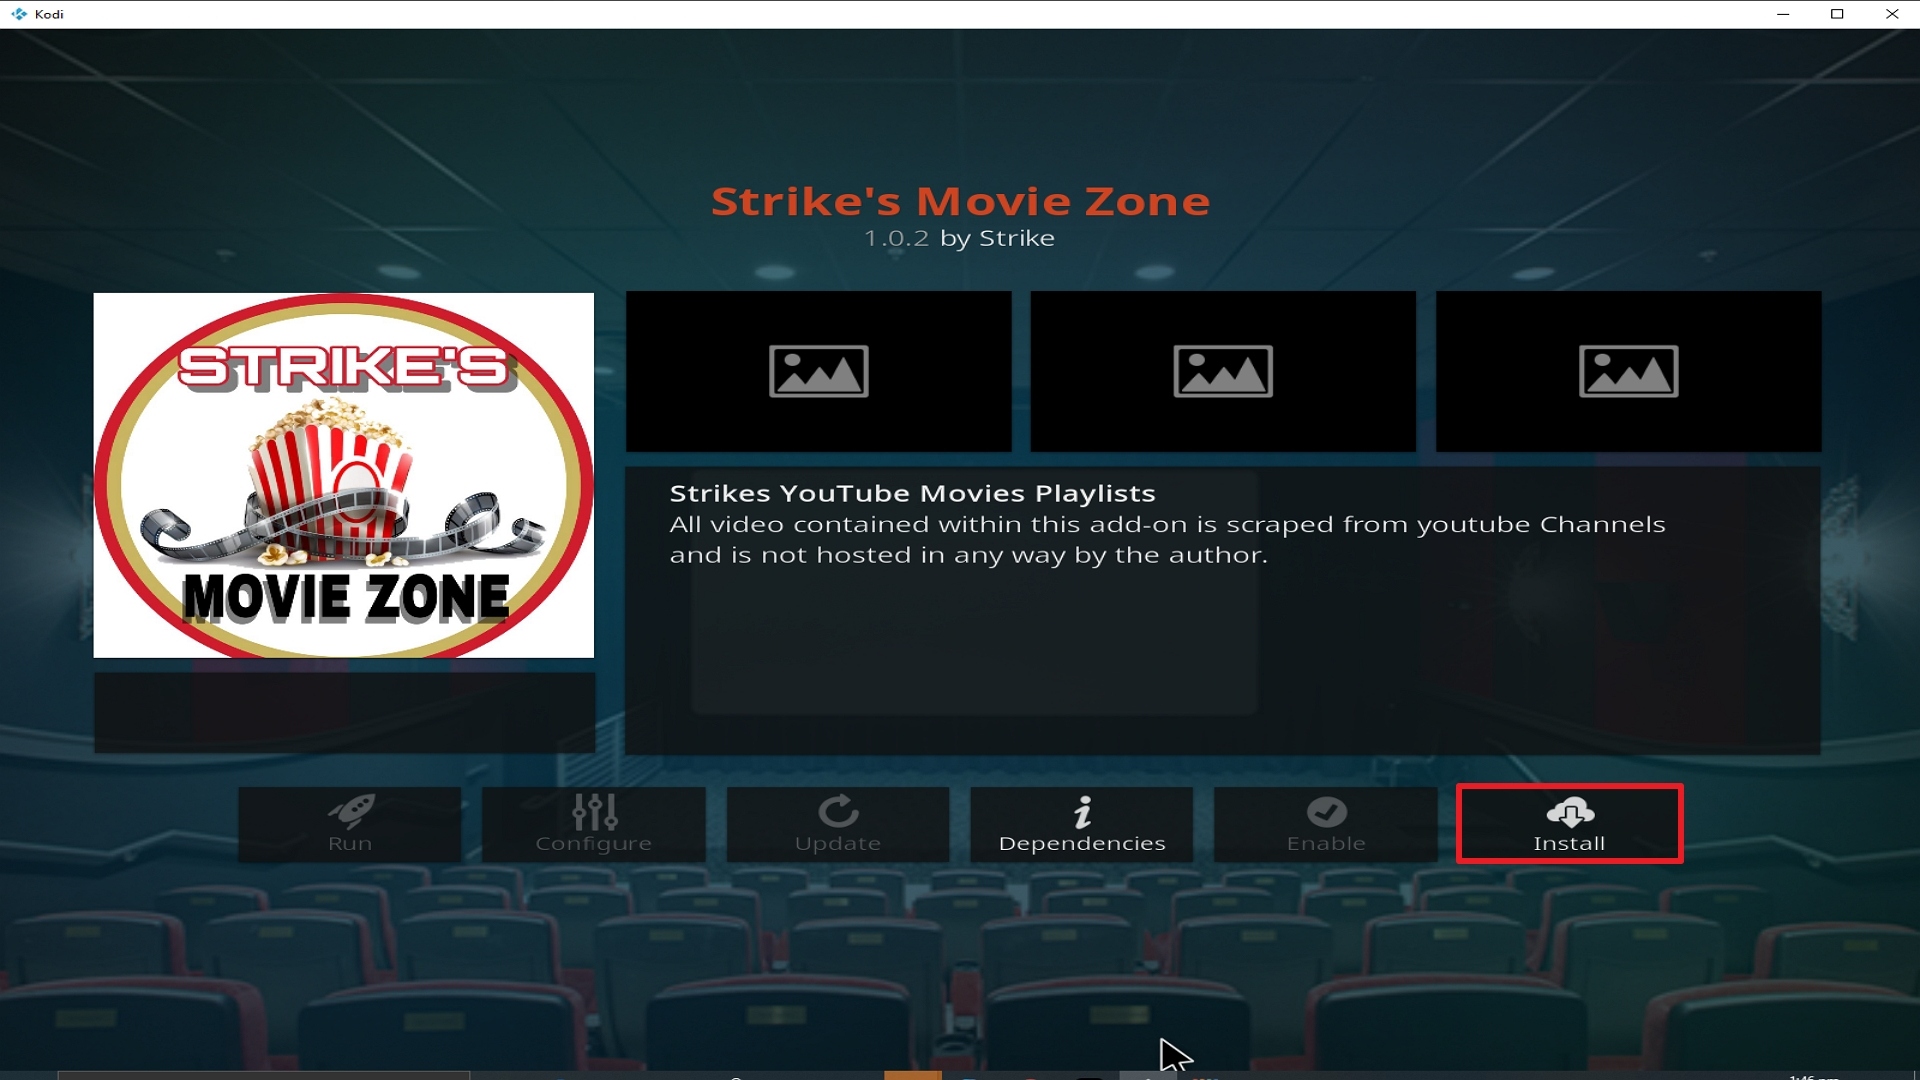
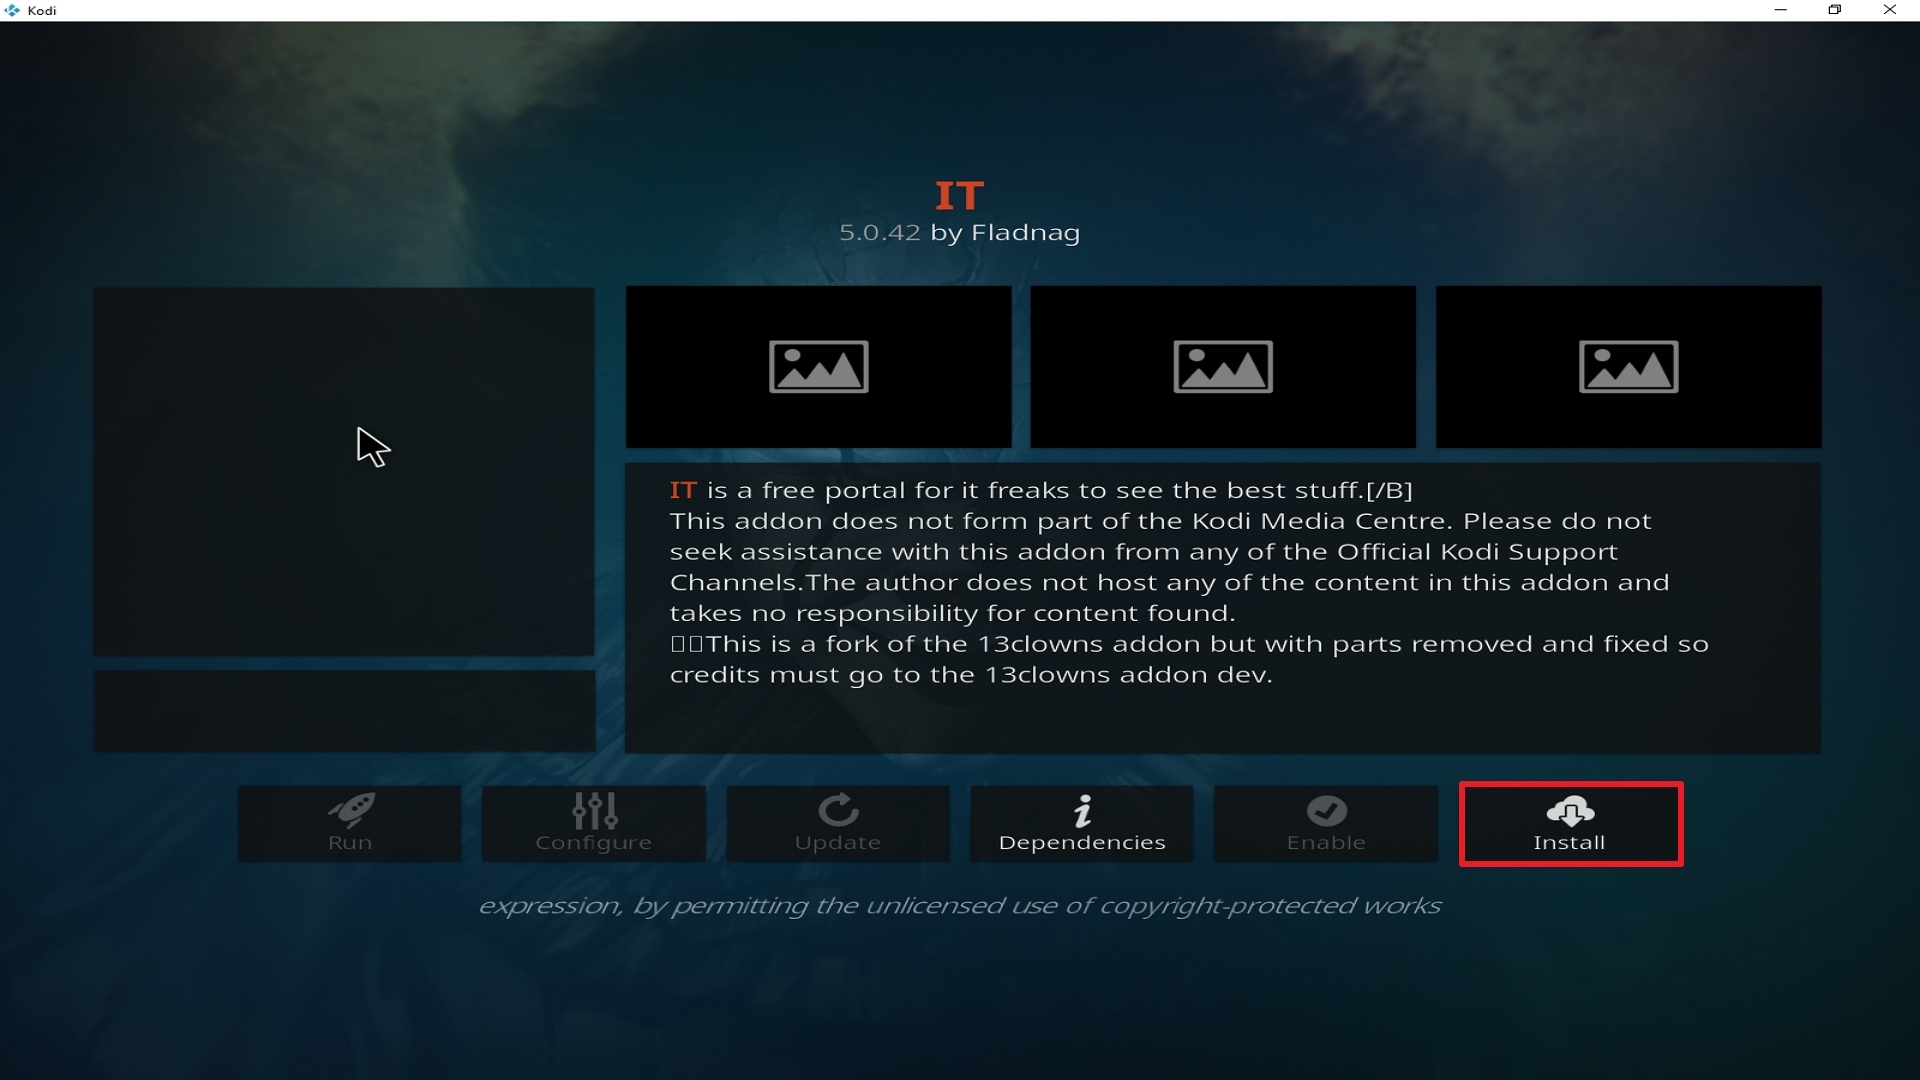
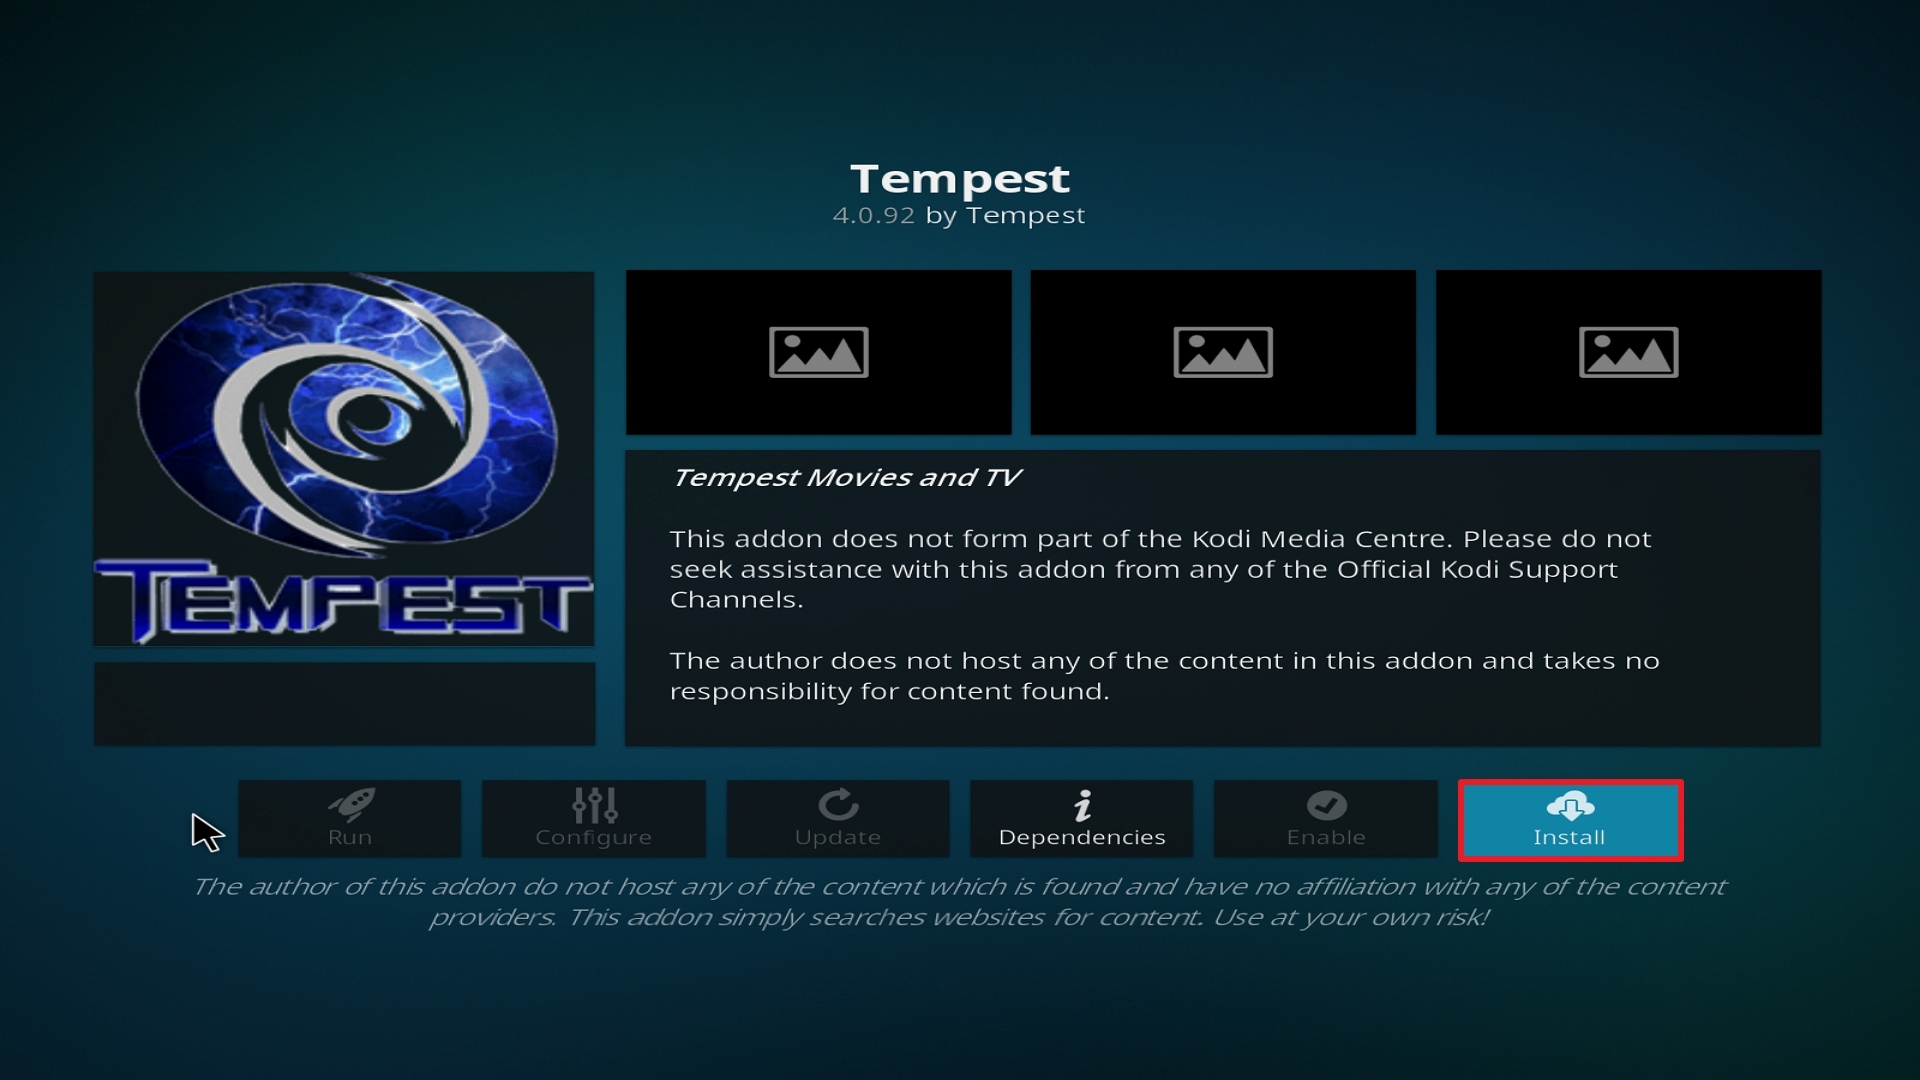
23. Click on Install. 

Step 23 Installing Strikes Movie Zone addon on Kodi


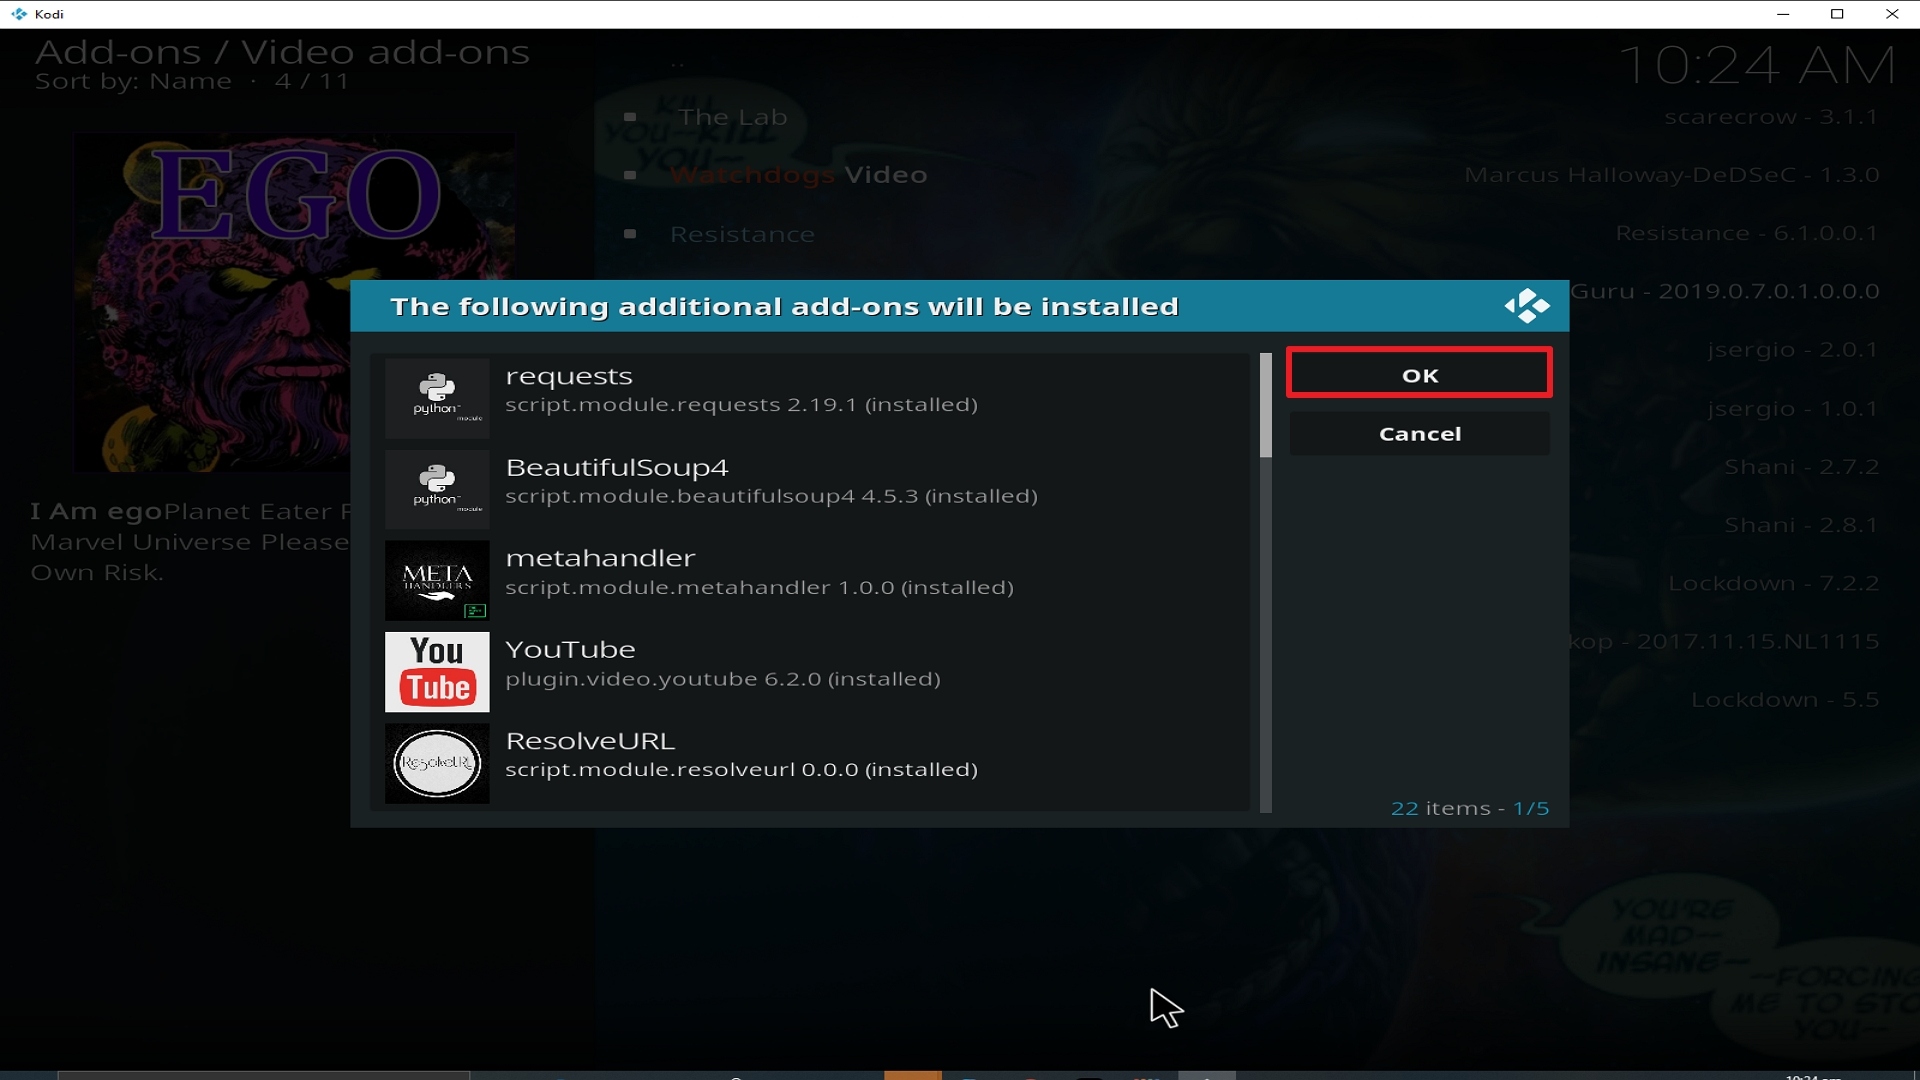
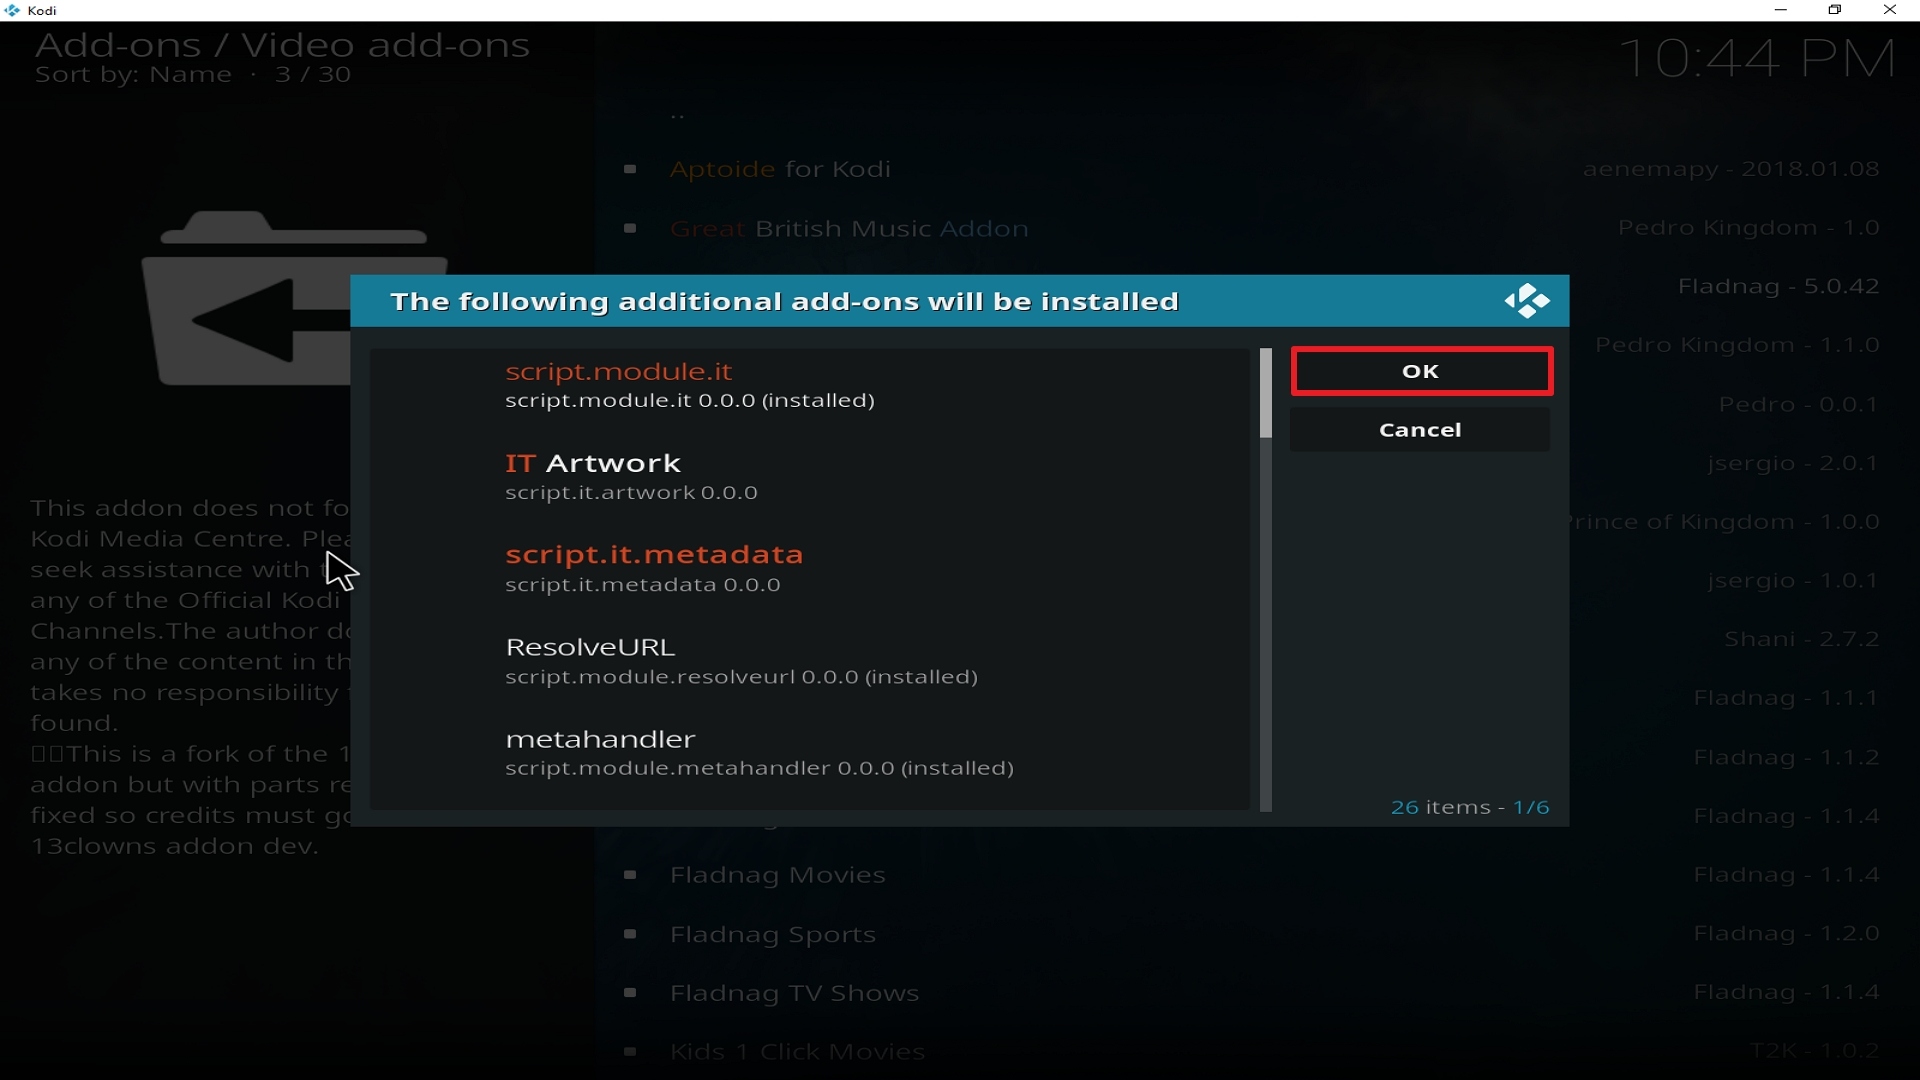
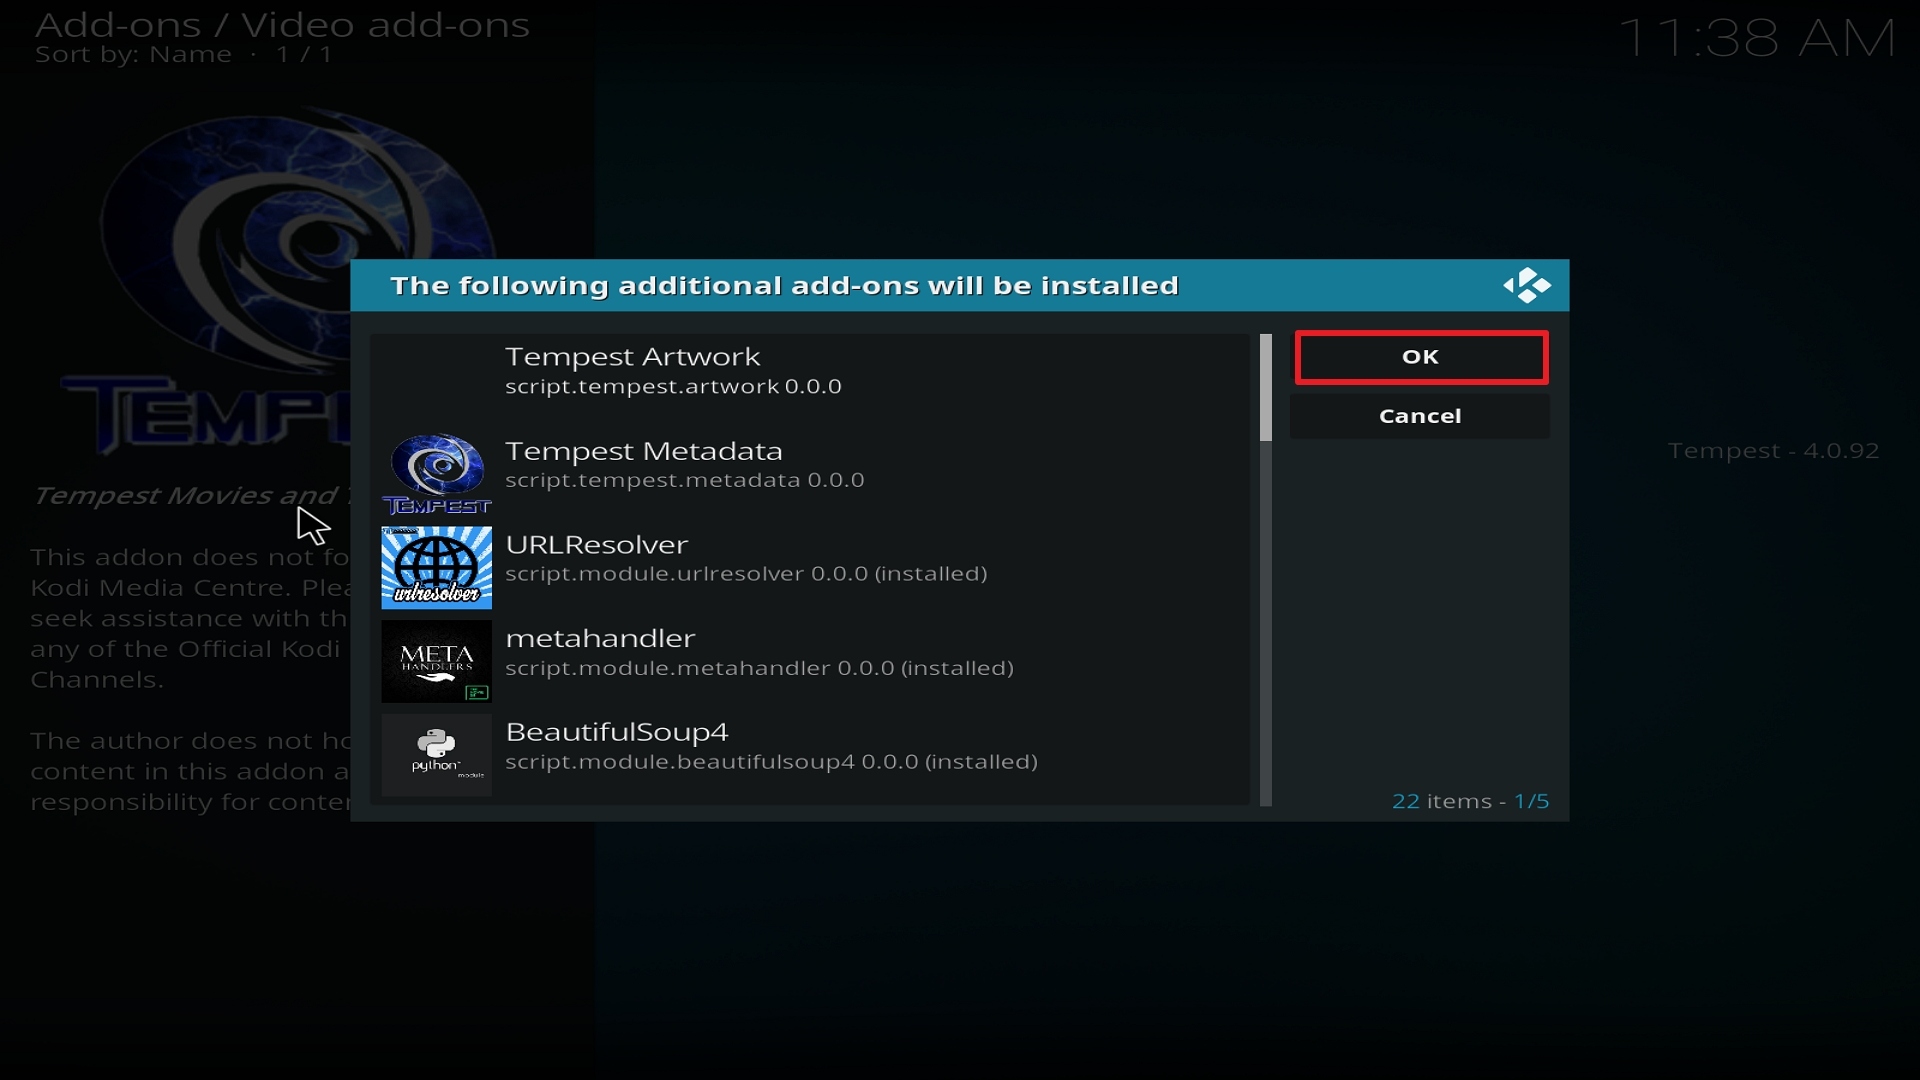
24. Select OK after reviewing the add-ons that will be installed.
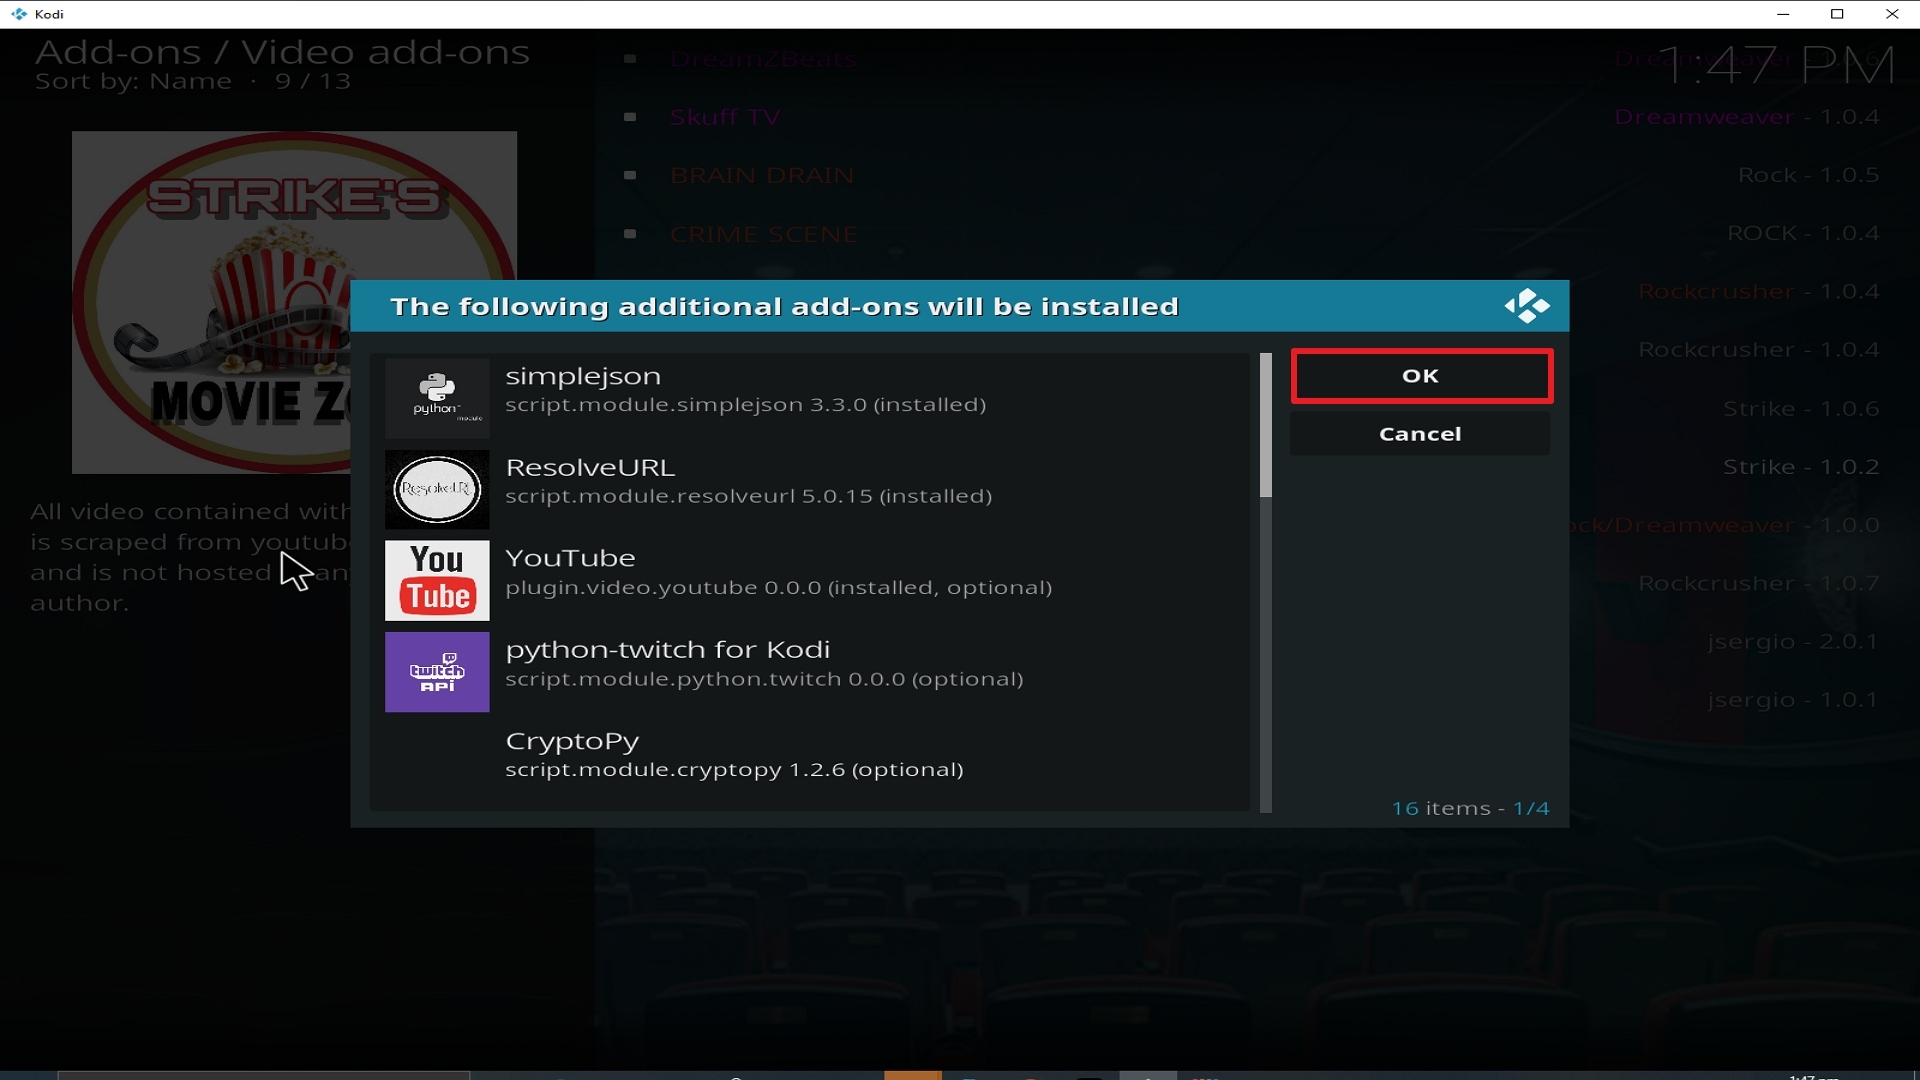
Step 24 Installing Strikes Movie Zone addon on Kodi


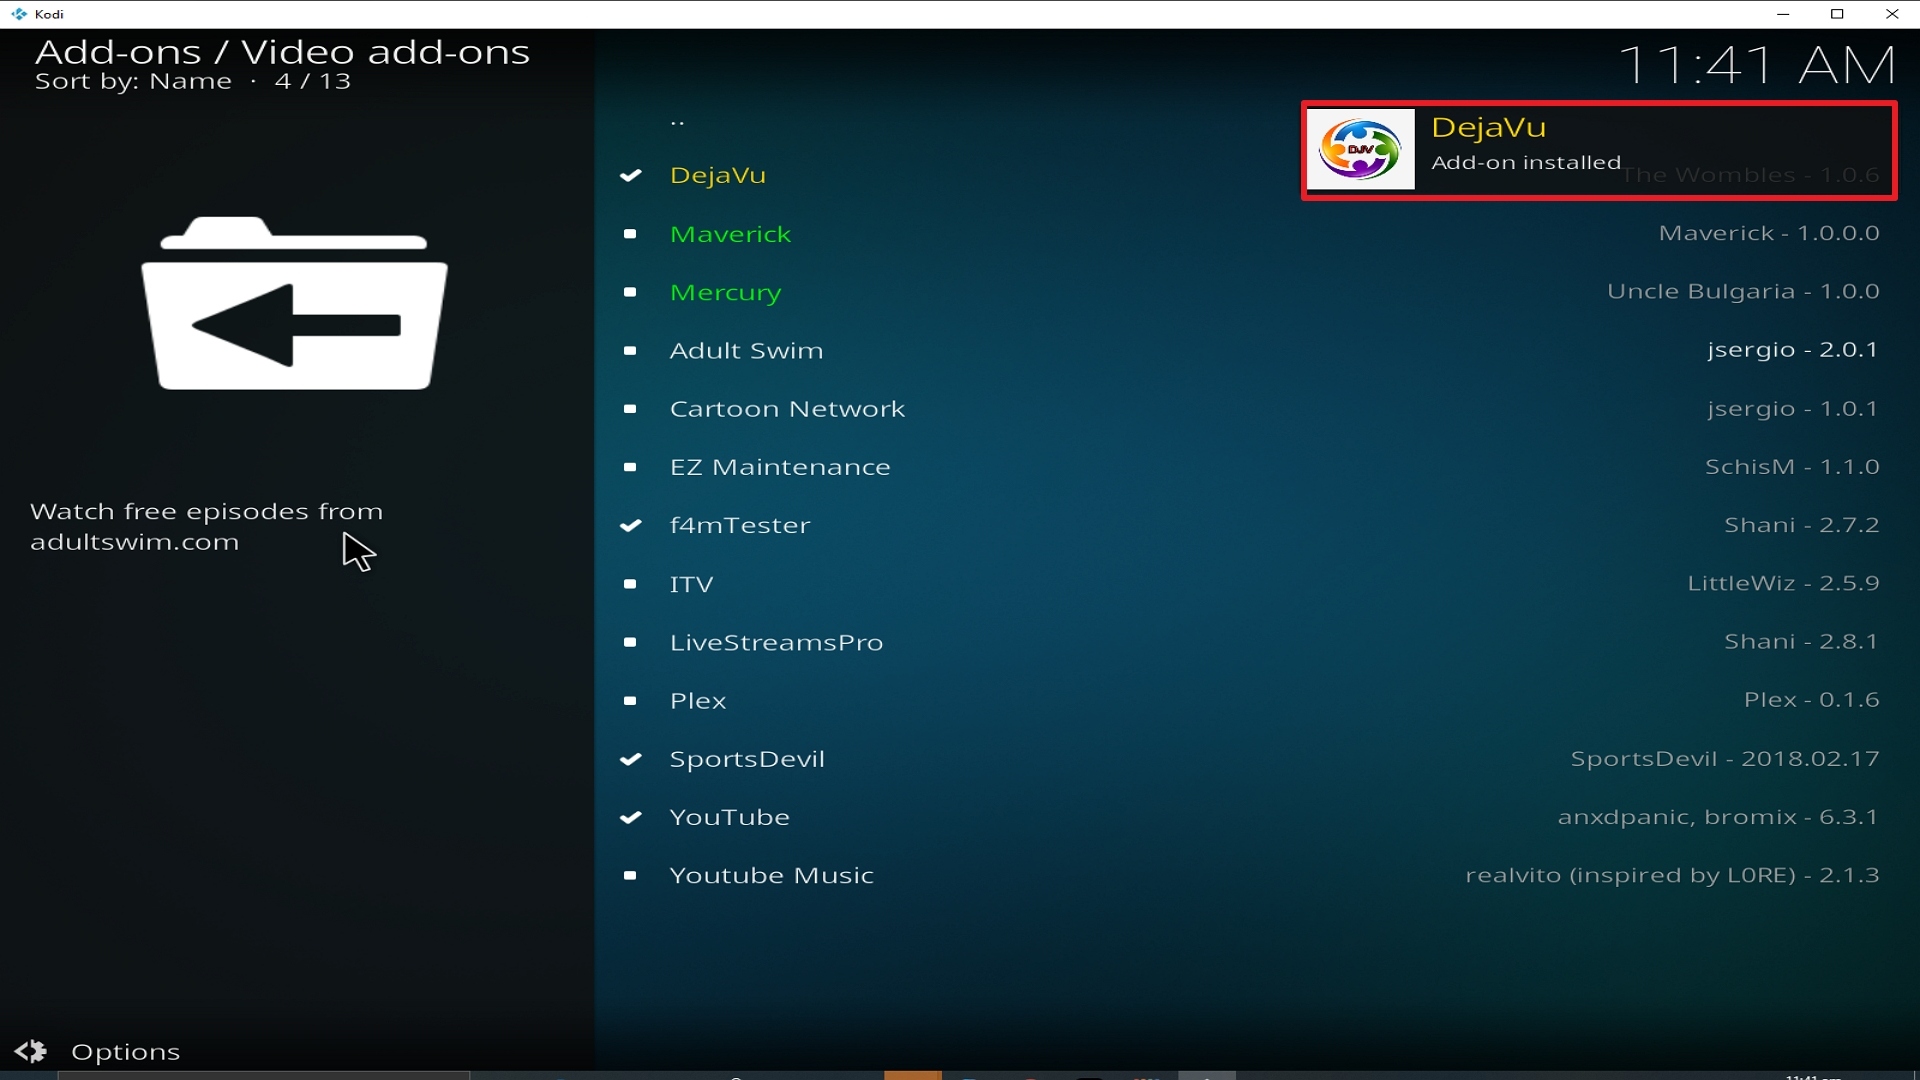
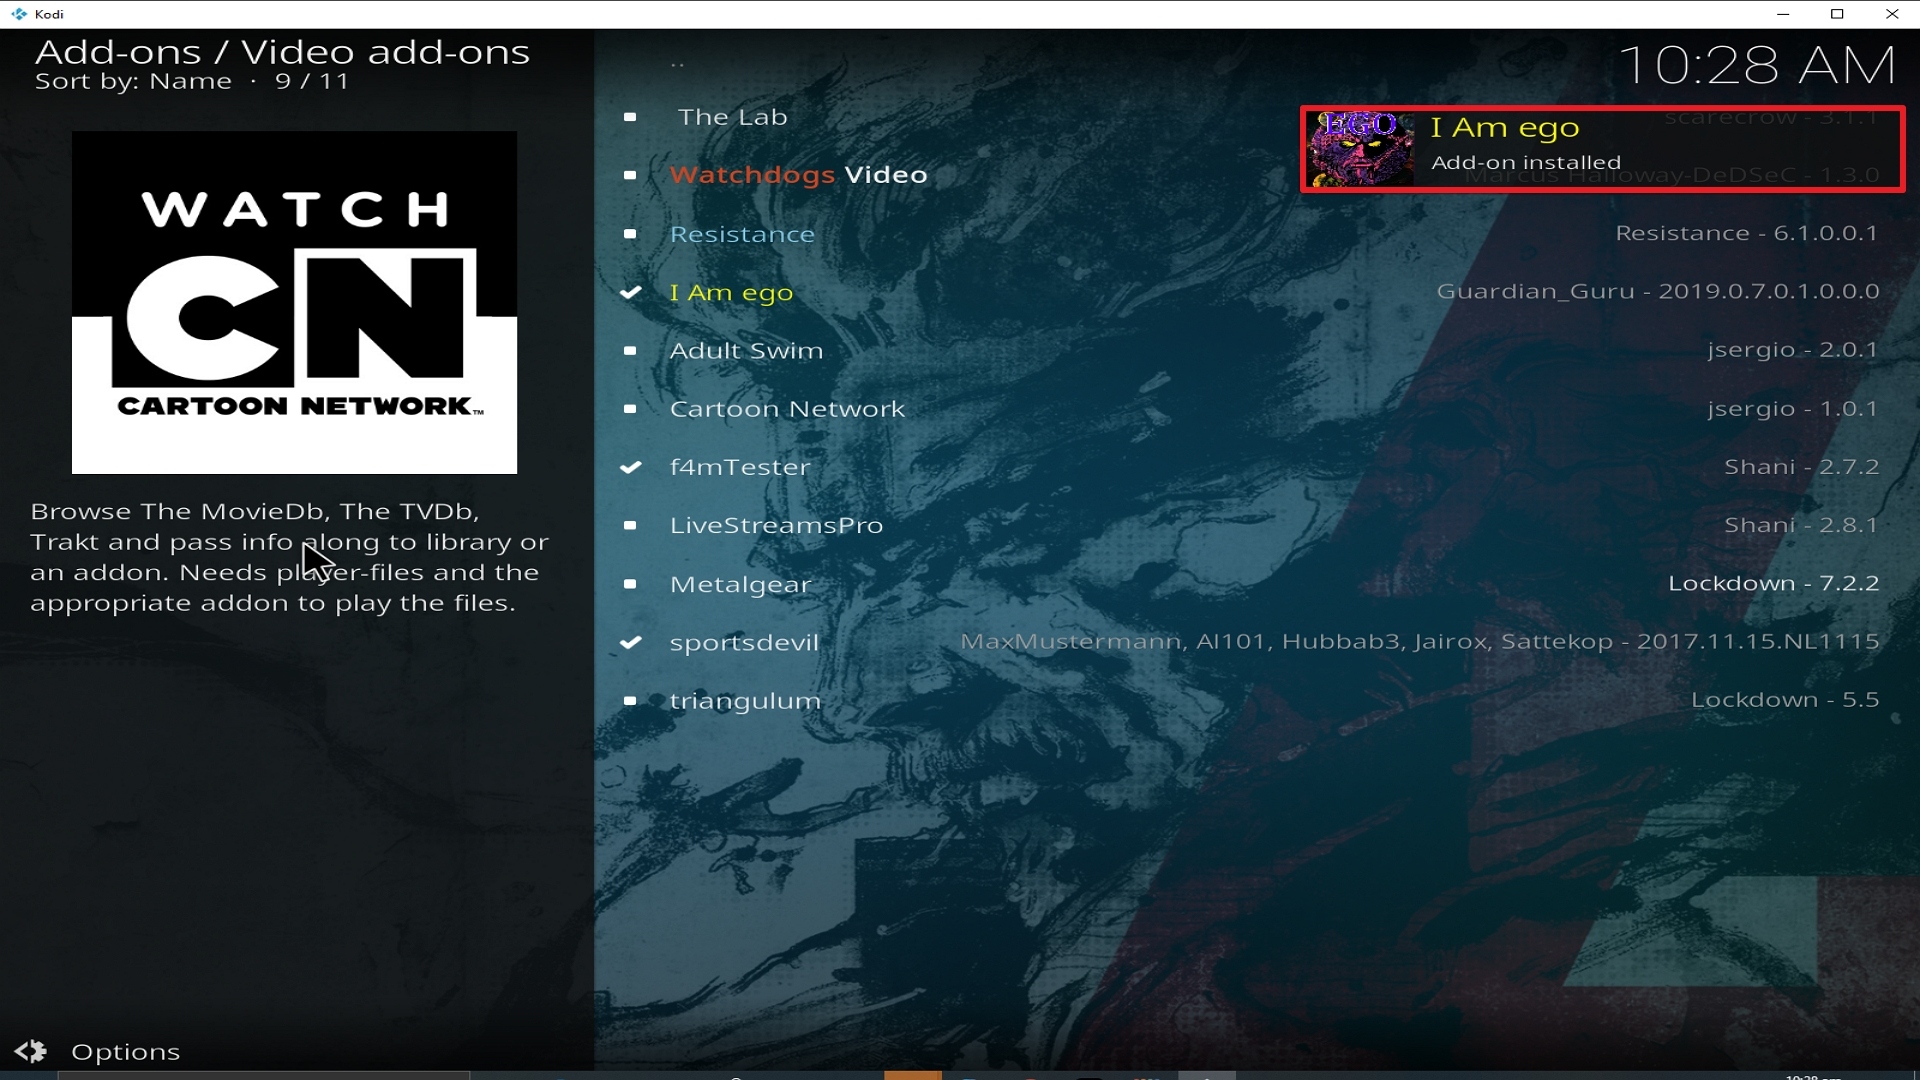
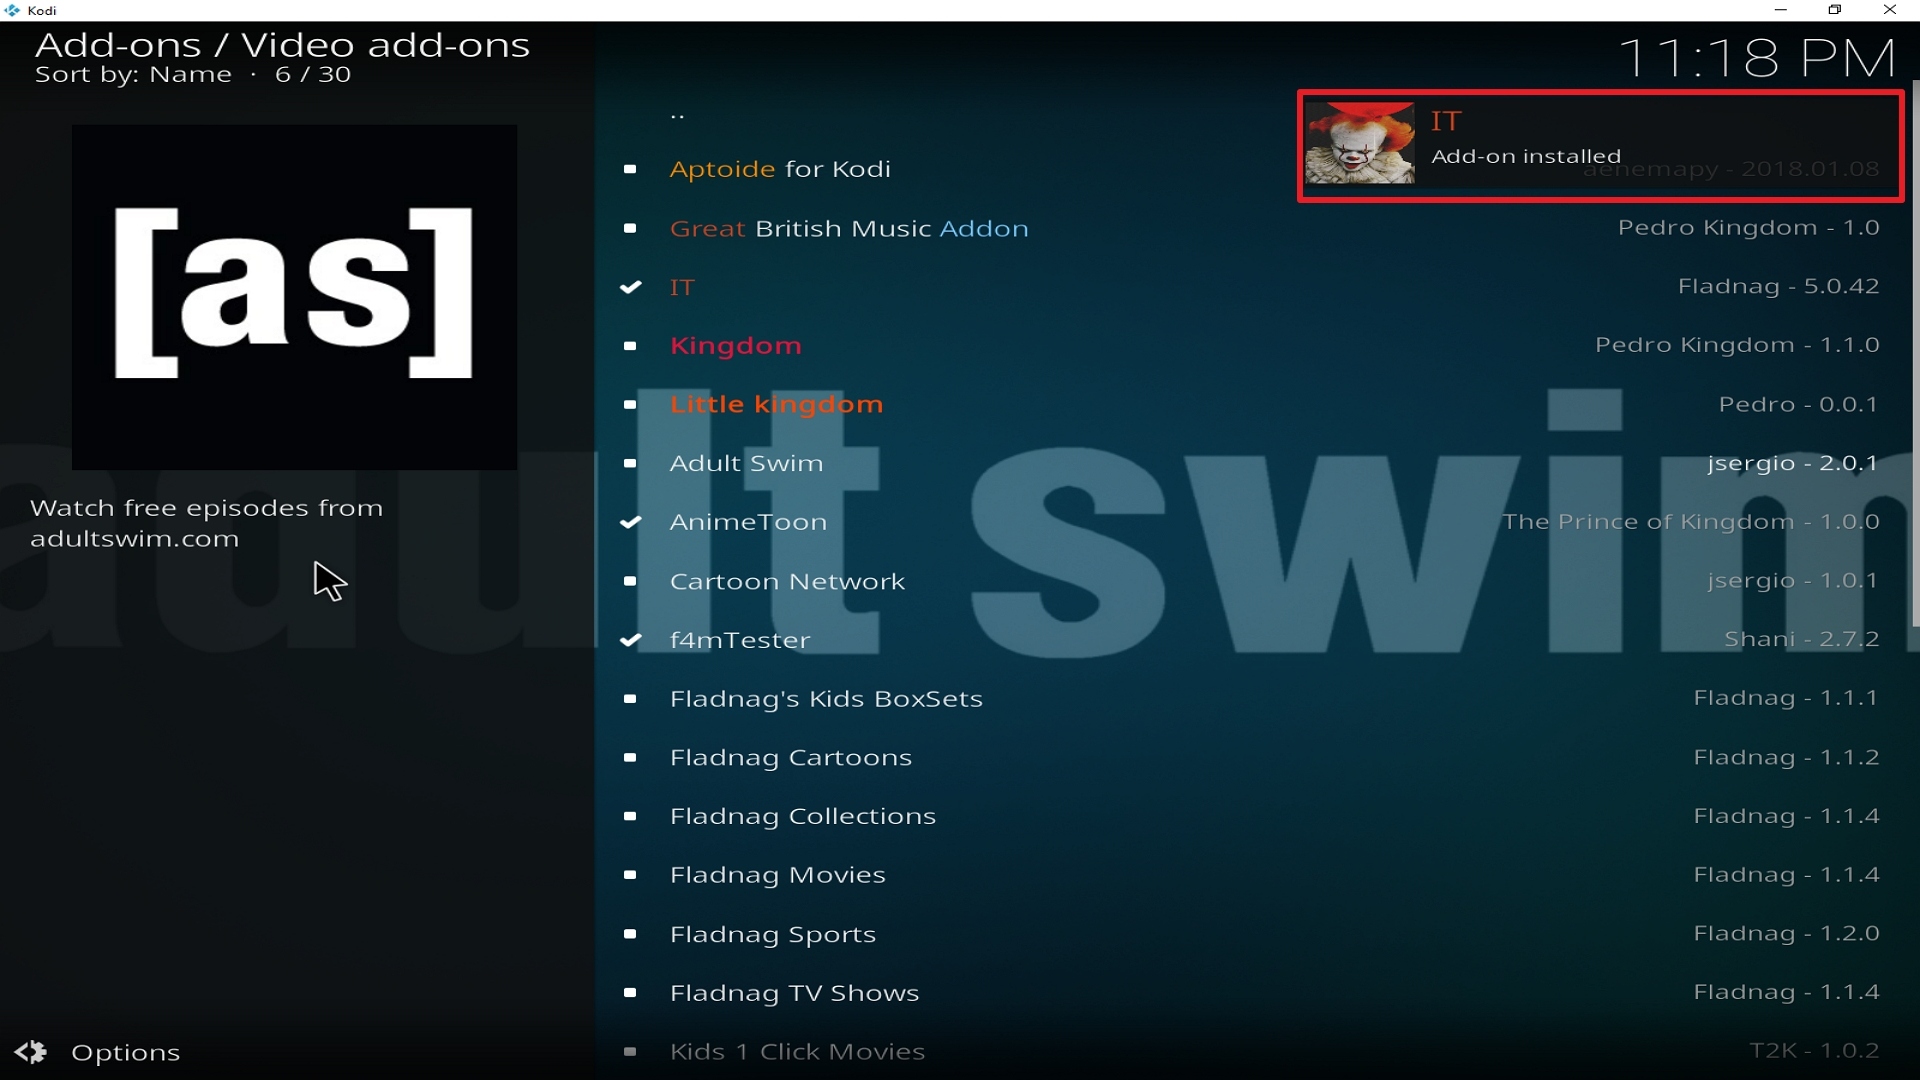
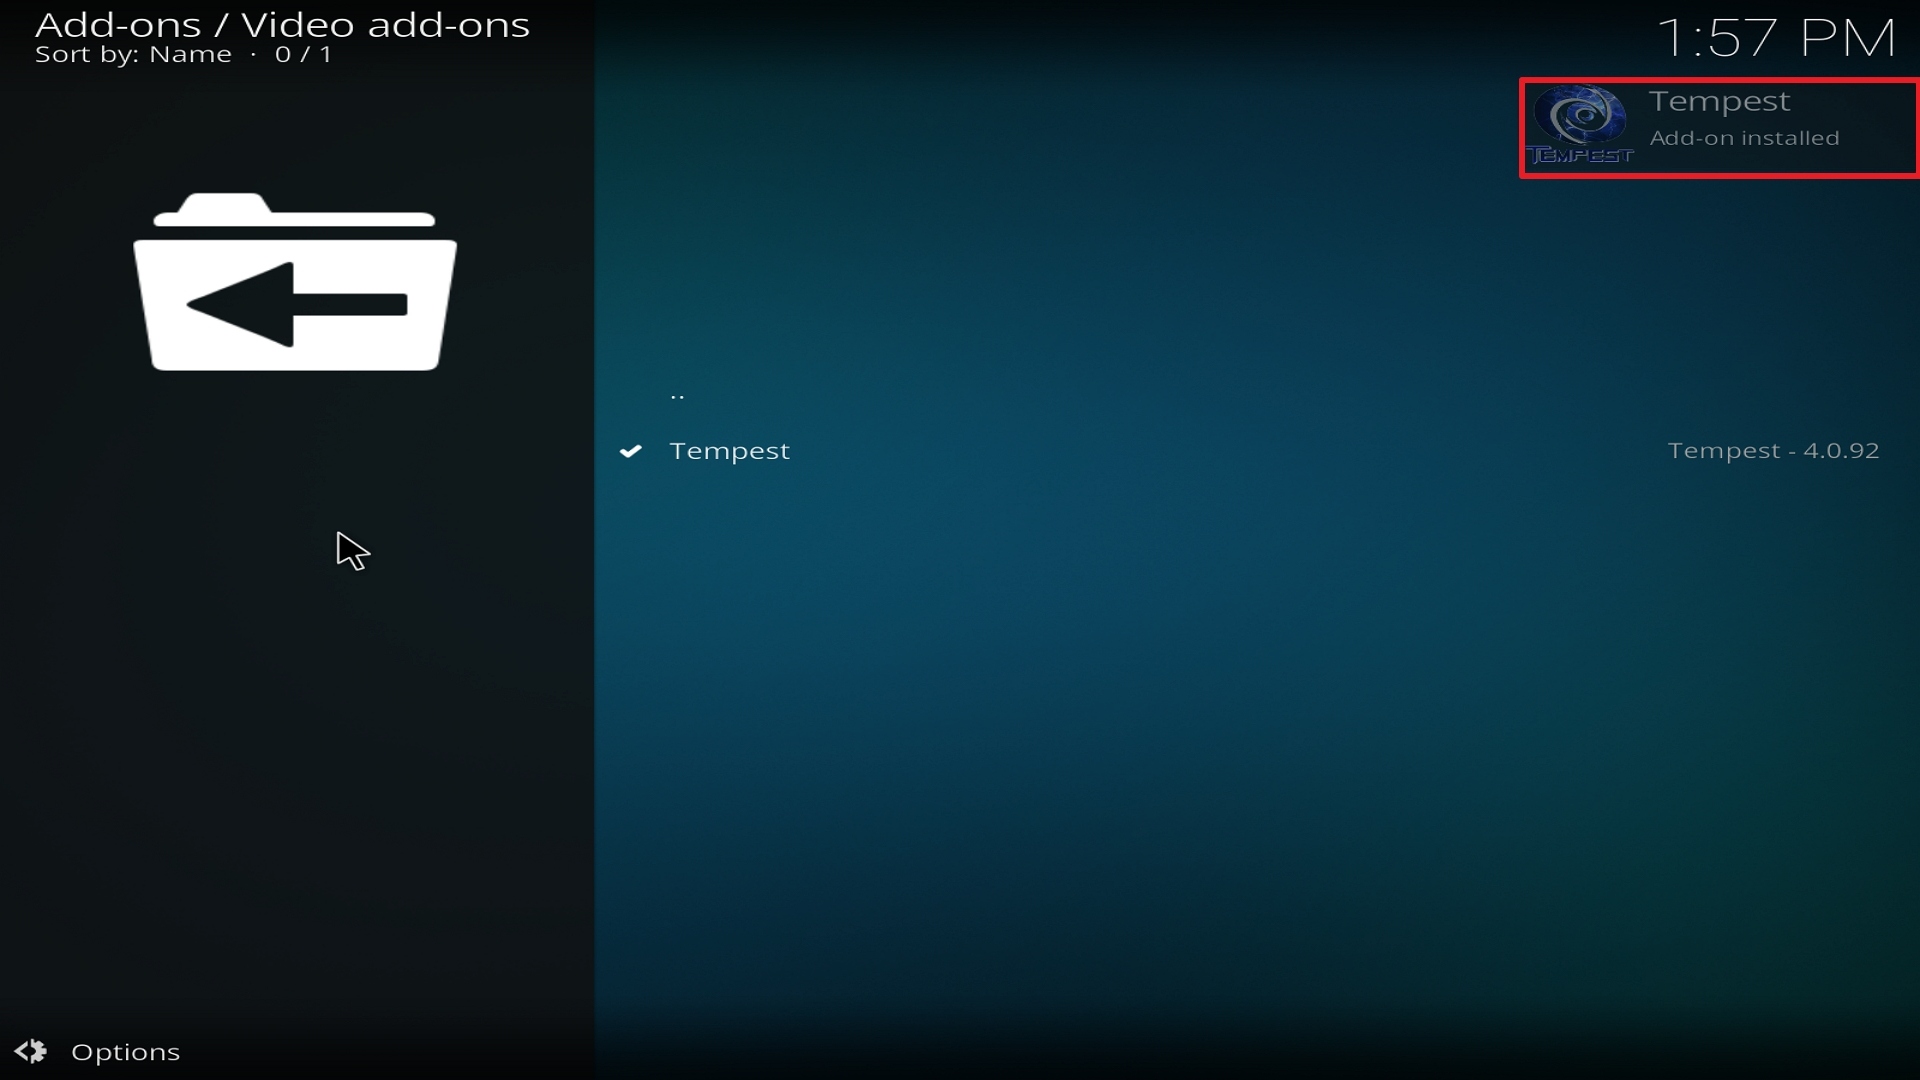
25. You should see a popup in the upper right corner saying Strikes Movie Zone has installed. There will actually be multiple popups for the various components.
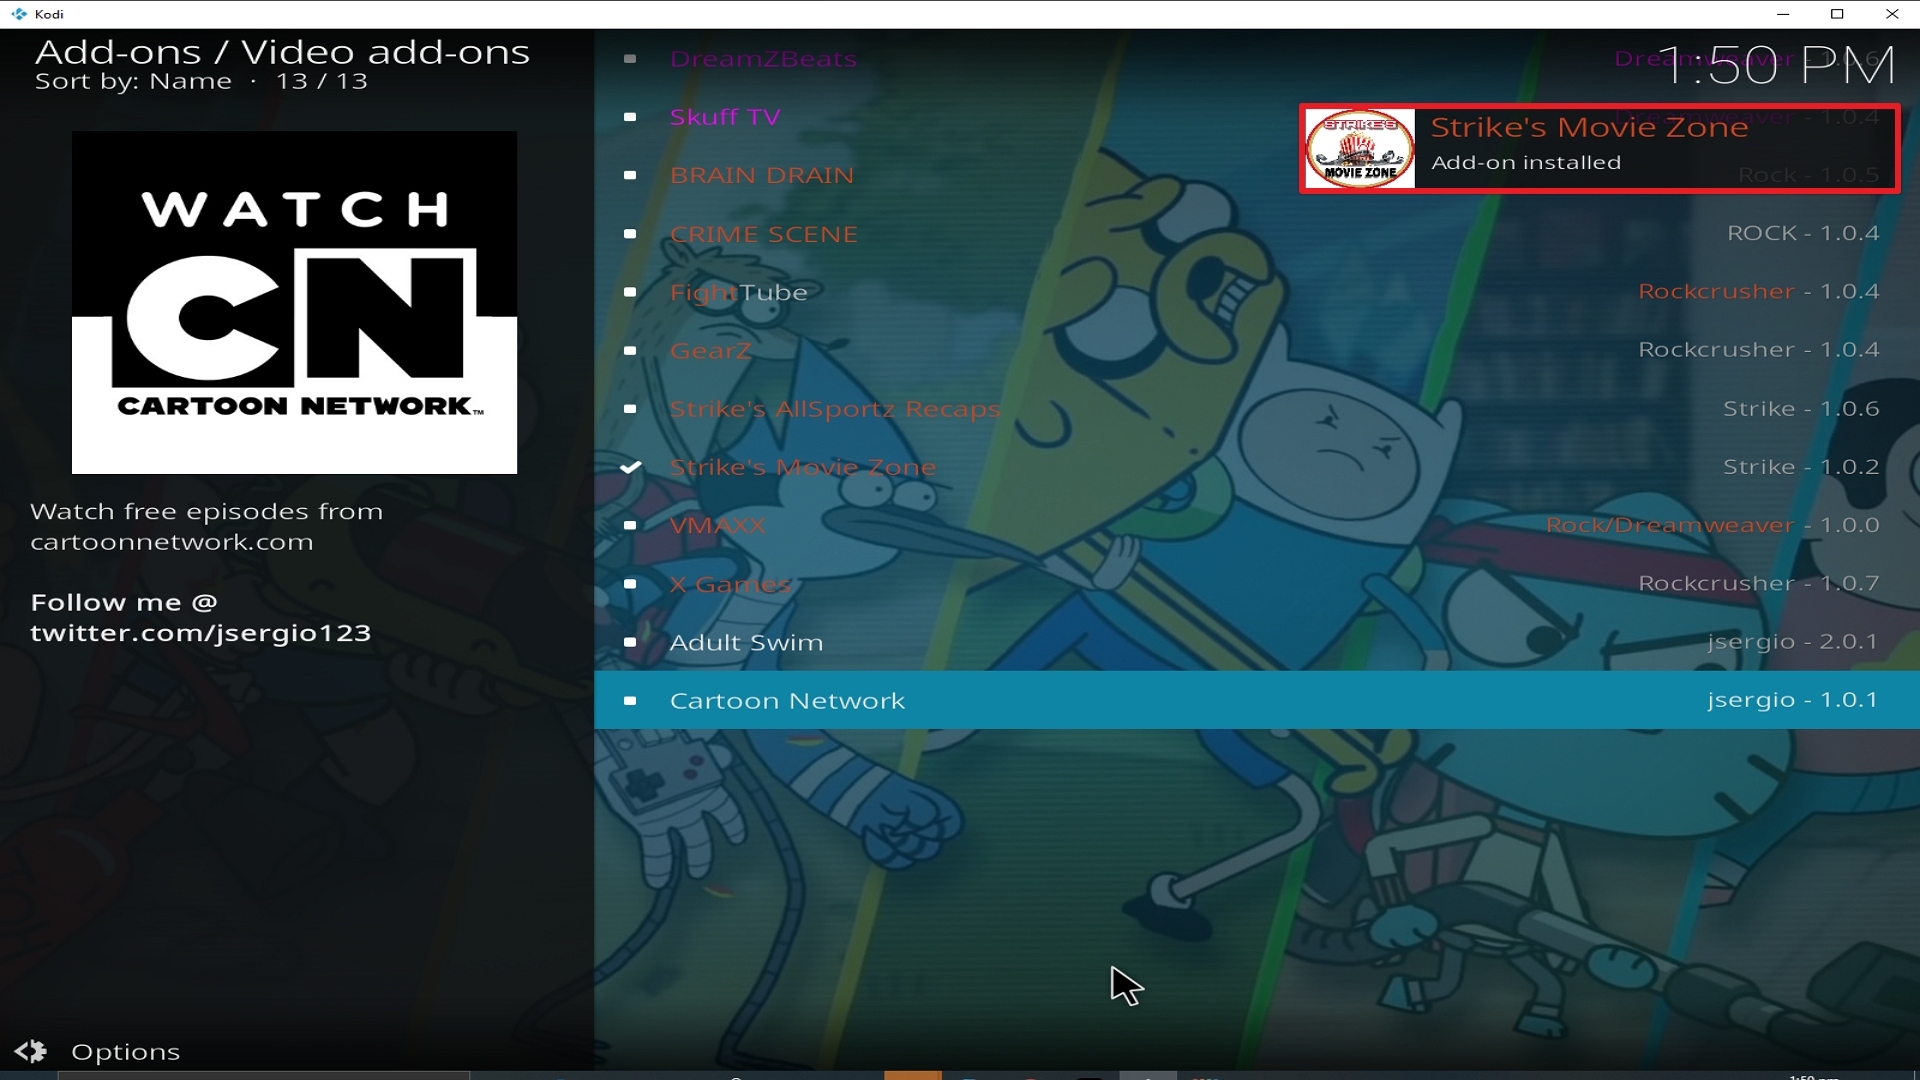
Step 25 Installing Strikes Movie Zone addon on Kodi


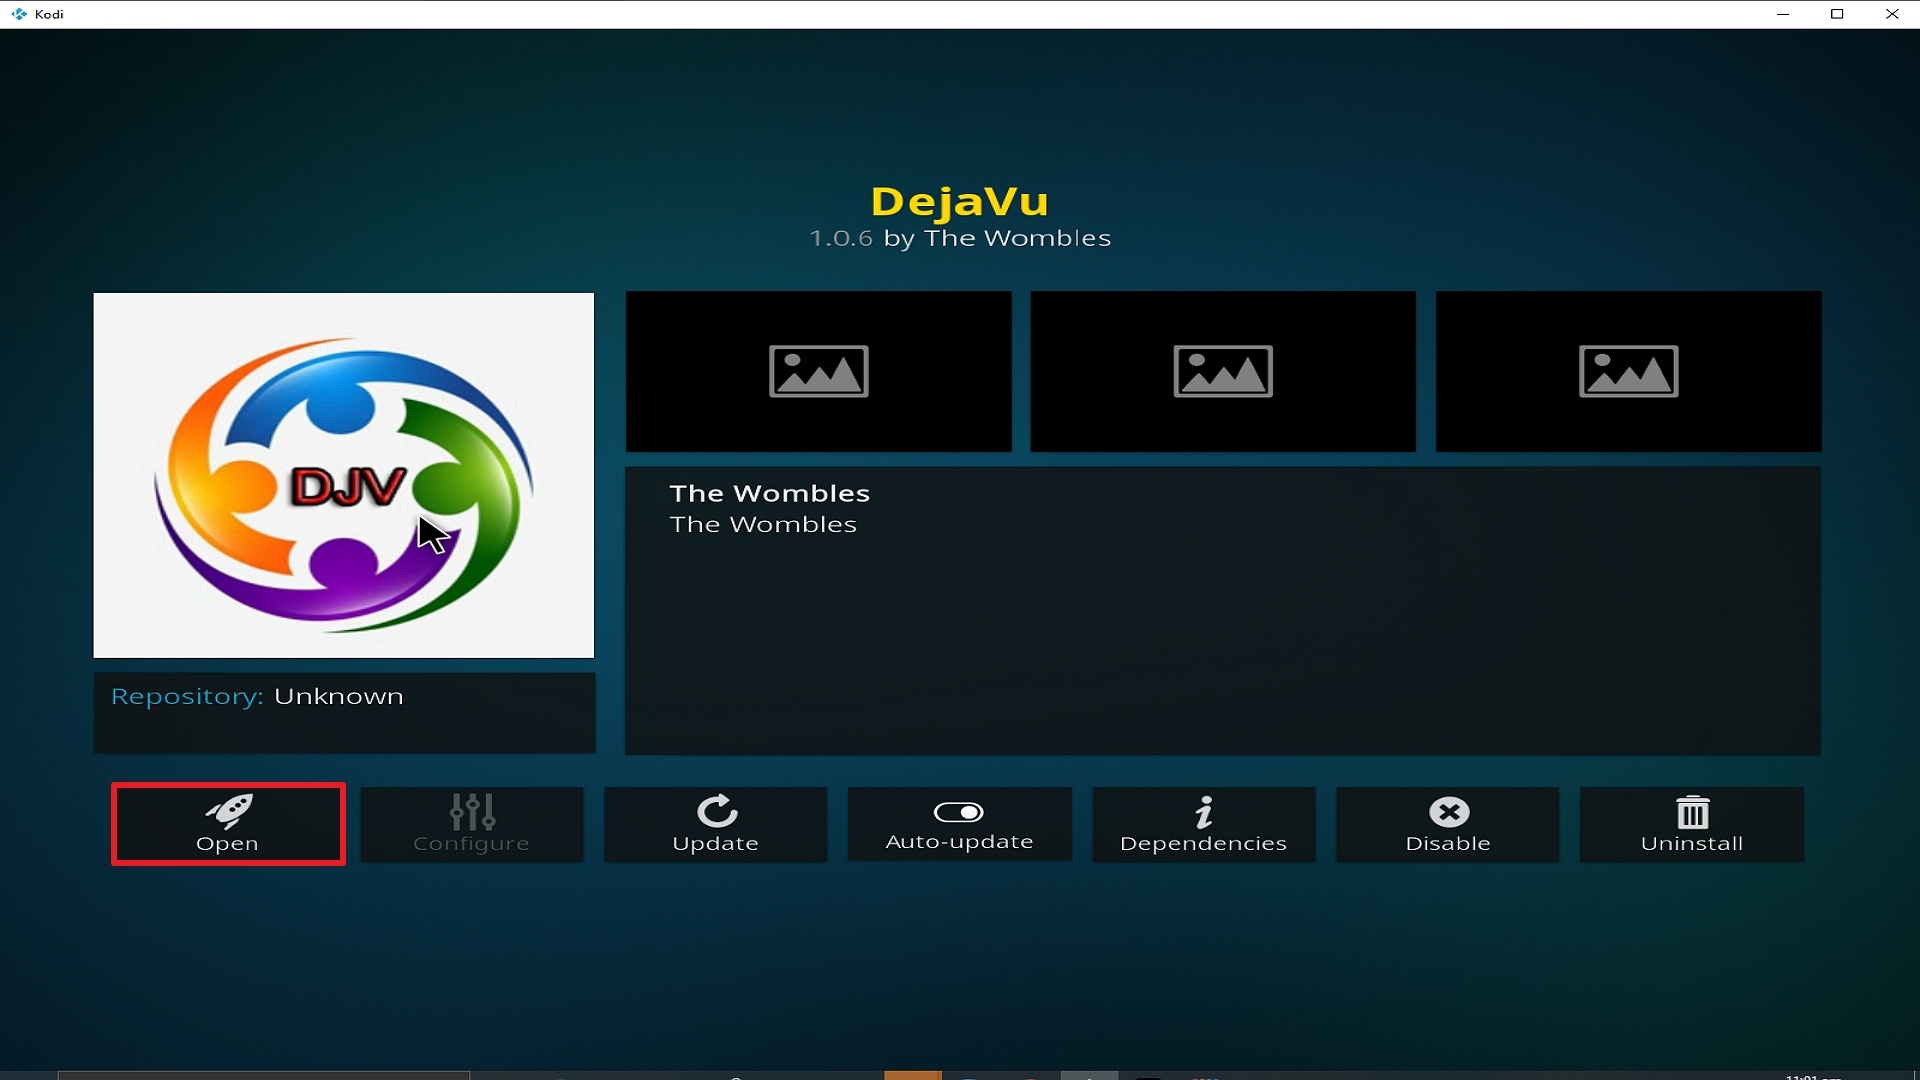
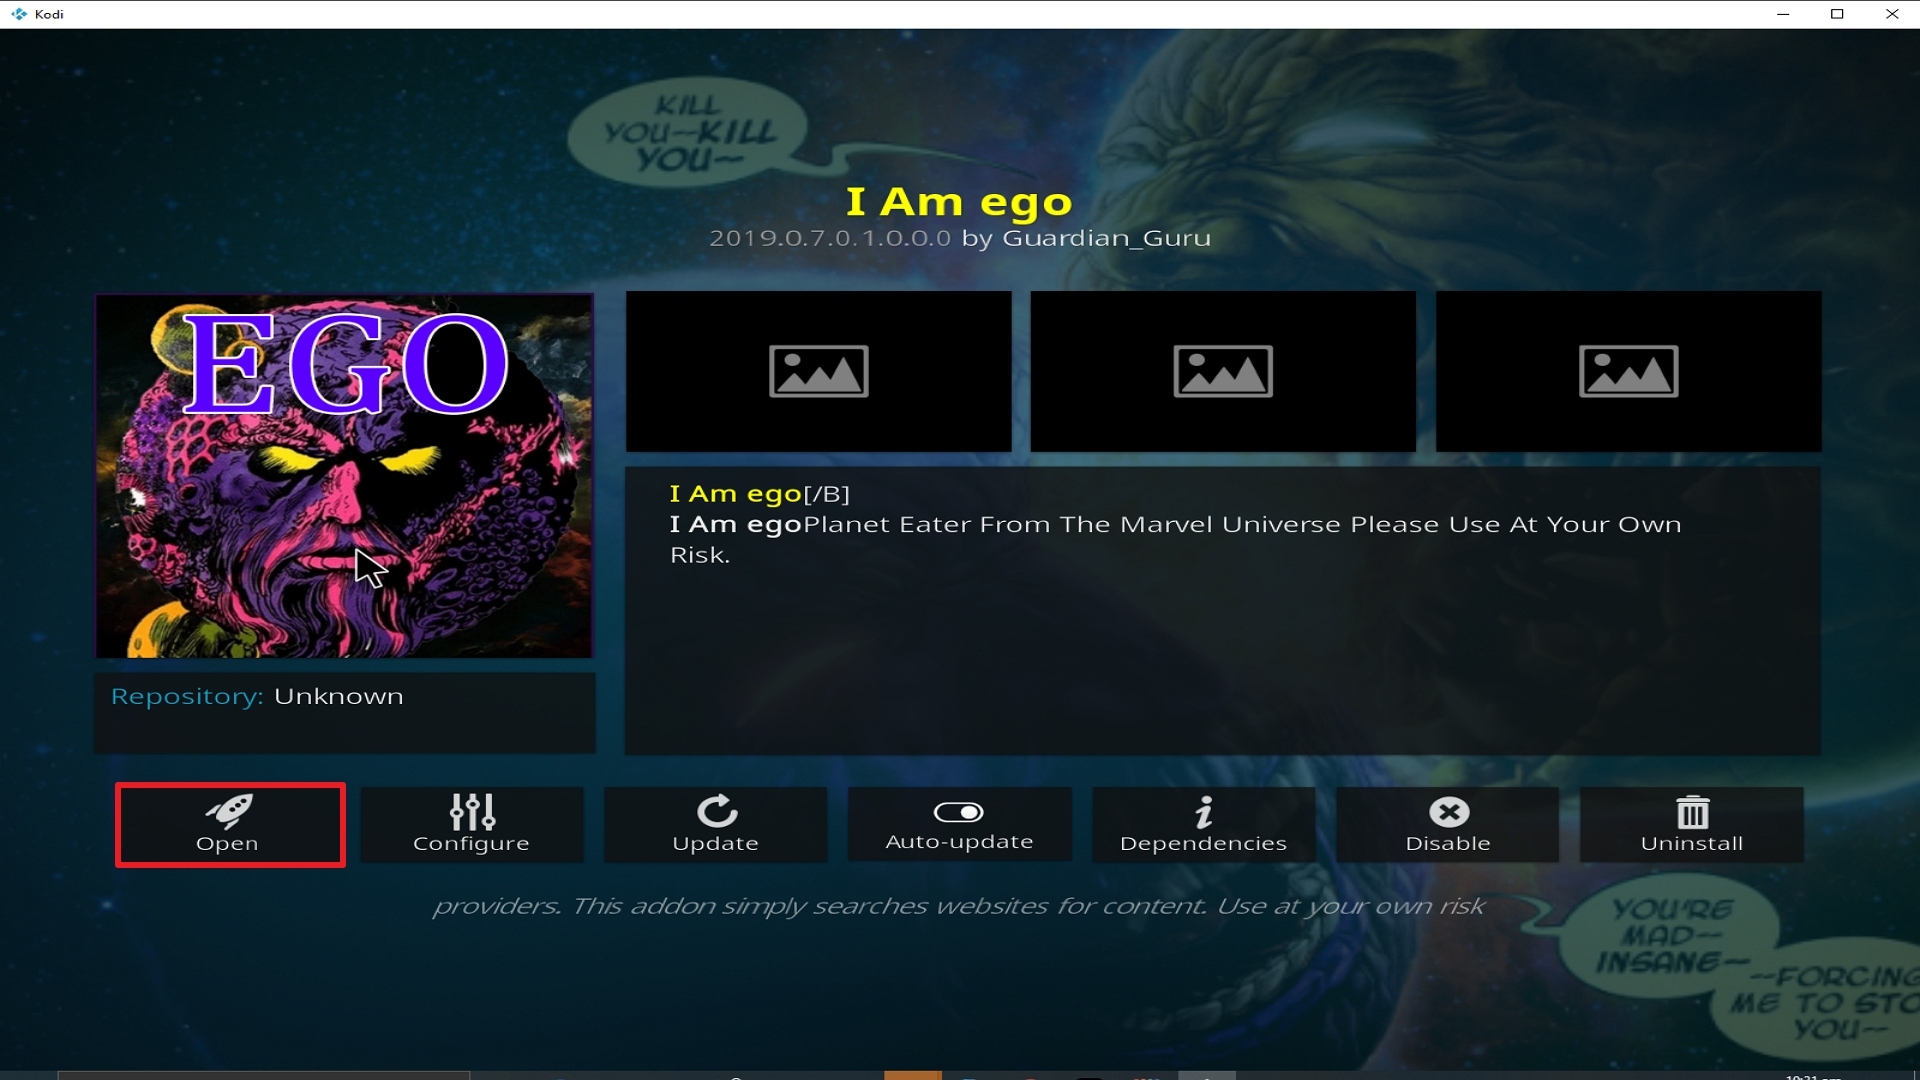
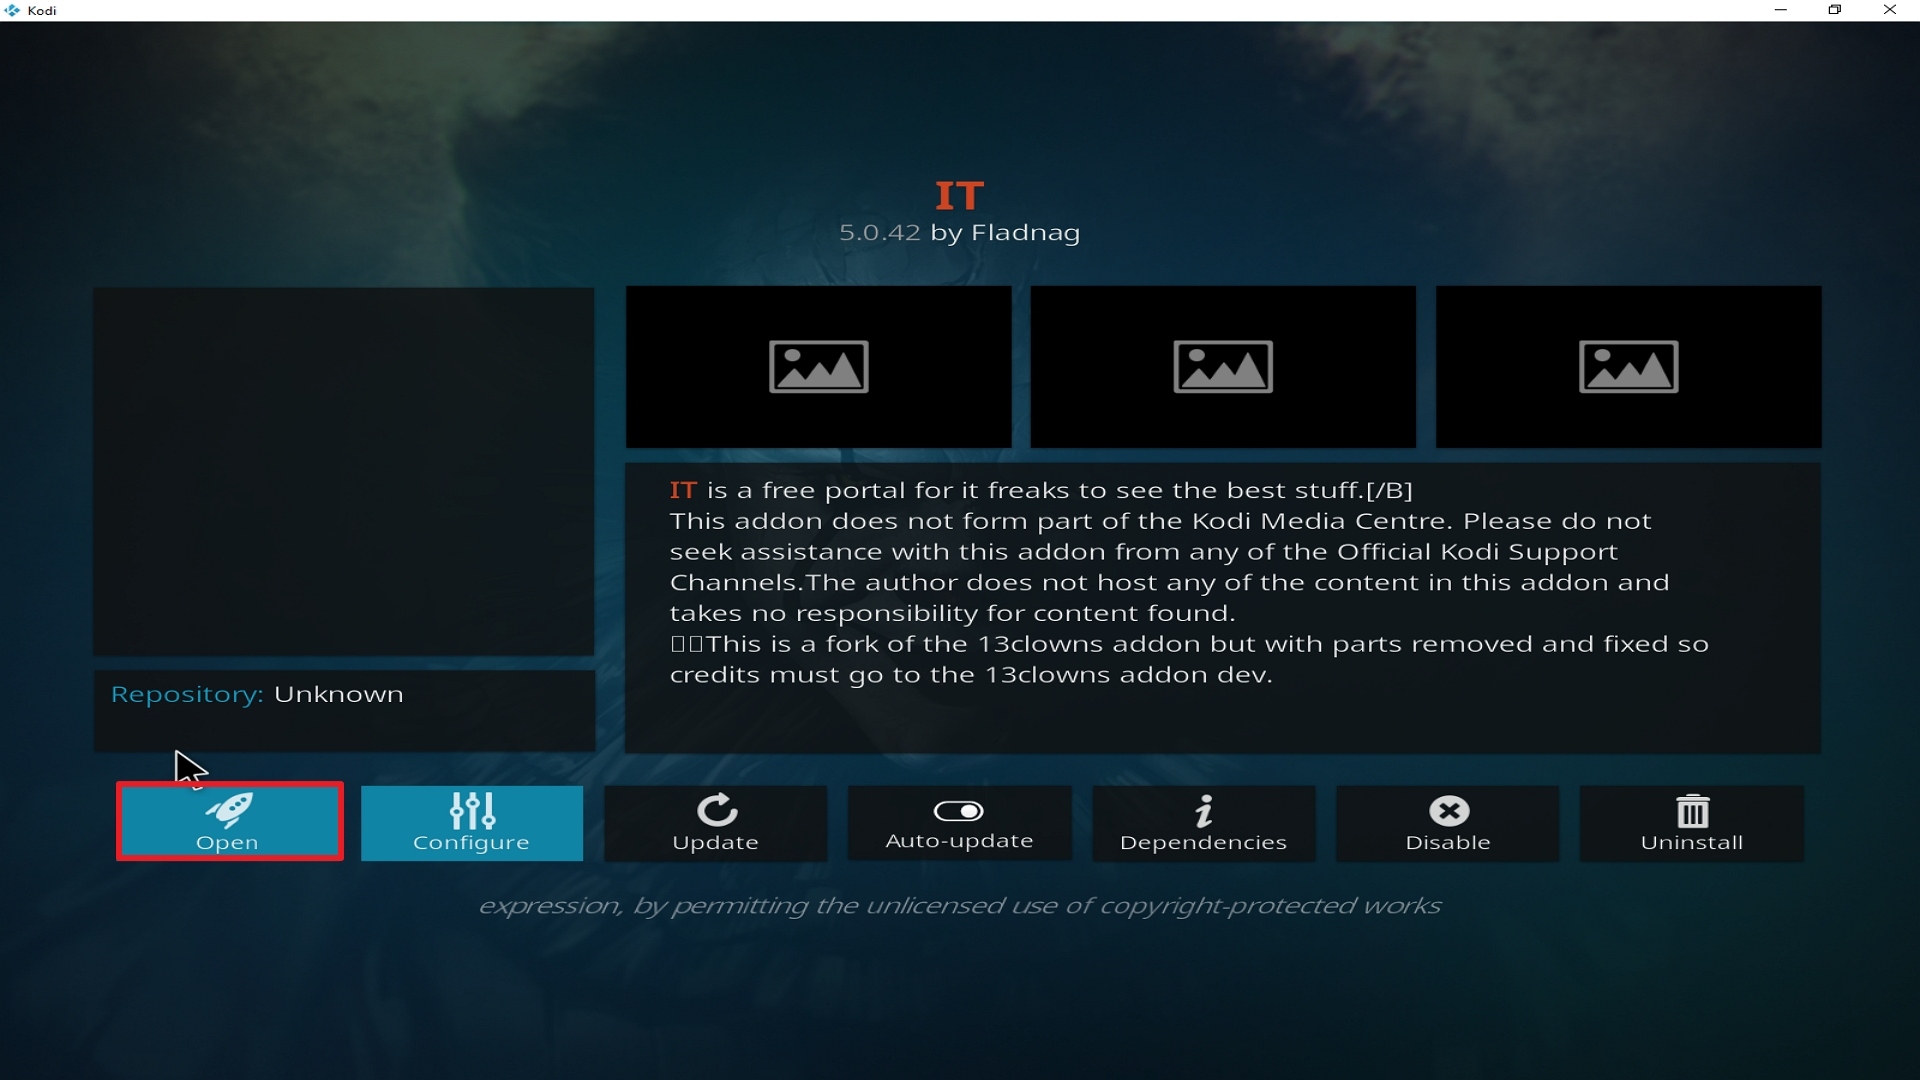
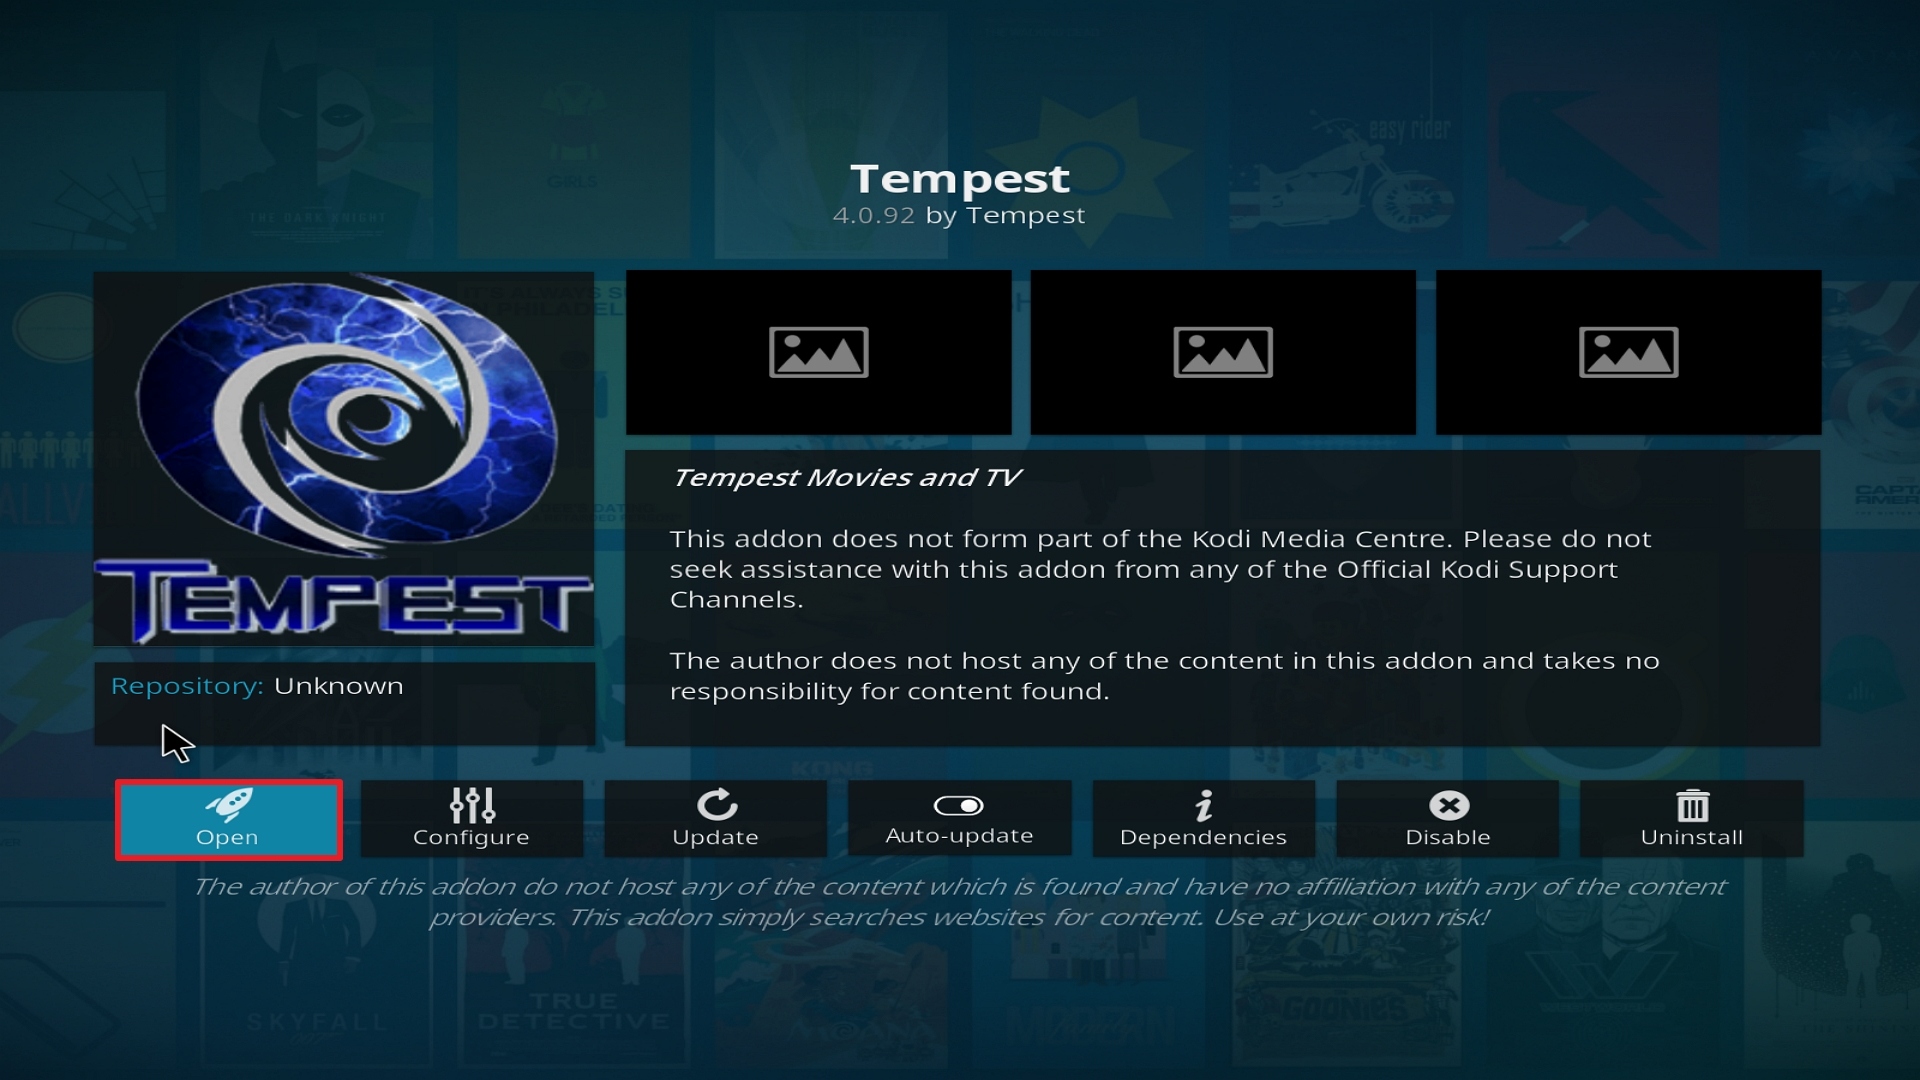
26. Click on Open to start the Strikes Movie Zone add-on.
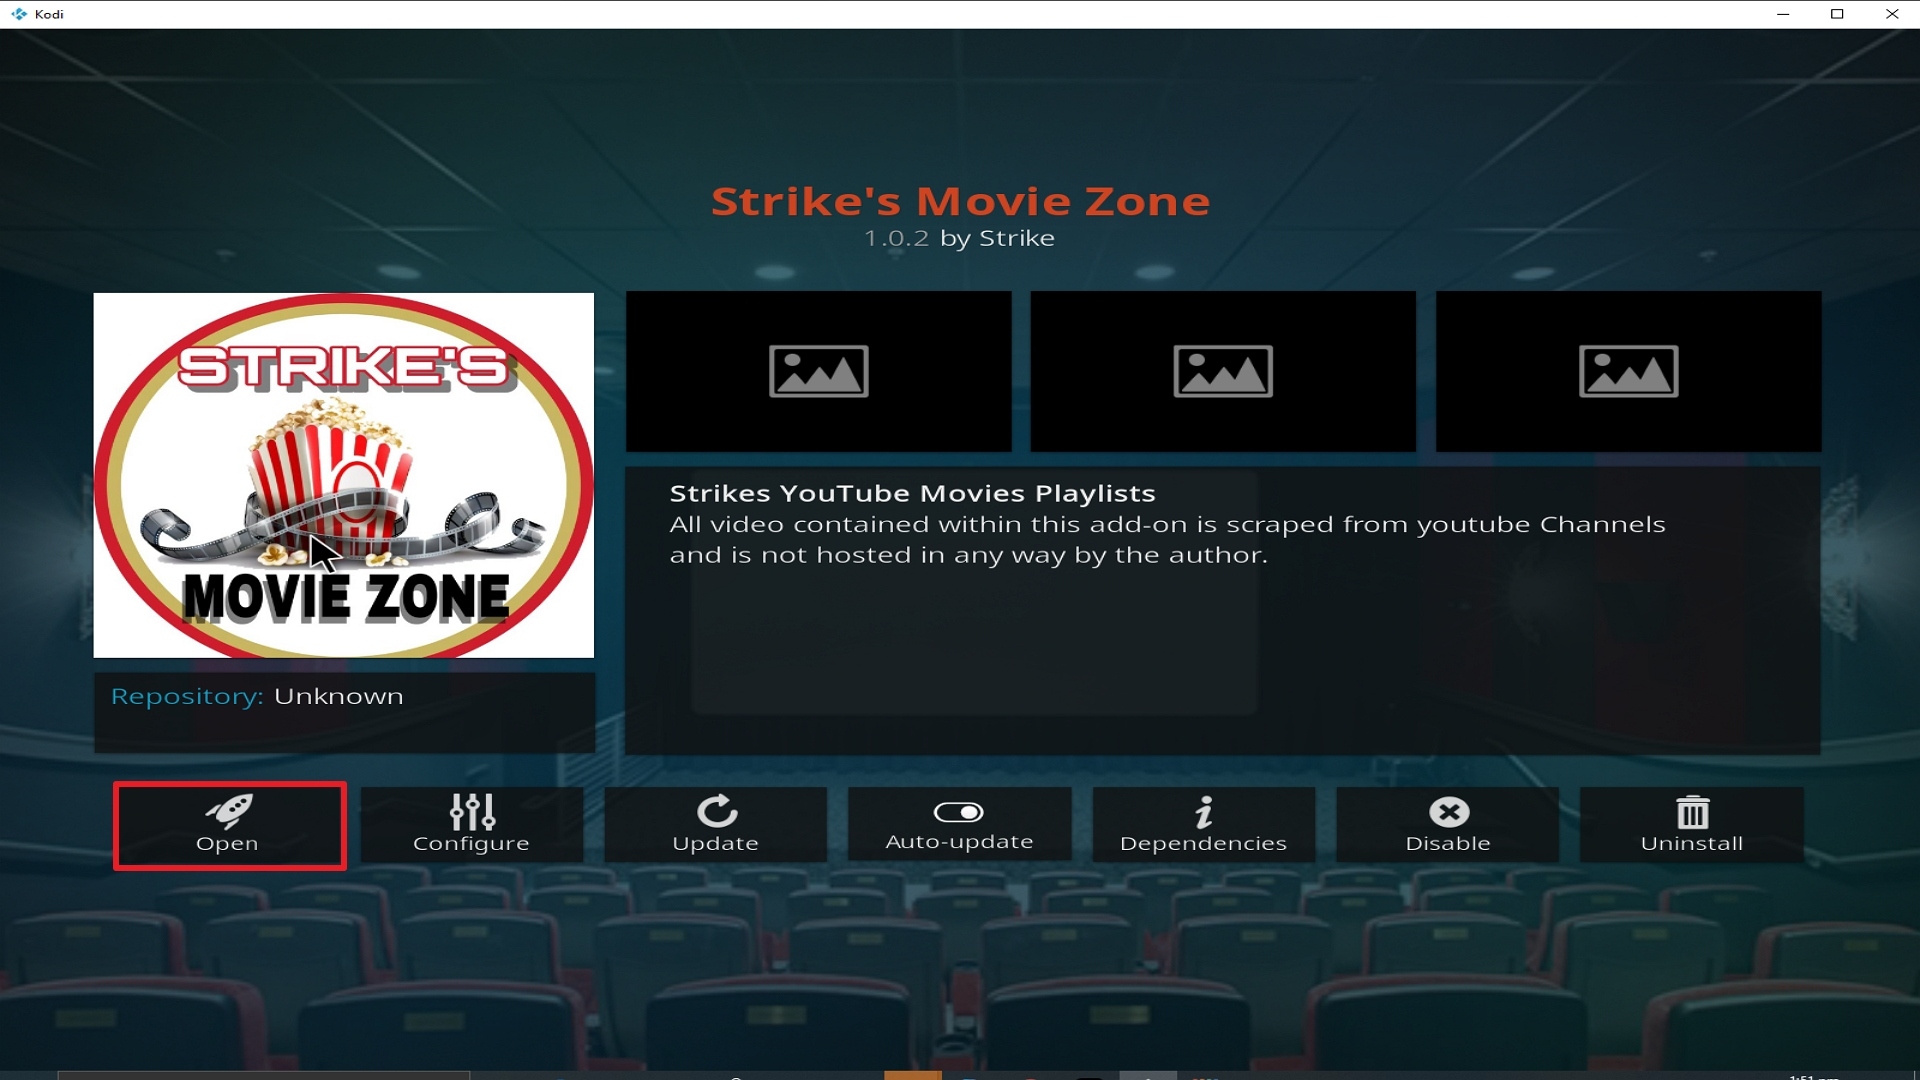
Step 26 Installing Strikes Movie Zone addon on Kodi


Install Surfshark on Firestick

Best Surfshark Deal


How to Install Surfshark VPN on Firestick

If your Firestick still has the older interface, read this article to learn how to update it: Update Firestick Interface.

Follow our screenshots below to install the SurfShark VPN app on your Fire TV stick.

1. Go to the Home screen of your Firestick.
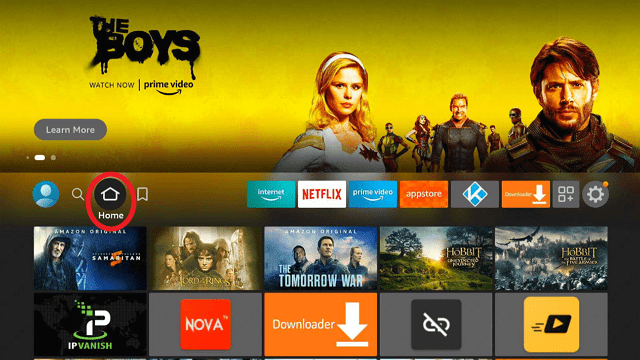
step 1 Install Surfshark VPN on Firestick


2. Navigate towards the Find tab. Press the Search button from the resulting dropdown.
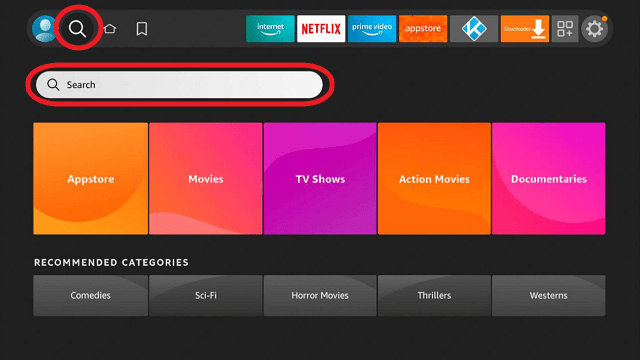
step 2 Install Surfshark VPN on Firestick


3. Type in the keyword of SurfShark and select from the suggestions that will appear.
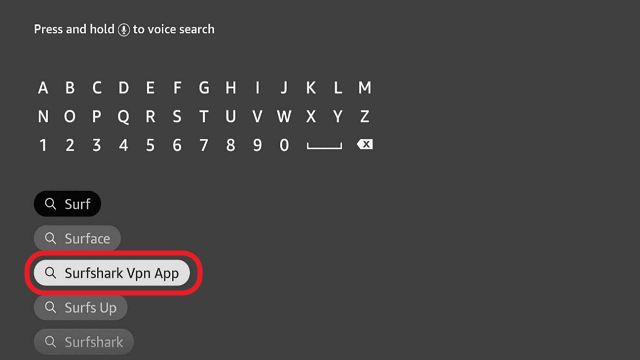
step 3 Install Surfshark VPN on Firestick


4. Click the official SurfShark icon from your search results.
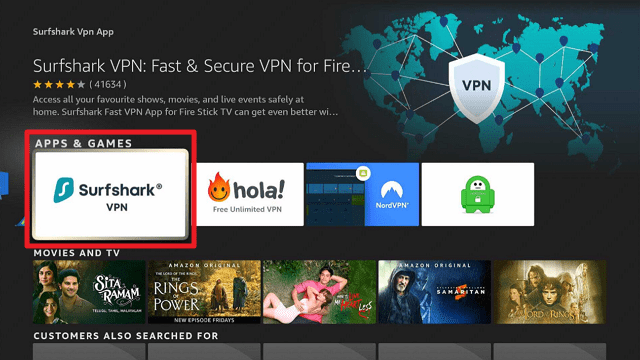
step 4 Install Surfshark VPN on Firestick


5. Press the Download (You own it) button.
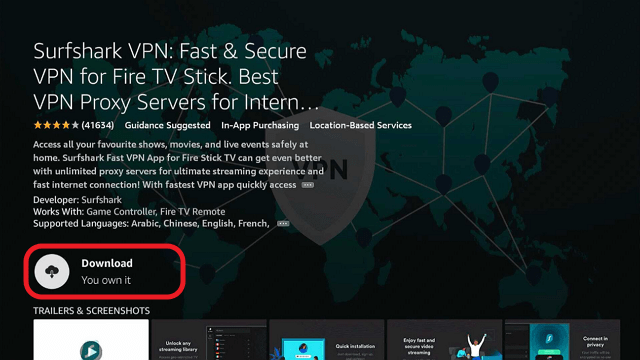
step 5 Install Surfshark VPN on Firestick


6. The SurfShark VPN installer will download on your device.
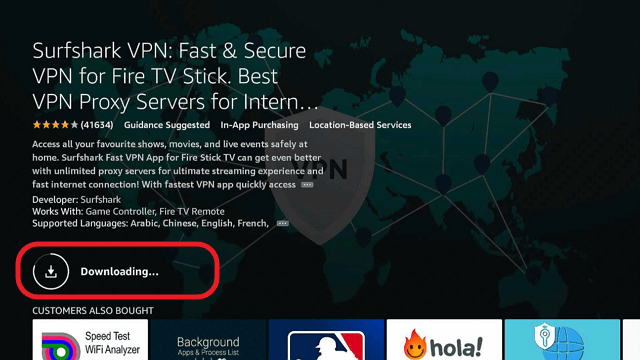
step 6 Install Surfshark VPN on Firestick


7. SurfShark VPN’s app will automatically install itself on your Fire TV stick.
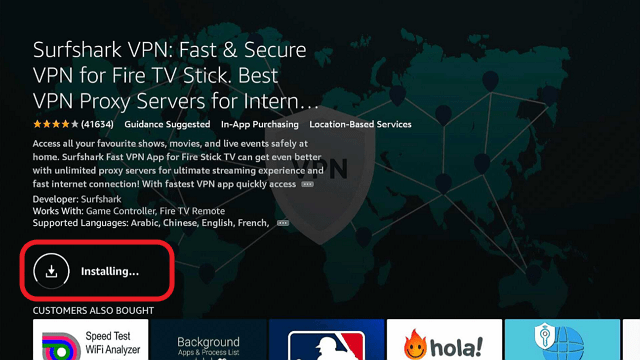
step 7 Install Surfshark VPN on Firestick


8. Press the Open button after completing SurfShark VPN’s installation process.
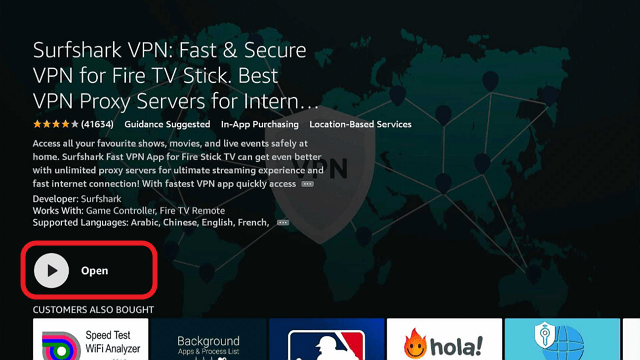
step 8 Install Surfshark VPN on Firestick


9. Please wait for the SurfShark VPN to load its user interface.
step 9 Install Surfshark VPN on Firestick


10. You can now log in with your SurfShark VPN account credentials.
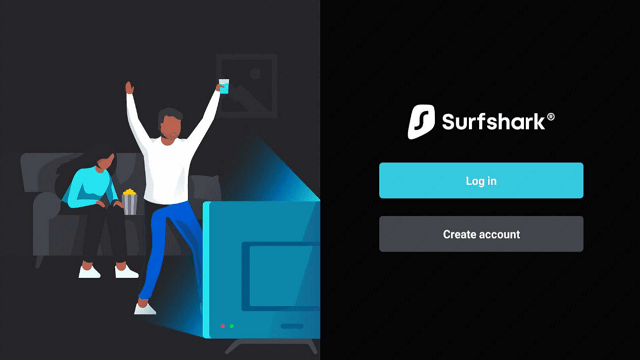
step 10 Install Surfshark VPN on Firestick

Learn more about Surfshark and Grab the Best Surfshark Deal Now!


Install Surfshark on Firestick
Best Surfshark Deal


Other VPNs to Consider

NordVPN (Best for Streaming)

Best Features

  • 5000+ Server in 50+ Countries 
  • Military-Grade Encryption
  • Fast Connection Speed
  • Suitable to a lot of devices
  • No-Log Policy

Prices
  • Complete $5.89 per month (64% Discount)
  • Plus $4.59 per month (56% Discount)
  • Standard $3.69 per month (55% Discount)

Best Features

  • 750+ High-speed VPN Servers in 43 Locations
  • Military-Grade Encryption
  • Fastest HD Streaming and Gaming
  • 30-Day Money-Back Guarantee
  • Unlimited Data & Devices
  • No-Log Policy

Prices
  • 3 Years $1.99 per month (82% Discount)
  • 1 Years $3.29 per month (70% Discount)
  • 1 Month $10.99 per month

IPVanish VPN (Most Secure)

Best Features

  • 1200+ Servers in 60+ Countries around the world
  • Unlimited Connections
  • No-Log Policy
  • Top Notch Military-Grade VPN Protocols and Encryptions
  • 100% Safe and Secured
  • Most Trusted VPN
  • Best VPN for Firestick
  • 30-Day Money-Back Guarantee

Prices
  • Yearly $3.99 per month (63% Discount) – 30 days risk free + Ransomware & Malware Protection
  • Quarterly $5.32 per month (51% Discount)
  • Monthly $10.99 per month


For more VPN discounts, go to ReviewVPN Deals and purchase the best VPN for you.

Click here to get the lowest price on Surfshark through our exclusive limited-time offer.


Install Deja Vu Kodi Addon

Deja Vu Kodi Addon


Deja vu image

Source: https://dejavurepo.github.io 

Deja Vu Kodi addon is a brand spanking new addon that is rising in the ranks of the most downloaded Kodi addon quickly.

Offers a wide range of streams and sections which are different from the norm, including 24/7 streams of US Cable Shows and random movies. Déjà vu is a pretty cute add-on and unique at that.

Fair warning, many of the streams have been specifically developed and structured around you have a Real Debrid account. For a subscription of as little as 2.50 euros a month (if you buy a 180-day pass for 16 euros) you can get access to 50+ high-speed paid servers and unlimited traffic for 4 devices.

You might think, why would I need unlimited access to servers? Because you don’t have to find a working link. If you synchronize Real Debrid with your add-on (Real Debrid works with pretty much all major add ons) then your first links will come from Real Debrid. Also gives you access to 4K and HD links, with high quality. You also get high-speed downloads up to 1Gbps.

If you really want to unleash the power of this add-on, do yourself a favor and pay for Real Debrid. You’ll never want to go back.


ANONYMOUSLY


Common Errors

Here are the most common errors you might come across with Déjà vu:

  • Could not connect to URL/Download: You will get this error when you are trying to install Déjà vu. First, check that you have typed in the URL exactly. For example, don’t type “http” when it should be “https”. If the URL is right, then click to install again. Sometimes the server may receive multiple requests and bounce one back. If you still don’t get any joy, then read our in-depth guide to go through further steps to fix this error. 
  • Source not working/slow/frozen: Déjà vu has made a name for itself by curating great content and high-quality links. But as we all know links change, break and sometimes are dog slow. When you first connect to a link, give it enough time to work. Often people use Kodi thinking it will just be like switching on a TV. Add ons take time to connect to the source and let them start buffering. You might need to wait up to 15 seconds before you write off a link. Also, try to refresh the link to see if it’s a server error. If the problem, persist then read our guide linked above for more fixes.

Review

Déjà vu is a great add on, and we are sure it’s going to become one of the community tops add ons soon. It covers a big range of content, but the specific tailoring around Real Debrid is a nice touch and something not too many other add ons do.

Déjà vu concentrate on curated lists of content that have high-quality links. So, you don’t get as big a range of content as you would with other add ons. But you do get quality links and ones that work.

One to download and watch for the future.

Déjà Vu film categories include:

  • New releases or hot content (Currently Stranger Things 3)
  • 4K UHD Movies
  • Latest Movies One Click
  • Debrid Latest Movies, Classic Movies, Classic Movie Torrents
  • 24/7 Continuous Play Movies, TV Shows and US Cable
  • Klassic Kids TV
  • Kids
  • Documentaries
  • YouTube videos
  • Jukebox collection
  • Online Radio
  • The Comedians (18+)
  • Worldwide CCTV
  • Live in Concert
  • Footy Fan zone
  • Authorize Debrid


YOUR INTERNET ACTIVITY IS BEING WATCHED

ReviewVPN cannot attest to the legality, security and privacy of the applications discussed on this site. It is highly recommended that you use a VPN service while streaming or using Kodi.

Currently, your IP 216.73.217.150 is visible to everyone and your Browser is being tracked by Advertisers & ISP Provider.

Save 65% Now

Limited Time Offer

Here are the main reasons why you must use a VPN:

  • Your activities are hidden from your ISP, the government, and from the apps you are using.
  • You can access additional movies and TV streams.
  • ISP attempts to throttle are thrwarted thus reducing buffering issues.
  • Geographically restricted content like Netflix and Hulu can be unblocked.

A VPN works be replacing your ISP-assigned IP address and creating an encrypted tunnel. We recommend the no log service offered by IPVanish. It works well on a Firestick and offers the fastest possible speeds.

Special Limited Time Offer - Get IPVanish


Legal Disclaimer: ReviewVPN.com does not encourage or endorse any illegal activity involved in the usage of services and applications referenced on this site. We do not verify the licensing agreements of services. The end-user is wholly responsible for ensuring that any media accessed through these services does not violate copyright and/or licensing laws. ReviewVPN does not promote, link to, or receive compensation from any Apps and IPTV services.


Install Surfshark on Firestick

Best Surfshark Deal


How to Install Deja Vu Addon on Kodi with Screenshots

1. From the home screen, select the cogwheel at the upper left.

Step 1 Installing Deja Vu addon on Kodi


2. Select System in the bottom right corner.

Step 2 Installing Deja Vu addon on Kodi


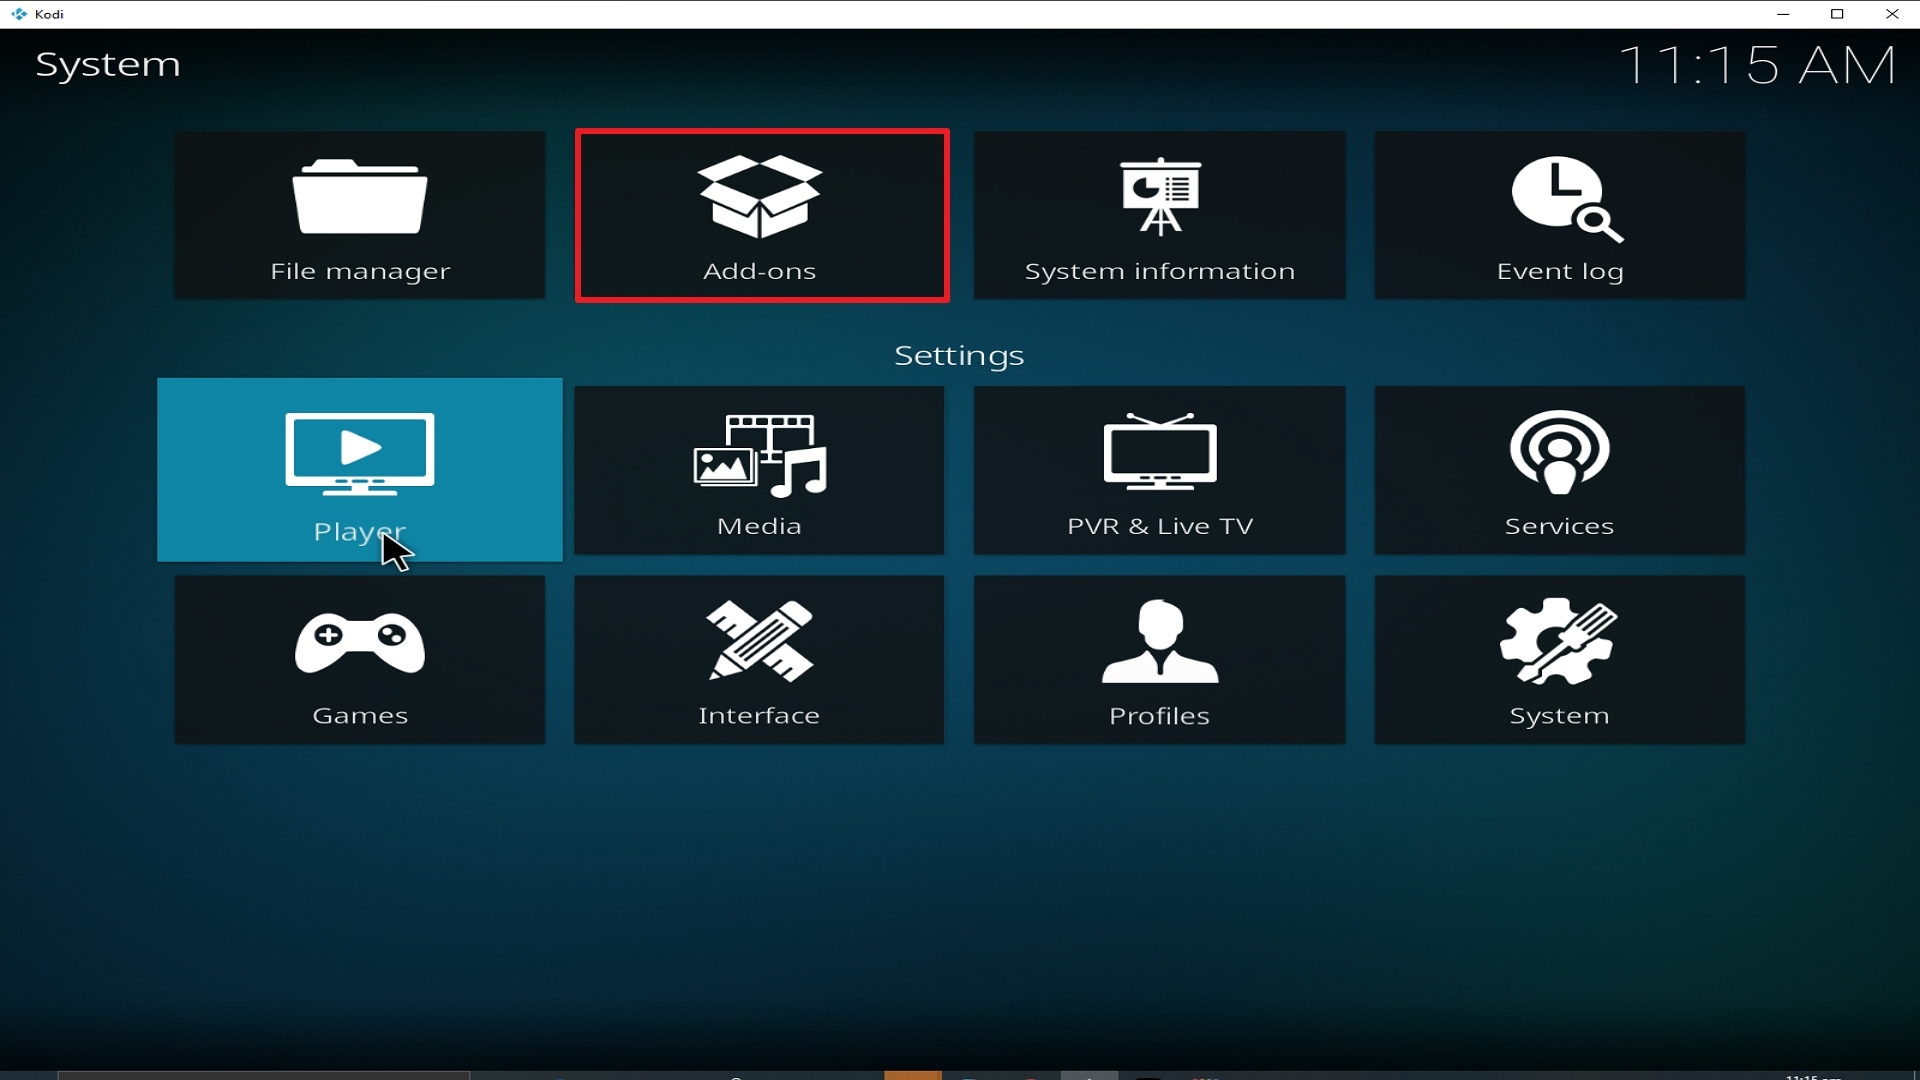
3. Select Add-ons on the left side of the screen.

Step 3 Installing Deja Vu addon on Kodi


4. Select Unknown sources.

Step 4 Installing Deja Vu addon on Kodi


5. Click Yes to allow unknown sources.

Step 5 Installing Deja Vu addon on Kodi


6. Select File manager.

Step 6 Installing Deja Vu addon on Kodi


7. Click Add source.

Step 7 Installing Deja Vu addon on Kodi


8. Click on <None>.

Step 8 Installing Deja Vu addon on Kodi


9. Type exactly: https://dejavurepo.github.io

Step 9 Installing Deja Vu addon on Kodi


10. Click on OK.

Step 10 Installing Deja Vu addon on Kodi

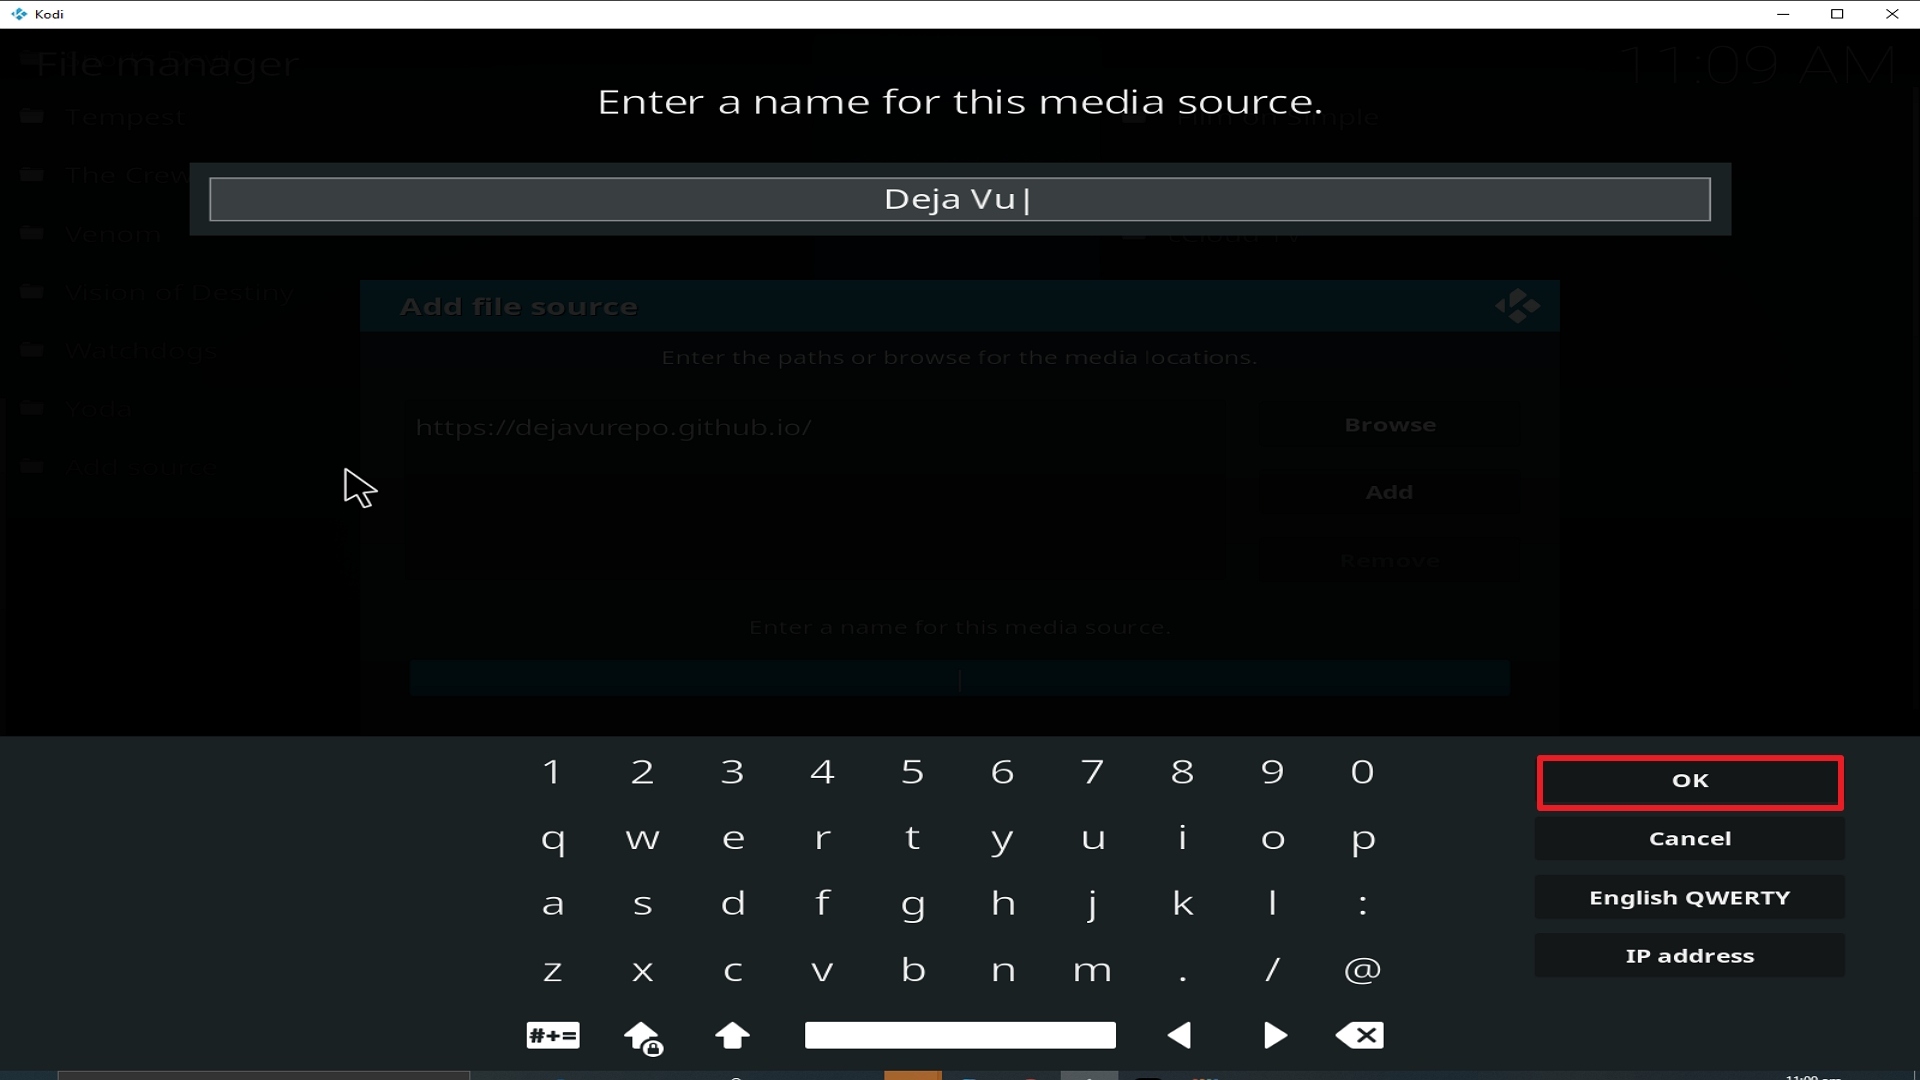
11. Select enter a name for this media source.

Step 11 Installing Deja Vu addon on Kodi


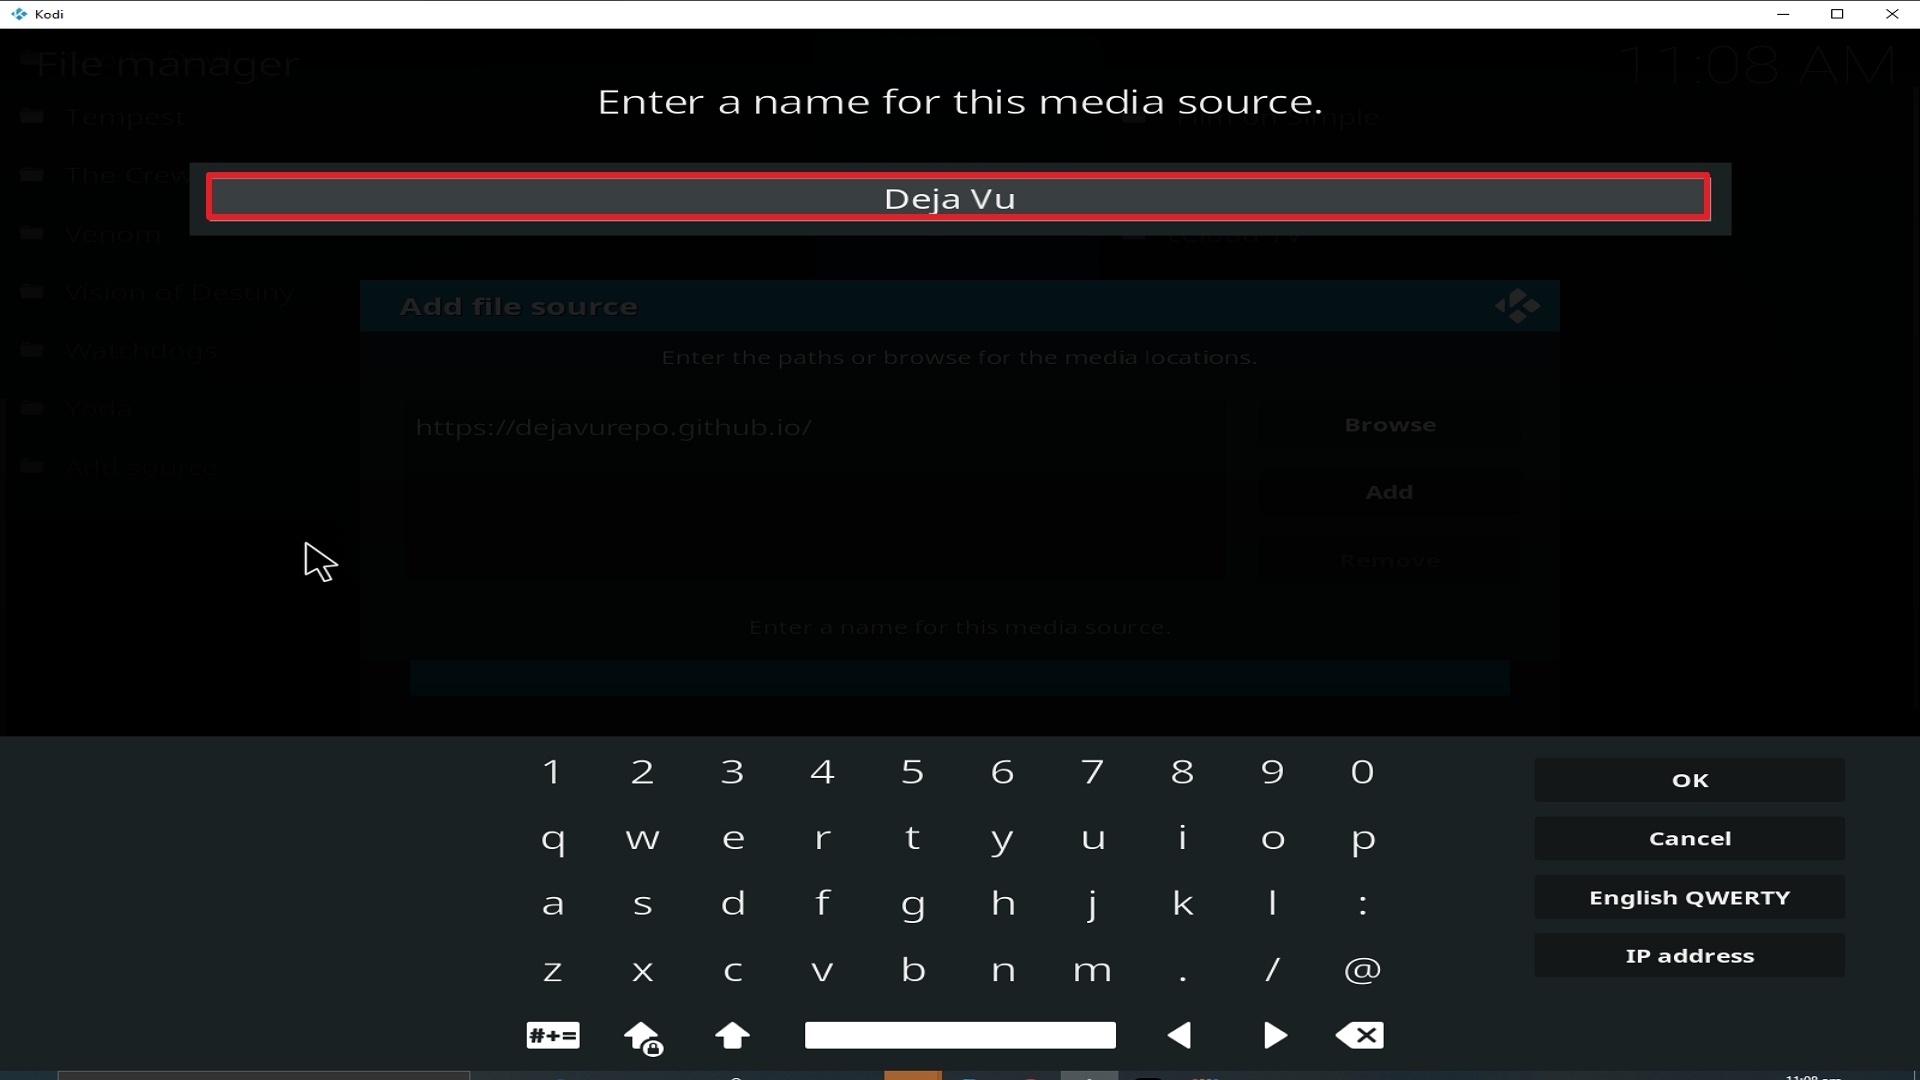
12. Name is Deja Vu (this part isn’t critical as long as you remember the name).

Step 12 Installing Deja Vu addon on Kodi


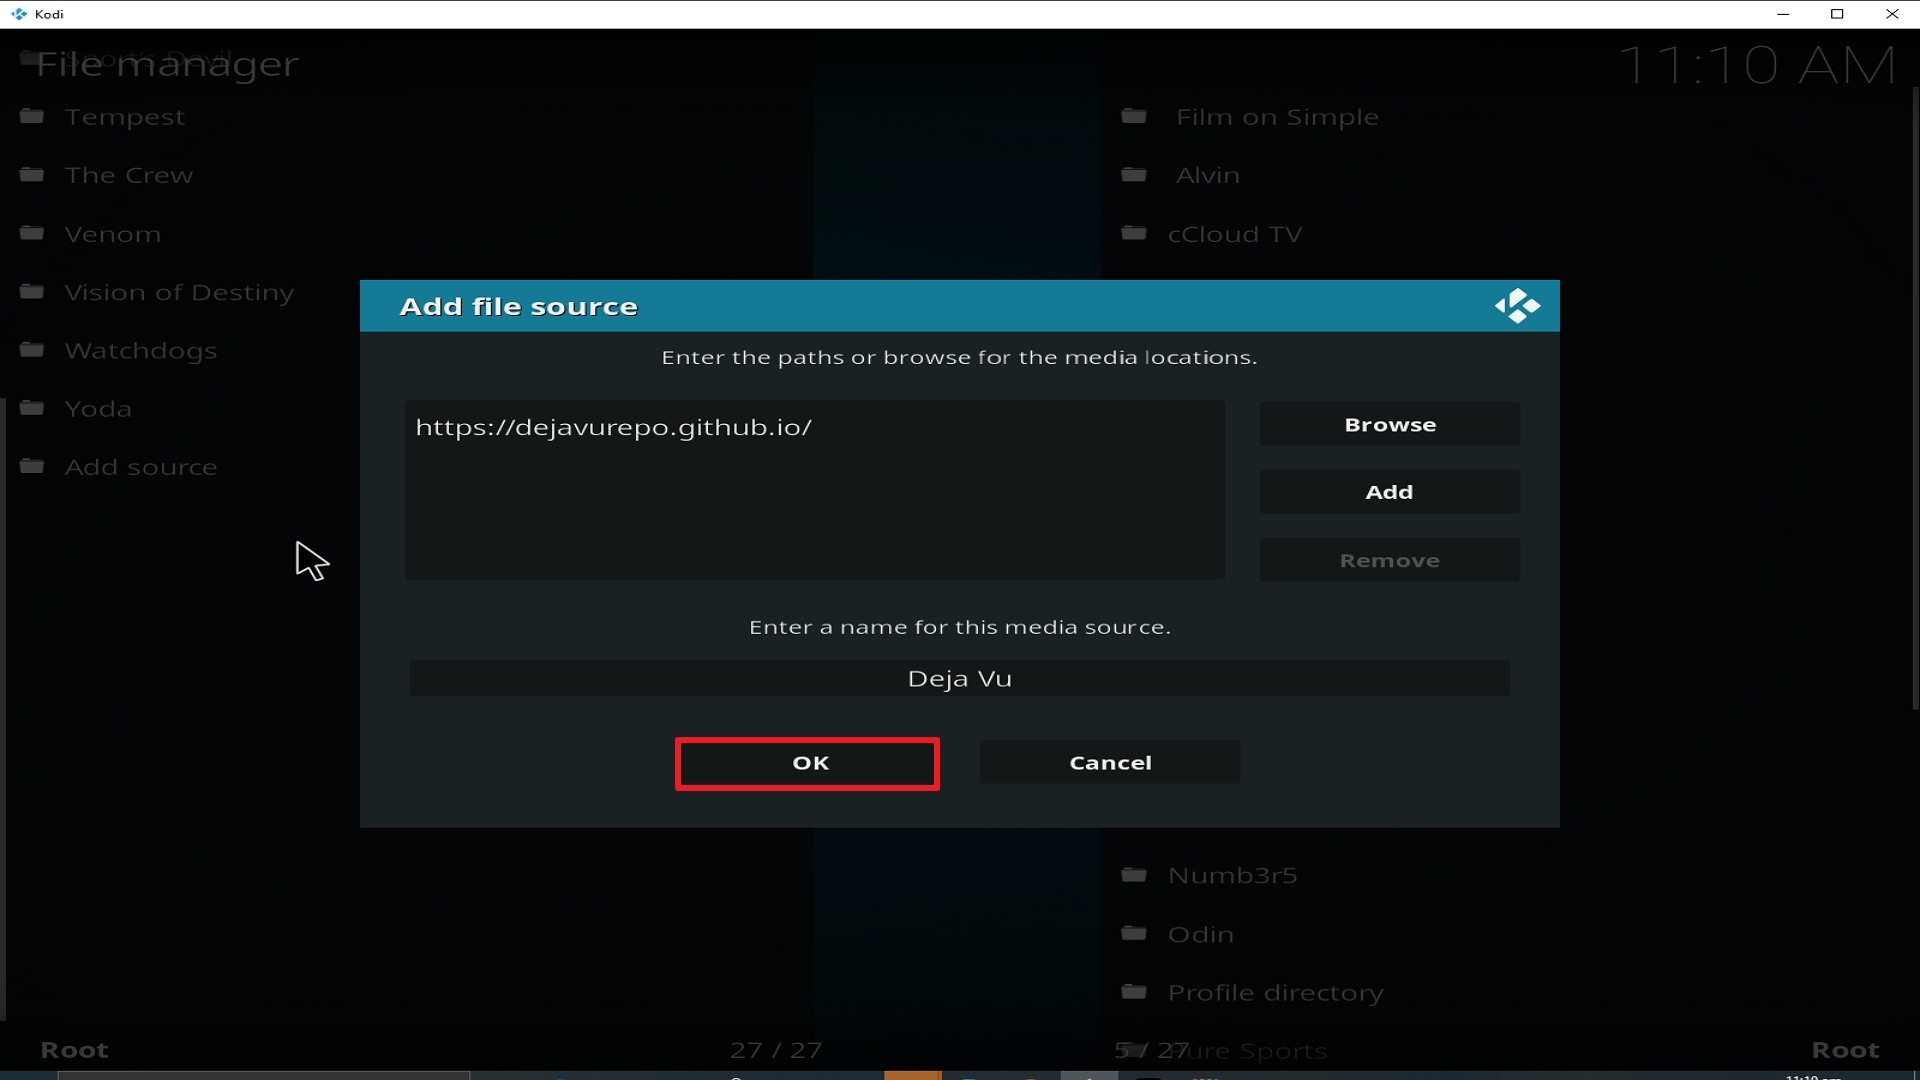
13. Click on OK.

Step 13 Installing Deja Vu addon on Kodi


14. Click on OK.

Step 14 Installing Deja Vu addon on Kodi


15. Take one step back and click on Add-ons.

Step 15 Installing Deja Vu addon on Kodi


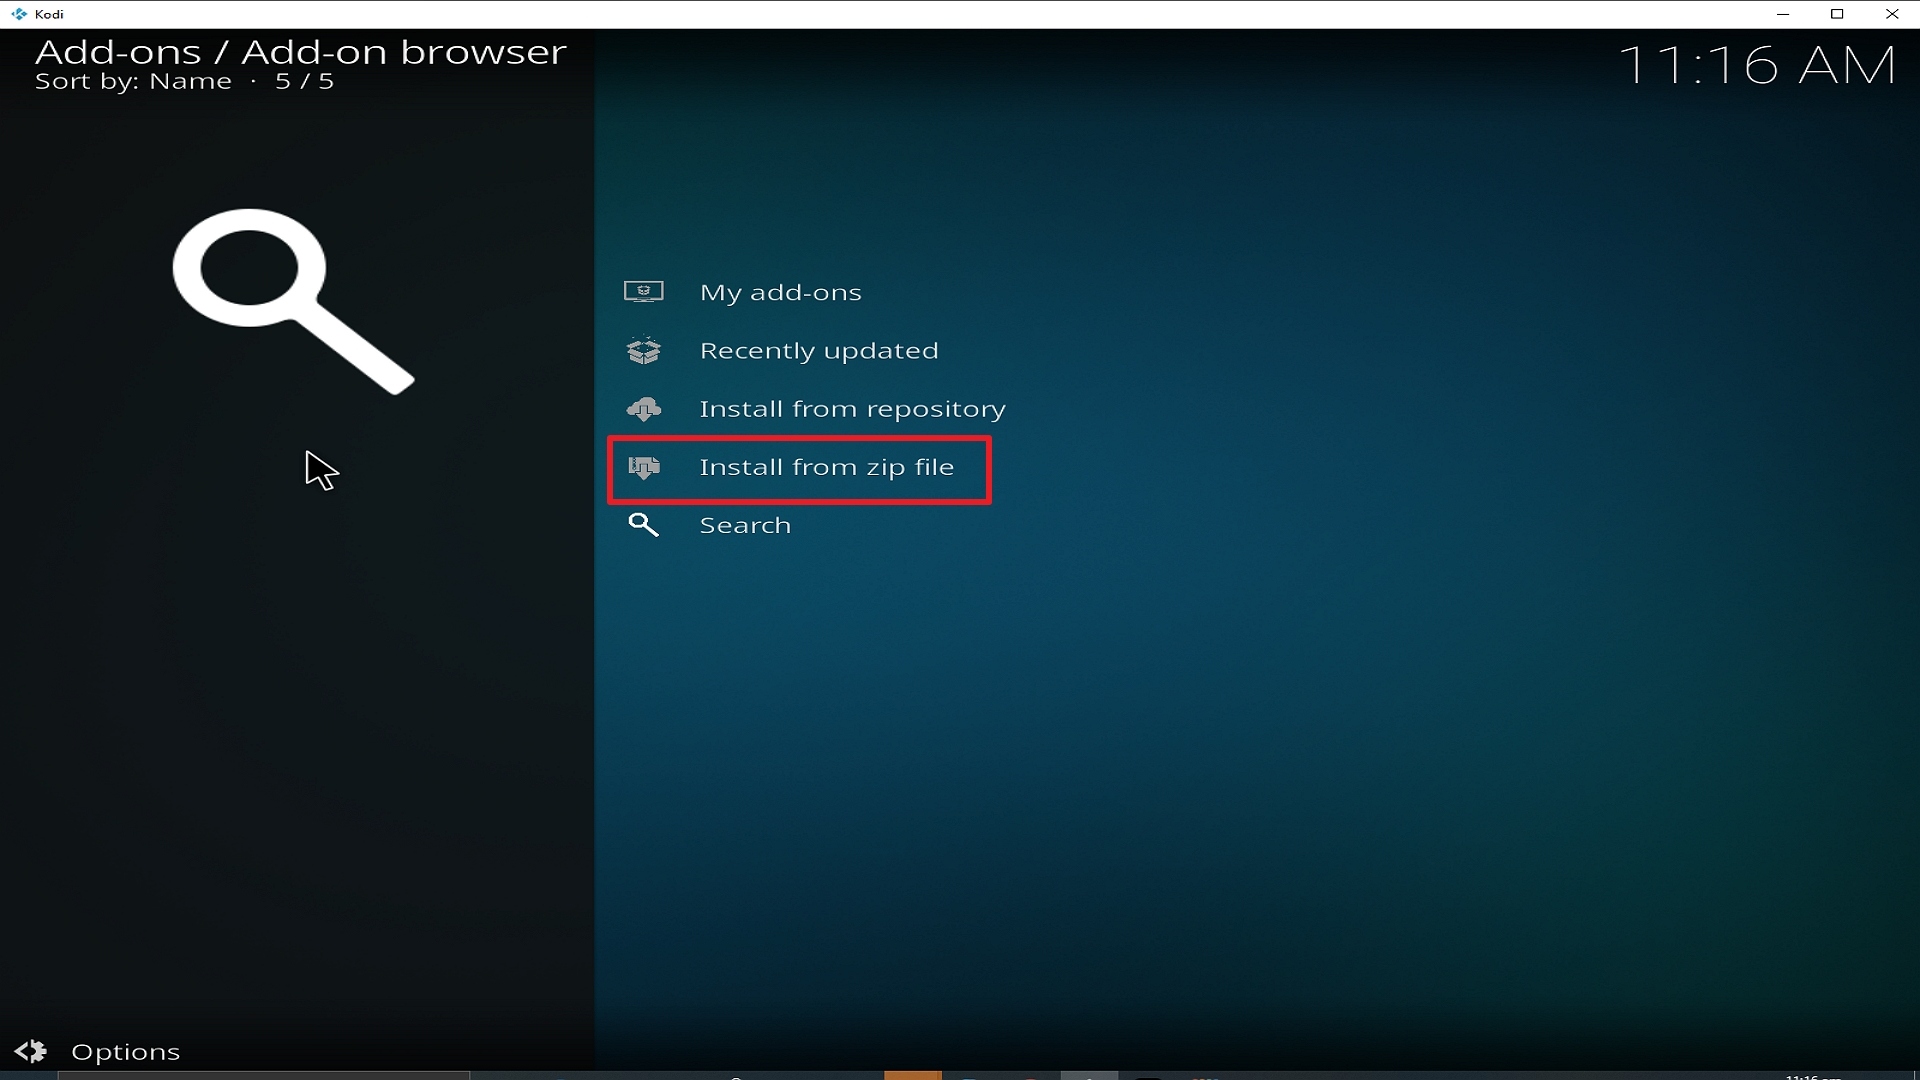
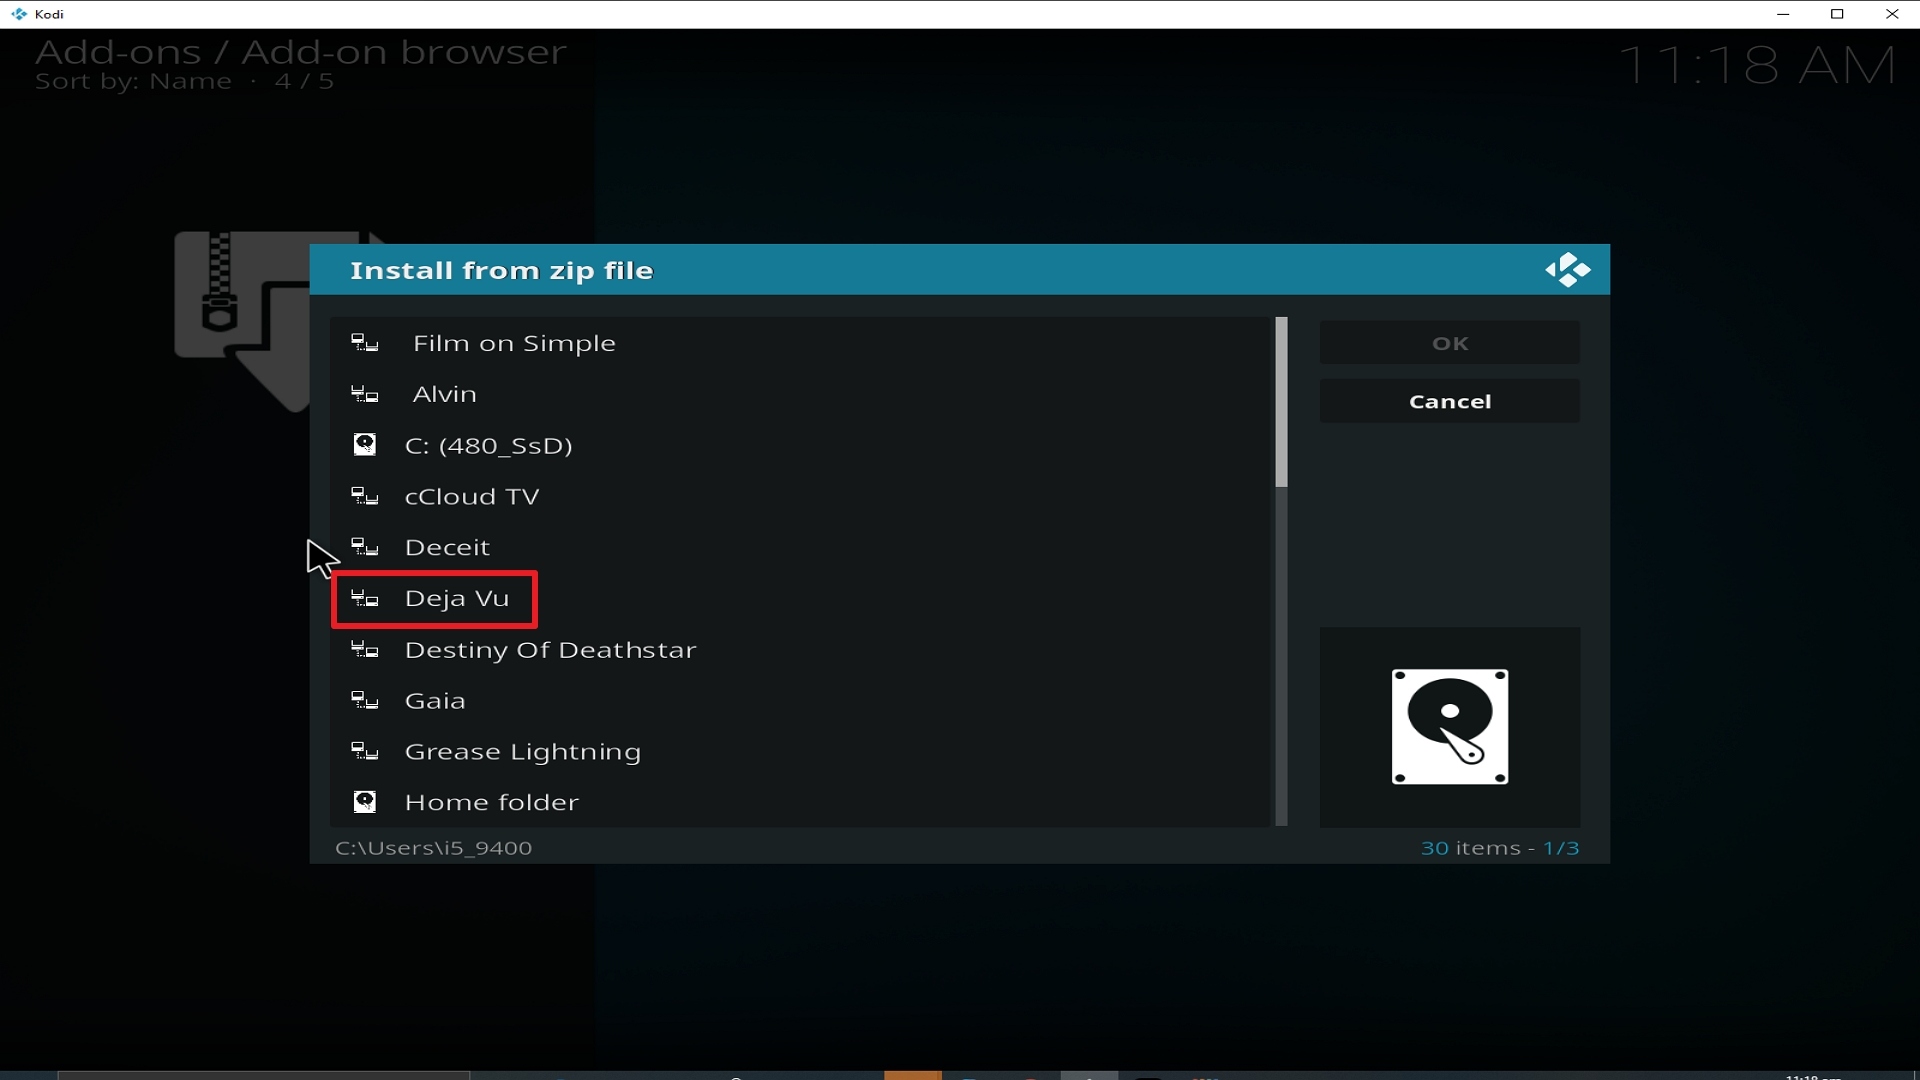
16. Select install from zip file.

Step 16 Installing Deja Vu addon on Kodi


17. Click on Deja Vu (or whatever you named the source).

Step 17 Installing Deja Vu addon on Kodi


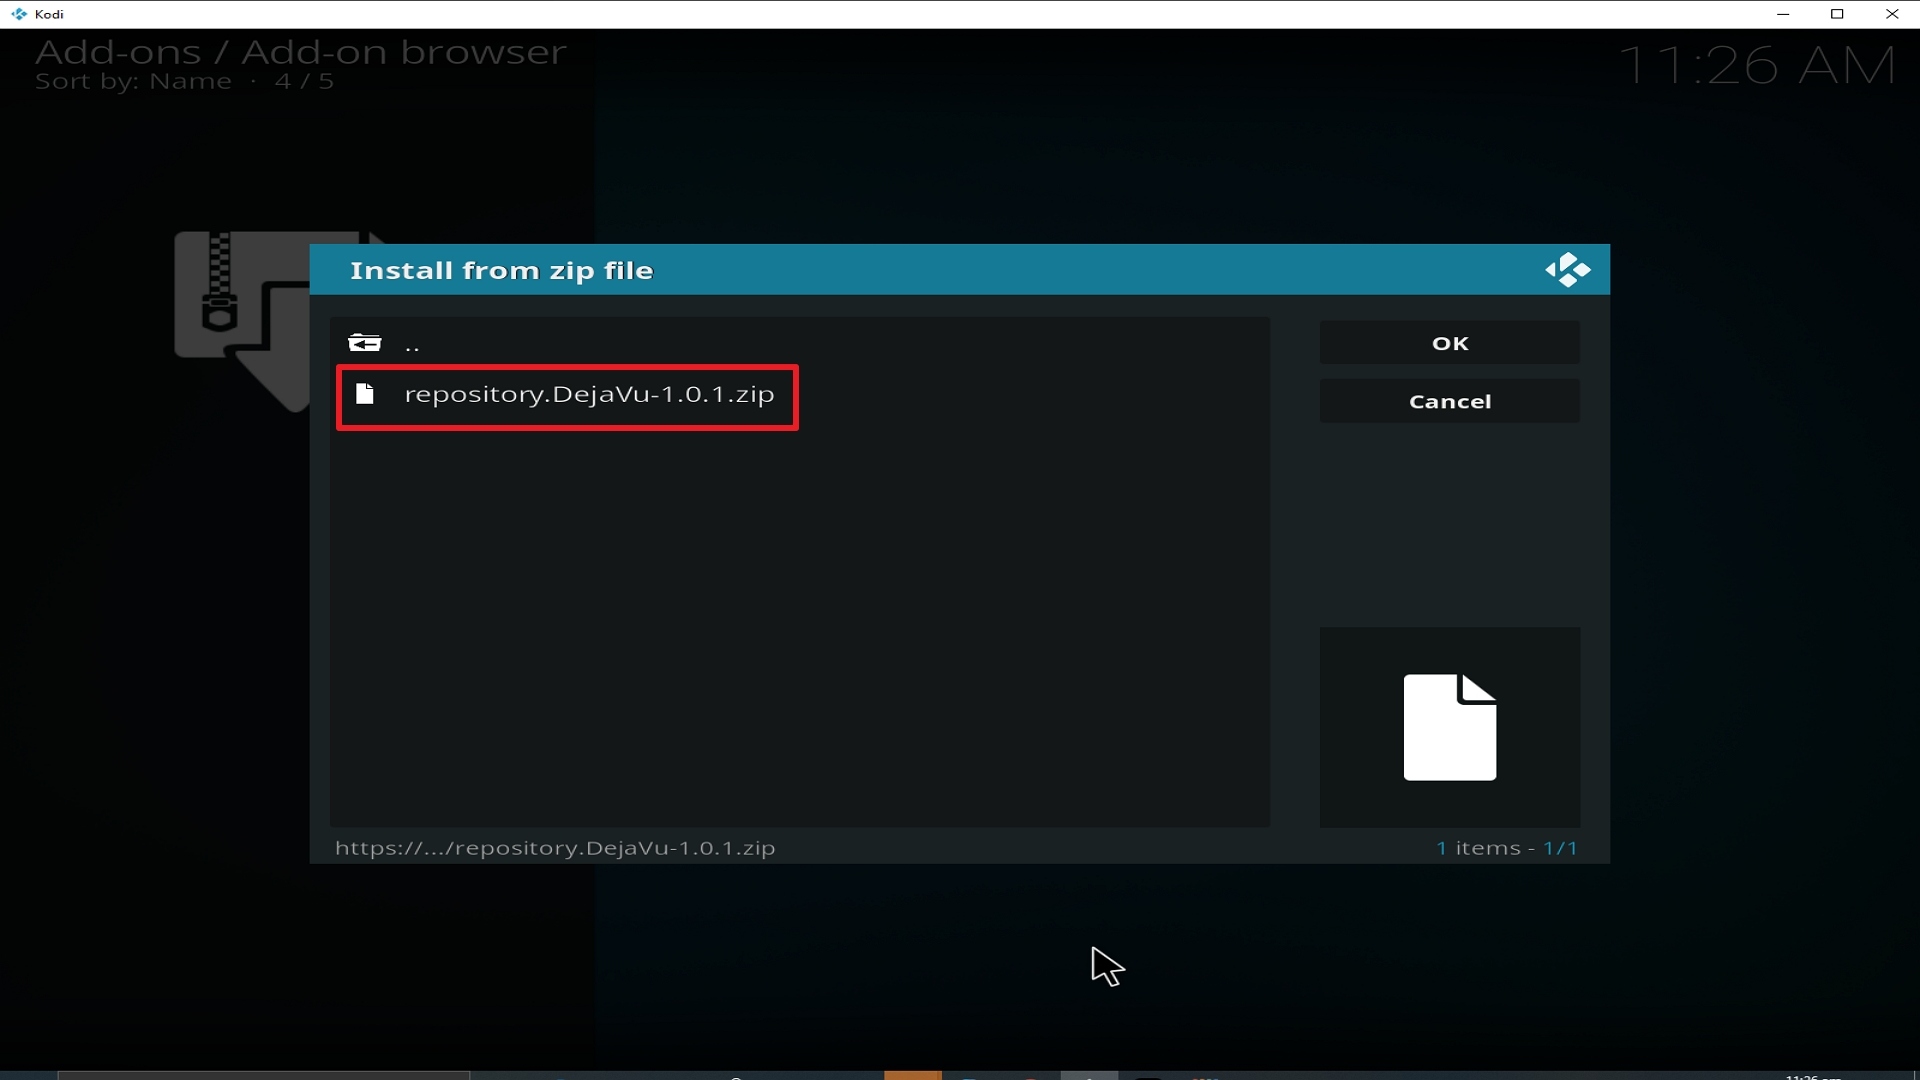
18. Click on repository.Dejavu-1.0.0.zip.

Step 18 Installing Deja Vu addon on Kodi


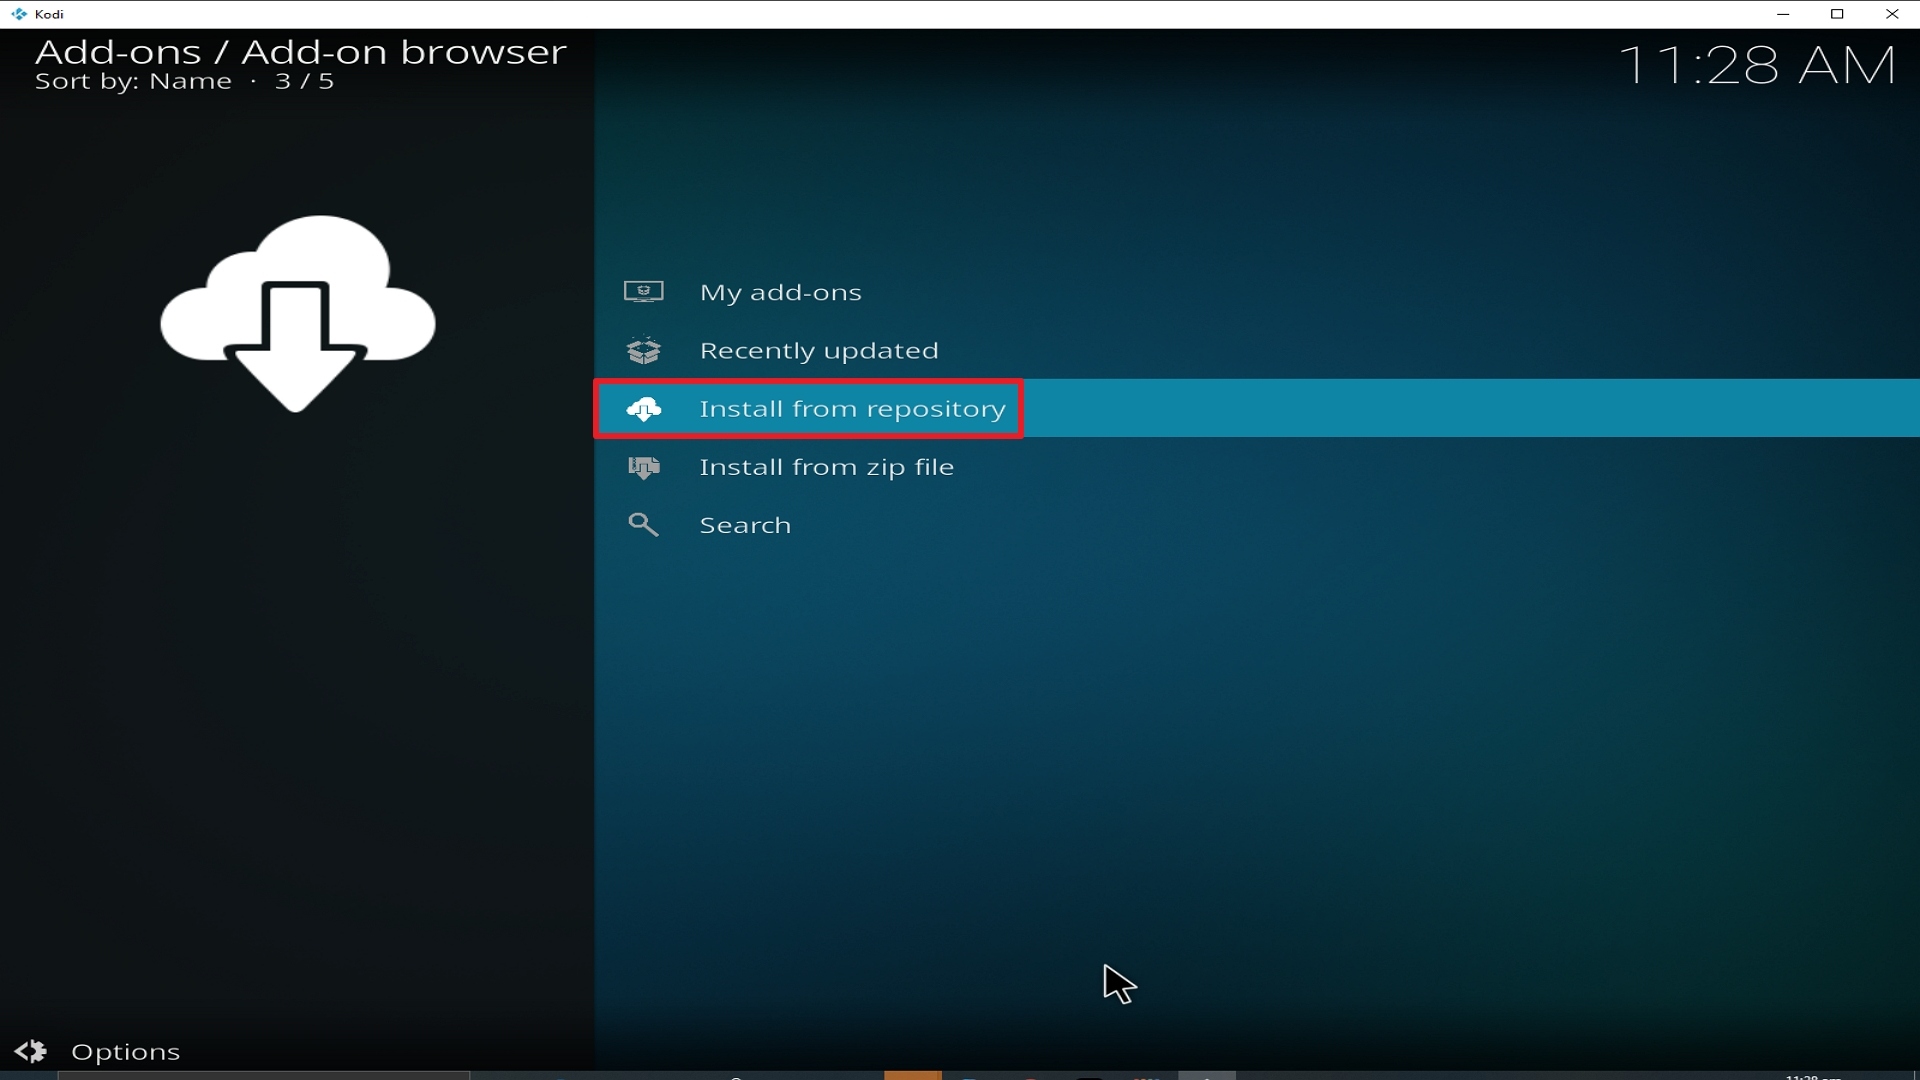
19. Select on Install from repository.

Step 19 Installing Deja Vu addon on Kodi


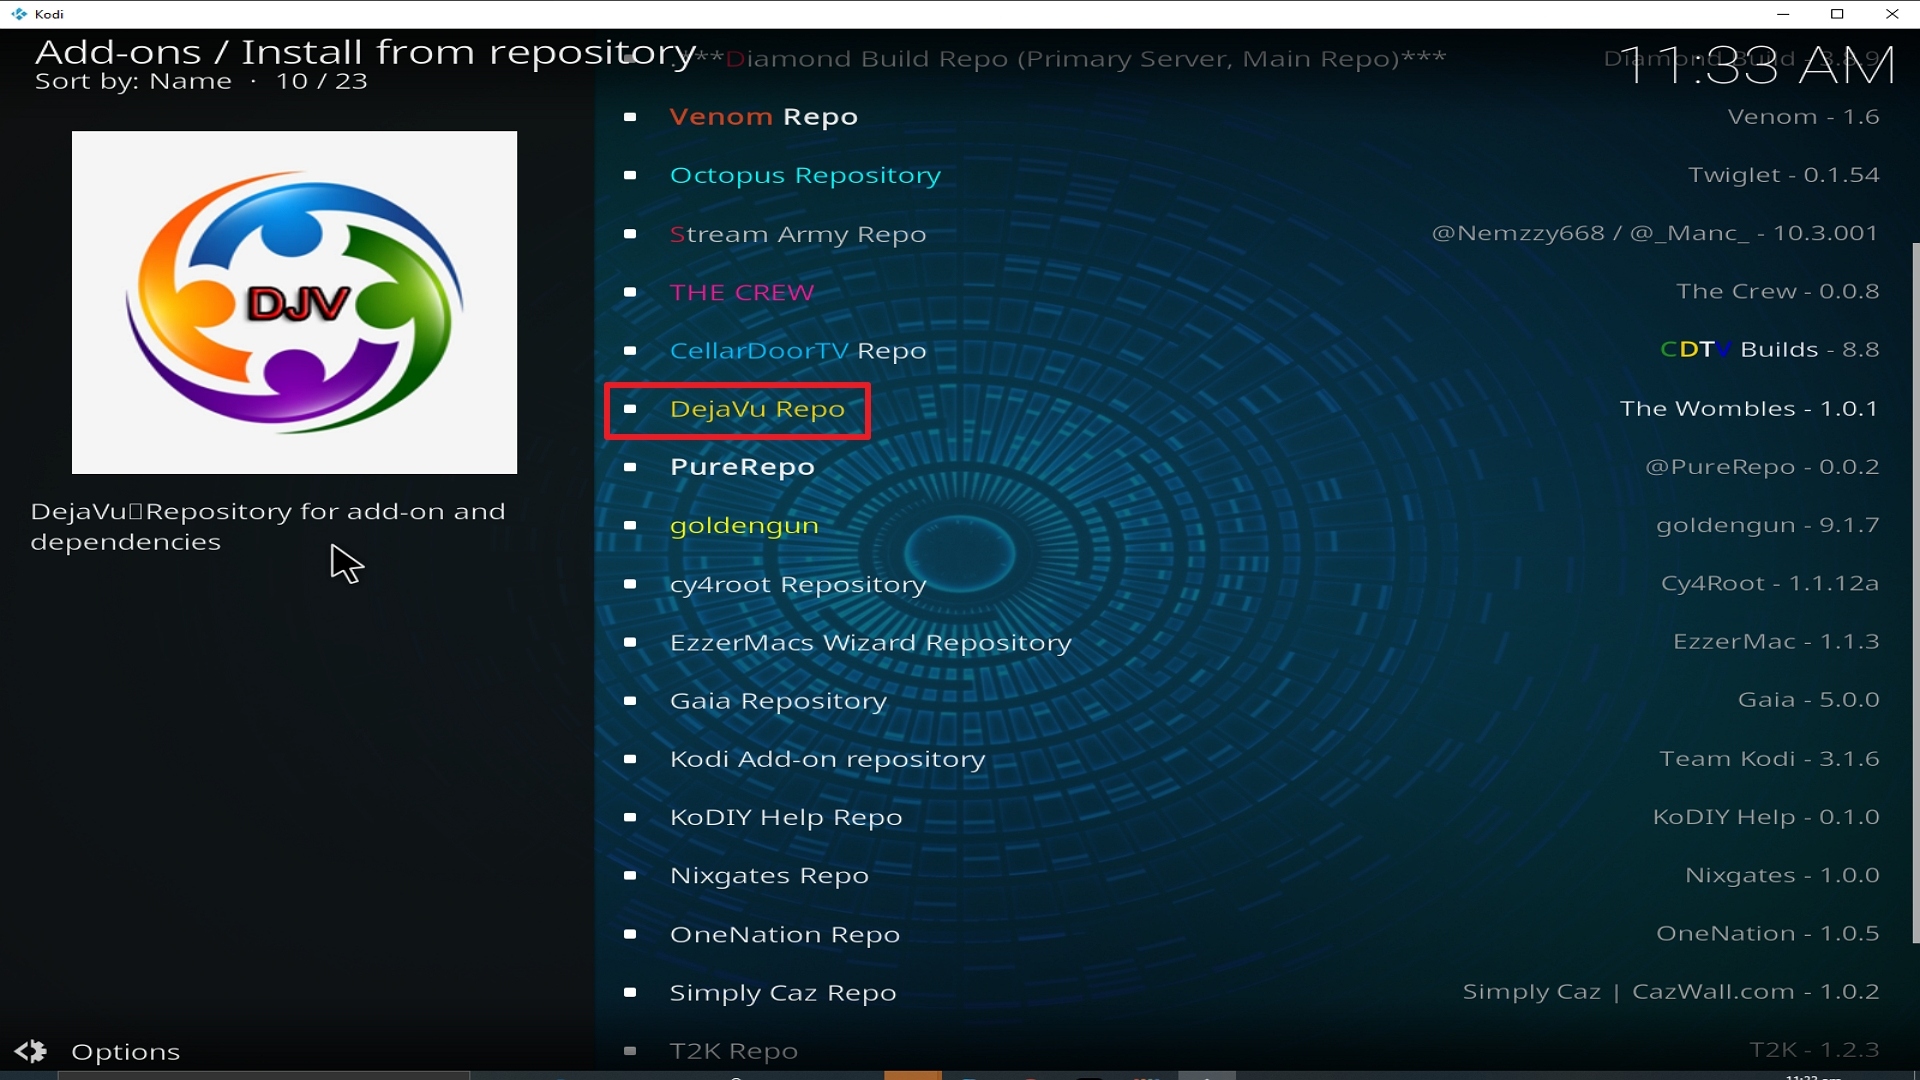
20. Click on Dejavu Repo

Step 20 Installing Deja Vu addon on Kodi


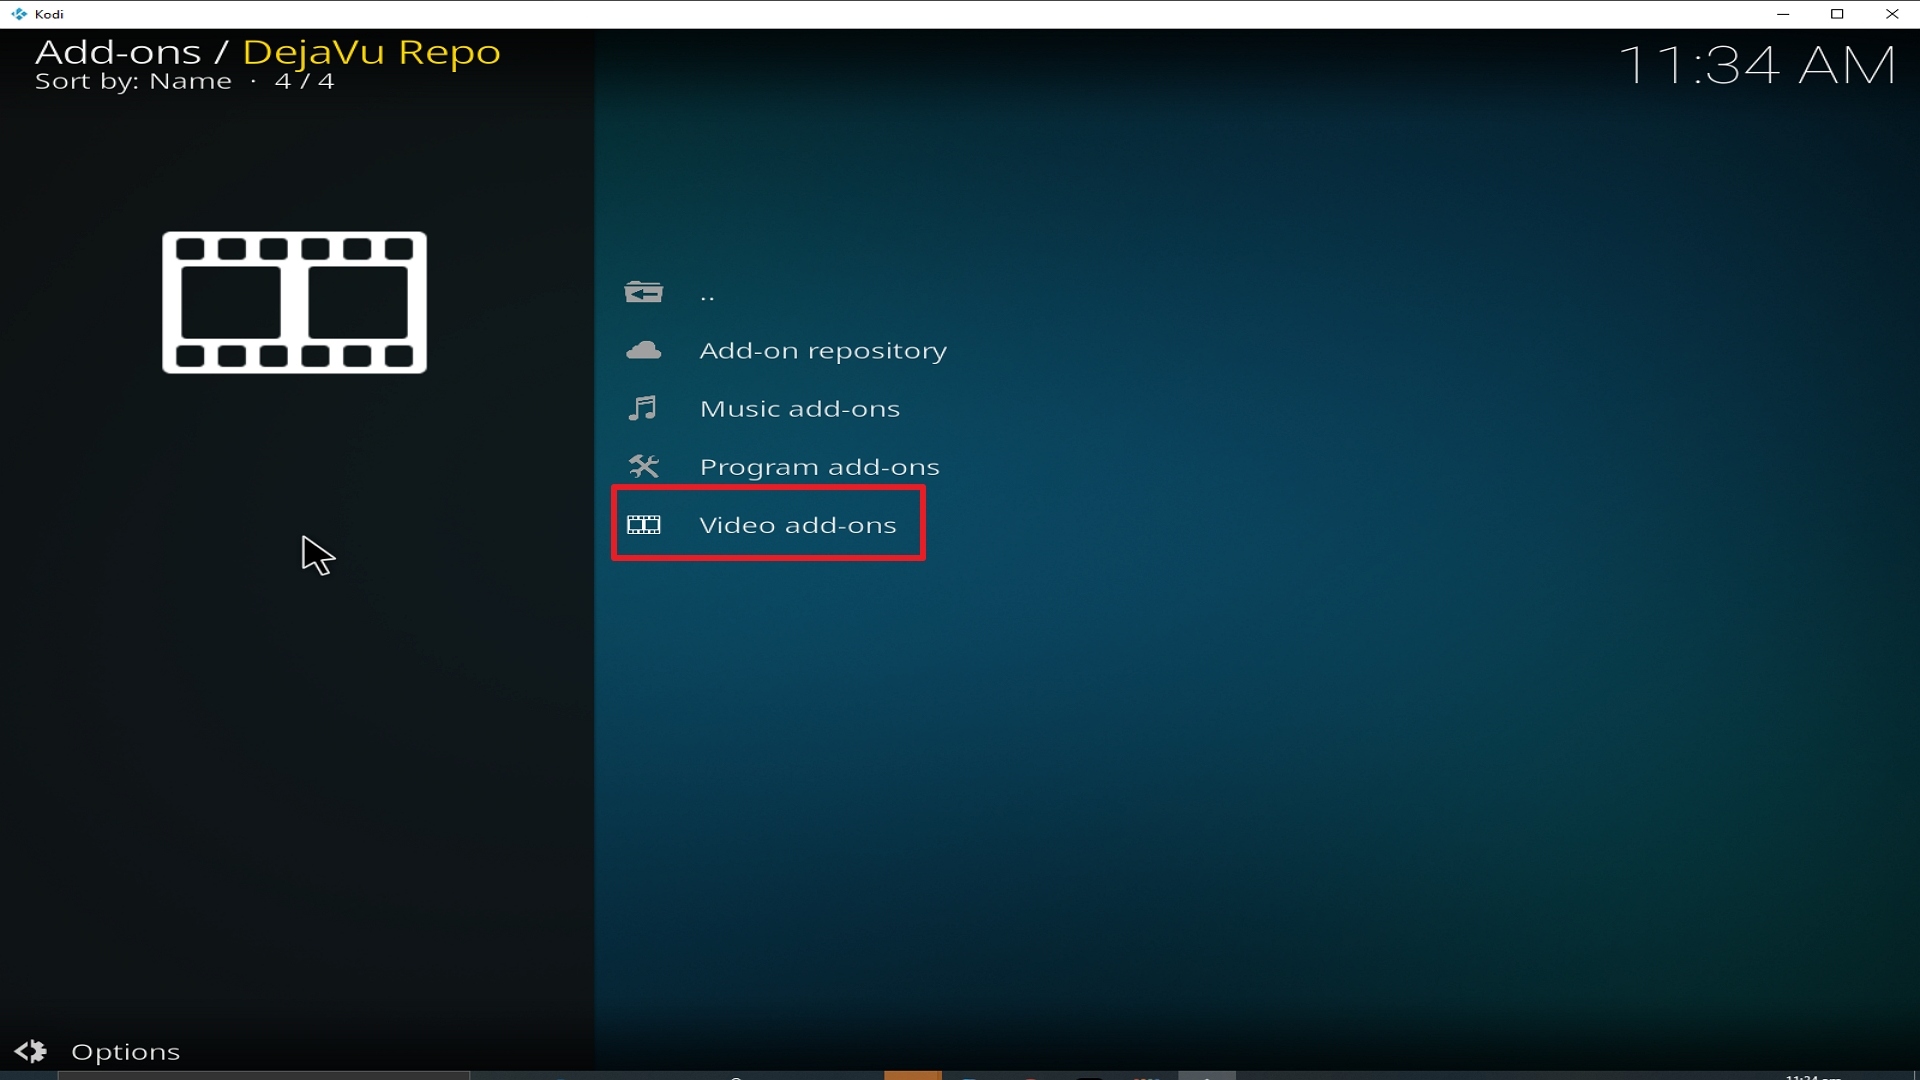
21. Pick Video add-ons.

Step 21 Installing Deja Vu addon on Kodi


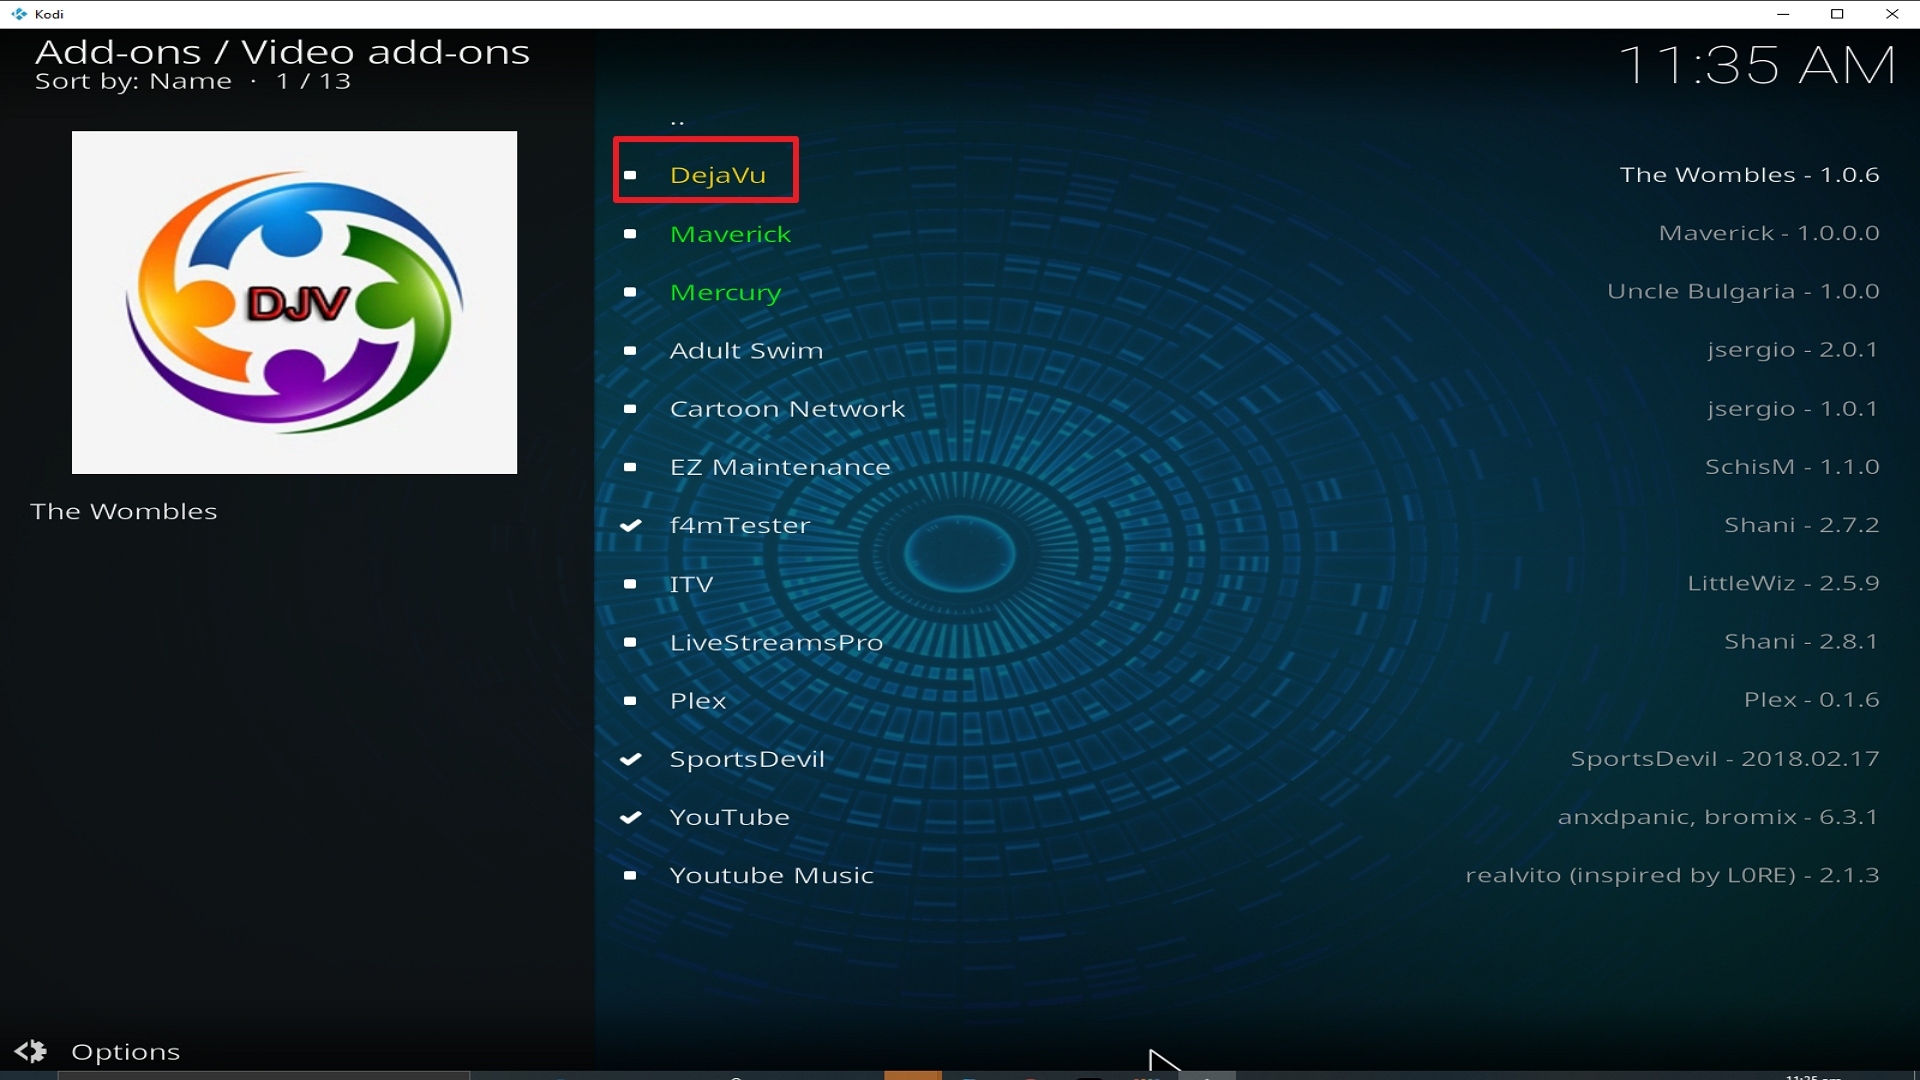
22. Select Deja Vu again.

Step 22 Installing Deja Vu addon on Kodi


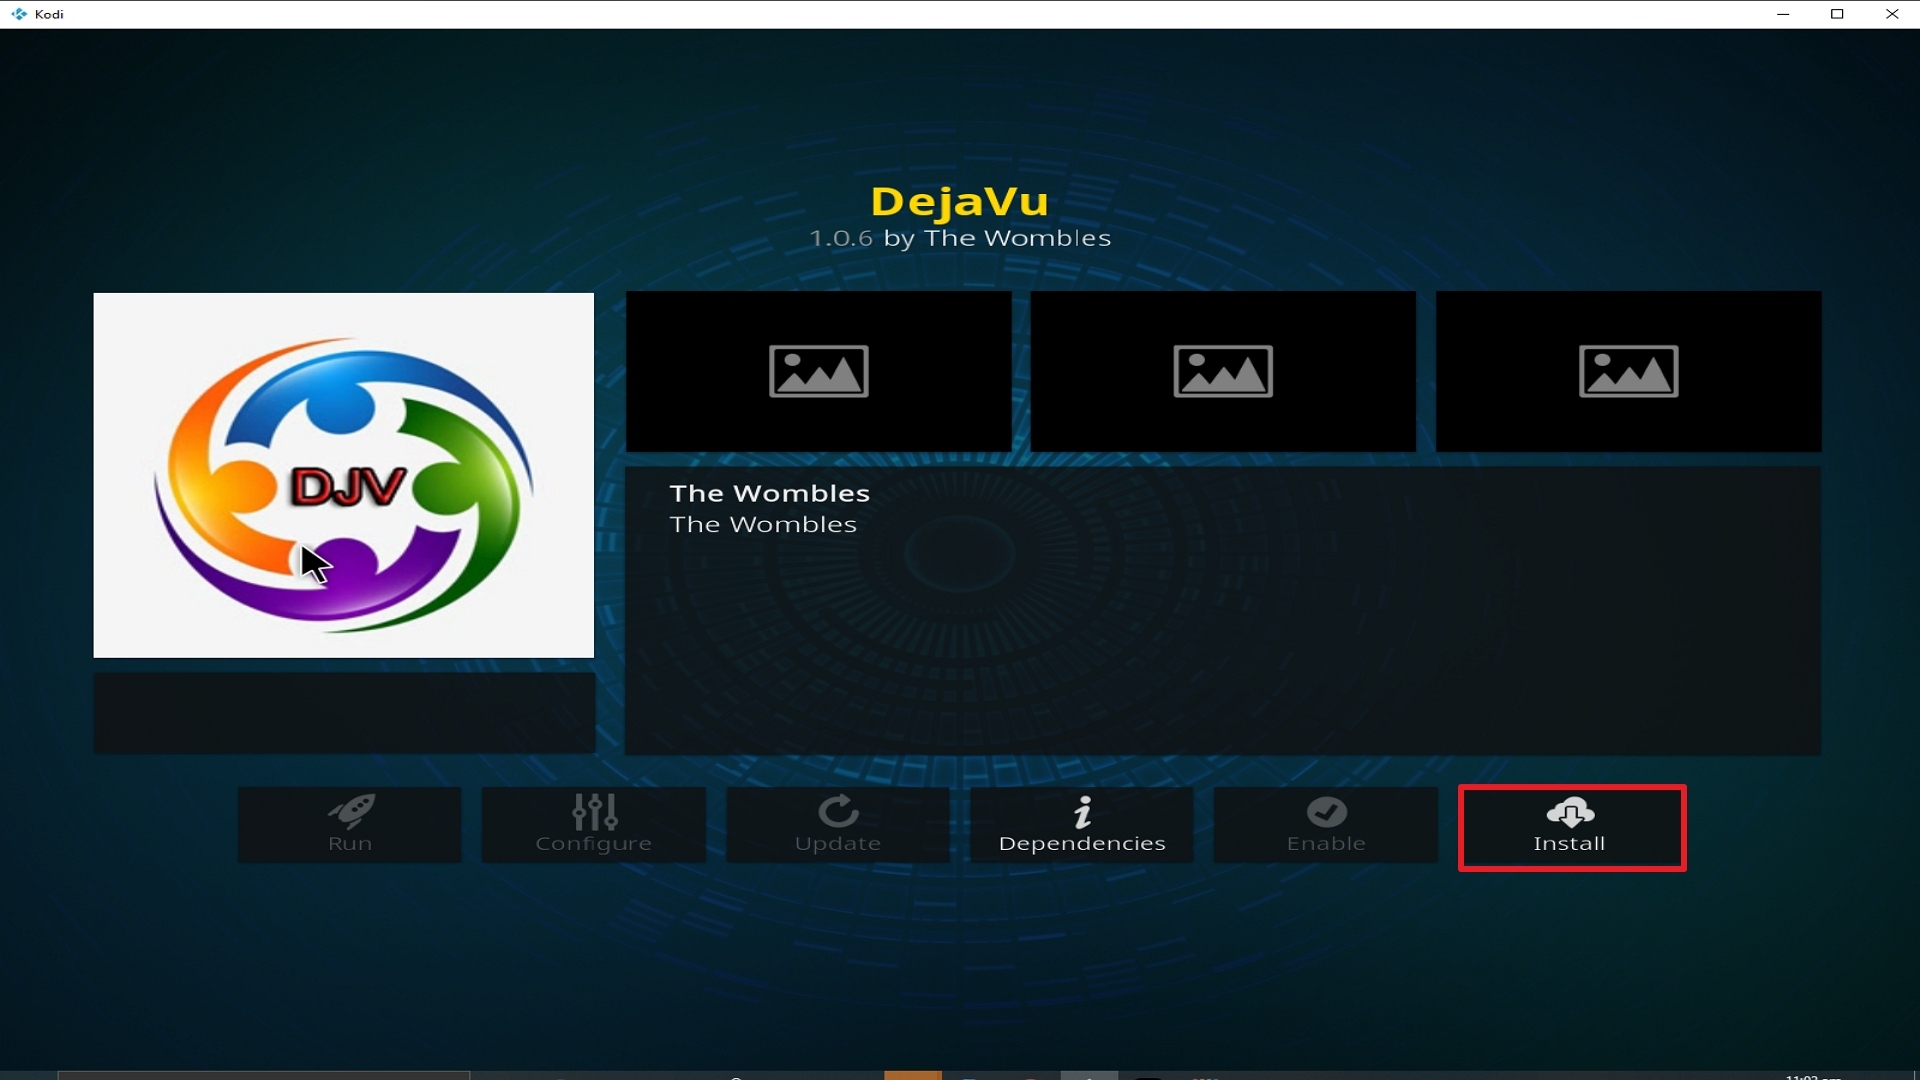
23. Click on Install. 

Step 23 Installing Deja Vu addon on Kodi


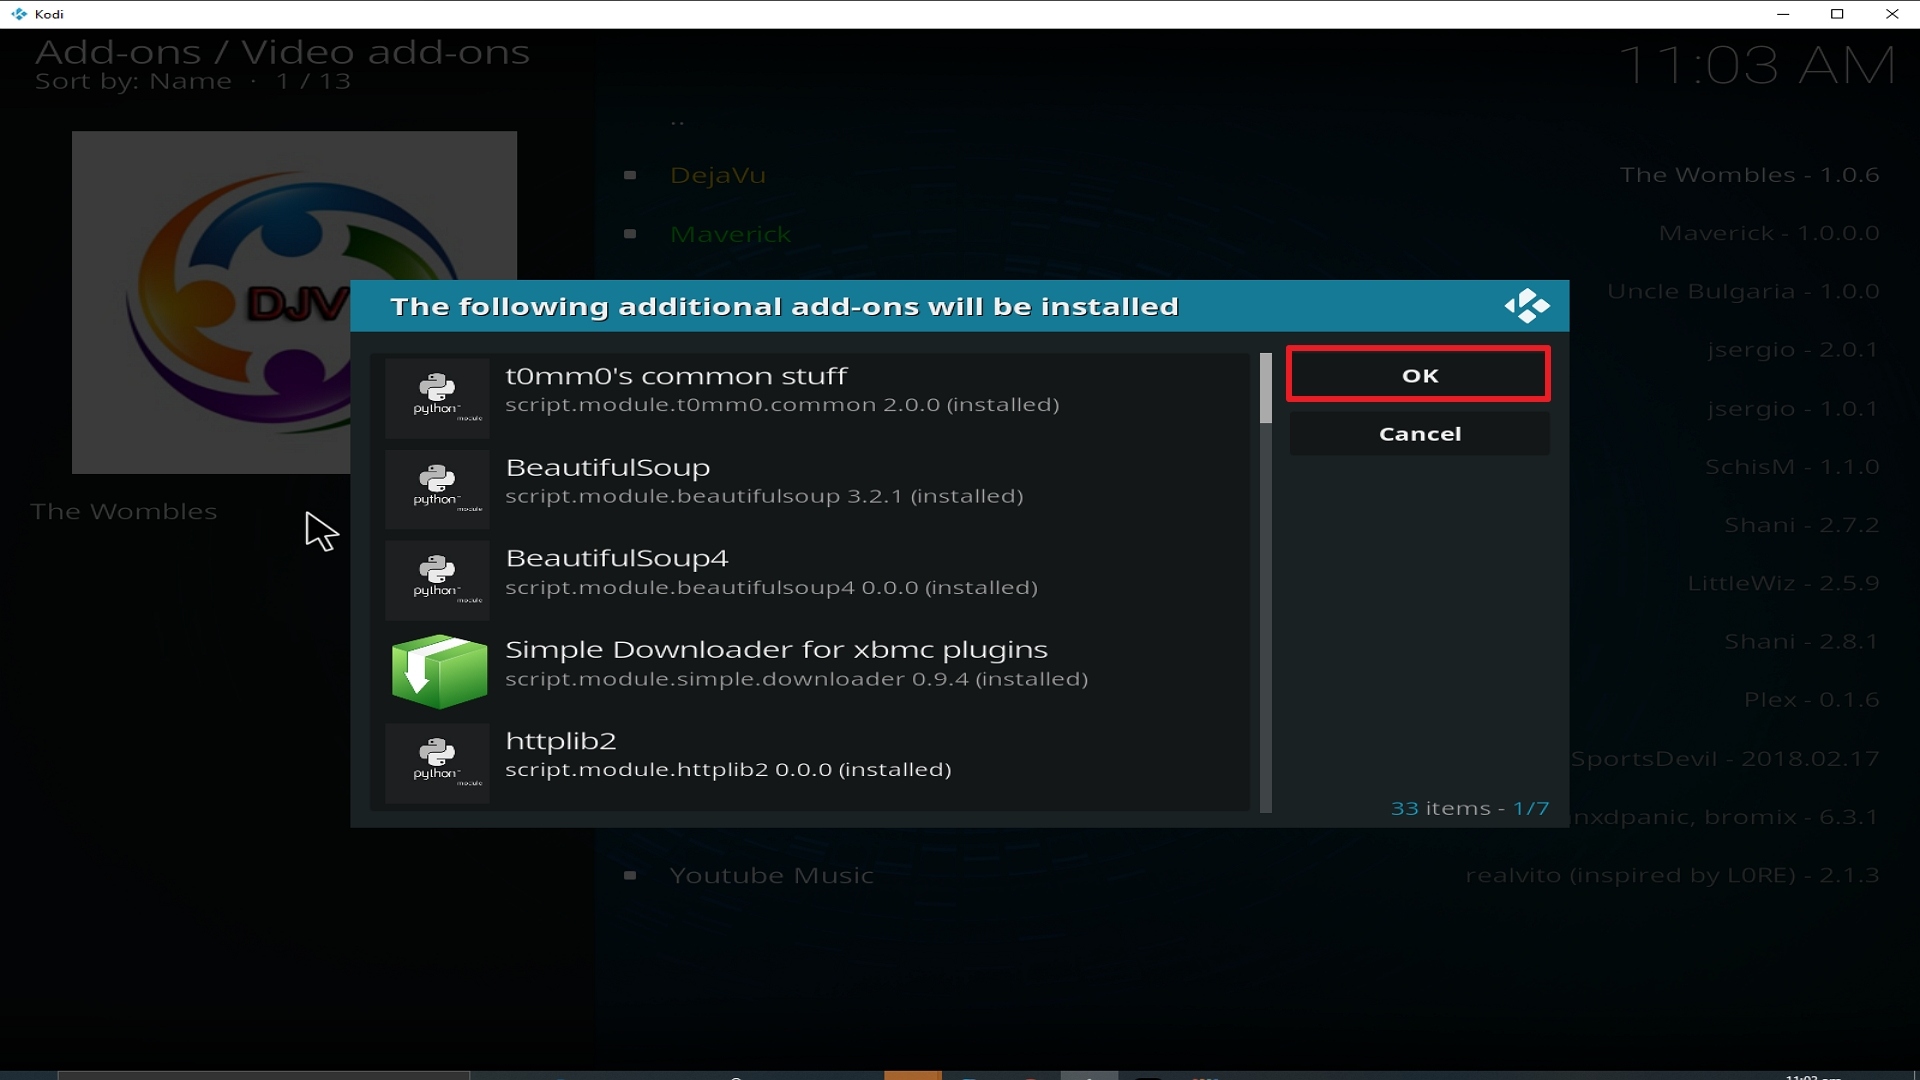
24. Select OK after reviewing the add-ons that will be installed.

Step 24 Installing Deja Vu addon on Kodi


25. You should see a popup in the upper right corner saying Deja Vu has installed. There will actually be multiple popups for the various components.

Step 25 Installing Deja Vu addon on Kodi


26. Click on Open to start the Deja Vu add-on.

Step 26 Installing Deja Vu addon on Kodi


Should I Use a VPN?

https://get.surfshark.net/aff_c?offer_id=865&aff_id=12312

Oftentimes these apps are legal to use but what we are uncertain of is how they obtain the links.

Are they legally obtained or not? So for us not to worry about that, we always recommend that you secure yourself with a VPN. 

If a link is obtained legally and you were able to use it, that activity will be cloaked by your VPN.

It masks your online activity and places you in a different location so you cannot be traced by your ISP. VPNs also give you direct access to content that is geographically restricted.

If you happen to find content that you like and it is not available in your location, the VPN will do its magic and then you can view that content.

Also, there will be times when loading the links will become an issue because of your internet connection, ISPs regulate the amount of speed you get so this will cause problems when watching.

The VPN will block your ISP’s attempt to throttle your speed and will ensure that you get the most out of it. Always settle for a trusted and reliable VPN and we usually recommend one of the best which is, Surfshark.

Please refer to this guide on how to install Surfshark on your device: Install Surfshark on Firestick.

Note: For more information about SurfShark, please read our SURFSHARK REVIEW.


Grab your subscription now!


How to Install Surfshark VPN on Firestick

If your Firestick still has the older interface, read this article to learn how to update it: Update Firestick Interface.

You can download Surfshark directly from the Amazon App store. It will be easy for you to find Surfshark with your Firestick’s Find feature. Refer to our screenshots below.

1. Go to the Home screen of your Firestick.

step 1 Install Surfshark VPN on Firestick


2. Navigate towards the Find tab. Press the Search button from the resulting dropdown.

step 2 Install Surfshark VPN on Firestick


3. Type in the keyword of SurfShark and select from the suggestions that will appear.

step 3 Install Surfshark VPN on Firestick


4. Click the official SurfShark icon from your search results.

step 4 Install Surfshark VPN on Firestick


5. Press the Download (You own it) button.

step 5 Install Surfshark VPN on Firestick


6. The SurfShark VPN installer will download on your device.

step 6 Install Surfshark VPN on Firestick


7. SurfShark VPN’s app will automatically install itself on your Fire TV stick.

step 7 Install Surfshark VPN on Firestick


8. Press the Open button after completing SurfShark VPN’s installation process.

step 8 Install Surfshark VPN on Firestick


9. Please wait for the SurfShark VPN to load its user interface.

step 9 Install Surfshark VPN on Firestick


10. You can now log in with your SurfShark VPN account credentials.

step 10 Install Surfshark VPN on Firestick

Learn more about Surfshark and Grab the Best Surfshark Deal Now!


Install Surfshark on Firestick

Best Surfshark Deal


Other VPNs to Consider

NordVPN (Best for Streaming)

Best Features

  • 5000+ Server in 50+ Countries 
  • Military-Grade Encryption
  • Fast Connection Speed
  • Suitable to a lot of devices
  • No-Log Policy

Prices
  • Complete $5.89 per month (64% Discount)
  • Plus $4.59 per month (56% Discount)
  • Standard $3.69 per month (55% Discount)

Best Features

  • 750+ High-speed VPN Servers in 43 Locations
  • Military-Grade Encryption
  • Fastest HD Streaming and Gaming
  • 30-Day Money-Back Guarantee
  • Unlimited Data & Devices
  • No-Log Policy

Prices
  • 3 Years $1.99 per month (82% Discount)
  • 1 Years $3.29 per month (70% Discount)
  • 1 Month $10.99 per month

IPVanish VPN (Most Secure)

Best Features

  • 1200+ Servers in 60+ Countries around the world
  • Unlimited Connections
  • No-Log Policy
  • Top Notch Military-Grade VPN Protocols and Encryptions
  • 100% Safe and Secured
  • Most Trusted VPN
  • Best VPN for Firestick
  • 30-Day Money-Back Guarantee

Prices
  • Yearly $3.99 per month (63% Discount) – 30 days risk free + Ransomware & Malware Protection
  • Quarterly $5.32 per month (51% Discount)
  • Monthly $10.99 per month


For more VPN discounts, go to ReviewVPN Deals and purchase the best VPN for you.

Click here to get the lowest price on Surfshark through our exclusive limited-time offer.


Install Film on Simple Kodi Addon

Film on Simple Kodi Addon

In this article, we will help you install Film on Simple Kodi Addon on Firestick.


Filmon Simple Image.

Source: https://cazwall.com/repo/ 

Film On Simple Kodi addon is a free and legal way to watch TV which first came out in 2017. In 2019 the service has broadened to include over 500 channels, channels on demand, movies on demand and a wide range of additional content.

For the service, you will need to pay $14.95 a month, if you are trying to access the web-based service. Fortunately for us, you can download the modded addon which means you don’t need to pay any money and get all the content unlocked and for free courtesy of one of the many great Kodi addon developers.

Film on Simple gives you access to a wide range of content, mainly free TV channels in several countries, as well as a limited amount of TV Shows and Films. But you won’t get anything that you couldn’t watch free legally if you searched it through Google and had a VPN to get around the Geo-IP blocking. So, in that sense, it’s nothing more than an aggregation of free TV channels and content from around the world. Don’t expect any new releases.


Common Errors

There are a couple of common errors you can expect to come across with Film on Simple:

  • Could not Download/ Web URL failure. Check that you have typed in the right URL. If the repository has changed, refer to Google and Reddit to find the latest link. Also, you can try again just to make sure that it isn’t a problem with the server receiving too many requests. If those quick fixes don’t work, find more steps here <LINK>
  • Stream not working/ Not available. You will get problems with streams. Firstly, give it time to load. 10 seconds at most, next try to refresh the stream and see if it connects now. if you still get no joy then check out more fixes in the guide linked above.
  • Kodi error check log. If you have been streaming for a while on Kodi or have a low storage device, you will get used to seeing this error. Probably it just means you need to clear your cache. Find out how and more fixes in the guide linked above.


ANONYMOUSLY

Review

There is a massive range of categories which include:

  • UK Live TV
  • Sports
  • Horror
  • Movies
  • Entertainment
  • Music
  • Bikini Babe
  • Comedy
  • Kids
  • Business TV
  • Documentary
  • News TV
  • Extreme Sports
  • Documentaries
  • Shopping

You can choose from Live TV Channels from:

  • Canada
  • US
  • UK
  • France
  • Italy 
  • Russia
  • India
  • Hungary
  • South America


Bear in mind that the Kodi version does not unlock premium channels, so you are “restricted” to the free channels.

Film on Simple has got fantastic quality for the channels that you can access, which tend to be live access channels within the country. So, for example, you could access all the BBC channels in the UK.

Another thing to bear in mind is that you will need to use a VPN with the addon. Film on Simple will scan your IP and only give you access to TV channels that would be available in your country. The addon hasn’t been able to hack the geo-locking capability of the premium service. Check here for the best VPN deal.

Film on Simple is a great addon for what it does, but honestly, there are better Live TV add ons out there, where you won’t need to use a VPN, in terms of changing countries to find a working channel. Try Mobdro, Redbox, or cCloud TV for a better and wider range of channels that is less restrictive.

Or just pay a few dollars a month for a great premium IPTV service like Player’s Klub or Helix and get 3,000+ channels in glorious HD with instant connection and almost no buffering.


YOUR INTERNET ACTIVITY IS BEING WATCHED

ReviewVPN cannot attest to the legality, security and privacy of the applications discussed on this site. It is highly recommended that you use a VPN service while streaming or using Kodi.

Currently, your IP 216.73.217.150 is visible to everyone and your Browser is being tracked by Advertisers & ISP Provider.

Save 65% Now

Limited Time Offer

Here are the main reasons why you must use a VPN:

  • Your activities are hidden from your ISP, the government, and from the apps you are using.
  • You can access additional movies and TV streams.
  • ISP attempts to throttle are thrwarted thus reducing buffering issues.
  • Geographically restricted content like Netflix and Hulu can be unblocked.

A VPN works be replacing your ISP-assigned IP address and creating an encrypted tunnel. We recommend the no log service offered by IPVanish. It works well on a Firestick and offers the fastest possible speeds.

Special Limited Time Offer - Get IPVanish


Legal Disclaimer: ReviewVPN.com does not encourage or endorse any illegal activity involved in the usage of services and applications referenced on this site. We do not verify the licensing agreements of services. The end-user is wholly responsible for ensuring that any media accessed through these services does not violate copyright and/or licensing laws. ReviewVPN does not promote, link to, or receive compensation from any Apps and IPTV services.


Install Surfshark on Firestick

Best Surfshark Deal


How to Install Film on Simple Addon on Kodi with Screenshots

  1. From the home screen, select the cogwheel at the upper left.

Step 1 Installing Film on Simple addon on Kodi


2. Select System in the bottom right corner.

Step 2 Installing Film on Simple addon on Kodi


3. Select Add-ons on the left side of the screen.

Step 3 Installing Film on Simple addon on Kodi


4. Select Unknown sources.

Step 4 Installing Film on Simple addon on Kodi


5. Click Yes to allow unknown sources.

Step 5 Installing Film on Simple addon on Kodi


6. Select File manager.

Step 6 Installing Film on Simple addon on Kodi


7. Click Add source.

Step 7 Installing Film on Simple addon on Kodi


8. Click on <None>.

Step 8 Installing Film on Simple addon on Kodi


9. Type exactly: https://cazwall.com/repo/

Step 9 Installing Film on Simple addon on Kodi


10. Click on OK.

Step 10 Installing Film on Simple addon on Kodi


11. Select enter a name for this media source.

Step 11 Installing Film on Simple addon on Kodi


12. Name is Film on Simple (this part isn’t critical as long as you remember the name).

Step 12 Installing Film on Simple addon on Kodi


13. Click on OK.

Step 13 Installing Film on Simple addon on Kodi


14. Click on OK.

Step 14 Installing Film on Simple addon on Kodi


15. Take one step back and click on Add-ons.

Step 15 Installing Film on Simple addon on Kodi


16. Select install from zip file.

Step 16 Installing Film on Simple addon on Kodi


17. Click on Film on Simple (or whatever you named the source).

Step 17 Installing Film on Simple addon on Kodi


18. Select Repository (Click Here)

Step 18 Installing Film on Simple addon on Kodi


19. Click on repository.simplycaz-1.0.2.zip

Step 19 Installing Film on Simple addon on Kodi


20. Select on Install from repository.

Step 20 Installing Film on Simple addon on Kodi


21. Click on Simply Caz Repo.

Step 21 Installing Film on Simple addon on Kodi


22. Pick Video add-ons.

Step 22 Installing Film on Simple addon on Kodi


23. Select Film on Simple again.

Step 23 Installing Film on Simple addon on Kodi


24. Click on Install.

Step 24 Installing Film on Simple addon on Kodi


25. You should see a popup in the upper right corner saying Film on Simple has installed. There will actually be multiple popups for the various components.

Step 25 Installing Film on Simple addon on Kodi


26. Click on Open to start the Film on Simple add-on.

Step 26 Installing Film on Simple addon on Kodi


Always Use a VPN On Kodi

It is advisable to install a VPN on your streaming device. This is because any time you are streaming content online, your online data is vulnerable and you are being monitored on the internet service provider’s network. 

Not only that, but you will also experience location restrictions. Using a VPN will save you that headache and stress and you will be safe and secure while streaming content online. We recommend Surfshark as it offers high security and privacy with a zero log policy with DNS leak protection. 

Note: For more information about Surfshark, please read our Surfshark Review.


Install Surfshark on Firestick

Best Surfshark Deal


How to Install Surfshark VPN on Firestick

If your Firestick still has the older interface, read this article to learn how to update it: Update Firestick Interface.

Follow our screenshots below to install the SurfShark VPN app on your Fire TV stick.

1. Go to the Home screen of your Firestick.

step 1 Install Surfshark VPN on Firestick


2. Navigate towards the Find tab. Press the Search button from the resulting dropdown.

step 2 Install Surfshark VPN on Firestick


3. Type in the keyword of SurfShark and select from the suggestions that will appear.

step 3 Install Surfshark VPN on Firestick


4. Click the official SurfShark icon from your search results.

step 4 Install Surfshark VPN on Firestick


5. Press the Download (You own it) button.

step 5 Install Surfshark VPN on Firestick


6. The SurfShark VPN installer will download on your device.

step 6 Install Surfshark VPN on Firestick


7. SurfShark VPN’s app will automatically install itself on your Fire TV stick.

step 7 Install Surfshark VPN on Firestick


8. Press the Open button after completing SurfShark VPN’s installation process.

step 8 Install Surfshark VPN on Firestick


9. Please wait for the SurfShark VPN to load its user interface.

step 9 Install Surfshark VPN on Firestick


10. You can now log in with your SurfShark VPN account credentials.

step 10 Install Surfshark VPN on Firestick

Learn more about Surfshark and Grab the Best Surfshark Deal Now!


Install Surfshark on Firestick

Best Surfshark Deal


Other VPNs to Consider

NordVPN (Best for Streaming)

Best Features

  • 5000+ Server in 50+ Countries 
  • Military-Grade Encryption
  • Fast Connection Speed
  • Suitable to a lot of devices
  • No-Log Policy

Prices
  • Complete $5.89 per month (64% Discount)
  • Plus $4.59 per month (56% Discount)
  • Standard $3.69 per month (55% Discount)

Best Features

  • 750+ High-speed VPN Servers in 43 Locations
  • Military-Grade Encryption
  • Fastest HD Streaming and Gaming
  • 30-Day Money-Back Guarantee
  • Unlimited Data & Devices
  • No-Log Policy

Prices
  • 3 Years $1.99 per month (82% Discount)
  • 1 Years $3.29 per month (70% Discount)
  • 1 Month $10.99 per month

IPVanish VPN (Most Secure)

Best Features

  • 1200+ Servers in 60+ Countries around the world
  • Unlimited Connections
  • No-Log Policy
  • Top Notch Military-Grade VPN Protocols and Encryptions
  • 100% Safe and Secured
  • Most Trusted VPN
  • Best VPN for Firestick
  • 30-Day Money-Back Guarantee

Prices
  • Yearly $3.99 per month (63% Discount) – 30 days risk free + Ransomware & Malware Protection
  • Quarterly $5.32 per month (51% Discount)
  • Monthly $10.99 per month


For more VPN discounts, go to ReviewVPN Deals and purchase the best VPN for you.

Click here to get the lowest price on Surfshark through our exclusive limited-time offer.


Install cCloud TV Kodi Addon

cCloud TV Kodi Addon

In this article, we will help you install cCloud TV Kodi Build on Firestick.


cCloud TV Image

Source: http://www.lvtvv.com/repo/

cCloud TV is one of the best Live TV addons for Kodi. Rivalling Red Box and even Mobdro when it’s on a good day.

You can access over 1000 live channels, as well as TV Shows, Movies, radio channels, and news channels. Its also been going for so long that it even has its own website: http://ccloudtv.org/

It’s also one of the longest-running Live TV add ons and has survived this longing by being smart and not hosting any content from all the Live TV that it allows you to stream.


In our review, we detail this further, but Live TV channels are kept updated by the community and you rarely have a channel go down for very long.

We also recommend that you install cCloud TV’s Electronic Programme Guide (EPG) alongside the add on, which you can do, after you have installed cCloud TV by going to:

  • From the Kodi home screen so to settings and then add ons
  • Go to Install from Repository
  • Then cCloud repo and program add ons
  • Click on cCloud TV Guide and then install

Just be aware that the database does take a while to build and synchronize for the programming and timings for over 1,000 channels. So, don’t panic and think the program guide has frozen. Just get it going and go and grab some fresh air. The guide really does make a massive difference to the experience.


ANONYMOUSLY

Common Errors

Here we list out the common errors you will come across with cCloud TV, this tends to happen much more when dealing with Live TV add ons:

  • Installation Failed. This error can manifest in two ways, either the installation gets an error message saying it cannot connect to the URL, or the installation bar just gets stuck at 0%. If you cannot install the add on in the first place, checked you have typed out the URL correctly. Then check the source, by typing in the URL into your internet browser. If the source works, then chalk it up to an overloaded server. If the problem persists find more fixes guide linked above.
  • Stream not working/ Not available. When a stream fails, it means that the source it was trying to fetch could not be connected. First, if a stream hasn’t failed but just appears to be a black screen, give it as long as 10 seconds to connect. Secondly, try to refresh the stream again. Sometimes the server may be overloaded and have not picked up your request. If the problem persists then read our full guide linked above.
  • Kodi error check log. You might get an error message saying you need to check the Kodi error log. This just means that your media cache is full. You will get this after you have been streaming for a while. Everything you have watched gets cached and on smaller storage devices you run out of space. You can either ignore the message until it won’t let you. Or learn how to clear the cache of any device and more fixes, try some more in the guide linked above.


Review

cCloud Tv is a brilliant Live TV add on and has been going strong for years. The reason is the community. Every channel is vetted and kept live by a community of faithful users.

When a link breaks a new one is found, and through the community, the add on stays active and updated.

The developer has continued to release some great updates as well. The EPG is beautiful and has a great outlay of programs and timings, as well as being easily searchable.

Tie this in with the ability to enable M3U IPTV playlists, which means you get a constantly updated and working list of channels.


YOUR INTERNET ACTIVITY IS BEING WATCHED

ReviewVPN cannot attest to the legality, security and privacy of the applications discussed on this site. It is highly recommended that you use a VPN service while streaming or using Kodi.

Currently, your IP 216.73.217.150 is visible to everyone and your Browser is being tracked by Advertisers & ISP Provider.

Save 65% Now

Limited Time Offer

Here are the main reasons why you must use a VPN:

  • Your activities are hidden from your ISP, the government, and from the apps you are using.
  • You can access additional movies and TV streams.
  • ISP attempts to throttle are thrwarted thus reducing buffering issues.
  • Geographically restricted content like Netflix and Hulu can be unblocked.

A VPN works be replacing your ISP-assigned IP address and creating an encrypted tunnel. We recommend the no log service offered by IPVanish. It works well on a Firestick and offers the fastest possible speeds.

Special Limited Time Offer - Get IPVanish


Legal Disclaimer: ReviewVPN.com does not encourage or endorse any illegal activity involved in the usage of services and applications referenced on this site. We do not verify the licensing agreements of services. The end-user is wholly responsible for ensuring that any media accessed through these services does not violate copyright and/or licensing laws. ReviewVPN does not promote, link to, or receive compensation from any Apps and IPTV services.


Install Surfshark on Firestick

Best Surfshark Deal


How to Install cCloud TV Addon on Kodi with Screenshots

  1. From the home screen, select the cogwheel at the upper left.

Step 1 Installing cCloud TV addon on Kodi


2. Select System in the bottom right corner.

Step 2 Installing cCloud TV addon on Kodi


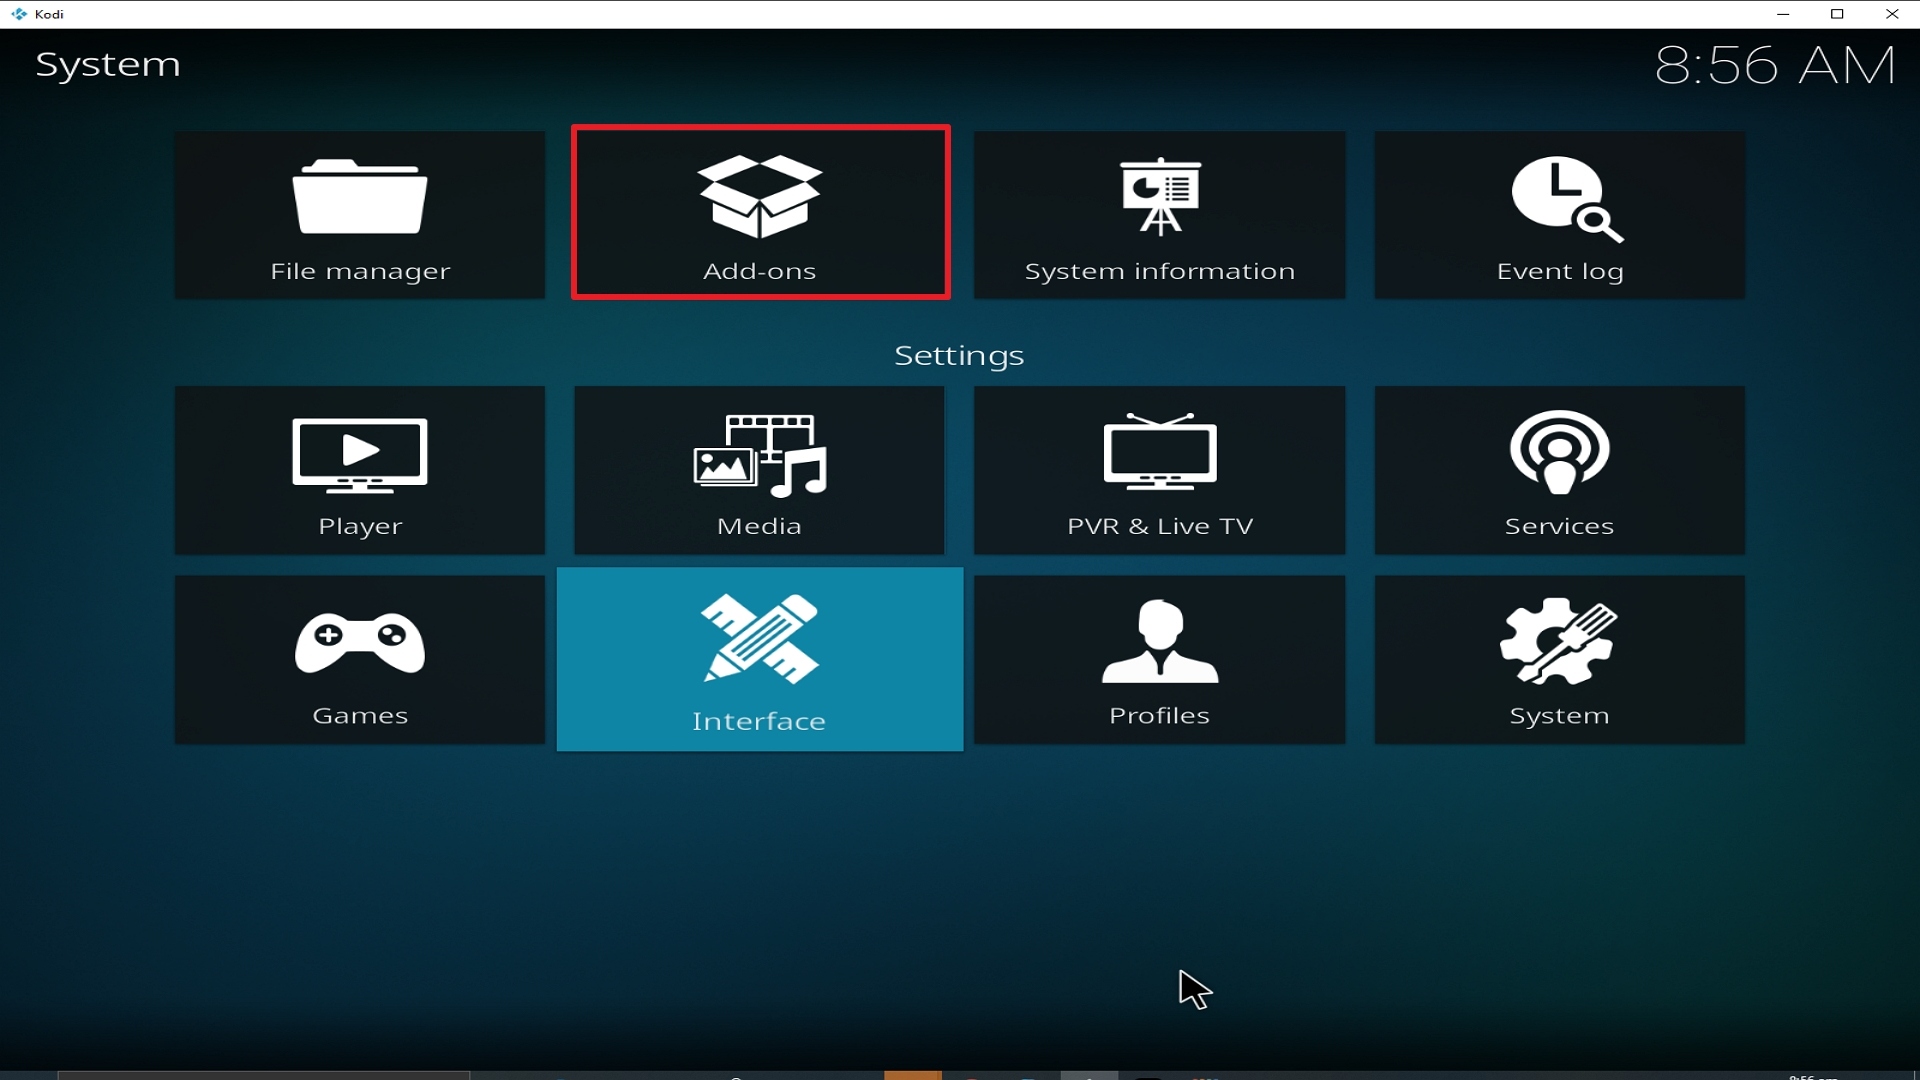
3. Select Add-ons on the left side of the screen.

Step 3 Installing cCloud TV addon on Kodi


4. Select Unknown sources.

Step 4 Installing cCloud TV addon on Kodi


5. Click Yes to allow unknown sources.

Step 5 Installing cCloud TV addon on Kodi


6. Select File manager.

Step 6 Installing cCloud TV addon on Kodi


7. Click Add source.

Step 7 Installing cCloud TV addon on Kodi


8. Click on <None>.

Step 8 Installing cCloud TV addon on Kodi


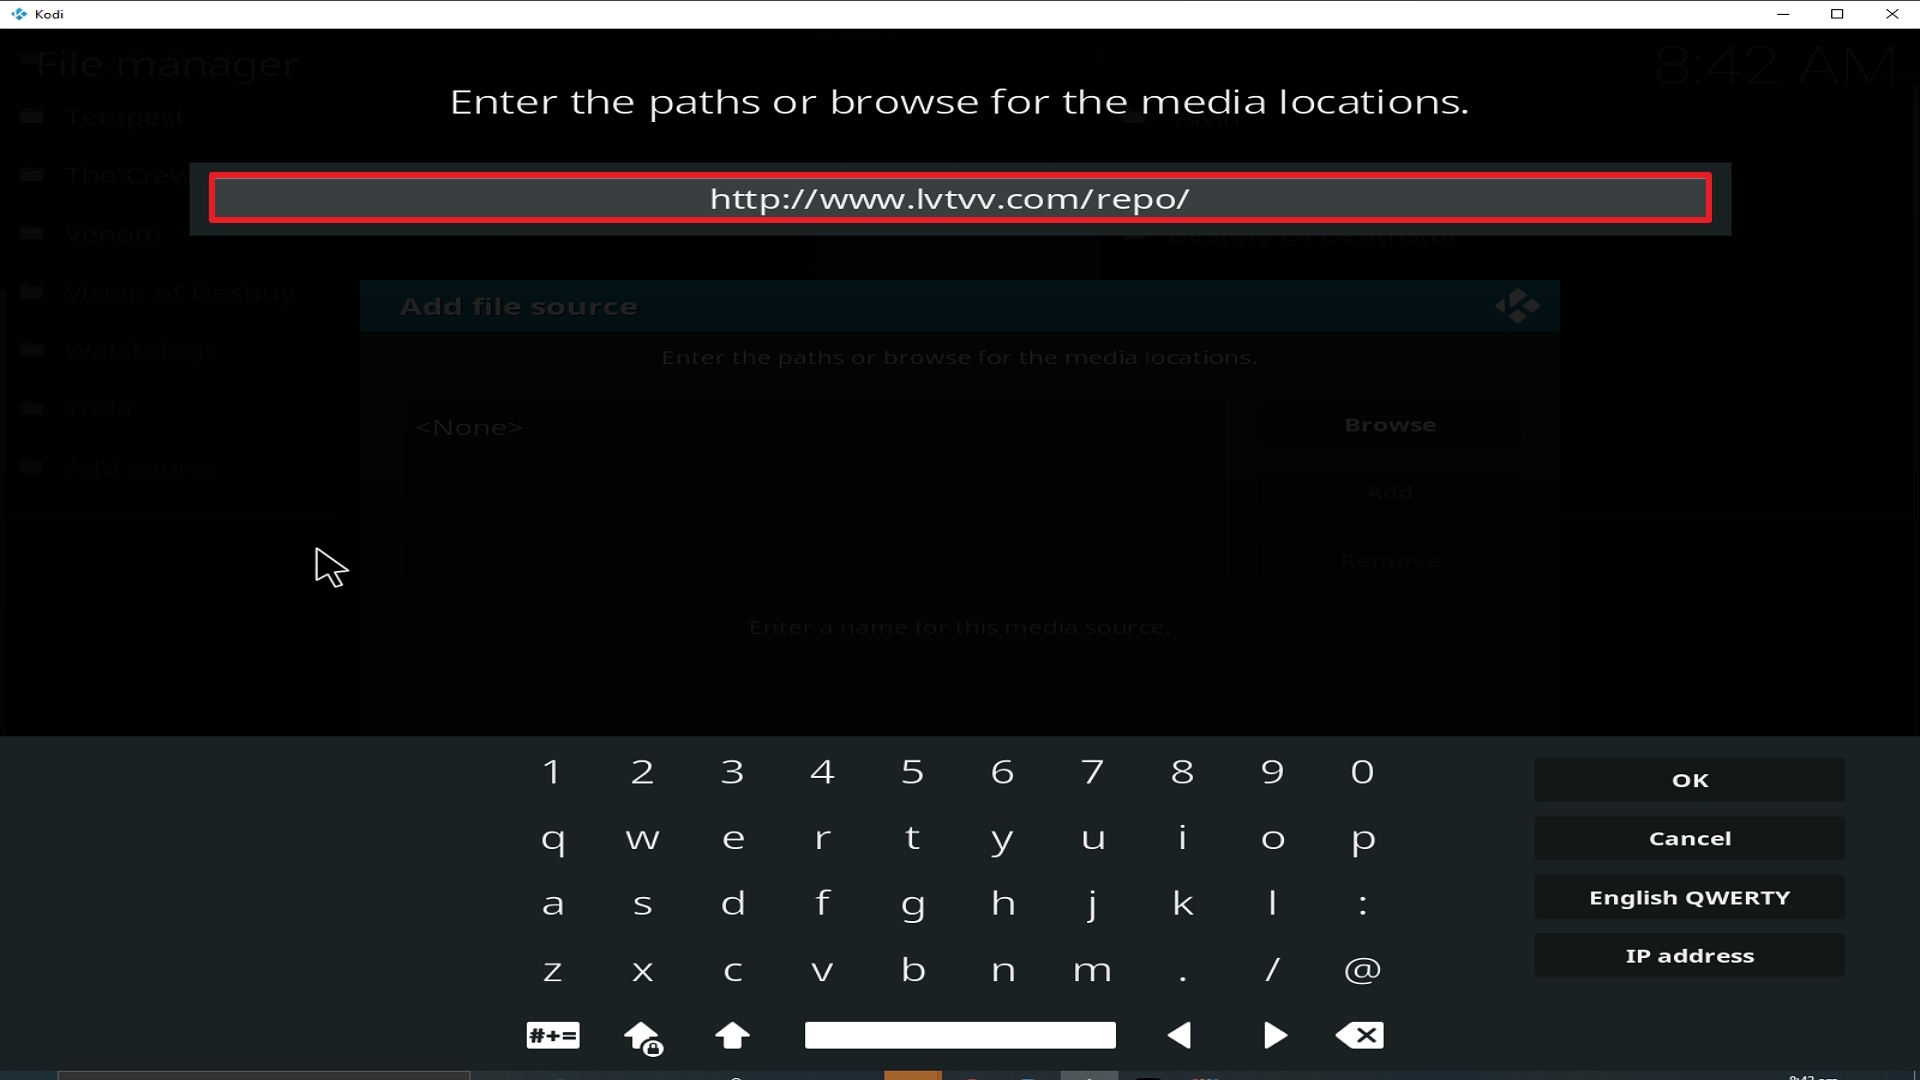
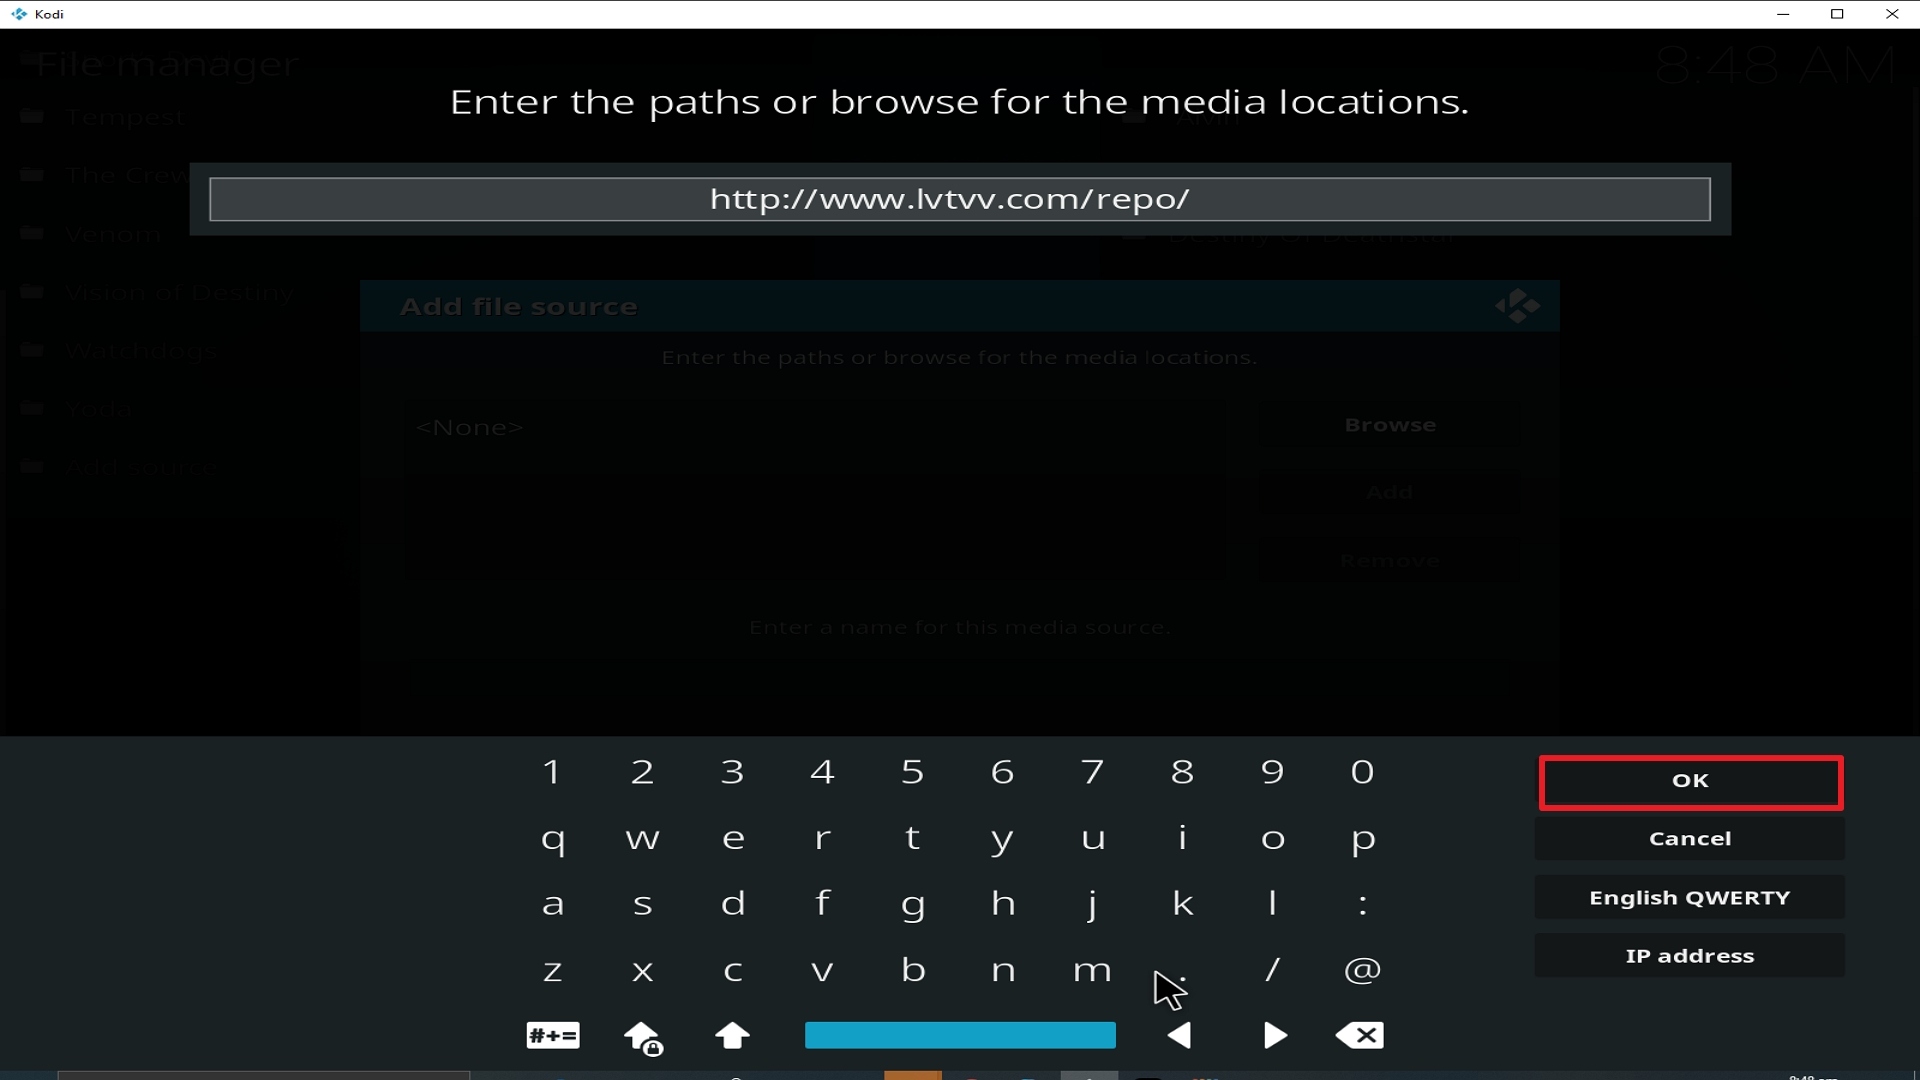
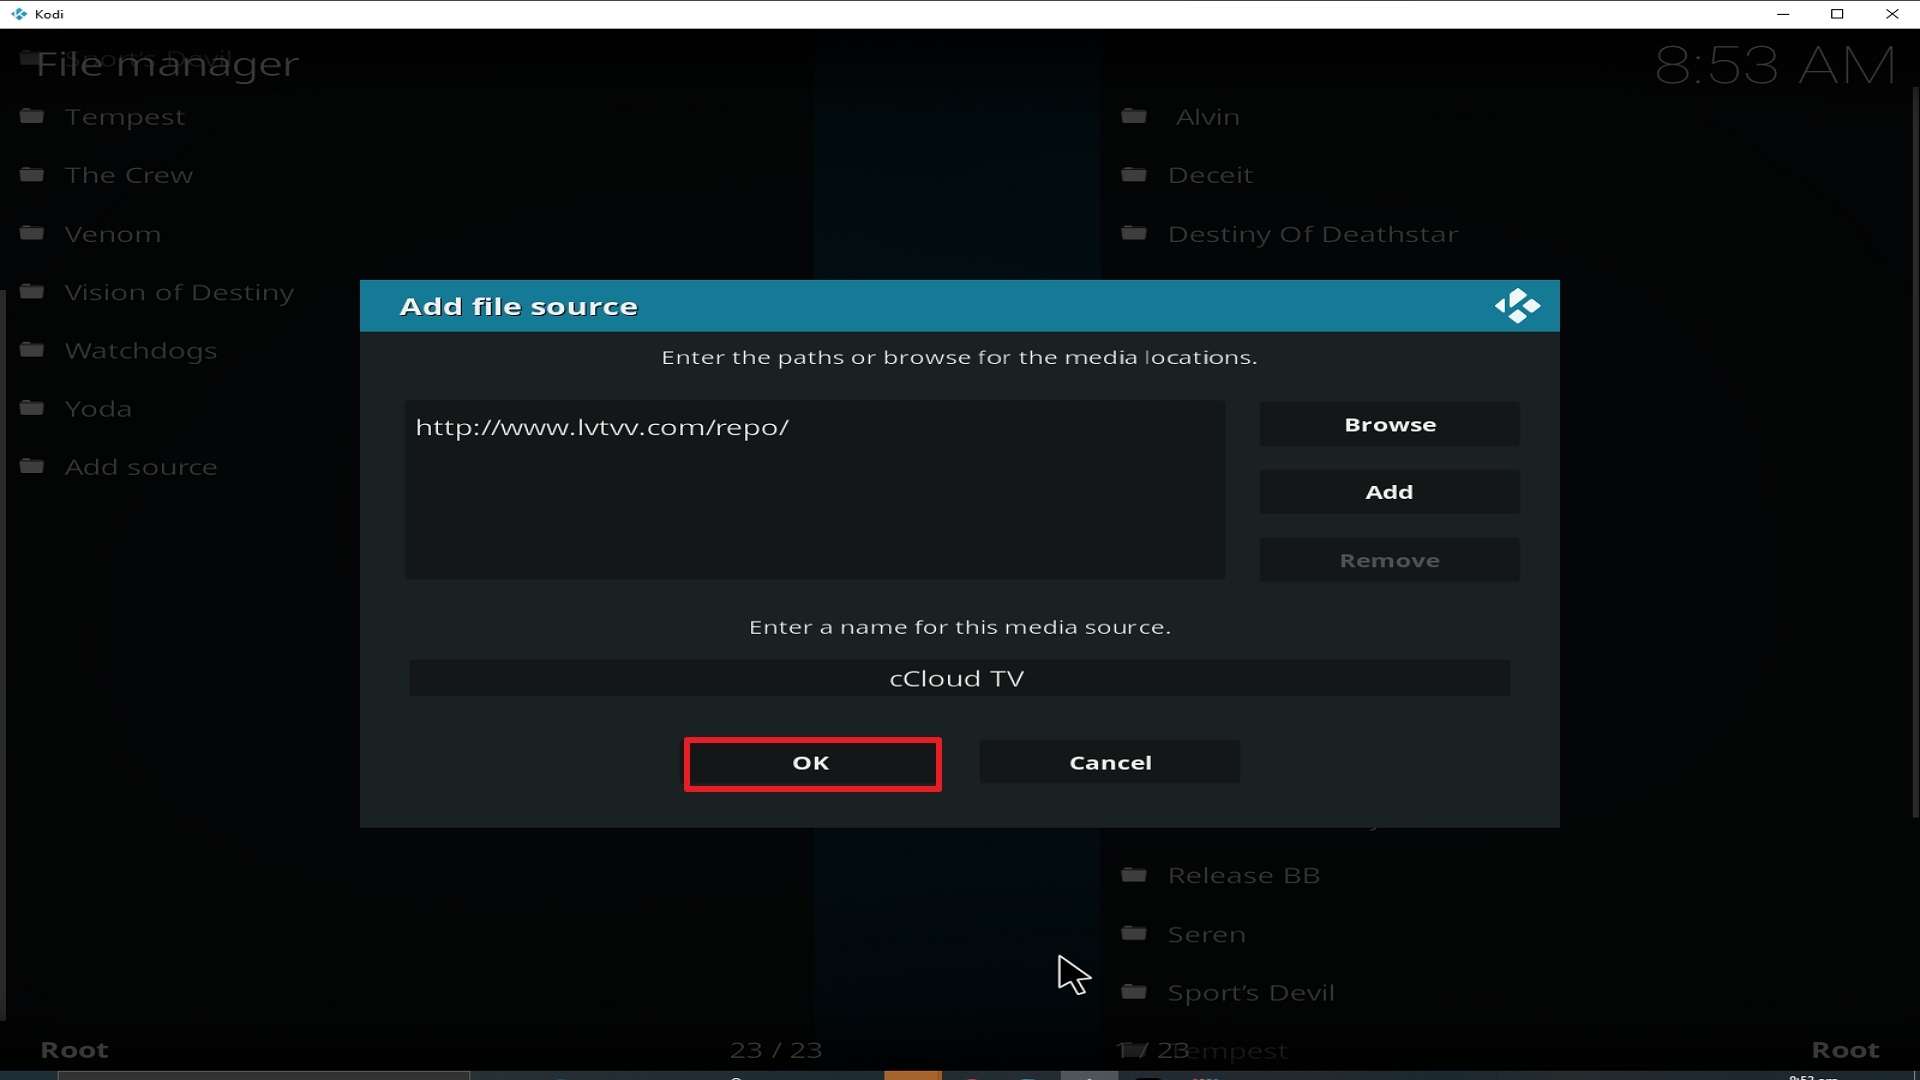
9. Type exactly: http://www.lvtvv.com/repo/

Step 9 Installing cCloud TV addon on Kodi


10. Click on OK.

Step 10 Installing cCloud TV addon on Kodi


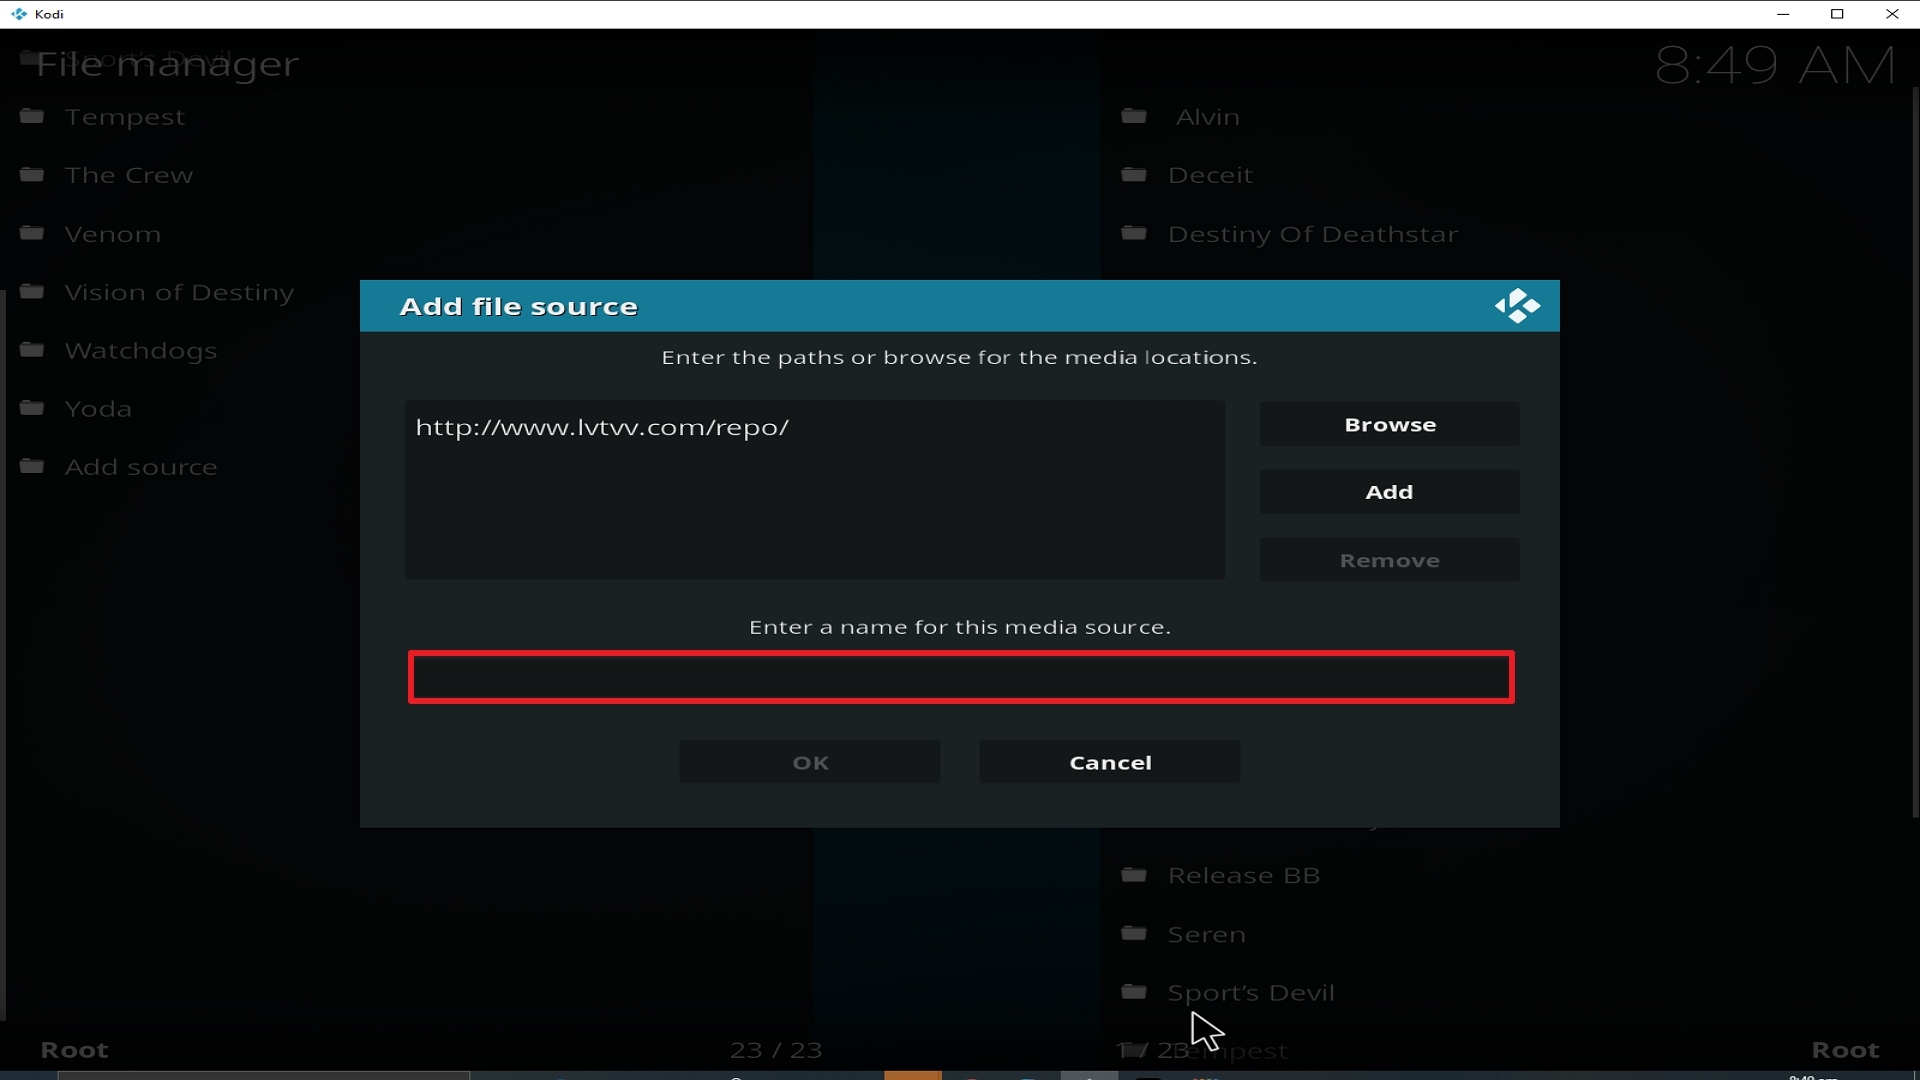
11. Select enter a name for this media source.

Step 11 Installing cCloud TV addon on Kodi


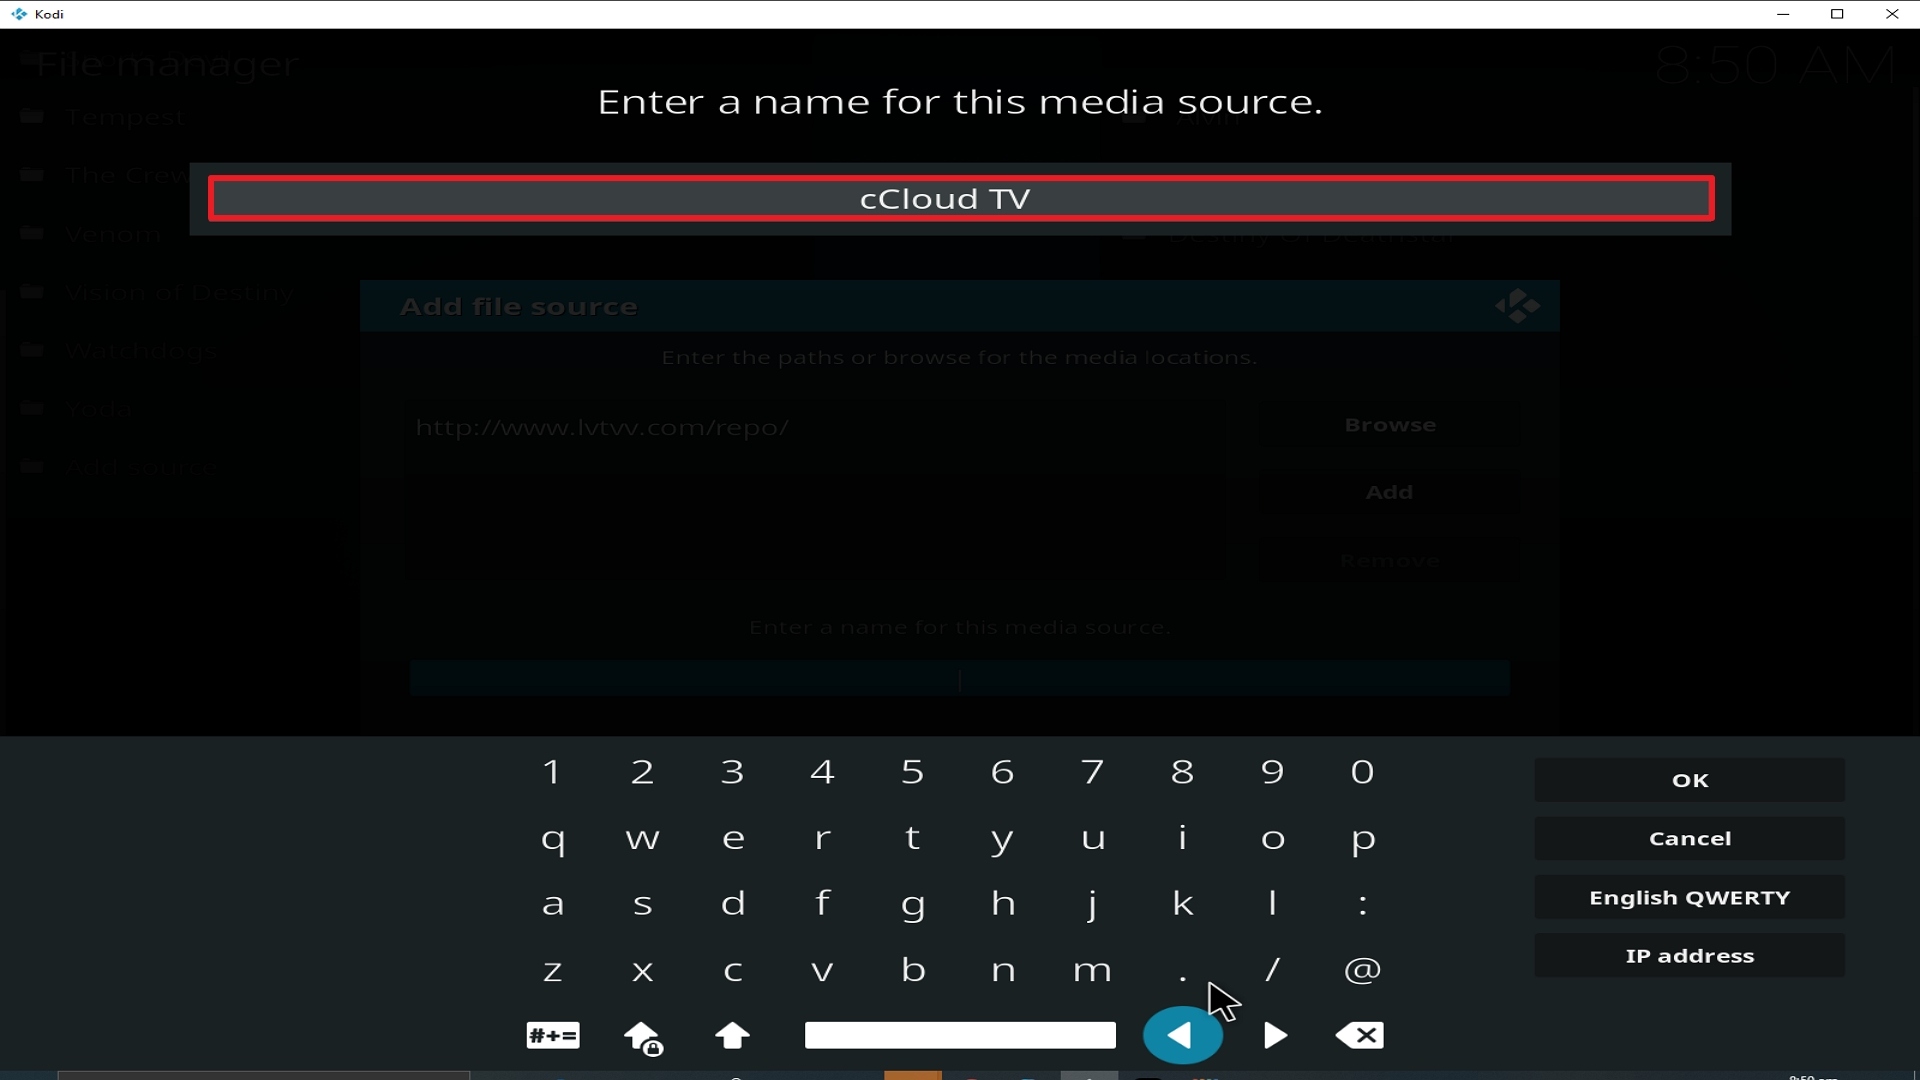
12. Name is cCloud TV (this part isn’t critical as long as you remember the name).

Step 12 Installing cCloud TV addon on Kodi


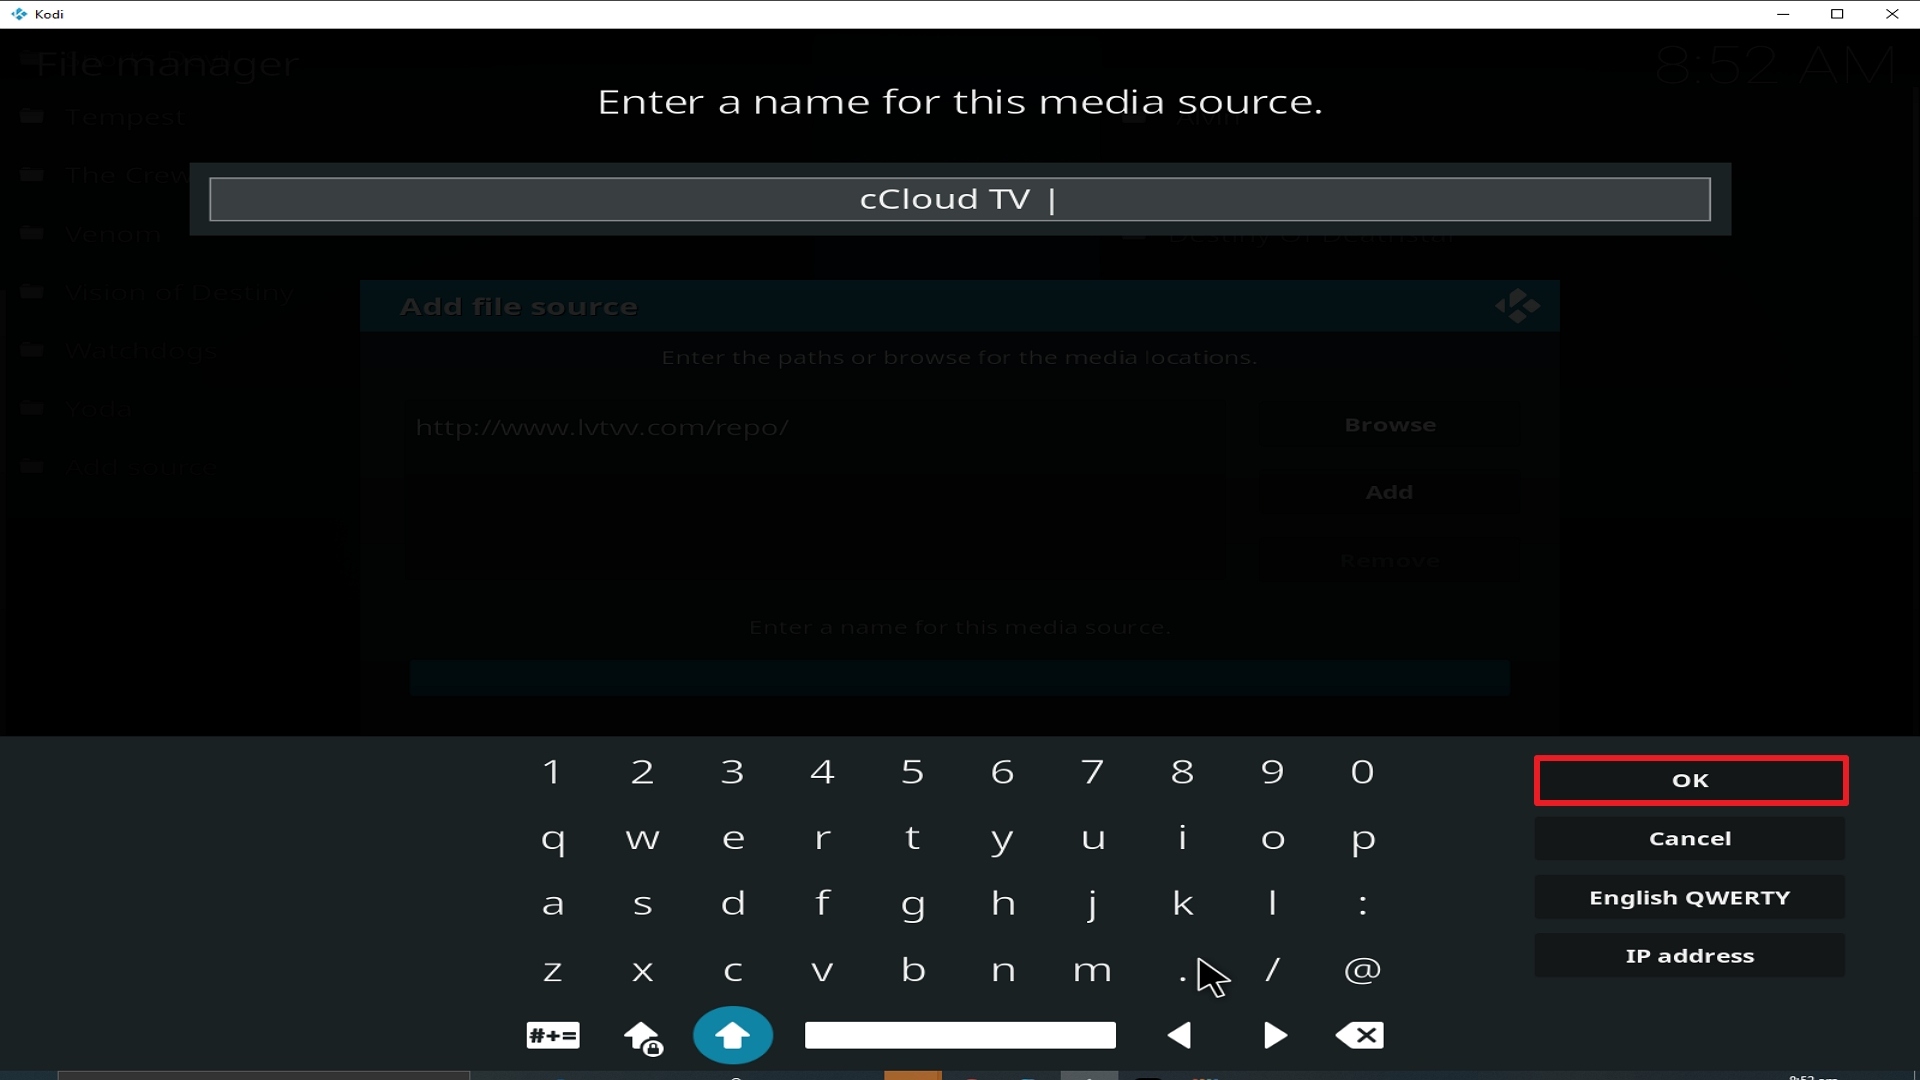
13. Click on OK.

Step 13 Installing cCloud TV addon on Kodi


14. Click on OK.

Step 14 Installing cCloud TV addon on Kodi


15. Take one step back and click on Add-ons.

Step 15 Installing cCloud TV addon on Kodi


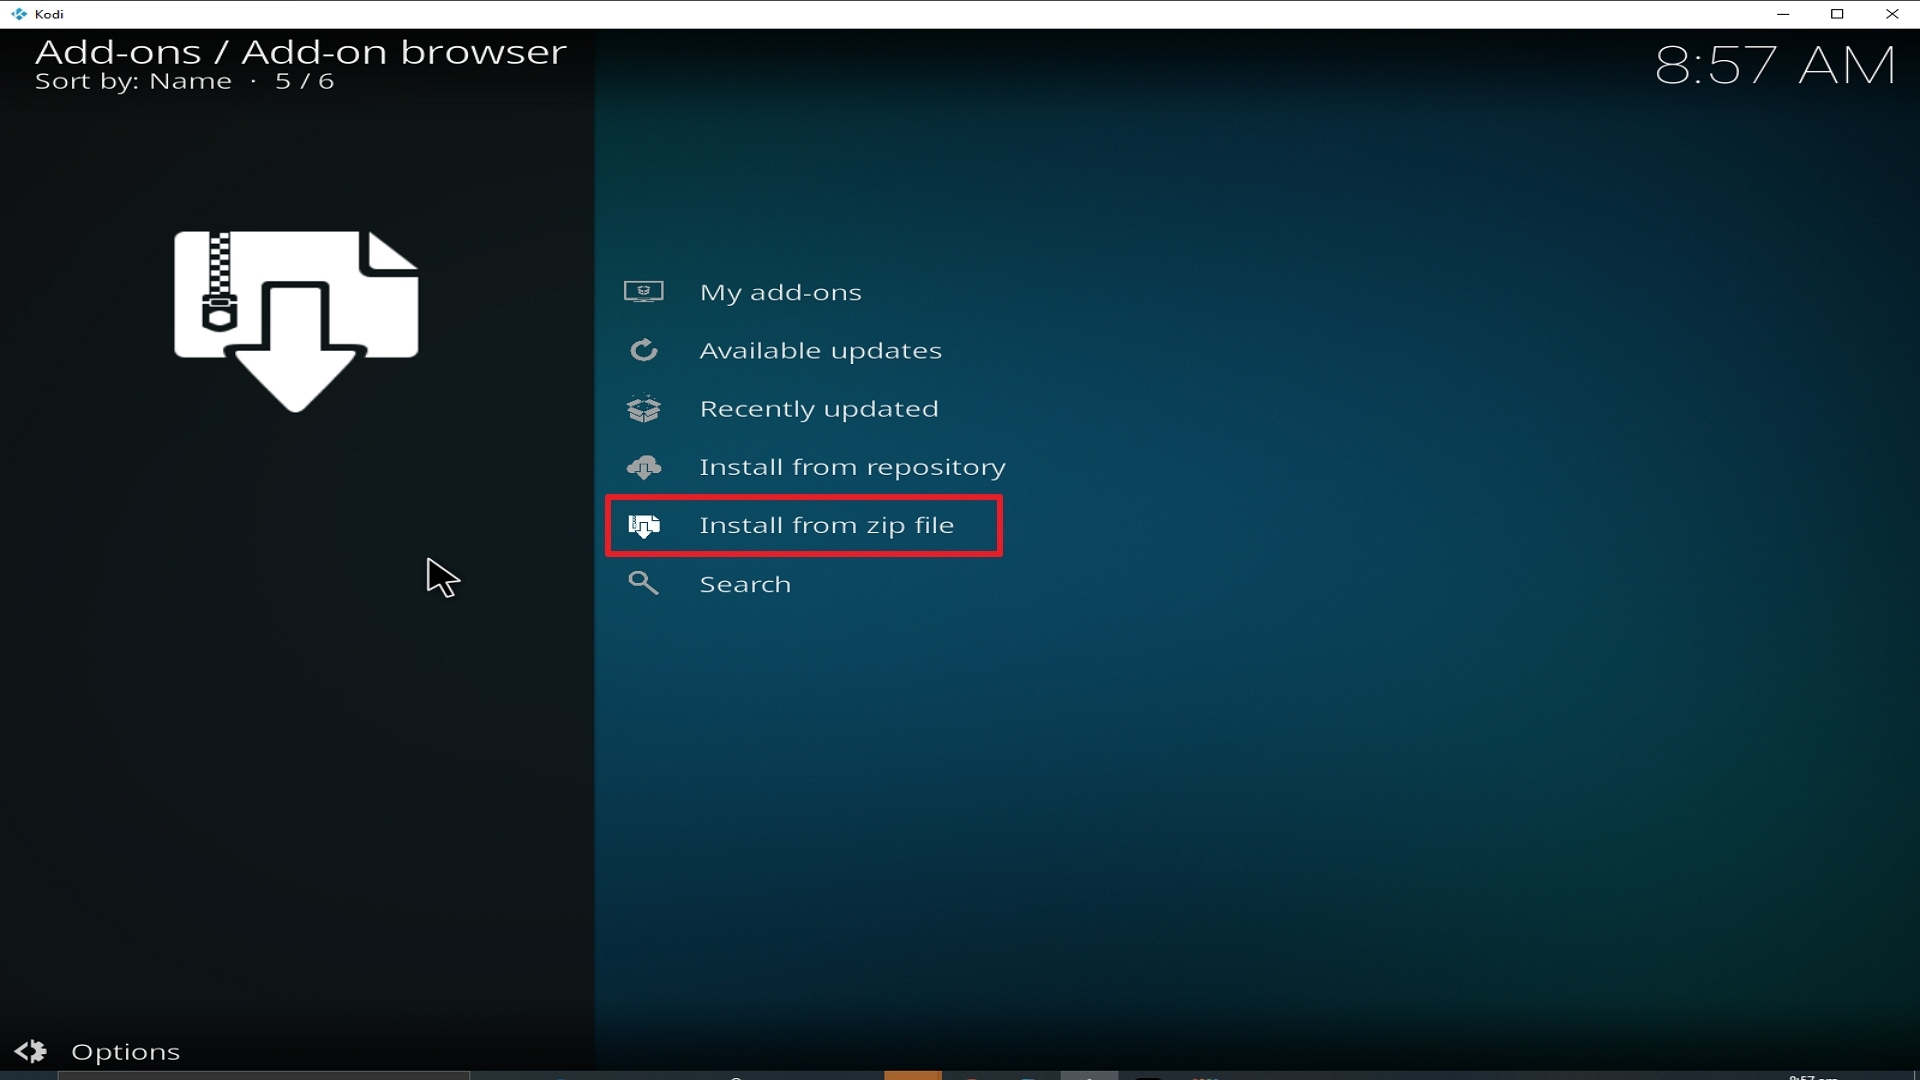
16. Select install from zip file.

Step 16 Installing cCloud TV addon on Kodi


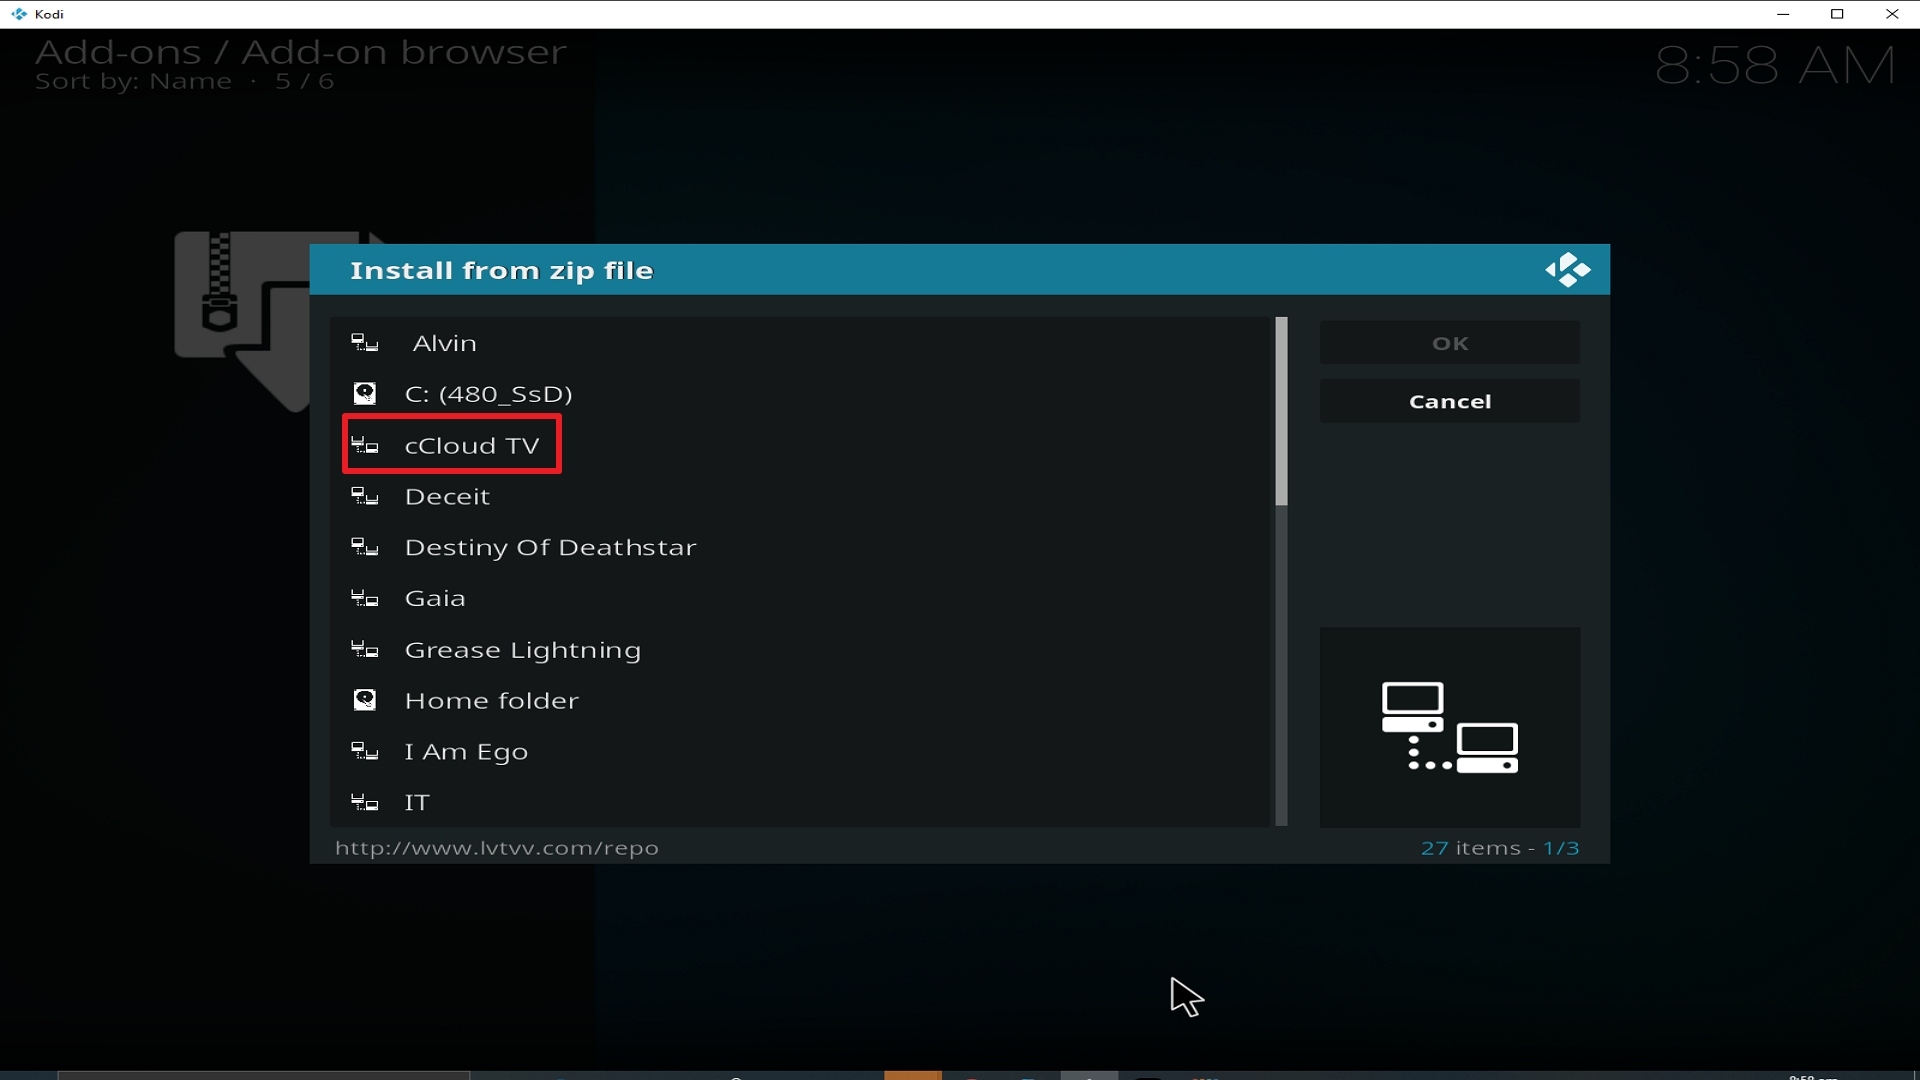
17. Click on cCloud TV (or whatever you named the source).

Step 17 Installing cCloud TV addon on Kodi


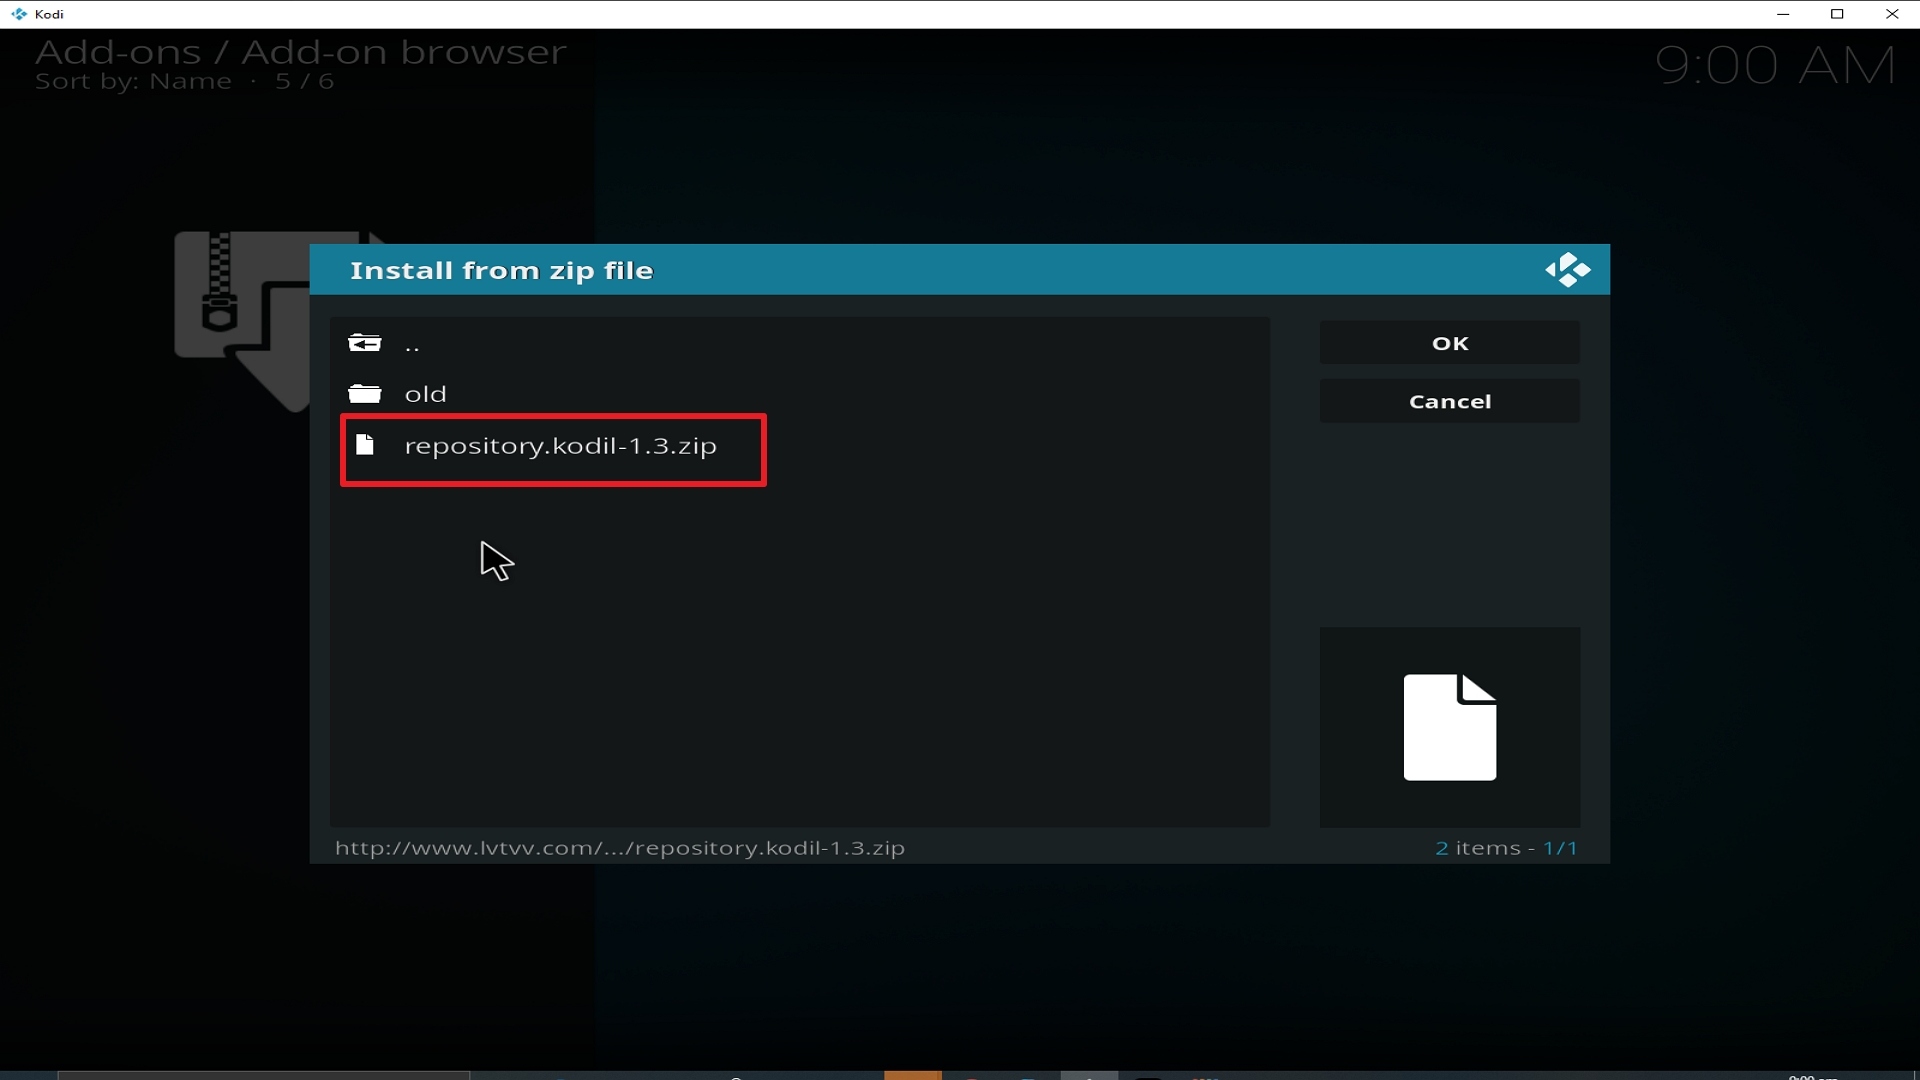
18. Click on repository.kodil-1.3.zip

Step 18 Installing cCloud TV addon on Kodi


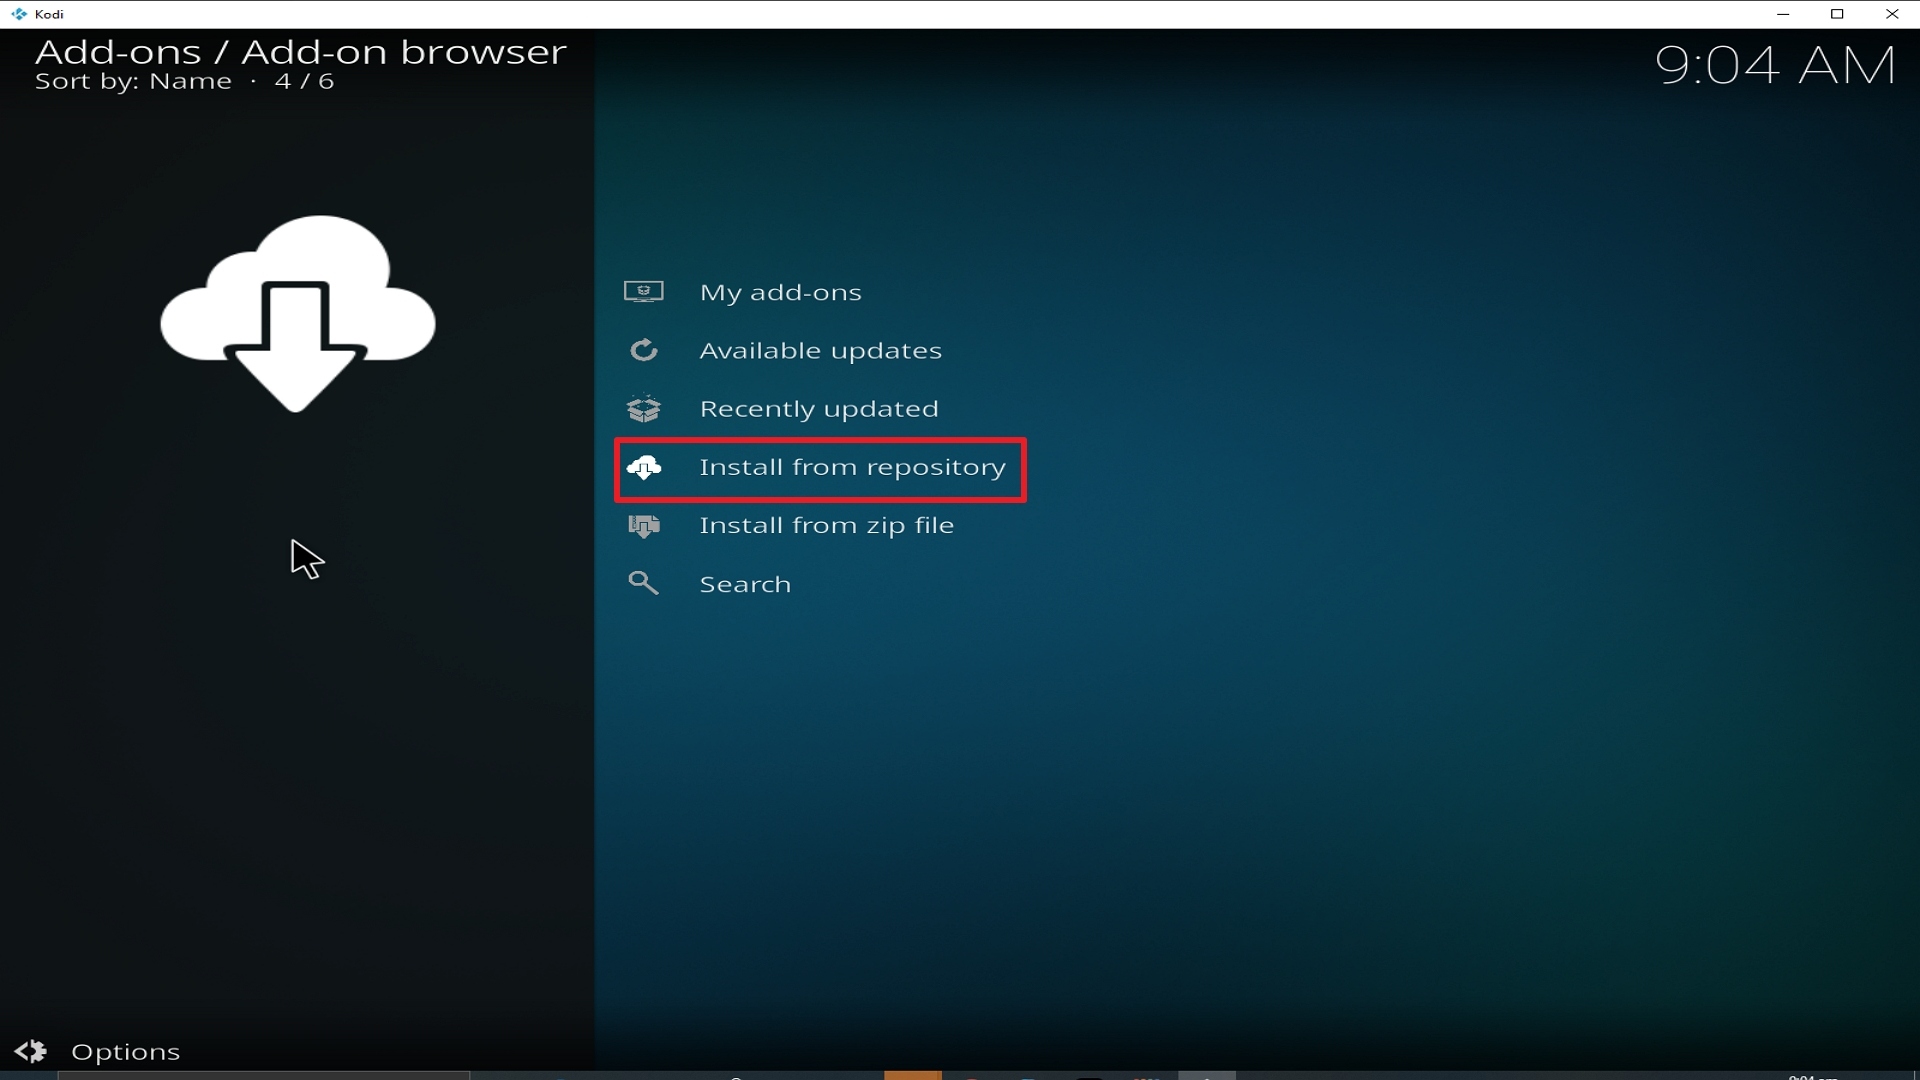
19. Select on Install from repository.

Step 19 Installing cCloud TV addon on Kodi


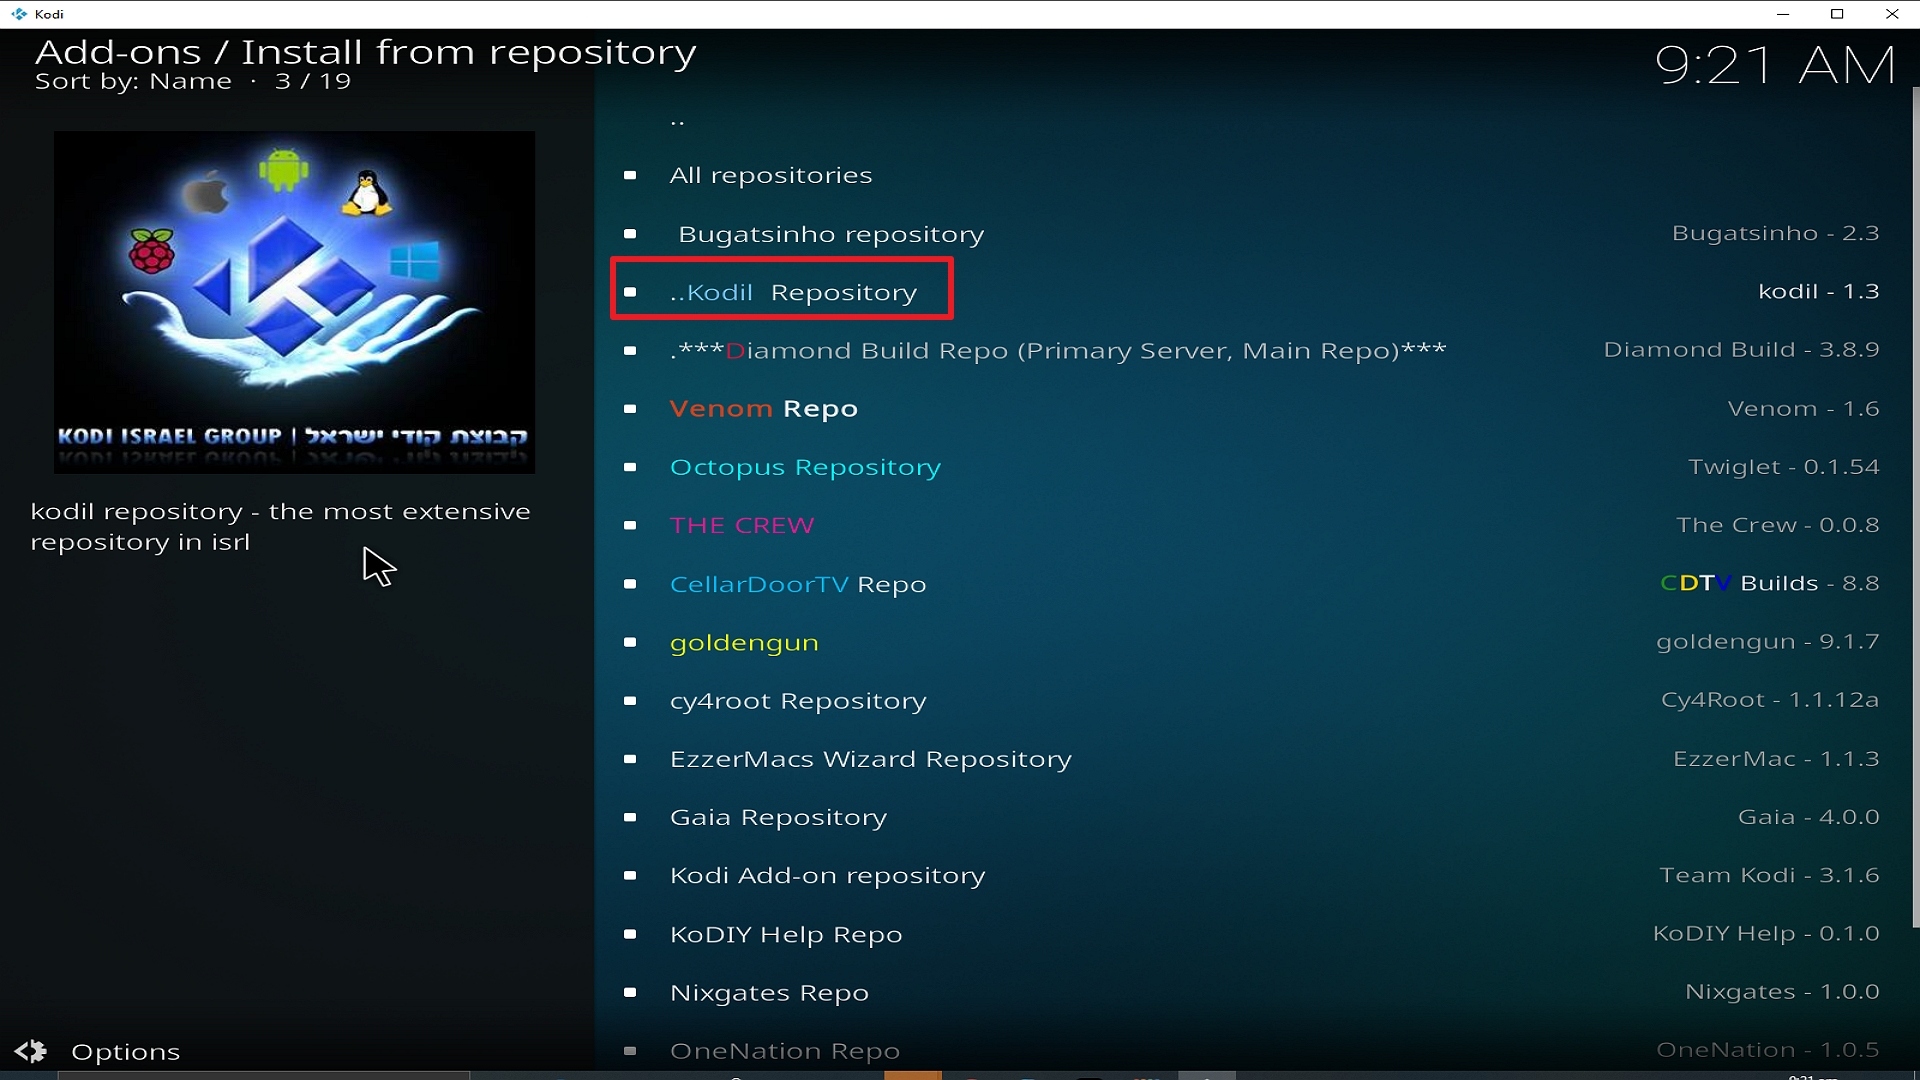
20. Click on Kodil Repo.

Step 20 Installing cCloud TV addon on Kodi


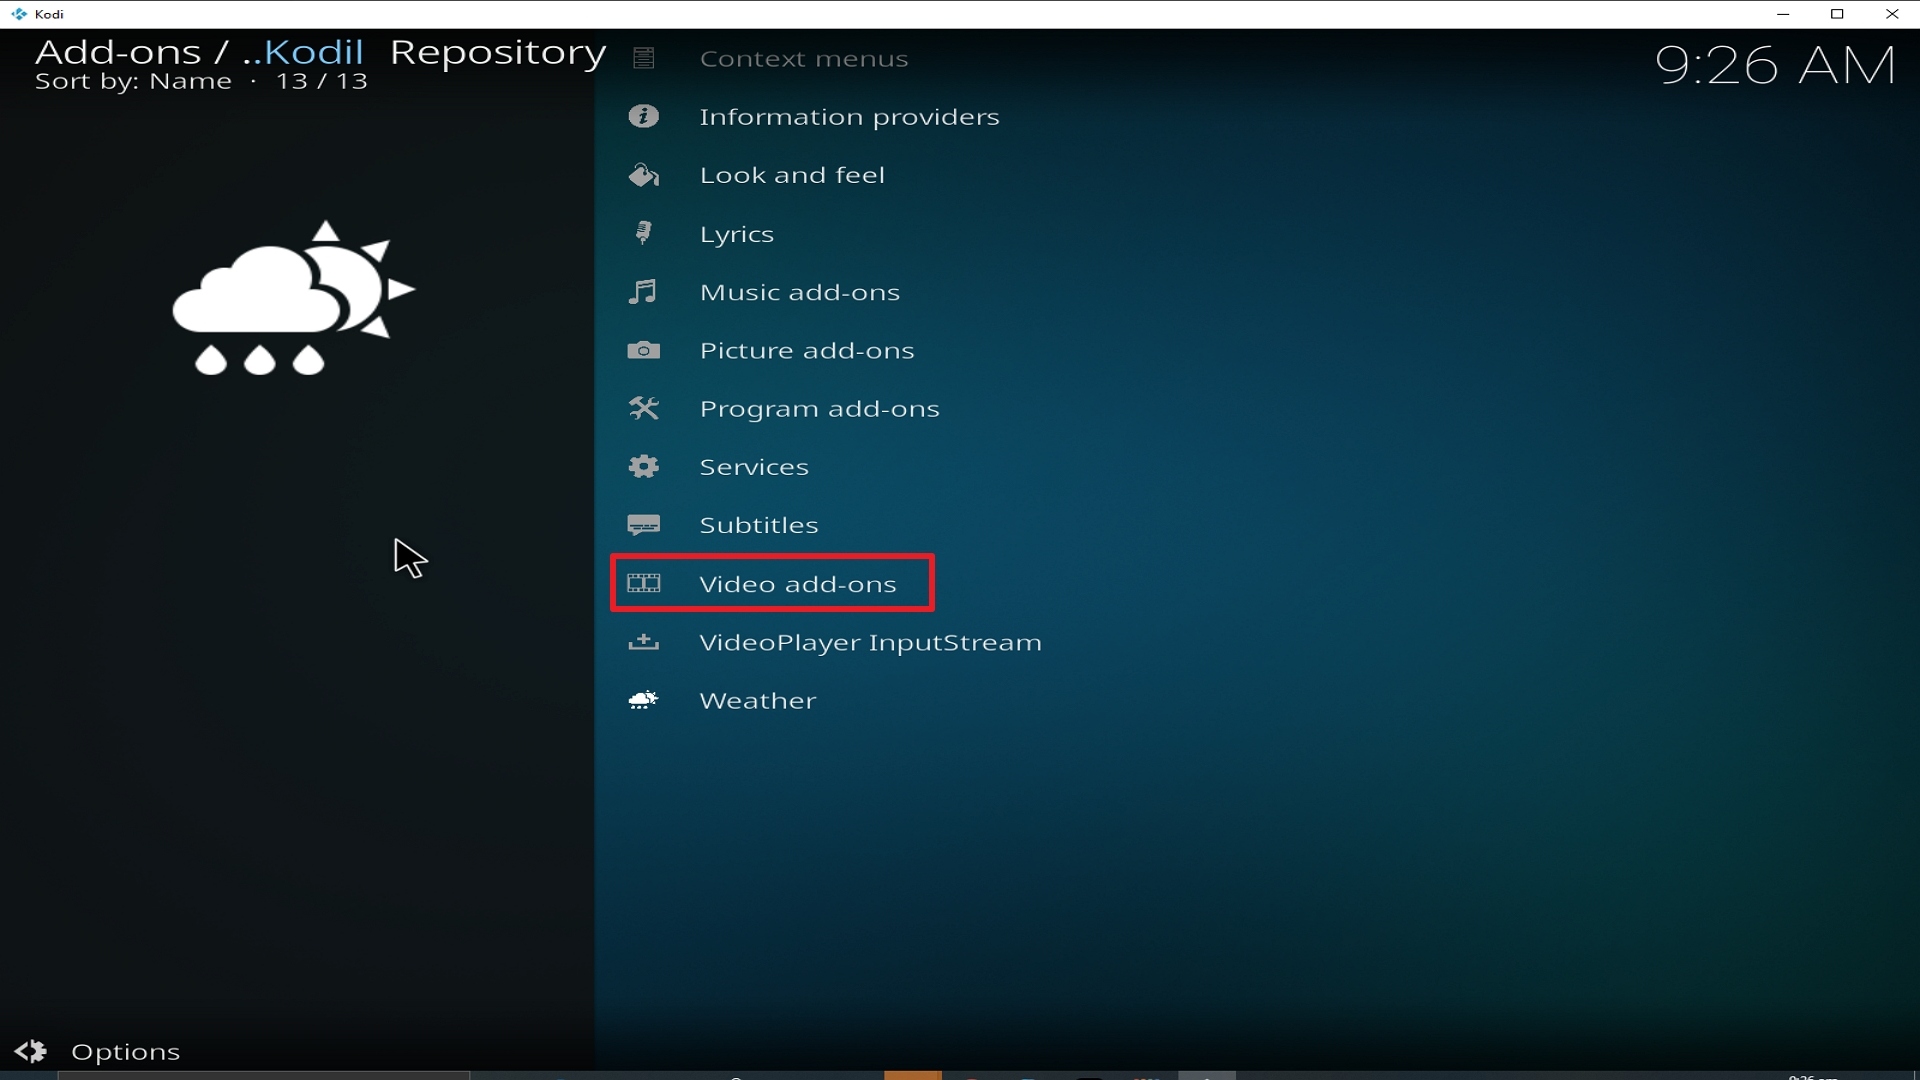
21. Pick Video add-ons.

Step 21 Installing cCloud TV addon on Kodi


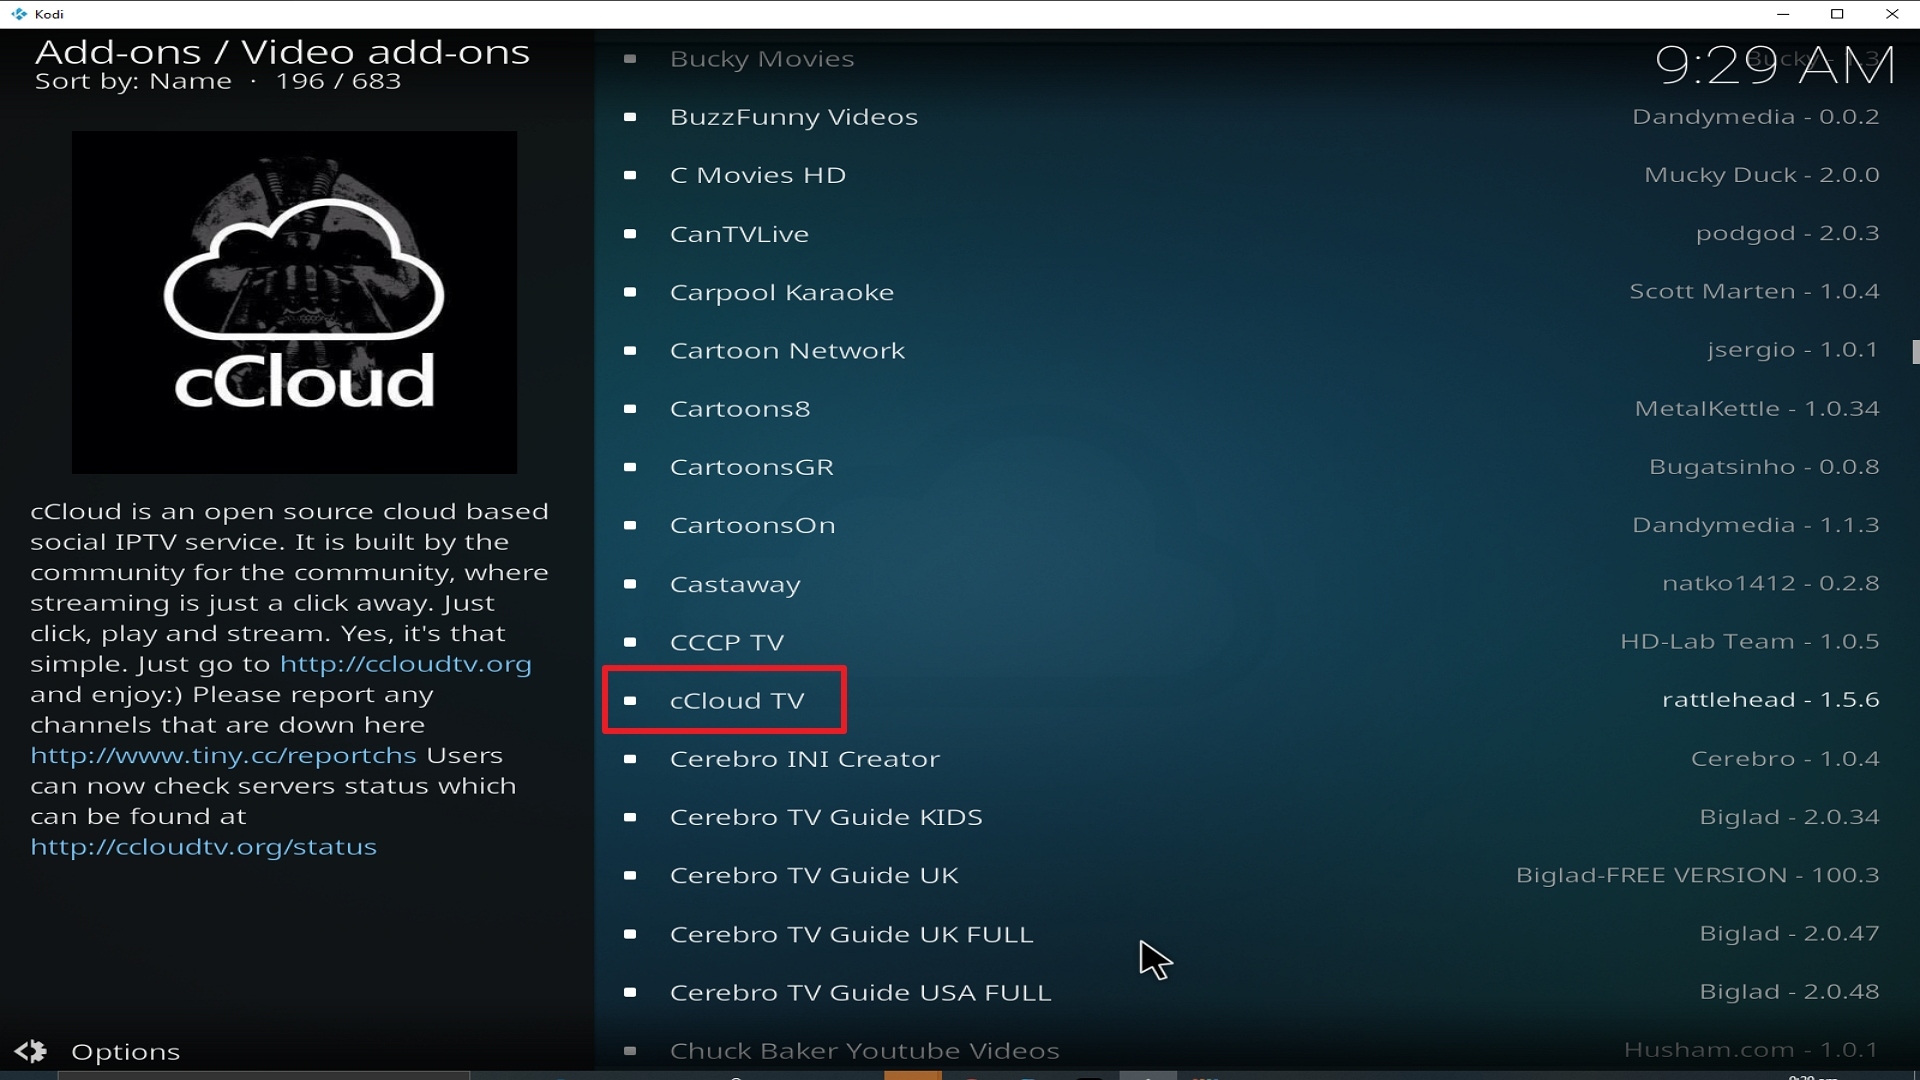
22. Select cCloud TV again.

Step 22 Installing cCloud TV addon on Kodi


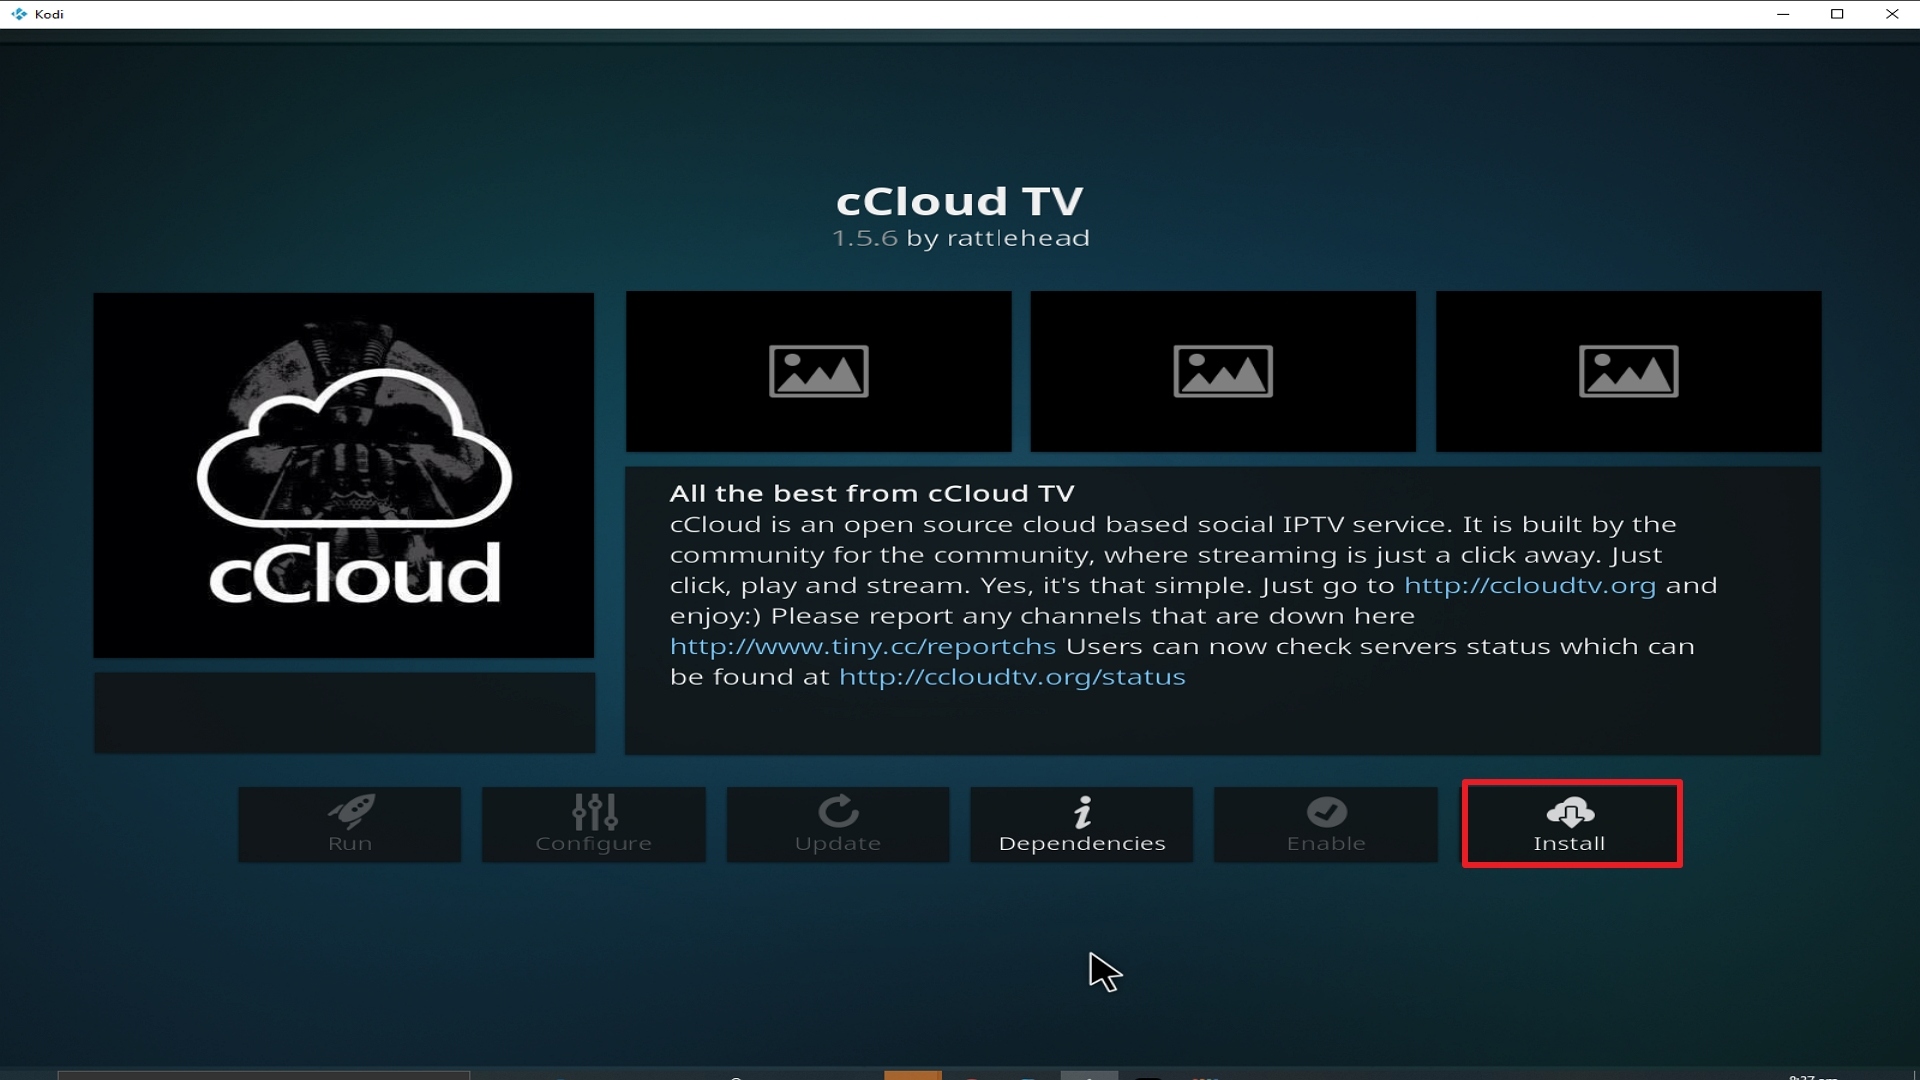
23. Click on Install.

Step 23 Installing cCloud TV addon on Kodi


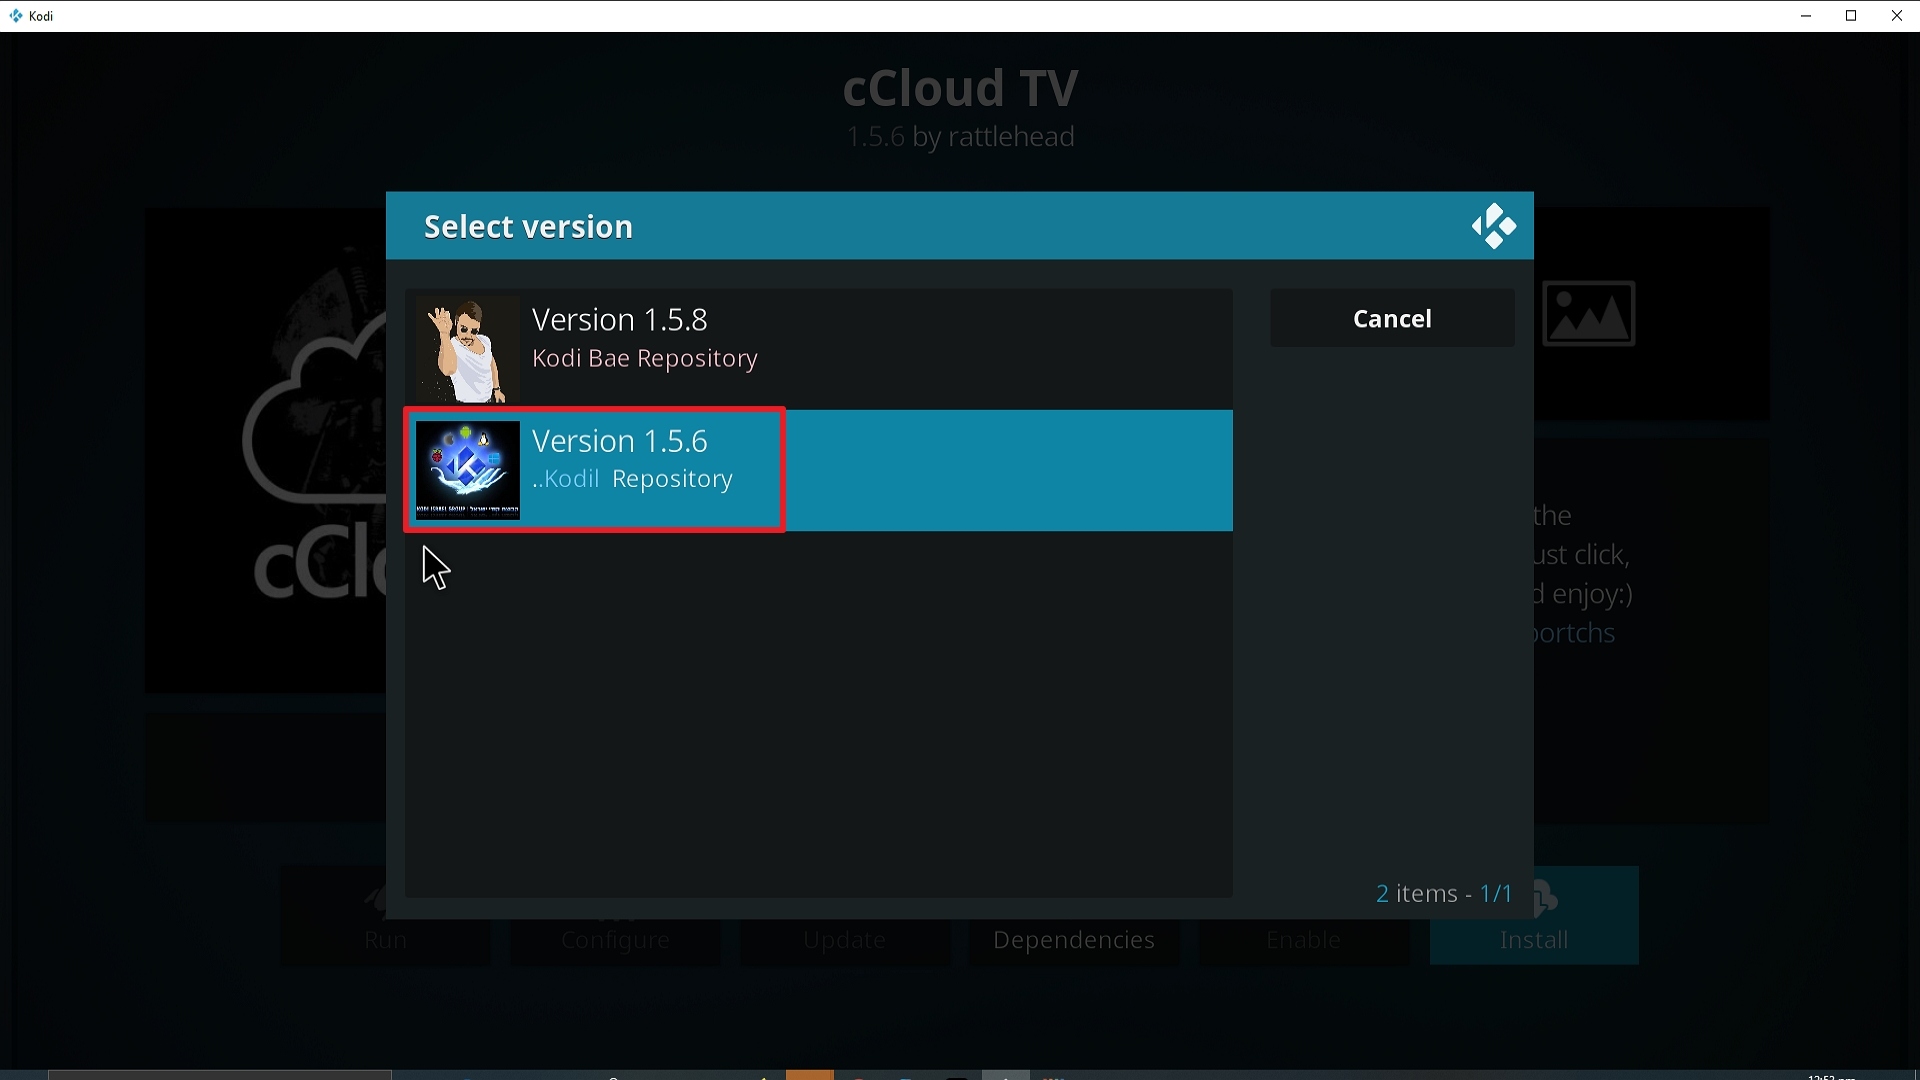
24. Select Version 1.5.6 Kodil Repo

Step 24 Installing cCloud Kodi addon on Kodi


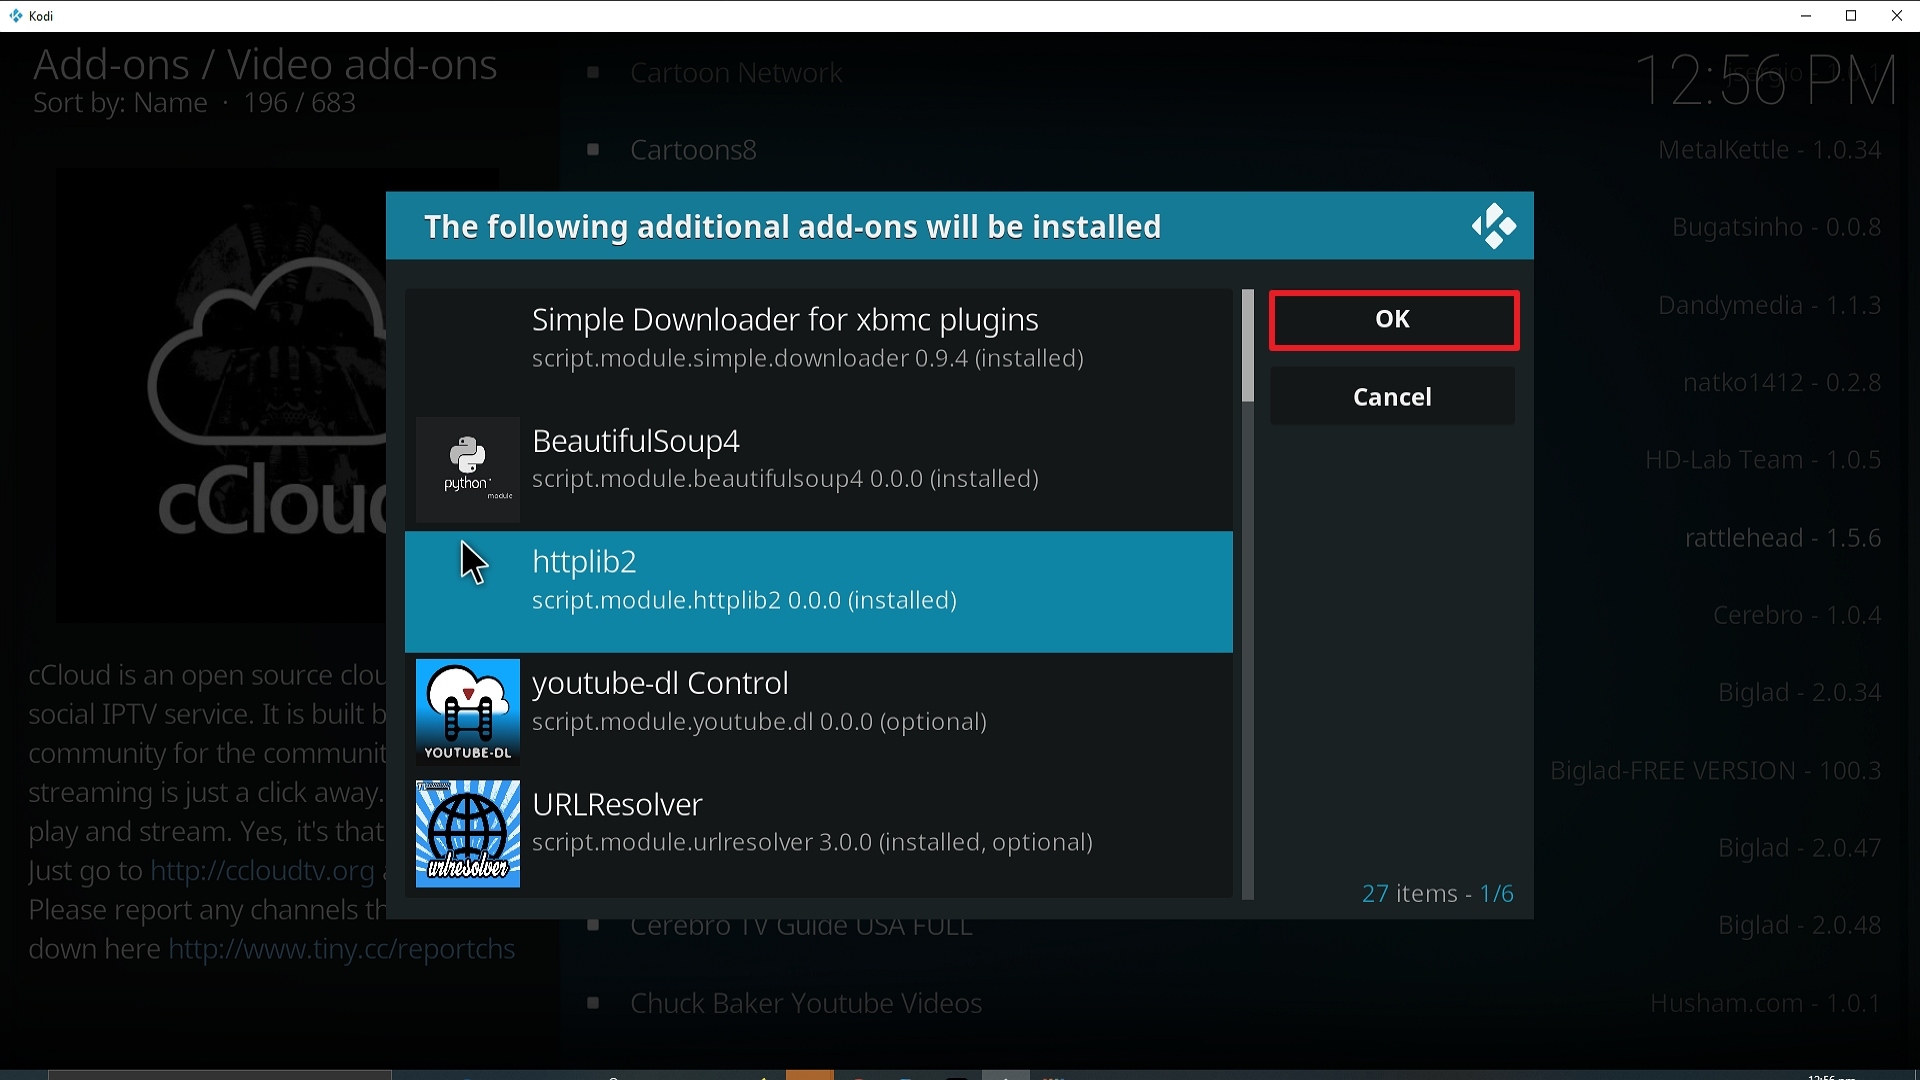
25. Select OK after reviewing the add-ons that will be installed.

Step 25 Installing cCloud Kodi addon on Kodi


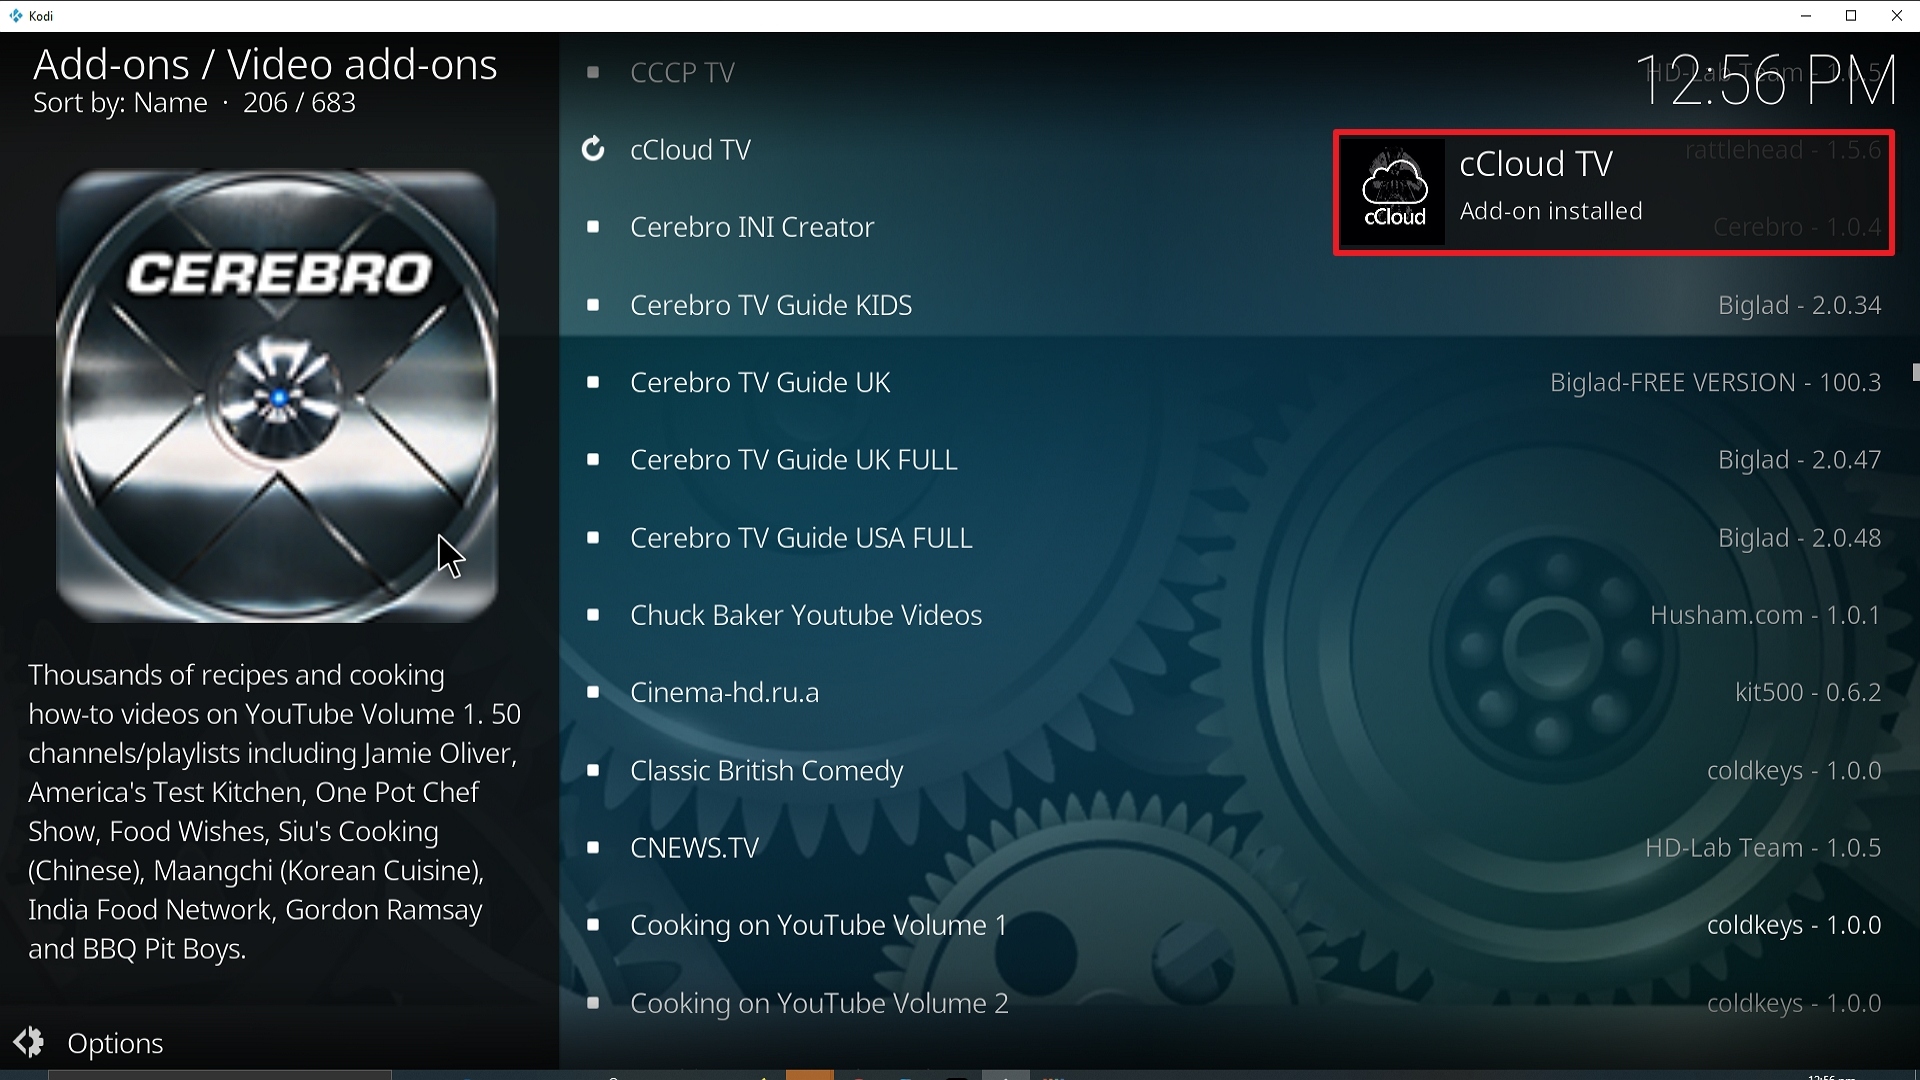
26. You should see a popup in the upper right corner saying cCloud TV has installed. There will actually be multiple popups for the various components.

Step 26 Installing cCloud Kodi addon on Kodi


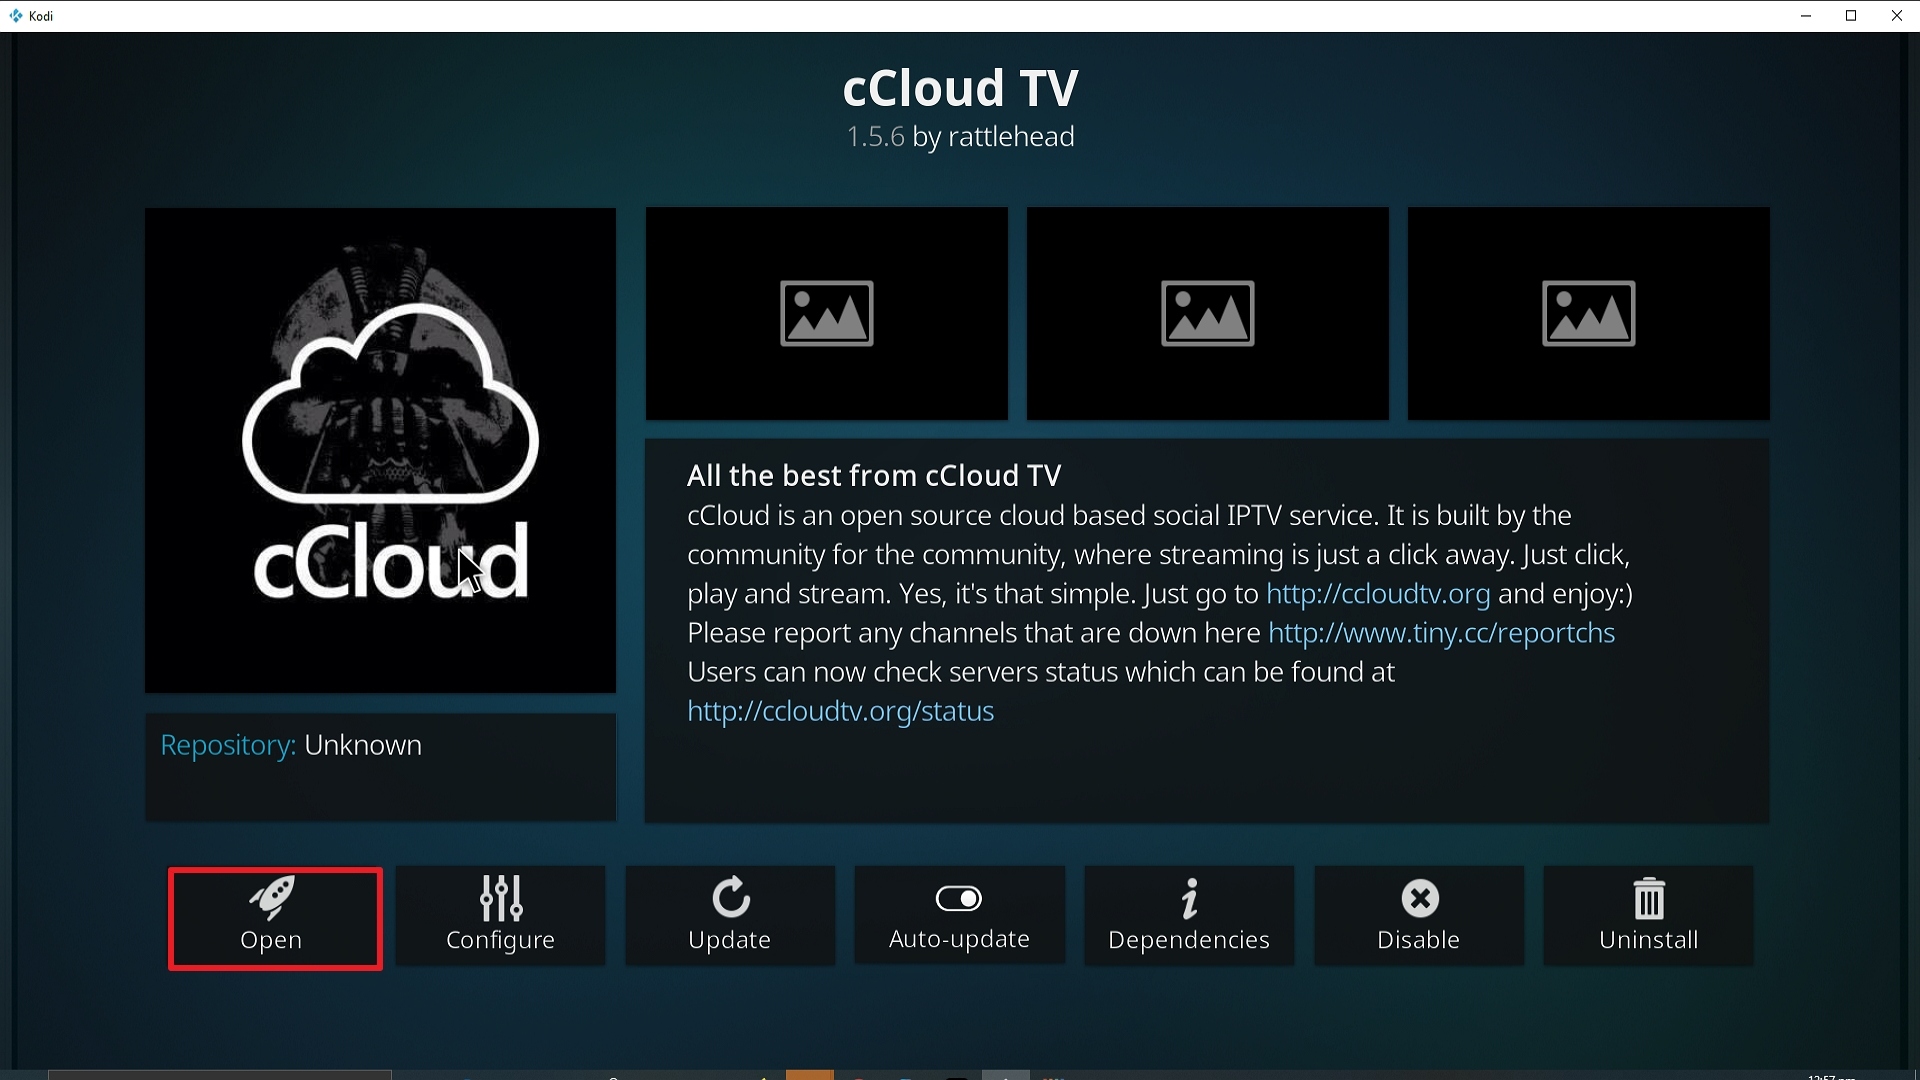
27. Click on Open to start the cCloud TV add-on.

Step 27 Installing cCloud Kodi addon on Kodi


Always Use a VPN On Kodi

It is advisable to install a VPN on your streaming device. This is because any time you are streaming content online, your online data is vulnerable and you are being monitored on the internet service provider’s network. 

Not only that, but you will also experience location restrictions. Using a VPN will save you that headache and stress and you will be safe and secure while streaming content online. We recommend Surfshark as it offers high security and privacy with a zero log policy with DNS leak protection. 

Note: For more information about Surfshark, please read our Surfshark Review.


Grab your subscription now!


How to Install Surfshark VPN on Firestick

If your Firestick still has the older interface, read this article to learn how to update it: Update Firestick Interface.

Follow our screenshots below to install the SurfShark VPN app on your Fire TV stick.

1. Go to the Home screen of your Firestick.

step 1 Install Surfshark VPN on Firestick


2. Navigate towards the Find tab. Press the Search button from the resulting dropdown.

step 2 Install Surfshark VPN on Firestick


3. Type in the keyword of SurfShark and select from the suggestions that will appear.

step 3 Install Surfshark VPN on Firestick


4. Click the official SurfShark icon from your search results.

step 4 Install Surfshark VPN on Firestick


5. Press the Download (You own it) button.

step 5 Install Surfshark VPN on Firestick


6. The SurfShark VPN installer will download on your device.

step 6 Install Surfshark VPN on Firestick


7. SurfShark VPN’s app will automatically install itself on your Fire TV stick.

step 7 Install Surfshark VPN on Firestick


8. Press the Open button after completing SurfShark VPN’s installation process.

step 8 Install Surfshark VPN on Firestick


9. Please wait for the SurfShark VPN to load its user interface.

step 9 Install Surfshark VPN on Firestick


10. You can now log in with your SurfShark VPN account credentials.

step 10 Install Surfshark VPN on Firestick

Learn more about Surfshark and Grab the Best Surfshark Deal Now!


Install Surfshark on Firestick

Best Surfshark Deal


Other VPNs to Consider

NordVPN (Best for Streaming)

Best Features

  • 5000+ Server in 50+ Countries 
  • Military-Grade Encryption
  • Fast Connection Speed
  • Suitable to a lot of devices
  • No-Log Policy

Prices
  • Complete $5.89 per month (64% Discount)
  • Plus $4.59 per month (56% Discount)
  • Standard $3.69 per month (55% Discount)

Best Features

  • 750+ High-speed VPN Servers in 43 Locations
  • Military-Grade Encryption
  • Fastest HD Streaming and Gaming
  • 30-Day Money-Back Guarantee
  • Unlimited Data & Devices
  • No-Log Policy

Prices
  • 3 Years $1.99 per month (82% Discount)
  • 1 Years $3.29 per month (70% Discount)
  • 1 Month $10.99 per month

IPVanish VPN (Most Secure)

Best Features

  • 1200+ Servers in 60+ Countries around the world
  • Unlimited Connections
  • No-Log Policy
  • Top Notch Military-Grade VPN Protocols and Encryptions
  • 100% Safe and Secured
  • Most Trusted VPN
  • Best VPN for Firestick
  • 30-Day Money-Back Guarantee

Prices
  • Yearly $3.99 per month (63% Discount) – 30 days risk free + Ransomware & Malware Protection
  • Quarterly $5.32 per month (51% Discount)
  • Monthly $10.99 per month


For more VPN discounts, go to ReviewVPN Deals and purchase the best VPN for you.

Click here to get the lowest price on Surfshark through our exclusive limited-time offer.



Install Sport’s Devil Kodi Addon

Sport’s Devil Kodi Addon

Sport's Devil Image

Source: http://www.lvtvv.com/repo/

Sport’s Devil has changed hands a few times over the past 5 years. It is one of the longest-running live streaming and sports add ons still available on Kodi, and it has had a long and illustrious history.

Sport’s Devil started out by clipping and streaming from several pirated sports channel sites that generated revenue from ads. Sports Devil has no ads. After a furious row, Sport’s Devil morphed into 3 different versions and needed to be manually installed to dissuade lazy Kodi users.


Updated this year by the Kodi Bae repository, Sport’s Devil Kodi Addon is still the king of sports add ons but has lost ground to some upcoming add ons like Sportowa TV. Mainly this is due to a lack of developer input into Sports Devil.

It’s a great add but with no clear revenue stream, it has proven to be a victim of its own success. Still, with a large range of the source, many of the other Kodi sports add ons you will see get their streams straight from Sports Devil.

Sport’s Devil Kodi Addon remains unrivaled in the sheer range of sports that it covers and the number of streams you can find in one place.


ANONYMOUSLY


Common Errors

There are quite a few errors you might come across with Sports Devil

  • Installation Failed/Web URL failure. You may have problems downloading the add-on, this could be server-related. Check the URL is correct and retry to see if there is a server request problem. If that doesn’t work, try out the fix list guide linked above.


  • Stream not working/ Not available. As a Live TV add-on, you will come across this problem frequently. Streams may be blocked. First, make sure that you are using Sport’s Devil with a VPN. If you are in the UK, almost all streams in Sport’s Devil will be blocked.  You can also enable RMPT input through the Kodi addons menu. If that doesn’t work, try more fixes in the guide linked above.


  • Kodi error checks log. This tends to mean that your cache is full. On a low RAM device like an Amazon Firestick, this can happen frequently. This fixes it and clears the cache read in the guide linked above.

Review

Sports Devils Kodi Addon has the biggest selection of streams and sports of any add on, on Kodi. Having said that several of the streams won’t be of the best quality. You might get 480p or 720p if you are lucky.

With such a broad range of sports covered, a big part of Sports Devil’s problems is that it doesn’t have a regular developer working on the code base and keeping the scrapers updated.

Also, as covered in the common errors. Sports Devil Kodi Addon has been around for such a long time, that you must have a VPN when using the add on. Otherwise, you will find almost none of the streams work. They work, your ISP is just blocking them all. Particularly if you are in the UK.

Sports Devils Kodi Addon Menu includes the following categories:

  • Favorites
  • Blogs
  • Highlights
  • Live Sports
  • Sports TV
  • Live TV


Sports included within Sports Devil include:

  • NFL
  • NBA
  • Football
  • Boxing
  • MMA
  • UFC
  • WWE
  • Ice Hockey
  • Motorsport
  • Rugby
  • Snooker
  • Golf
  • Darts
  • Many lesser-known sports and niche items


Sport’s Devil sources include:

  • RojaDirecta
  • SportStream365
  • StopStream
  • VIPBox
  • VipGoal
  • Cricfree
  • CricHD
  • HDFree
  • iLive
  • MamaHD
  • Bundesliga-Streams
  • Dimsports
  • Live Football Video
  • LiveTV
  • LSHunter
  • ShowSport
  • Sports4u
  • StreamHD
  • Bypassed.ORG
  • CinestrenosTV
  • FilmOn
  • FireOne TV
  • iBrod
  • First Row Sports
  • Live9
  • OK Live TV
  • ShadowNet
  • Ustreamix


Install Surfshark on Firestick

Best Surfshark Deal


Legal Disclaimer: ReviewVPN.com does not encourage or endorse any illegal activity involved in the usage of services and applications referenced on this site. We do not verify the licensing agreements of services. The end-user is wholly responsible for ensuring that any media accessed through these services does not violate copyright and/or licensing laws. ReviewVPN does not promote, link to, or receive compensation from any Apps and IPTV services.


YOUR INTERNET ACTIVITY IS BEING WATCHED

ReviewVPN cannot attest to the legality, security and privacy of the applications discussed on this site. It is highly recommended that you use a VPN service while streaming or using Kodi.

Currently, your IP 216.73.217.150 is visible to everyone and your Browser is being tracked by Advertisers & ISP Provider.

Save 65% Now

Limited Time Offer

Here are the main reasons why you must use a VPN:

  • Your activities are hidden from your ISP, the government, and from the apps you are using.
  • You can access additional movies and TV streams.
  • ISP attempts to throttle are thrwarted thus reducing buffering issues.
  • Geographically restricted content like Netflix and Hulu can be unblocked.

A VPN works be replacing your ISP-assigned IP address and creating an encrypted tunnel. We recommend the no log service offered by IPVanish. It works well on a Firestick and offers the fastest possible speeds.

Special Limited Time Offer - Get IPVanish


How to Install Sport’s Devil on Kodi with Screenshots

  1. From the home screen, select the cogwheel at the upper left.

Step 1 Installing Sport’s Devil addon on Kodi

2. Select System in the bottom right corner.

Step 2 Installing Sport’s Devil addon on Kodi


3. Select Add-ons on the left side of the screen.

Step 3 Installing Sport’s Devil addon on Kodi


4. Select Unknown sources.

Step 4 Installing Sport’s Devil addon on Kodi


5. Click Yes to allow unknown sources.

Step 5 Installing Sport’s Devil addon on Kodi


6. Select File manager.

Step 6 Installing Sport’s Devil addon on Kodi


7. Click Add source.

Step 7 Installing Sport’s Devil addon on Kodi


8. Click on <None>.

Step 8 Installing Sport’s Devil addon on Kodi


9. Type exactly: http://www.lvtvv.com/repo/

Step 9 Installing Sport’s Devil addon on Kodi


10. Click on OK.

Step 10 Installing Sport’s Devil addon on Kodi


11. Select enter a name for this media source.

Step 11 Installing Sport’s Devil addon on Kodi


12. Name is Sport’s Devil  (this part isn’t critical as long as you remember the name).

Step 12 Installing Sport’s Devil addon on Kodi


13. Click on OK.

Step 13 Installing Sport’s Devil addon on Kodi


14. Click on OK.

Step 14 Installing Sport’s Devil addon on Kodi


15. Take one step back and click on Add-ons.

Step 15 Installing Sport's Devil on Kodinom on Kodi


16. Select install from zip file.

Step 16 Installing Sport's Devil Kodi addon on Kodi


17. Click on Sport’s Devil (or whatever you named the source).

Step 17 Installing Sport’s Devil addon on Kodi


18. Click on repository.kodil-1.3.zip

Step 18 Installing Sport's Devil Kodi addon on Kodi


19. Select on Install from repository.

Step 19 Installing Sport’s Devil addon on Kodi


20. Click on kodil Repo.

Step 20 Installing Sport's Devil Kodi addon on Kodi


21. Pick Video add-ons.

Step 21 Installing Sport's Devil Kodi addon on Kodi


22. Select Sport’s Devil Video again.

Step 22 Installing Sport’s Devil addon on Kodi


23. Click on Install.

Step 23 Installing Sport's Devil Kodi addon on Kodi


24. Select Version 2018.09.20 Kodil Repo

Step 24 Installing Sport's Devil Kodi addon on Kodi


25. Select OK after reviewing the add-ons that will be installed.

Step 25 Installing Sport's Devil Kodi addon on Kodi


26. You should see a popup in the upper right corner saying Sport’s Devil has installed. There will actually be multiple popups for the various components.

Step 26 Installing Sport's Devil Kodi addon on Kodi


27. Click on Open to start the Sport’s Devil add-on.

Step 27 Installing Sport's Devil Kodi addon on Kodi


Install Surfshark on Firestick

Best Surfshark Deal

How to Install Surfshark VPN on Firestick

If your Firestick still has the older interface, read this article to learn how to update it: Update Firestick Interface.

You can download Surfshark directly from the Amazon App store. It will be easy for you to find Surfshark with your Firestick’s Find feature. Refer to our screenshots below.

1. Go to the Home screen of your Firestick.

step 1 Install Surfshark VPN on Firestick


2. Navigate towards the Find tab. Press the Search button from the resulting dropdown.

step 2 Install Surfshark VPN on Firestick


3. Type in the keyword of SurfShark and select from the suggestions that will appear.

step 3 Install Surfshark VPN on Firestick


4. Click the official SurfShark icon from your search results.

step 4 Install Surfshark VPN on Firestick


5. Press the Download (You own it) button.

step 5 Install Surfshark VPN on Firestick


6. The SurfShark VPN installer will download on your device.

step 6 Install Surfshark VPN on Firestick


7. SurfShark VPN’s app will automatically install itself on your Fire TV stick.

step 7 Install Surfshark VPN on Firestick


8. Press the Open button after completing SurfShark VPN’s installation process.

step 8 Install Surfshark VPN on Firestick


9. Please wait for the SurfShark VPN to load its user interface.

step 9 Install Surfshark VPN on Firestick


10. You can now log in with your SurfShark VPN account credentials.

step 10 Install Surfshark VPN on Firestick

Learn more about Surfshark and Grab the Best Surfshark Deal Now!


Install Surfshark on Firestick

Best Surfshark Deal


Other VPNs to Consider

NordVPN (Best for Streaming)

Best Features

  • 5000+ Server in 50+ Countries 
  • Military-Grade Encryption
  • Fast Connection Speed
  • Suitable to a lot of devices
  • No-Log Policy

Prices
  • Complete $5.89 per month (64% Discount)
  • Plus $4.59 per month (56% Discount)
  • Standard $3.69 per month (55% Discount)

Best Features

  • 750+ High-speed VPN Servers in 43 Locations
  • Military-Grade Encryption
  • Fastest HD Streaming and Gaming
  • 30-Day Money-Back Guarantee
  • Unlimited Data & Devices
  • No-Log Policy

Prices
  • 3 Years $1.99 per month (82% Discount)
  • 1 Years $3.29 per month (70% Discount)
  • 1 Month $10.99 per month

IPVanish VPN (Most Secure)

Best Features

  • 1200+ Servers in 60+ Countries around the world
  • Unlimited Connections
  • No-Log Policy
  • Top Notch Military-Grade VPN Protocols and Encryptions
  • 100% Safe and Secured
  • Most Trusted VPN
  • Best VPN for Firestick
  • 30-Day Money-Back Guarantee

Prices
  • Yearly $3.99 per month (63% Discount) – 30 days risk free + Ransomware & Malware Protection
  • Quarterly $5.32 per month (51% Discount)
  • Monthly $10.99 per month


For more VPN discounts, go to ReviewVPN Deals and purchase the best VPN for you.

Click here to get the lowest price on Surfshark through our exclusive limited-time offer.
 

Install Grease Lightning Kodi Addon

Grease Lightning Kodi Addon

grease lightning image

Source: http://repo.rubyjewelwizard.com 

In this article, we will help you install Grease Lighting Kodi Addon on Firestick.


When you download Grease Lightning Kodi Addon you will see that much of the sources come from Movie Theatre Butter. They come from the same creator. You will see the similarity in everything from the user interface to the autoplay function. They aren’t direct clones, but they are very similar. Having said that Grease Lightning is a great add on which holds its own.

Like Movie Theatre it’s a real mixture of different code bases. Mainly Exodus and Inception, but you’ve also got elements of Michael Myers, Atreides, Resistance, and Yoda as well. Grease Lightning is a real MVP when it comes to Kodi add ons.

Concentrating solely on Movies and TV Shows just like Movie Theatre Butter, you also get the excellent autoplay function installed, which you can disable at any time. Autoplay means that Grease Lightning will automatically play the best working link for your content. You don’t need to test each link. Though you may get a lower quality link than if you looked manually.

So, it doesn’t hurt to look for links for your favorite content or a big movie you’ve been looking forward to.

Grease Lightning can also be integrated with both Real Debrid and Trakt.TV. We highly recommend using the premium service Real Debrid, this will make your life much easier, as you will always get the best working link from the 50+ paid server providers that Real Debrid gives you access to.


ANONYMOUSLY

Common Errors

There are 3 common errors that you might come across when installing or running Grease Lightning:

  • No stream. You’re unlikely to come across this error, but it does happen. You can reload the content to check its not just a server glitch, or the server may just be receiving too many requests at the same time. Also, you can switch off Grease Lightning Auto Play function and find a better-quality link. If the problem persists read through our in-depth fix guide linked above.
  • Script Error. Make sure you install Grease Lightning from the Diamond Build Repo. Sometimes users may try to get the add on from a different repo, which may have a file that is corrupted or not the most recent updated version of the add on. If you have the correct source, then the problem may lie in a corrupted version of Kodi. If you have been using Kodi for a while, you may have downloaded an add on which corrupted a crucial script. A fresh Kodi install or one of our other fixes should do the trick. For more fixes, try some more in the guide linked above.
  • Olpair Streaming Error. You won’t get this error if you decided to pay for Real Debrid. For those who want to stream for free, you must put up with Captcha servers which need the links updated on a regular basis. Most of the content will be streamed through Olpair though there are tonnes of free servers. Find out how to fix,  try some more in the guide linked above.

Review

Categories in the menu include:

  • Movies
  • New Movies
  • TV Shows
  • New Episodes
  • My Movies
  • My TV Shows
  • Search
  • Tools

You also have a wide range of extended categories which include:

  • Kung Fu
  • Movie Time
  • Kings of Horror
  • Fitness Zone
  • Kids’ Corner
  • Documentaries
  • Podcasts
  • Legends of Music


YOUR INTERNET ACTIVITY IS BEING WATCHED

ReviewVPN cannot attest to the legality, security and privacy of the applications discussed on this site. It is highly recommended that you use a VPN service while streaming or using Kodi.

Currently, your IP 216.73.217.150 is visible to everyone and your Browser is being tracked by Advertisers & ISP Provider.

Save 65% Now

Limited Time Offer

Here are the main reasons why you must use a VPN:

  • Your activities are hidden from your ISP, the government, and from the apps you are using.
  • You can access additional movies and TV streams.
  • ISP attempts to throttle are thrwarted thus reducing buffering issues.
  • Geographically restricted content like Netflix and Hulu can be unblocked.

A VPN works be replacing your ISP-assigned IP address and creating an encrypted tunnel. We recommend the no log service offered by IPVanish. It works well on a Firestick and offers the fastest possible speeds.

Special Limited Time Offer - Get IPVanish


Legal Disclaimer: ReviewVPN.com does not encourage or endorse any illegal activity involved in the usage of services and applications referenced on this site. We do not verify the licensing agreements of services. The end-user is wholly responsible for ensuring that any media accessed through these services does not violate copyright and/or licensing laws. ReviewVPN does not promote, link to, or receive compensation from any Apps and IPTV services.


Install Surfshark on Firestick

Best Surfshark Deal


When you see the extended range of categories, Movie Theatre Butters will see that they are the same as MTB.

Grease Lightning is every it as quality as MTB, with great scrapers, fast playback, and excellent link quality. If you want 4K or HD links, we recommend you turn off autoplay and enable manual selection to get the best quality link.

How to Install Grease Lightning on Kodi with Screenshots

  1. From the home screen, select the cogwheel at the upper left.

Step 1 Installing Grease Lightning addon on Kodi


2. Select System in the bottom right corner.

Step 2 Installing Grease Lightning addon on Kodi


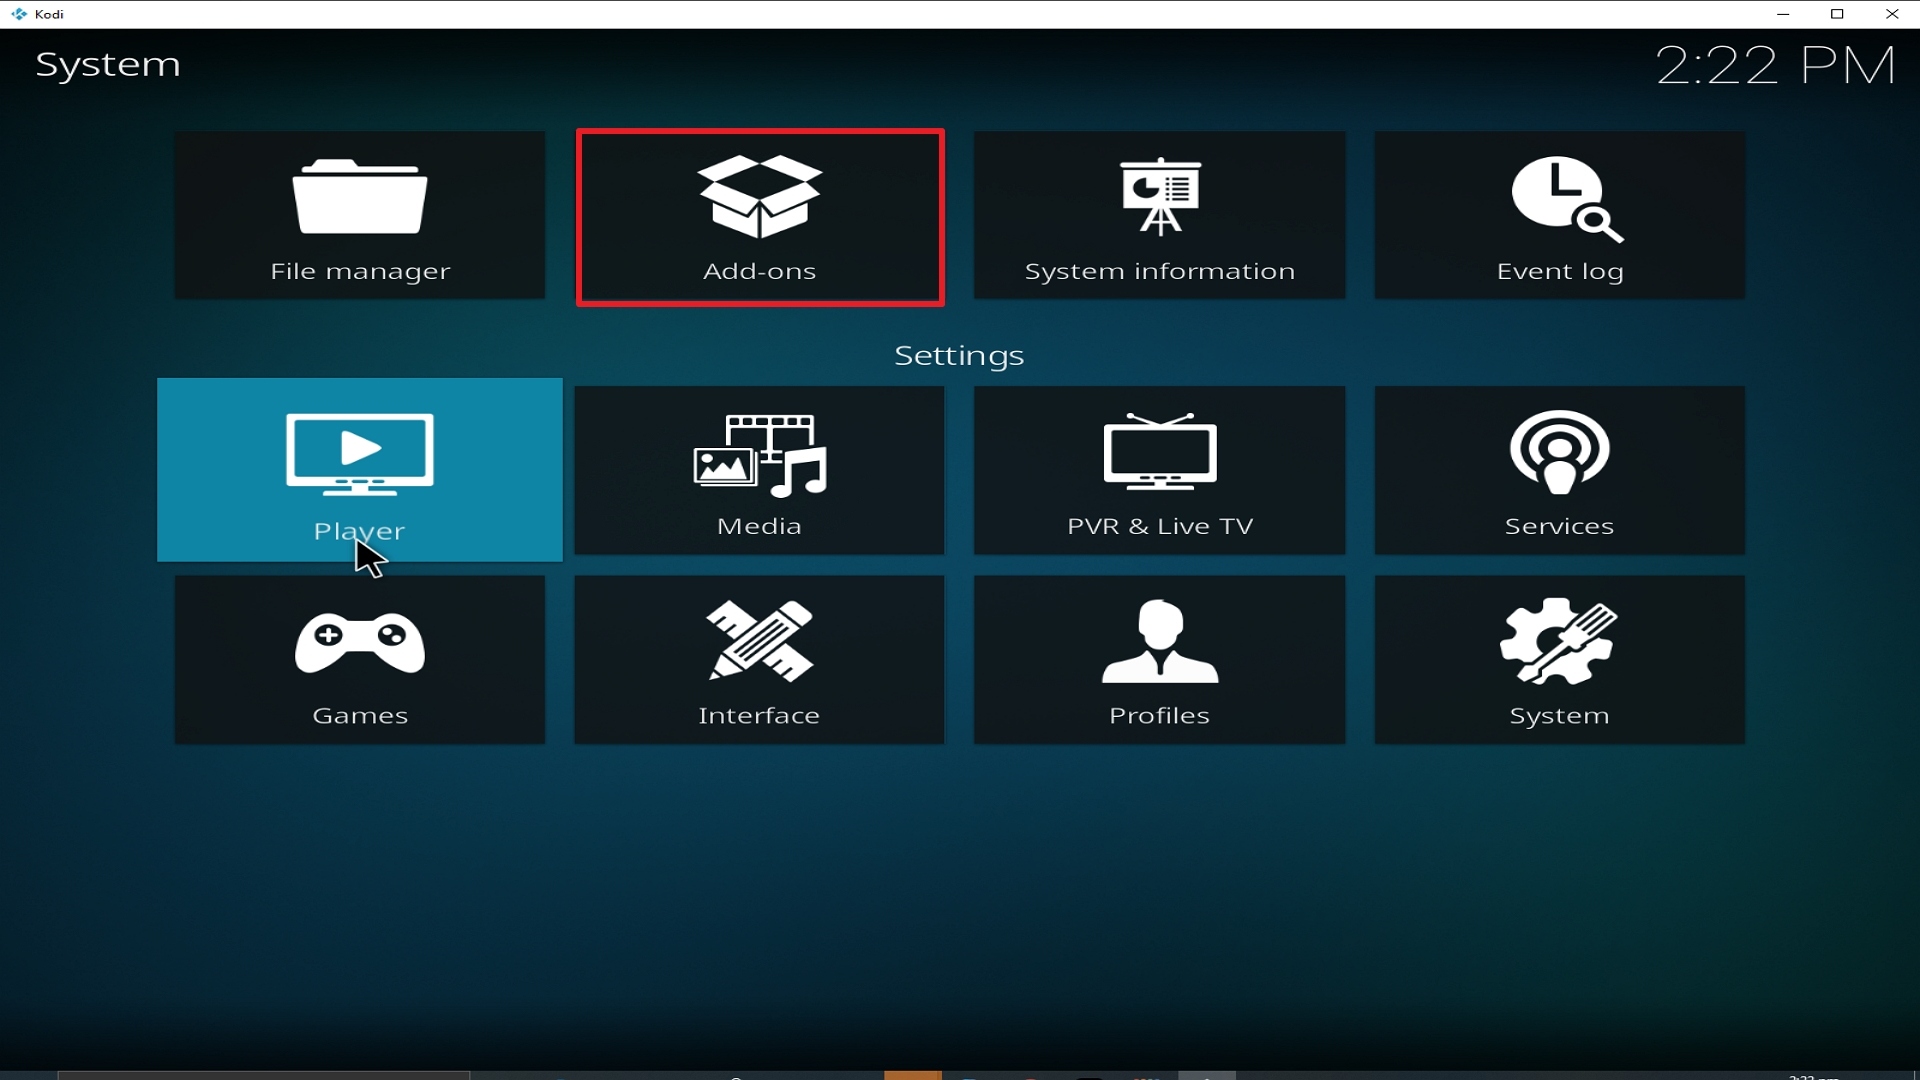
3. Select Add-ons on the left side of the screen.

Step 3 Installing Grease Lightning addon on Kodi


4. Select Unknown sources.

Step 4 Installing Grease Lightning addon on Kodi


5. Click Yes to allow unknown sources.

Step 5 Installing Grease Lightning addon on Kodi


6. Select File manager.

Step 6 Installing Grease Lightning addon on Kodii


7. Click Add source.

Step 7 Installing Grease Lightning addon on Kodi


8. Click on <None>.

Step 8 Installing Grease Lightning addon on Kodi


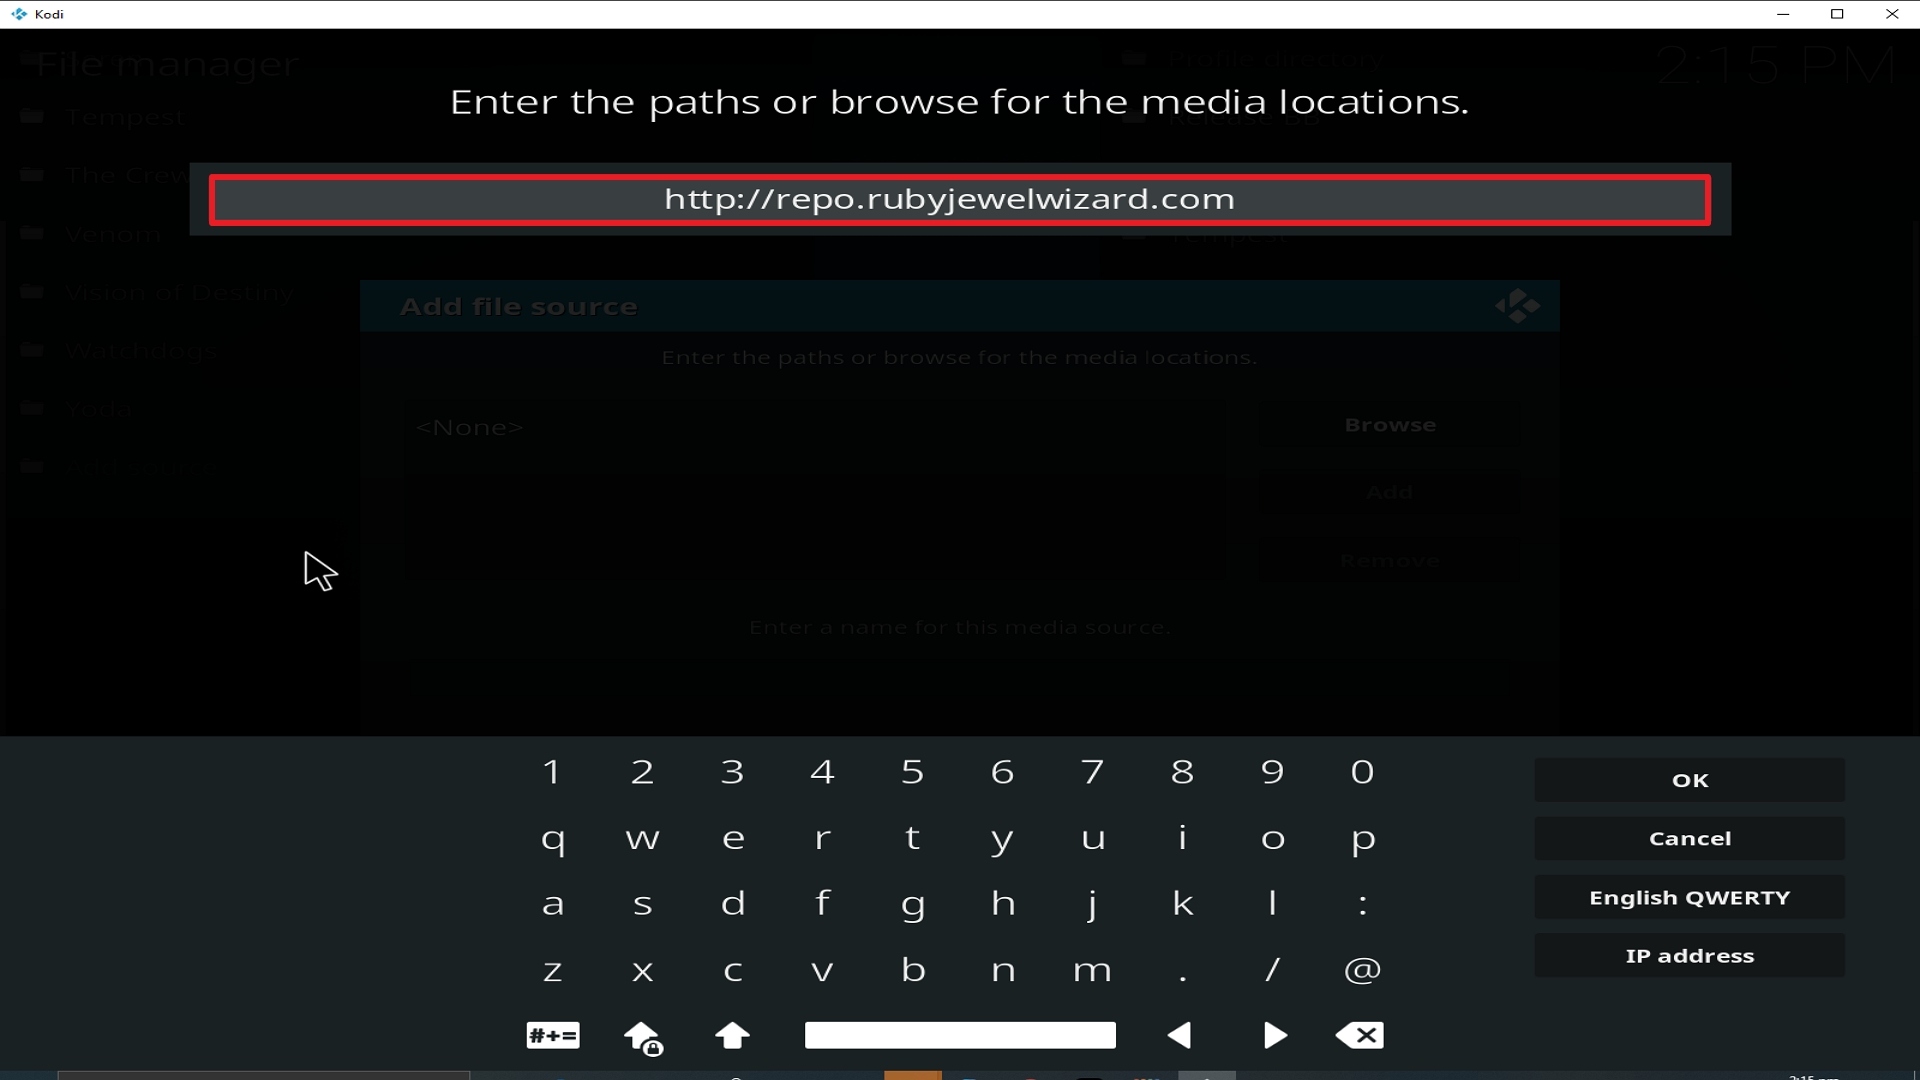
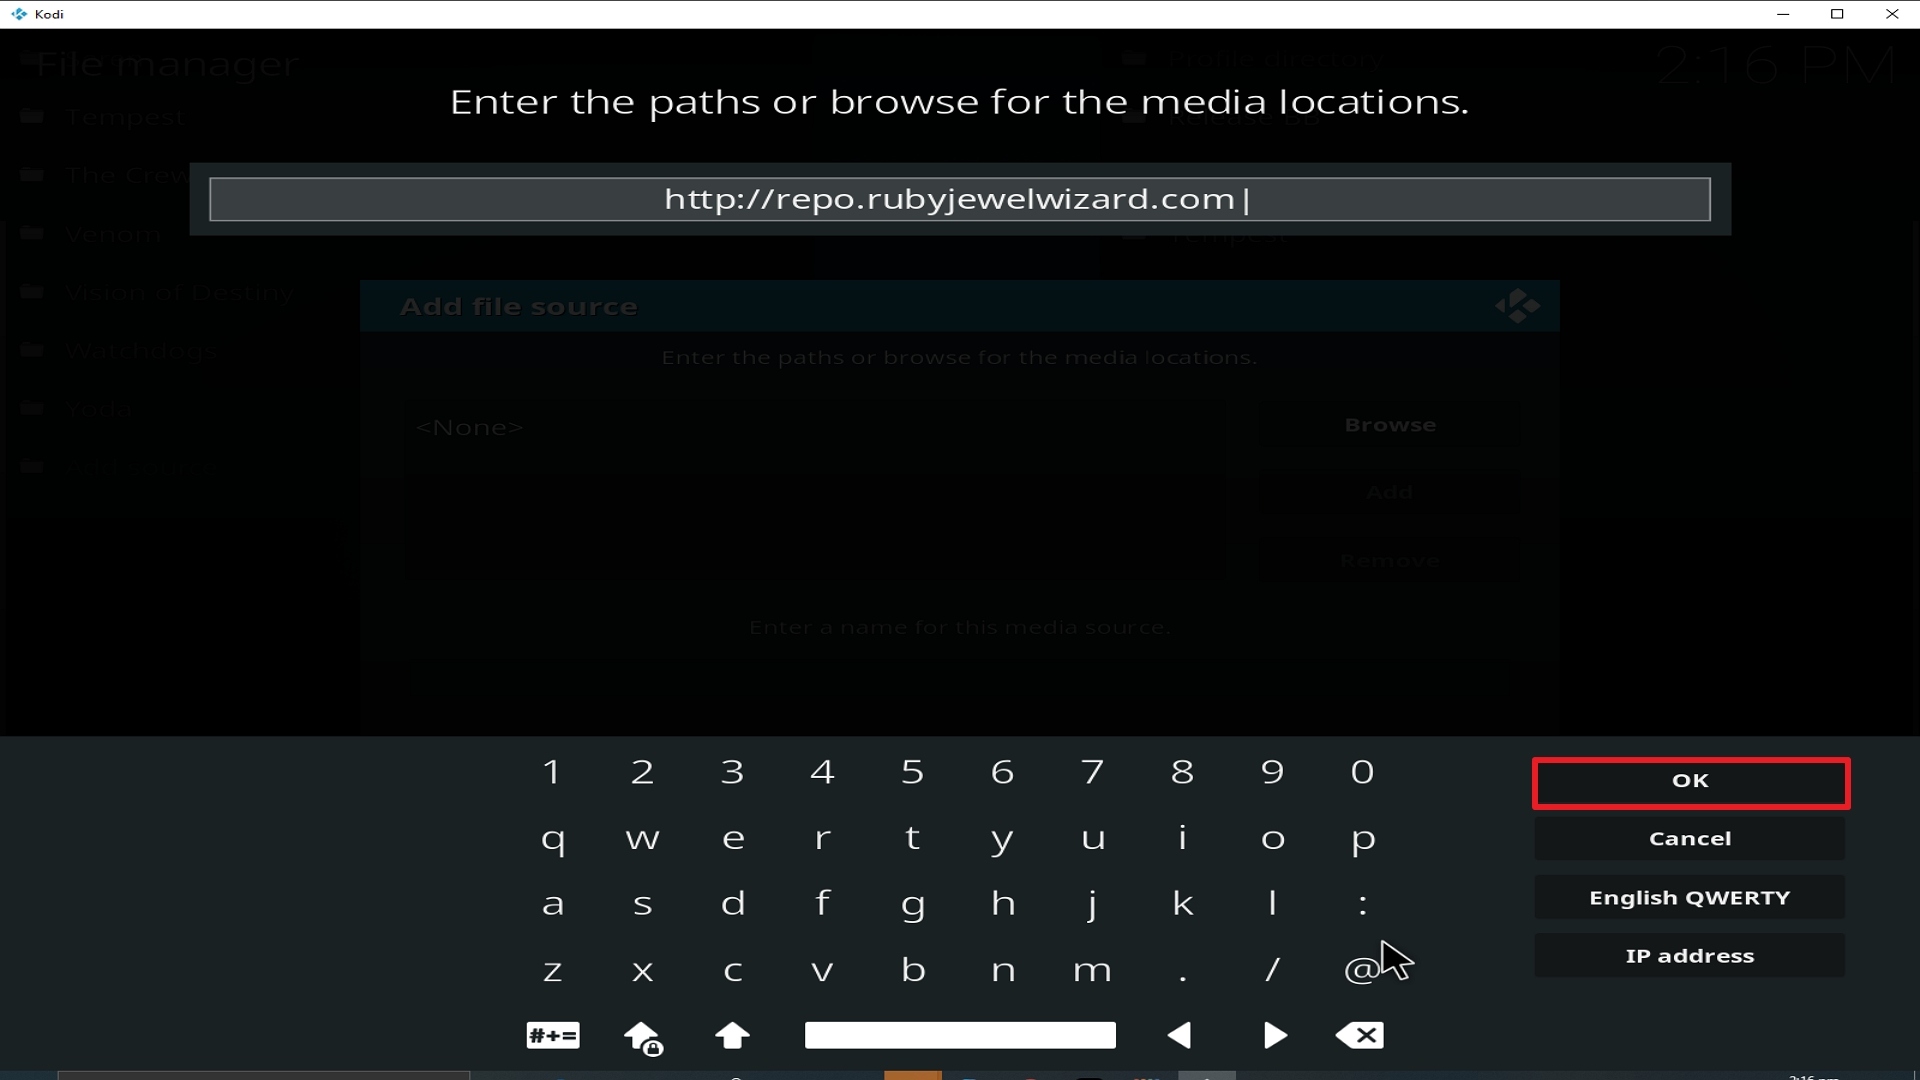
9. Type exactly: http://repo.rubyjewelwizard.com

Step 9 Installing Grease Lightning addon on Kodi


10. Click on OK.

Step 10 Installing Grease Lightning addon on Kodi


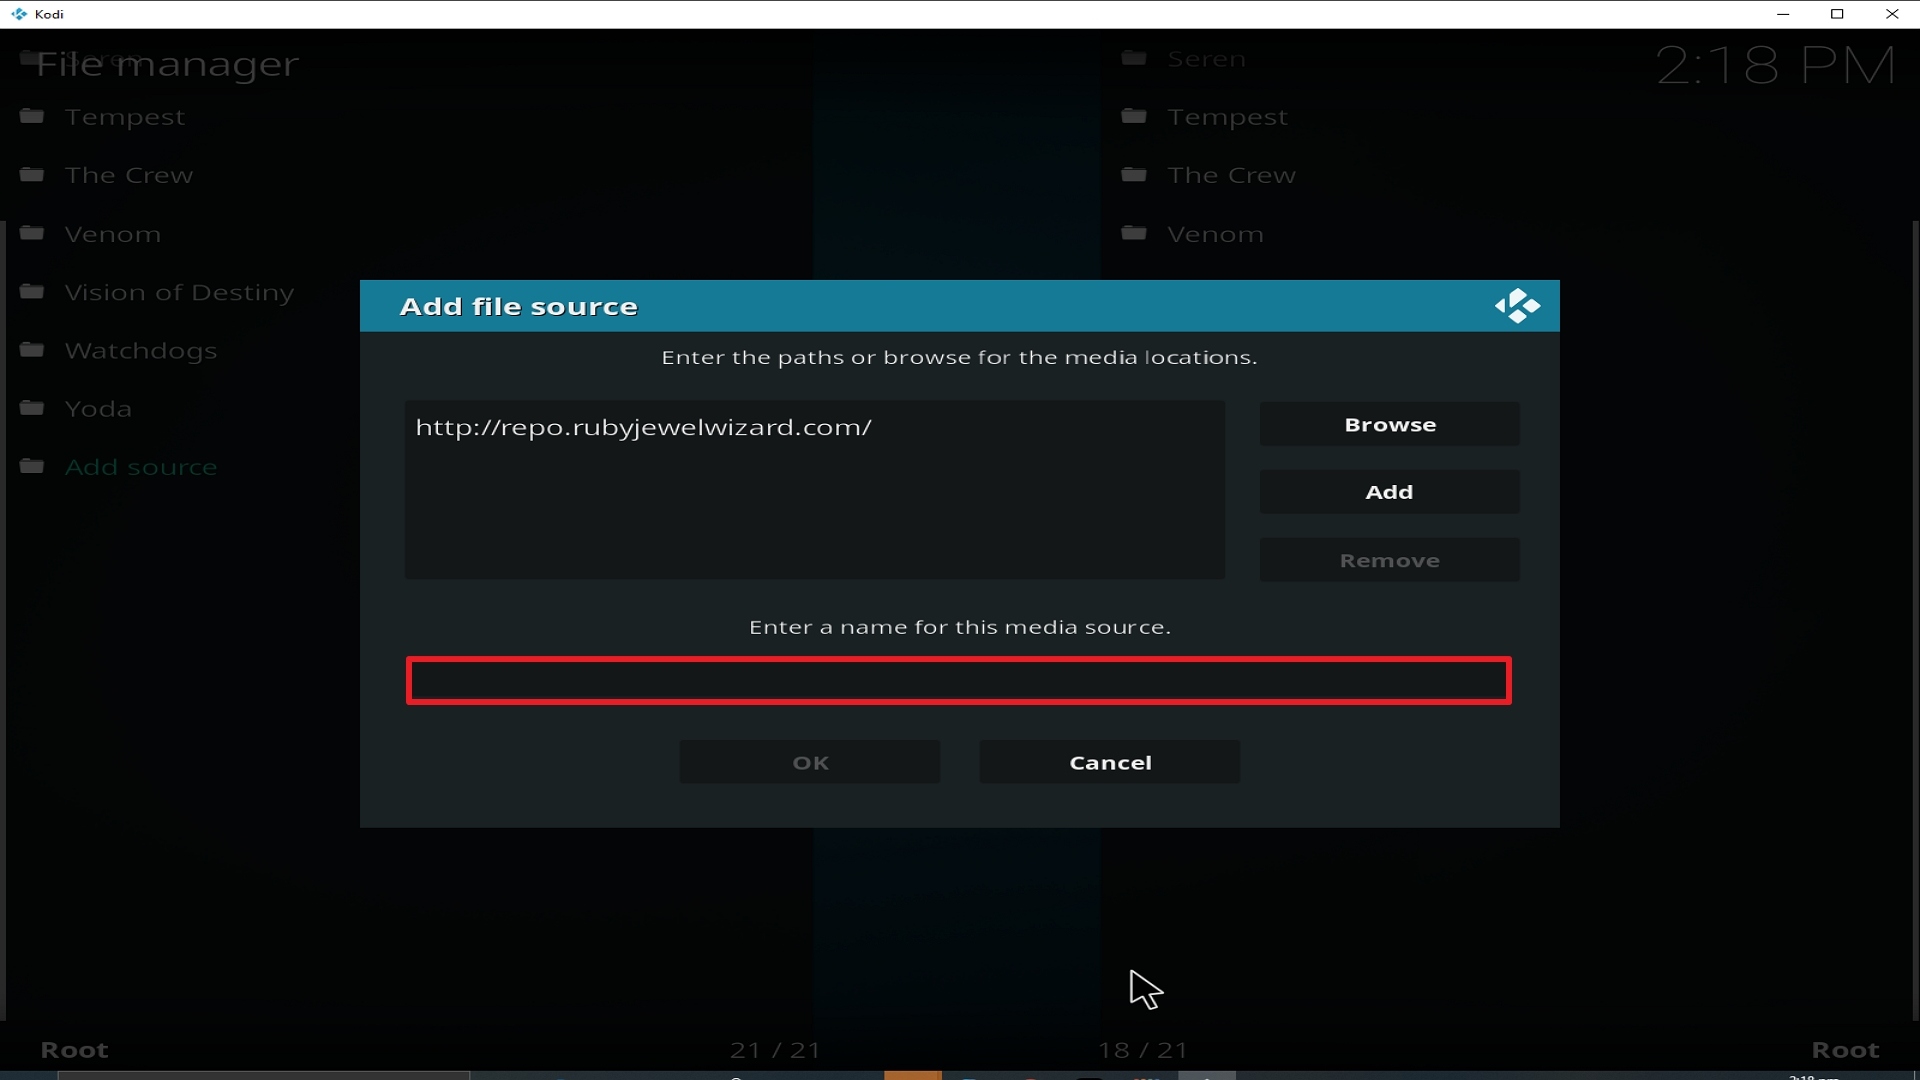
11. Select enter a name for this media source.

Step 11 Installing Grease Lightning addon on Kodi


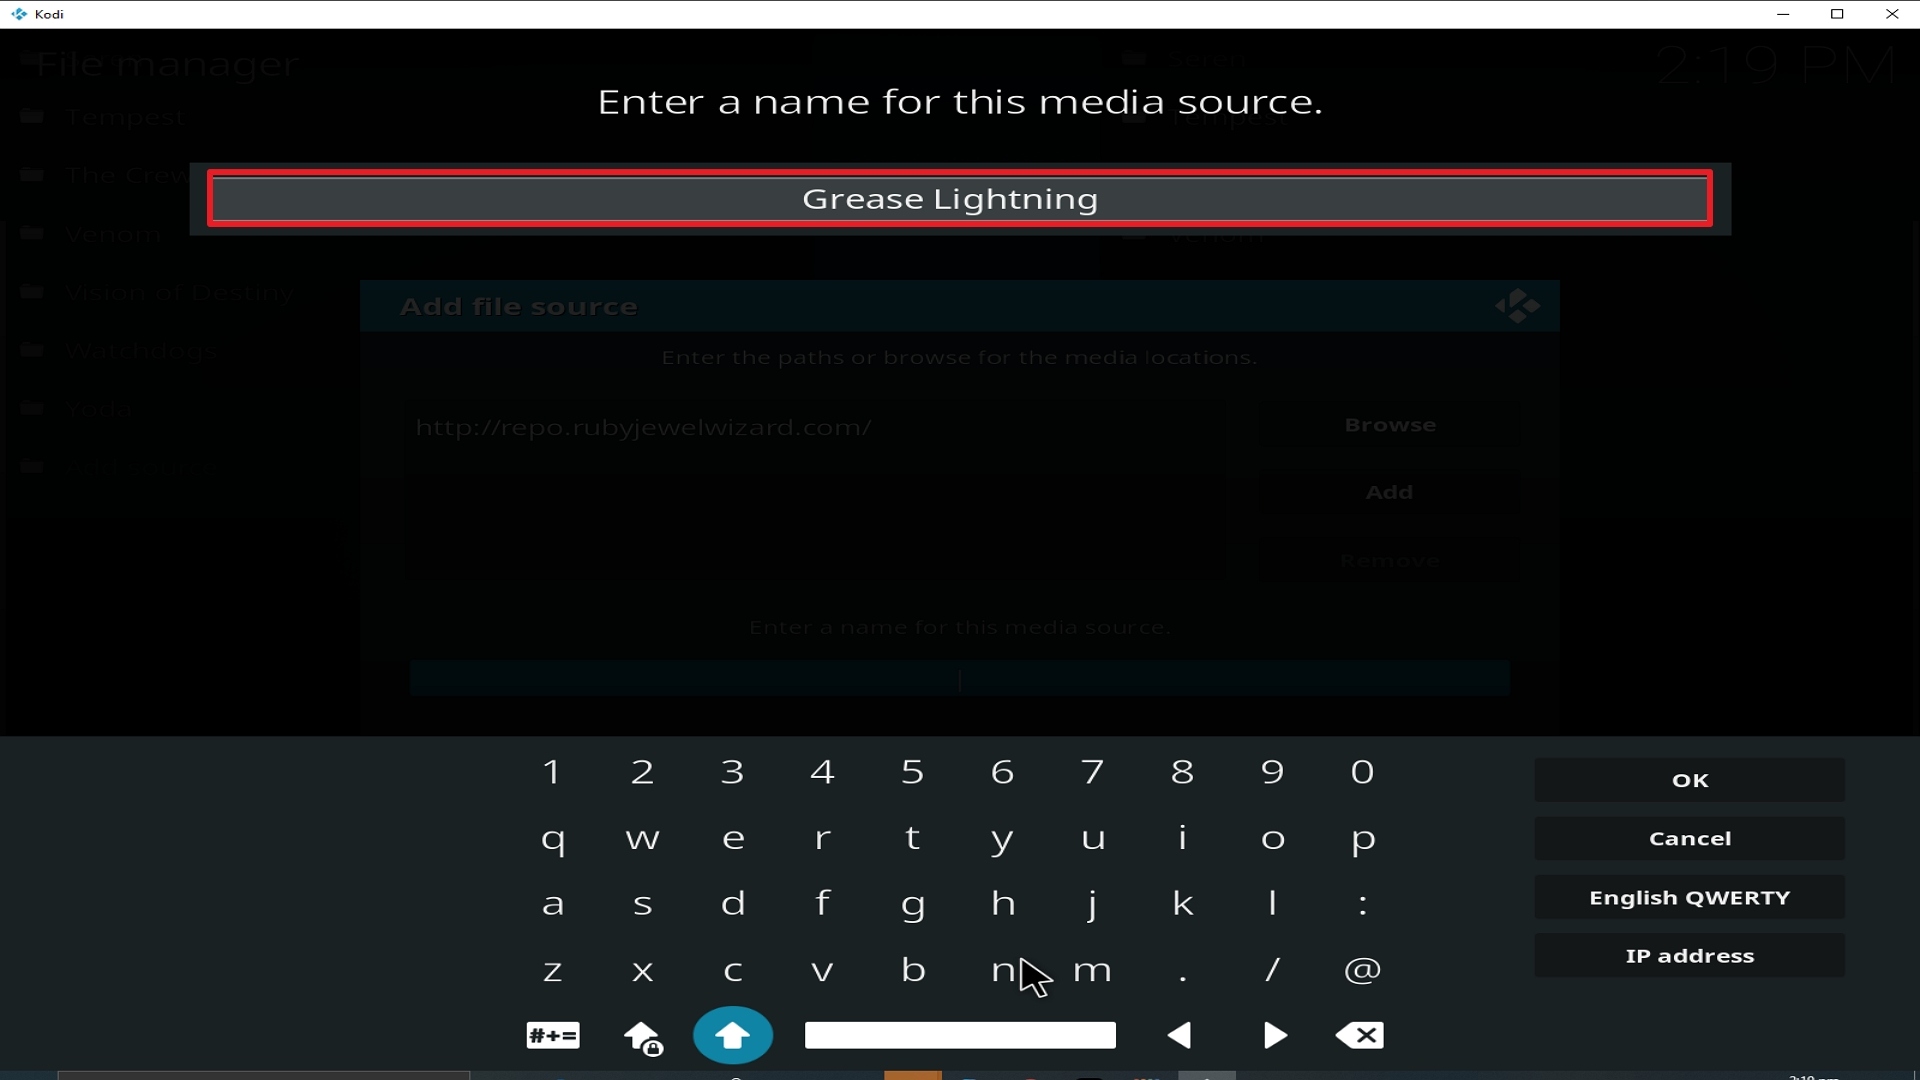
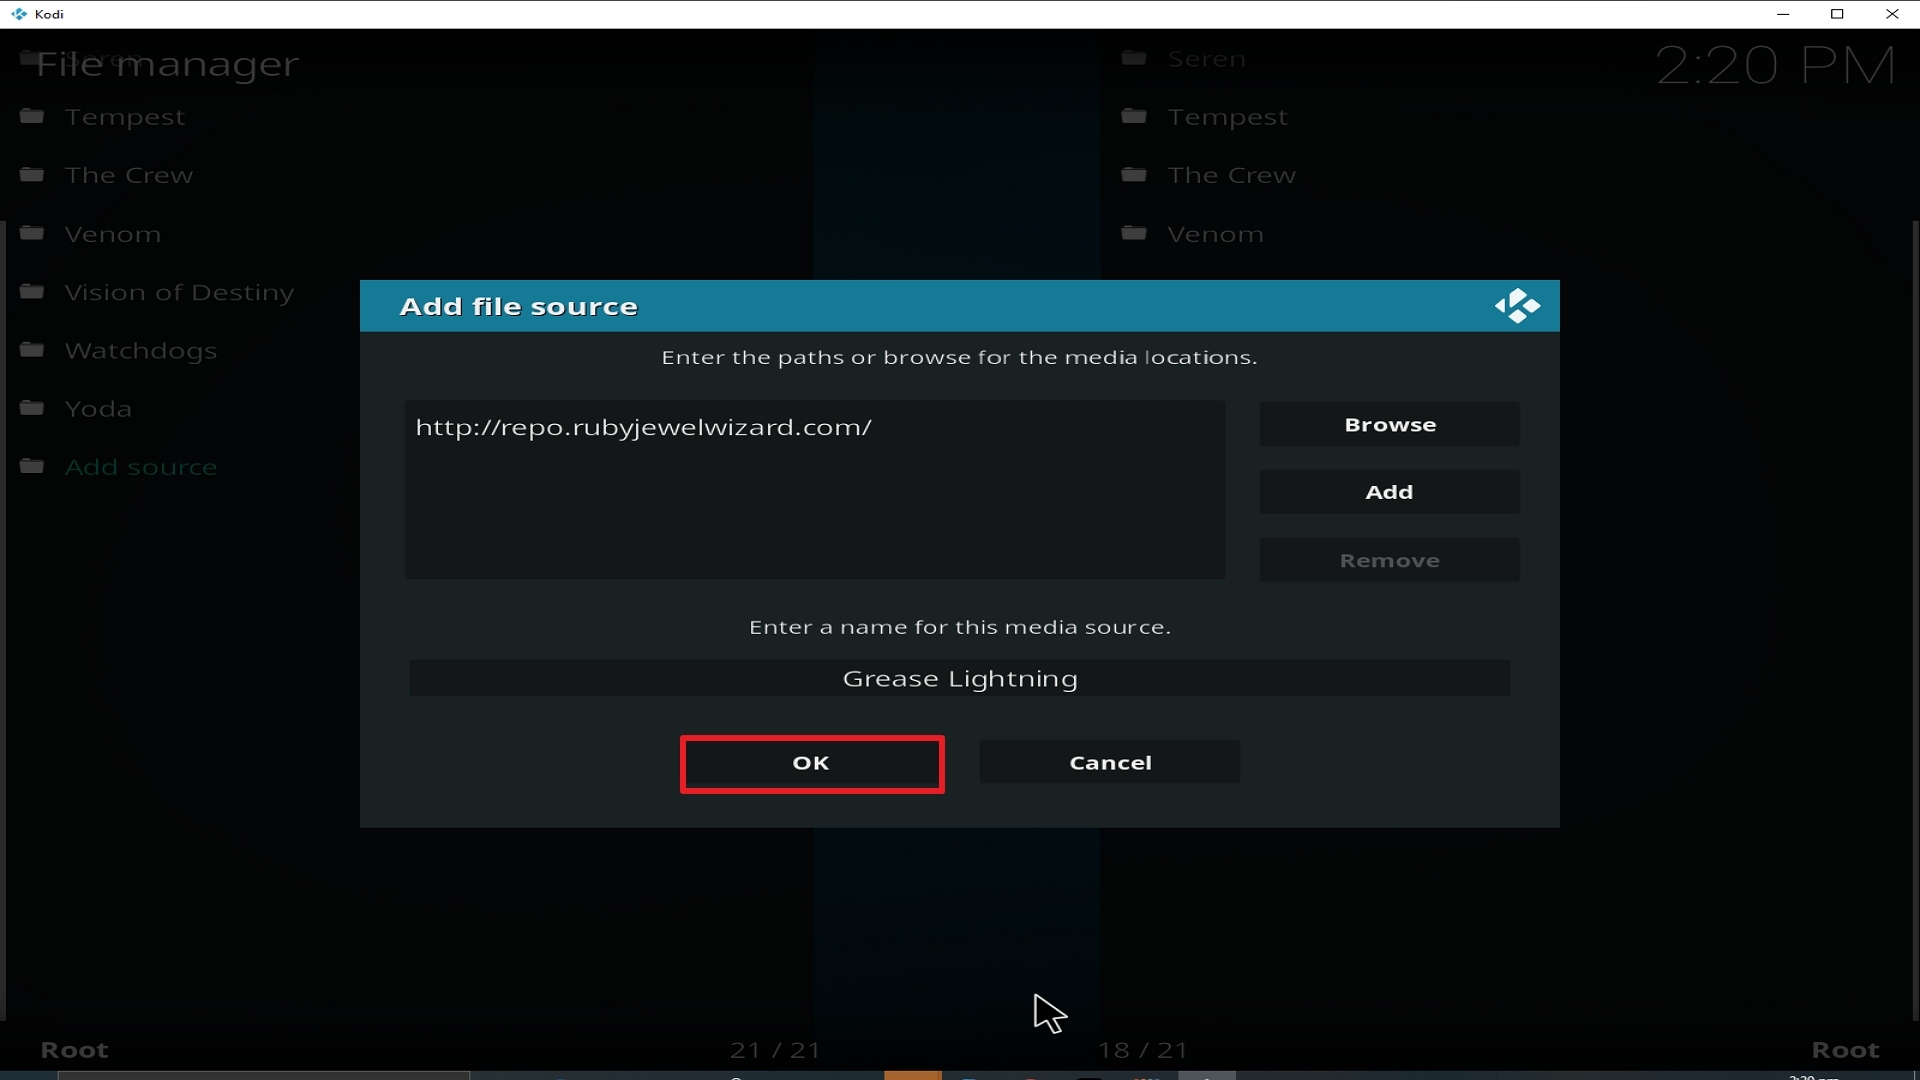
12. Name is Grease Lightning (this part isn’t critical as long as you remember the name).

Step 12 Installing Grease Lightning addon on Kodi


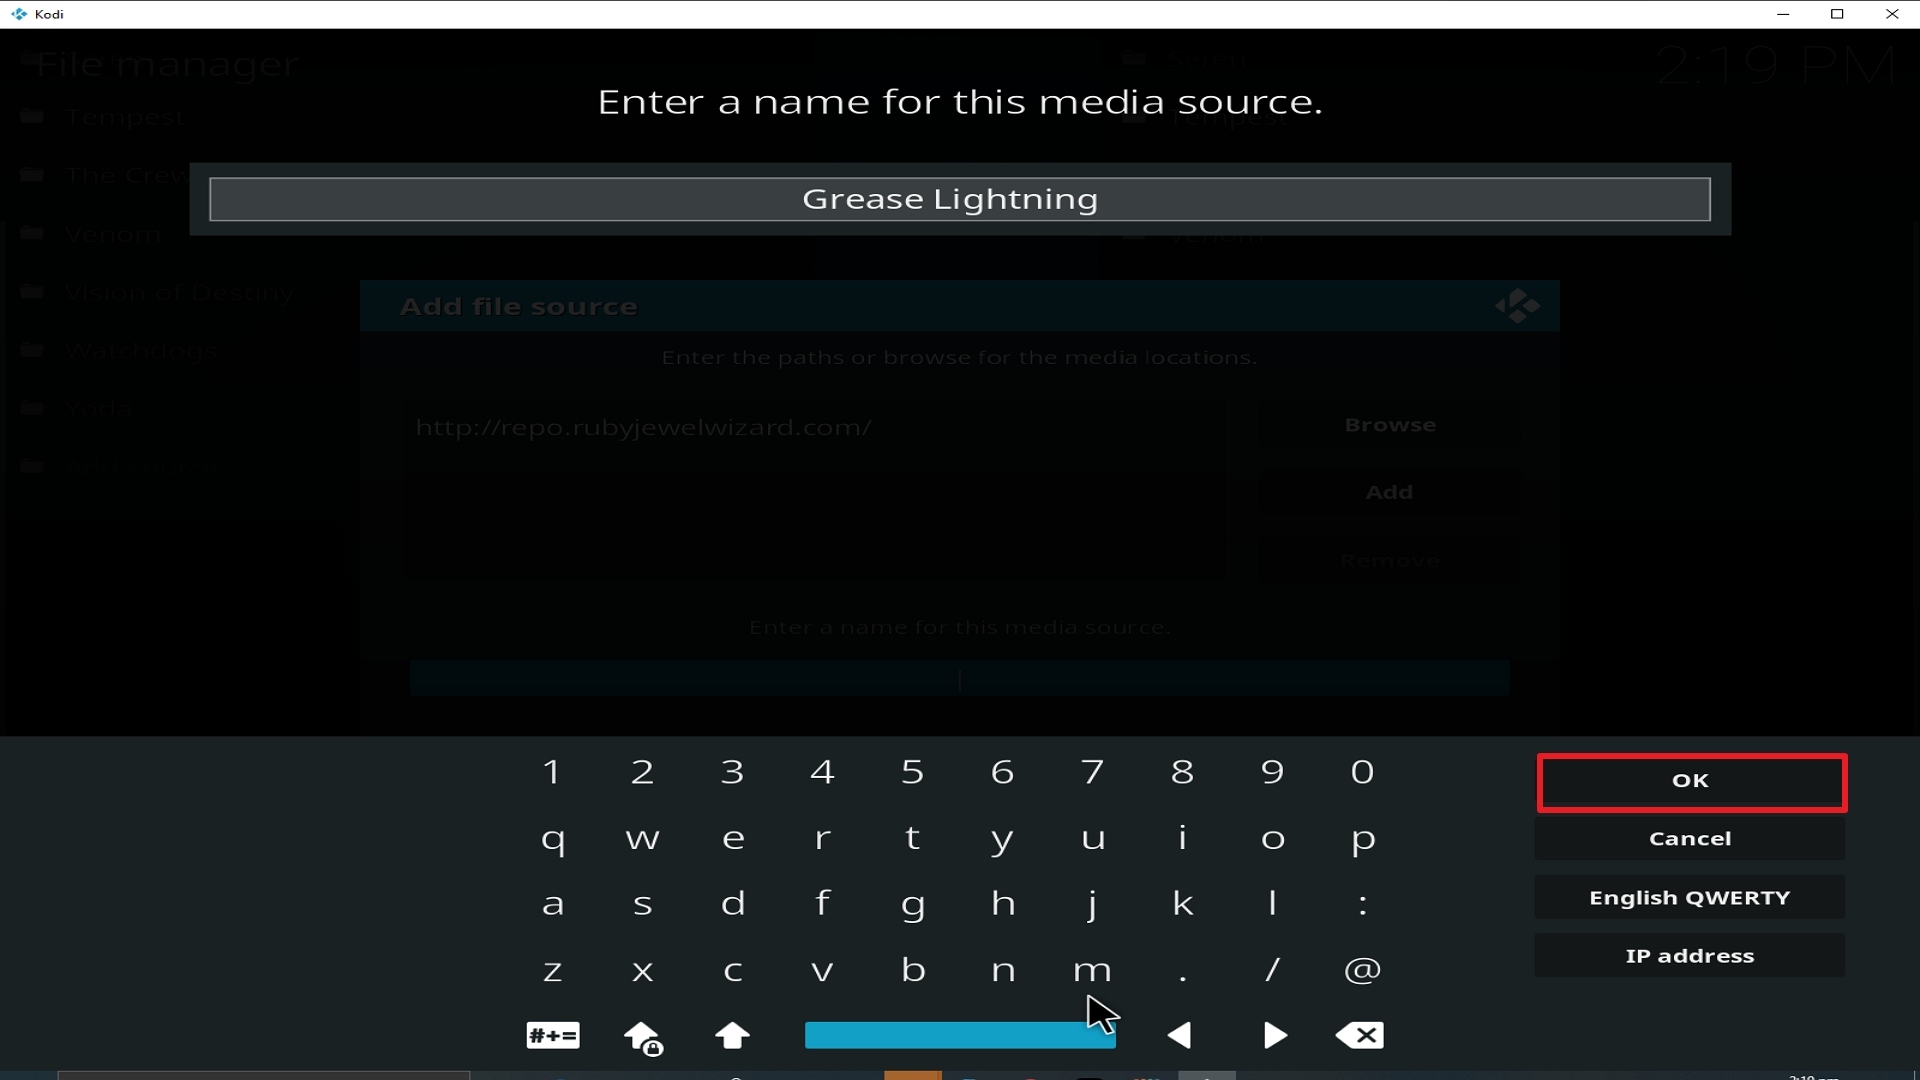
13. Click on OK.

Step 13 Installing Grease Lightning addon on Kodi


14. Click on OK.

Step 14 Installing Grease Lightning addon on Kodi


15. Take one step back and click on Add-ons.

Step 15 Installing Grease Lightning addon on Kodi


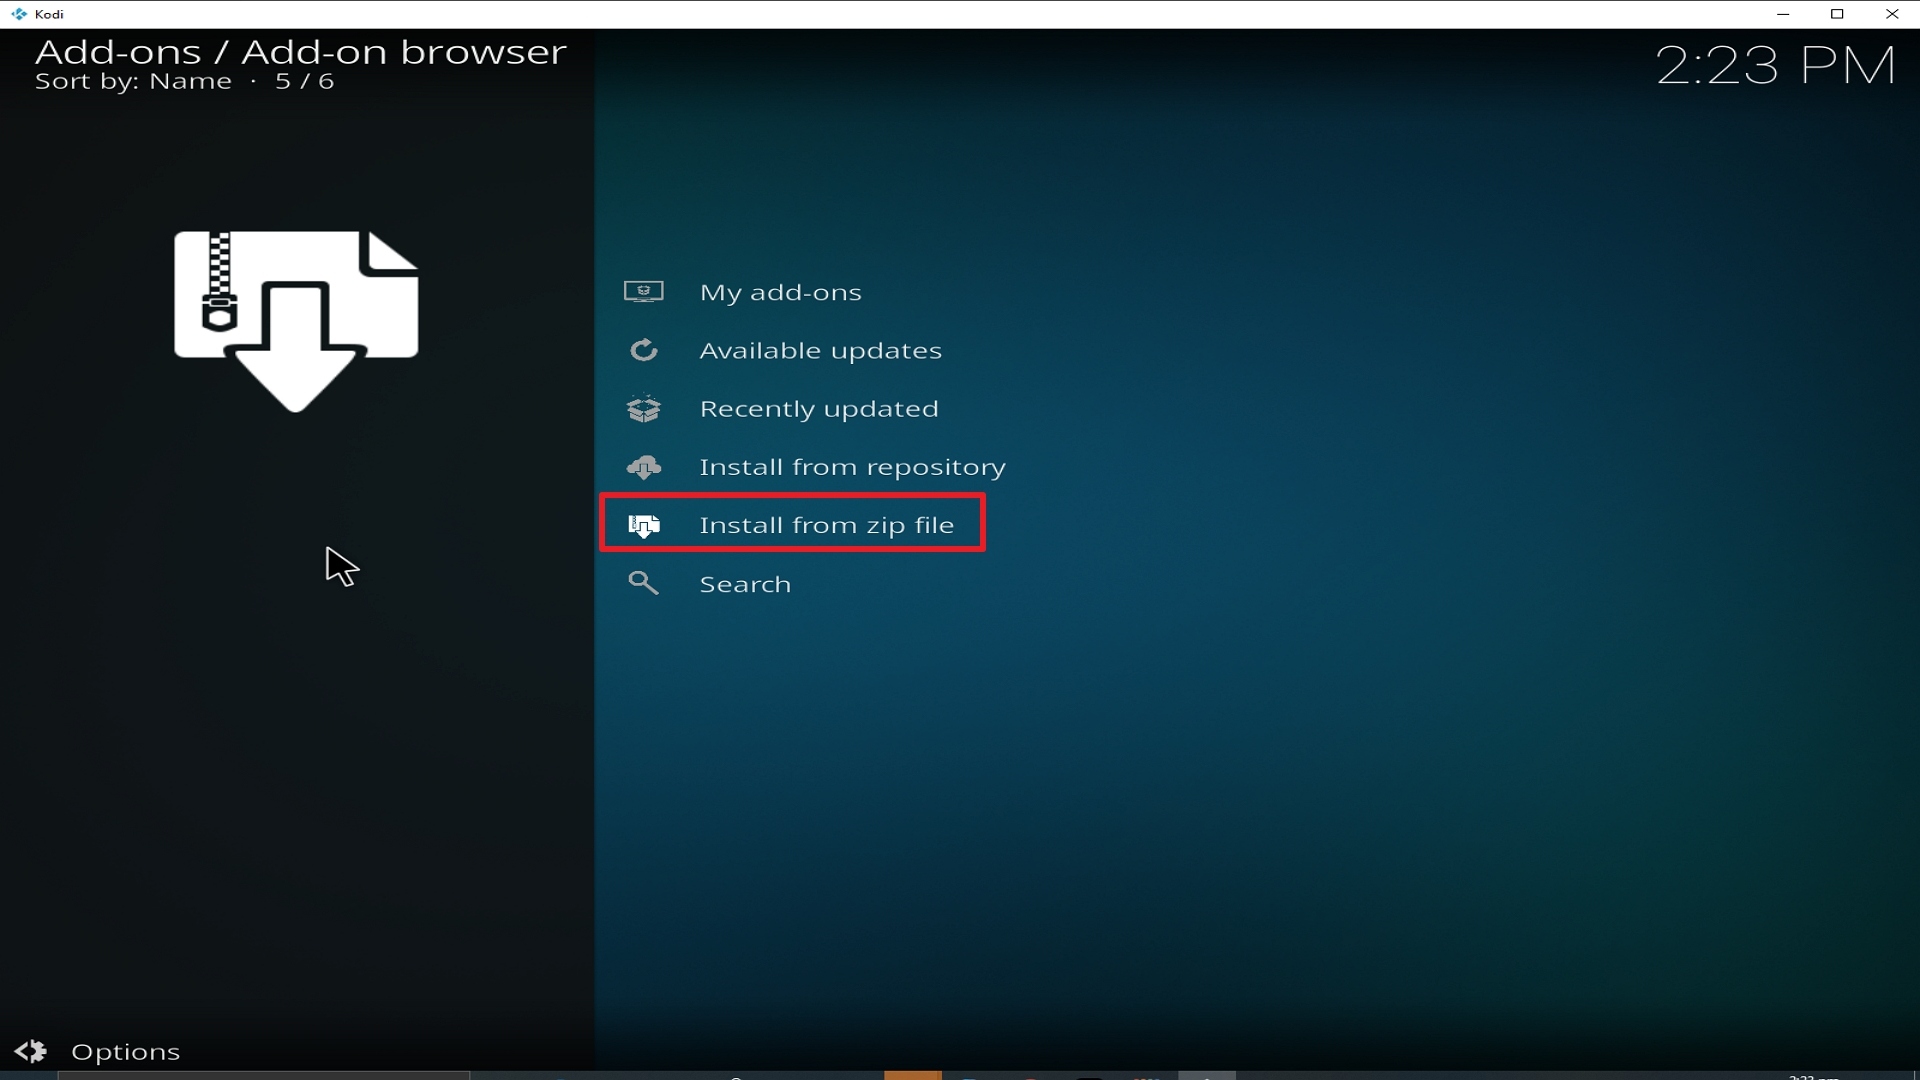
16. Select install from zip file.

Step 16 Installing Grease Lightning addon on Kodi


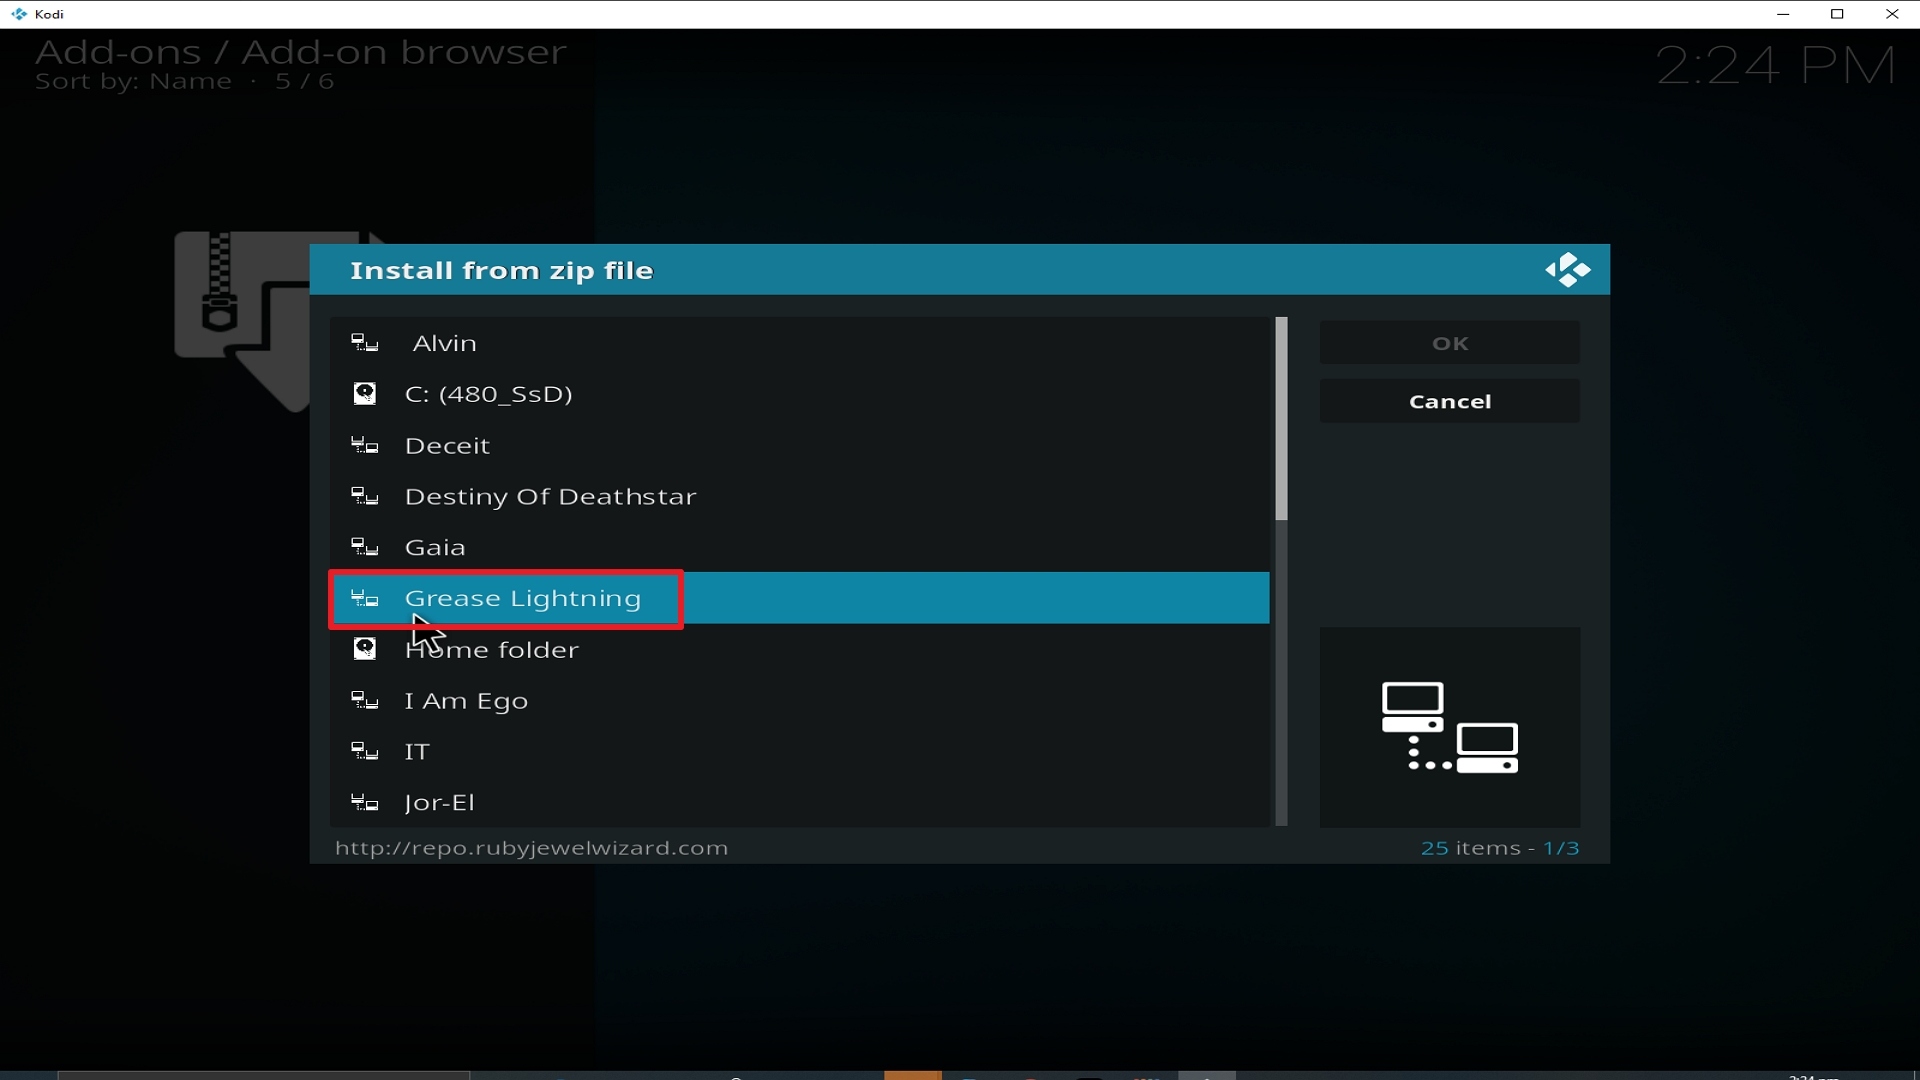
17. Click on Grease Lightning (or whatever you named the source).

Step 17 Installing Grease Lightning addon on Kodi


18. Click on repository.Diamond-Wizard-Repo-3.8.9.zip

Step 18 Installing Grease Lightning addon on Kodi


19. Select on Install from repository.

Step 19 Installing Grease Lightning addon on Kodi


20. Click on Diamond Build Repo.

Step 20 Installing Grease Lightning addon on Kodi


21. Pick Video add-ons.

Step 21 Installing Grease Lightning addon on Kodi


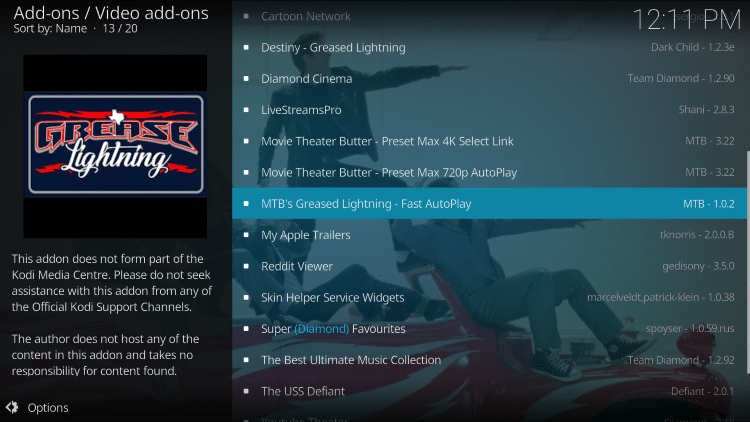
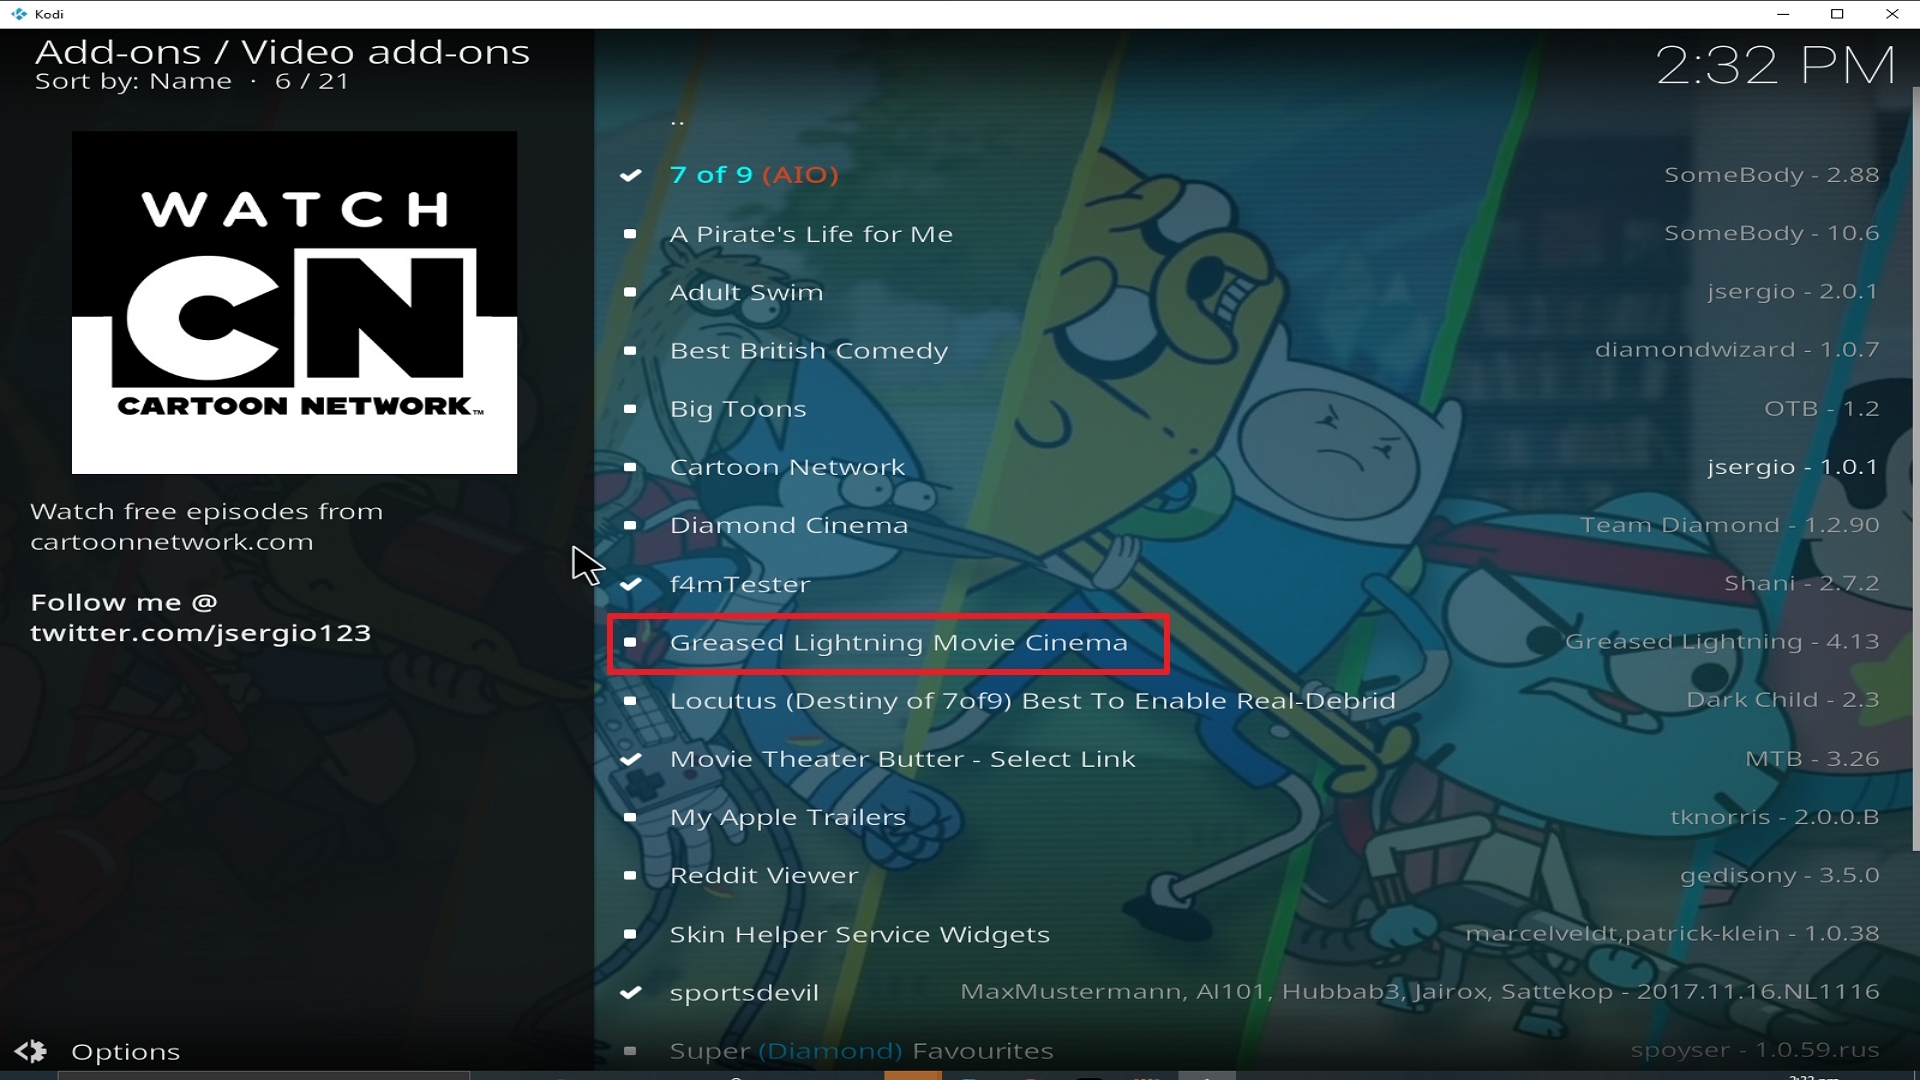
22. Select Greased Lightning again.

Step 22 Installing Grease Lightning addon on Kodi


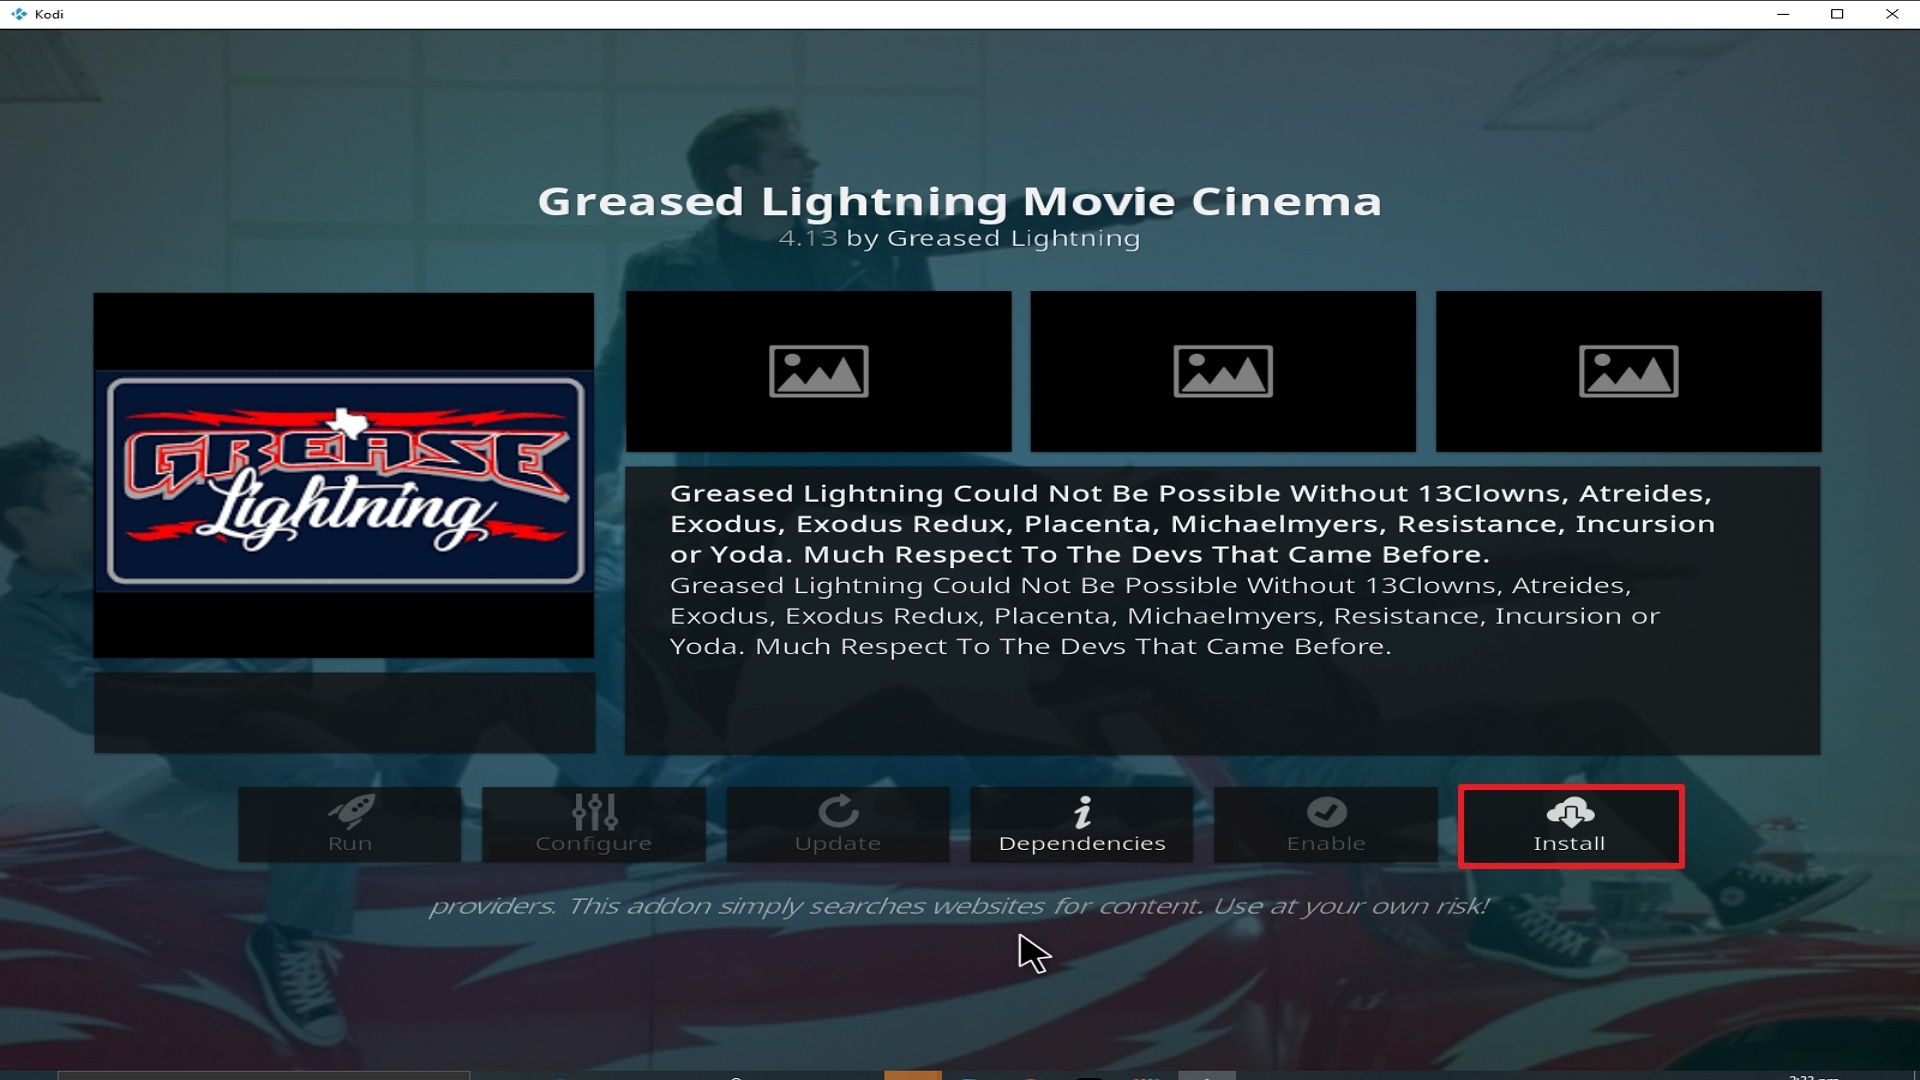
23. Click on Install.

Step 23 Installing Grease Lightning addon on Kodi


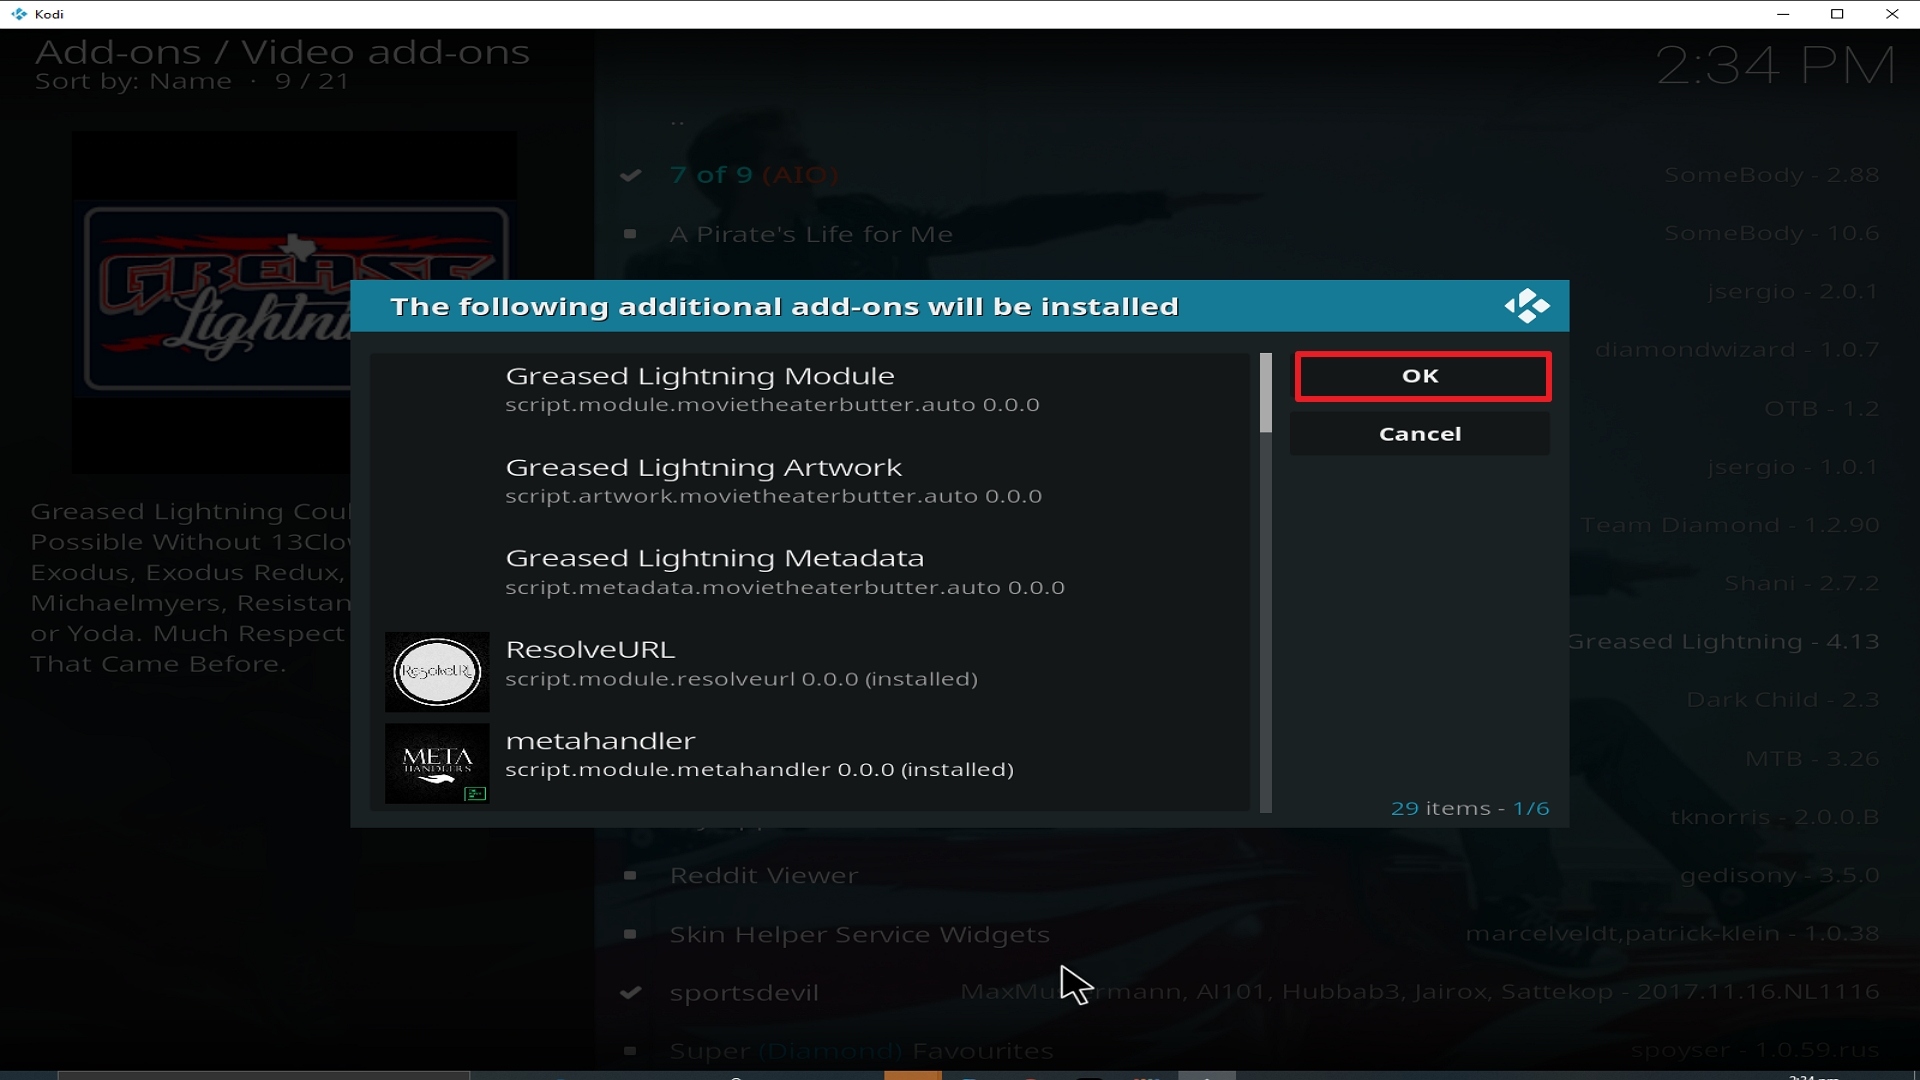
24. Select OK after reviewing the add-ons that will be installed.

Step 24 Installing Grease Lightning addon on Kodi


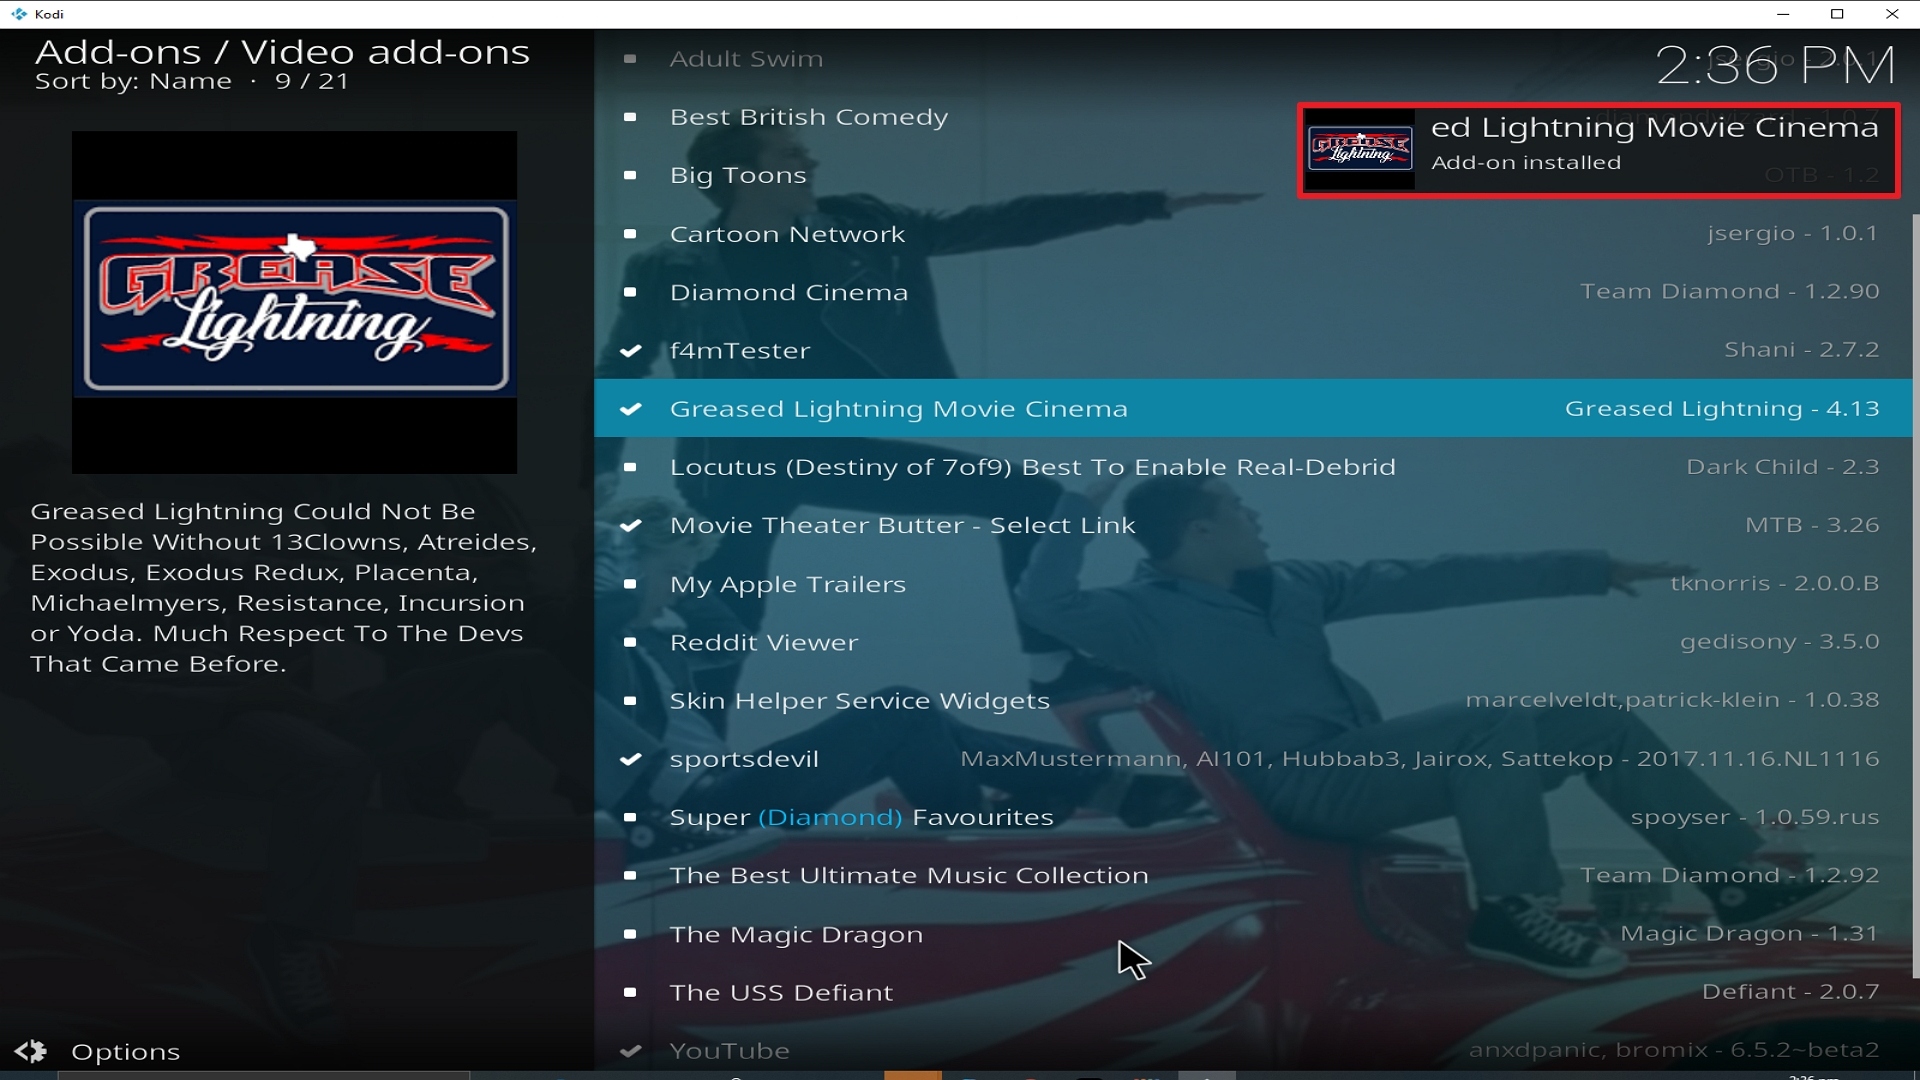
25. You should see a popup in the upper right corner saying Grease Lightning has installed. There will actually be multiple popups for the various components.

Step 25 Installing Grease Lightning addon on Kodi


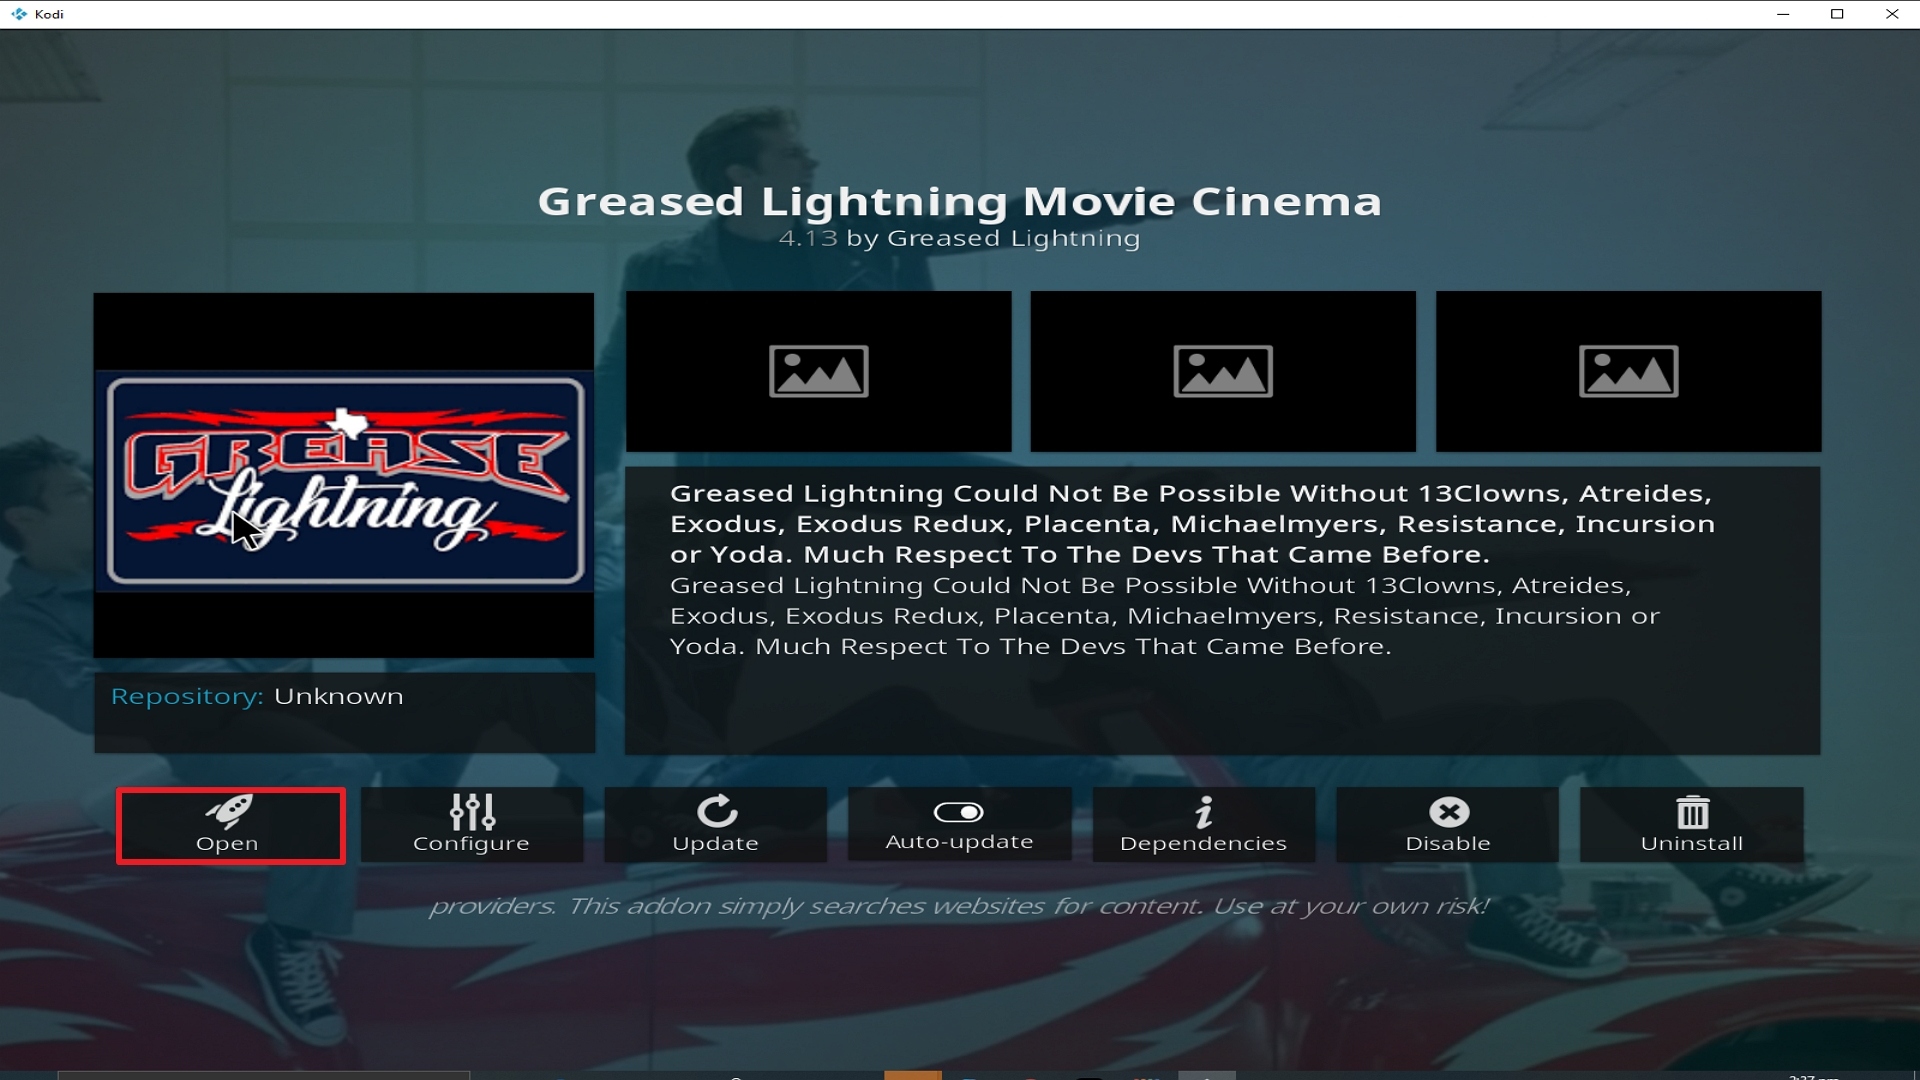
26. Click on Open to start the Grease Lightning add-on.

Step 26 Installing Grease Lightning addon on Kodi


Why should you use Kodi with a VPN?

If you are fond of streaming free content on Kodi, I recommend you install a VPN for privacy, security, and anonymity purposes. A VPN like Surfshark will encrypt and mask your IP address to appear as an anonymous user on the internet service provider network. When this happens, no one will be able to track and monitor whatever activities you are doing online. 


Benefits of using a VPN

  • Bypass third-party monitoring and tracking
  • Private, security, and anonymity
  • Minimize throttling. 
  • Beat geolocation

Note: For more information about Surfshark, please read our Surfshark Review.


Install Surfshark on Firestick

Best Surfshark Deal


How to Install Surfshark VPN on Firestick

If your Firestick still has the older interface, read this article to learn how to update it: Update Firestick Interface.

Follow our screenshots below to install the SurfShark VPN app on your Fire TV stick.

1. Go to the Home screen of your Firestick.

step 1 Install Surfshark VPN on Firestick


2. Navigate towards the Find tab. Press the Search button from the resulting dropdown.

step 2 Install Surfshark VPN on Firestick


3. Type in the keyword of SurfShark and select from the suggestions that will appear.

step 3 Install Surfshark VPN on Firestick


4. Click the official SurfShark icon from your search results.

step 4 Install Surfshark VPN on Firestick


5. Press the Download (You own it) button.

step 5 Install Surfshark VPN on Firestick


6. The SurfShark VPN installer will download on your device.

step 6 Install Surfshark VPN on Firestick


7. SurfShark VPN’s app will automatically install itself on your Fire TV stick.

step 7 Install Surfshark VPN on Firestick


8. Press the Open button after completing SurfShark VPN’s installation process.

step 8 Install Surfshark VPN on Firestick


9. Please wait for the SurfShark VPN to load its user interface.

step 9 Install Surfshark VPN on Firestick


10. You can now log in with your SurfShark VPN account credentials.

step 10 Install Surfshark VPN on Firestick

Learn more about Surfshark and Grab the Best Surfshark Deal Now!


Install Surfshark on Firestick

Best Surfshark Deal


Other VPNs to Consider

NordVPN (Best for Streaming)

Best Features

  • 5000+ Server in 50+ Countries 
  • Military-Grade Encryption
  • Fast Connection Speed
  • Suitable to a lot of devices
  • No-Log Policy

Prices
  • Complete $5.89 per month (64% Discount)
  • Plus $4.59 per month (56% Discount)
  • Standard $3.69 per month (55% Discount)

Best Features

  • 750+ High-speed VPN Servers in 43 Locations
  • Military-Grade Encryption
  • Fastest HD Streaming and Gaming
  • 30-Day Money-Back Guarantee
  • Unlimited Data & Devices
  • No-Log Policy

Prices
  • 3 Years $1.99 per month (82% Discount)
  • 1 Years $3.29 per month (70% Discount)
  • 1 Month $10.99 per month

IPVanish VPN (Most Secure)

Best Features

  • 1200+ Servers in 60+ Countries around the world
  • Unlimited Connections
  • No-Log Policy
  • Top Notch Military-Grade VPN Protocols and Encryptions
  • 100% Safe and Secured
  • Most Trusted VPN
  • Best VPN for Firestick
  • 30-Day Money-Back Guarantee

Prices
  • Yearly $3.99 per month (63% Discount) – 30 days risk free + Ransomware & Malware Protection
  • Quarterly $5.32 per month (51% Discount)
  • Monthly $10.99 per month


For more VPN discounts, go to ReviewVPN Deals and purchase the best VPN for you.


Install Gaia Kodi Addon

Gaia Kodi Addon

In this article, we will help you install Gaia Kodi Addon on Firestick.


Gaia Image

Source: http://repo.gaiakodi.com  

Gaia deserves to be in the hall of fame when it comes to the Kodi addon. A fork of the Bubbles addon from 2017, which then went dark. The Gaia developer forked their code and has kept Gaia going ever since, making it one of the oldest add ons around on Kodi.

Gaia has a habit of becoming popular after a big update (Gaia is currently on its 5th major version) then sinking down the rankings before shooting back up.

Gaia concentrates solely on Movies and TV Shows, with a massive range of content. As well as an incredible amount of settings and configurations.

We can’t think of another addon that is compatible with as many premium services, user nets, or different scraper libraries. You can get the very best out of Gaia by using it with a service like Real Debrid.

But, honestly your unlikely to not be able to find a stream for any content. Gaia now comes with Orion a faster system of downloading content from streams and reducing bandwidth for playback. As well as automatic playback which means Gaia will find the best working stream, and you can also set it to download the next episode in the background.


ANONYMOUSLY


Common Errors

Here’s a list of common errors you might come across with Gaia:

  • No stream available. An unlikely error with Gaia, but you can turn on and search for updated scraper lists in the Scraper settings. If the problem persists check our step by step fix guide above.
  • A script error. If you come across this error when installing Gaia, check that you are downloading it from the correct repository. Otherwise, chances are your Kodi installation may be corrupted. For more fixes, try some more in the guide linked above.
  • Cannot download Gaia. Always check you’ve got the right URL, try again just to check it’s not a server overload problem. If the problem persists read more here <LINK>
  • Olpair Streaming Error. The upside of using Real Debrid is you don’t have to renew Captcha on free servers. Olpair errors can generally be fixed by getting a new token. If that doesn’t work, try some more in the fixed guide linked above.

Review

Categories from the menu:

  • Promotions
  • Movies
  • Shows
  • Documentaries
  • Shorts
  • Kids
  • Search
  • Tools


Gaia is one of the best add ons out their hands down. It just has so many functions, settings, and configurations that one of its biggest problems was that it was so hard to set up initially.

Now that is a problem of the past, you can use the Reaper settings mode to get Gaia set up in 3 minutes or less.

That’s because Gaia links in with 10+ premium add ons, as well as a massive library or scrapers and UseNet interfaces. But for the less technical user, just follow the suggested installation instructions provided.

The fifth big update for Gaia which came out in June 2019 provides some awesome updated functions:

  • You can now binge-watch episodes Netflix style, Gaia’s will scrape and load the next episode in the background moving you seamlessly from one episode to the next
  • Emby is now supported which means you can scrape and stream from their servers
  • Both the internal and Orion UseNet has been upgraded meaning that you can get even more content scrapers that are continuously updated
  • IMDB watchlists can be exported to your Trakt account
  • Orion now has a vastly improved caching system, which reduces the amount of time it takes to load content, and less bandwidth is taken up. Great news for those who have slower internet connections

YOUR INTERNET ACTIVITY IS BEING WATCHED

ReviewVPN cannot attest to the legality, security and privacy of the applications discussed on this site. It is highly recommended that you use a VPN service while streaming or using Kodi.

Currently, your IP 216.73.217.150 is visible to everyone and your Browser is being tracked by Advertisers & ISP Provider.

Save 65% Now

Limited Time Offer

Here are the main reasons why you must use a VPN:

  • Your activities are hidden from your ISP, the government, and from the apps you are using.
  • You can access additional movies and TV streams.
  • ISP attempts to throttle are thrwarted thus reducing buffering issues.
  • Geographically restricted content like Netflix and Hulu can be unblocked.

A VPN works be replacing your ISP-assigned IP address and creating an encrypted tunnel. We recommend the no log service offered by IPVanish. It works well on a Firestick and offers the fastest possible speeds.

Special Limited Time Offer - Get IPVanish


Legal Disclaimer: ReviewVPN.com does not encourage or endorse any illegal activity involved in the usage of services and applications referenced on this site. We do not verify the licensing agreements of services. The end-user is wholly responsible for ensuring that any media accessed through these services does not violate copyright and/or licensing laws. ReviewVPN does not promote, link to, or receive compensation from any Apps and IPTV services.


Install Surfshark on Firestick

Best Surfshark Deal


How to Install Gaia Addon on Kodi with Screenshots

  1. From the home screen, select the cogwheel at the upper left.

Step 1 Installing Gaia addon on Kodi


2. Select System in the bottom right corner.

Step 2 Installing Gaia addon on Kodi


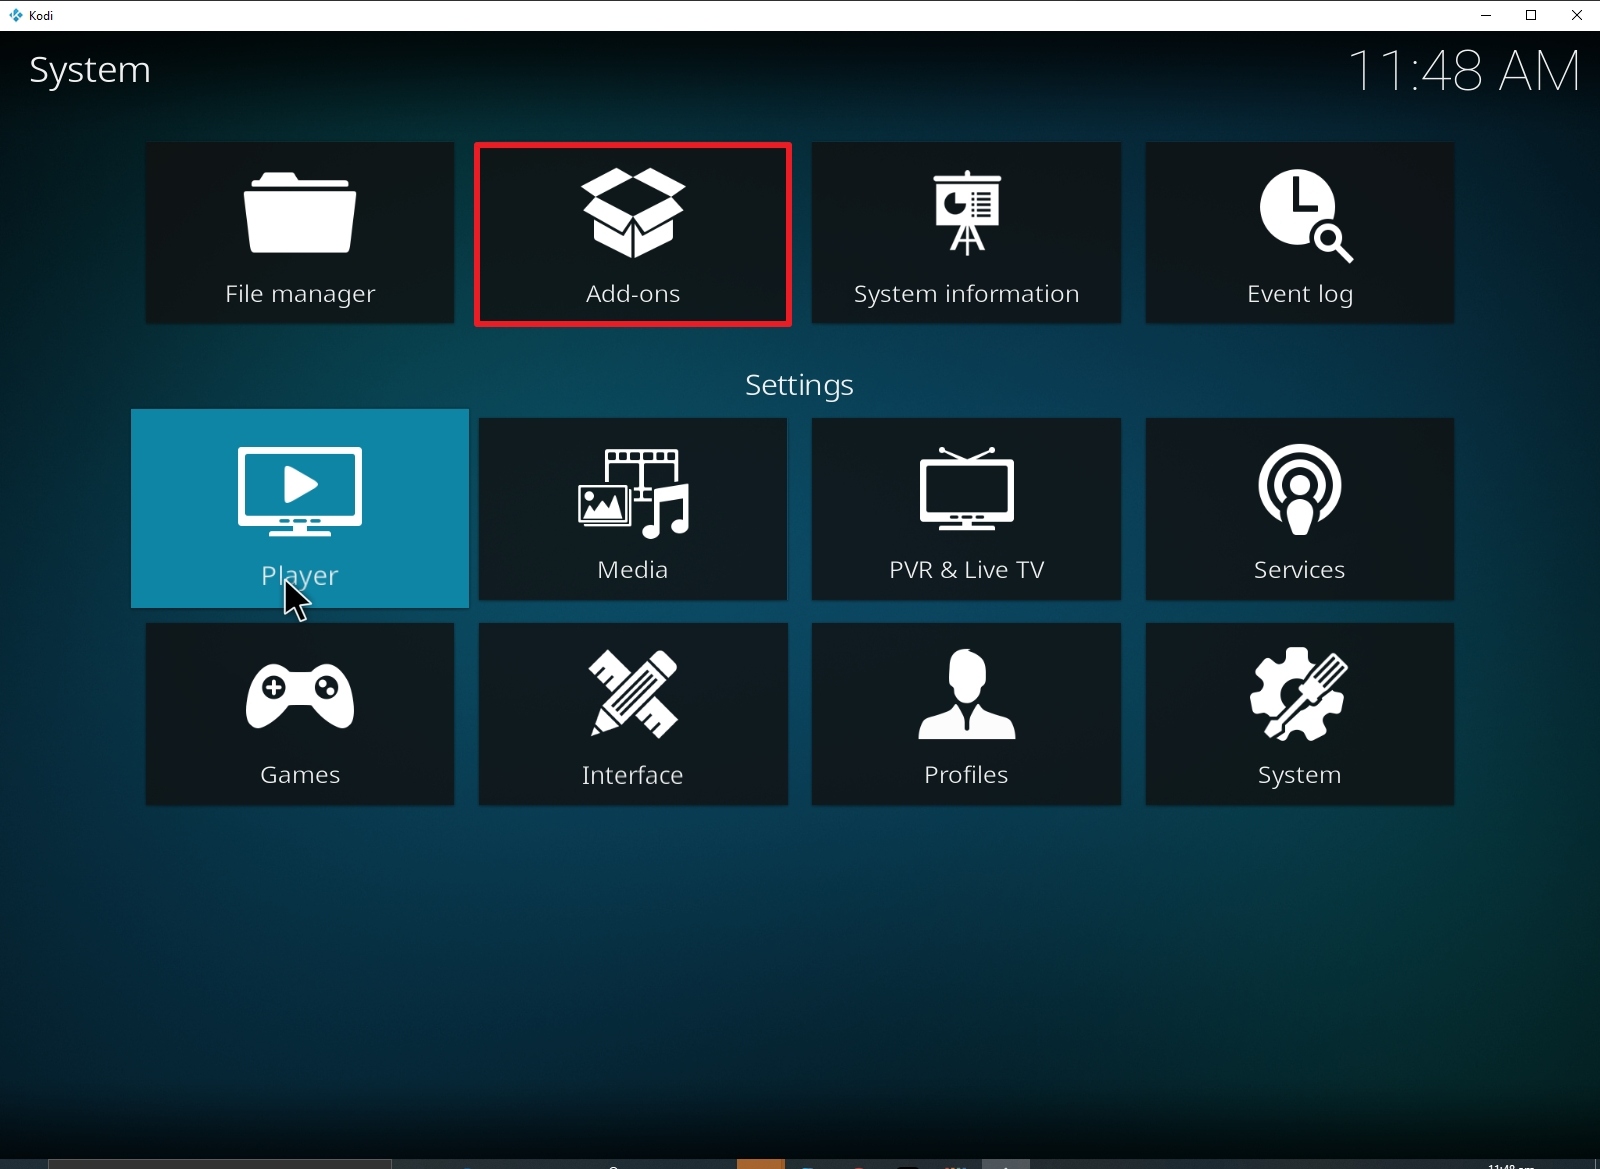
3. Select Add-ons on the left side of the screen.

Step 3 Installing Gaia addon on Kodi


4. Select Unknown sources.

Step 4 Installing Gaia addon on Kodi


5. Click Yes to allow unknown sources.

Step 5 Installing Gaia addon on Kodi


6. Select File manager.

Step 6 Installing Gaia addon on Kodi


7. Click Add source.

Step 7 Installing Gaia addon on Kodi


8. Click on <None>.

Step 8 Installing Gaia addon on Kodi


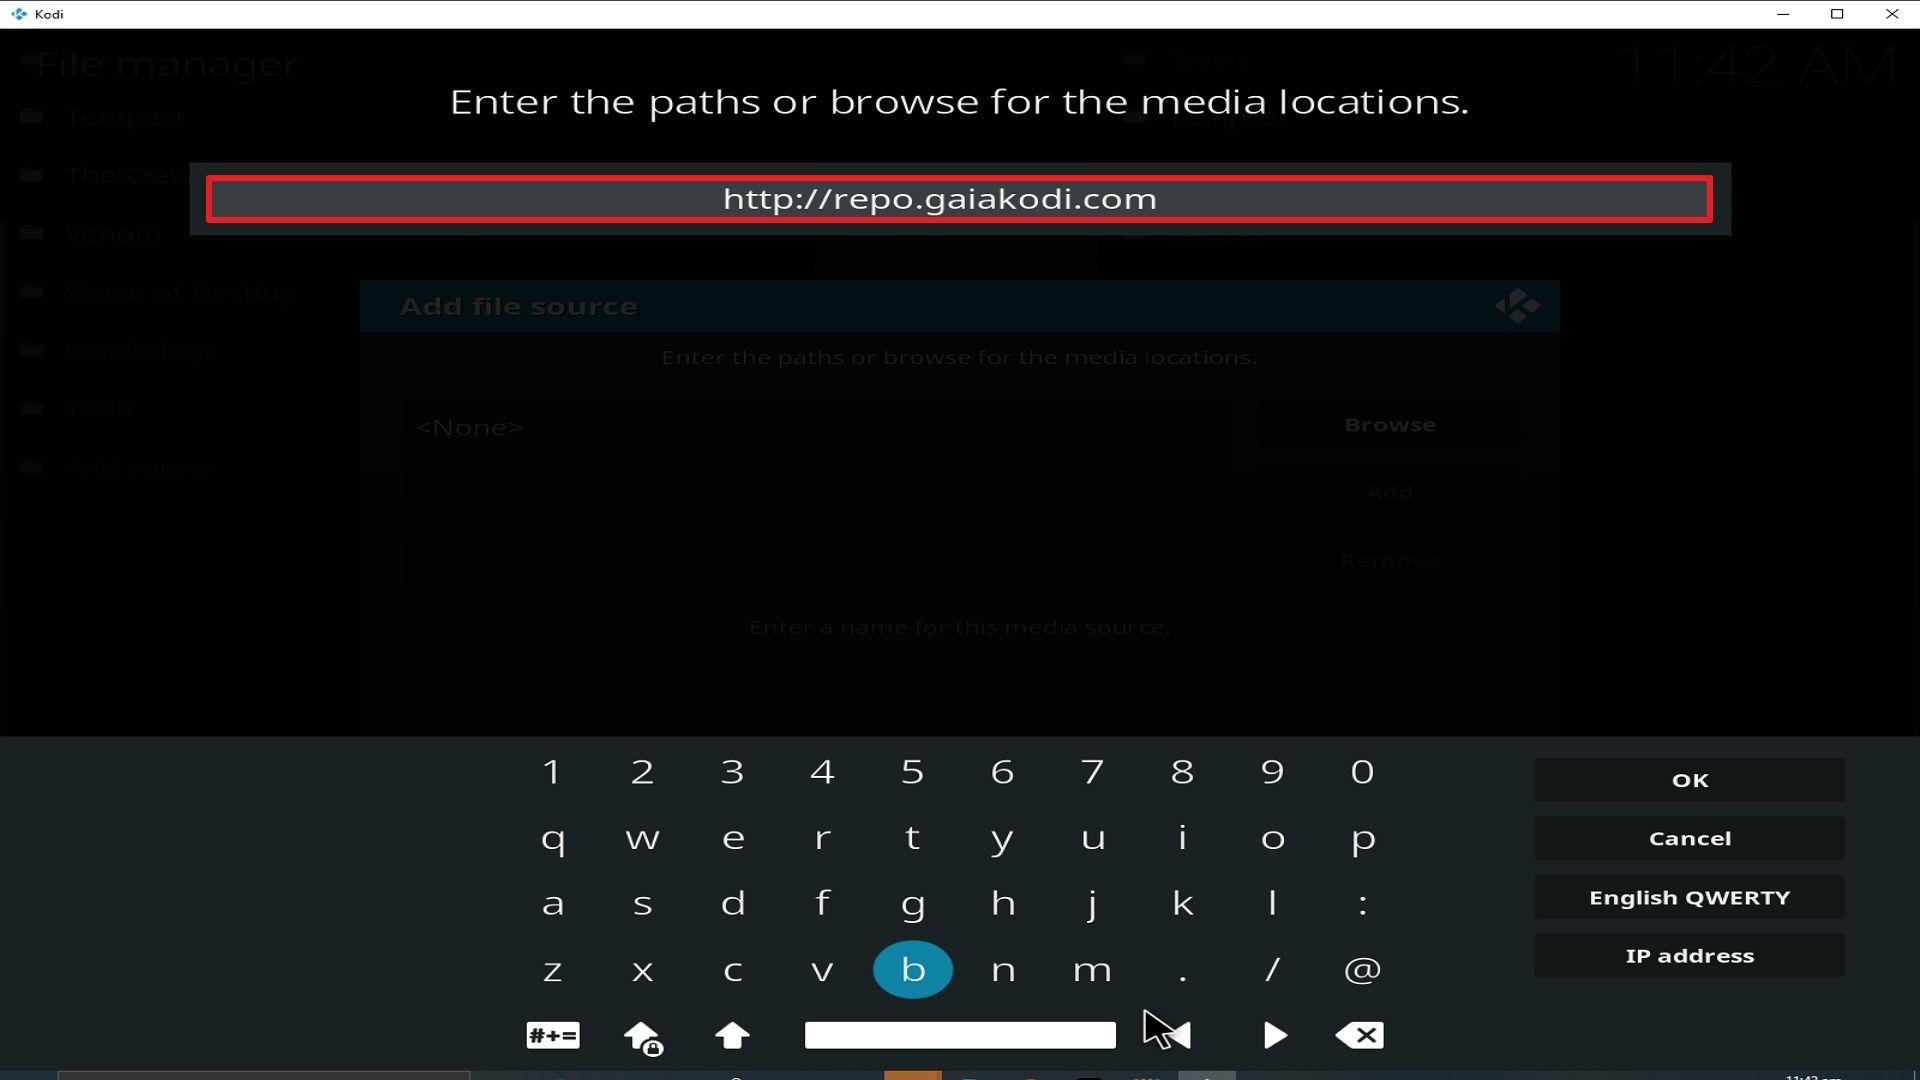
9. Type exactly: http://repo.gaiakodi.com

Step 9 Installing Gaia addon on Kodi


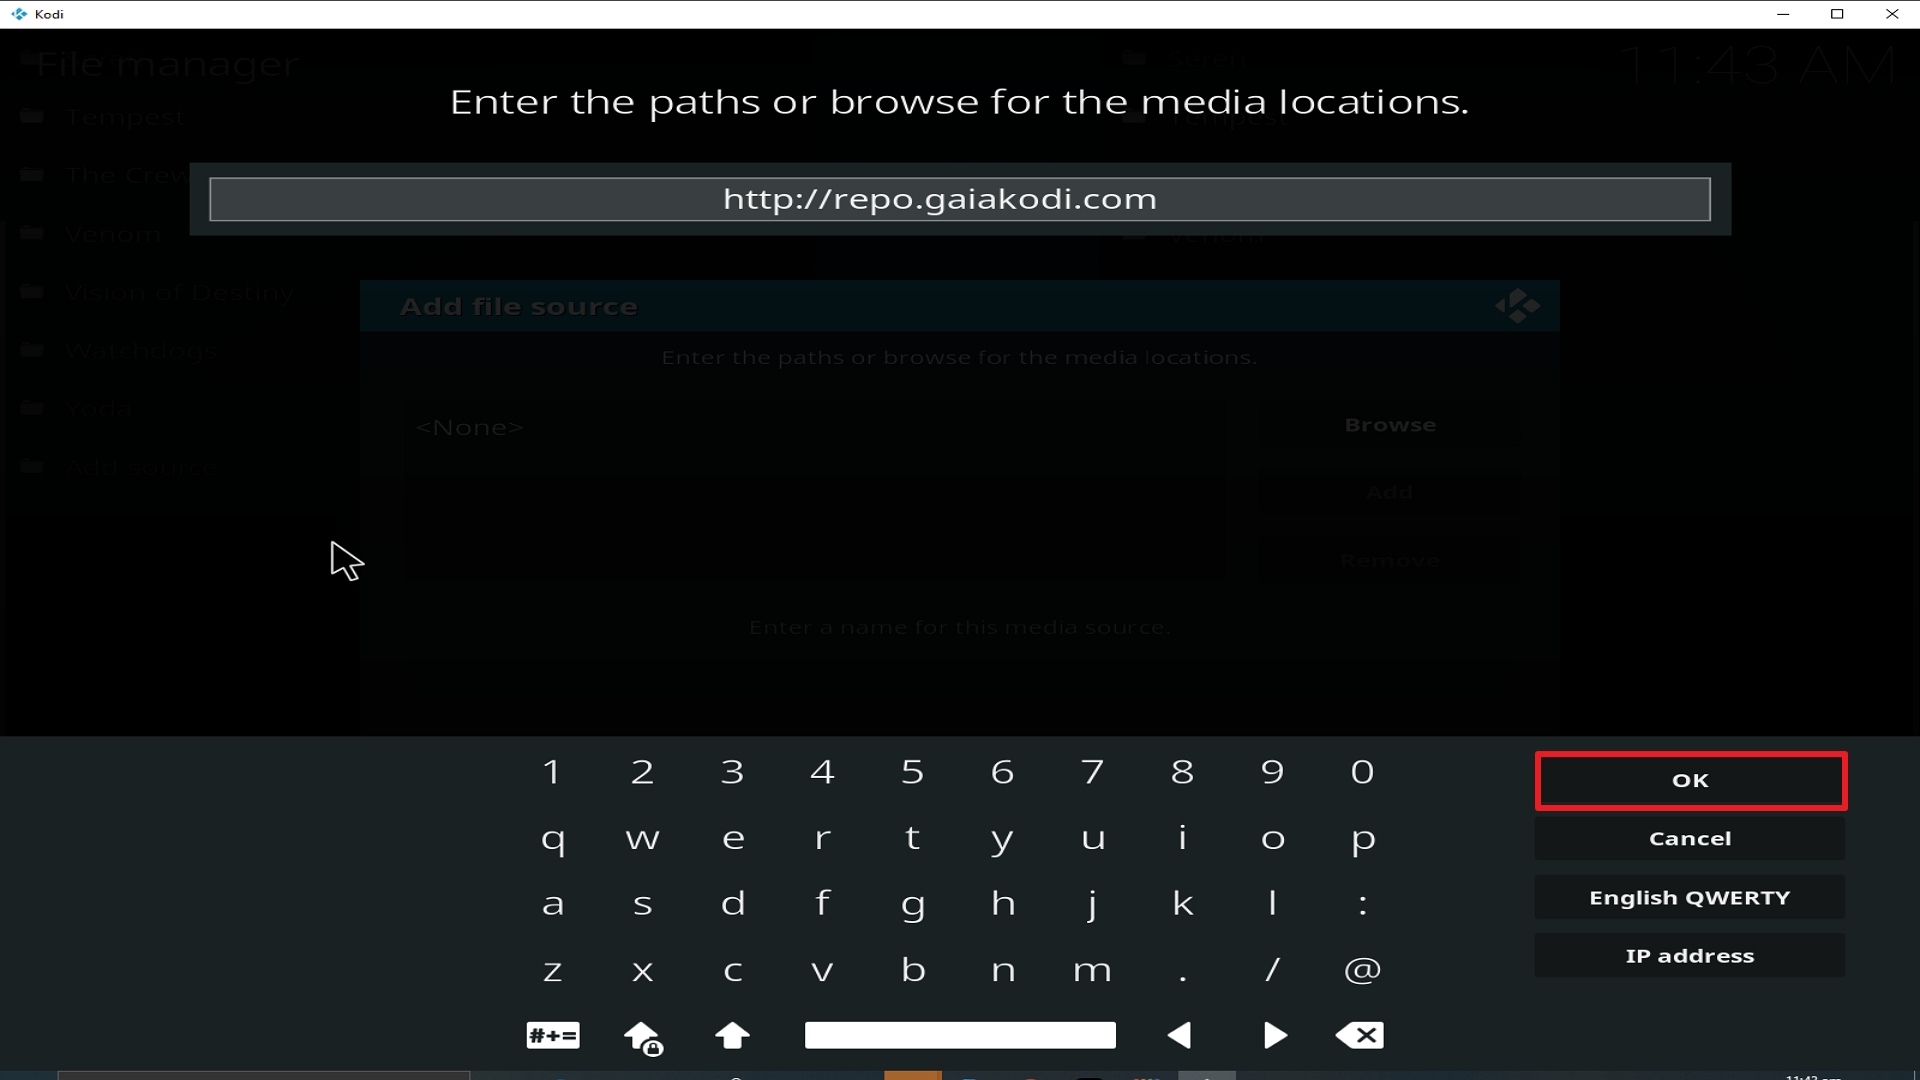
10. Click on OK.

Step 10 Installing Gaia addon on Kodi


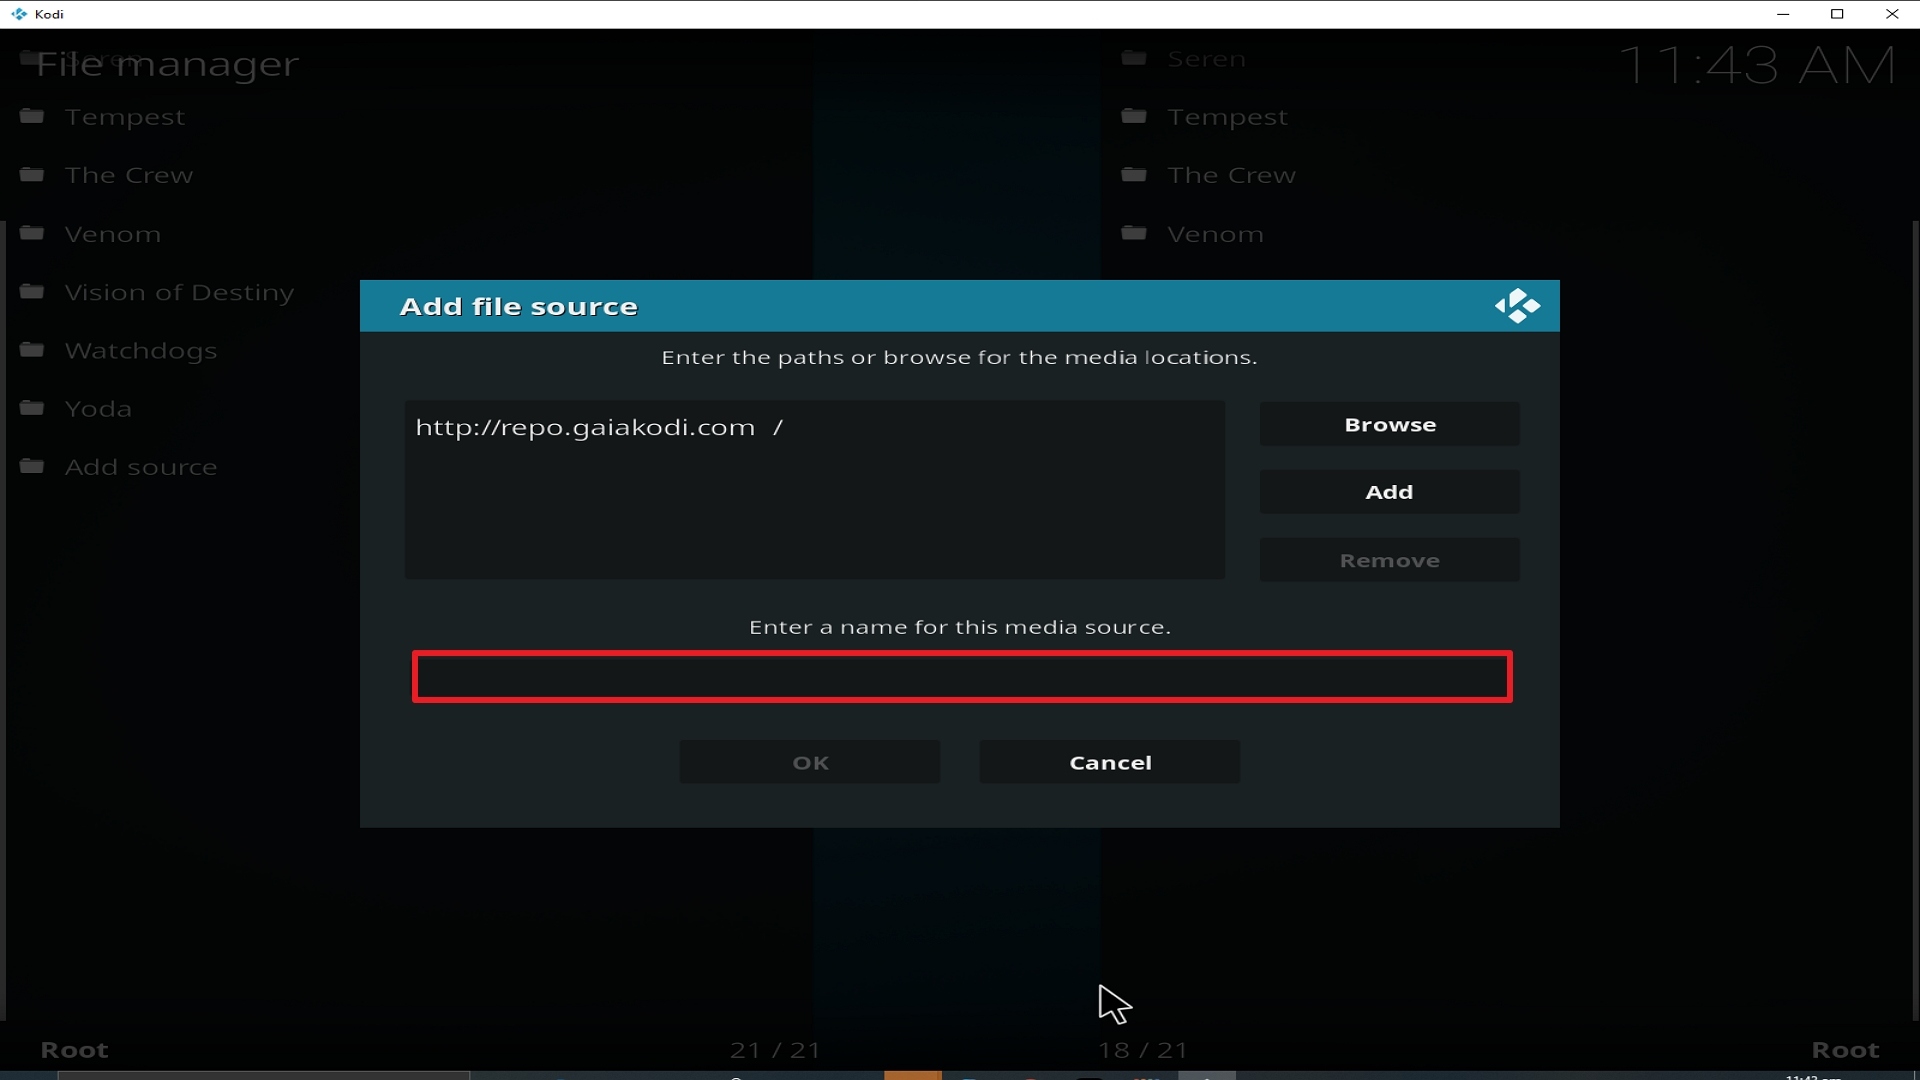
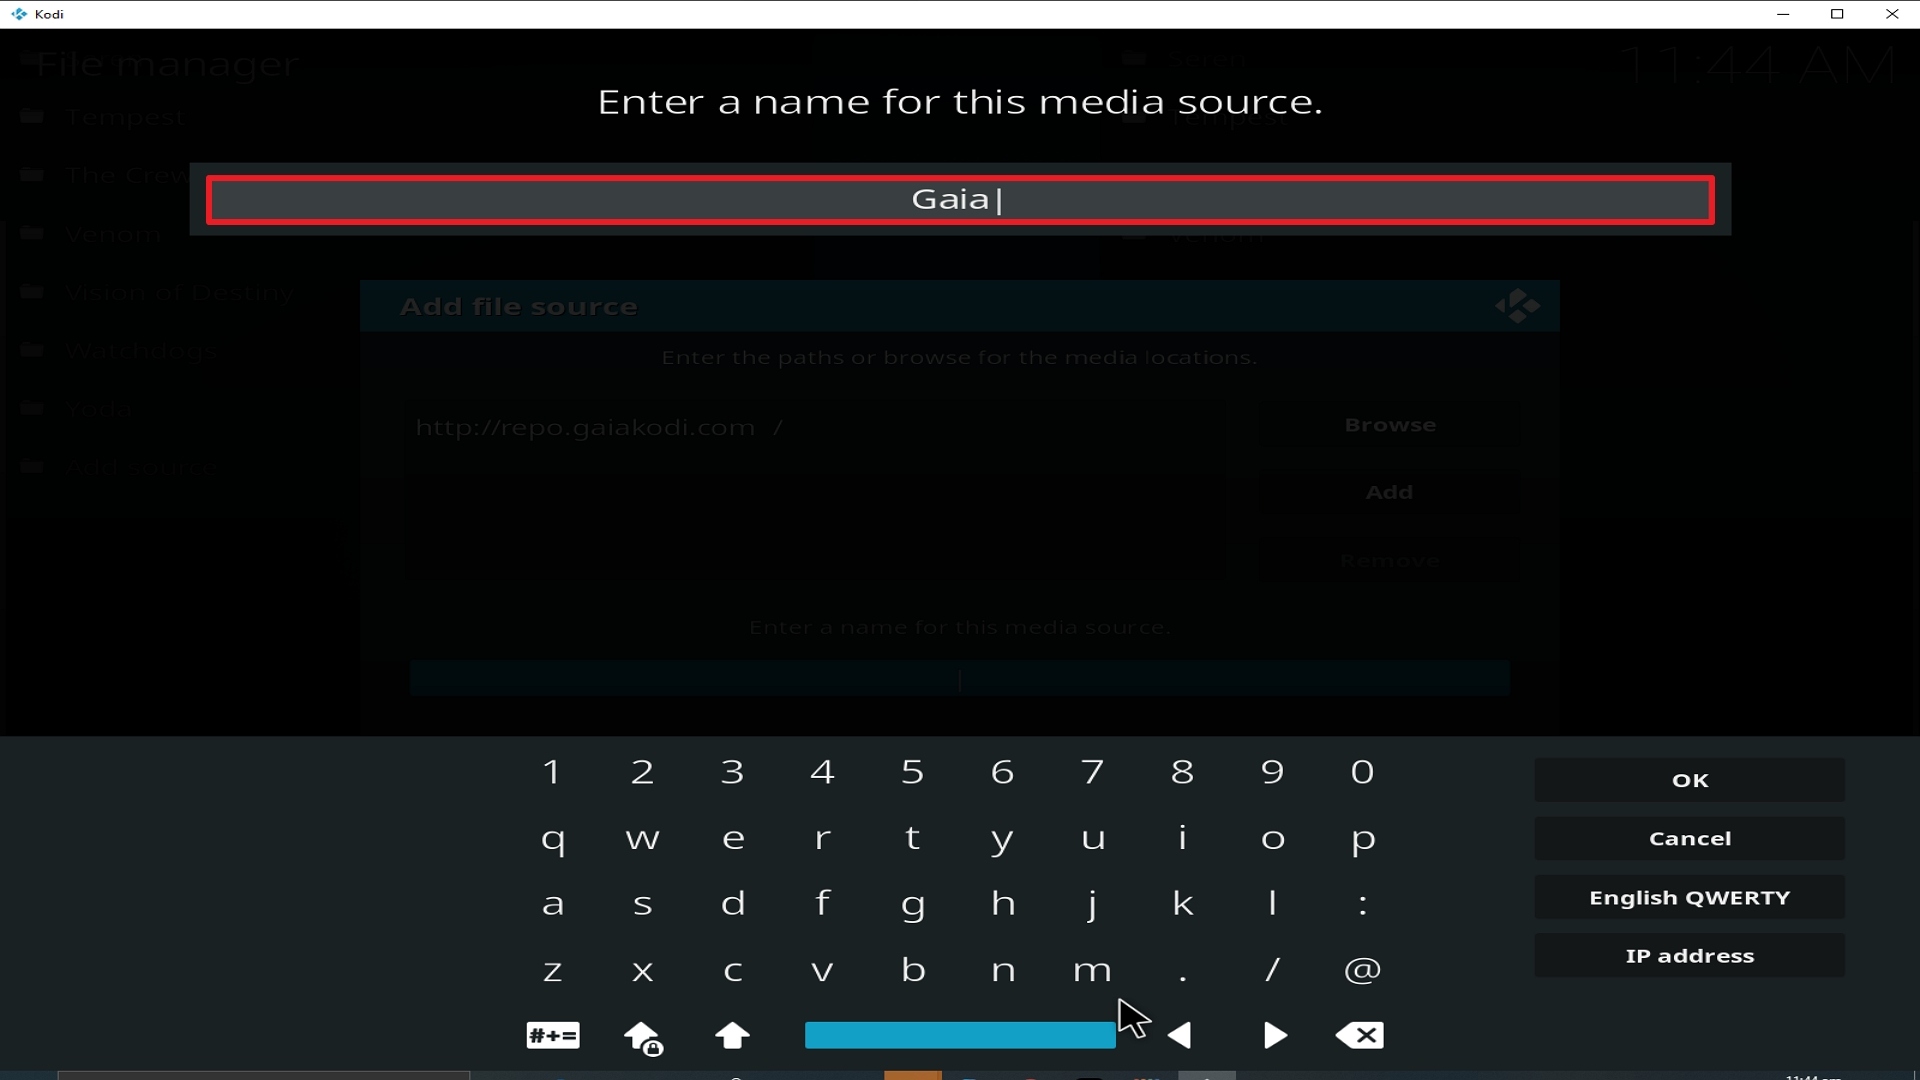
11. Select enter a name for this media source.

Step 11 Installing Gaia addon on Kodi


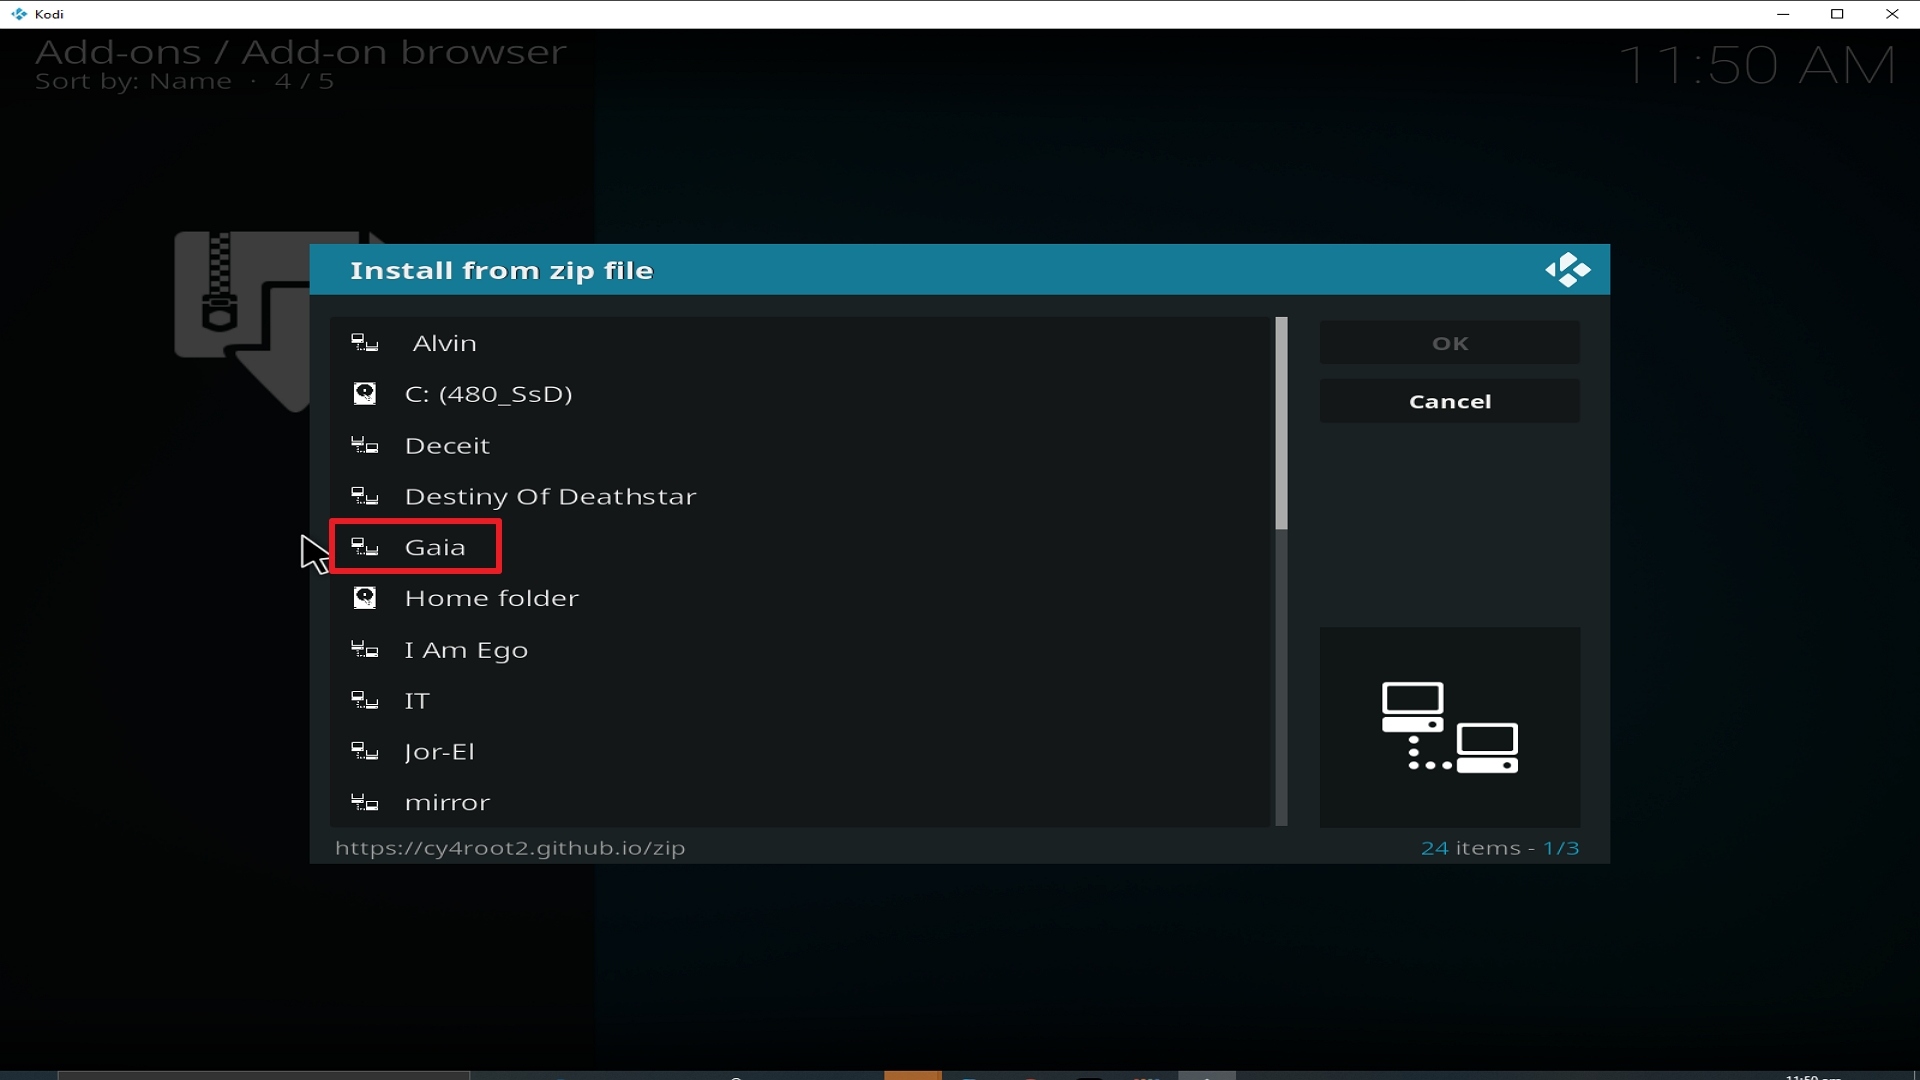
12. Name is Gaia (this part isn’t critical as long as you remember the name).

Step 12 Installing Gaia addon on Kodi


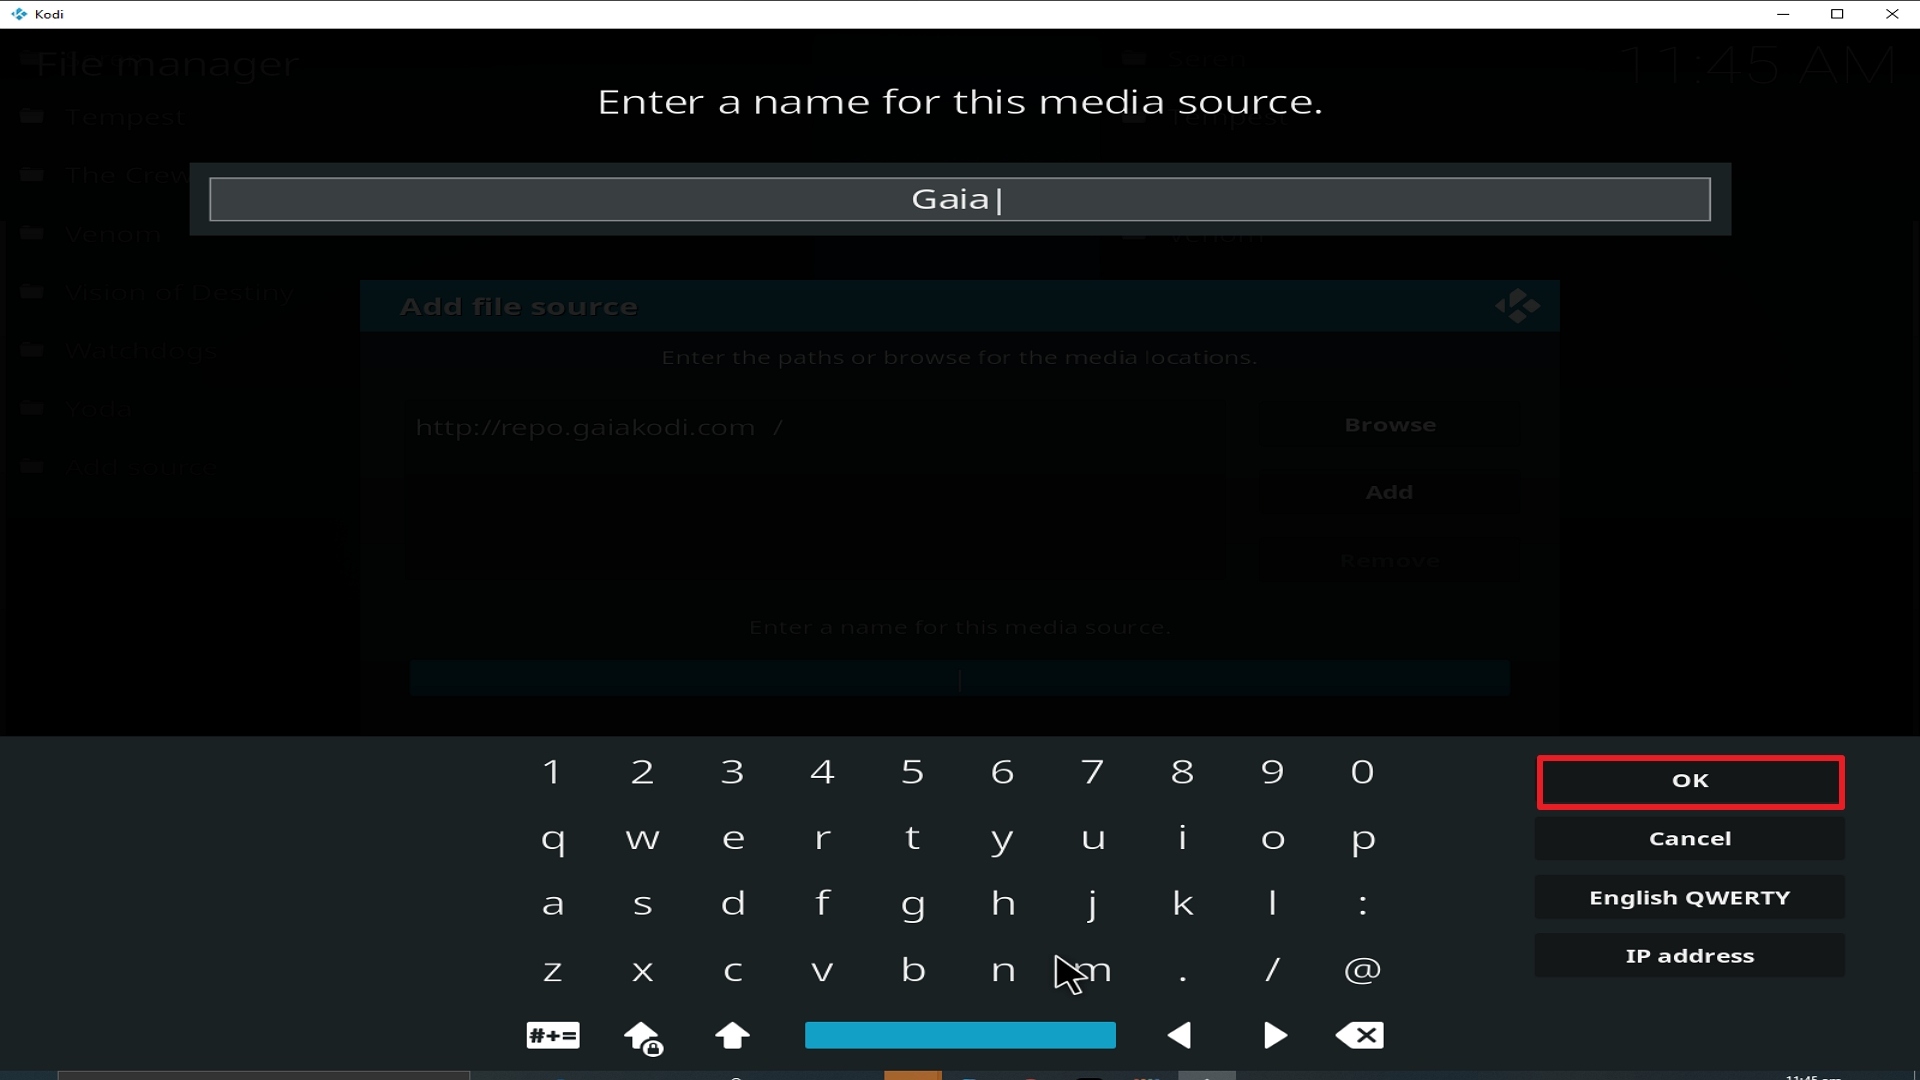
13. Click on OK.

Step 13 Installing Gaia addon on Kodi


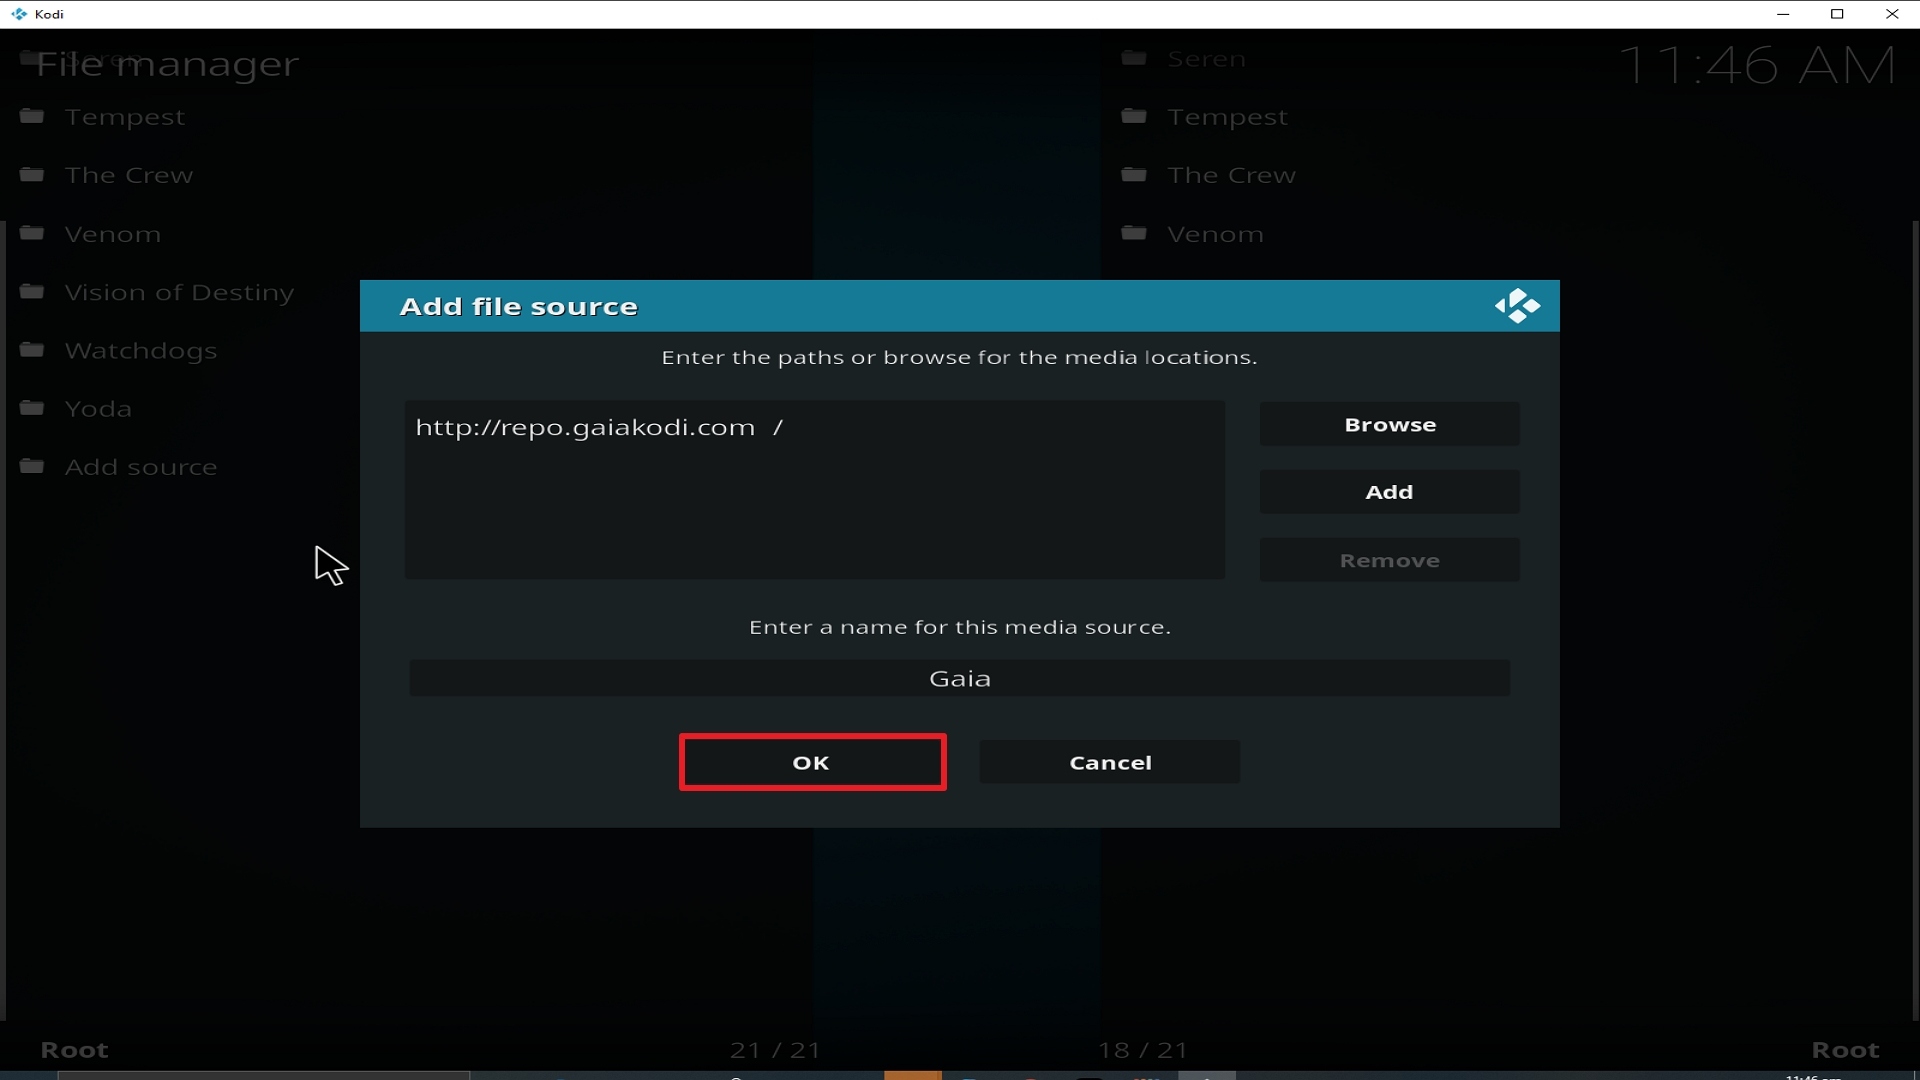
14. Click on OK.

Step 14 Installing Gaia addon on Kodi


15. Take one step back and click on Add-ons.

Step 15 Installing Gaia addon on Kodi


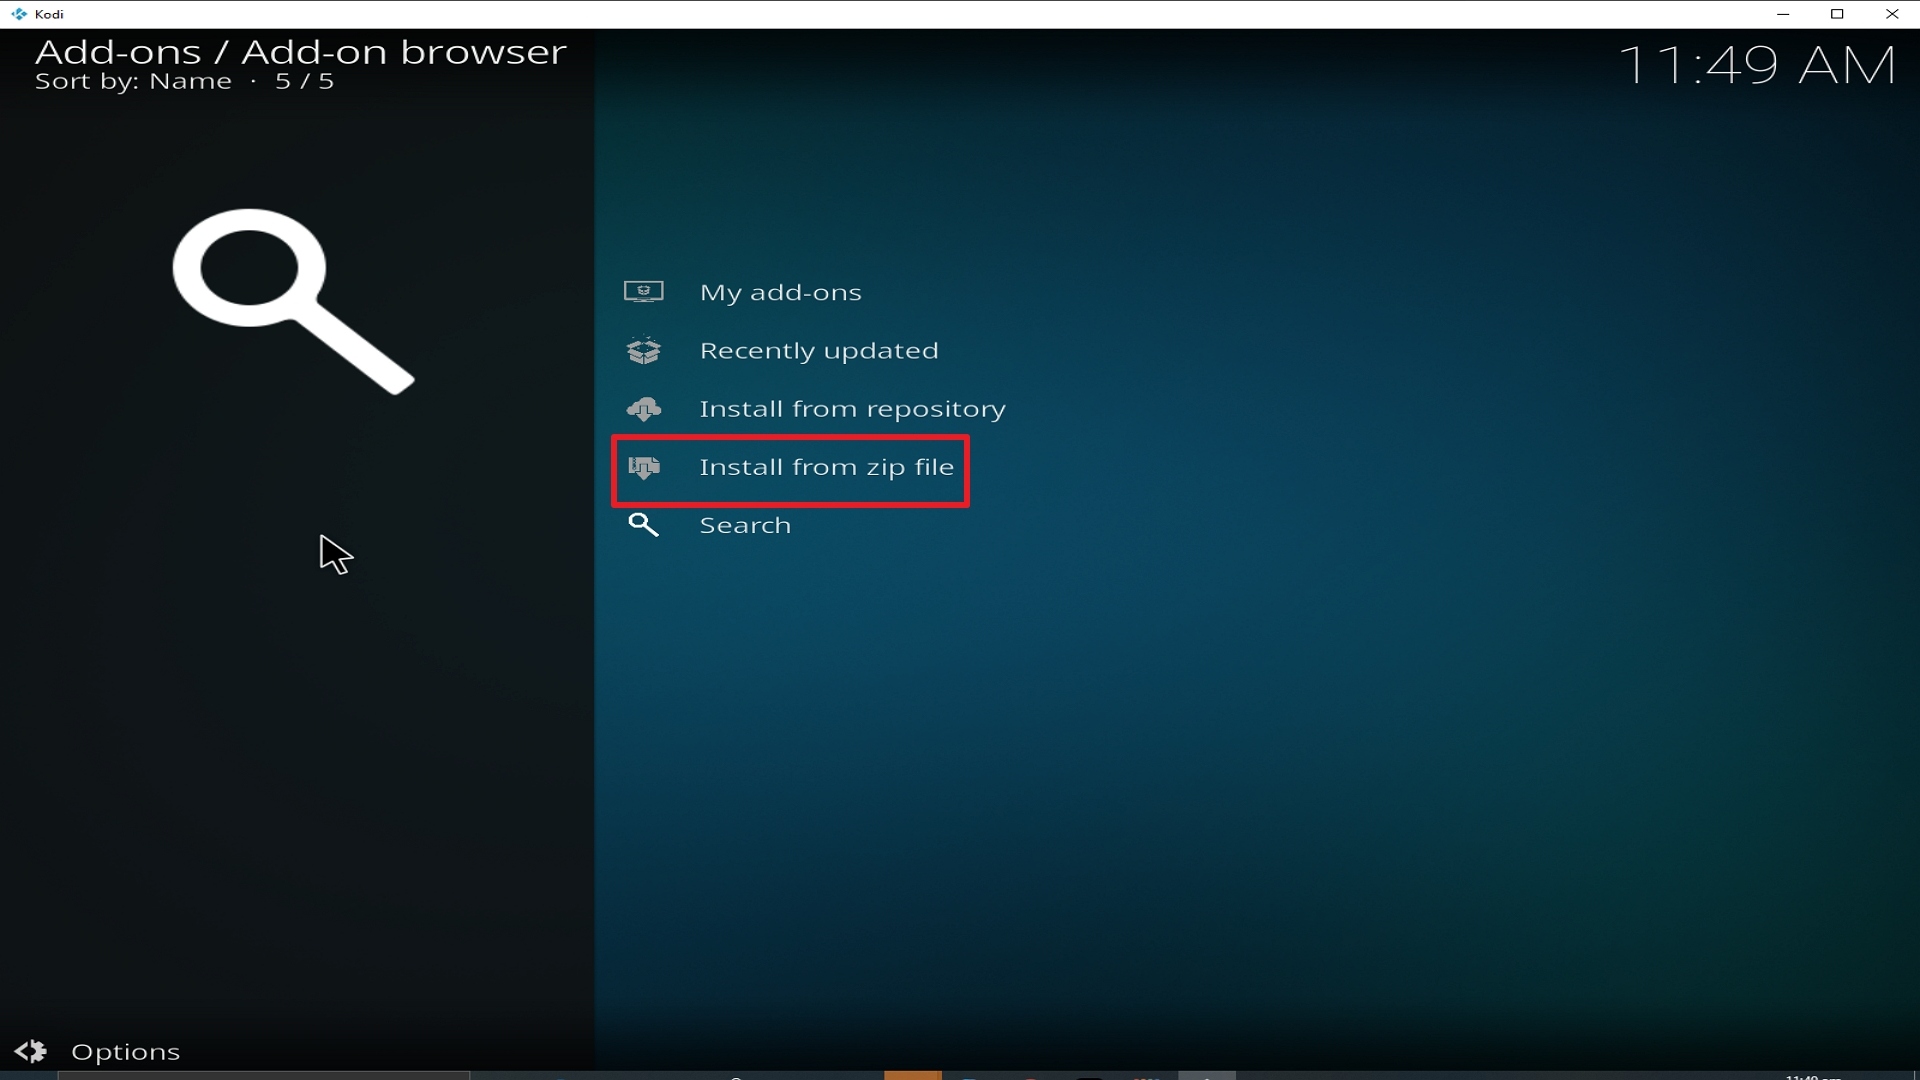
16. Select install from zip file.

Step 16 Installing Gaia addon on Kodi


17. Click on Gaia (or whatever you named the source).

Step 17 Installing Gaia addon on Kodi


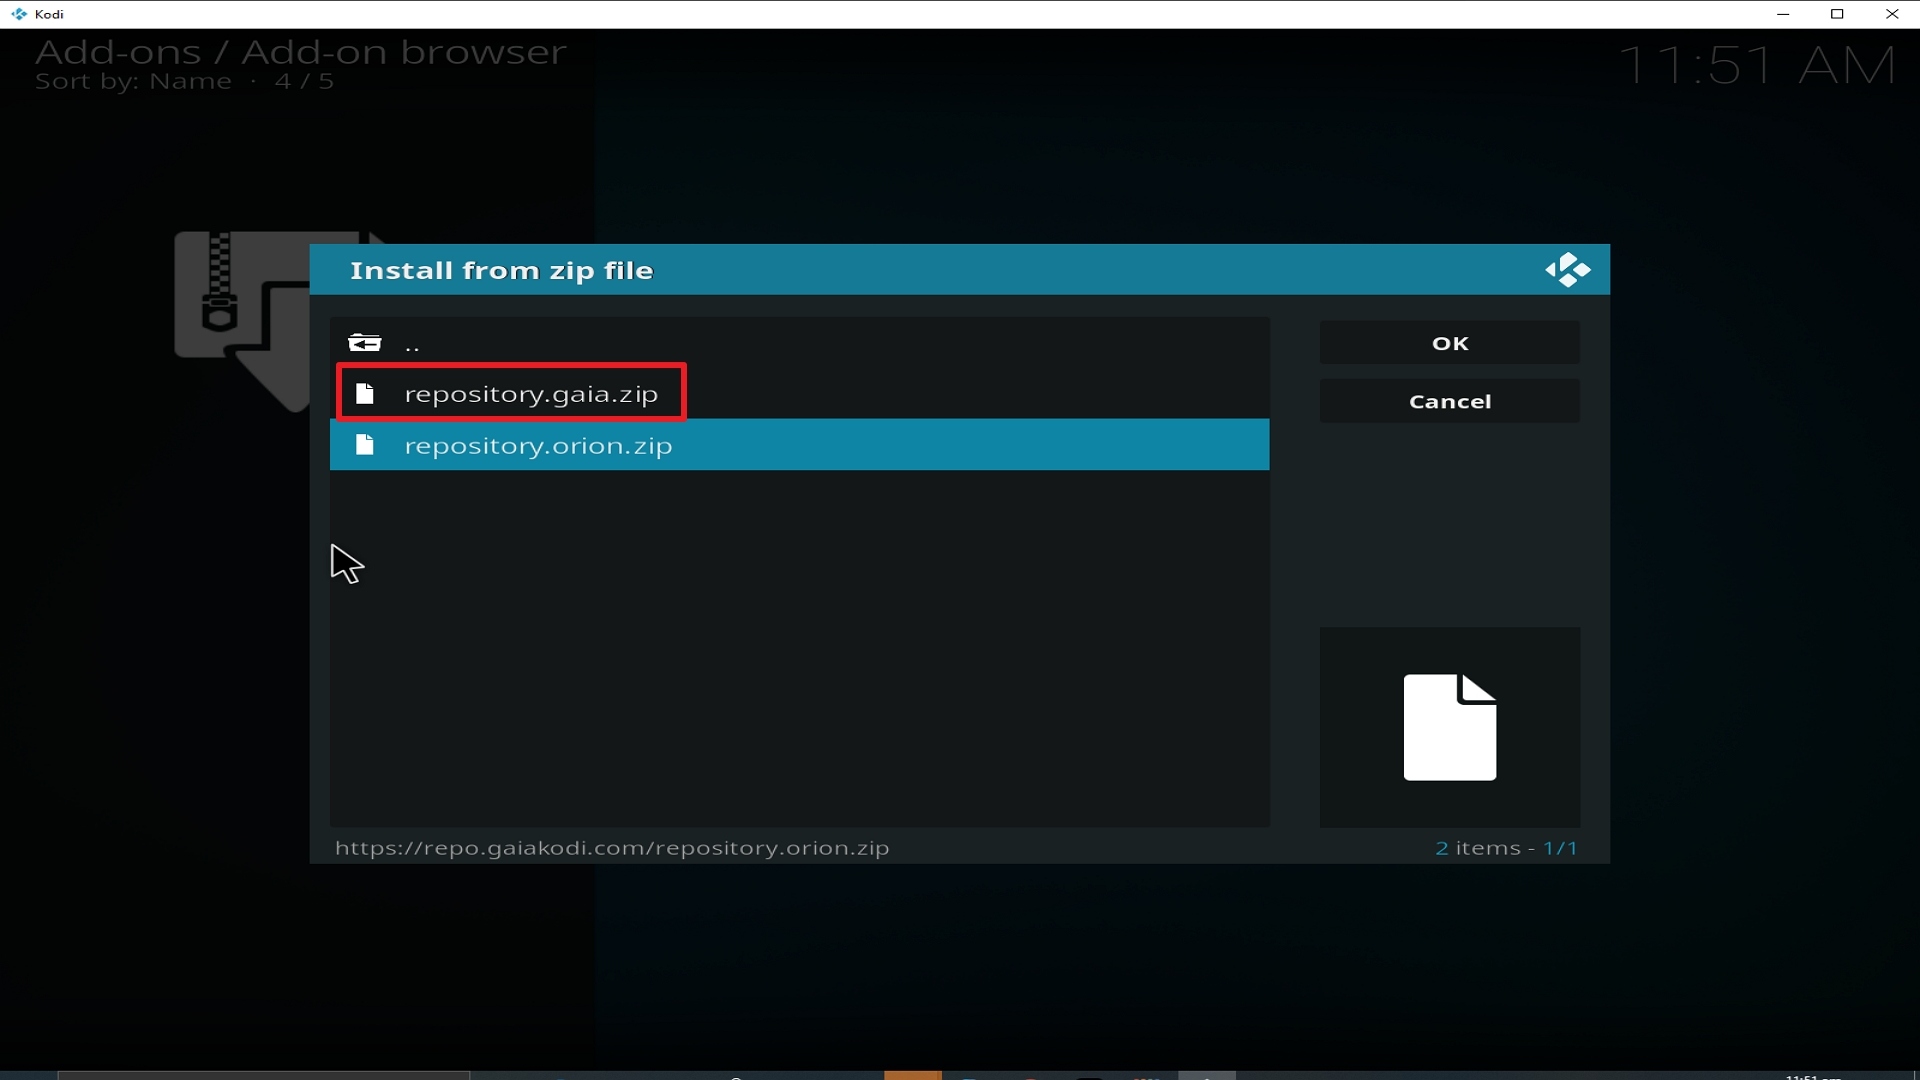
18. Click on repository.gaia.zip

Step 18 Installing Gaia addon on Kodi


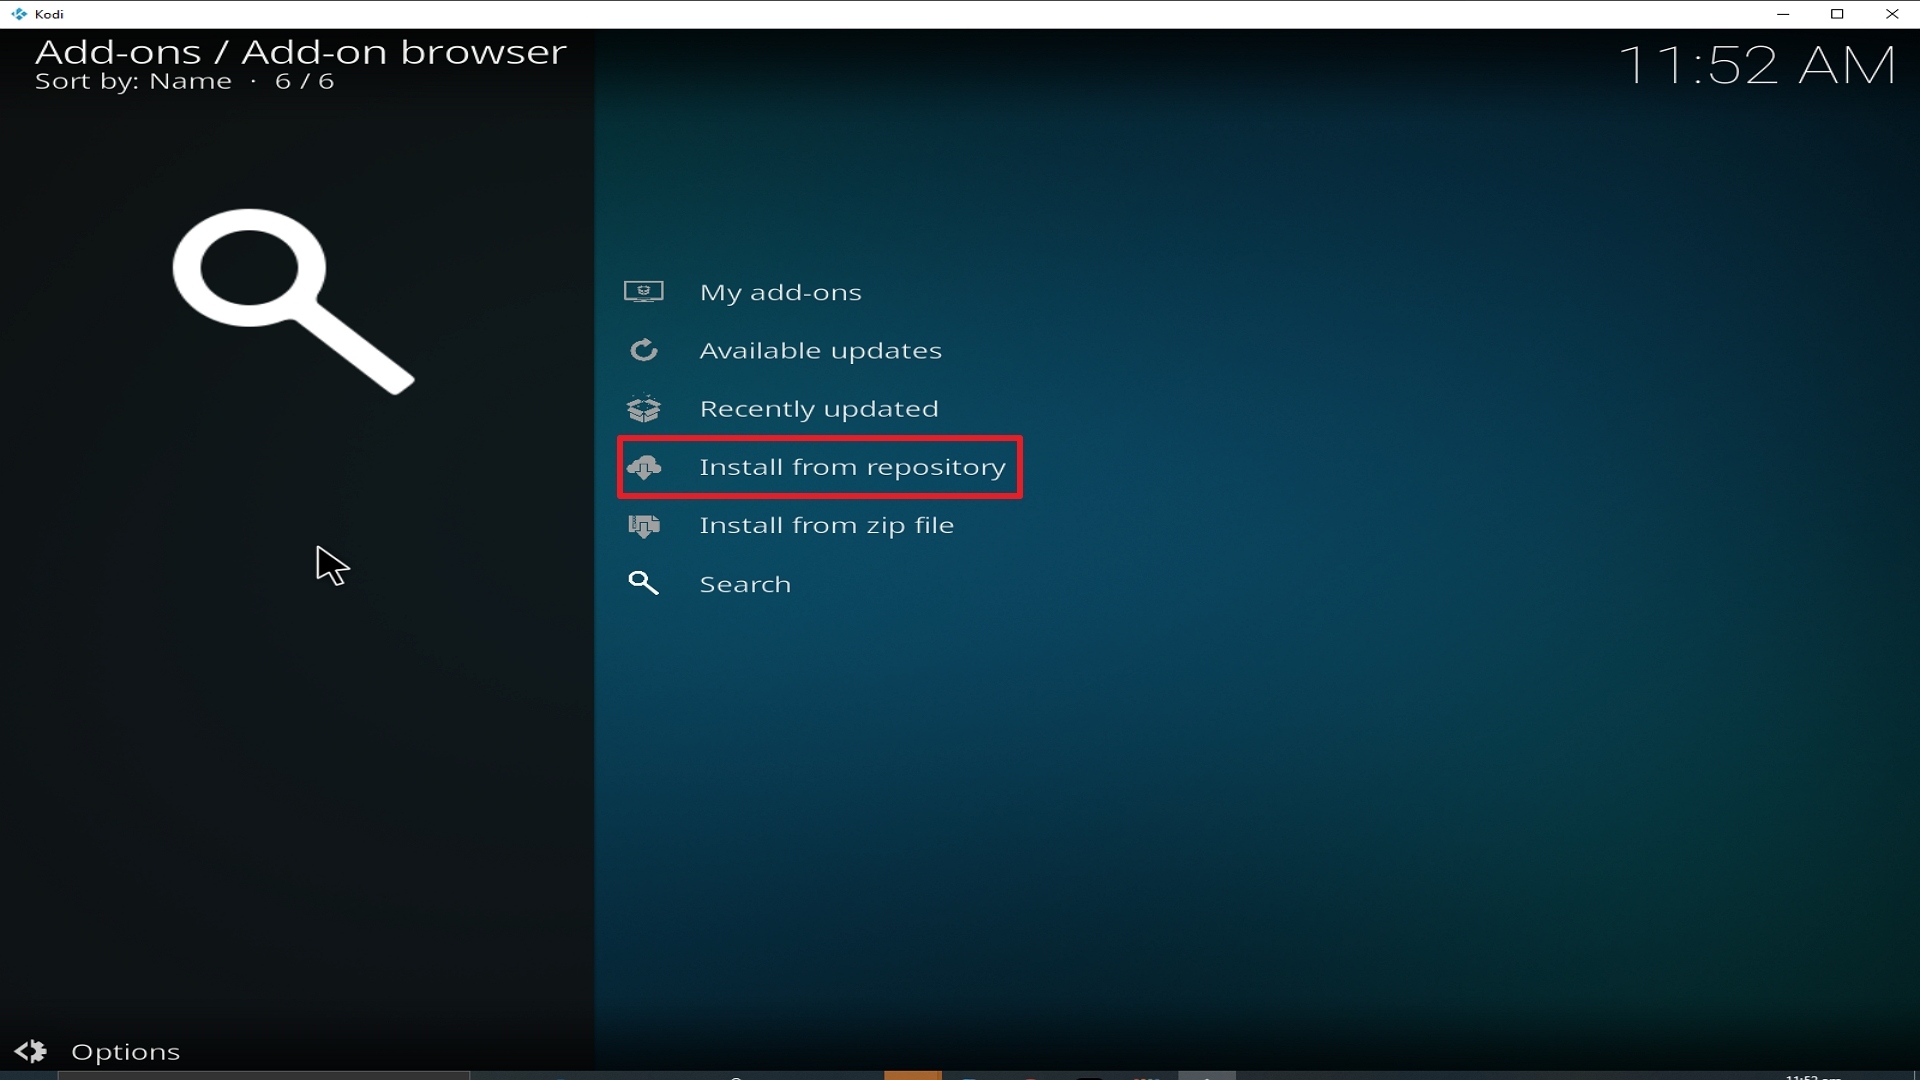
19. Select on Install from repository.

Step 19 Installing Gaia addon on Kodi


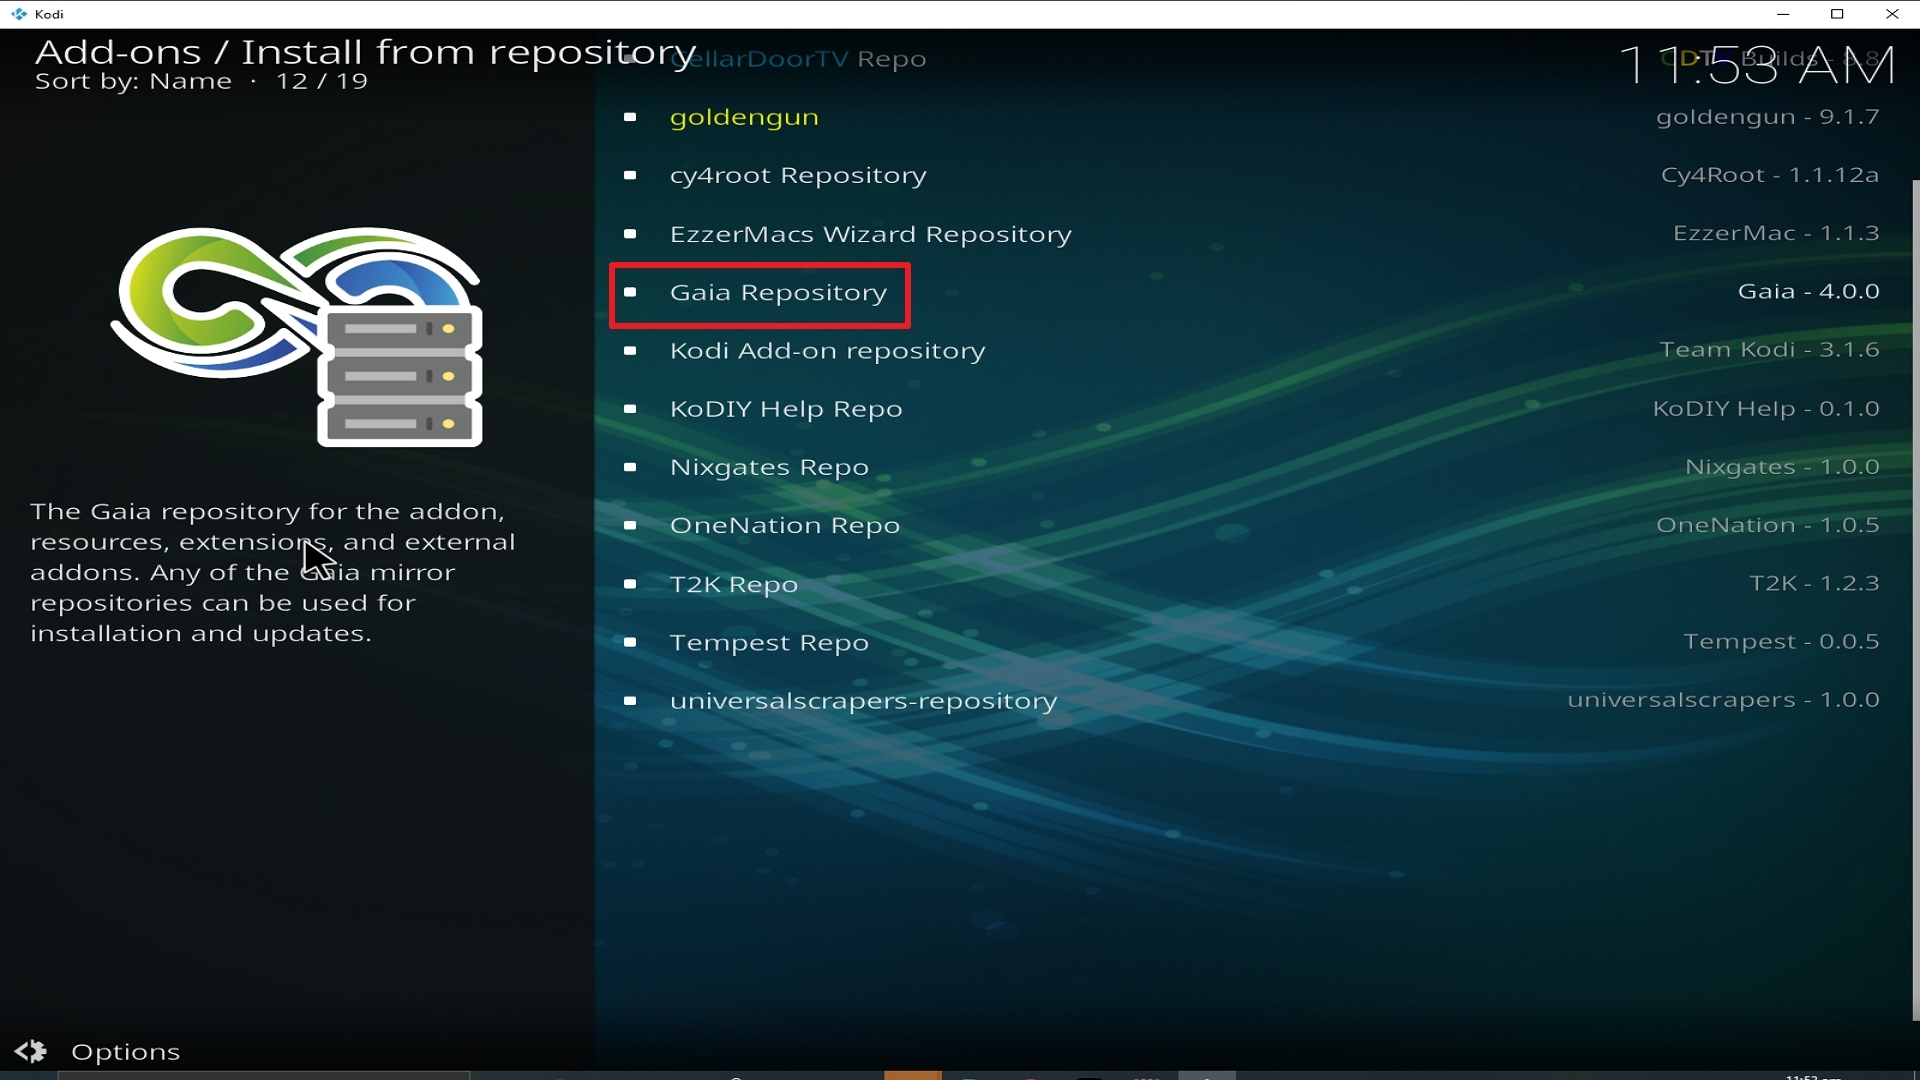
20. Click on Gaia Repo.

Step 20 Installing Gaia addon on Kodi


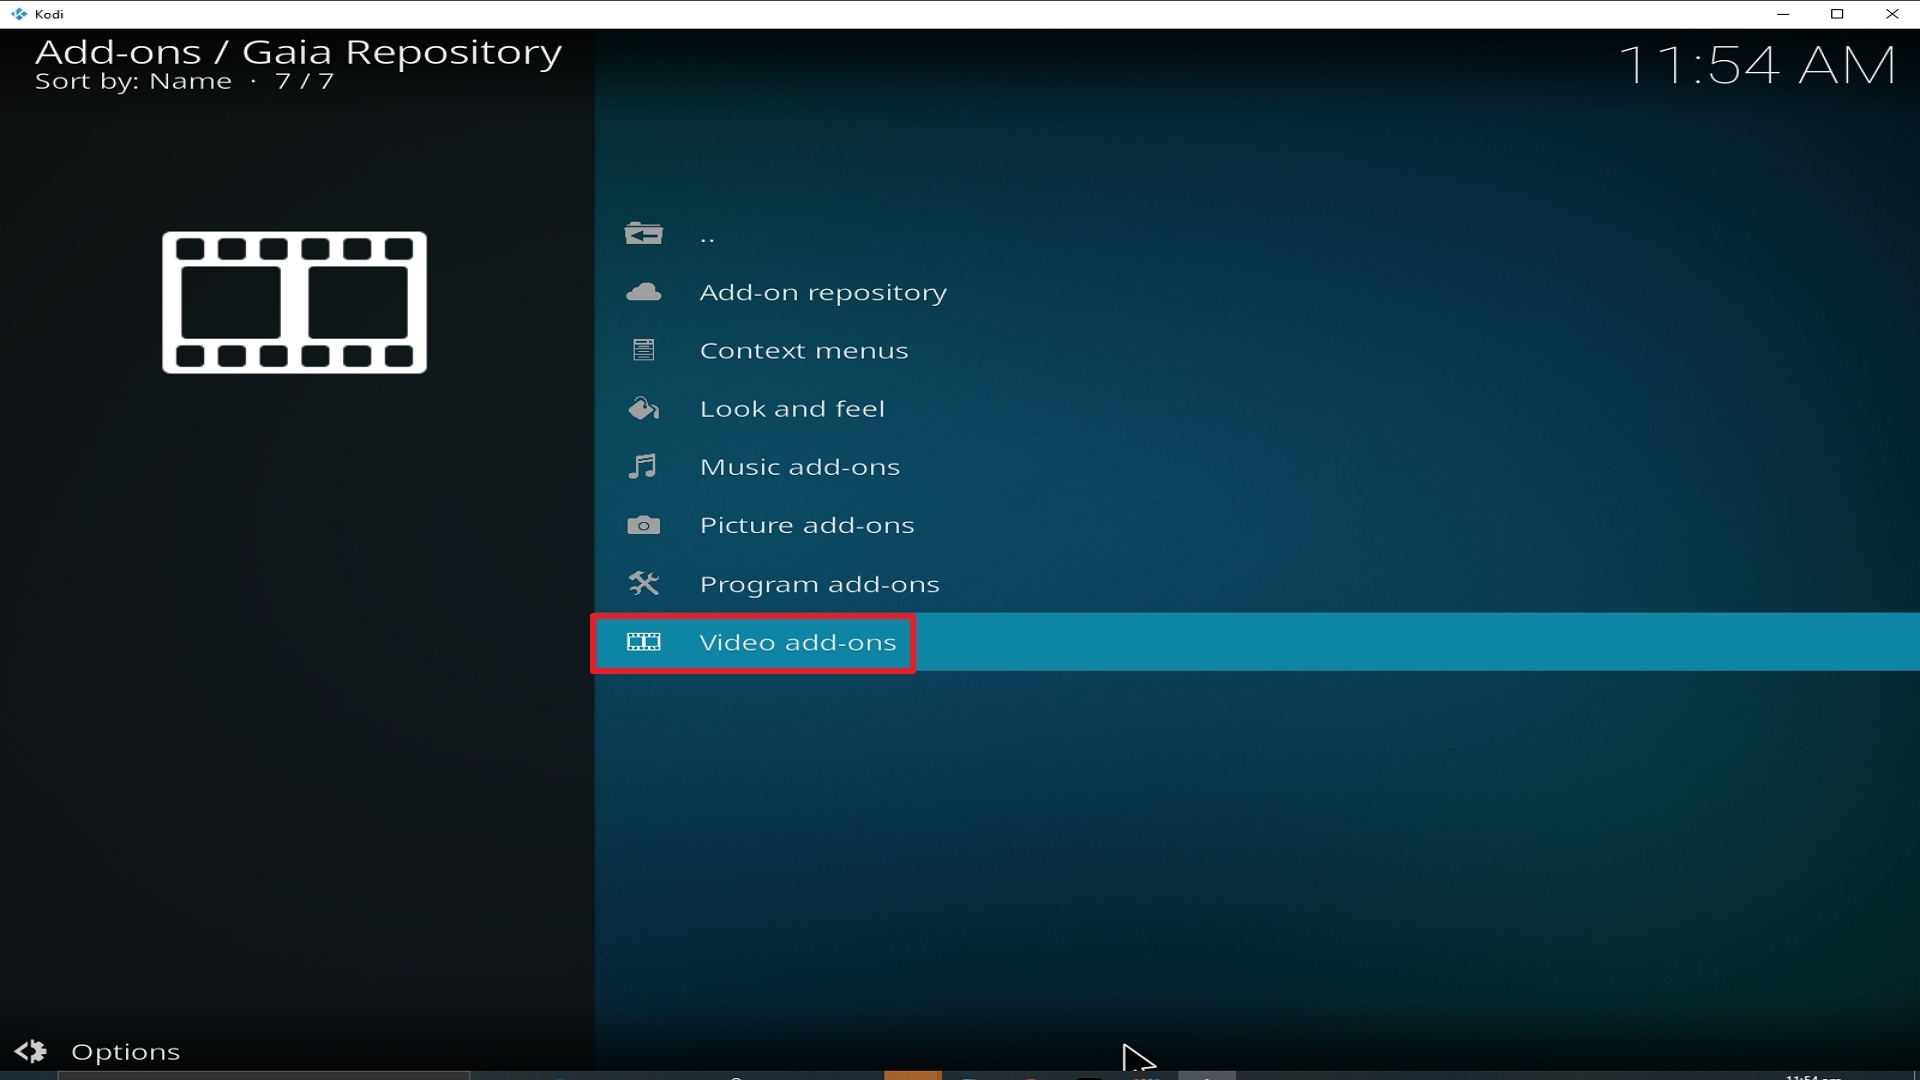
21. Pick Video add-ons.

Step 21 Installing Gaia addon on Kodi


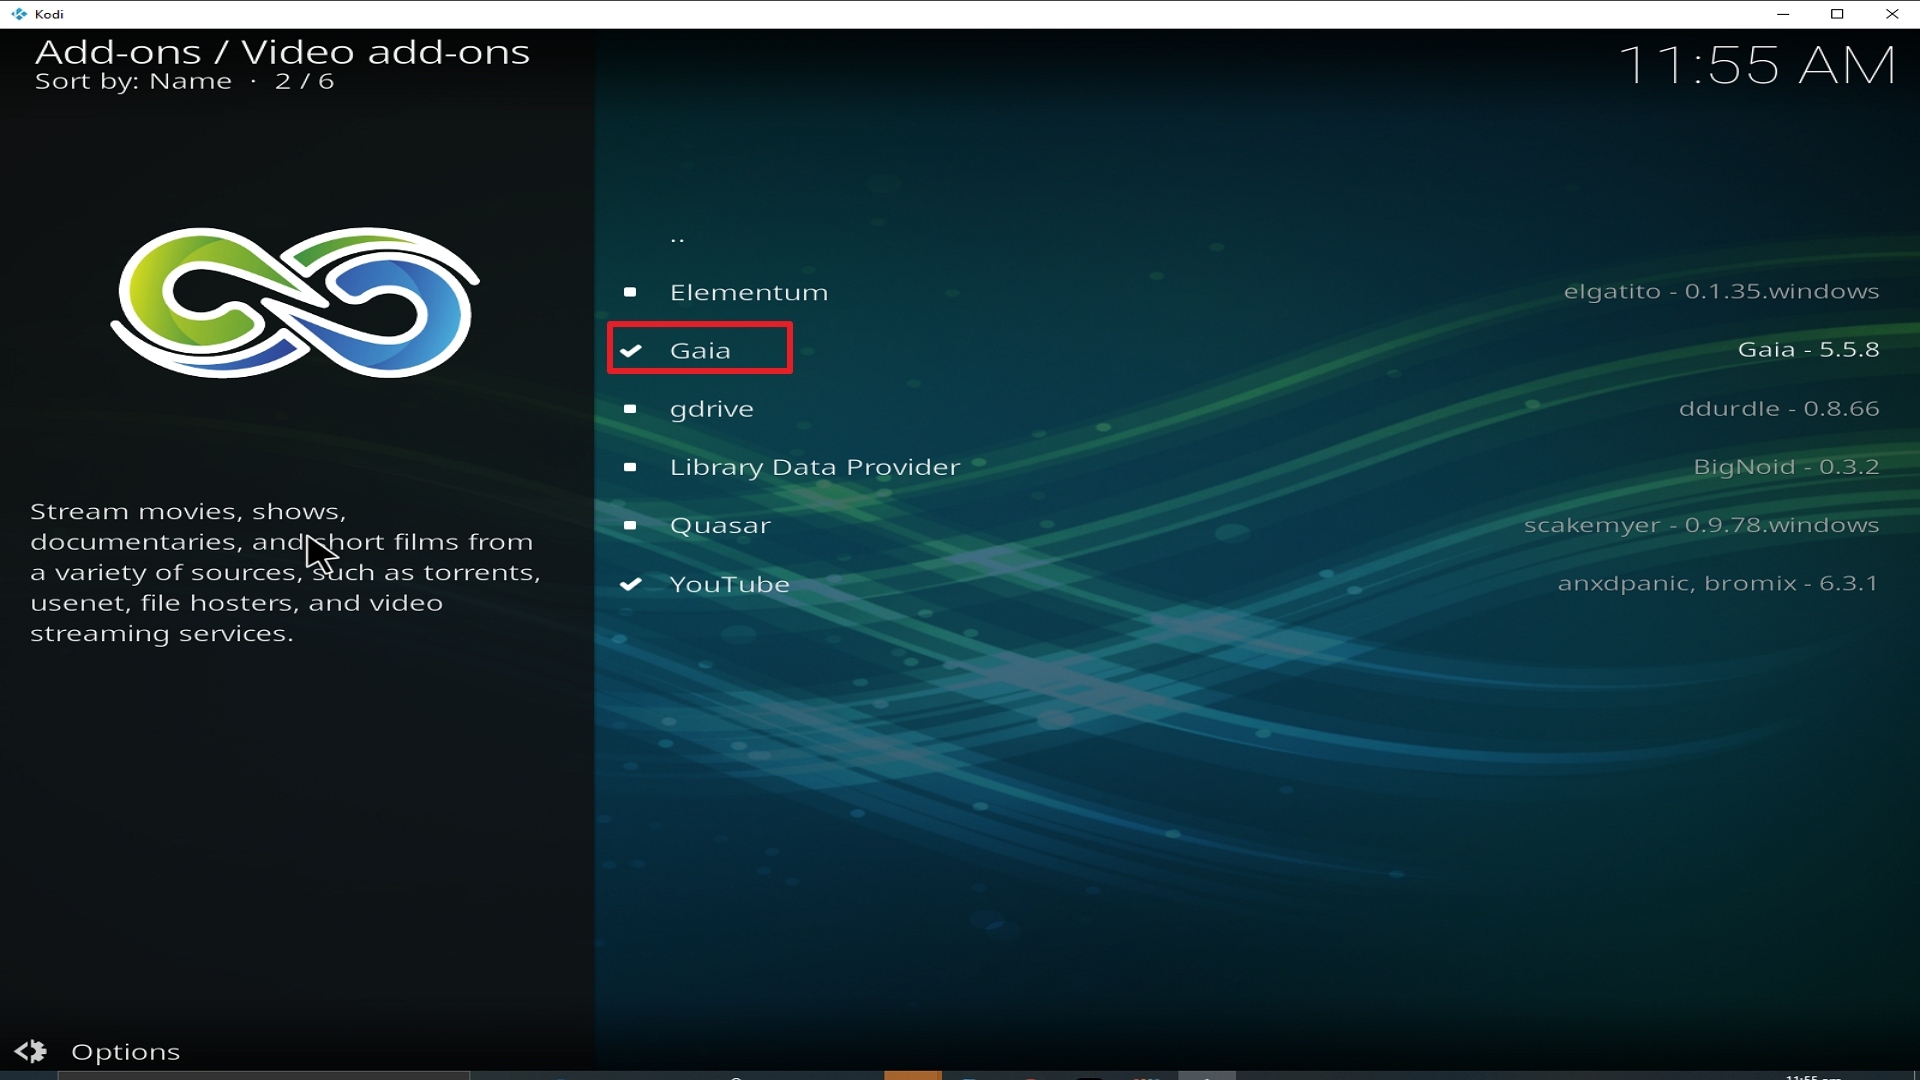
22. Select Gaia again.

Step 22 Installing Gaia addon on Kodi


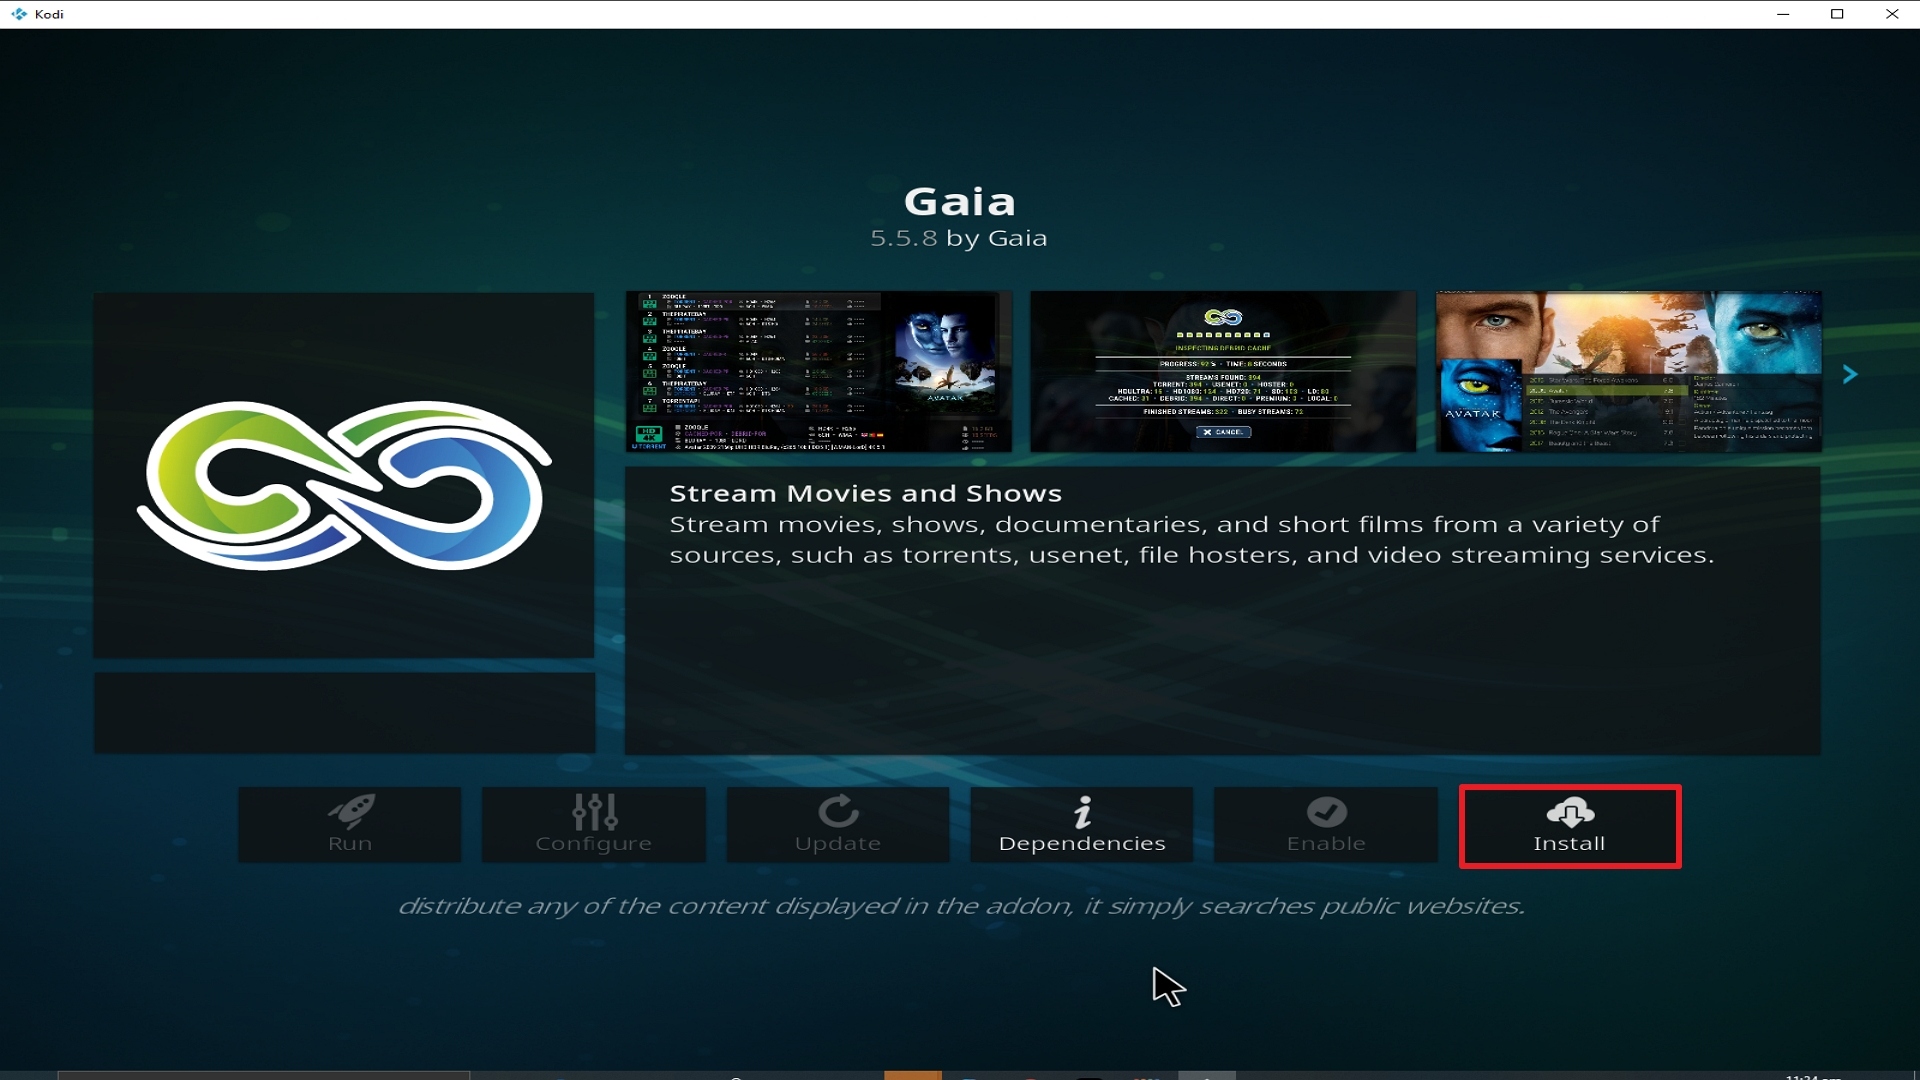
23. Click on Install.

Step 23 Installing Gaia addon on Kodi


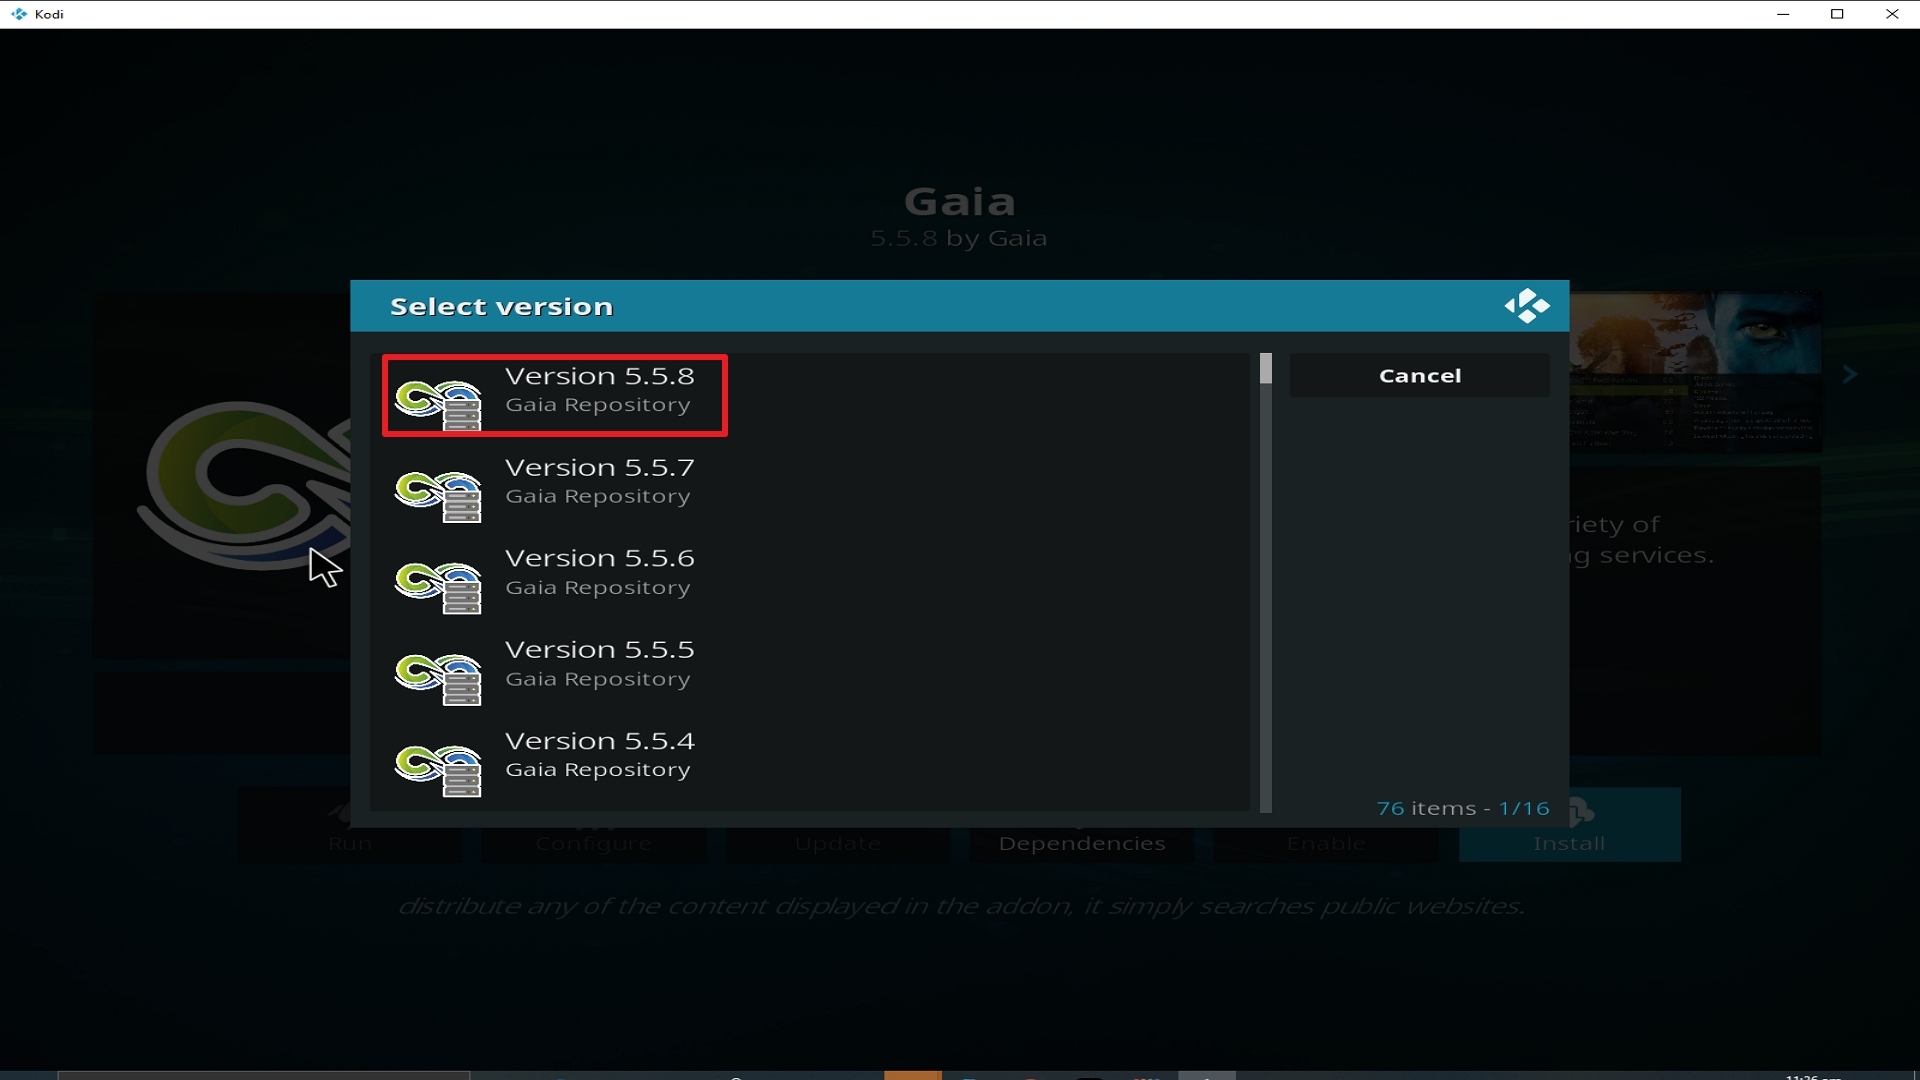
24. Select Version 5.5.8

Step 24 Installing Gaia addon on Kodi


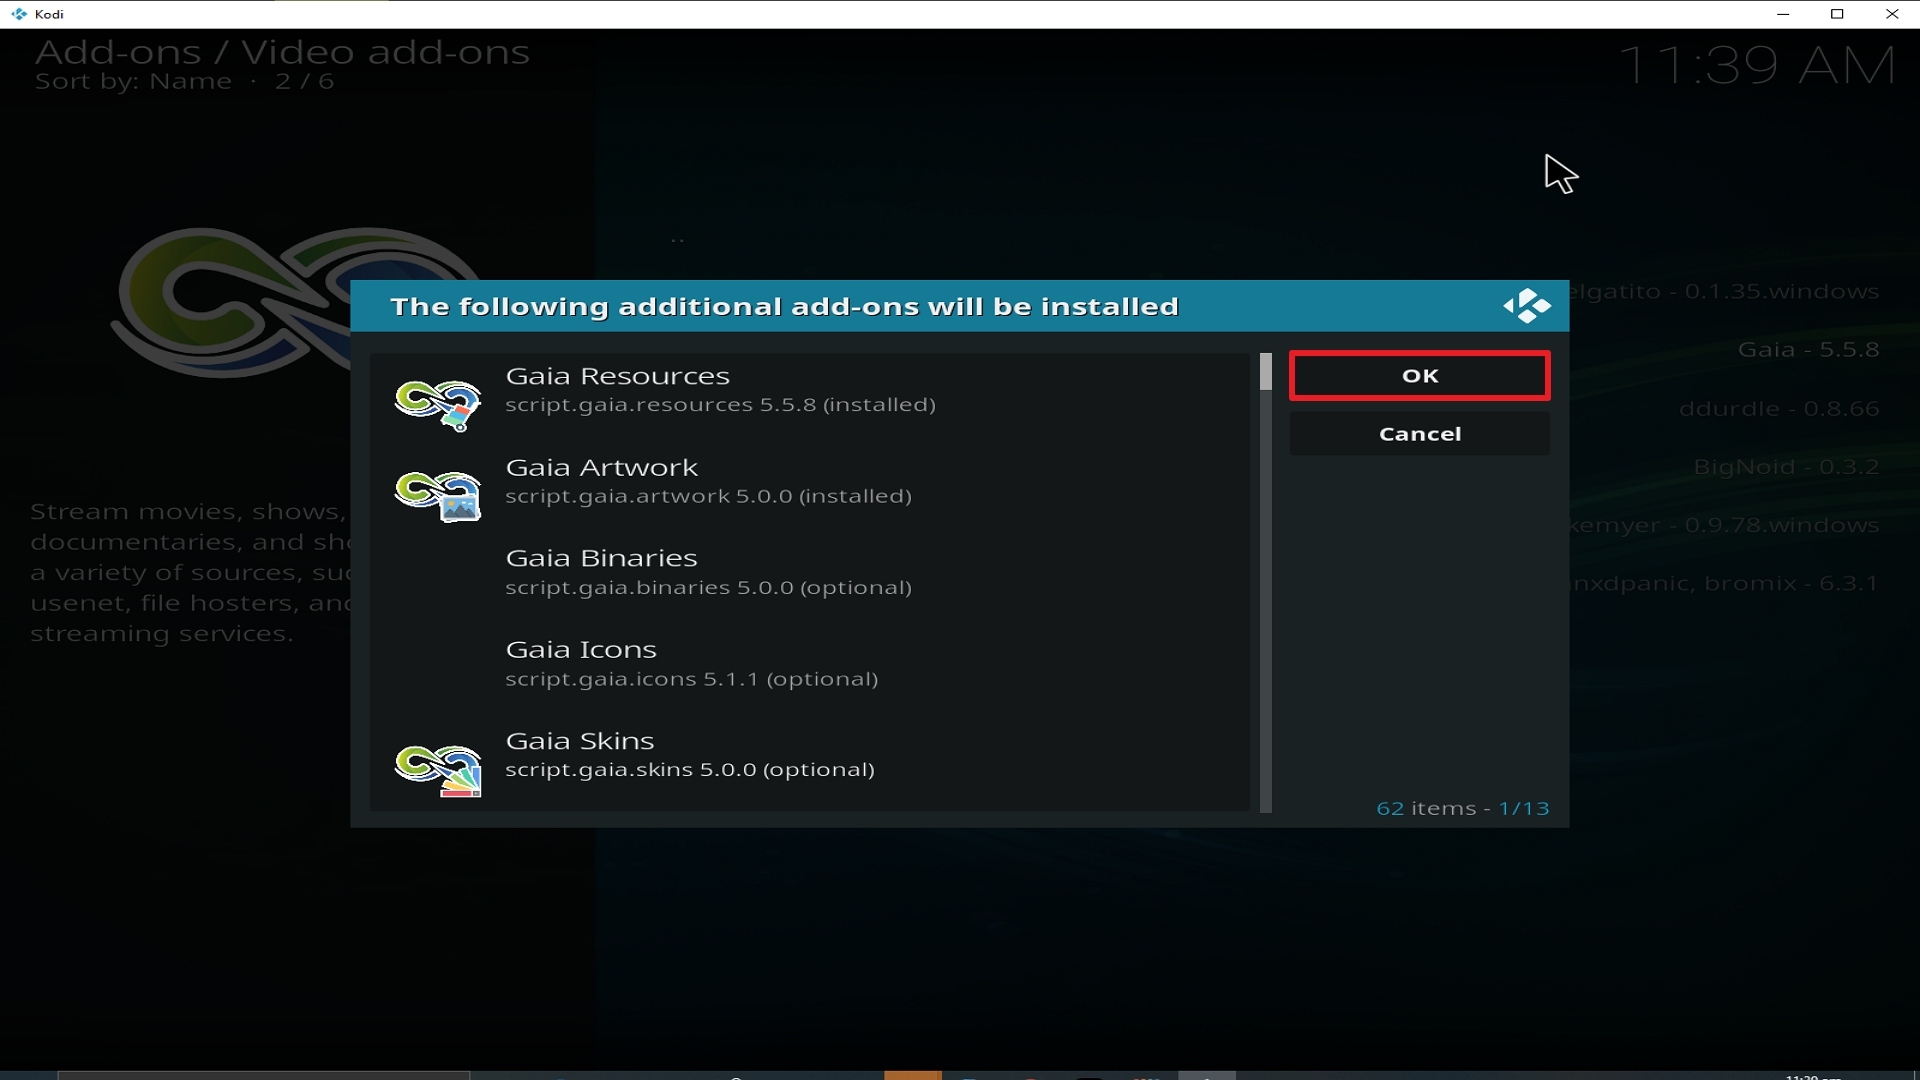
25. Select OK after reviewing the add-ons that will be installed.

Step 25 Installing Gaia addon on Kodi


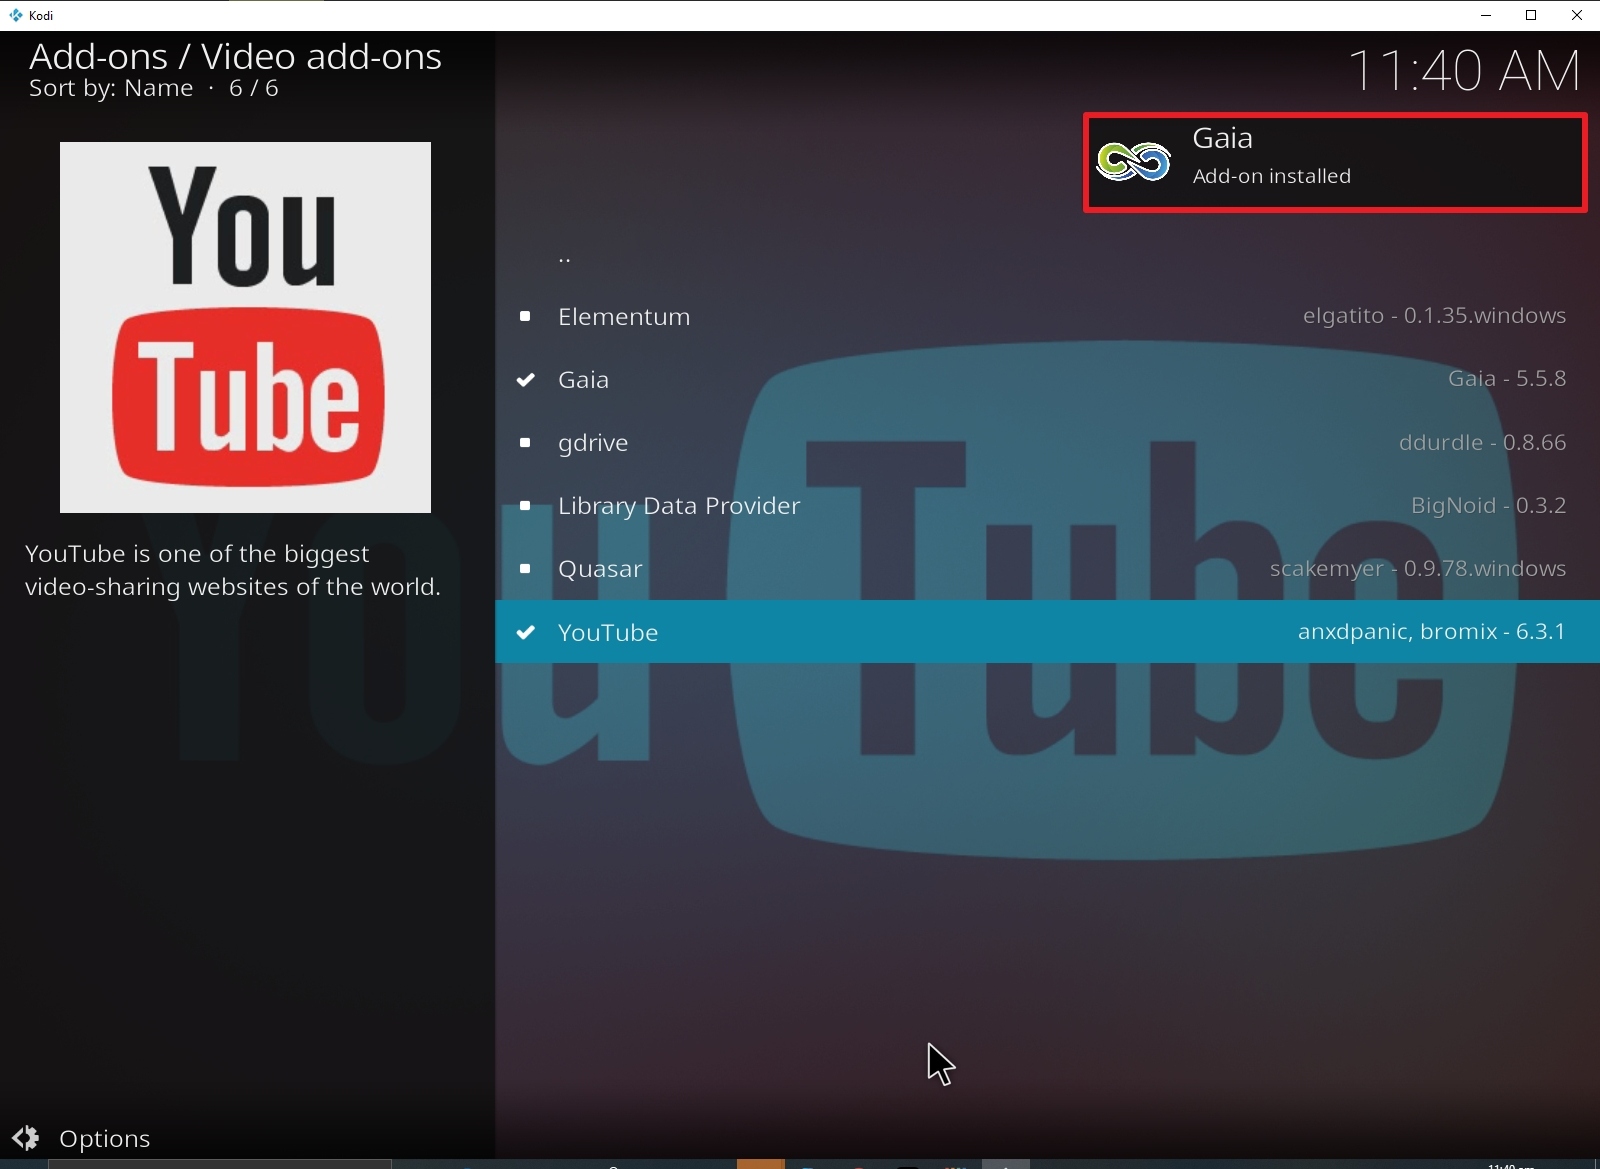
26. You should see a popup in the upper right corner saying Gaia has installed. There will actually be multiple popups for the various components.

Step 26 Installing Gaia addon on Kodi


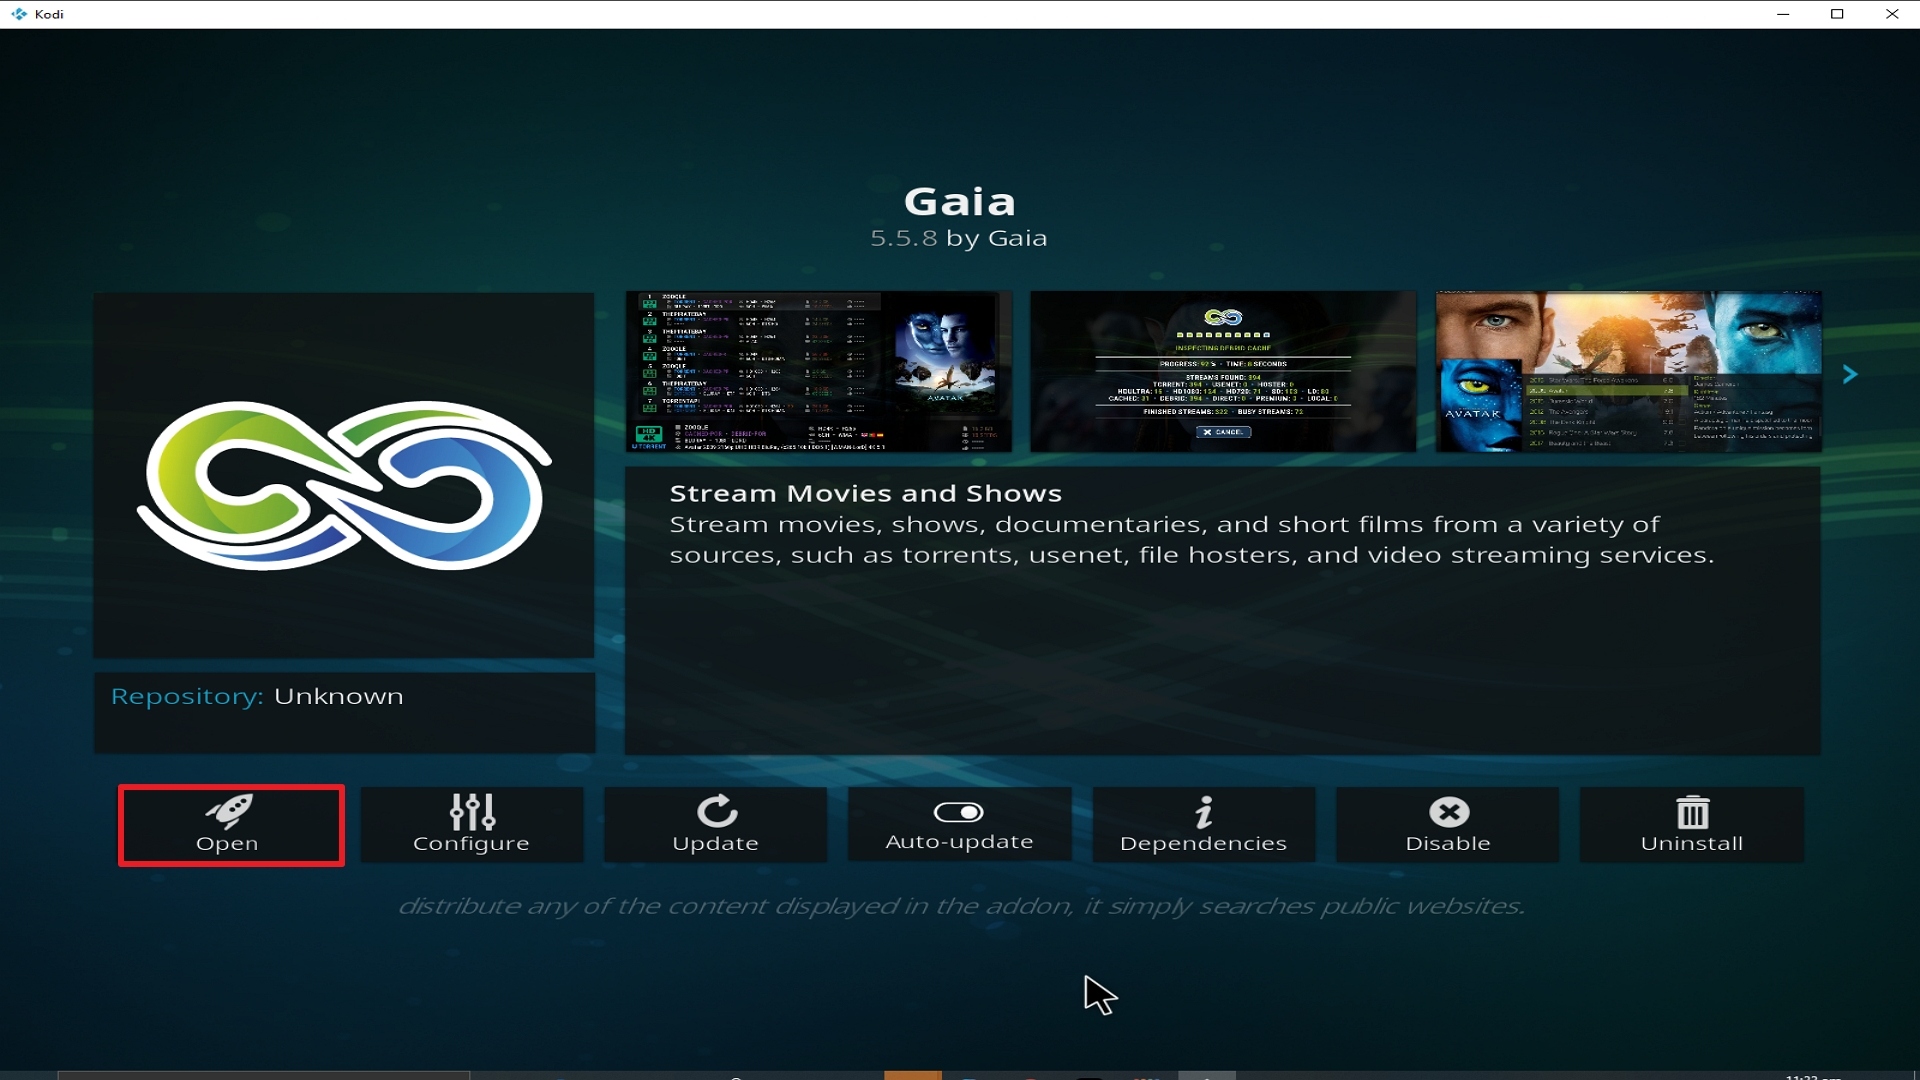
27. Click on Open to start the Gaia add-on.

Step 27 Installing Gaia addon on Kodi


Always Use a VPN On Kodi

It is advisable to install a VPN on your streaming device. This is because any time you are streaming content online, your online data is vulnerable and you are being monitored on the internet service provider’s network. 

Not only that, but you will also experience location restrictions. Using a VPN will save you that headache and stress and you will be safe and secure while streaming content online. We recommend Surfshark as it offers high security and privacy with a zero log policy with DNS leak protection. 

Note: For more information about Surfshark, please read our Surfshark Review.


Install Surfshark on Firestick

Best Surfshark Deal


How to Install Surfshark VPN on Firestick

If your Firestick still has the older interface, read this article to learn how to update it: Update Firestick Interface.

Follow our screenshots below to install the SurfShark VPN app on your Fire TV stick.

1. Go to the Home screen of your Firestick.

step 1 Install Surfshark VPN on Firestick


2. Navigate towards the Find tab. Press the Search button from the resulting dropdown.

step 2 Install Surfshark VPN on Firestick


3. Type in the keyword of SurfShark and select from the suggestions that will appear.

step 3 Install Surfshark VPN on Firestick


4. Click the official SurfShark icon from your search results.

step 4 Install Surfshark VPN on Firestick


5. Press the Download (You own it) button.

step 5 Install Surfshark VPN on Firestick


6. The SurfShark VPN installer will download on your device.

step 6 Install Surfshark VPN on Firestick


7. SurfShark VPN’s app will automatically install itself on your Fire TV stick.

step 7 Install Surfshark VPN on Firestick


8. Press the Open button after completing SurfShark VPN’s installation process.

step 8 Install Surfshark VPN on Firestick


9. Please wait for the SurfShark VPN to load its user interface.

step 9 Install Surfshark VPN on Firestick


10. You can now log in with your SurfShark VPN account credentials.

step 10 Install Surfshark VPN on Firestick

Learn more about Surfshark and Grab the Best Surfshark Deal Now!


Install Surfshark on Firestick

Best Surfshark Deal


Other VPNs to Consider

NordVPN (Best for Streaming)

Best Features

  • 5000+ Server in 50+ Countries 
  • Military-Grade Encryption
  • Fast Connection Speed
  • Suitable to a lot of devices
  • No-Log Policy

Prices
  • Complete $5.89 per month (64% Discount)
  • Plus $4.59 per month (56% Discount)
  • Standard $3.69 per month (55% Discount)

Best Features

  • 750+ High-speed VPN Servers in 43 Locations
  • Military-Grade Encryption
  • Fastest HD Streaming and Gaming
  • 30-Day Money-Back Guarantee
  • Unlimited Data & Devices
  • No-Log Policy

Prices
  • 3 Years $1.99 per month (82% Discount)
  • 1 Years $3.29 per month (70% Discount)
  • 1 Month $10.99 per month

IPVanish VPN (Most Secure)

Best Features

  • 1200+ Servers in 60+ Countries around the world
  • Unlimited Connections
  • No-Log Policy
  • Top Notch Military-Grade VPN Protocols and Encryptions
  • 100% Safe and Secured
  • Most Trusted VPN
  • Best VPN for Firestick
  • 30-Day Money-Back Guarantee

Prices
  • Yearly $3.99 per month (63% Discount) – 30 days risk free + Ransomware & Malware Protection
  • Quarterly $5.32 per month (51% Discount)
  • Monthly $10.99 per month


For more VPN discounts, go to ReviewVPN Deals and purchase the best VPN for you.


Install I Am Ego Kodi Addon

I Am Ego Kodi Addon

In this article, we will help you install I Am Ego Kodi Addon on Firestick.


I Am Ego Image

Source: https://goldengunrepo.github.io/install/me/ 

Another great addon comes from the well-established Golden Gun Repo. I Am Ego Kodi Addon has managed to stay popular and relevant because it gives open access to its scrapers which allows users a greater amount of control than with other addons.

I Am Go sticks solely to TV Shows and Videos and has a great back selection. They show no signs of trying to be an all-in-one addon and include Live TV which pleases us.

The best addons stick to a niche and get better at it.

To get the best out of I Am Ego you can pay for a Real Debrid subscription and get premium links from 50+ paid servers. Also, sync up your Trakt account and keep up to date with what you have been watching and get customized recommendation lists.


ANONYMOUSLY


Common Errors

There are a few errors you might run across when installing and running I Am Ego. We look at some quick fixes and give you links to more in-depth guides.

  • No stream available. This has been a commonly reported error with I Am Ego.  I Am Ego gives you access to their scraper settings, which means you can import your own, or modify the existing scrapers. Before you try our more in-depth fixes. You can access “Scraper Settings” from the menu, then click on the “Providers” tab and make sure that “Enable All Providers” is selected. If you are still having trouble check the guide linked above.


  • Script Error. This is an error you would get while installing I Am Ego. An error message will say that a missing script is preventing you from installing the add on. Check the link is correct and from the Golden Gun Repository. If the I Am Ego repo is right, then chances are, a previous Kodi addon has corrupted your Kodi installation. You can overcome the problem with a fresh install of Kodi, Learn some more in the guide linked above.


  • Cannot download I Am Ego. 9 times out of 10, any problem with downloading an add on means you have either mistyped the URL or are trying to grab the add on from the wrong repository. If both aren’t true check out further steps to fix this problem.


  • Olpair Streaming Error. If you aren’t using Real Debrid then your streams will come through Olpair. To stop the abuse of free servers, you need to reconnect every 4 hours and authenticate. You can either find Captcha free servers that are slower or read more here to renew your token.

Review

Categories in the menu include:

  • Movies
  • Family Movies
  • TV Shows
  • Family TV Shows
  • My Movies
  • My TV Shows
  • New Movies
  • New Episodes
  • Documentaries
  • Search
  • Tools
  • Scraper Settings
  • I am Ego info
  • Movies Coming soon


Family Movies and TV Shows would normally be found in the Kid’s sections of other add ons. I am Ego is a well-structured add on.

Each category within the menu is broken down into east sections like movies that can be searched by year, genre, or person.

Having access to their scrapers also means that you can easily add sources and don’t have to rely on the addons developers to keep those up to date. When an addon starts going downhill it’s because their addons aren’t being updated, now you can do that yourself and find open community lists easily online.

I Am Ego is a well-thought-out add-on, where the developers have obviously realized that giving their users more control gives them less to do.


YOUR INTERNET ACTIVITY IS BEING WATCHED

ReviewVPN cannot attest to the legality, security and privacy of the applications discussed on this site. It is highly recommended that you use a VPN service while streaming or using Kodi.

Currently, your IP 216.73.217.150 is visible to everyone and your Browser is being tracked by Advertisers & ISP Provider.

Save 65% Now

Limited Time Offer

Here are the main reasons why you must use a VPN:

  • Your activities are hidden from your ISP, the government, and from the apps you are using.
  • You can access additional movies and TV streams.
  • ISP attempts to throttle are thrwarted thus reducing buffering issues.
  • Geographically restricted content like Netflix and Hulu can be unblocked.

A VPN works be replacing your ISP-assigned IP address and creating an encrypted tunnel. We recommend the no log service offered by IPVanish. It works well on a Firestick and offers the fastest possible speeds.

Special Limited Time Offer - Get IPVanish


Legal Disclaimer: ReviewVPN.com does not encourage or endorse any illegal activity involved in the usage of services and applications referenced on this site. We do not verify the licensing agreements of services. The end-user is wholly responsible for ensuring that any media accessed through these services does not violate copyright and/or licensing laws. ReviewVPN does not promote, link to, or receive compensation from any Apps and IPTV services.


Install Surfshark on Firestick

Best Surfshark Deal


How to Install I Am Ego Addon on Kodi with Screenshots

  1. From the home screen, select the cogwheel at the upper left.

Step 1 Installing I Am Ego addon on Kodi


2. Select System in the bottom right corner.

Step 2 Installing I Am Ego addon on Kodi


3. Select Add-ons on the left side of the screen.

Step 3 Installing I Am Ego addon on Kodi


4. Select Unknown sources.

Step 4 Installing I Am Ego addon on Kodi


5. Click Yes to allow unknown sources.

Step 5 Installing I Am Ego addon on Kodi


6. Select File manager.

Step 6 Installing I Am Ego addon on Kodi


7. Click Add source.

Step 7 Installing I Am Ego addon on Kodi


8. Click on <None>.

Step 8 Installing I Am Ego addon on Kodi


9. Type exactly: https://goldengunrepo.github.io/install/me/

Step 9 Installing I Am Ego addon on Kodi


10. Click on OK.

Step 10 Installing I Am Ego addon on Kodi


11. Select enter a name for this media source.

Step 11 Installing I Am Ego addon on Kodi


12. Name is I Am Ego (this part isn’t critical as long as you remember the name).

Step 12 Installing I Am Ego addon on Kodi


13. Click on OK.

Step 13 Installing I Am Ego addon on Kodi


14. Click on OK.

Step 14 Installing I Am Ego addon on Kodi


15. Take one step back and click on Add-ons.

Step 15 Installing I Am Ego addon on Kodi


16. Select install from zip file.

Step 16 Installing I Am Ego addon on Kodi


17. Click on I Am Ego(or whatever you named the source).

Step 17 Installing I Am Ego addon on Kodi


18. Click on repository.goldengun-9.1.7.zip.

Step 18 Installing I Am Ego addon on Kodi


19. Select on Install from repository.

Step 19 Installing I Am Ego addon on Kodi


20. Click on Goldengun Repo

Step 20 Installing I Am Ego addon on Kodi


21. Pick Video add-ons.

Step 21 Installing I Am Ego addon on Kodi


22. Select I Am Ego again.

Step 22 Installing I Am Ego addon on Kodi


23. Click on Install. 

Step 23 Installing I Am Ego addon on Kodi


24. Select OK after reviewing the add-ons that will be installed.

Step 24 Installing I Am Ego addon on Kodi


25. You should see a popup in the upper right corner saying I Am Ego has installed. There will actually be multiple popups for the various components.

Step 25 Installing I Am Ego addon on Kodi


26. Click on Open to start the I Am Ego add-on.

Step 26 Installing I Am Ego addon on Kodi


Should I Use This App With a VPN?

surfshark logo

We recommend you use a VPN for the following reasons:

  • Many of the addons you will access in Streamline will direct you to links for illegally distributed content. Without a VPN you may find many of these links do not work because your ISP is blocking your access
  • If you try to access Live TV Channels in other countries through Streamline your access may also be blocked. This is because these channels can detect your IP is not in that country and will block you from accessing their channels.
  • Using a VPN, you can encrypt your requests, change your IP, and also the location where your IP originates from. Thus, allowing you to circumvent any blocks or firewalls in place to do your accessing most restricted content
  • A VPN also helps you maintain anonymity, safety, and privacy online from unwanted third parties.

Note: For more information about Surfshark, please read our Surfshark Review.


Grab your subscription now!


How to Install Surfshark VPN on Firestick

If your Firestick still has the older interface, read this article to learn how to update it: Update Firestick Interface.

Follow our screenshots below to install the SurfShark VPN app on your Fire TV stick.

1. Go to the Home screen of your Firestick.

step 1 Install Surfshark VPN on Firestick


2. Navigate towards the Find tab. Press the Search button from the resulting dropdown.

step 2 Install Surfshark VPN on Firestick


3. Type in the keyword of SurfShark and select from the suggestions that will appear.

step 3 Install Surfshark VPN on Firestick


4. Click the official SurfShark icon from your search results.

step 4 Install Surfshark VPN on Firestick


5. Press the Download (You own it) button.

step 5 Install Surfshark VPN on Firestick


6. The SurfShark VPN installer will download on your device.

step 6 Install Surfshark VPN on Firestick


7. SurfShark VPN’s app will automatically install itself on your Fire TV stick.

step 7 Install Surfshark VPN on Firestick


8. Press the Open button after completing SurfShark VPN’s installation process.

step 8 Install Surfshark VPN on Firestick


9. Please wait for the SurfShark VPN to load its user interface.

step 9 Install Surfshark VPN on Firestick


10. You can now log in with your SurfShark VPN account credentials.

step 10 Install Surfshark VPN on Firestick

Learn more about Surfshark and Grab the Best Surfshark Deal Now!


Install Surfshark on Firestick

Best Surfshark Deal


Other VPNs to Consider

NordVPN (Best for Streaming)

Best Features

  • 5000+ Server in 50+ Countries 
  • Military-Grade Encryption
  • Fast Connection Speed
  • Suitable to a lot of devices
  • No-Log Policy

Prices
  • Complete $5.89 per month (64% Discount)
  • Plus $4.59 per month (56% Discount)
  • Standard $3.69 per month (55% Discount)

Best Features

  • 750+ High-speed VPN Servers in 43 Locations
  • Military-Grade Encryption
  • Fastest HD Streaming and Gaming
  • 30-Day Money-Back Guarantee
  • Unlimited Data & Devices
  • No-Log Policy

Prices
  • 3 Years $1.99 per month (82% Discount)
  • 1 Years $3.29 per month (70% Discount)
  • 1 Month $10.99 per month

IPVanish VPN (Most Secure)

Best Features

  • 1200+ Servers in 60+ Countries around the world
  • Unlimited Connections
  • No-Log Policy
  • Top Notch Military-Grade VPN Protocols and Encryptions
  • 100% Safe and Secured
  • Most Trusted VPN
  • Best VPN for Firestick
  • 30-Day Money-Back Guarantee

Prices
  • Yearly $3.99 per month (63% Discount) – 30 days risk free + Ransomware & Malware Protection
  • Quarterly $5.32 per month (51% Discount)
  • Monthly $10.99 per month


For more VPN discounts, go to ReviewVPN Deals and purchase the best VPN for you.

Click here to get the lowest price on Surfshark through our exclusive limited-time offer.
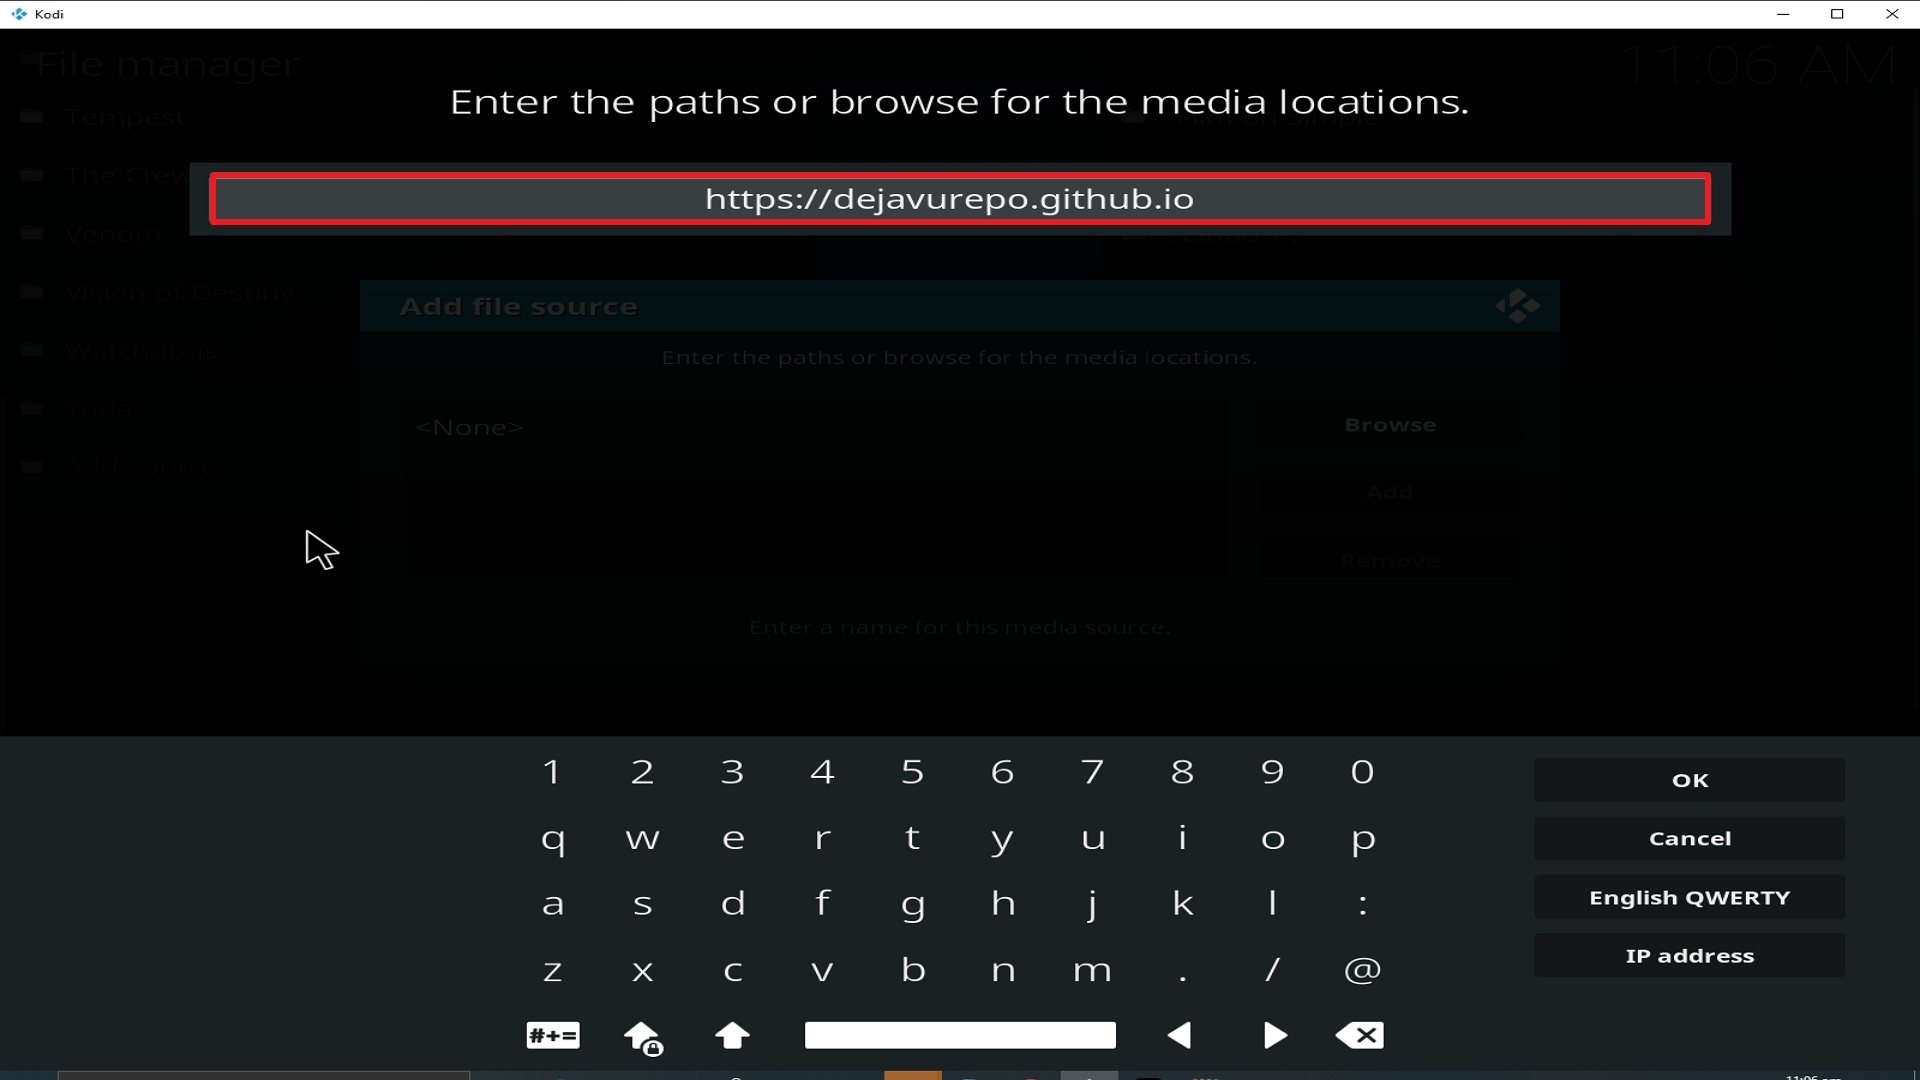
 

Install IT Kodi Addon on Firestick/Fire TV

IT Kodi Addon

In this article, we will help you install IT Kodi Addon on Firestick/Fire TV.


Source: https://t2k-cloud.co.uk/Repo

IT Kodi addon is a fork of the extremely popular 13 Clowns which went down along with several other add ons in June 2019.

In terms of look and menu options, IT is pretty much identical to 13 Clowns. IT has done a great job of replacing the hole left behind by 13 Clowns, with good usability and stability. As well as regular updates from the developer.

IT has kept the same multi-source scrapers, as well as the Resolver, add on which made 13 Clowns so effective in finding great content.

IT is compatible with Real Debrid. For as little as $4 a month you can get the best working links from the 50+ paid servers that Real Debrid hosts, including many of the top torrent websites. We recommend using Real Debrid to get the best user experience. Over time Real Debrid pays for itself in terms of the money you will save.

You can also use Trak.TV to track what you have watched and got access to curated watchlists from users around the world.

ANONYMOUSLY

Common Errors

Here are the most common errors with quick fixes and links to troubleshooting guides.

  • No Link Found. When looking for content, you may get an error message saying that no link has been found. You can try another link and if that does not work then the problem may be with you. Check your internet connection and make sure that you are using a trusted VPN Provider like IP Vanish. As the link may work but be currently blocked by your ISP provider. For a whole list of fixed check out our guide.


  • Olpair Streaming Error. This error is quickly remedied if you decide to use Real Debrid. You will get faster links without buffering using their paid servers. But if you want to continue watching content for free, then you will need to renew your Olpair link once every 4 hours. Follow the link on the pop-up and if the problem persists then check out our full guide.


  • Script Error. While installing IT you may get an error message saying that a script is missing. Firstly, check that you are trying to install IT from the T2K repository. If there is nothing wrong with the URL, then you may need to repair or re-install your version of Kodi, which may have been corrupted. Learn some more in the guide linked above.


  • Unable to download IT. If you’re having problems downloading the add on in the first place. Check that you have typed in the right URL, many people just misspelled it and think the link is broken. Second, make sure that you are using a VPN, your Internet Service Provider may be blocking access to IT in your country. If the problem persists then go through all the steps in our guide.

Review

IT Kodi Addon menu includes:

  • Movies
  • TV Shows
  • Monthly spotlight
  • Documentaries
  • Kids Area
  • YouTube Videos
  • My Movies
  • My TV Shows
  • New Movies
  • New Episodes
  • Search
  • Tools
  • Status

IT is doing a superb job of filling the massive hole that 13 Clown demise left behind. By keeping the same scrapers, they are great at finding good content across multiple sources and finding quality links to the latest titles.

For the best experience, as well as getting content buffer-free we do advise you to use IT with Real Debrid and Trakt.


YOUR INTERNET ACTIVITY IS BEING WATCHED

ReviewVPN cannot attest to the legality, security and privacy of the applications discussed on this site. It is highly recommended that you use a VPN service while streaming or using Kodi.

Currently, your IP 216.73.217.150 is visible to everyone and your Browser is being tracked by Advertisers & ISP Provider.

Save 65% Now

Limited Time Offer

Here are the main reasons why you must use a VPN:

  • Your activities are hidden from your ISP, the government, and from the apps you are using.
  • You can access additional movies and TV streams.
  • ISP attempts to throttle are thrwarted thus reducing buffering issues.
  • Geographically restricted content like Netflix and Hulu can be unblocked.

A VPN works be replacing your ISP-assigned IP address and creating an encrypted tunnel. We recommend the no log service offered by IPVanish. It works well on a Firestick and offers the fastest possible speeds.

Special Limited Time Offer - Get IPVanish


Legal Disclaimer: ReviewVPN.com does not encourage or endorse any illegal activity involved in the usage of services and applications referenced on this site. We do not verify the licensing agreements of services. The end-user is wholly responsible for ensuring that any media accessed through these services does not violate copyright and/or licensing laws. ReviewVPN does not promote, link to, or receive compensation from any Apps and IPTV services.


Install Surfshark on Firestick

Best Surfshark Deal


How to Install IT Addon on Kodi with Screenshots

  1. From the home screen, select the cogwheel at the upper left.

Step 1 Installing IT addon on Kodi


2. Select System in the bottom right corner.

Step 2 Installing IT addon on Kodi


3. Select Add-ons on the left side of the screen.

Step 3 Installing IT addon on Kodi


4. Select Unknown sources.

Step 4 Installing IT addon on Kodi


5. Click Yes to allow unknown sources.

Step 5 Installing IT addon on Kodi


6. Select File manager.

Step 6 Installing IT addon on Kodi


7. Click Add source.

Step 7 Installing IT addon on Kodi


8. Click on <None>.

Step 8 Installing IT addon on Kodi


9. Type exactly: https://t2k-cloud.co.uk/Repo

Step 9 Installing IT addon on Kodi


10. Click on OK.Step 10 Installing IT addon on Kodi


11. Select enter a name for this media source.

Step 11 Installing IT addon on Kodi


12. Name is IT (this part isn’t critical as long as you remember the name).

Step 12 Installing IT addon on Kodi


13. Click on OK.

Step 13 Installing IT addon on Kodi


14. Click on OK.

Step 14 Installing IT addon on Kodi


15. Take one step back and click on Add-ons.

Step 15 Installing IT addon on Kodi


16. Select install from zip file.

Step 16 Installing IT addon on Kodi


17. Click on IT(or whatever you named the source).

Step 17 Installing IT addon on Kodi


18. Click on repository.T2K-1.2.3.zip.

Step 18 Installing IT addon on Kodi


19. Select on Install from repository.

Step 19 Installing IT addon on Kodi


20. Click on T2K Repo

Step 20 Installing IT addon on Kodi


21. Pick Video add-ons.

Step 21 Installing IT addon on Kodi


22. Select IT again.

Step 22 Installing IT addon on Kodi


23. Click on Install. 

Step 23 Installing IT addon on Kodi


24. Select OK after reviewing the add-ons that will be installed.

Step 24 Installing IT addon on Kodi


25. You should see a popup in the upper right corner saying IT has installed. There will actually be multiple popups for the various components.

Step 25 Installing IT addon on Kodi


26. Click on Open to start the IT add-on.

Step 26 Installing IT addon on Kodi


Should I Use This App With a VPN?

surfshark logo

We recommend you use a VPN for the following reasons:

  • Many of the addons you will access in Streamline will direct you to links for illegally distributed content. Without a VPN you may find many of these links do not work because your ISP is blocking your access
  • If you try to access Live TV Channels in other countries through Streamline your access may also be blocked. This is because these channels can detect your IP is not in that country and will block you from accessing their channels.
  • Using a VPN, you can encrypt your requests, change your IP, and also the location where your IP originates from. Thus, allowing you to circumvent any blocks or firewalls in place to do your accessing most restricted content
  • A VPN also helps you maintain anonymity, safety, and privacy online from unwanted third parties.

Note: For more information about Surfshark, please read our Surfshark Review.


Grab your subscription now!


How to Install Surfshark VPN on Firestick

If your Firestick still has the older interface, read this article to learn how to update it: Update Firestick Interface.

Follow our screenshots below to install the SurfShark VPN app on your Fire TV stick.

1. Go to the Home screen of your Firestick.

step 1 Install Surfshark VPN on Firestick


2. Navigate towards the Find tab. Press the Search button from the resulting dropdown.

step 2 Install Surfshark VPN on Firestick


3. Type in the keyword of SurfShark and select from the suggestions that will appear.

step 3 Install Surfshark VPN on Firestick


4. Click the official SurfShark icon from your search results.

step 4 Install Surfshark VPN on Firestick


5. Press the Download (You own it) button.

step 5 Install Surfshark VPN on Firestick


6. The SurfShark VPN installer will download on your device.

step 6 Install Surfshark VPN on Firestick


7. SurfShark VPN’s app will automatically install itself on your Fire TV stick.

step 7 Install Surfshark VPN on Firestick


8. Press the Open button after completing SurfShark VPN’s installation process.

step 8 Install Surfshark VPN on Firestick


9. Please wait for the SurfShark VPN to load its user interface.

step 9 Install Surfshark VPN on Firestick


10. You can now log in with your SurfShark VPN account credentials.

step 10 Install Surfshark VPN on Firestick

Learn more about Surfshark and Grab the Best Surfshark Deal Now!


Install Surfshark on Firestick

Best Surfshark Deal


Other VPNs to Consider

NordVPN (Best for Streaming)

Best Features

  • 5000+ Server in 50+ Countries 
  • Military-Grade Encryption
  • Fast Connection Speed
  • Suitable to a lot of devices
  • No-Log Policy

Prices
  • Complete $5.89 per month (64% Discount)
  • Plus $4.59 per month (56% Discount)
  • Standard $3.69 per month (55% Discount)

Best Features

  • 750+ High-speed VPN Servers in 43 Locations
  • Military-Grade Encryption
  • Fastest HD Streaming and Gaming
  • 30-Day Money-Back Guarantee
  • Unlimited Data & Devices
  • No-Log Policy

Prices
  • 3 Years $1.99 per month (82% Discount)
  • 1 Years $3.29 per month (70% Discount)
  • 1 Month $10.99 per month

IPVanish VPN (Most Secure)

Best Features

  • 1200+ Servers in 60+ Countries around the world
  • Unlimited Connections
  • No-Log Policy
  • Top Notch Military-Grade VPN Protocols and Encryptions
  • 100% Safe and Secured
  • Most Trusted VPN
  • Best VPN for Firestick
  • 30-Day Money-Back Guarantee

Prices
  • Yearly $3.99 per month (63% Discount) – 30 days risk free + Ransomware & Malware Protection
  • Quarterly $5.32 per month (51% Discount)
  • Monthly $10.99 per month


For more VPN discounts, go to ReviewVPN Deals and purchase the best VPN for you.

Click here to get the lowest price on Surfshark through our exclusive limited-time offer.
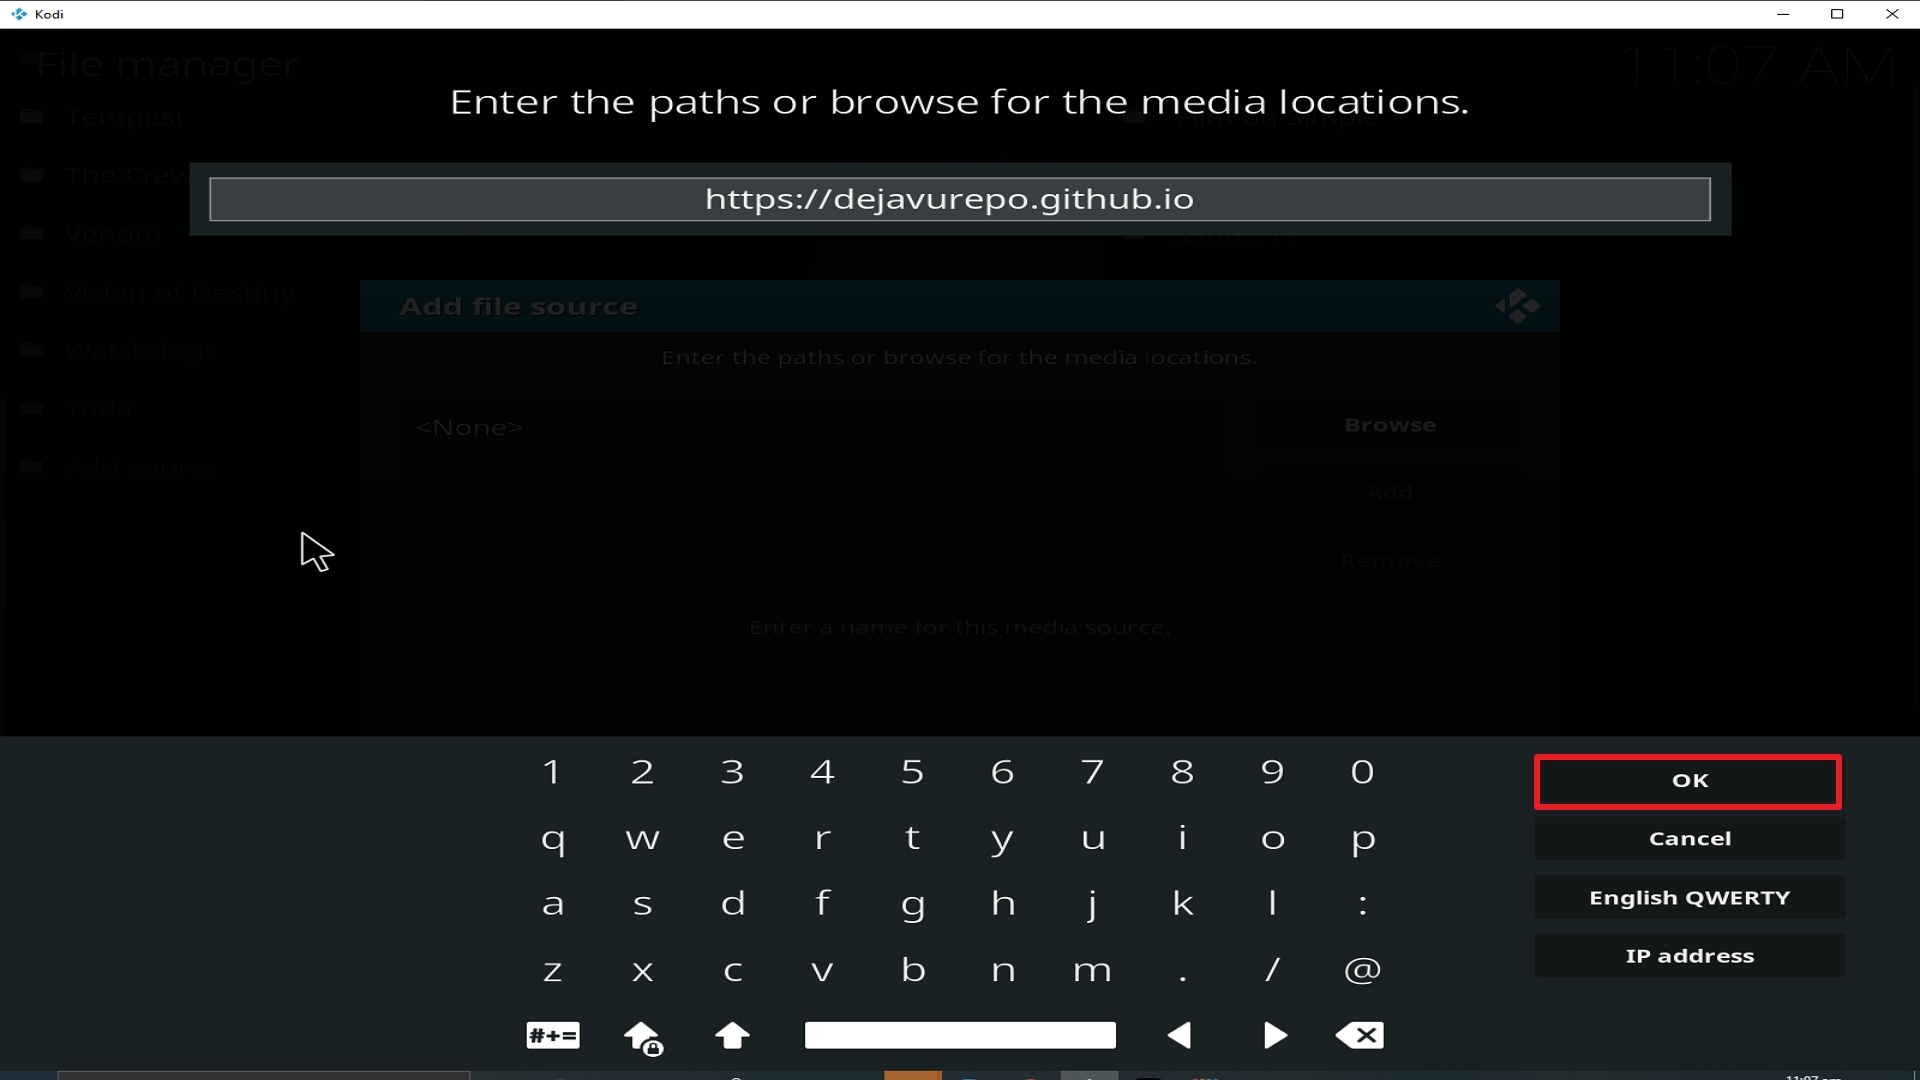
 

Install Tempest Kodi Addon

Tempest Kodi Addon

In this article, we will help you install Tempest Kodi Addon on Firestick.


Source: https://tempest0580.github.io/ 

Tempest is a popular Kodi addon, a fork of the original Covenant. Tempest remains popular because many ex-Covenant users now use Tempest instead as the usability and layout is almost identical.

Also, the Tempest developer keeps the addon updated, whereas Covenant has fallen into disuse.

Tempest is compatible with both Real Debrid and Trakt.TV and has a good track record of returning multiple working streams for a wide range of content and getting 1080p /HD streams as well.

You can pay for Real Debrid and get premium working links from their 50+ paid servers and use Trakt.TV to keep an eye on your watched shows and keep on track.


Common Errors

All Kodi add ons are susceptible to errors, particularly when it comes to streaming and caching media, here you can find out how to fix the most common errors you might get with Tempest:

  • Olpair streaming errors. Any addon that streams content will occasionally get Olpair streaming errors. This can normally be remedied by getting a new key for 4 hours, for this and more fixes, and if you still have problems check out our error fixing guide.
  • Unable to download the addon from the source provided. Some addon sources if popular may be blocked by your ISP. If you are unable to download Tempest, we recommend using a VPN or going through these further fixes.
  • No stream available. It’s always maddening spending hours looking for the right title, and then getting no stream. But this could be down to several factors including your internet connection. Not necessarily because there is no stream. To fix it, find out some more in the guide linked above.
  • A script error. Sometimes you may install an addon and run into a script error. Generally, if you have input the addon URL properly then the problem will be with your Kodi installation. Somewhere along the line, it may have gotten corrupted. So, a fresh install might be in order, amongst one of the many fixes you can find, and check our step-by-step fix guide here.
  • A web request error. Always check the download URL, and make sure you are using a VPN. Also, the server may be busy processing too many requests. For more fixes, try some more in the guide linked above.


ANONYMOUSLY

Review

Tempest is a tidy addon, with all the functionality you would expect from Covenant. When you get into the addon you have several menu choices:

  • Movies
  • TV Shows
  • My Movies
  • My TV Shows
  • New Movies
  • New Episodes
  • Search
  • Changelog


There are a few things we love about this. 

First, you can favorite and save movies and tv shows in separate sections to come back and watch them later. Always good when you are in browsing mode and your eyes are bigger than the amount of time you have.

Second, having a changelog is always positive. Many add on rarely update and don’t keep a changelog which can be frustrating. Because if you log on and something doesn’t work with the addon then you can refer to the changelog and probably flag a problem with the developer. Also, a changelog means an intent to keep updated.

Lastly, new episodes and new movies mean new content is always getting added. Tempest has managed to stay popular because it has multiple working scrapers, which have a good track record of serving up working links. Also connecting to content is quick and seamless.

Tempest works well with both Trak and Real Debrid. We recommend using Real Debrid if you consistently want to find working high-quality links.


YOUR INTERNET ACTIVITY IS BEING WATCHED

ReviewVPN cannot attest to the legality, security and privacy of the applications discussed on this site. It is highly recommended that you use a VPN service while streaming or using Kodi.

Currently, your IP 216.73.217.150 is visible to everyone and your Browser is being tracked by Advertisers & ISP Provider.

Save 65% Now

Limited Time Offer

Here are the main reasons why you must use a VPN:

  • Your activities are hidden from your ISP, the government, and from the apps you are using.
  • You can access additional movies and TV streams.
  • ISP attempts to throttle are thrwarted thus reducing buffering issues.
  • Geographically restricted content like Netflix and Hulu can be unblocked.

A VPN works be replacing your ISP-assigned IP address and creating an encrypted tunnel. We recommend the no log service offered by IPVanish. It works well on a Firestick and offers the fastest possible speeds.

Special Limited Time Offer - Get IPVanish


Legal Disclaimer: ReviewVPN.com does not encourage or endorse any illegal activity involved in the usage of services and applications referenced on this site. We do not verify the licensing agreements of services. The end-user is wholly responsible for ensuring that any media accessed through these services does not violate copyright and/or licensing laws. ReviewVPN does not promote, link to, or receive compensation from any Apps and IPTV services.


Install Surfshark on Firestick

Best Surfshark Deal


How to Install Tempest Addon on Kodi with Screenshots

  1. From the home screen, select the cogwheel at the upper left.

Step 9 Installing Vision of Destiny on Kodi


2. Select System in the bottom right corner.

Step 2 Installing Vision of Destiny on Kodi


3. Select Add-ons on the left side of the screen.

Step 3 Installing Vision of Destiny on Kodi


4. Select Unknown sources.

Step 4 Installing Vision of Destiny on Kodi


5. Click Yes to allow unknown sources.

Step 5 Installing Vision of Destiny on Kodi


6. Select File manager.

Step 6 Installing Vision of Destiny on Kodi


7. Click Add source.

Step 7 Installing Vision of Destiny on Kodi


8. Click on <None>.

Step 8 Installing Vision of Destiny on Kodi


9. Type exactly: https://tempest0580.github.io/

Step 9 Installing Tempest on Kodi


10. Click on OK.

Step 10 Installing Tempest on Kodi


11. Select enter a name for this media source.

Step 11 Installing Tempest on Kodi


12. Name is Tempest (this part isn’t critical as long as you remember the name).

Step 12 Installing Tempest on Kodi


13. Click on OK.

Step 13 Installing Tempest on Kodi


14. Click on OK.

Step 14 Installing Tempest on Kodi


15. Take one step back and click on Add-ons.

Step 15 Installing Tempest on Kodi


16. Select install from zip file.

Step 16 Installing Tempest on Kodi


17. Click on Tempest (or whatever you named the source).

Step 17 Installing Tempest on Kodi


18. Click on repository.tempest-1.0.5zip

Step 18 Installing Tempest addon on Kodi


19. Select on Install from repository.

Step 19 Installing Tempest on Kodi


20. Click on Tempest Repo.

Step 20 Installing Tempest on Kodi


21. Pick Video add-ons.

Step 21 Installing Tempest on Kodi


22. Select Tempest again.

Step 22 Installing Tempest on Kodi


23. Click on Install.

Step 23 Installing Tempest on Kodi


24. Select OK after reviewing the add-ons that will be installed.

Step 24 Installing Tempest on Kodi


25. You should see a popup in the upper right corner saying Tempest has installed. There will actually be multiple popups for the various components.

Step 25 Installing Tempest on Kodi


26. Click on Open to start the Tempest add-on.

Step 26 Installing Tempest on Kodi


Should I Use This App With a VPN?

surfshark logo

We recommend you use a VPN for the following reasons:

  • Many of the addons you will access in Streamline will direct you to links for illegally distributed content. Without a VPN you may find many of these links do not work because your ISP is blocking your access
  • If you try to access Live TV Channels in other countries through Streamline your access may also be blocked. This is because these channels can detect your IP is not in that country and will block you from accessing their channels.
  • Using a VPN, you can encrypt your requests, change your IP, and also the location where your IP originates from. Thus, allowing you to circumvent any blocks or firewalls in place to do your accessing most restricted content
  • A VPN also helps you maintain anonymity, safety, and privacy online from unwanted third parties.

Note: For more information about Surfshark, please read our Surfshark Review.


Grab your subscription now!


How to Install Surfshark VPN on Firestick

If your Firestick still has the older interface, read this article to learn how to update it: Update Firestick Interface.

Follow our screenshots below to install the SurfShark VPN app on your Fire TV stick.

1. Go to the Home screen of your Firestick.

step 1 Install Surfshark VPN on Firestick


2. Navigate towards the Find tab. Press the Search button from the resulting dropdown.

step 2 Install Surfshark VPN on Firestick


3. Type in the keyword of SurfShark and select from the suggestions that will appear.

step 3 Install Surfshark VPN on Firestick


4. Click the official SurfShark icon from your search results.

step 4 Install Surfshark VPN on Firestick


5. Press the Download (You own it) button.

step 5 Install Surfshark VPN on Firestick


6. The SurfShark VPN installer will download on your device.

step 6 Install Surfshark VPN on Firestick


7. SurfShark VPN’s app will automatically install itself on your Fire TV stick.

step 7 Install Surfshark VPN on Firestick


8. Press the Open button after completing SurfShark VPN’s installation process.

step 8 Install Surfshark VPN on Firestick


9. Please wait for the SurfShark VPN to load its user interface.

step 9 Install Surfshark VPN on Firestick


10. You can now log in with your SurfShark VPN account credentials.

step 10 Install Surfshark VPN on Firestick

Learn more about Surfshark and Grab the Best Surfshark Deal Now!


Install Surfshark on Firestick

Best Surfshark Deal


Other VPNs to Consider

NordVPN (Best for Streaming)

Best Features

  • 5000+ Server in 50+ Countries 
  • Military-Grade Encryption
  • Fast Connection Speed
  • Suitable to a lot of devices
  • No-Log Policy

Prices
  • Complete $5.89 per month (64% Discount)
  • Plus $4.59 per month (56% Discount)
  • Standard $3.69 per month (55% Discount)

Best Features

  • 750+ High-speed VPN Servers in 43 Locations
  • Military-Grade Encryption
  • Fastest HD Streaming and Gaming
  • 30-Day Money-Back Guarantee
  • Unlimited Data & Devices
  • No-Log Policy

Prices
  • 3 Years $1.99 per month (82% Discount)
  • 1 Years $3.29 per month (70% Discount)
  • 1 Month $10.99 per month

IPVanish VPN (Most Secure)

Best Features

  • 1200+ Servers in 60+ Countries around the world
  • Unlimited Connections
  • No-Log Policy
  • Top Notch Military-Grade VPN Protocols and Encryptions
  • 100% Safe and Secured
  • Most Trusted VPN
  • Best VPN for Firestick
  • 30-Day Money-Back Guarantee

Prices
  • Yearly $3.99 per month (63% Discount) – 30 days risk free + Ransomware & Malware Protection
  • Quarterly $5.32 per month (51% Discount)
  • Monthly $10.99 per month


For more VPN discounts, go to ReviewVPN Deals and purchase the best VPN for you.

Click here to get the lowest price on Surfshark through our exclusive limited-time offer.
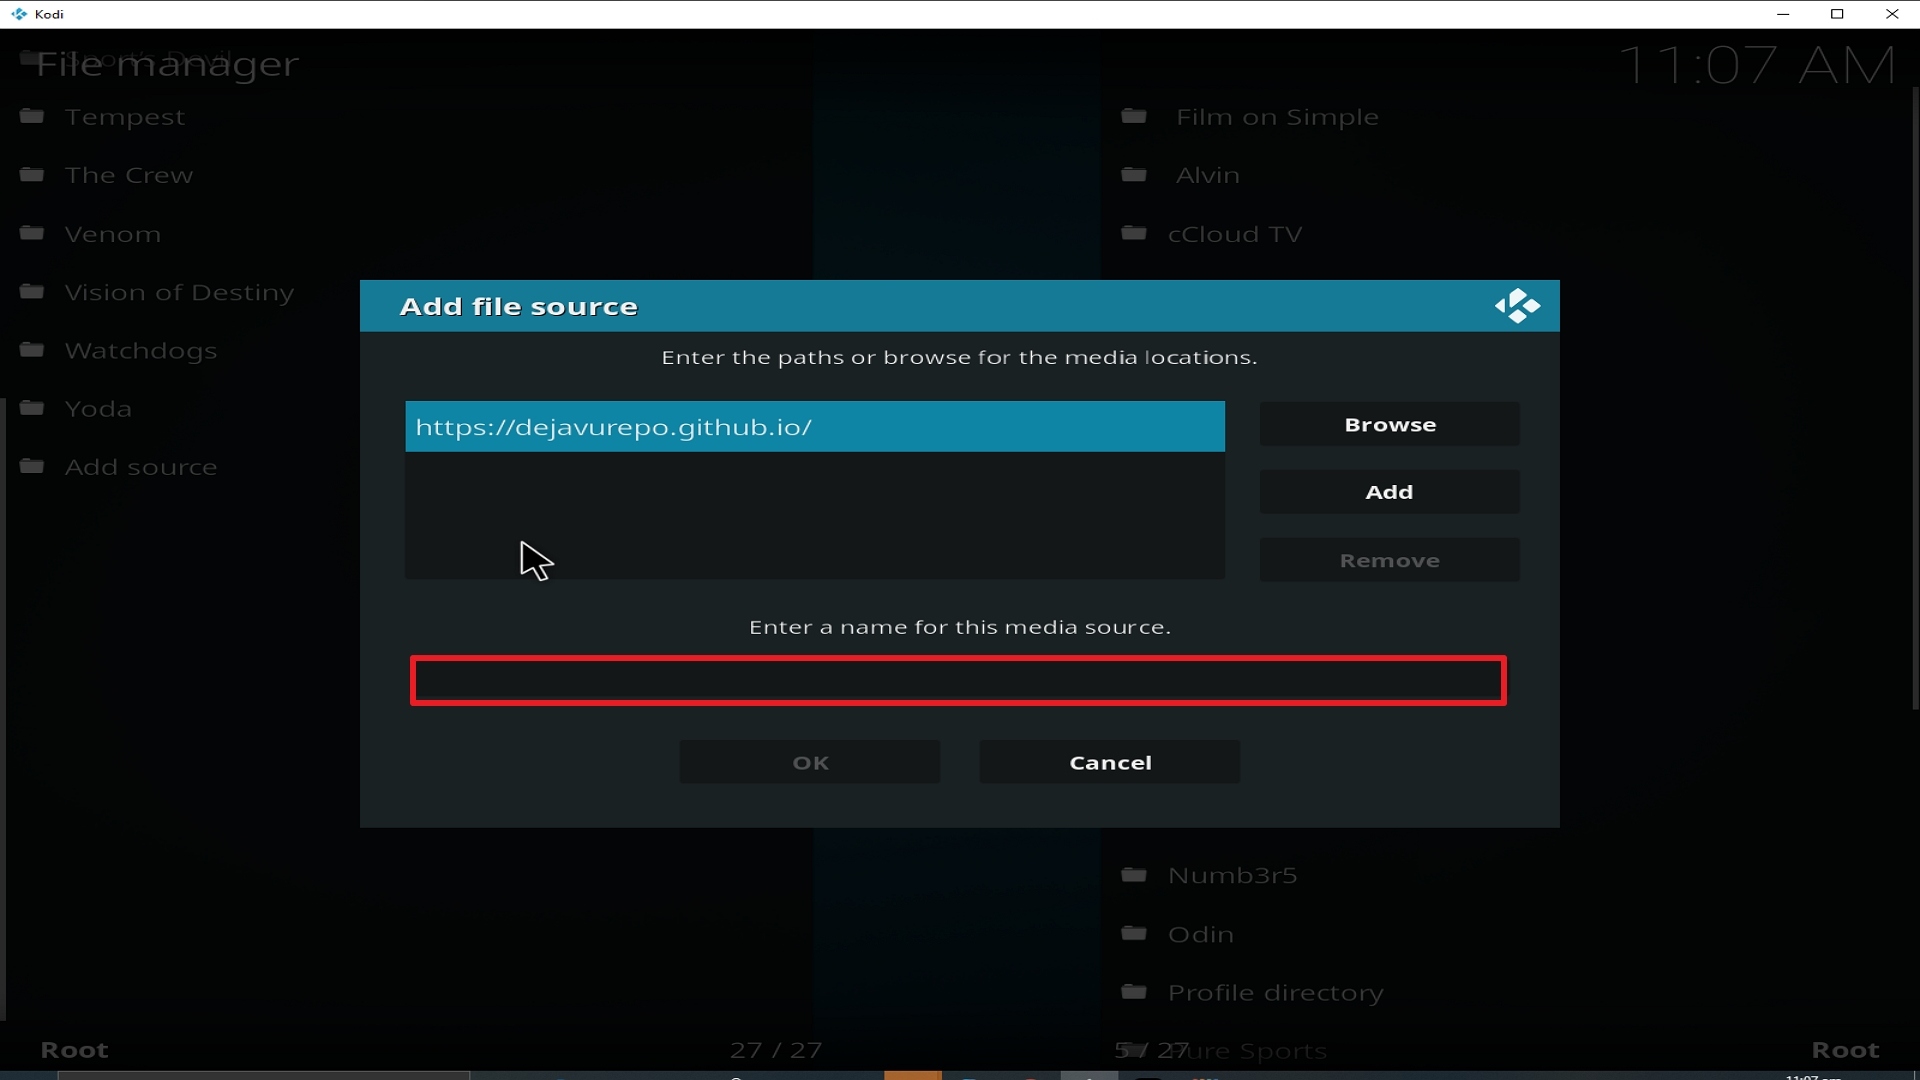
 

2