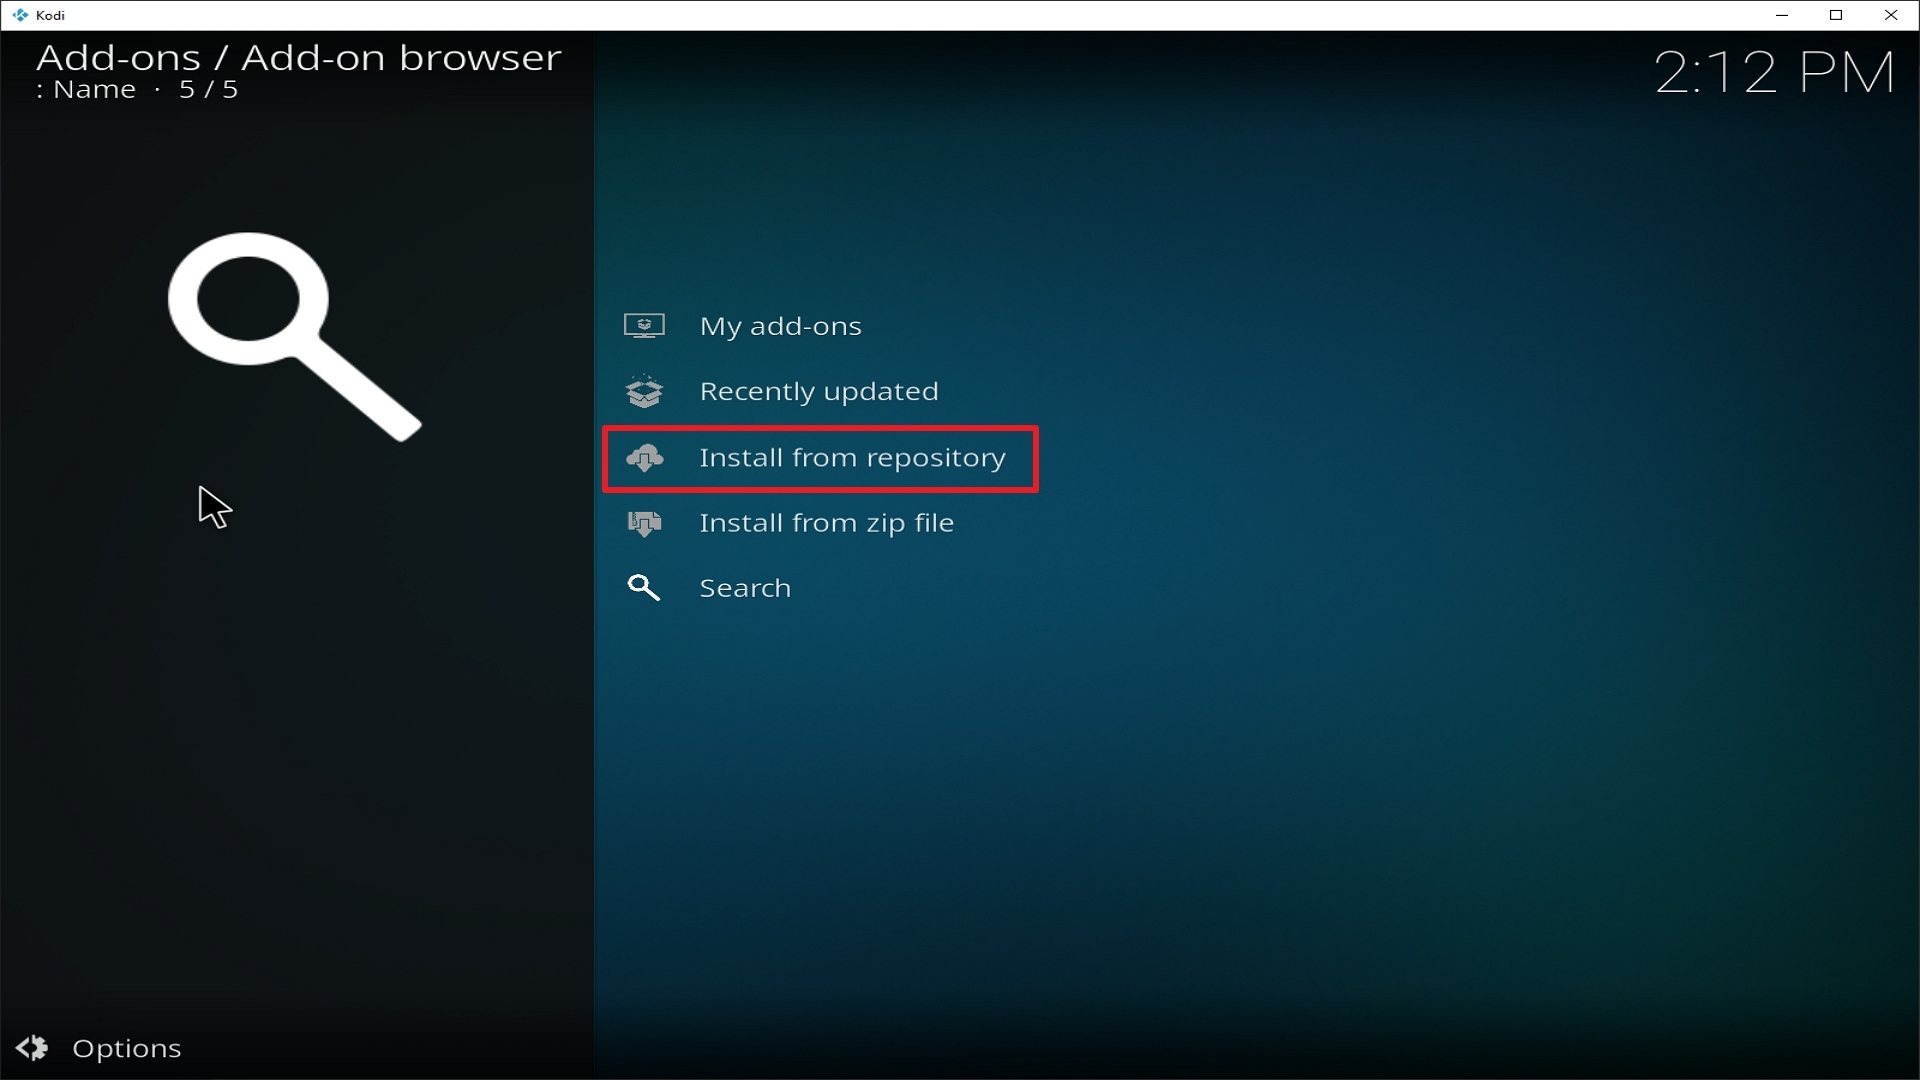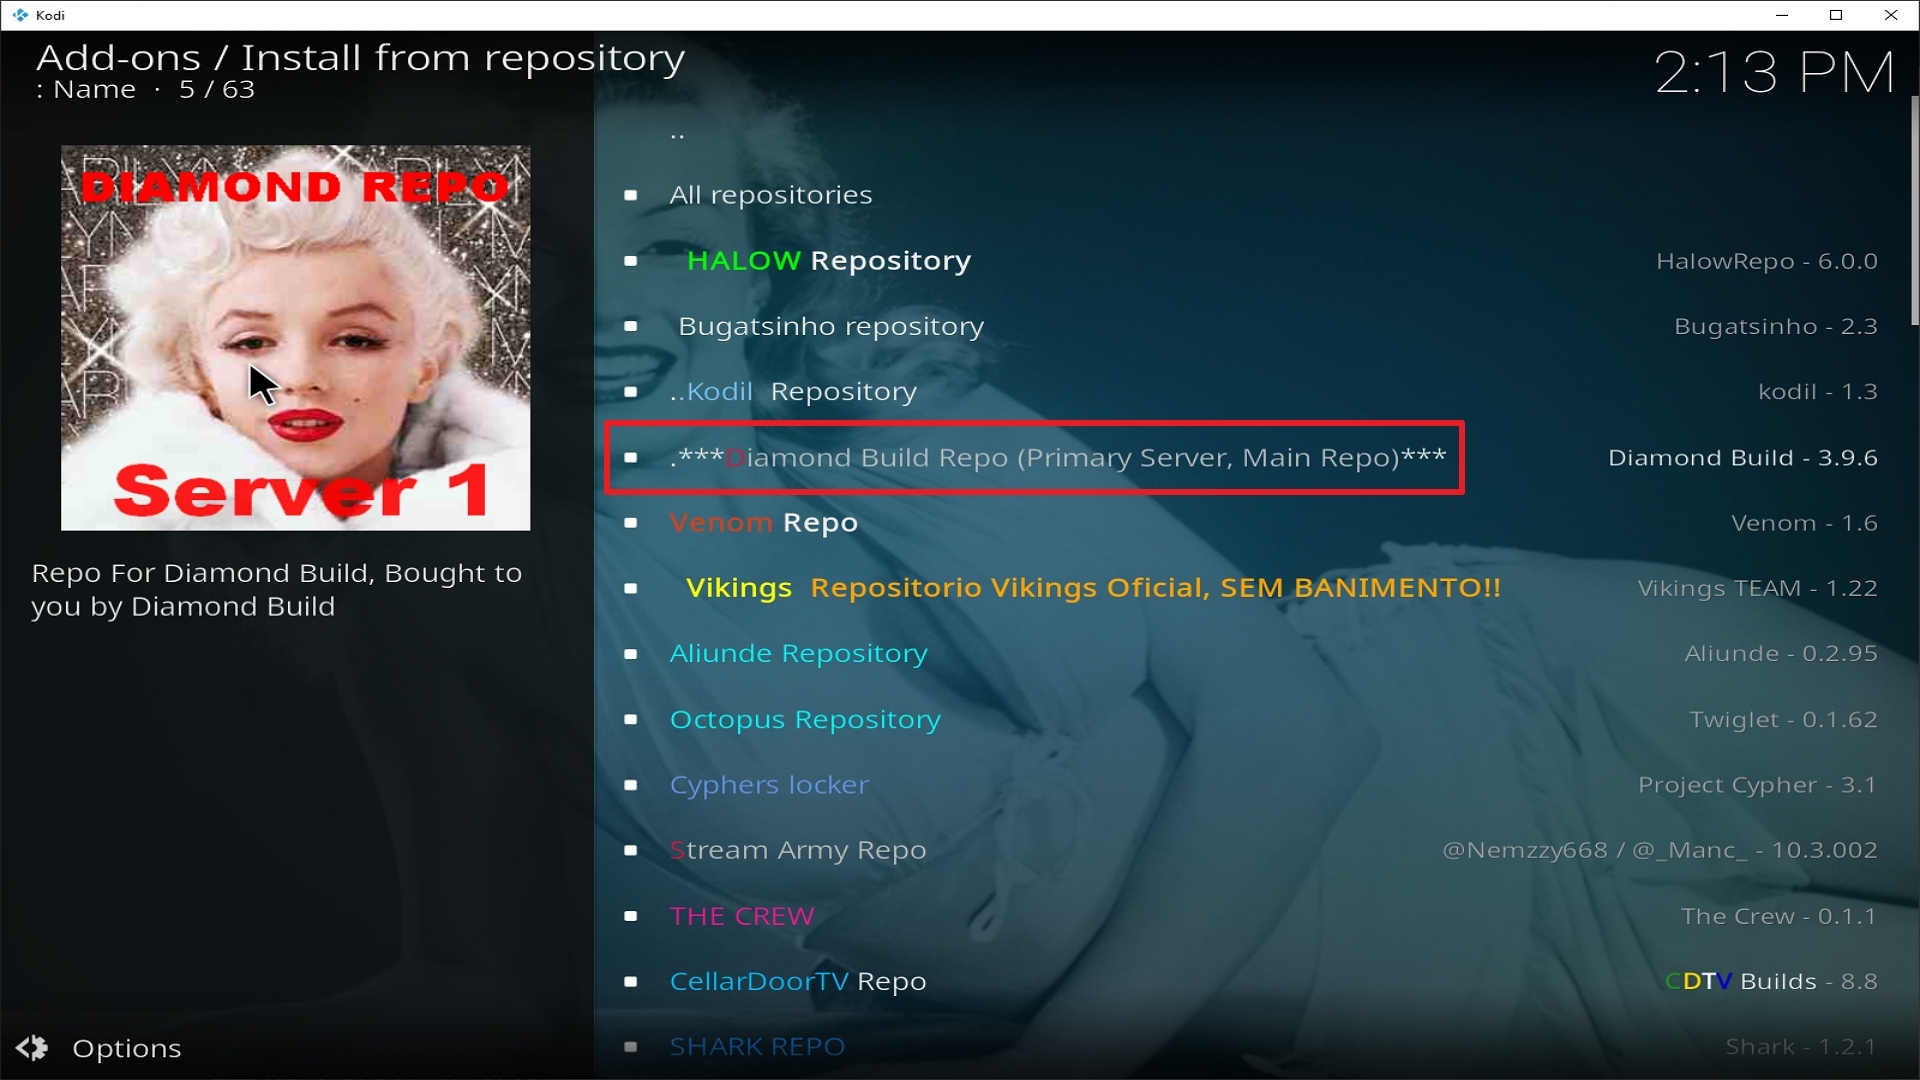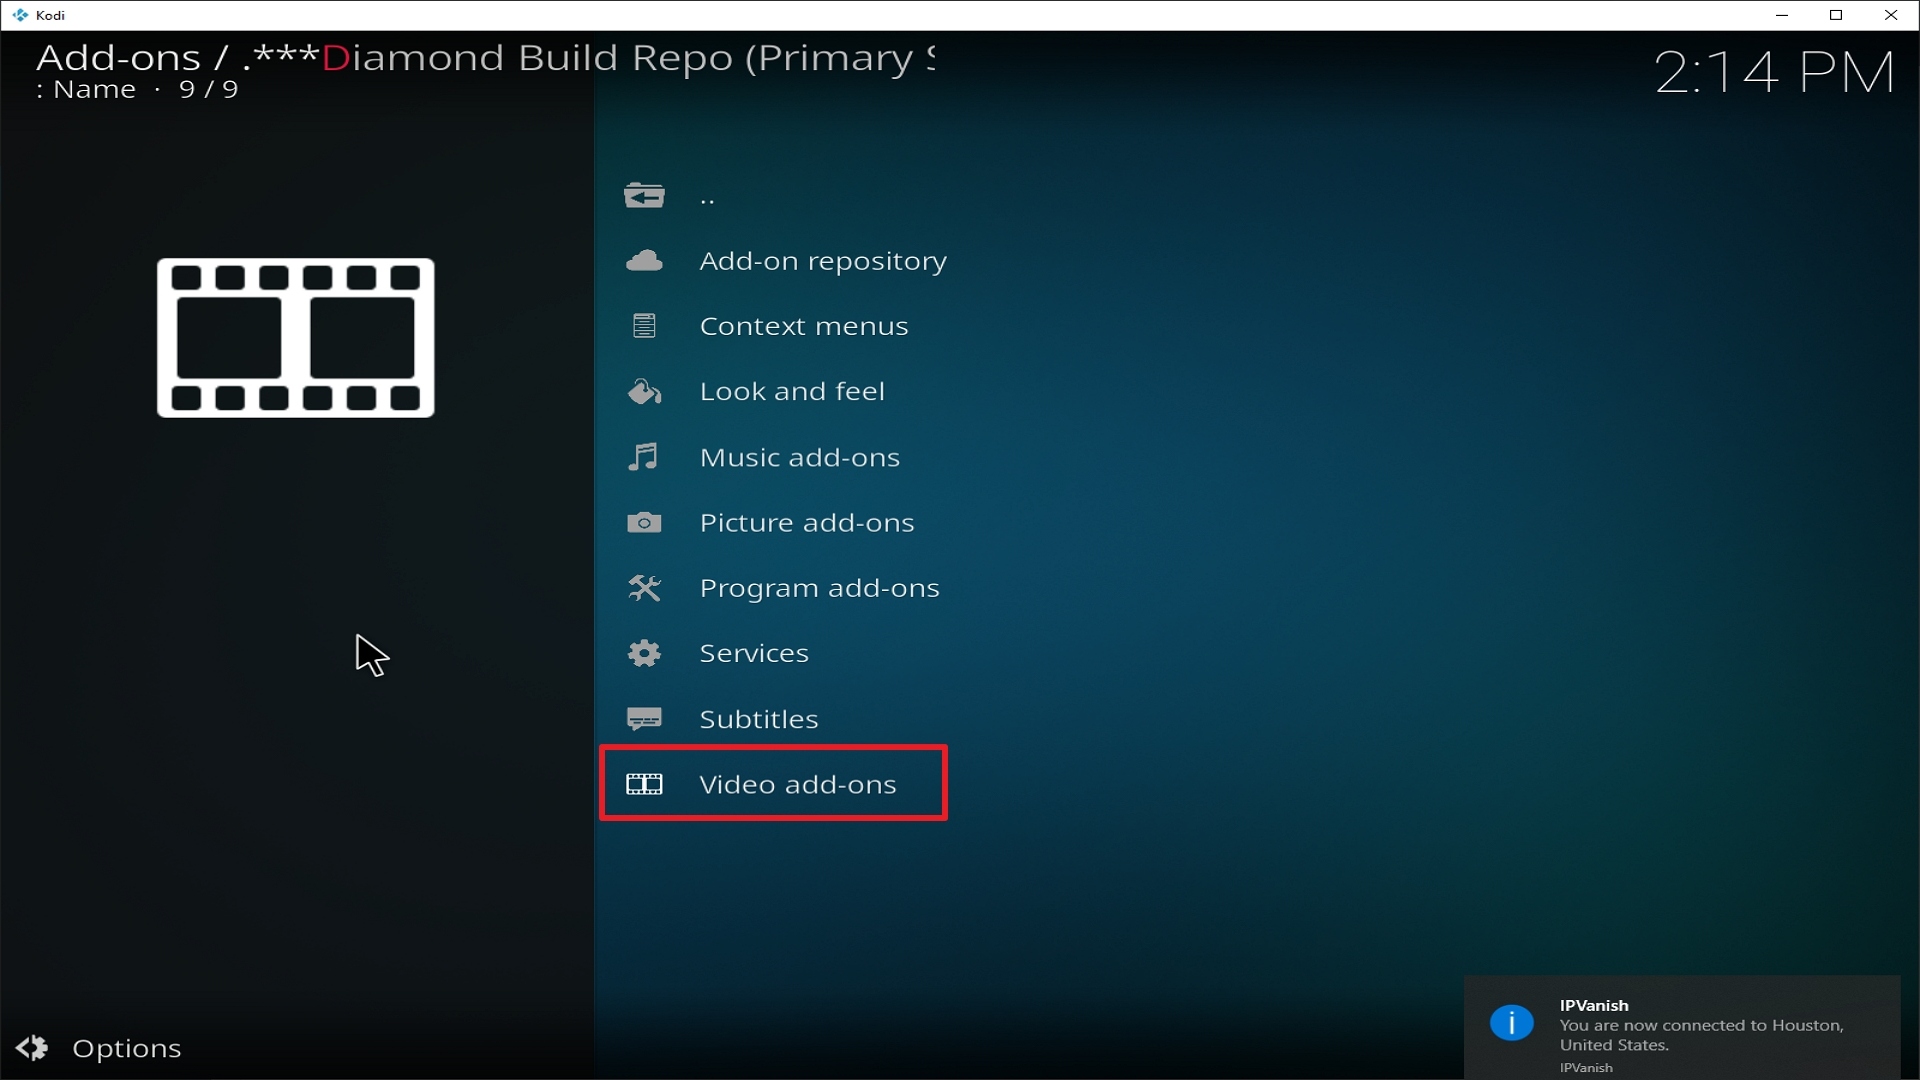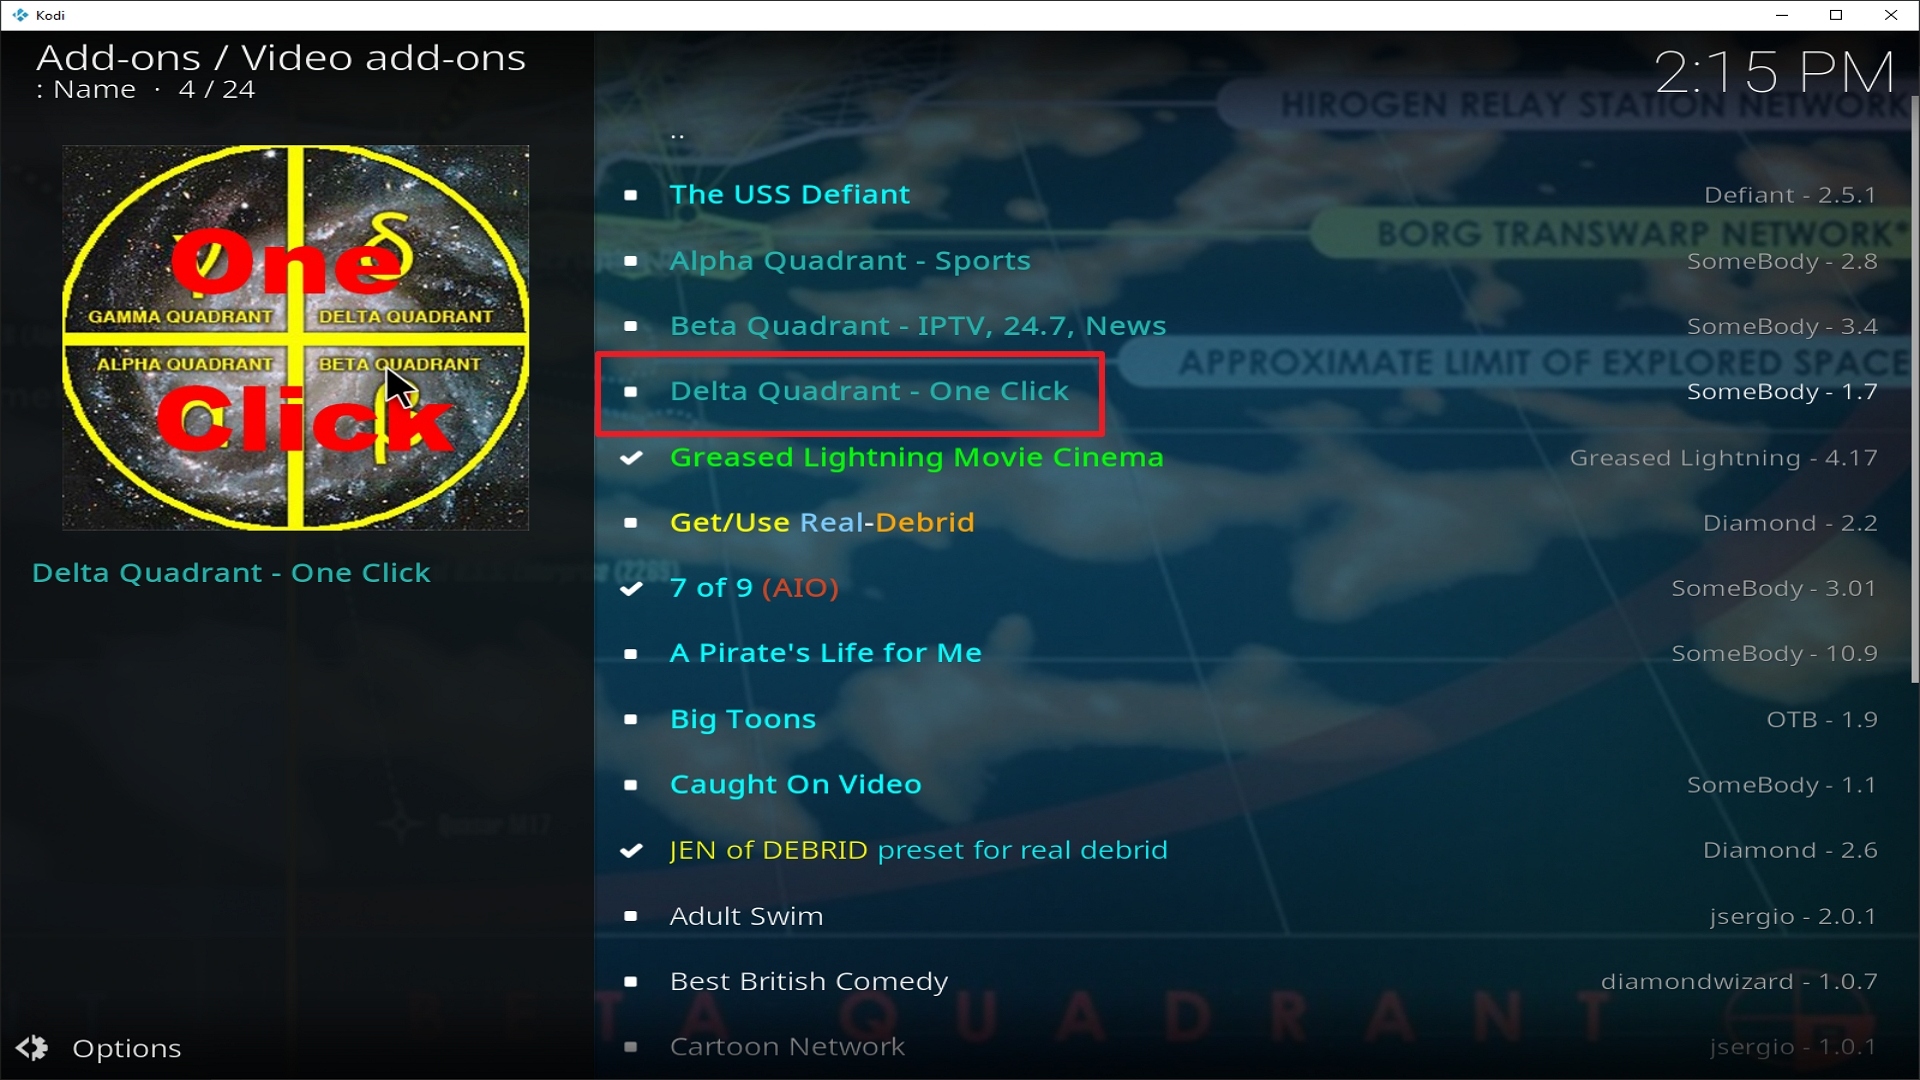
Install Galaxy Kodi Addon

Galaxy Kodi Video Addon

Source: http://theuforepo.us/repo 

People often find themselves complaining about paying for a cable subscription that is way too expensive. Come to think of it who would want to pay for $150 when there is an alternative at a fraction of the cost? This is where Kodi in all its gloriousness comes into play.
 

For some years now, Kodi has helped a lot of people in viewing high-quality content that doesn’t cost anything at all and with the help of add-ons the entertainment experience has evolved as well. One of the best add-ons around is Galaxy Kodi Add-on and a lot of users prefer it due to its versatile nature.

Galaxy Kodi Video Add-on is a fork of the most popular and successful Exodus/Covenant add-on. It provides an extensive array of content that will make most Kodi users find sufficient to their liking. You will be able to stream Movies, TV Shows, Channels, Documentaries, and a whole lot more with this add-on. It is a multi-source add-on that has a variety of purposes.


ANONYMOUSLY


Features

  • High-Quality Video 
  • Information on link providers
  • Descriptive summary for each title
  • Very simple and easy UI


Installation Guide

  1. Launch Kodi on your device
  2. Open the “Gear Icon” and choose “System”
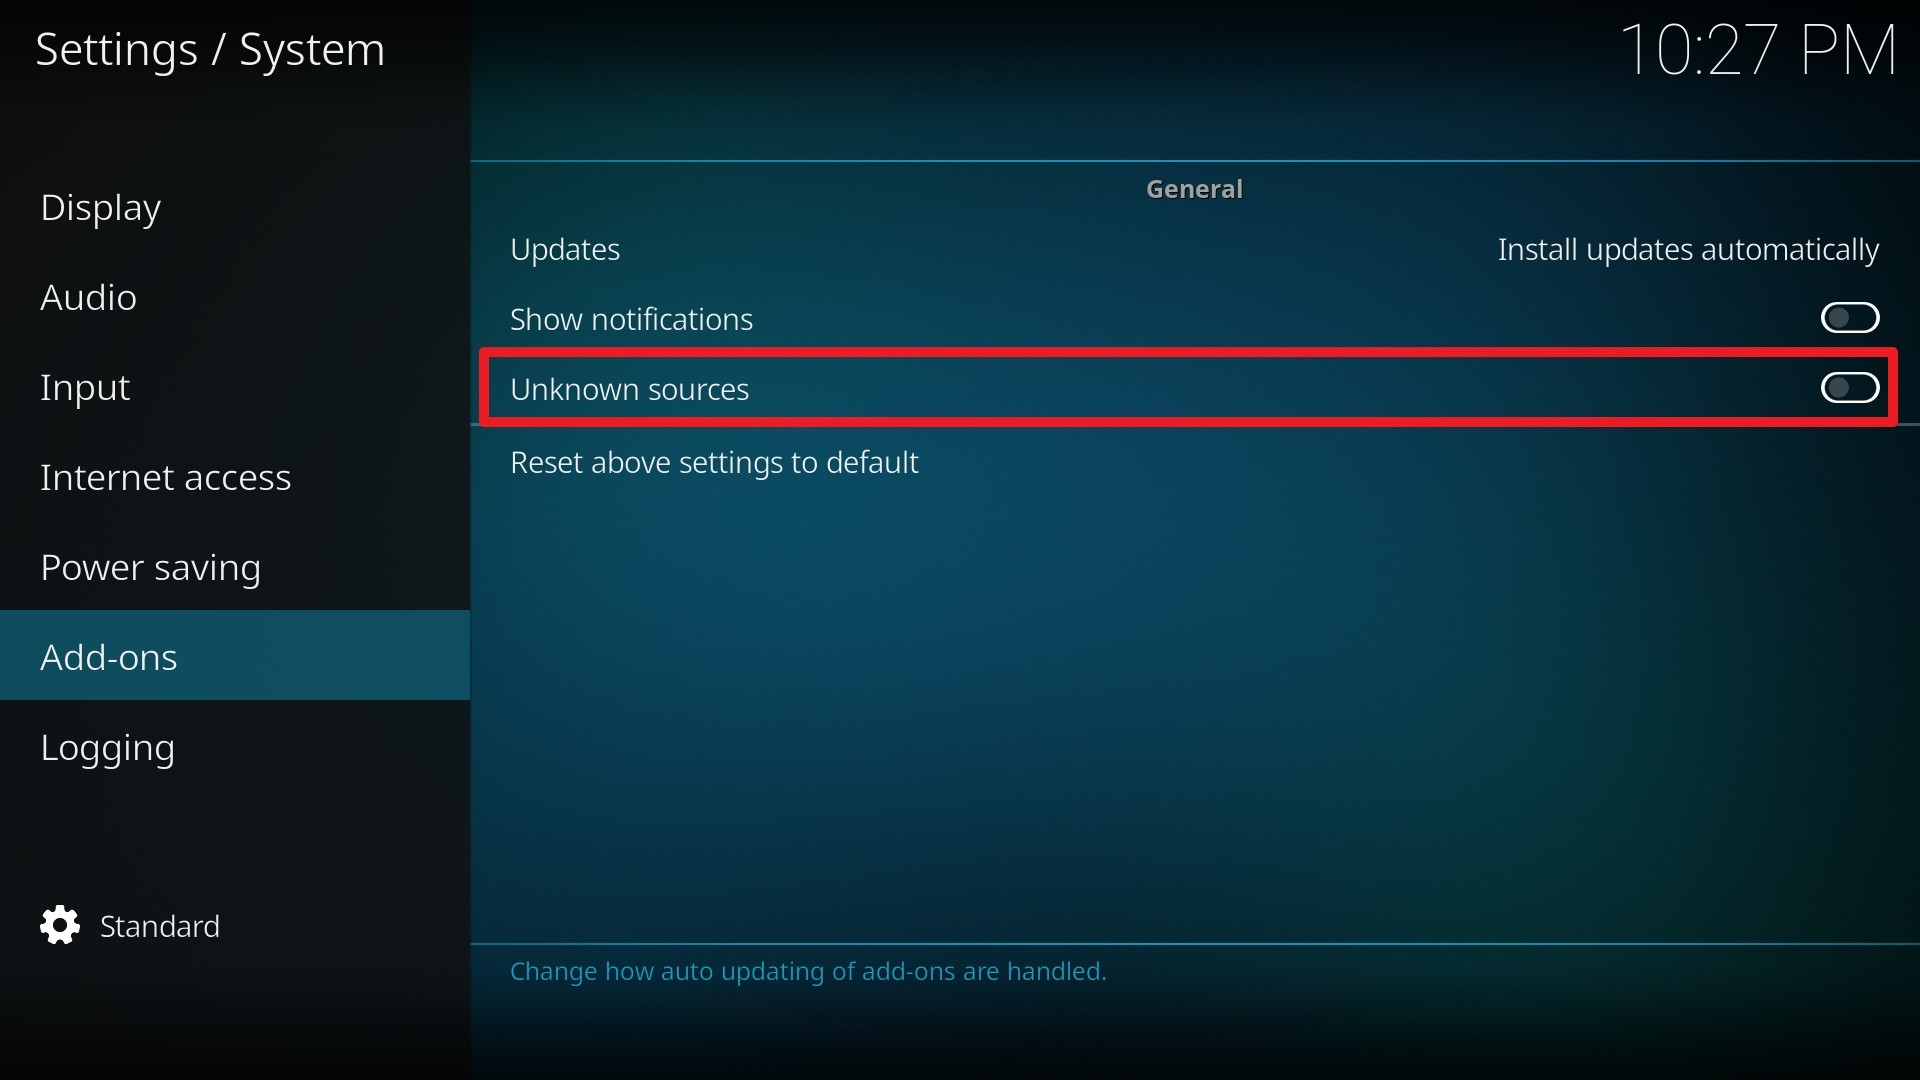
  3. Select the add-ons menu, turn on the “Unknown Sources” by clicking “yes”
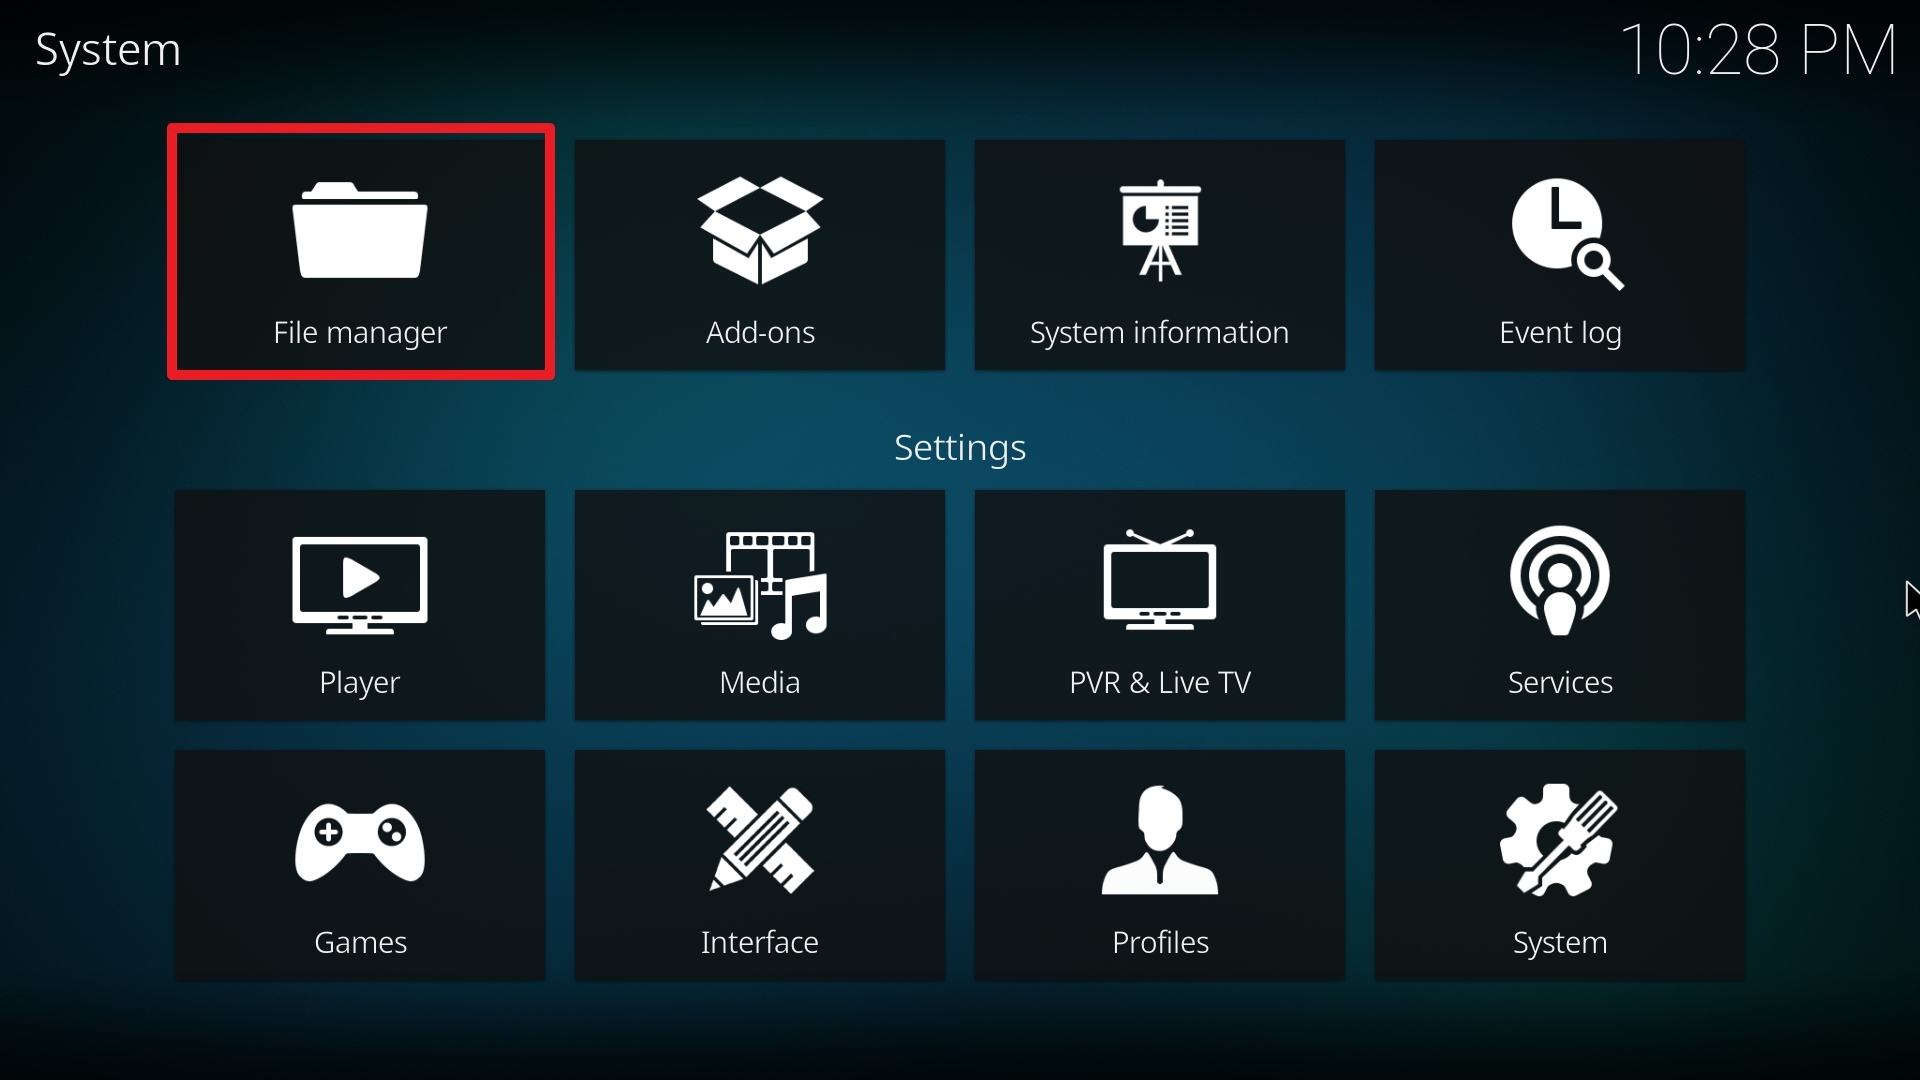
  4. Go back to the “systems” page and choose “File Manager”
  5. Choose Add source and select “none”
  6. Go to http://theuforepo.us/repo/
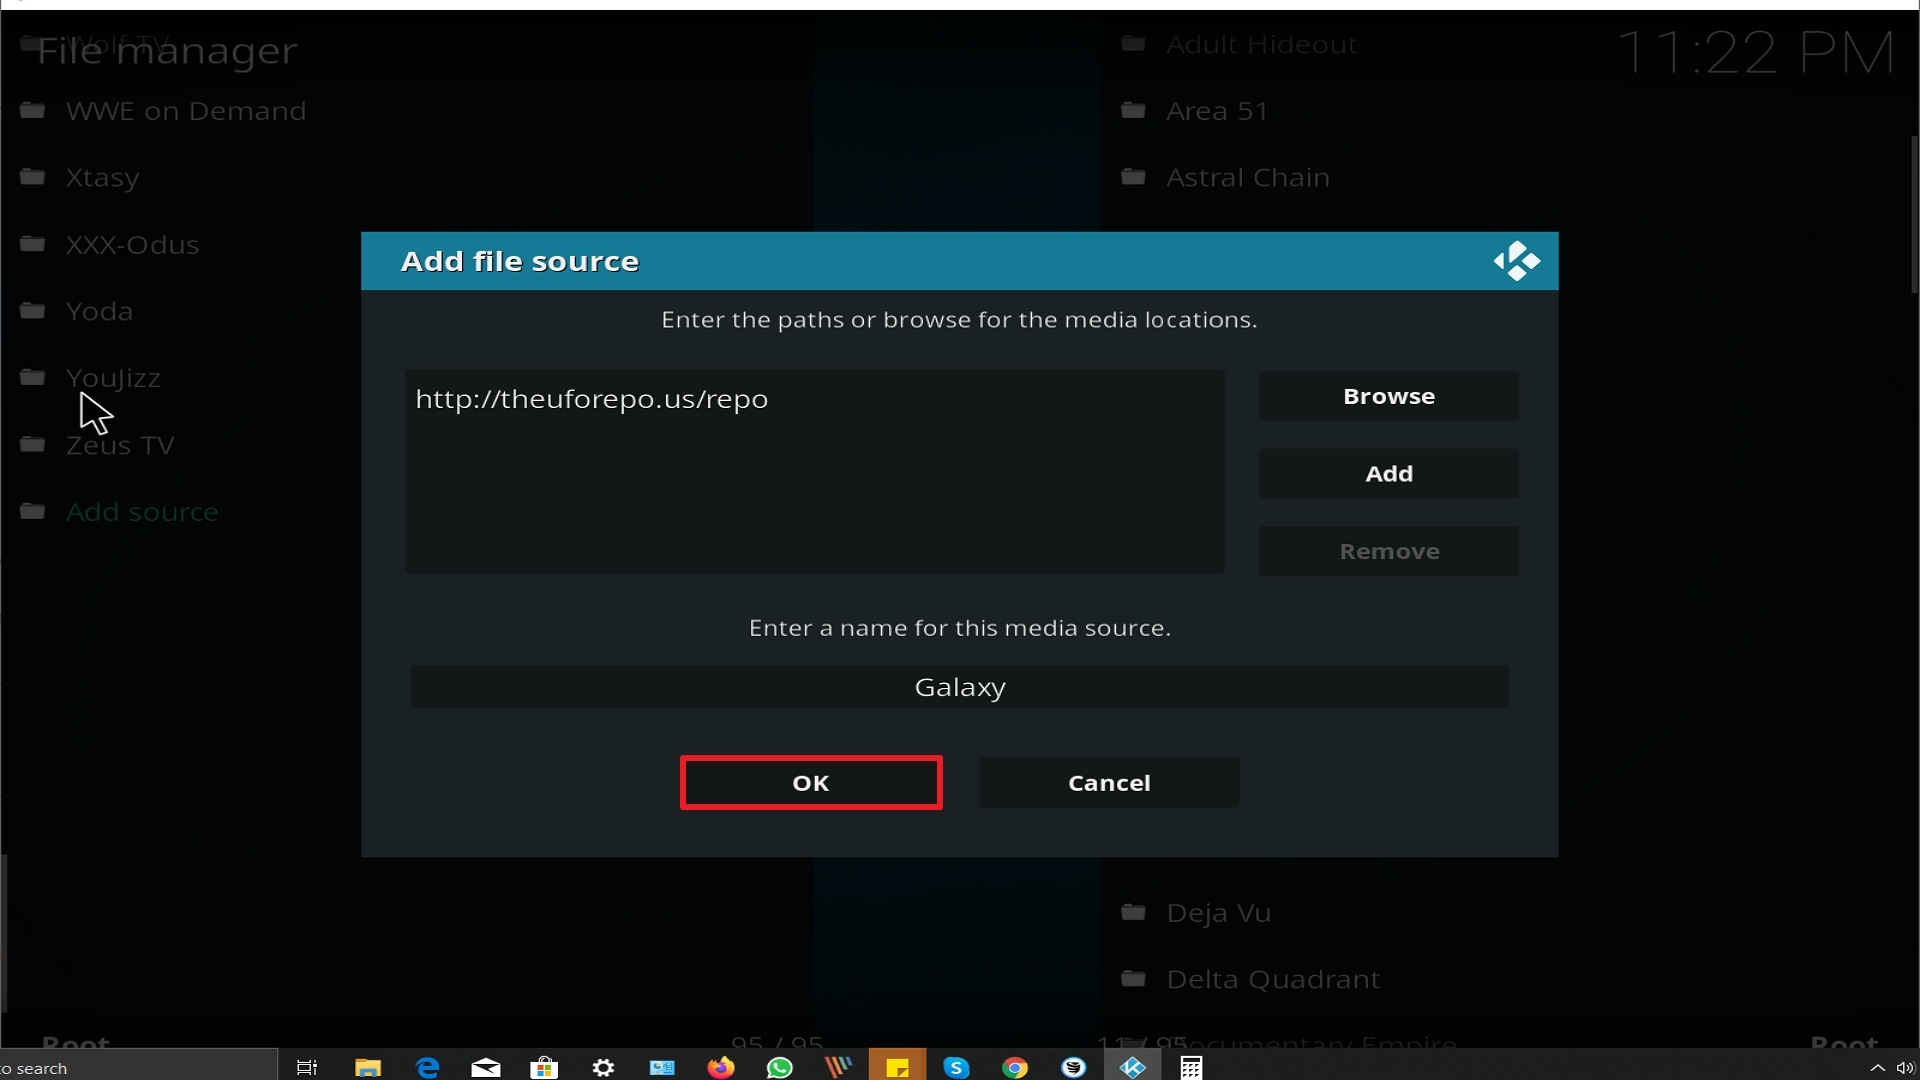
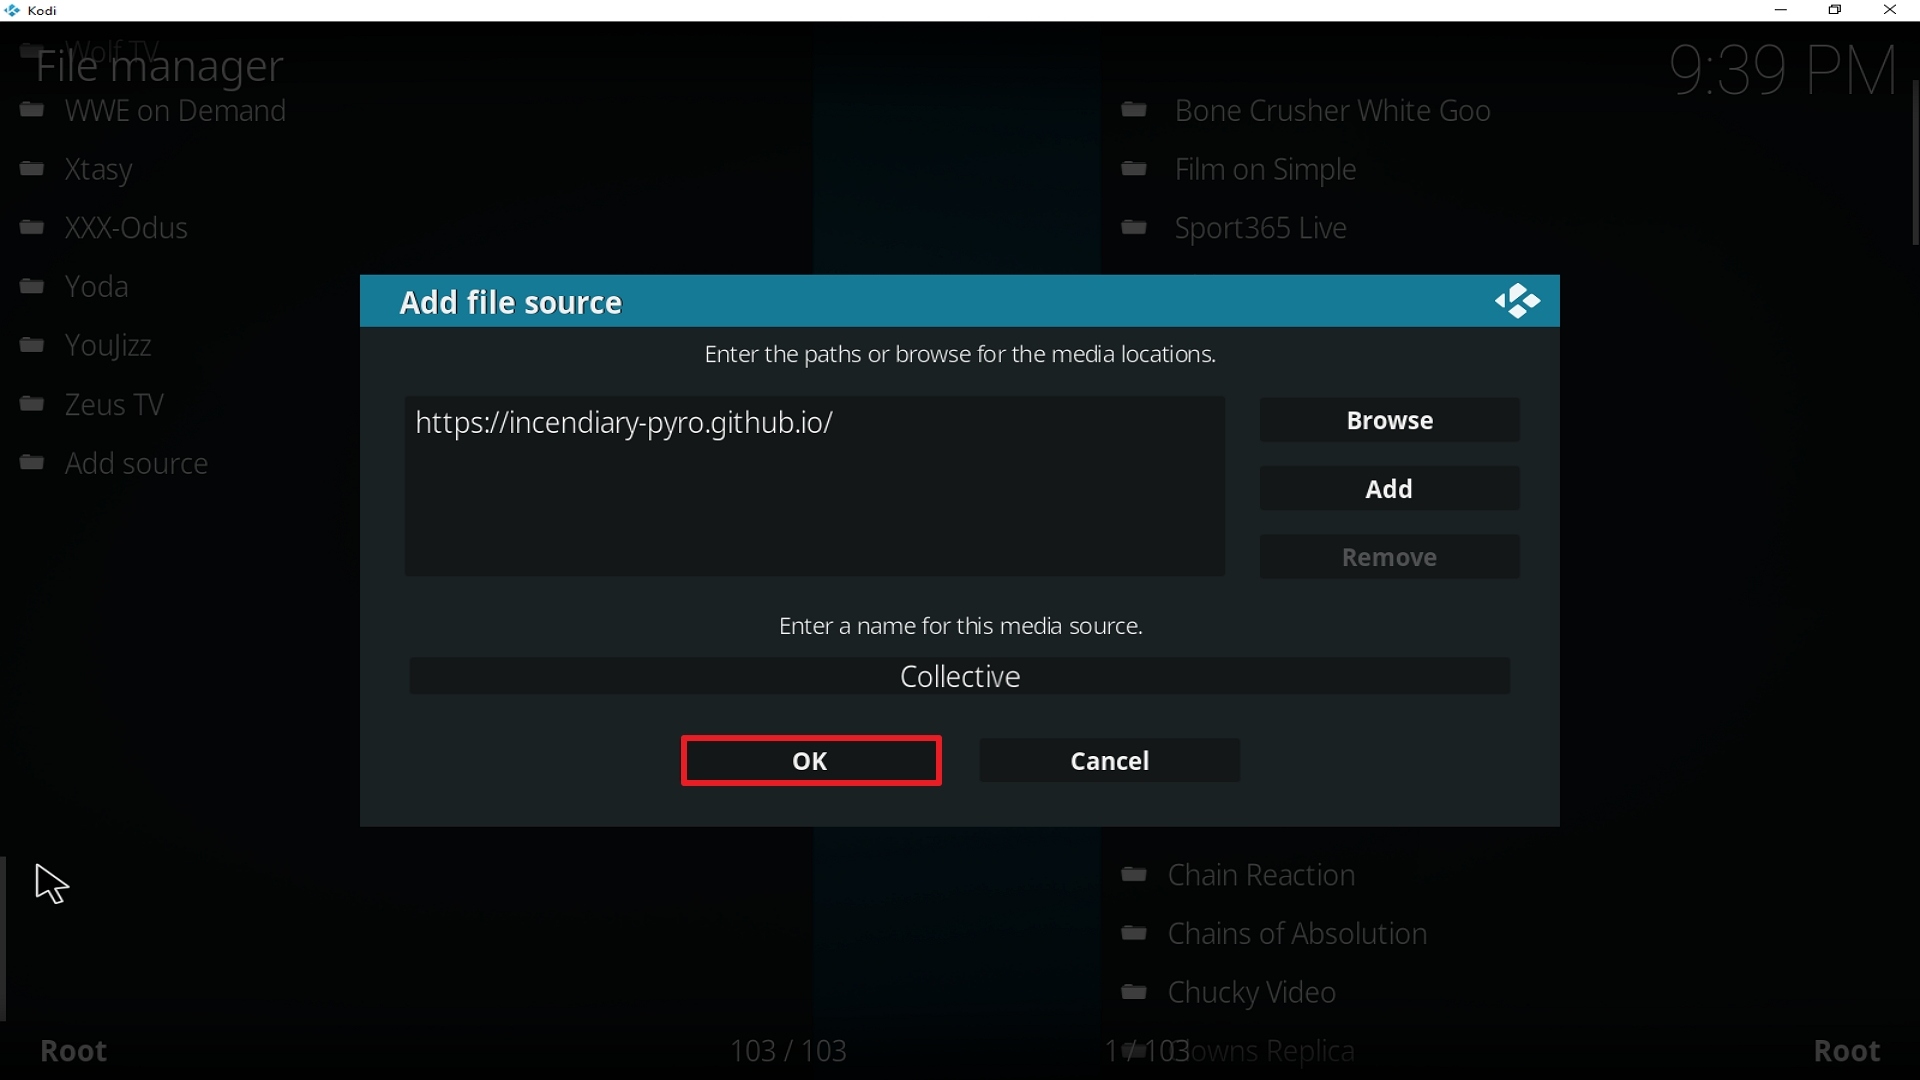
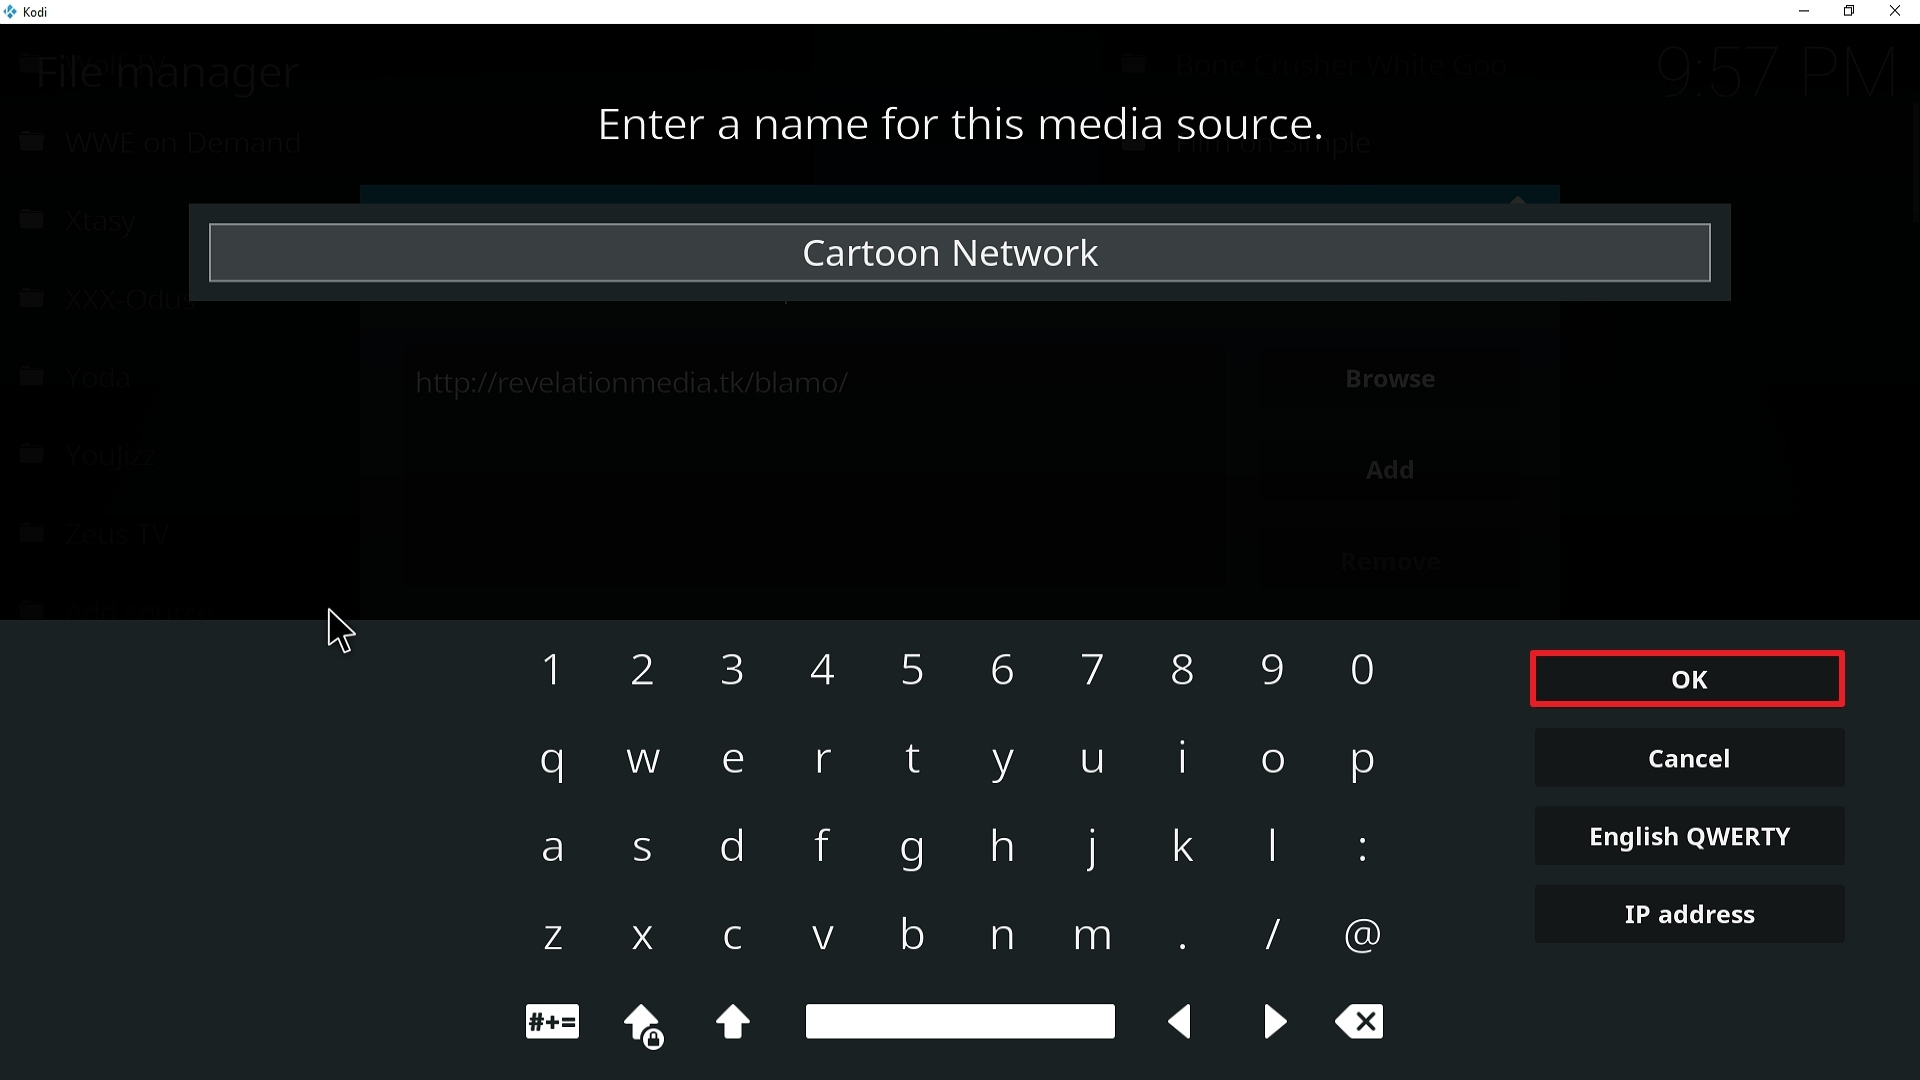
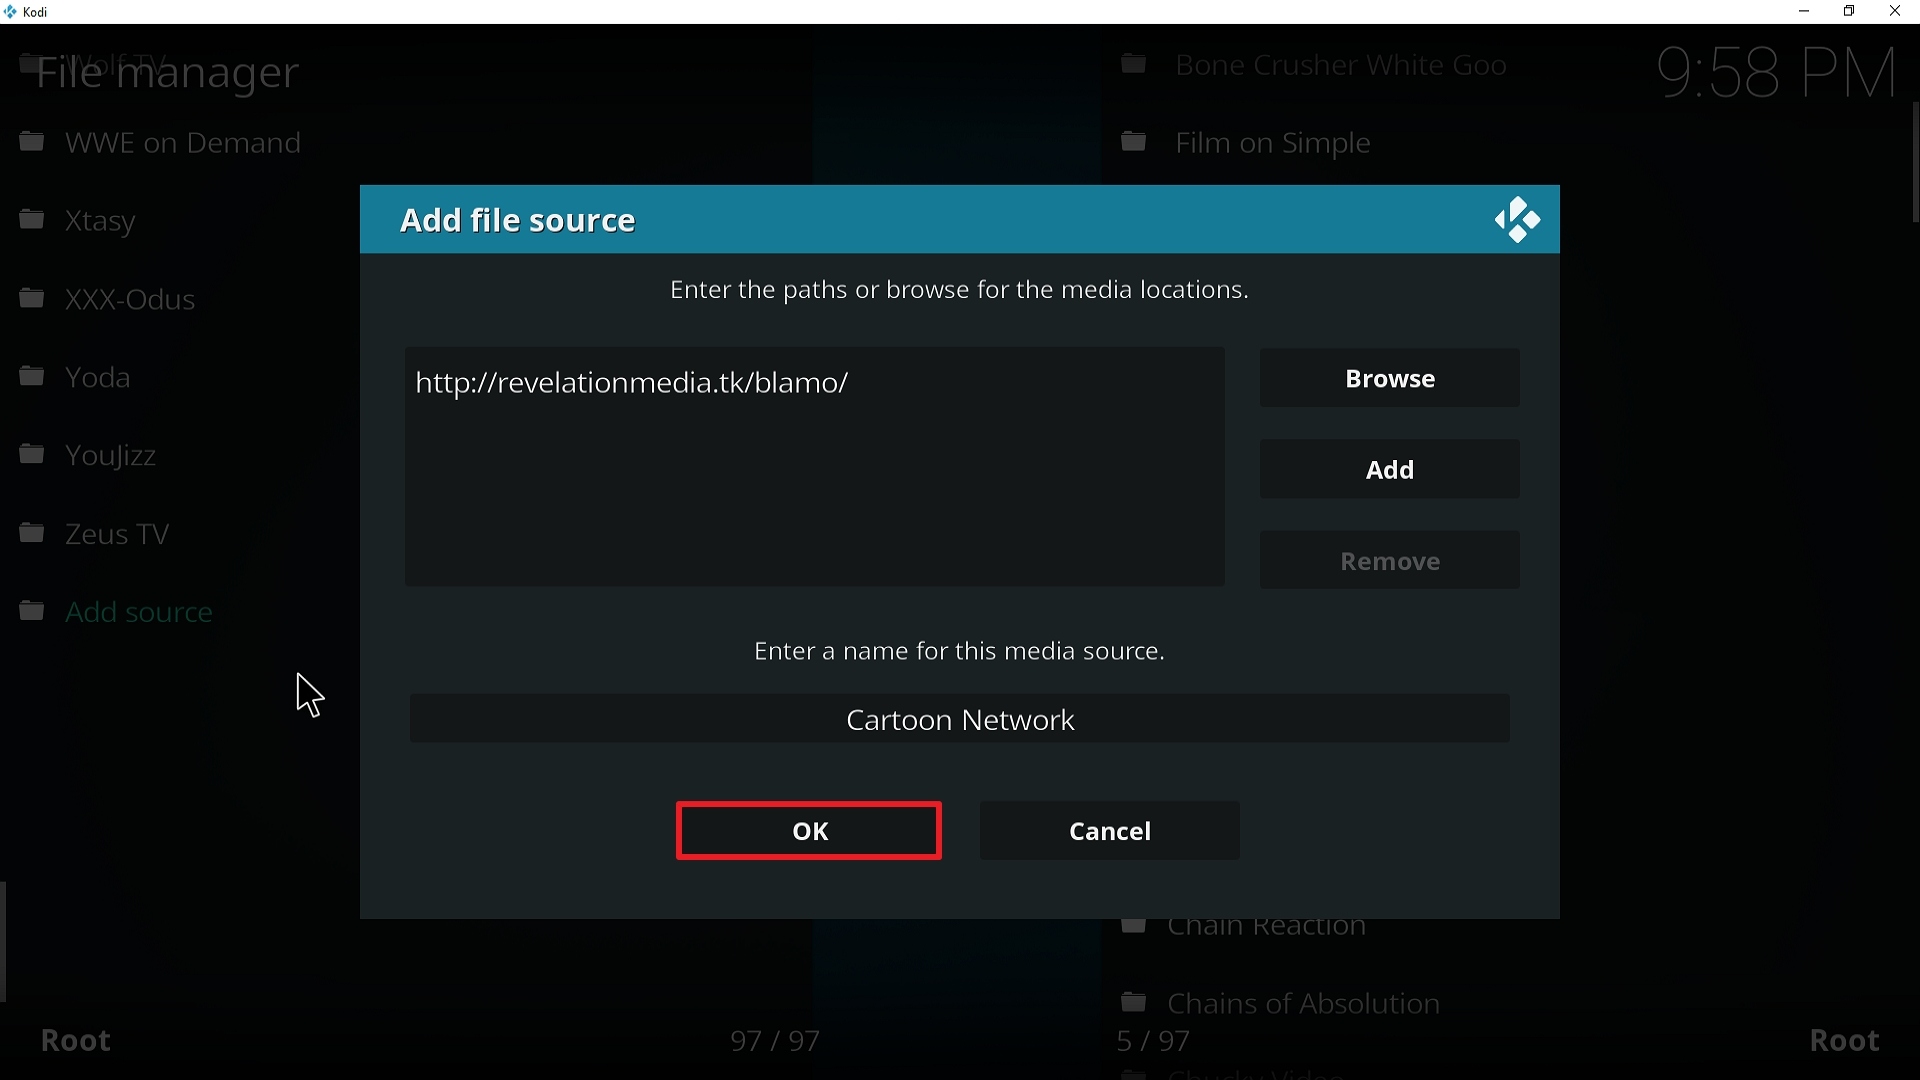
  7. Highlight the source and rename it to “UFO” or any name you would like to use to identify this particular source and click “ok”
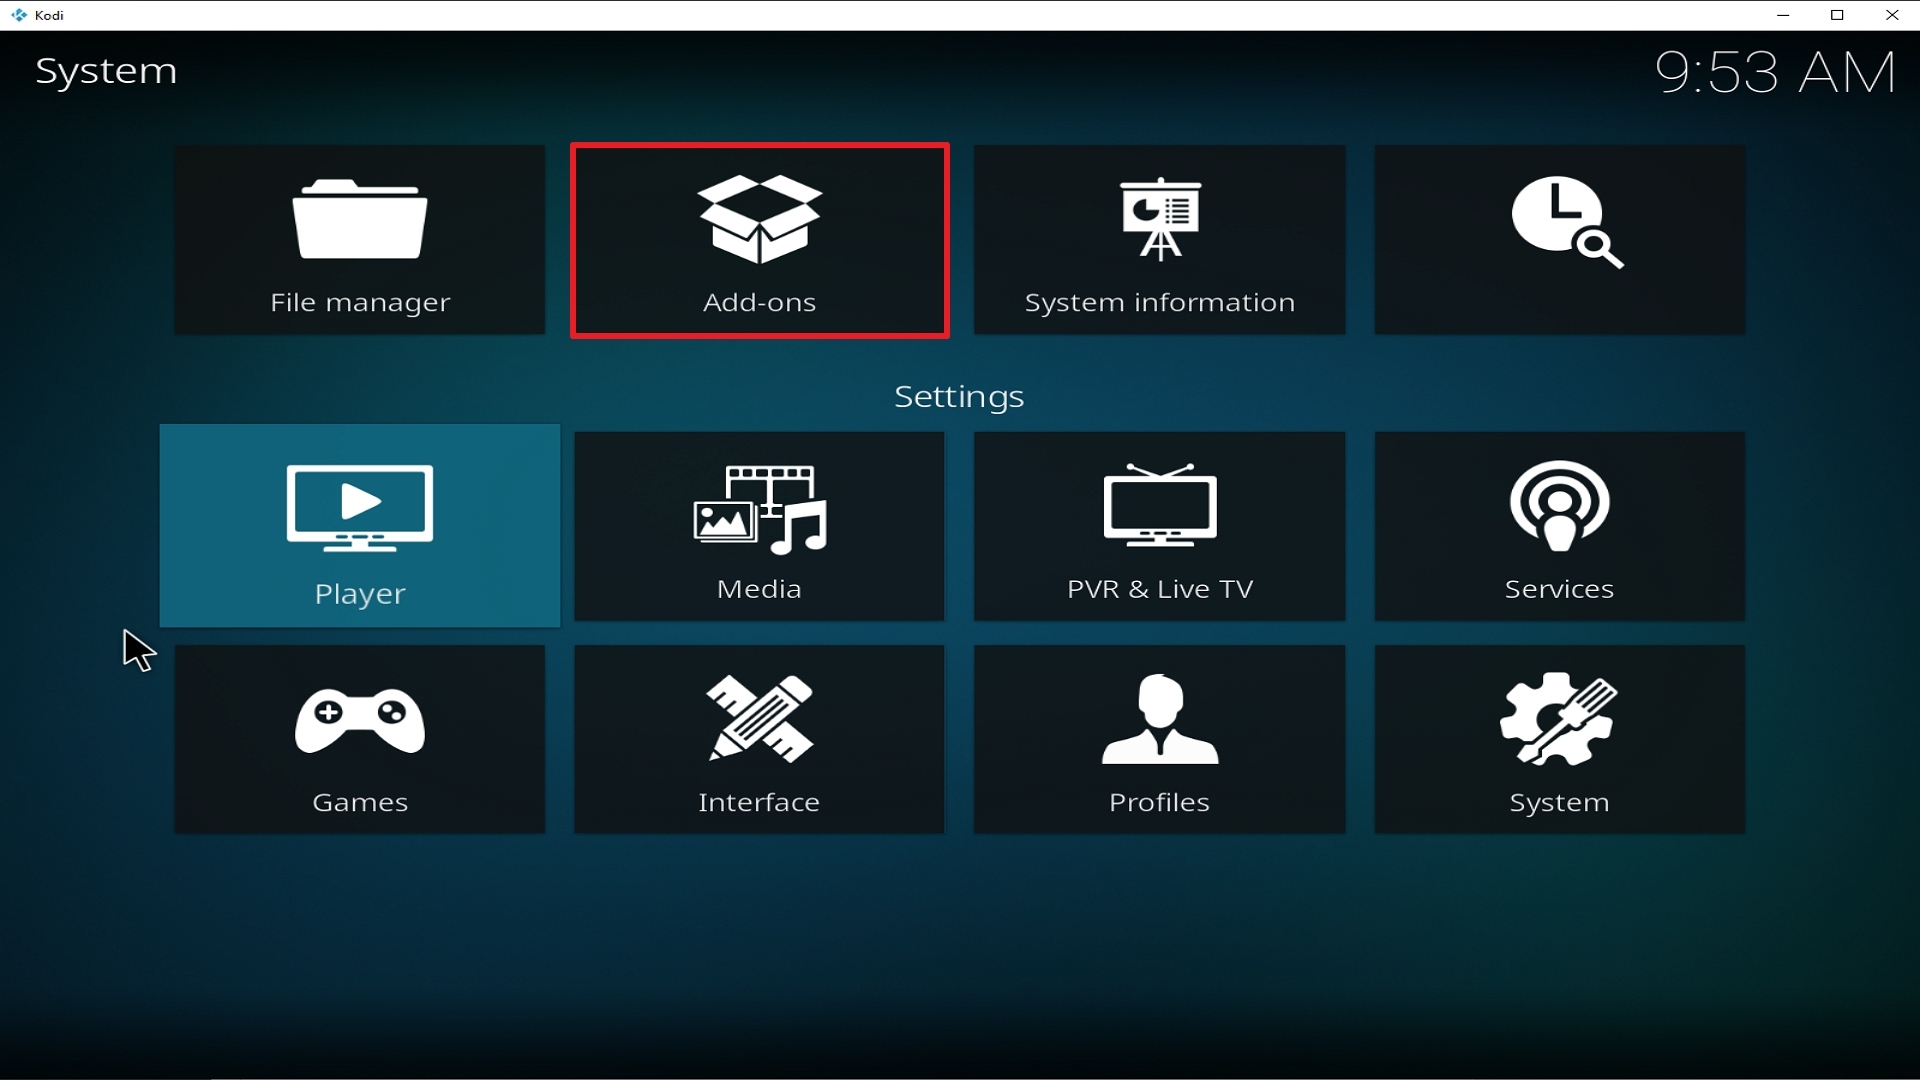
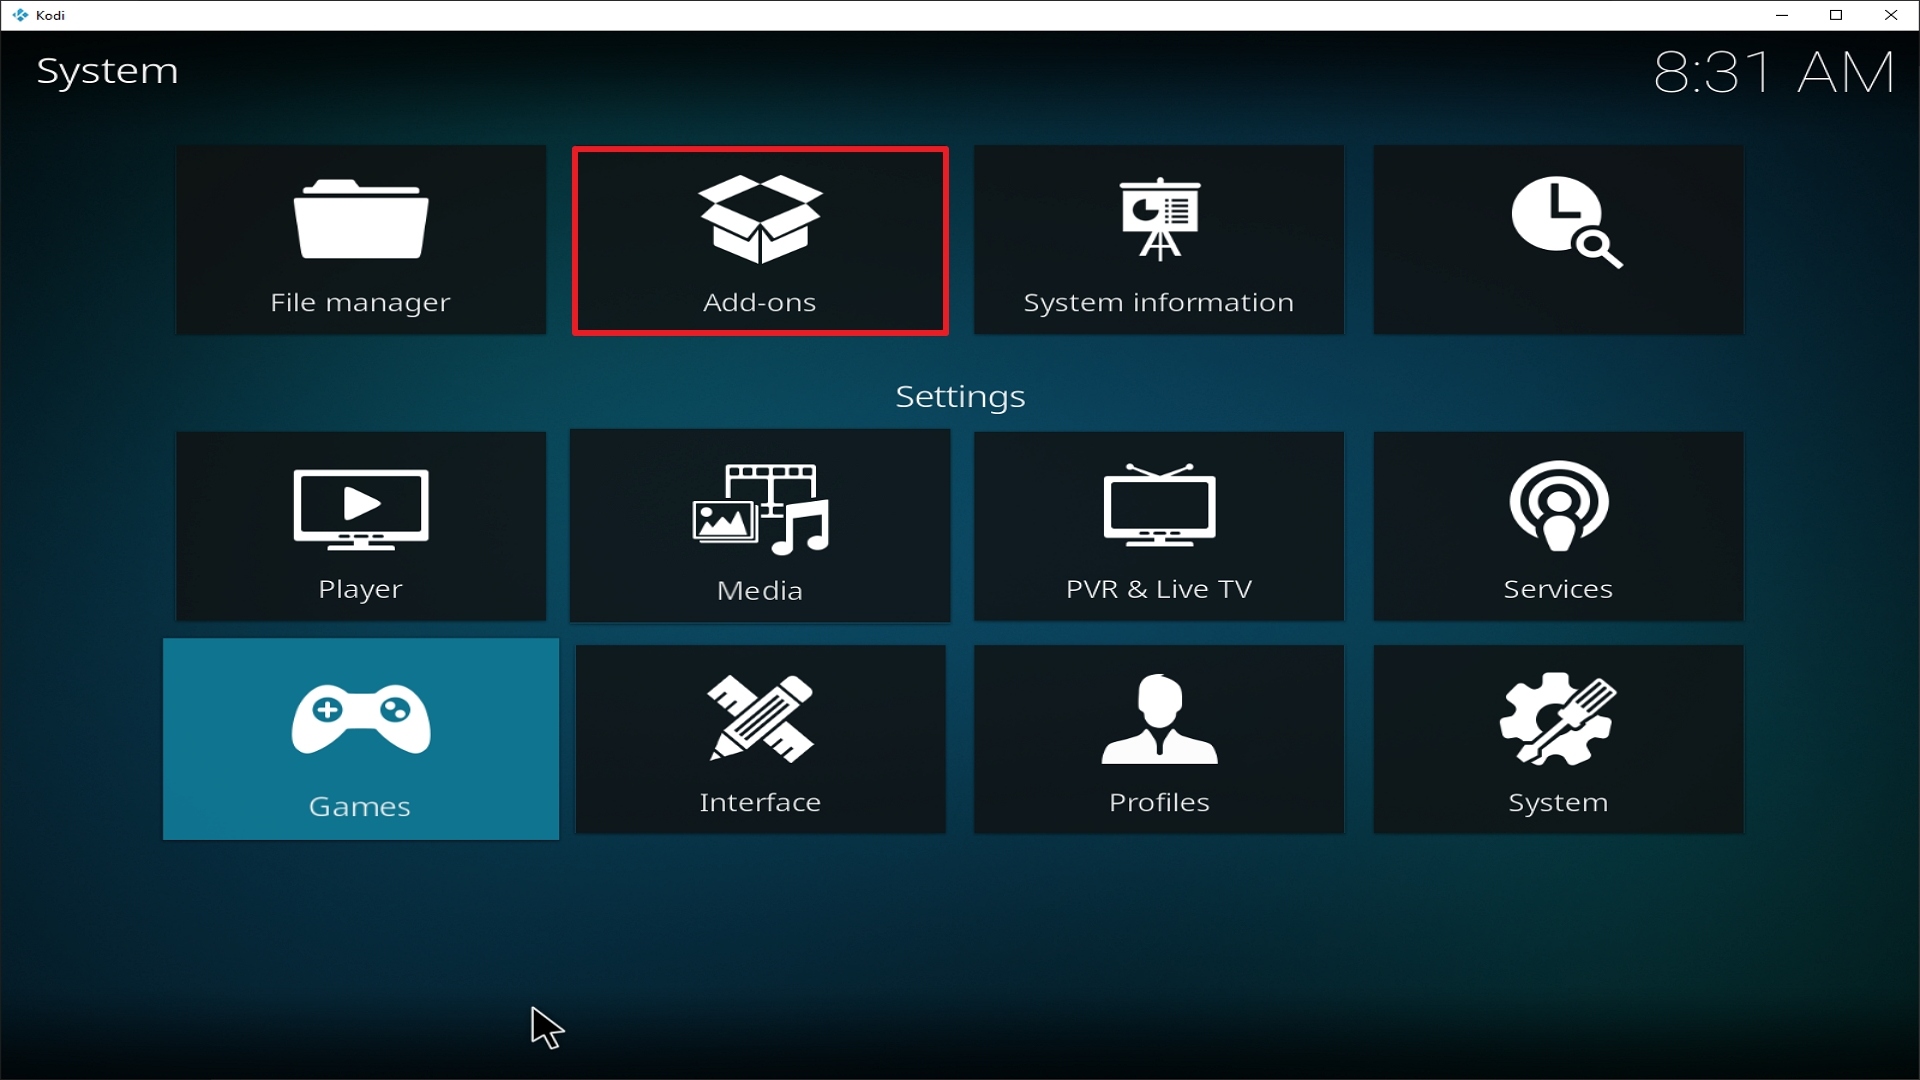
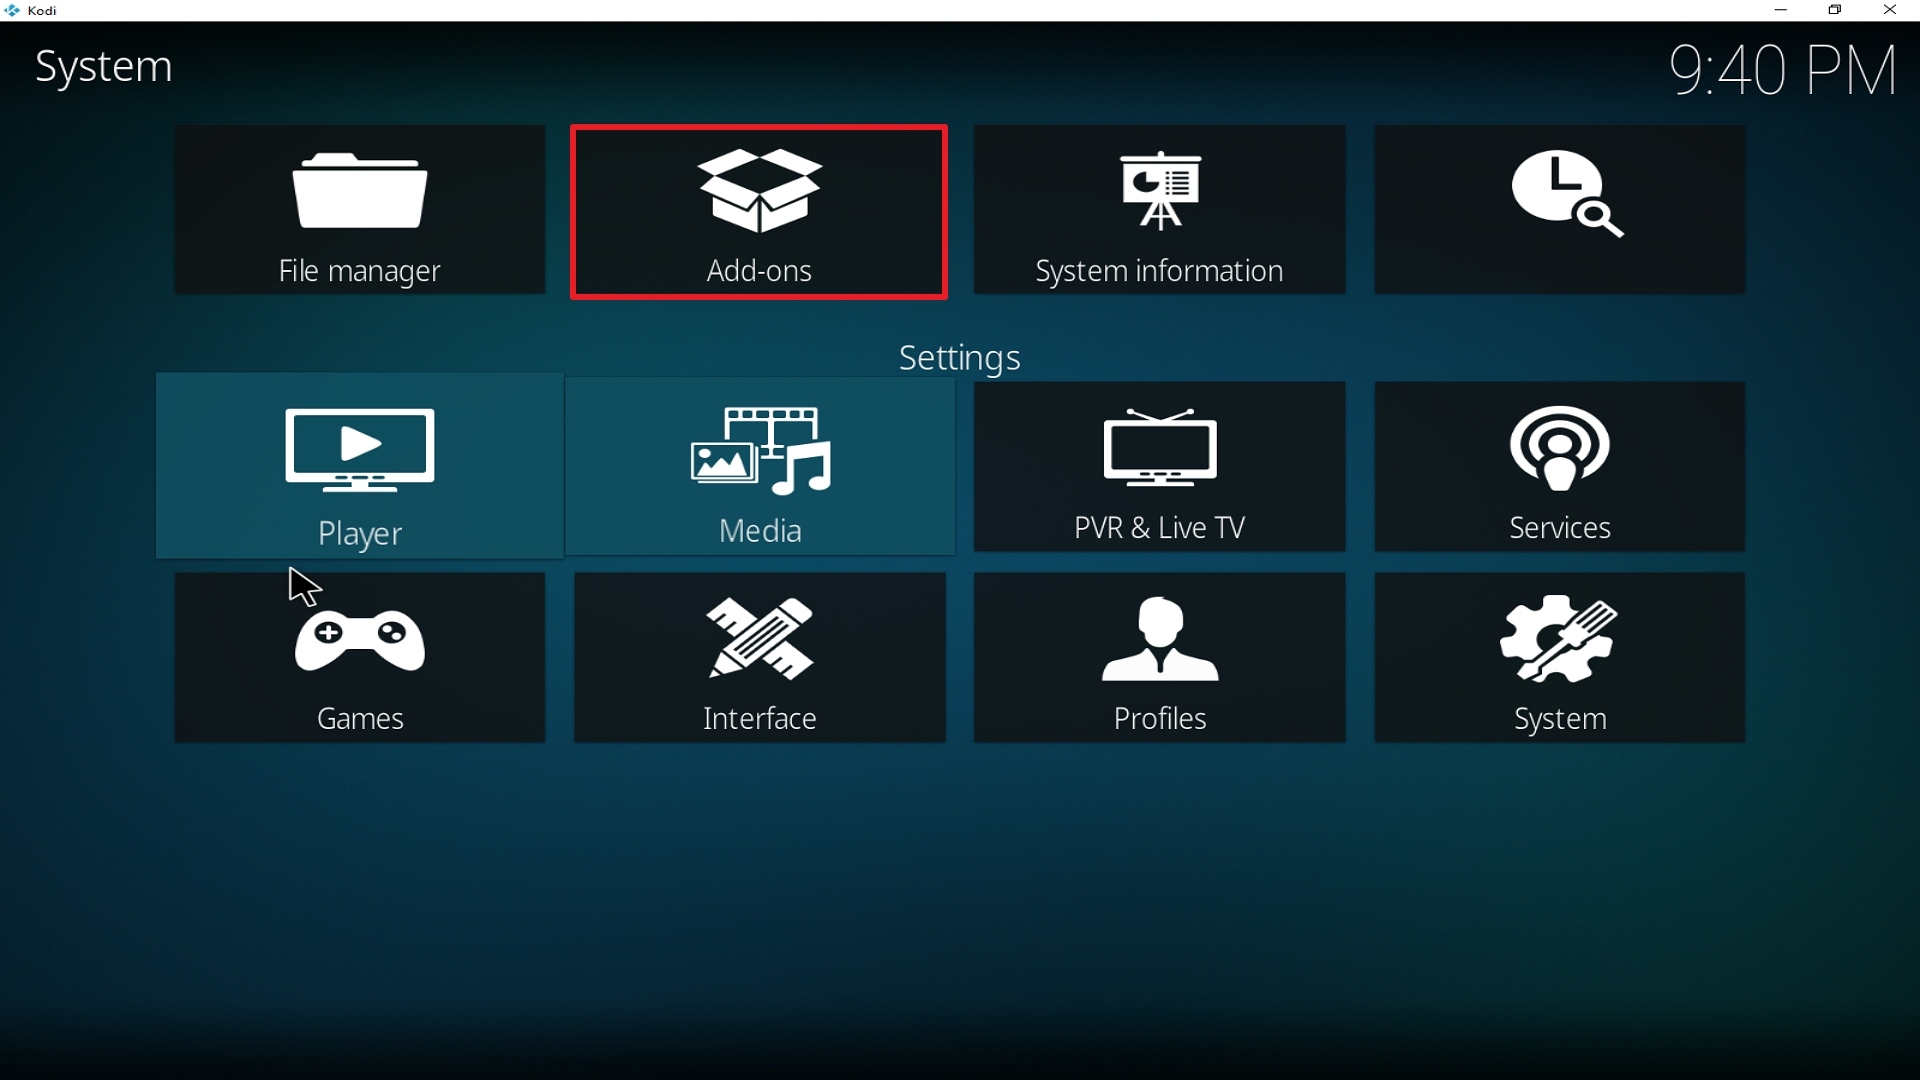
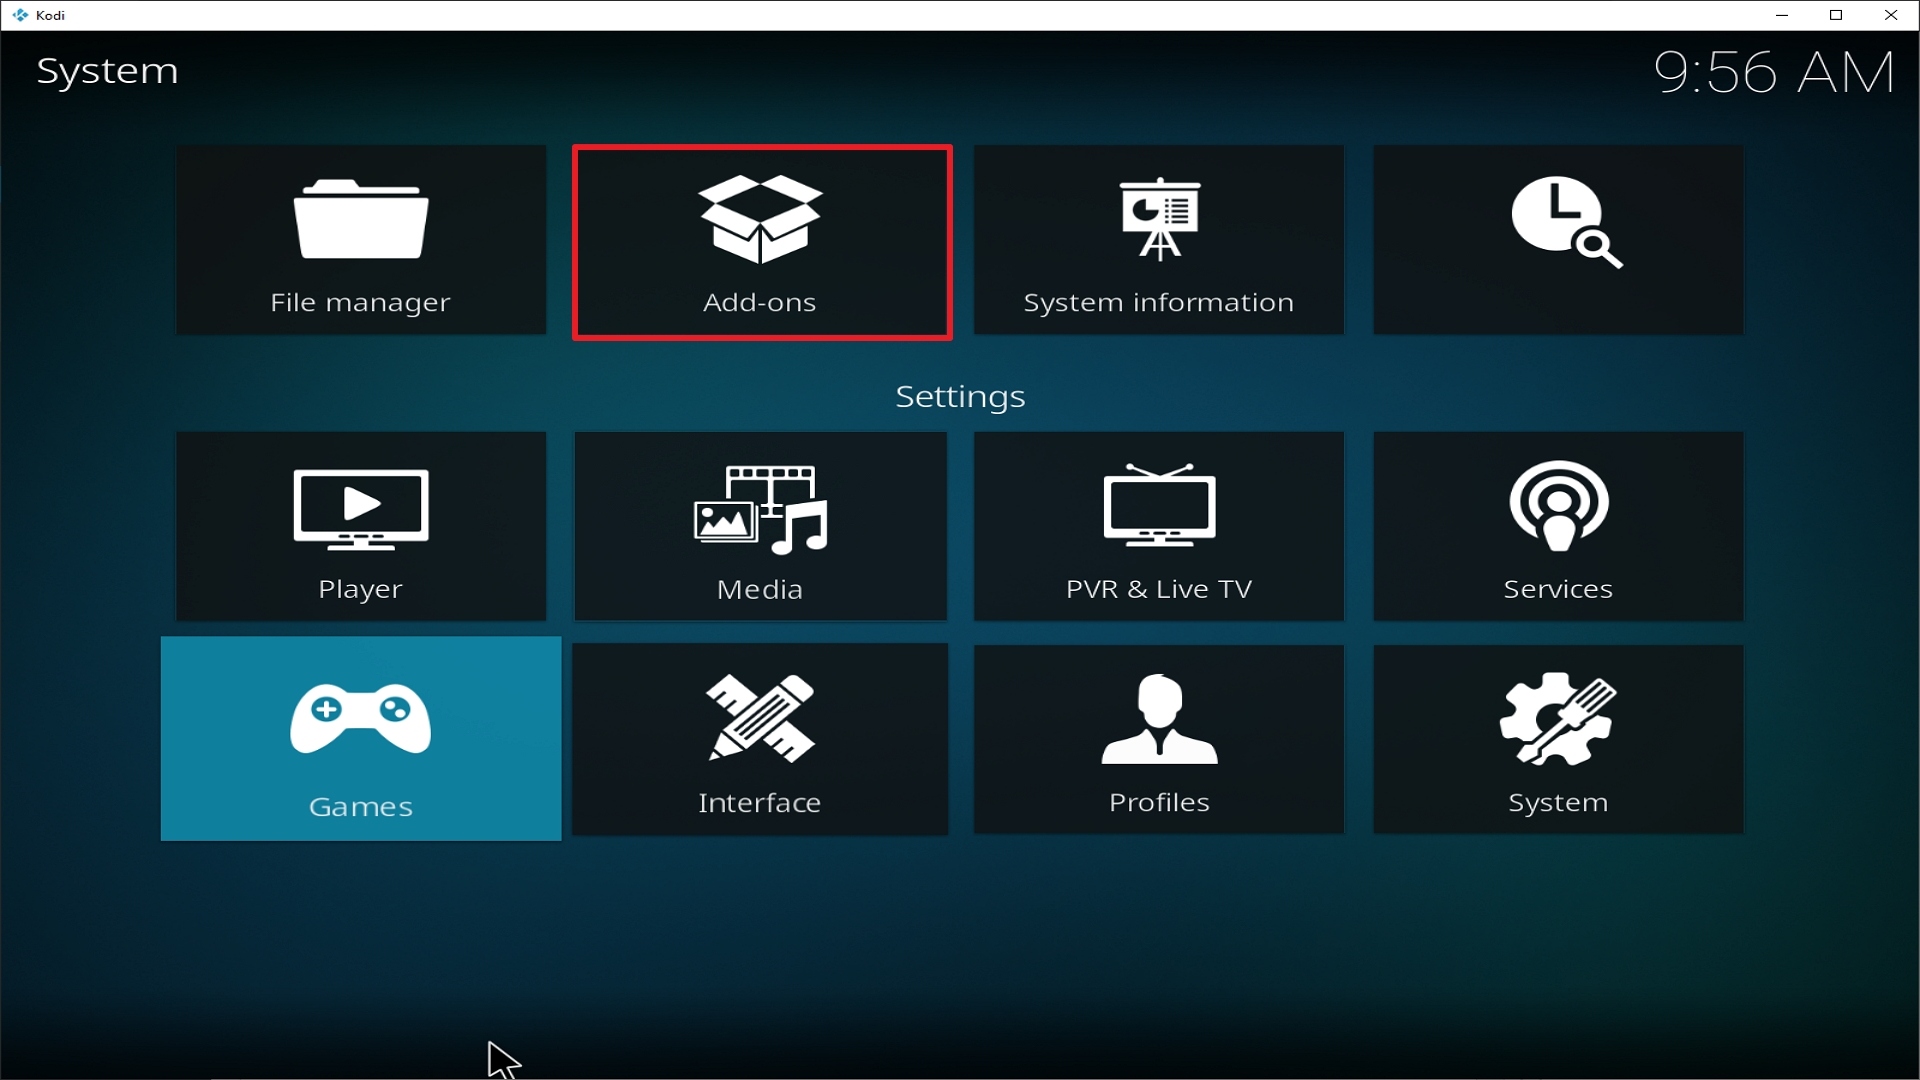
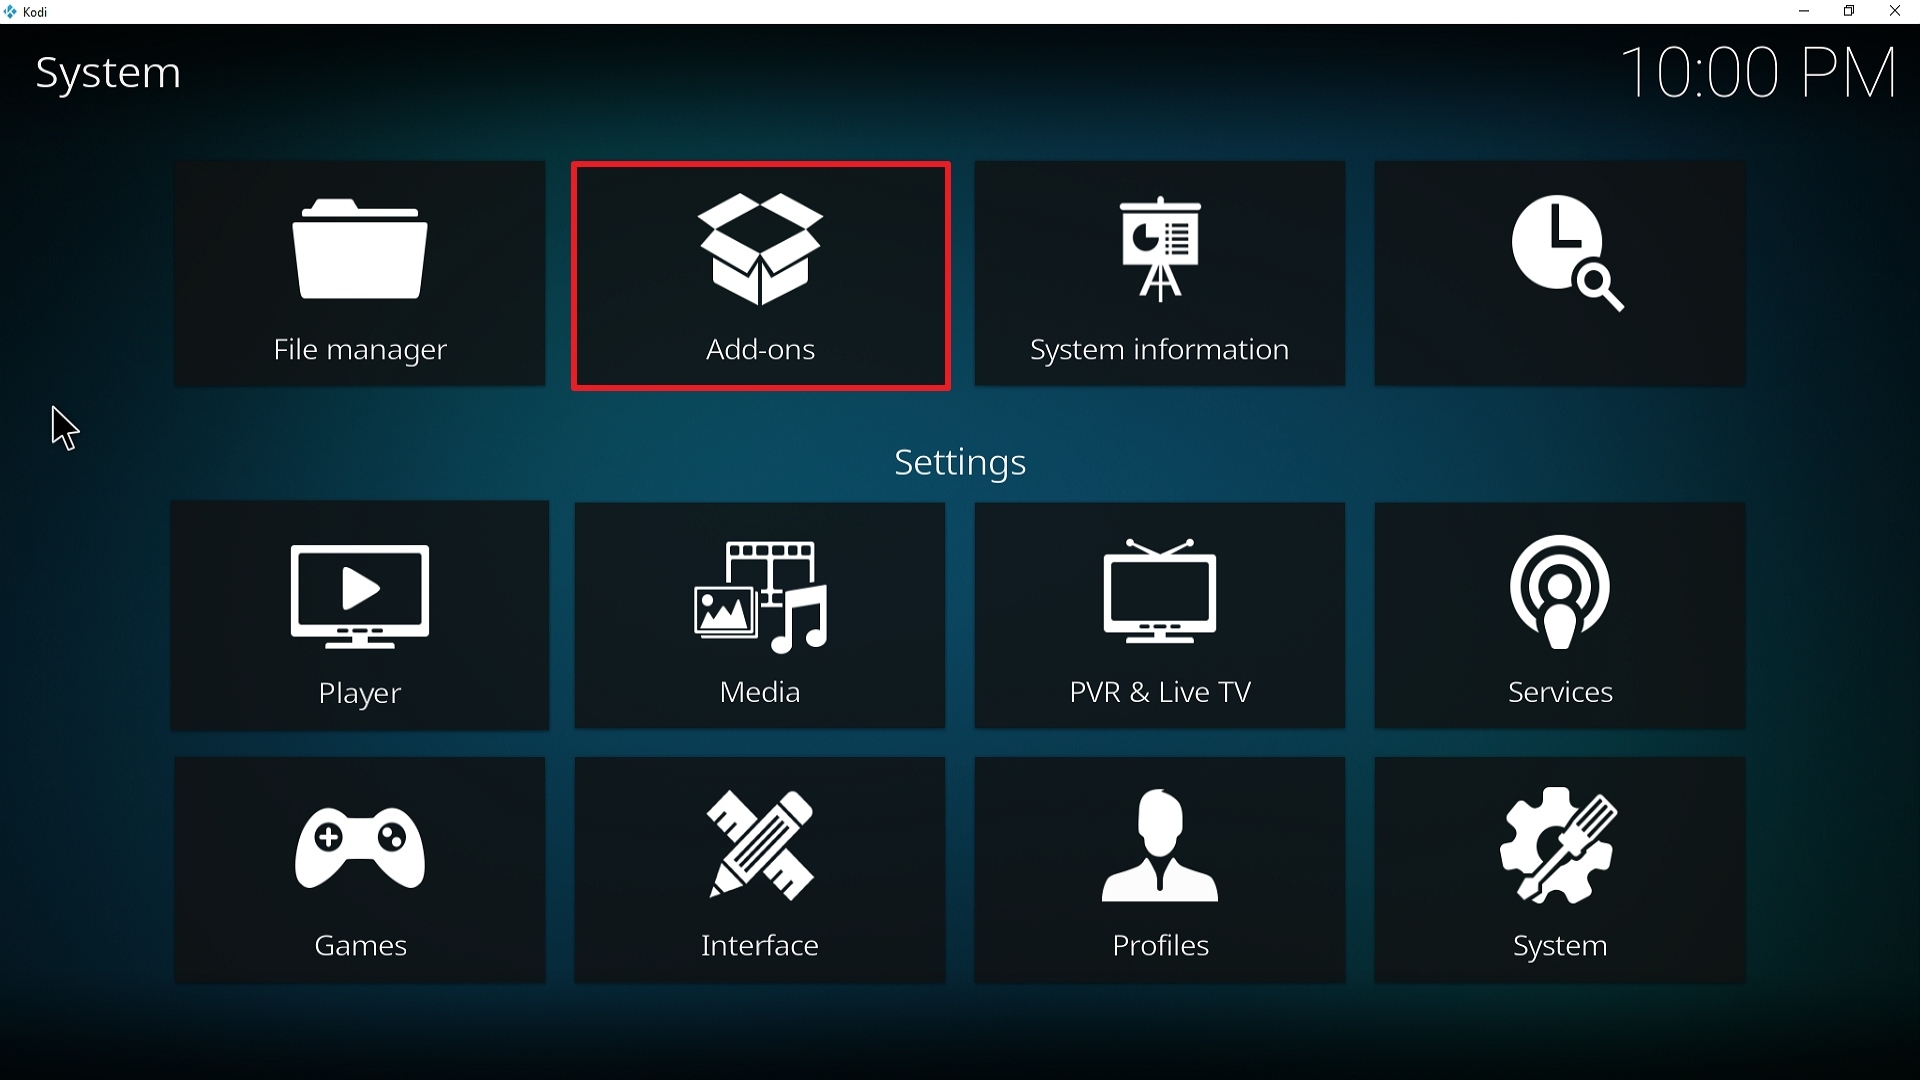
  8. Go back to the System Screen and click “Add-ons”
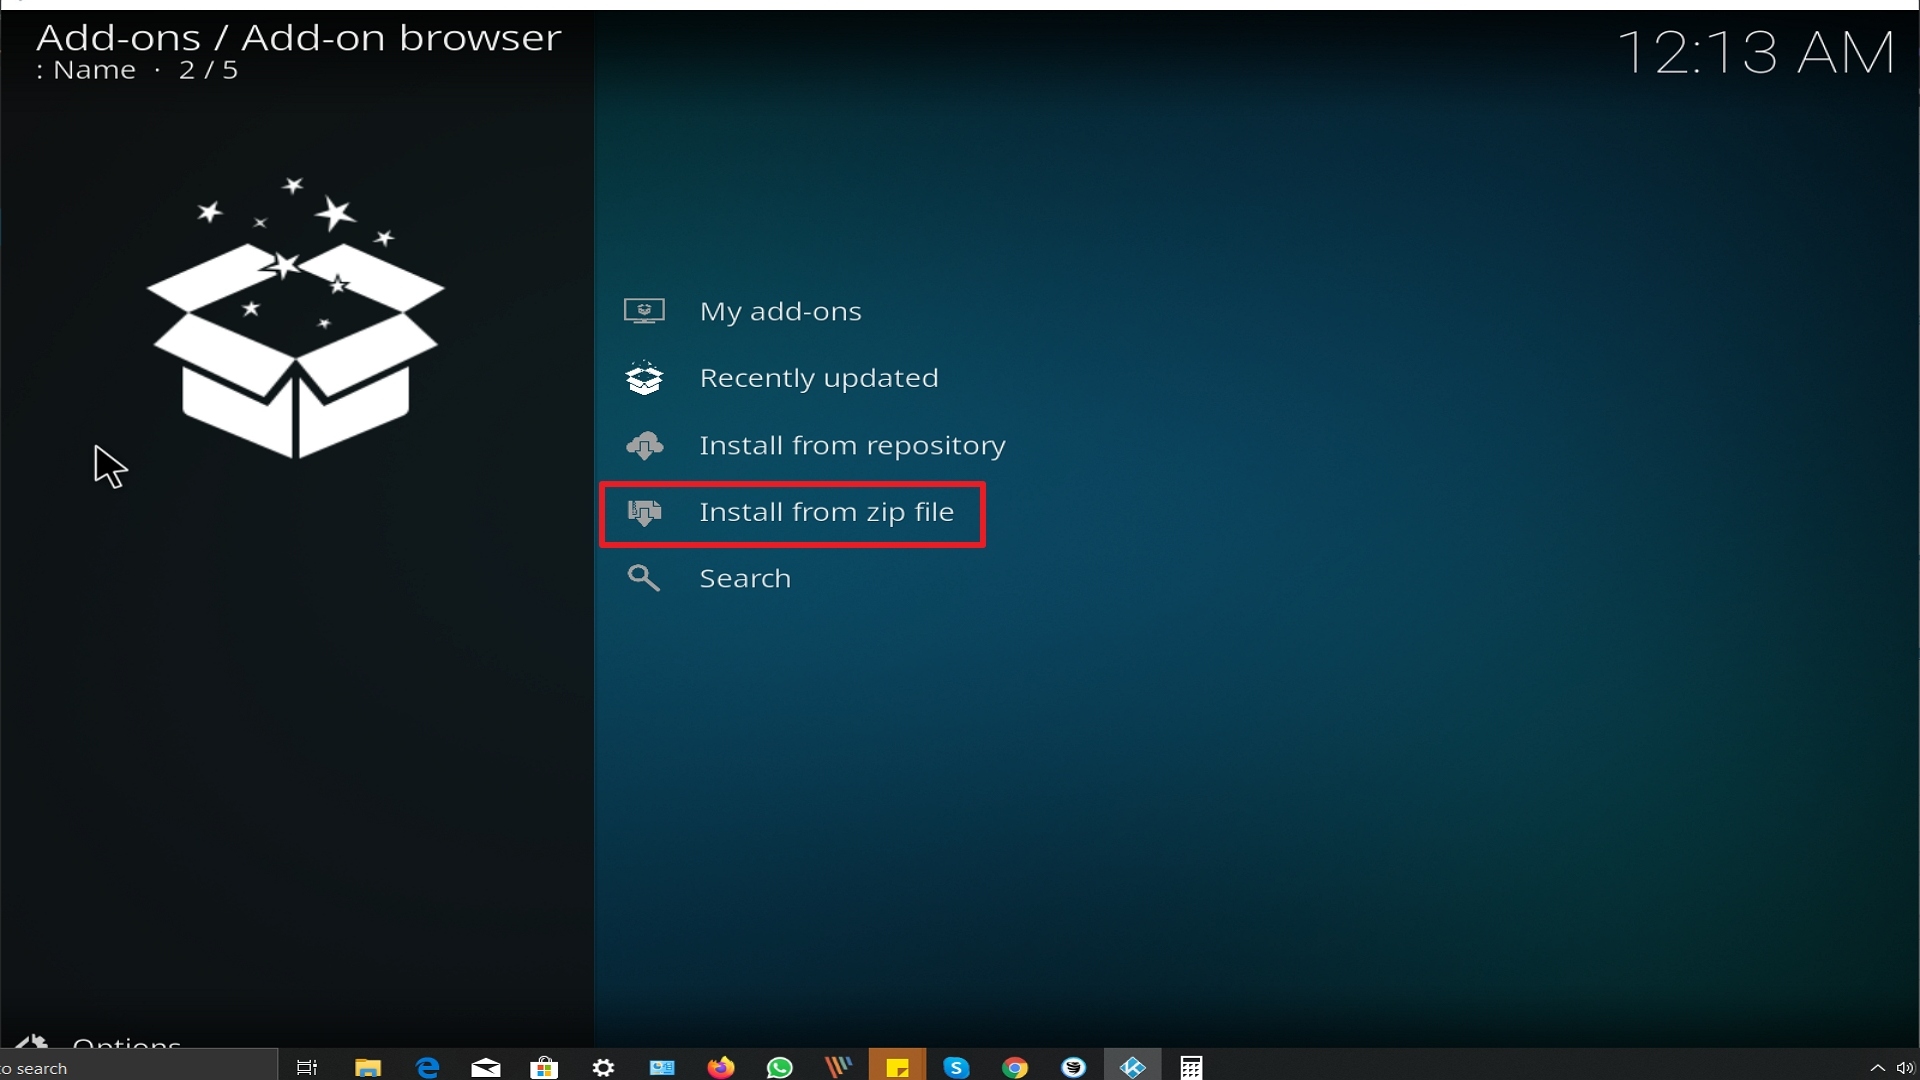
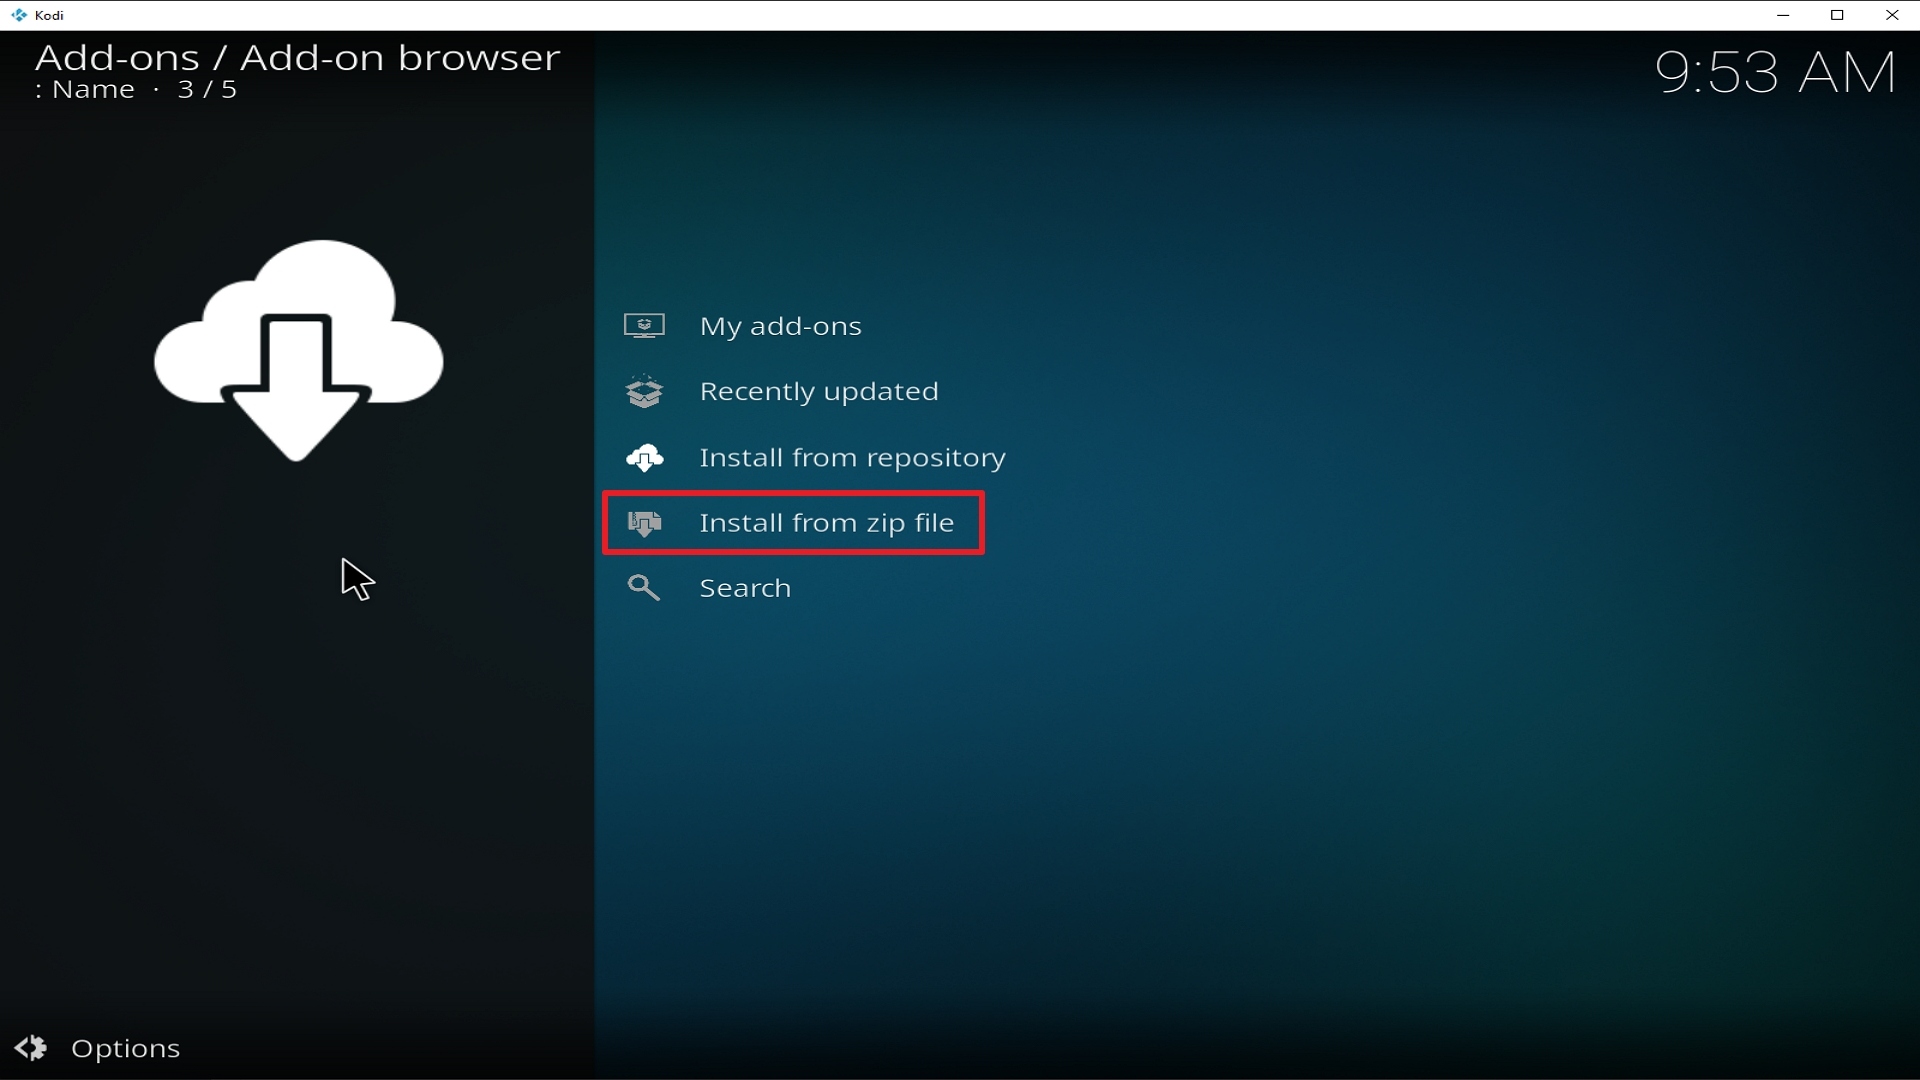
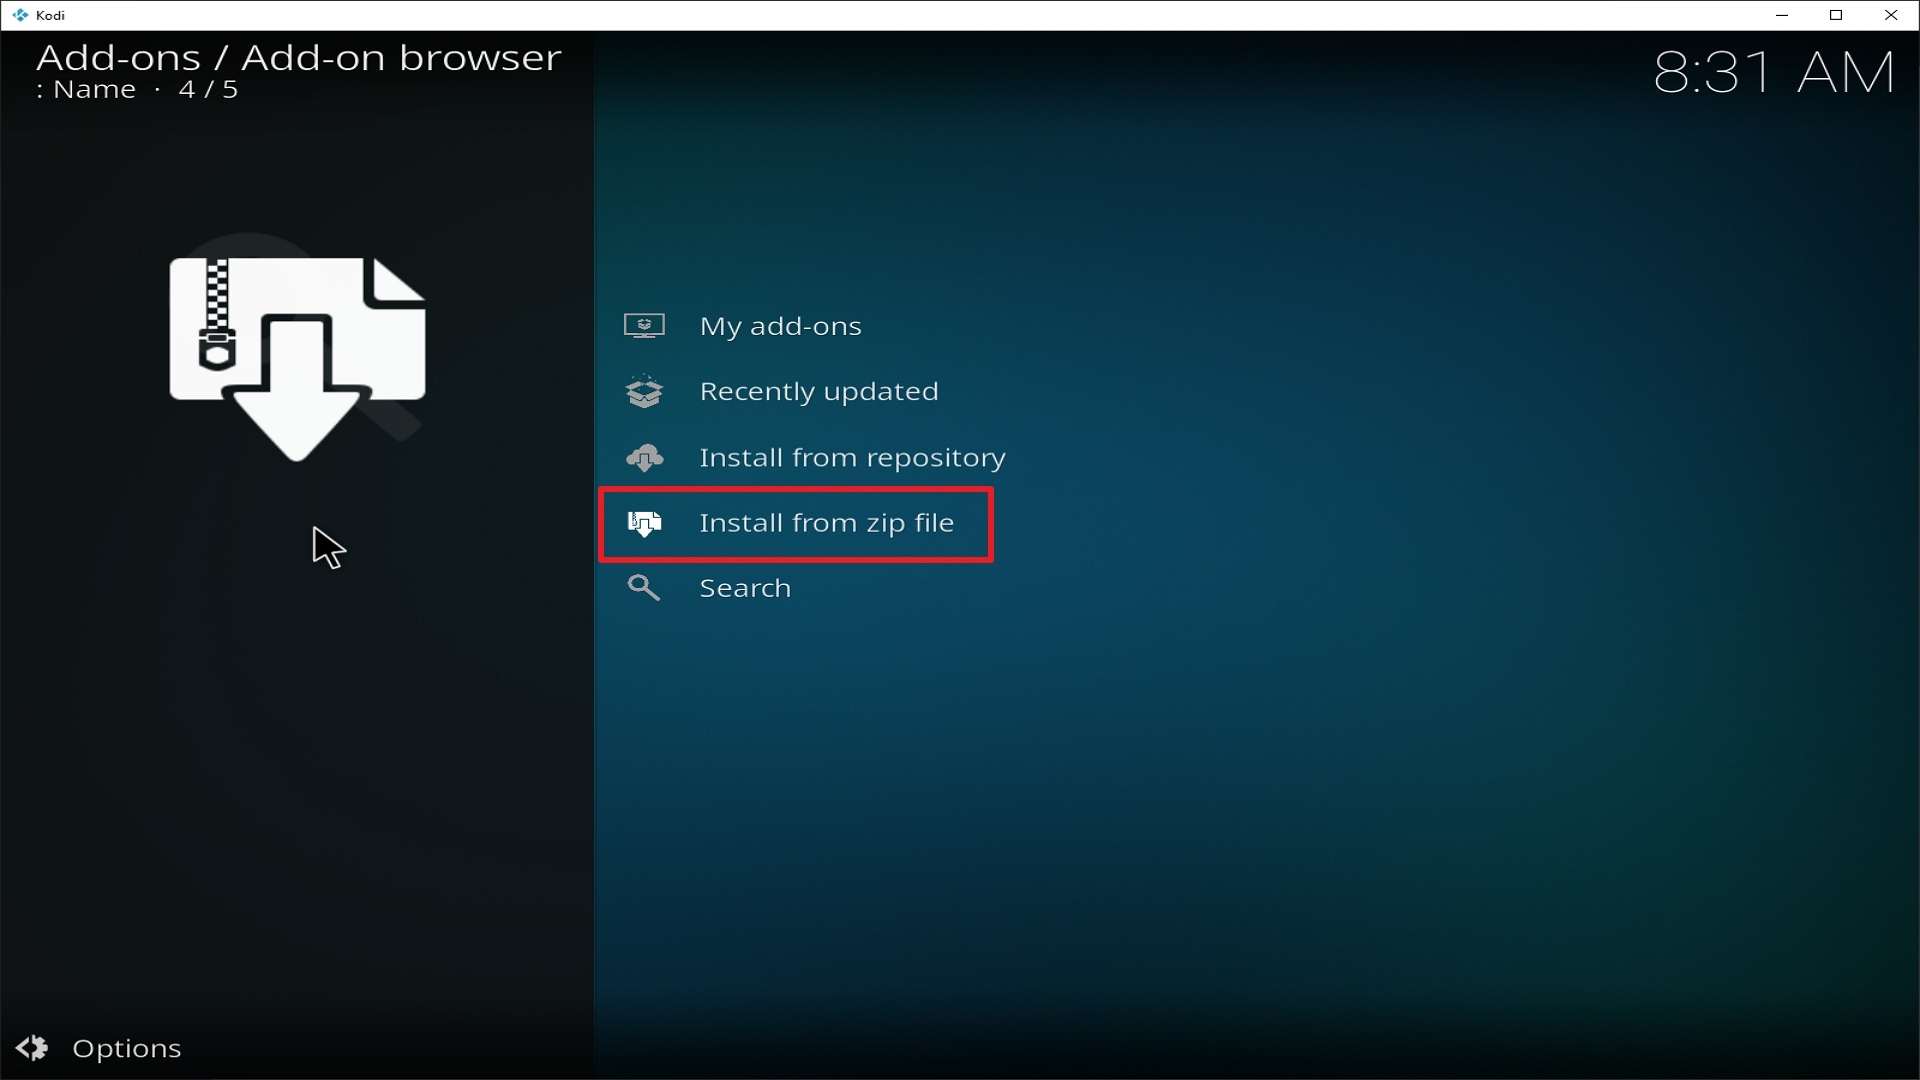
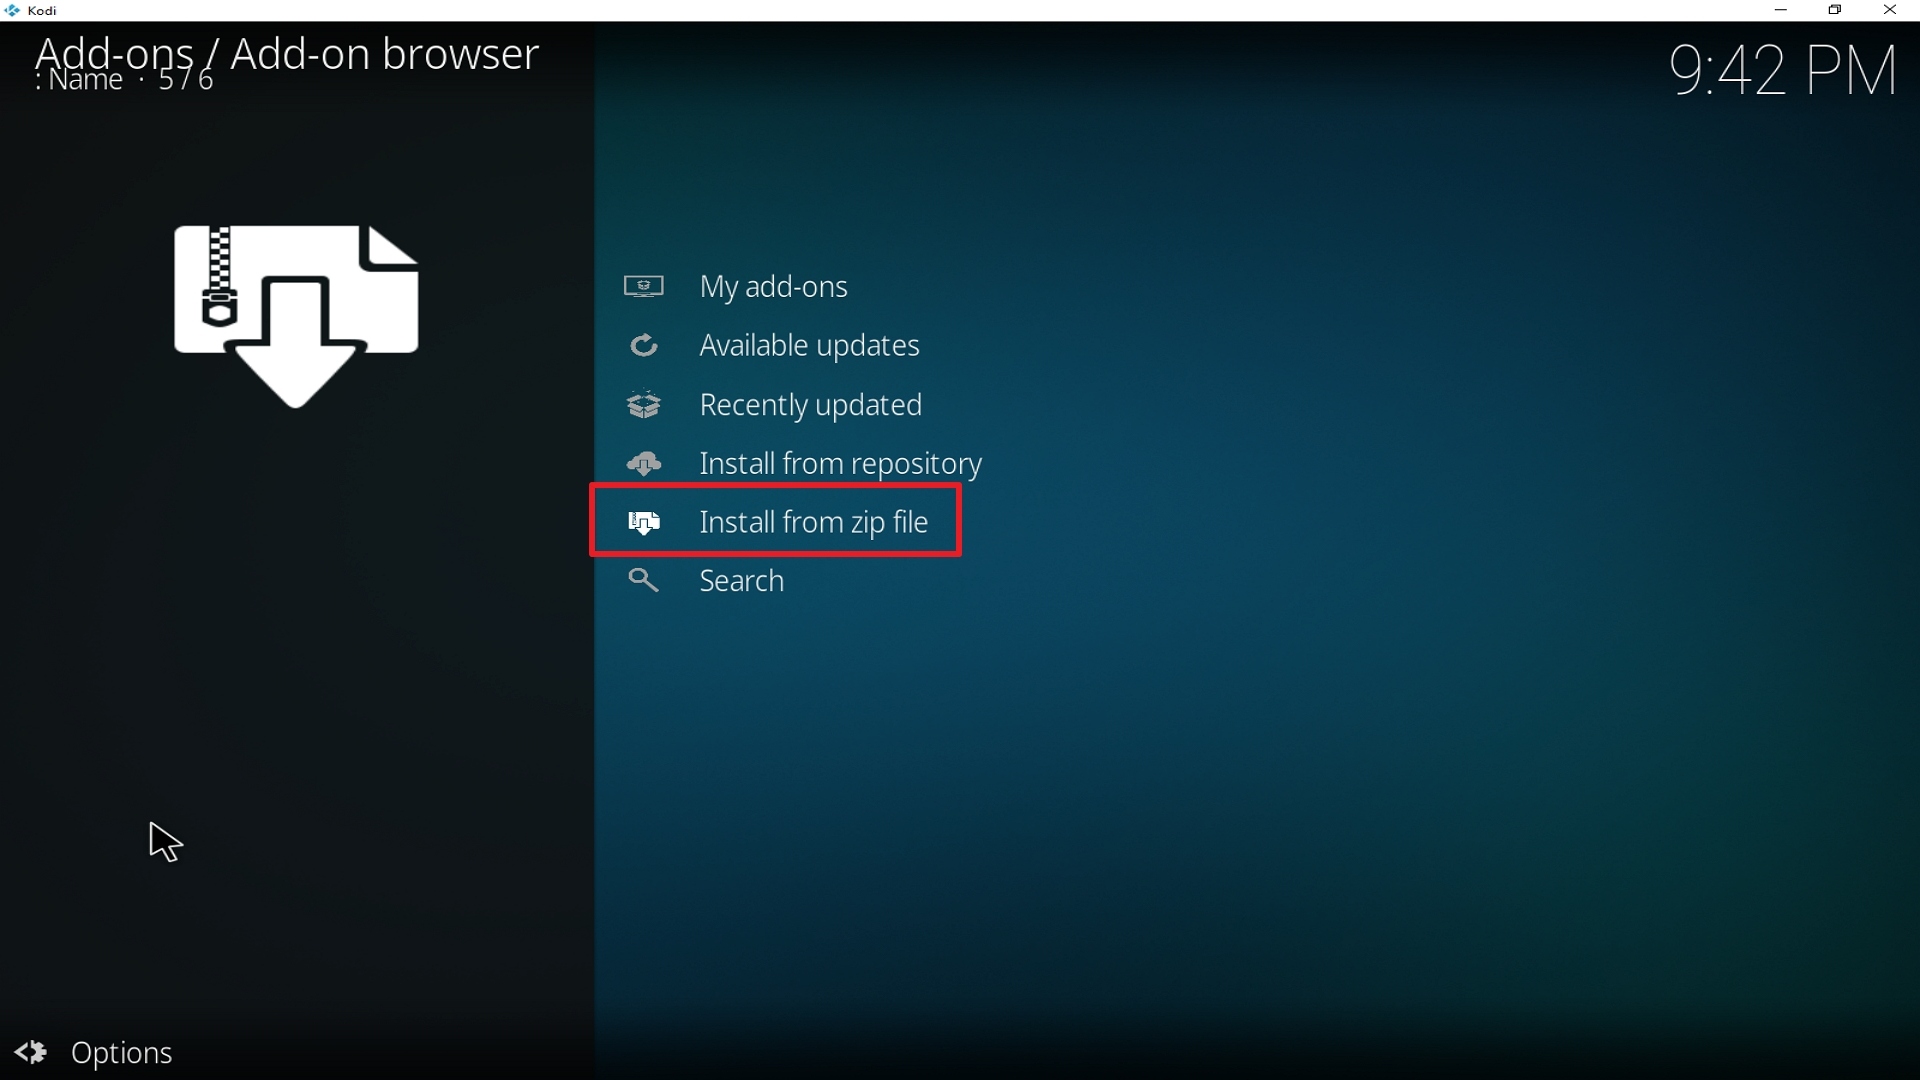
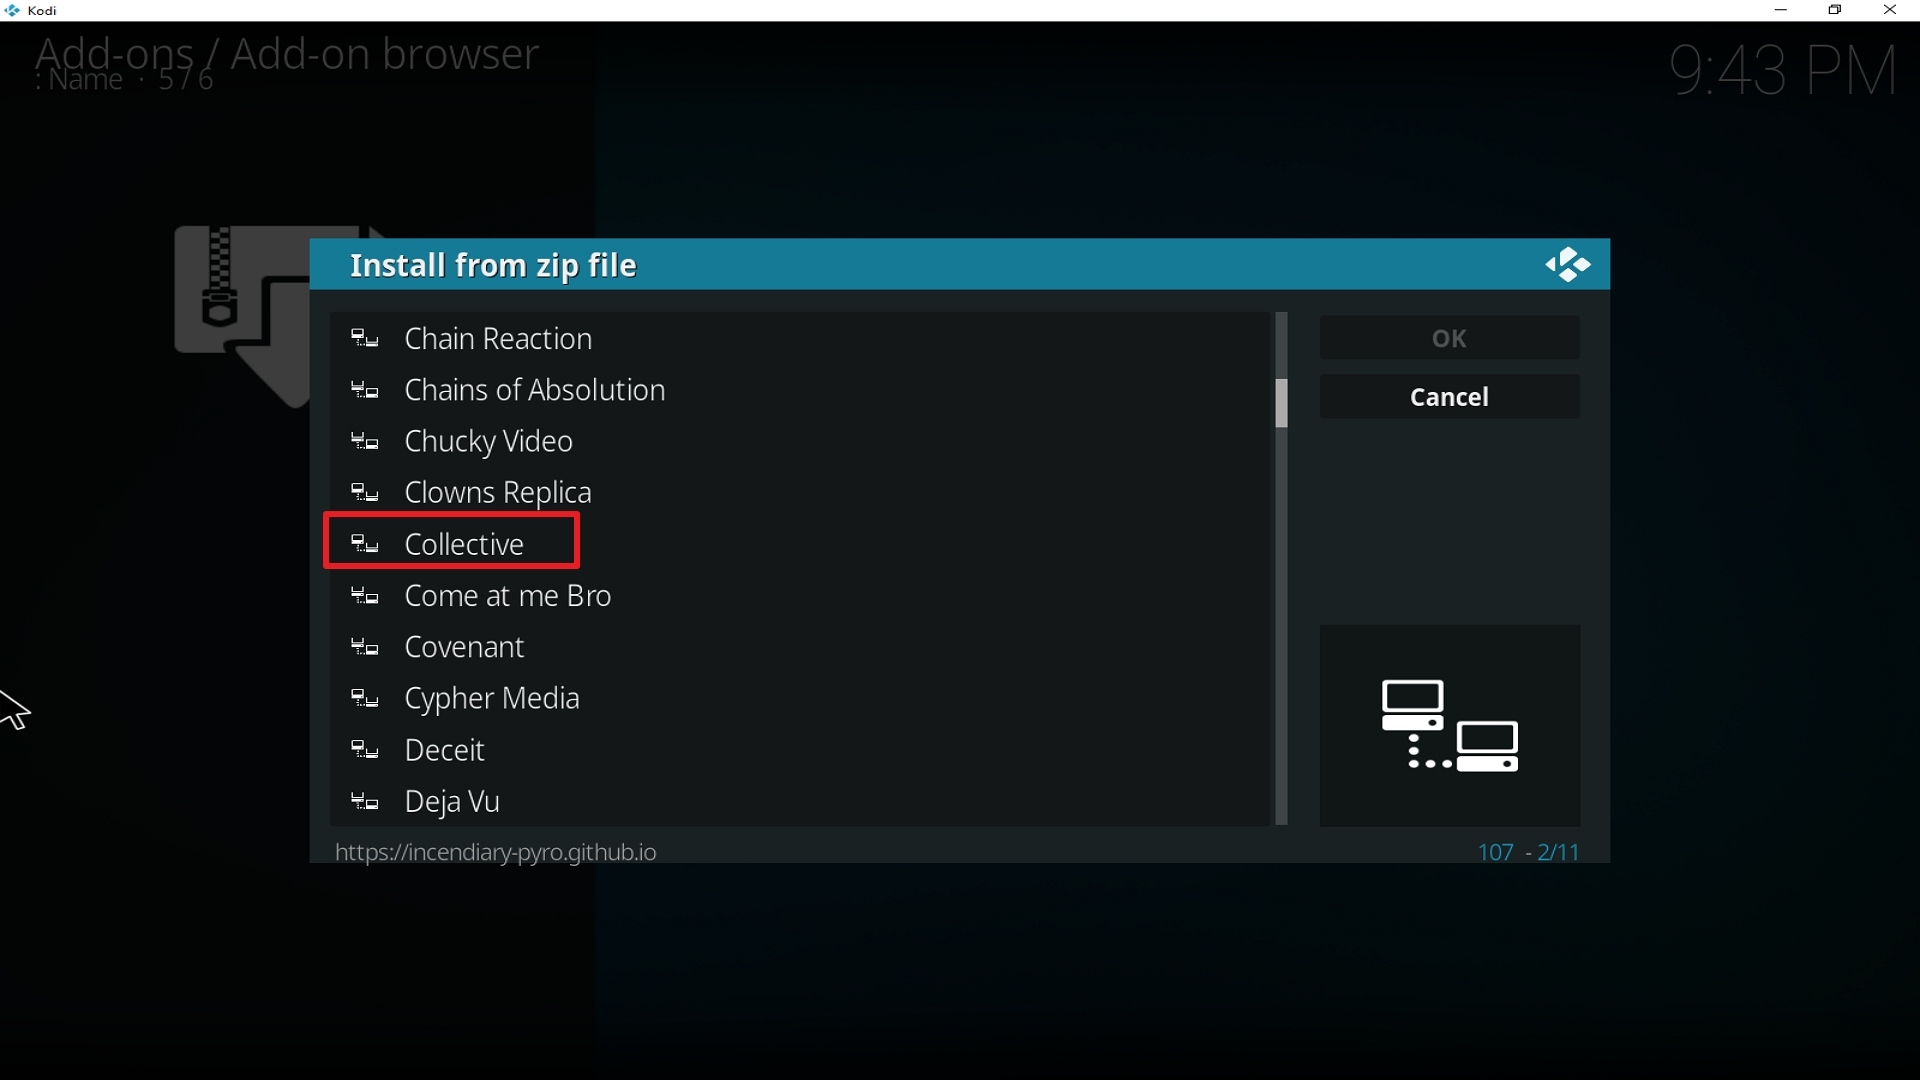
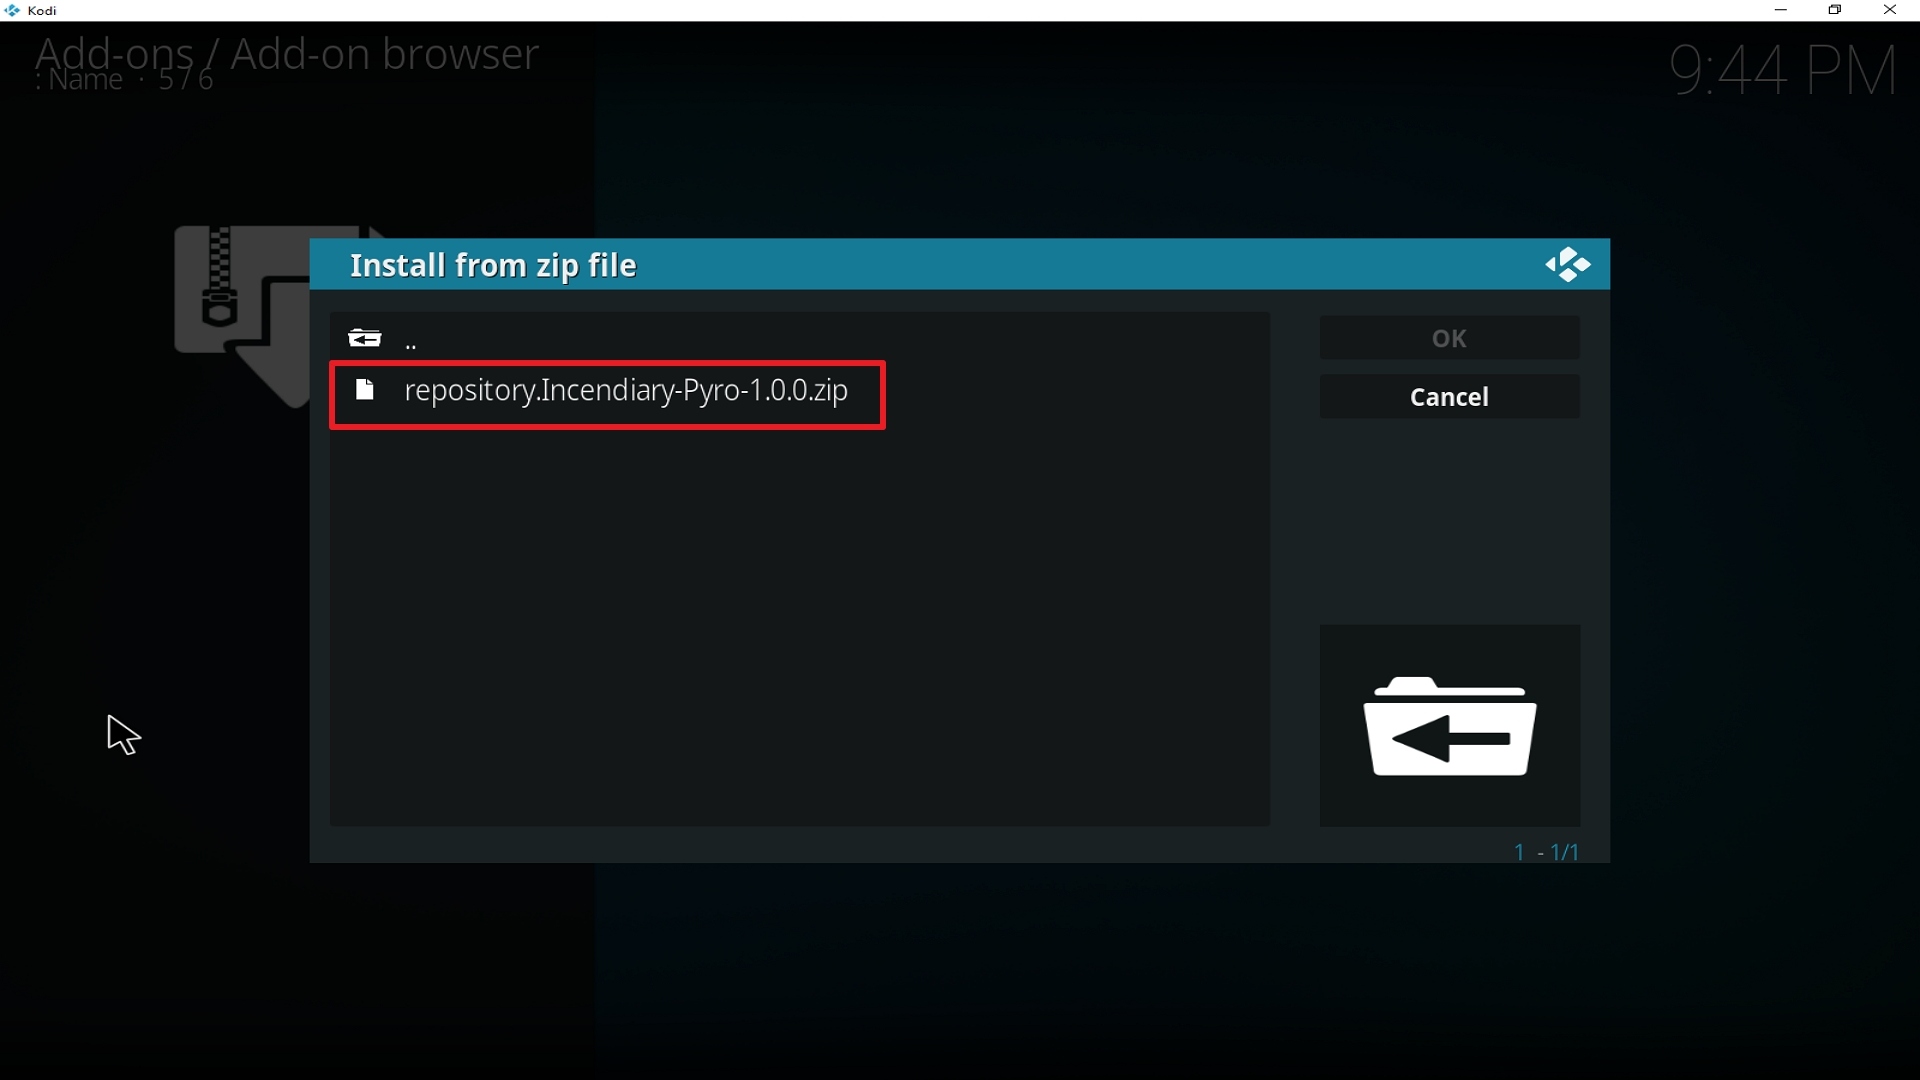
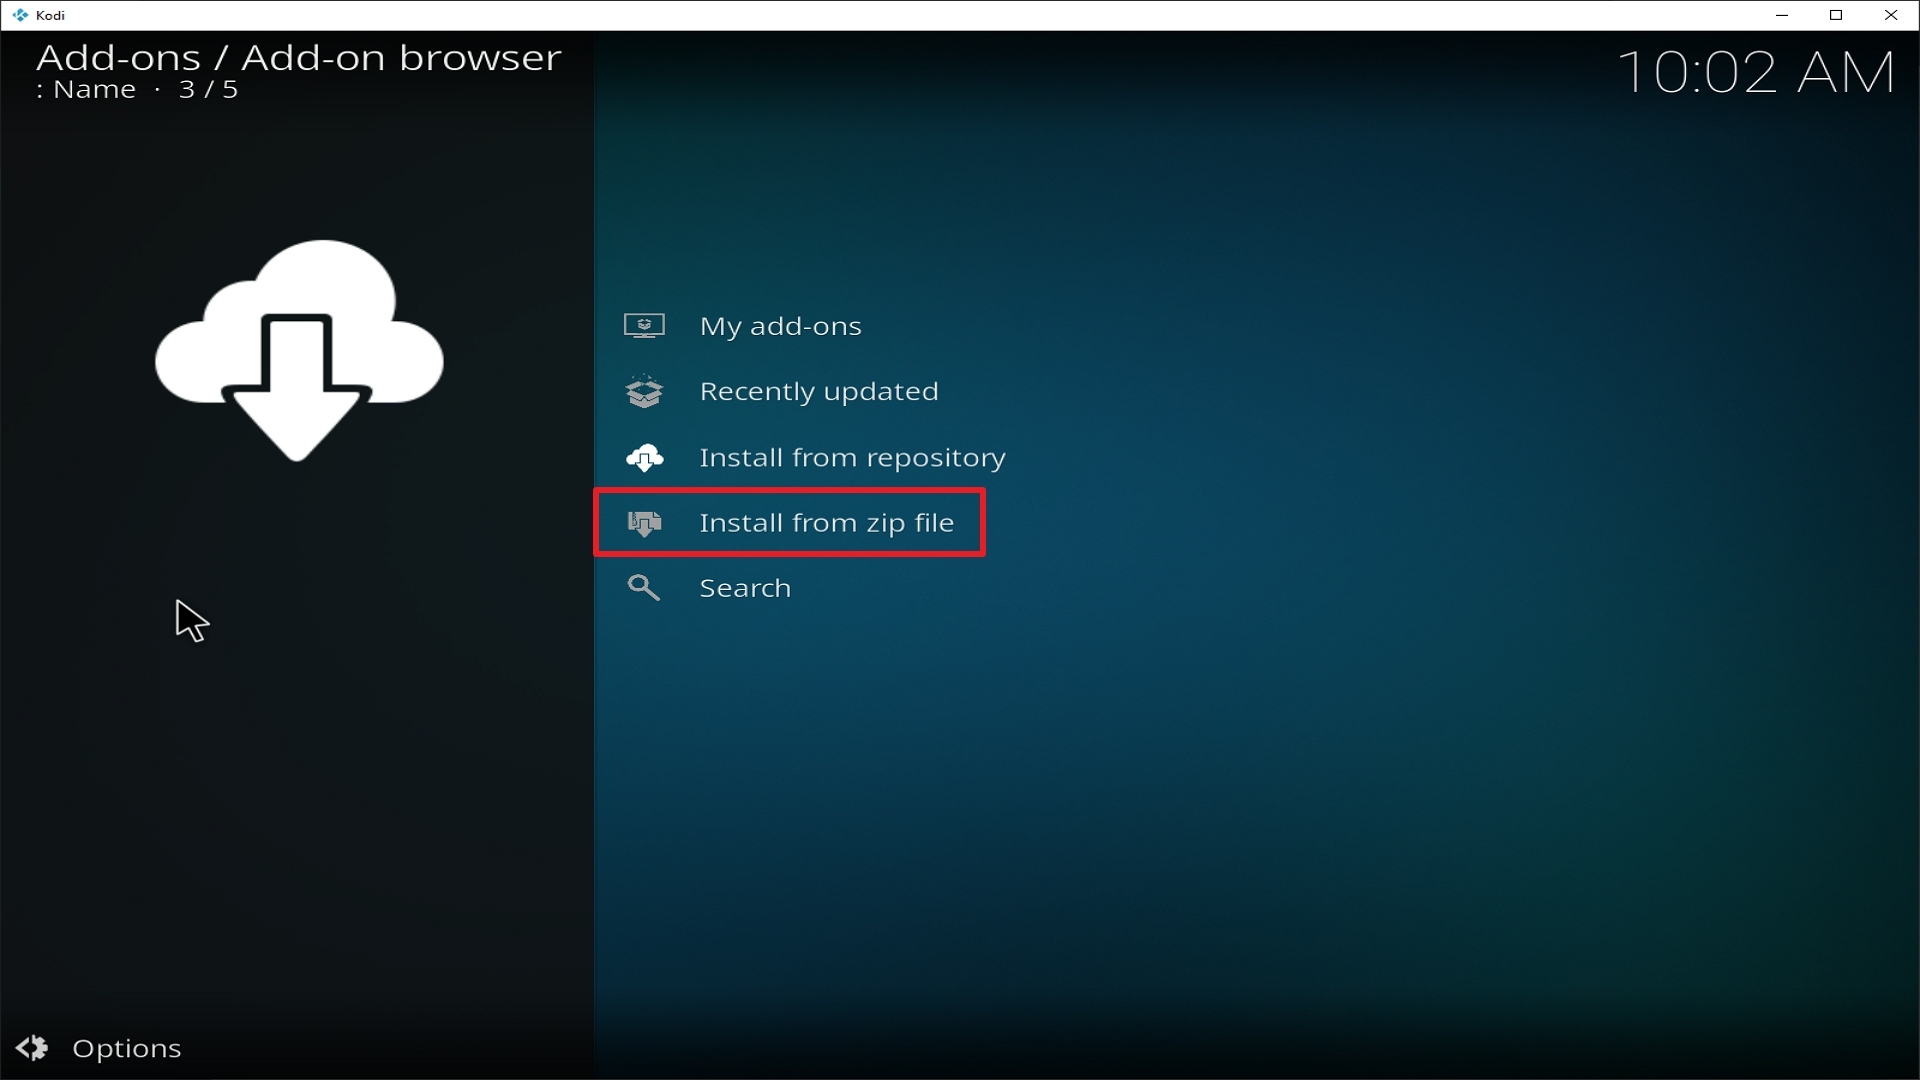
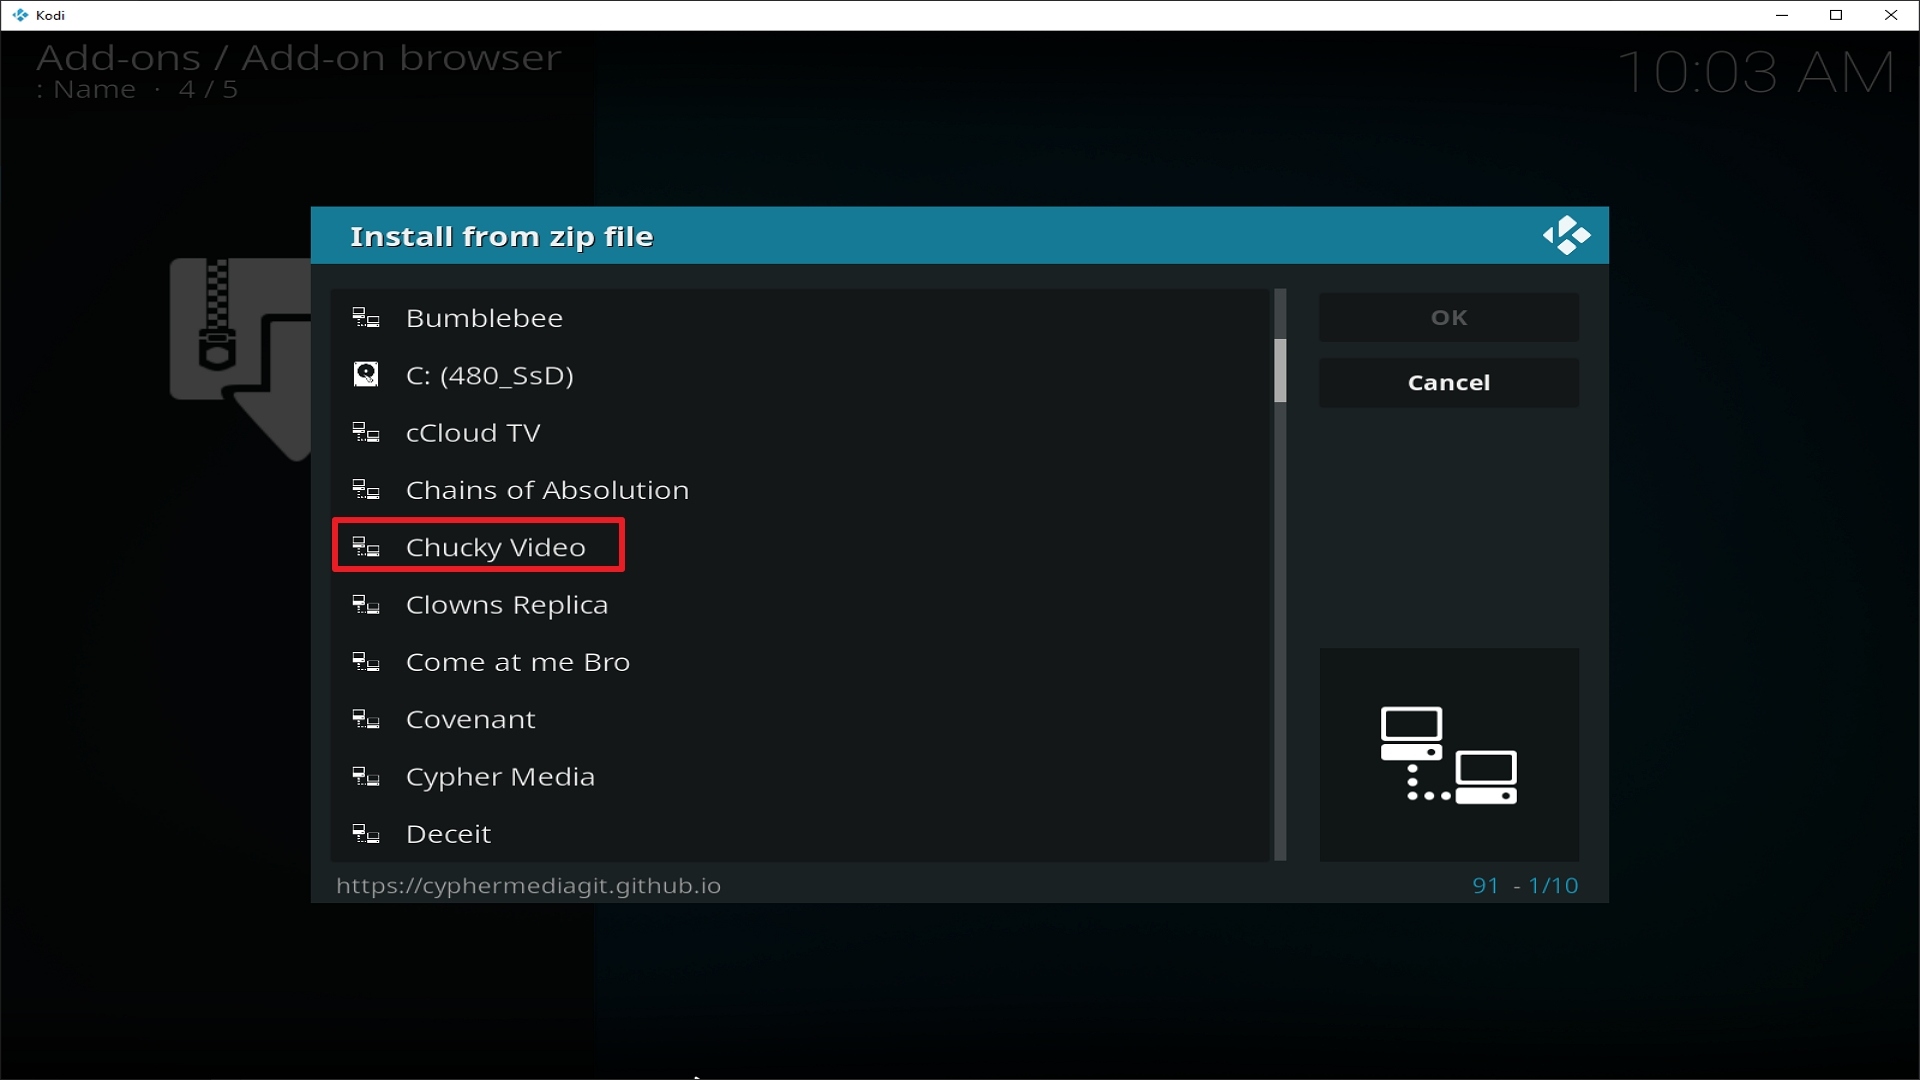
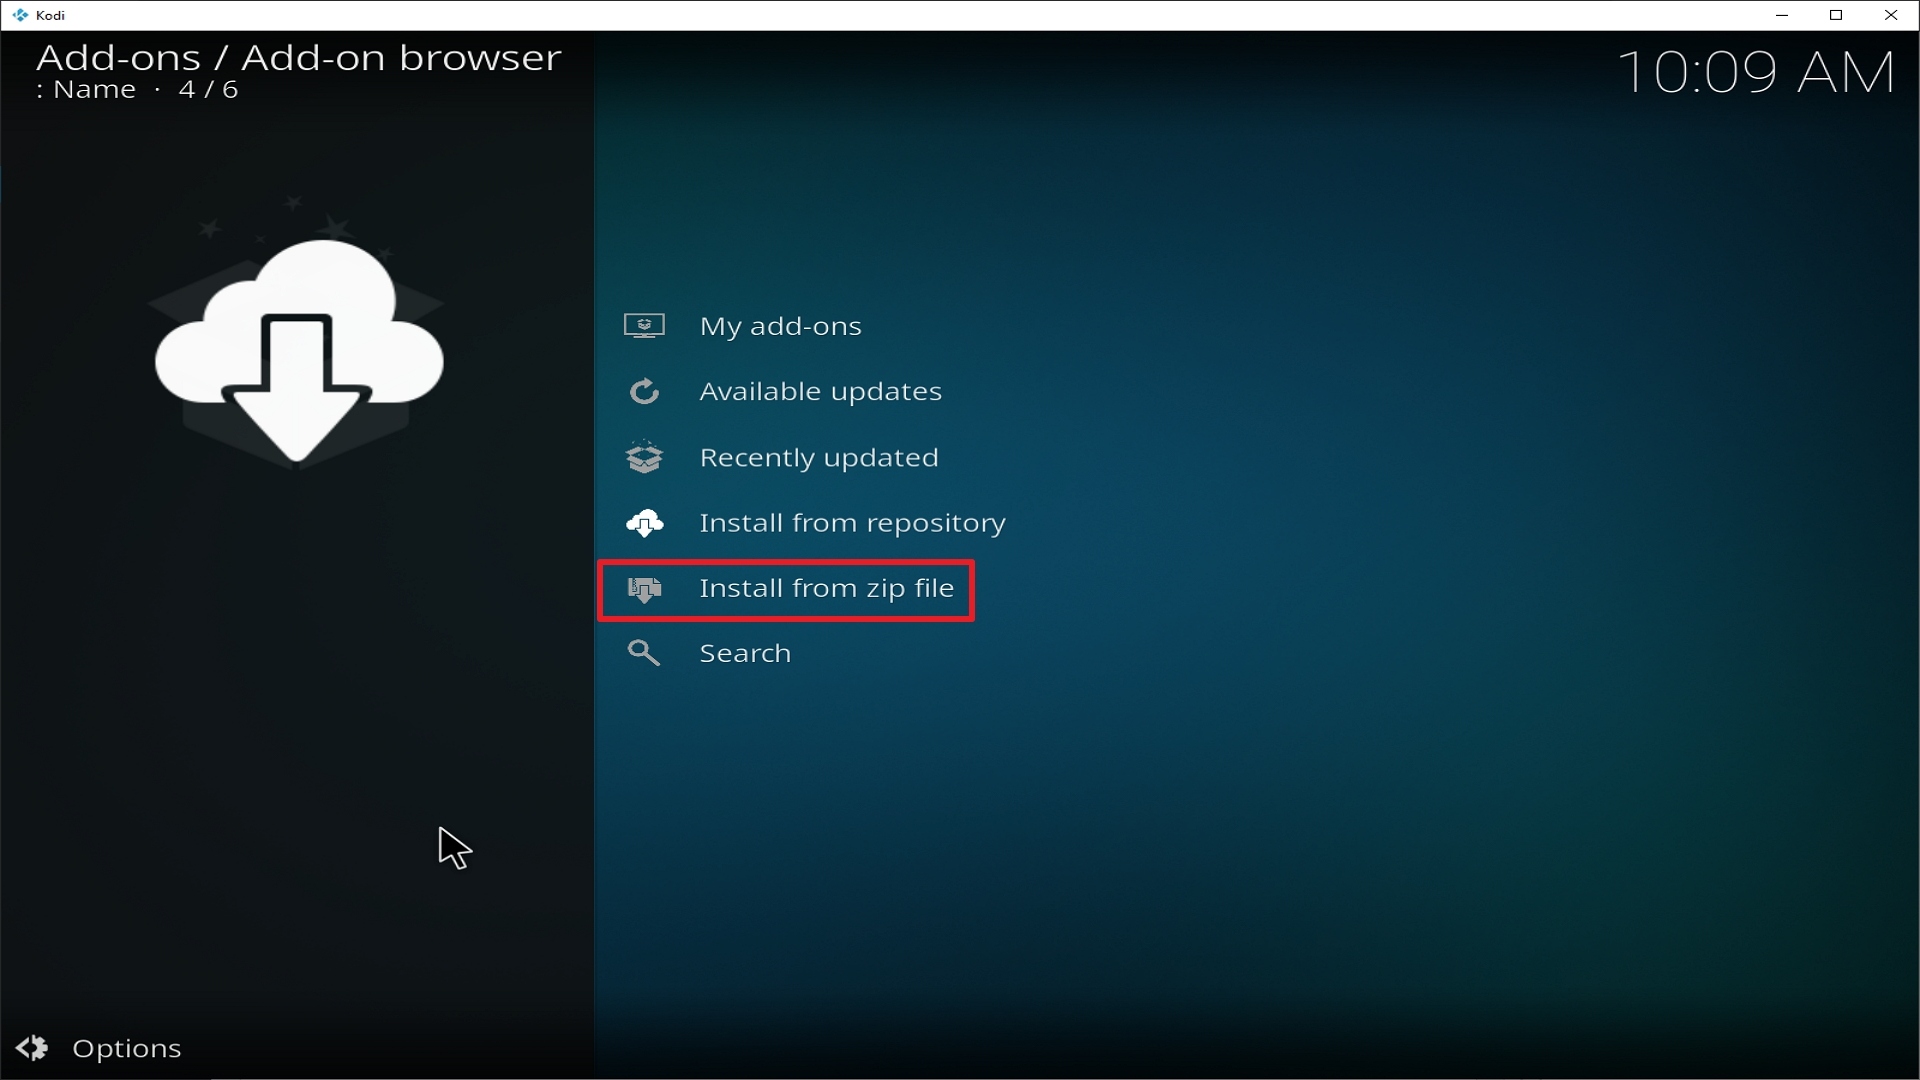
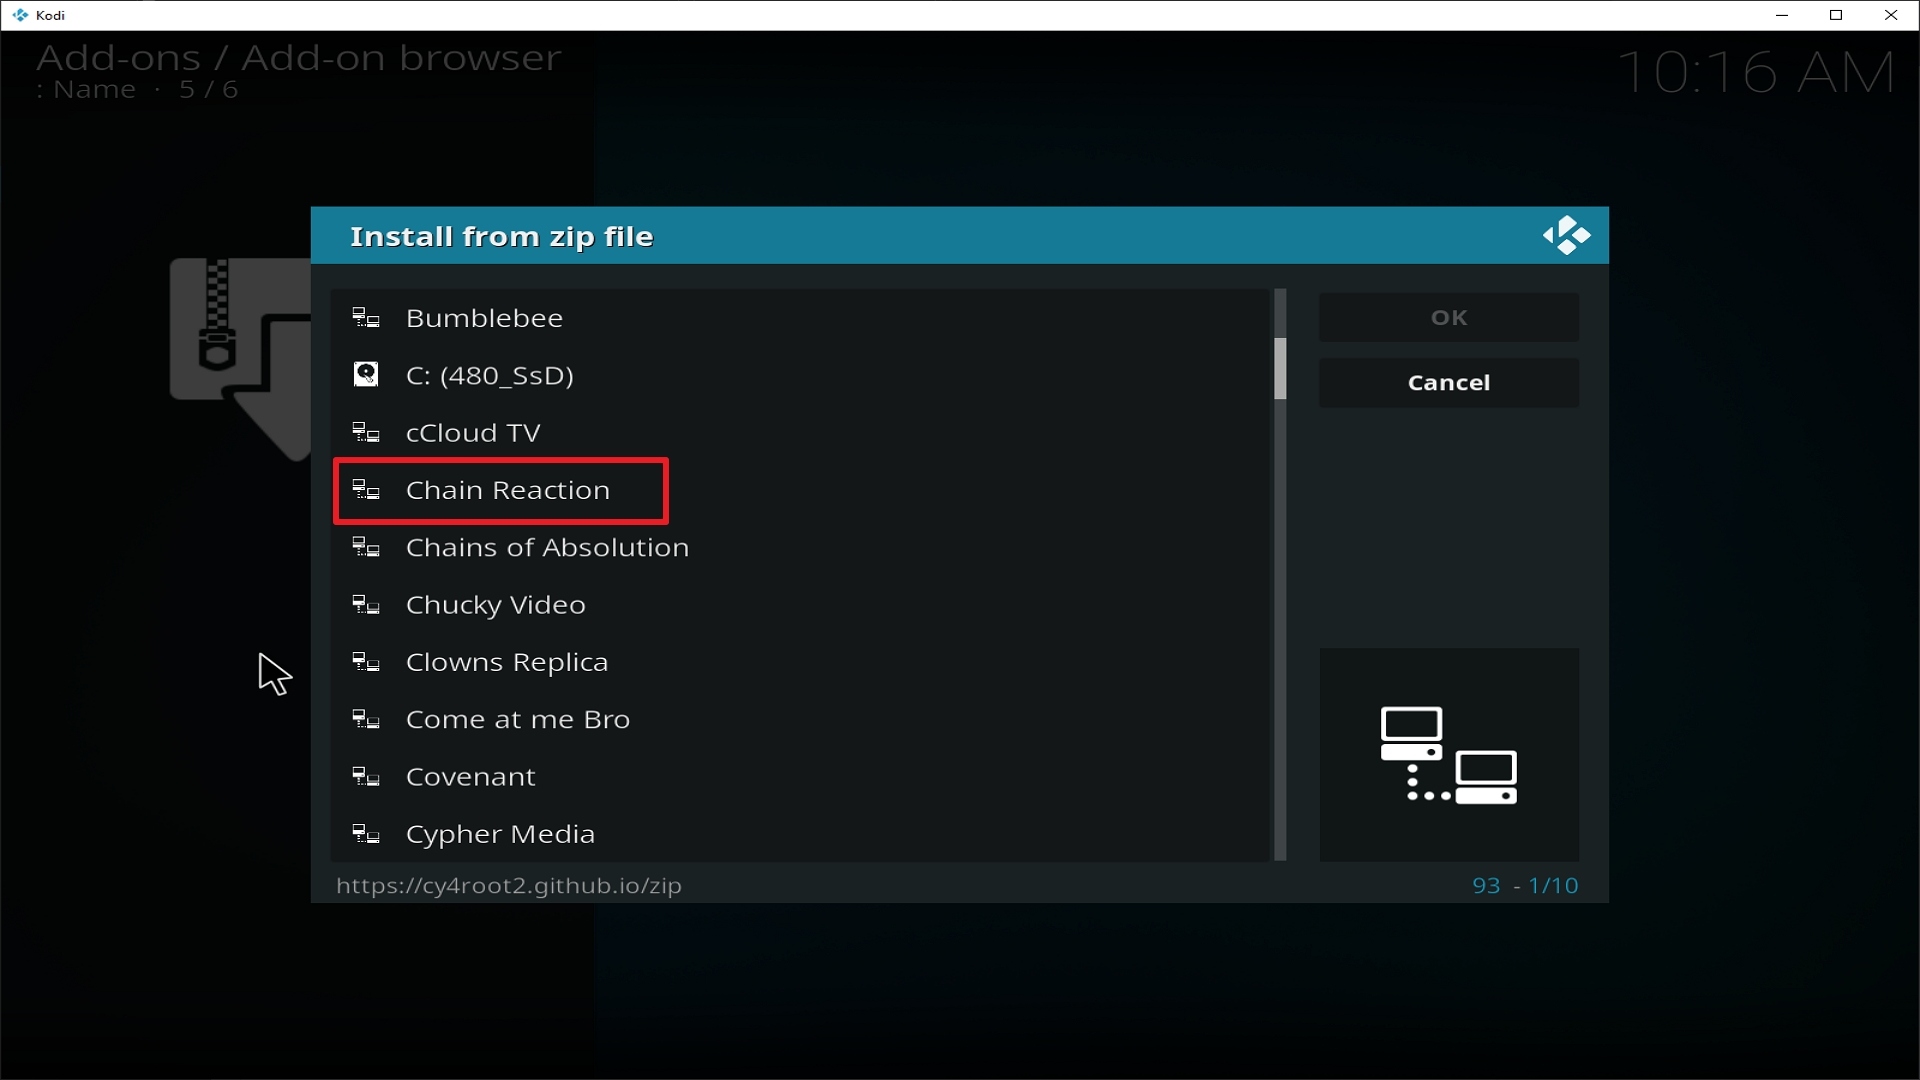
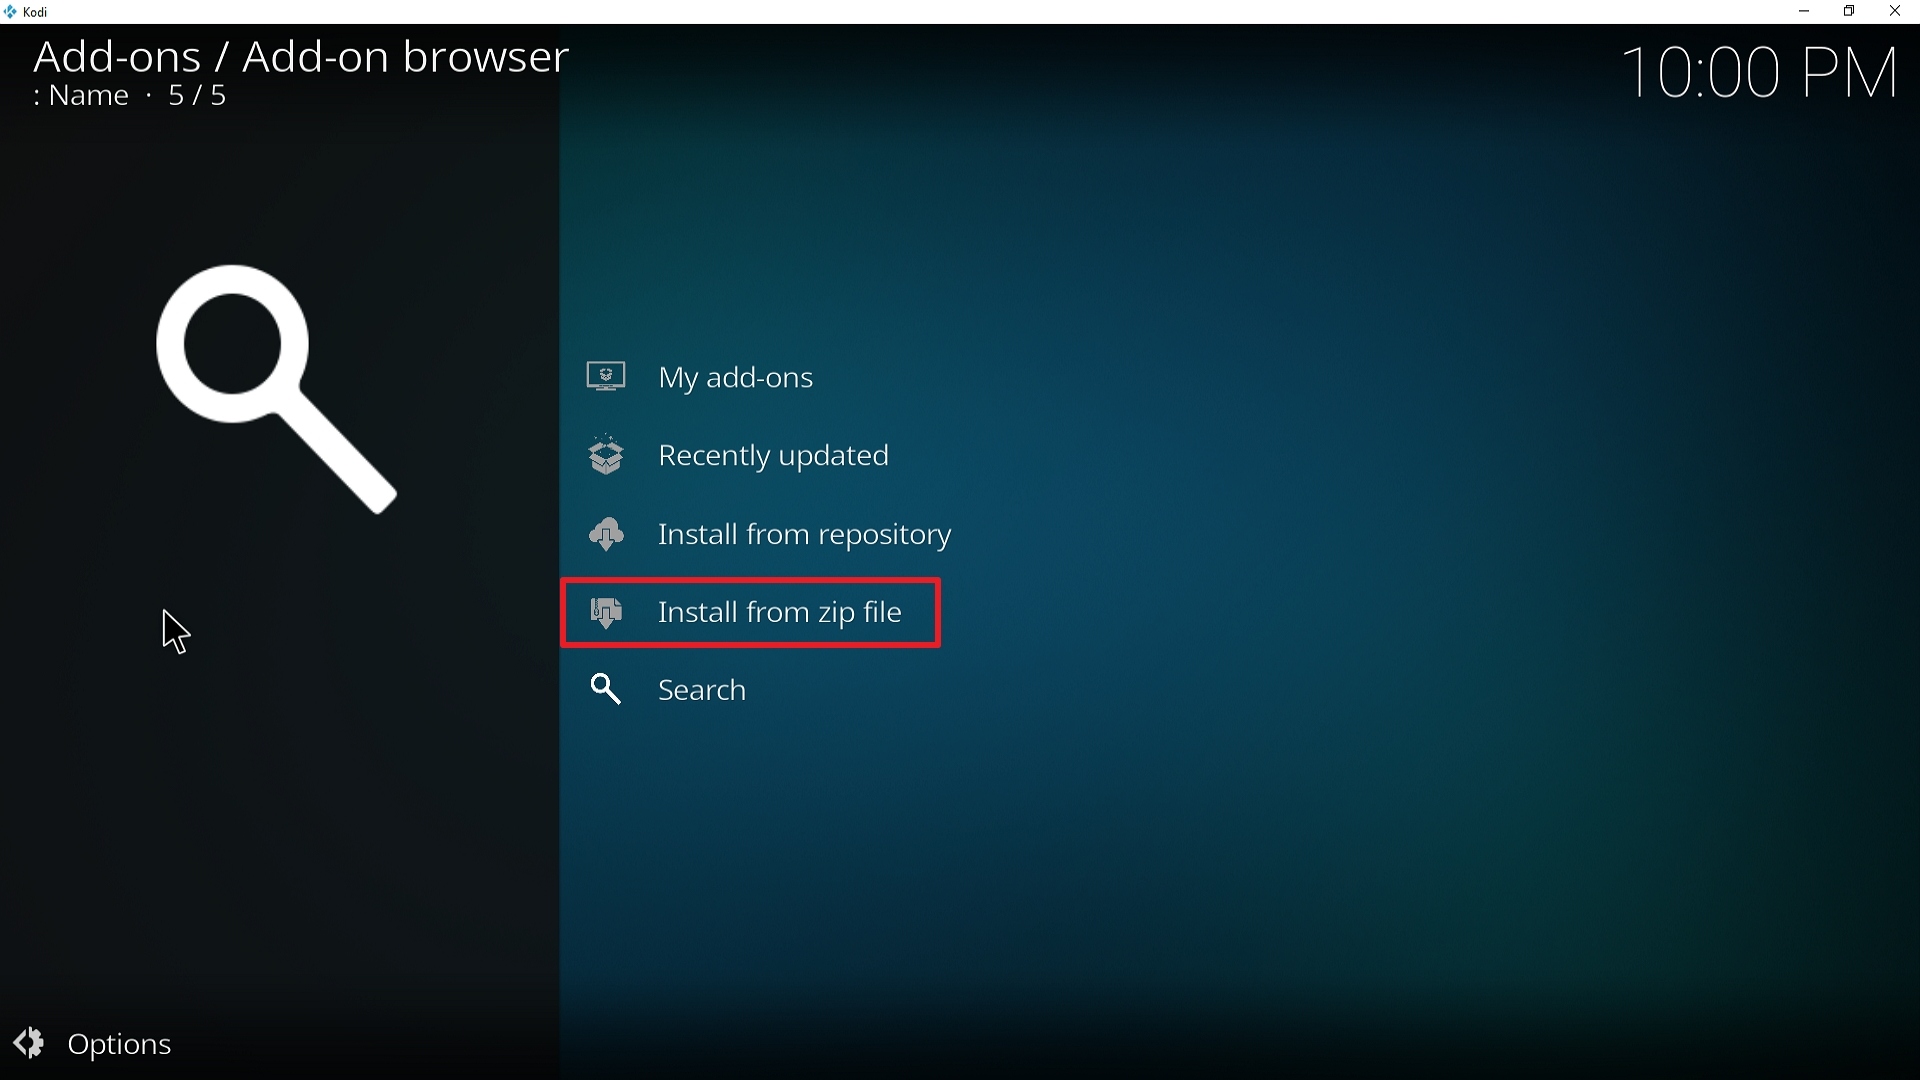
  9. Choose “Install Zip File” and choose “UFO” or whatever you renamed the file.
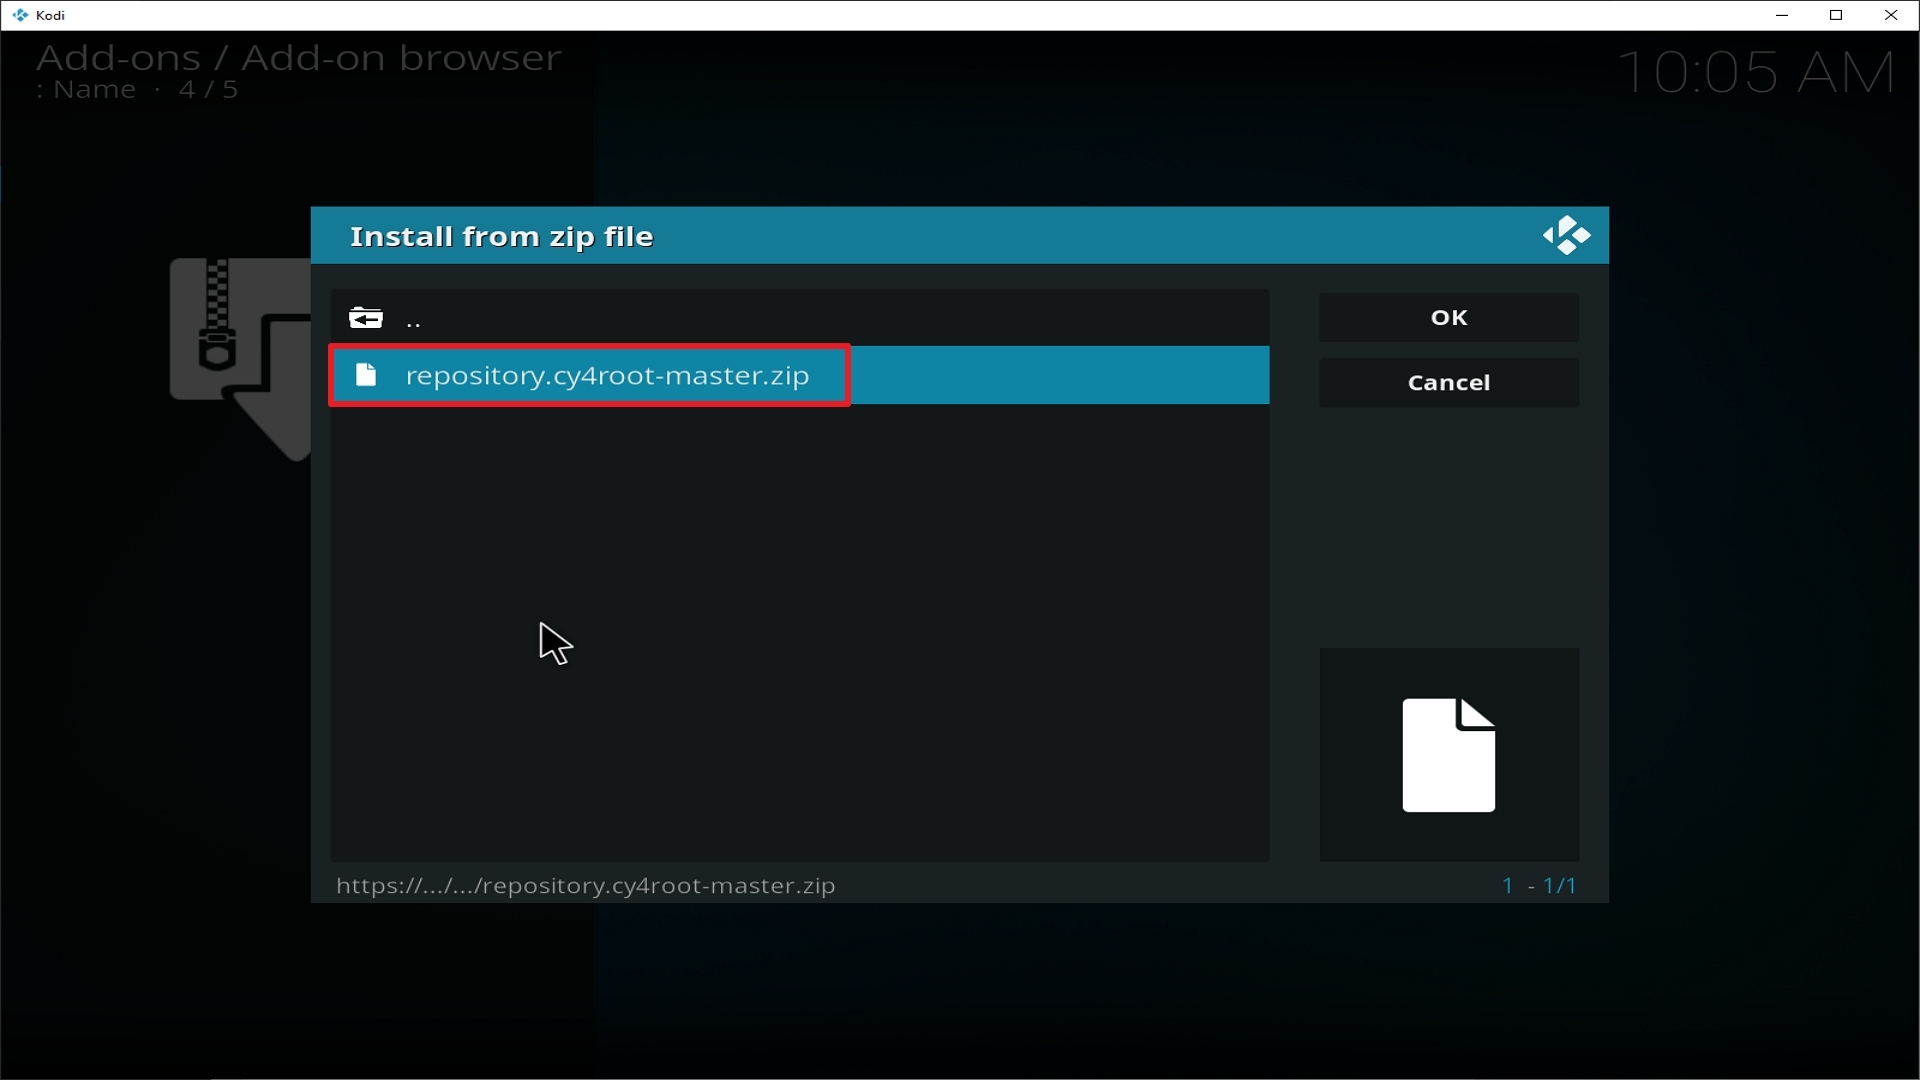
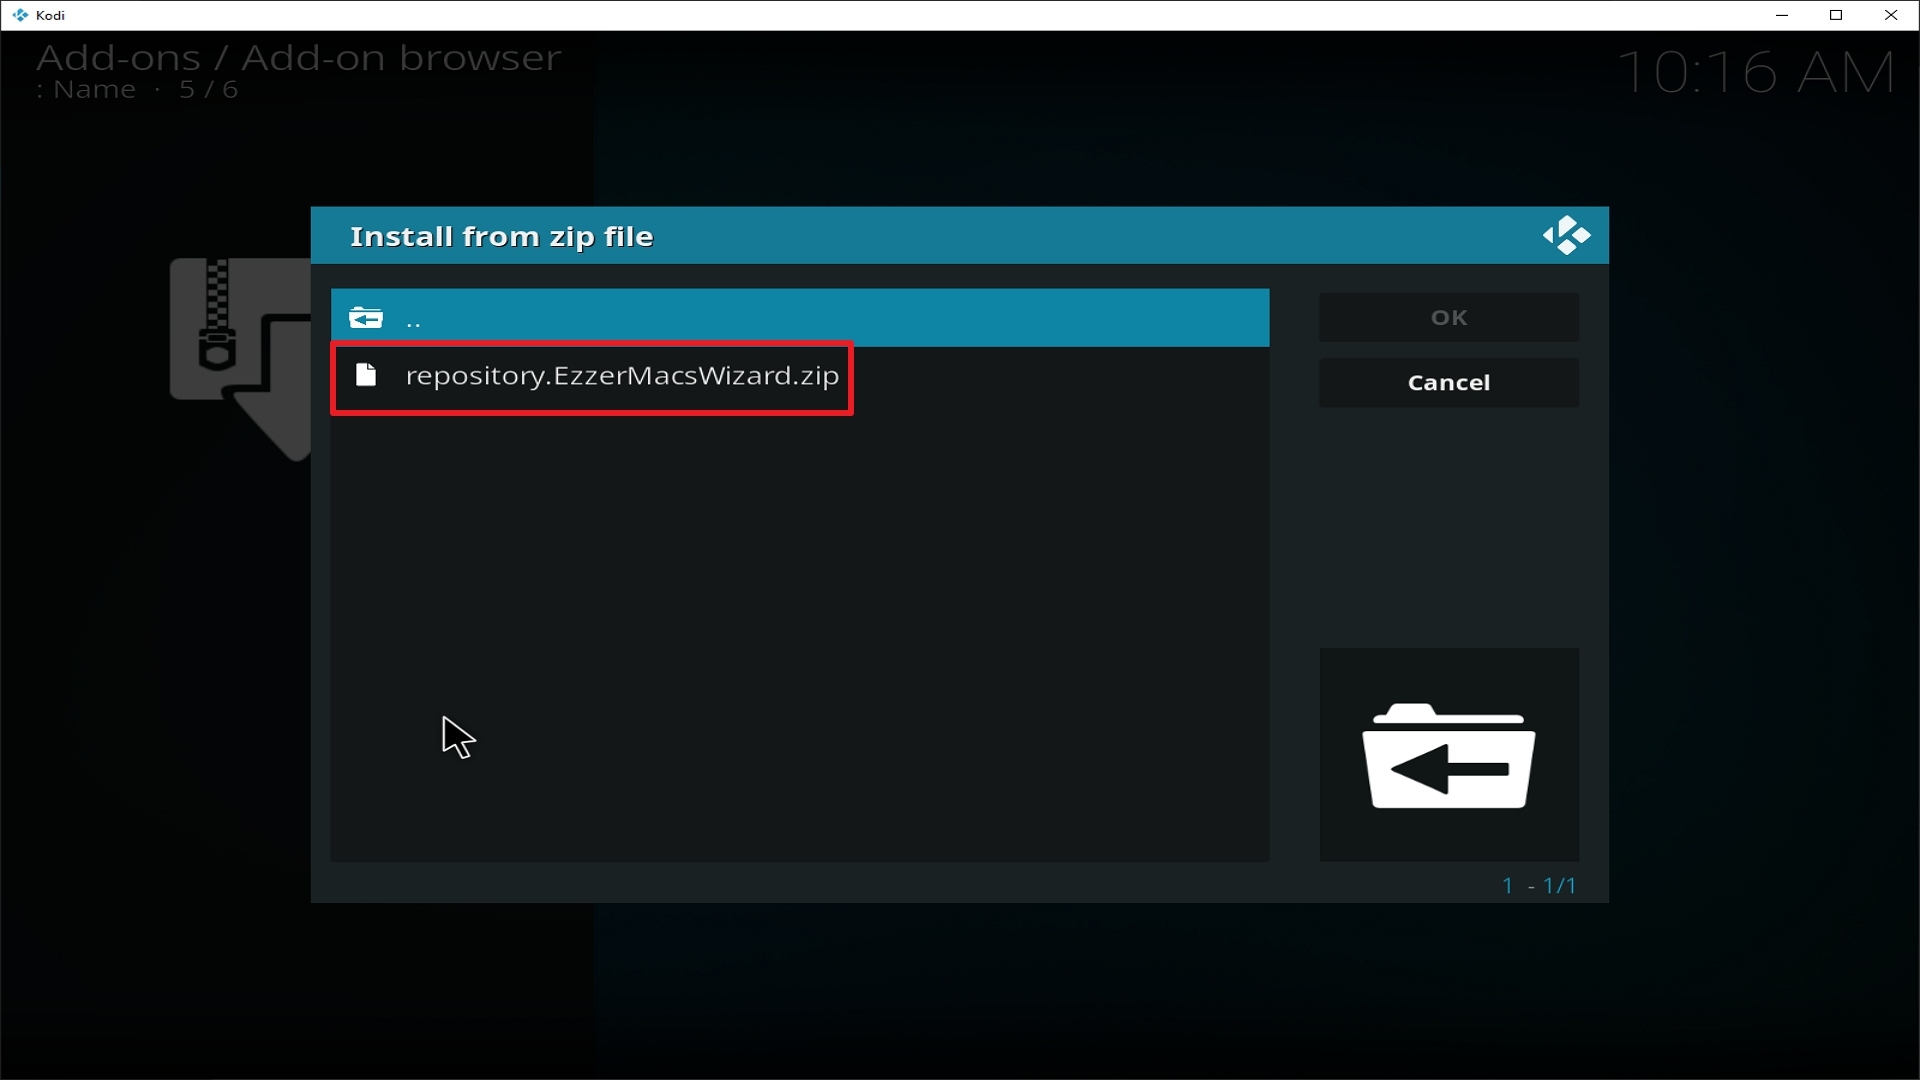
  10. Choose the zip file URL– repository.ufo-repo.zip
  11. Wait for the notification “UFO Build Add-on Repo Installed” to appear.
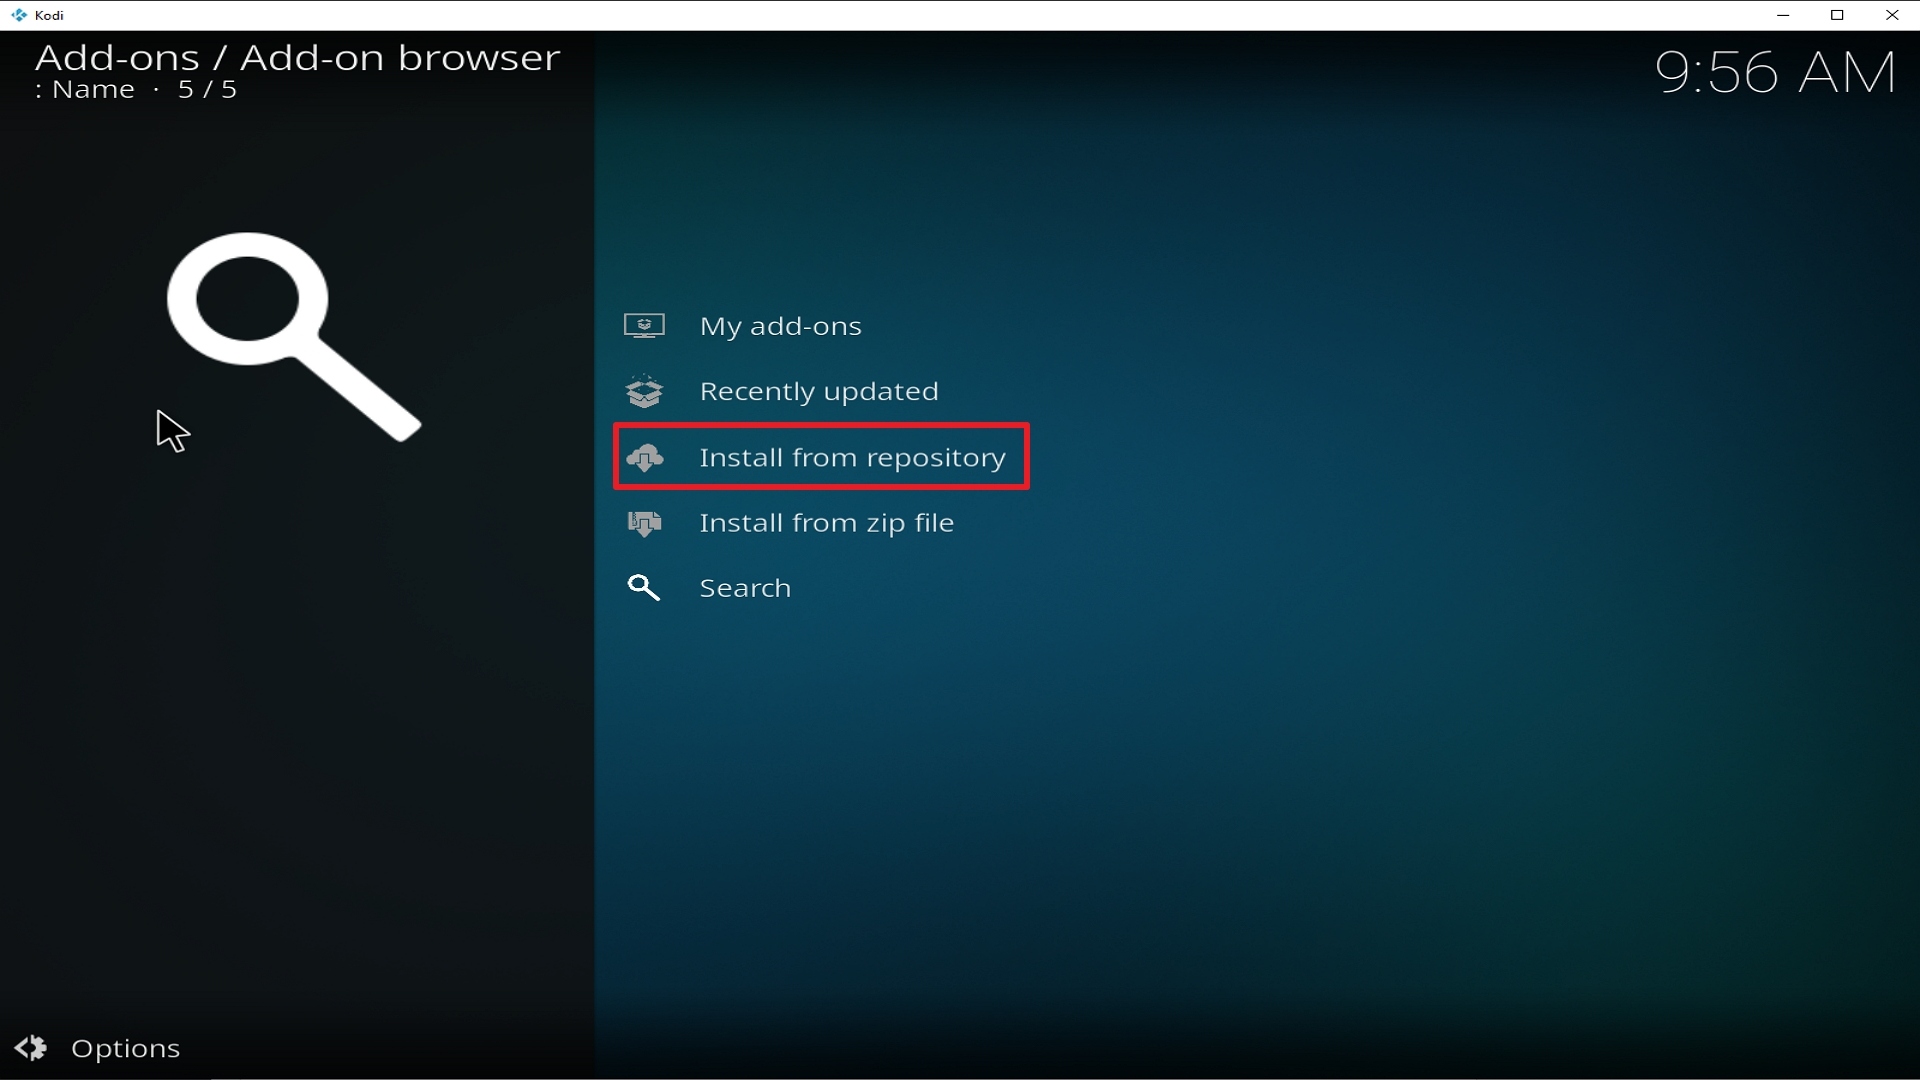
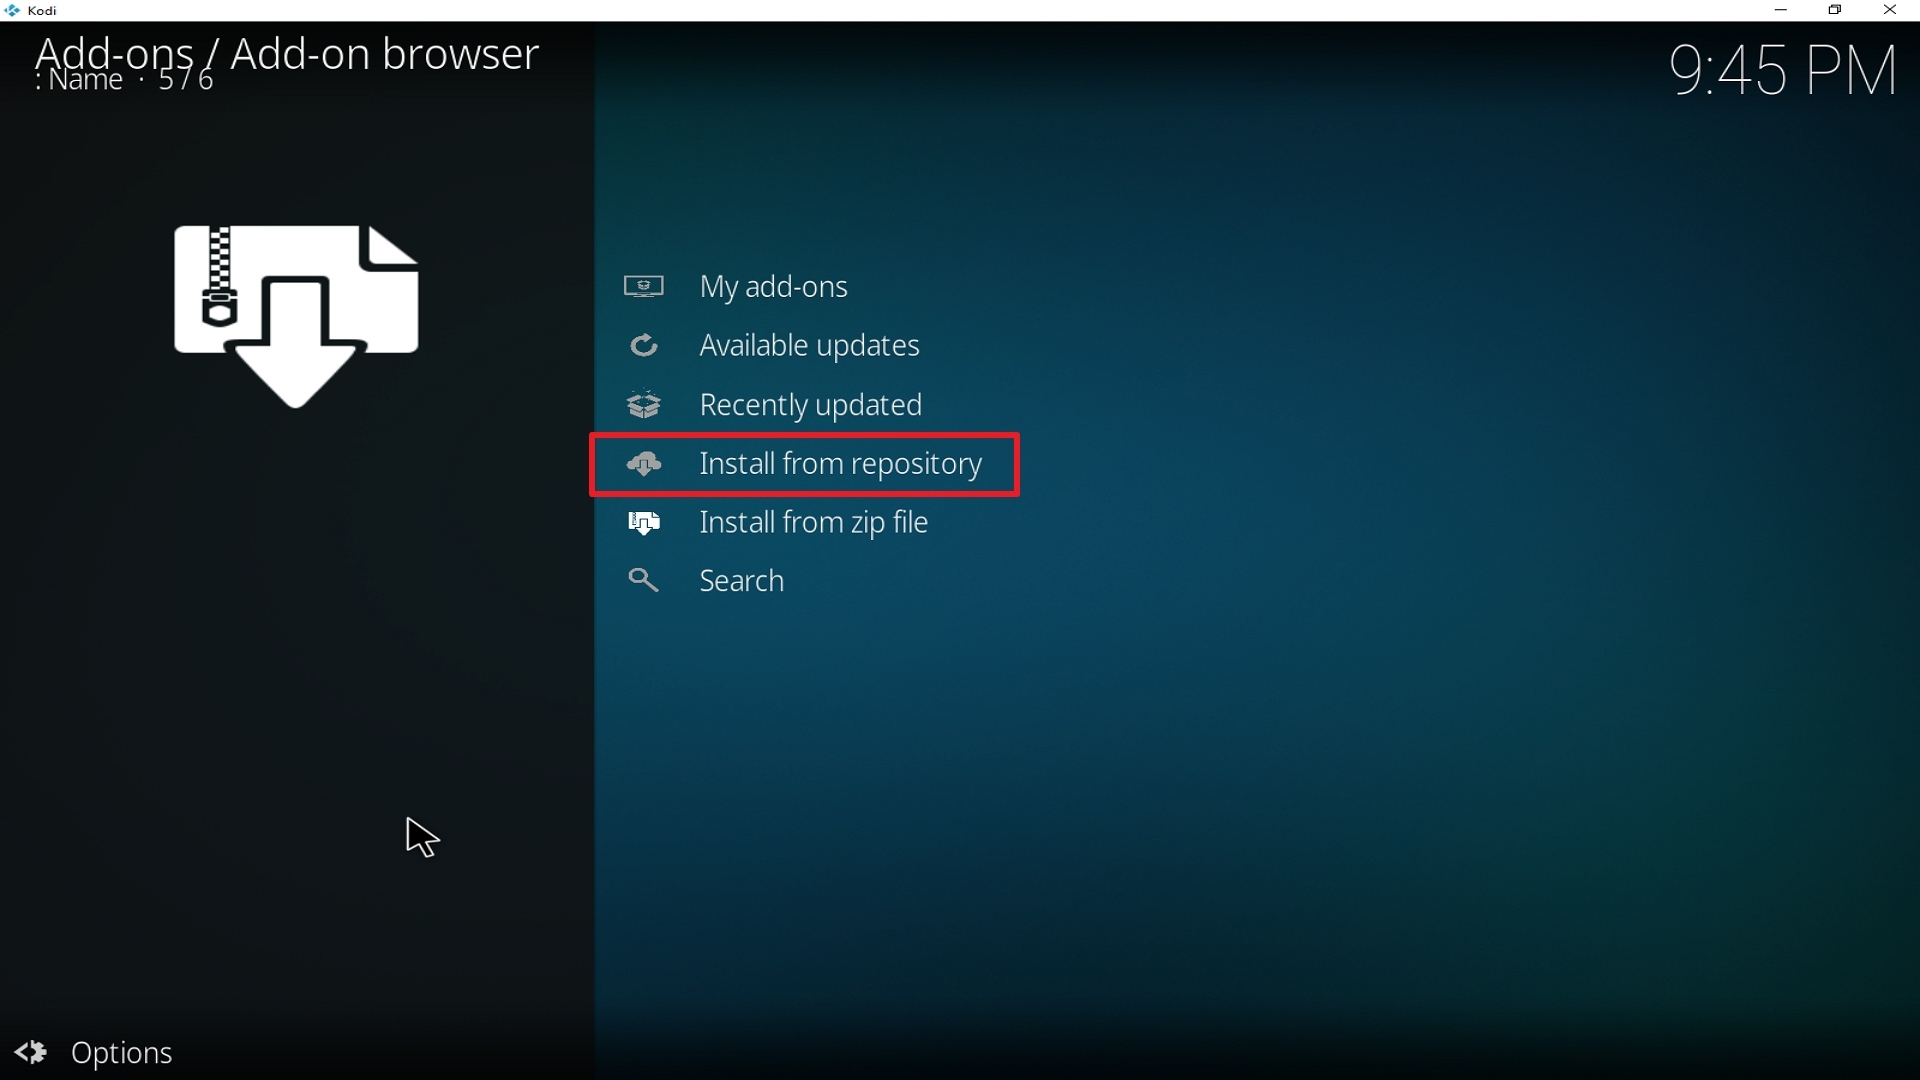
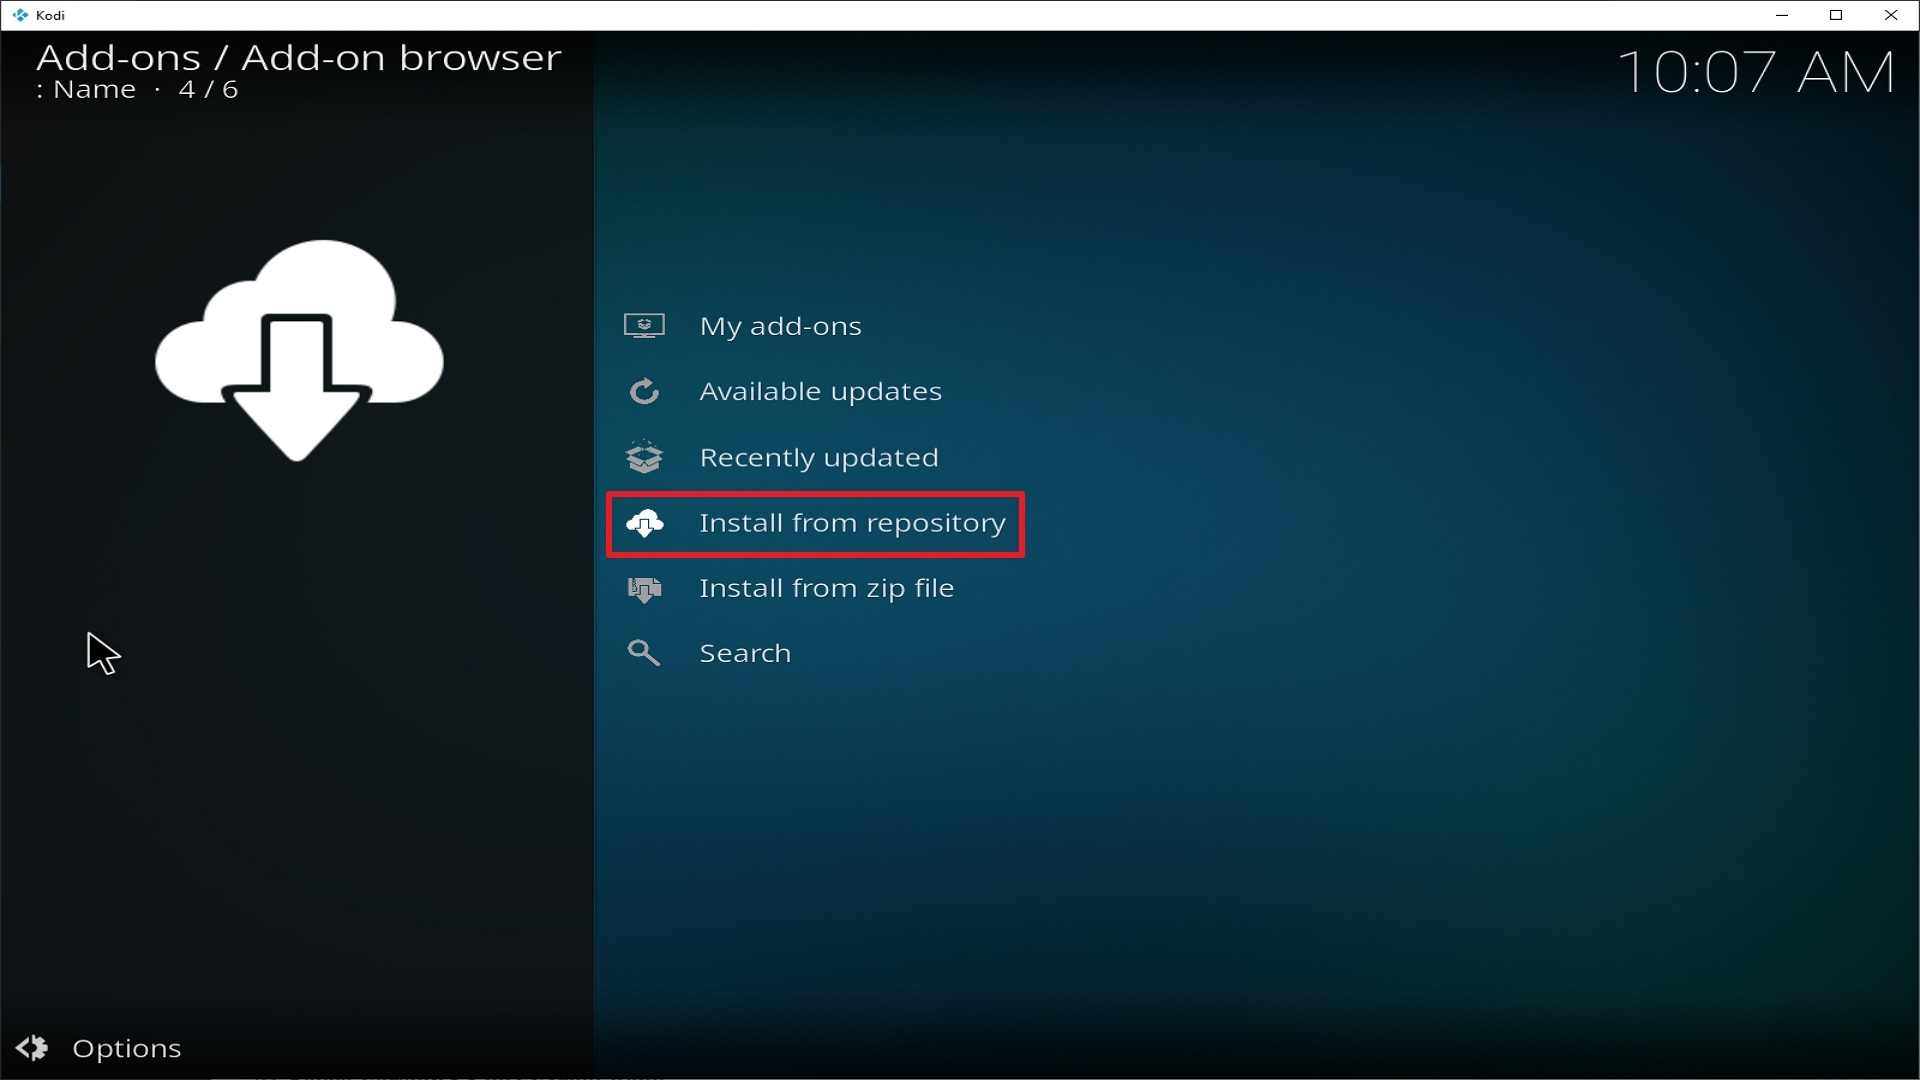
  12. Click on “Install Repository”
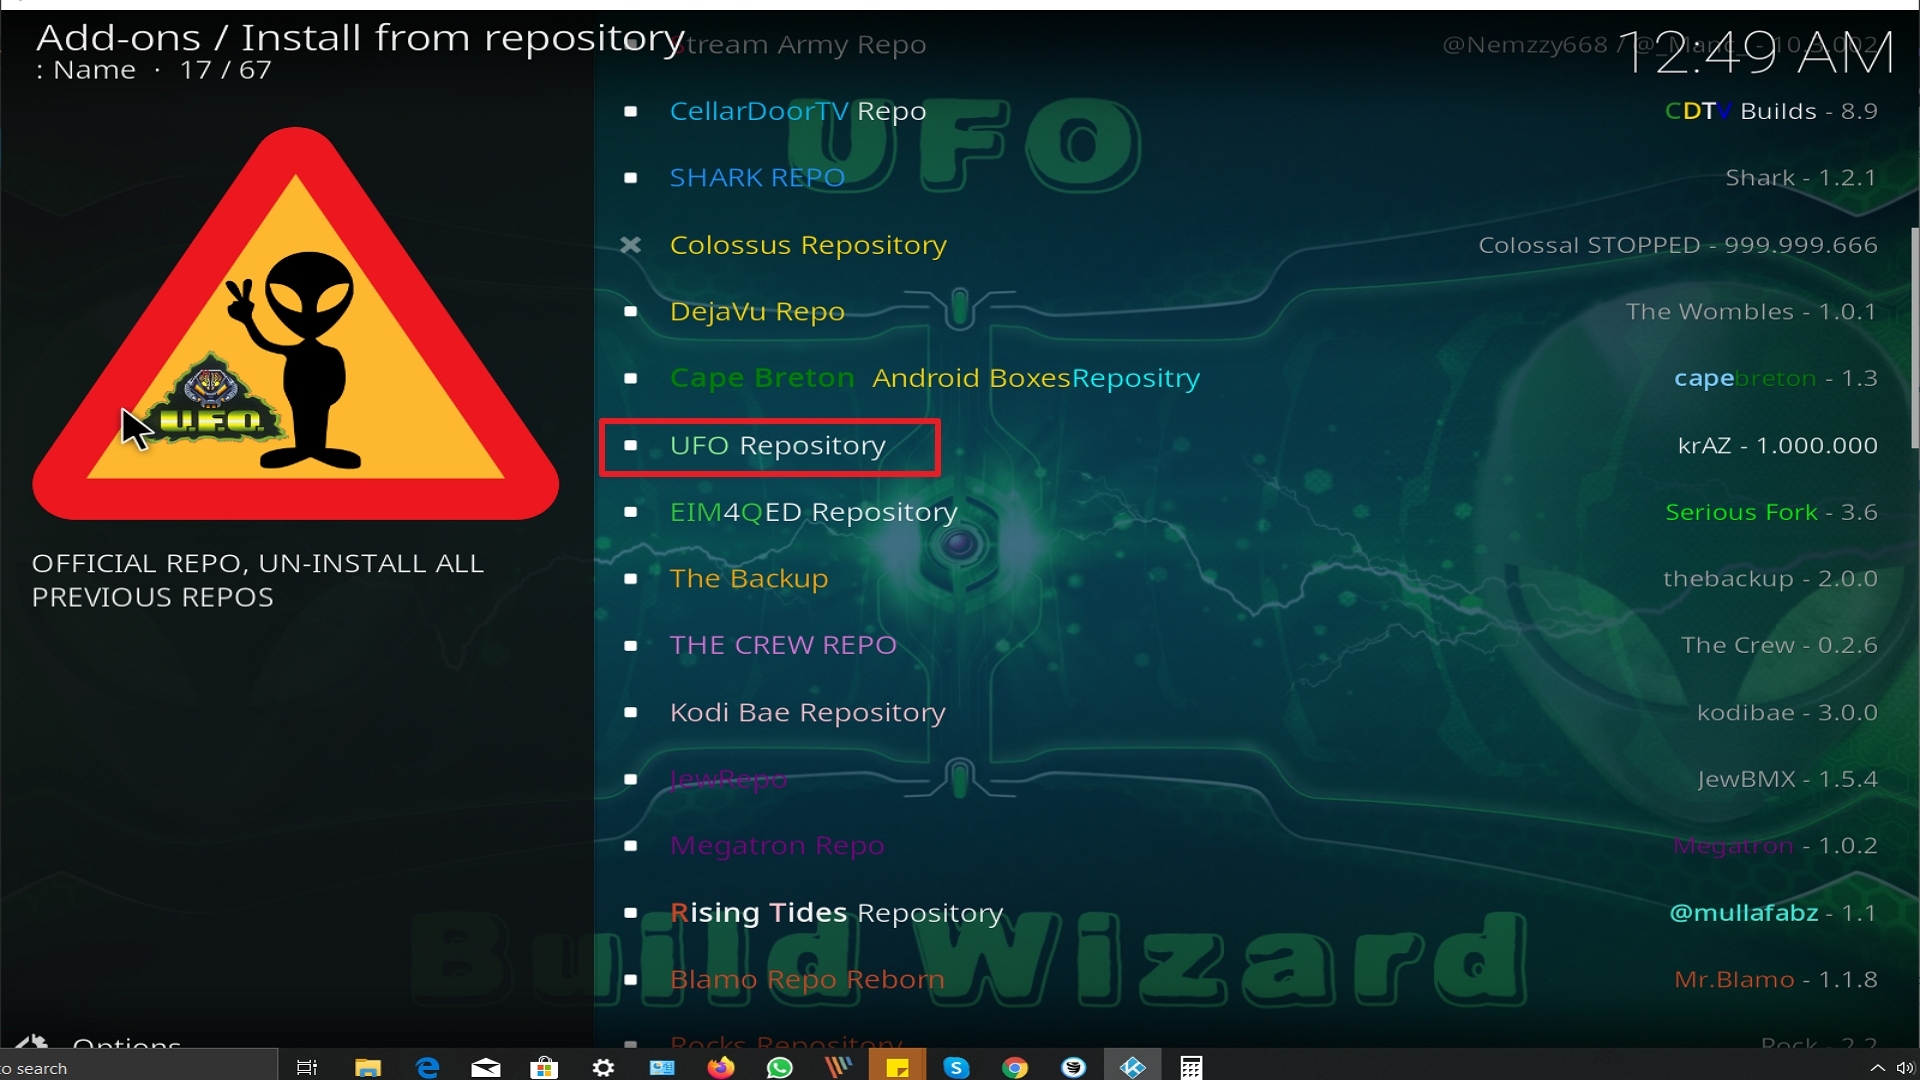
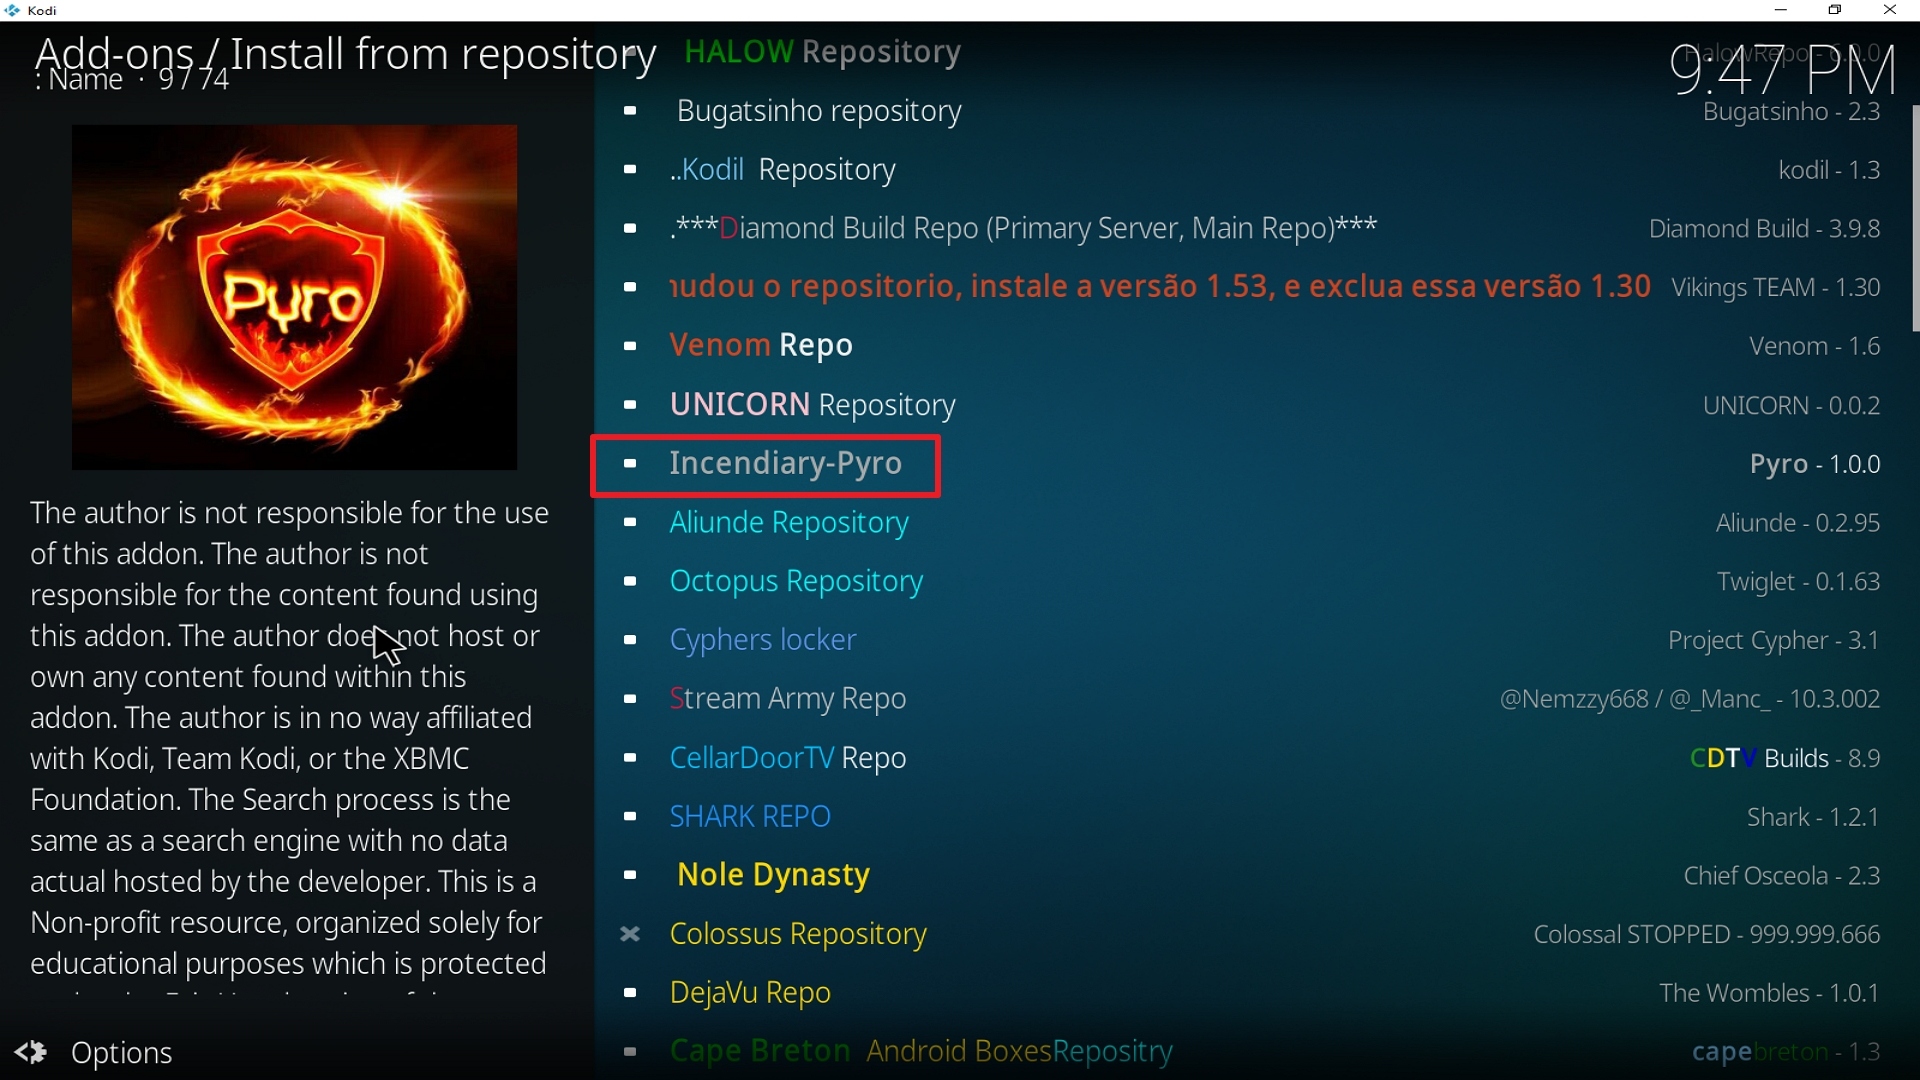
  13. Select “UFO Repository”
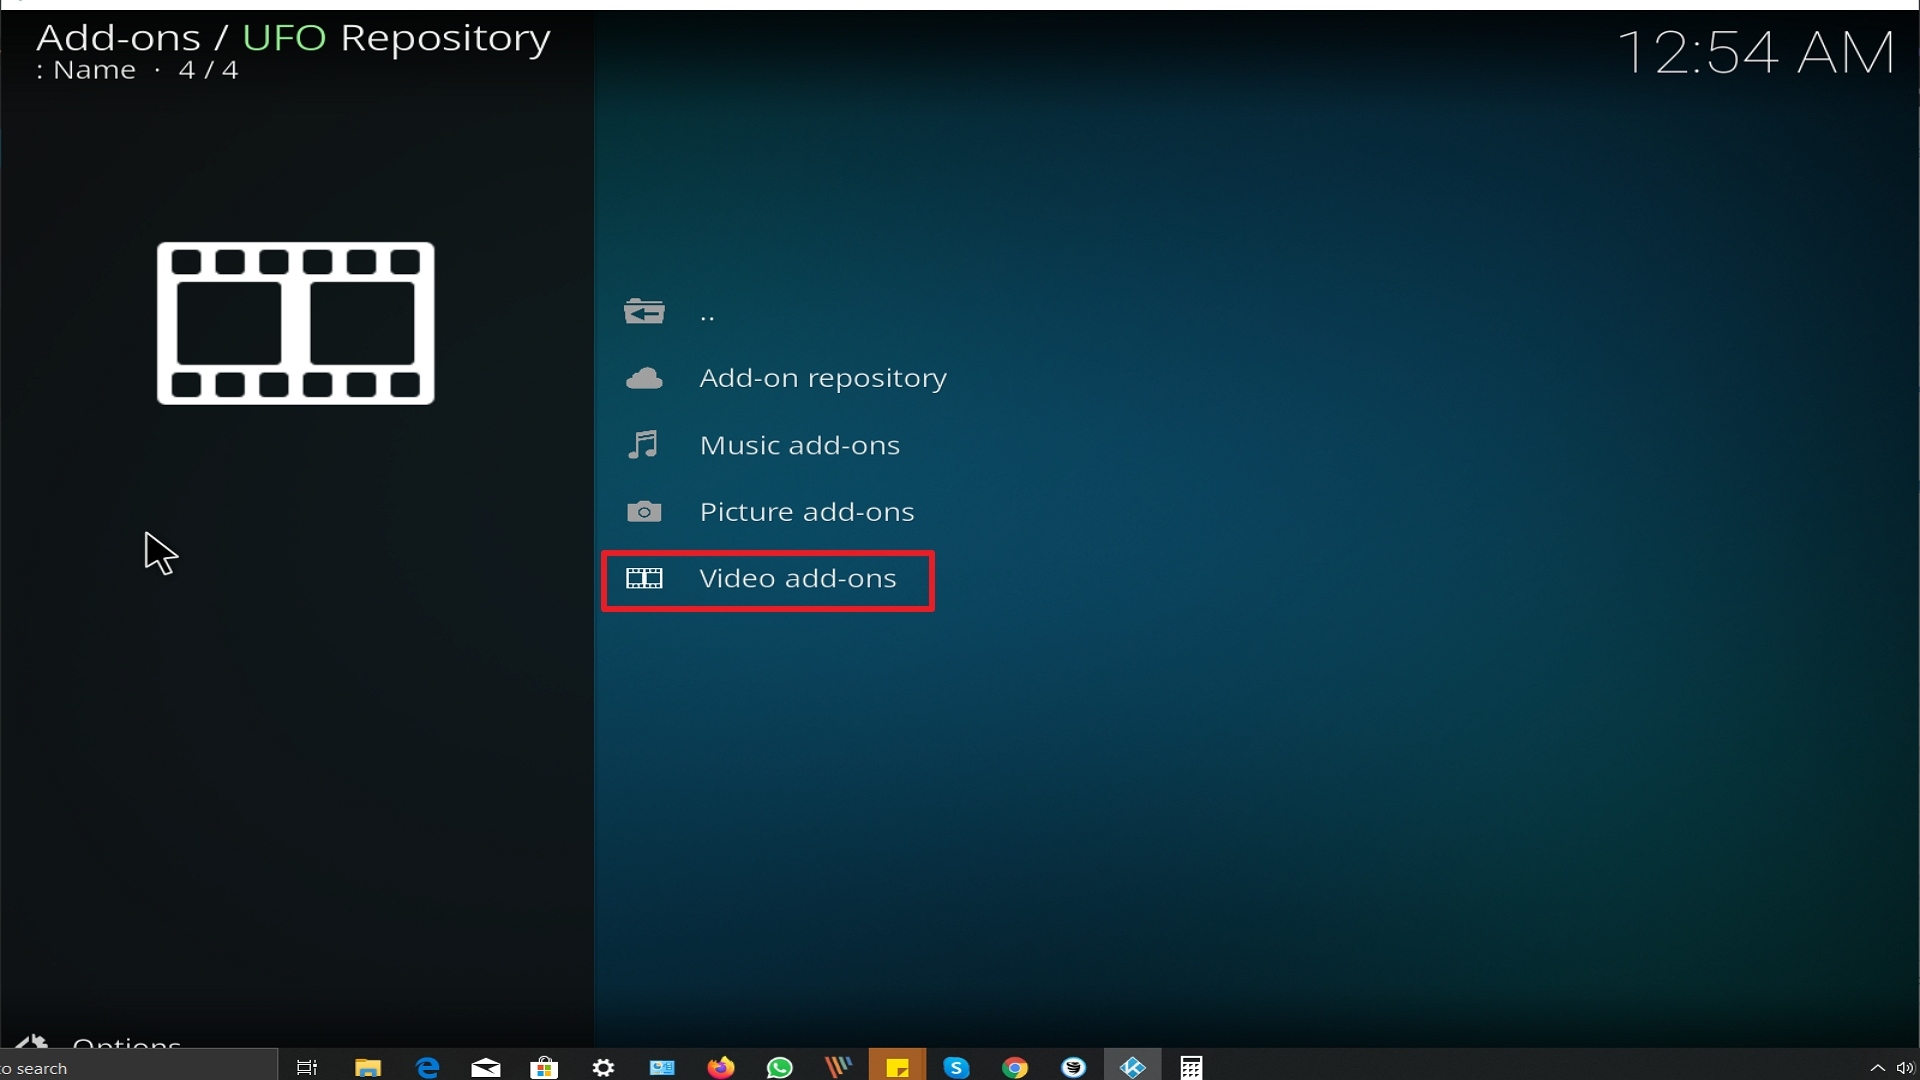
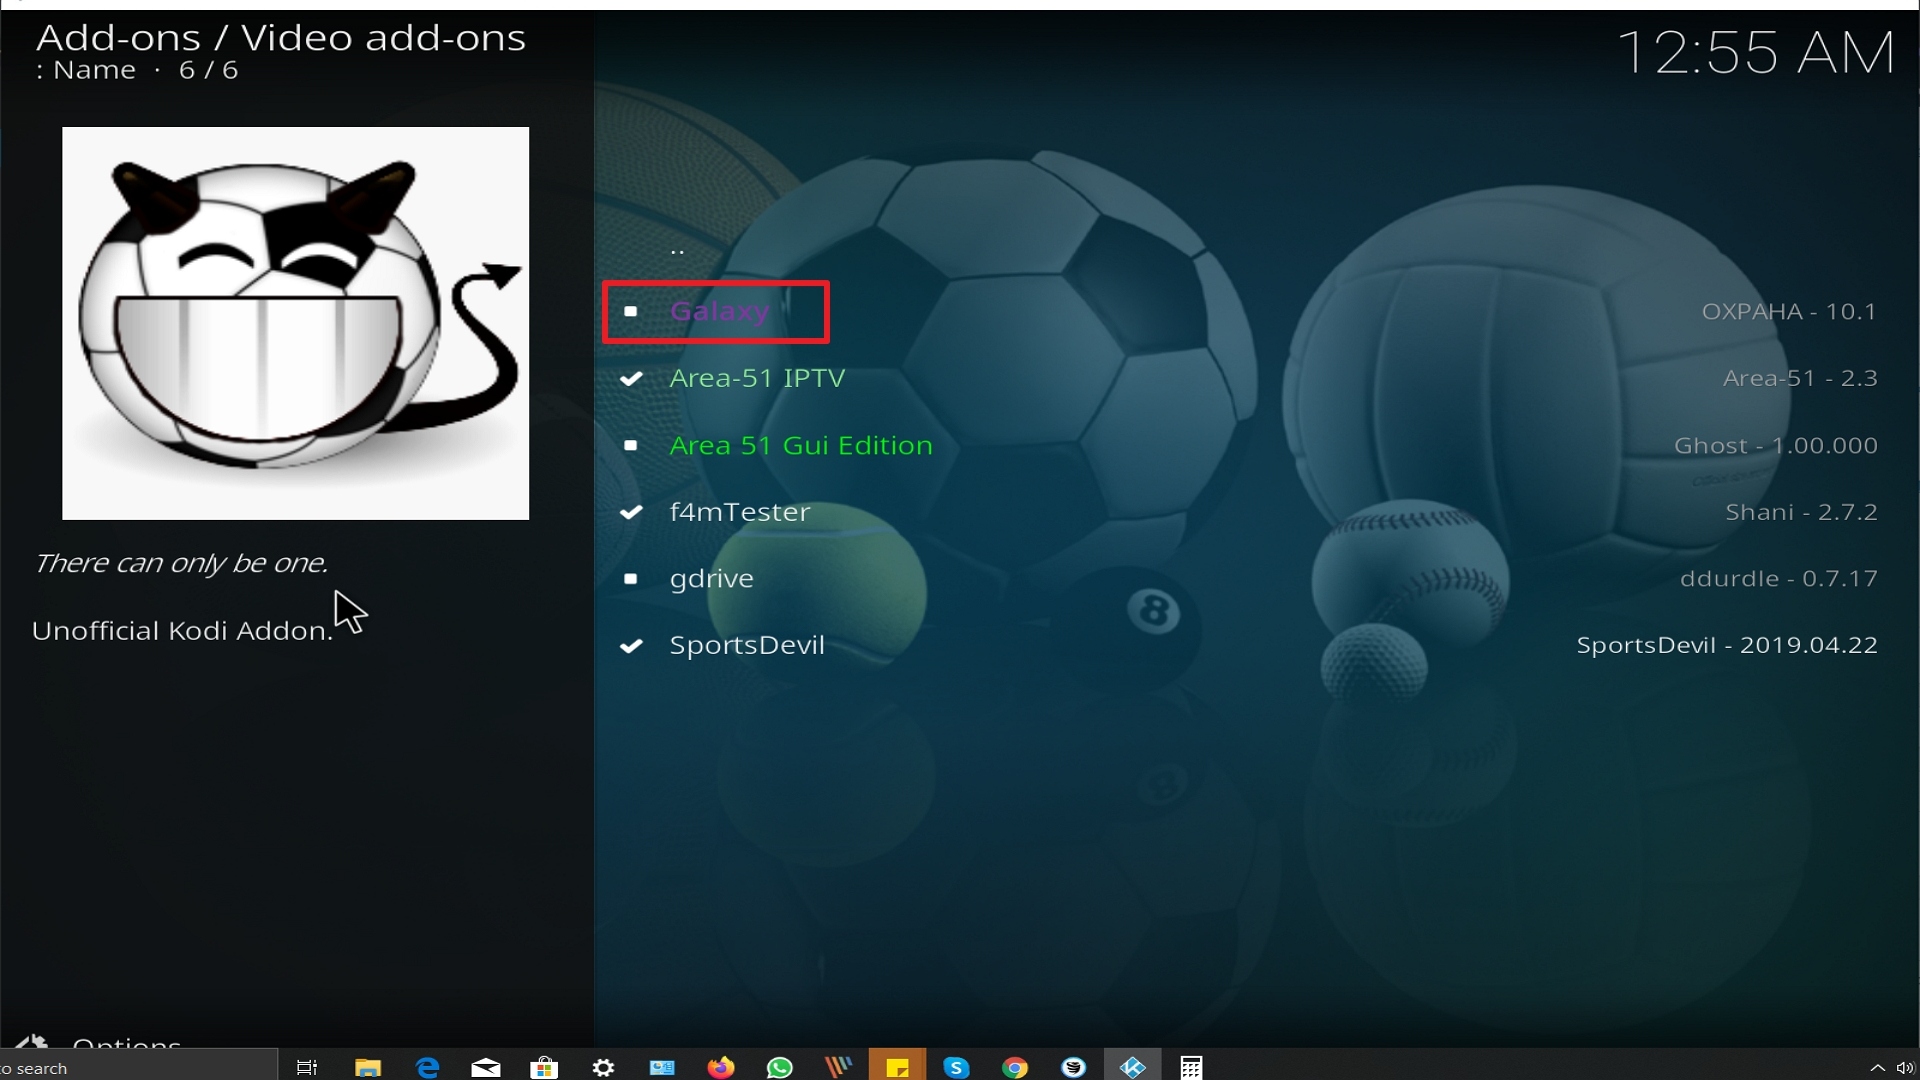
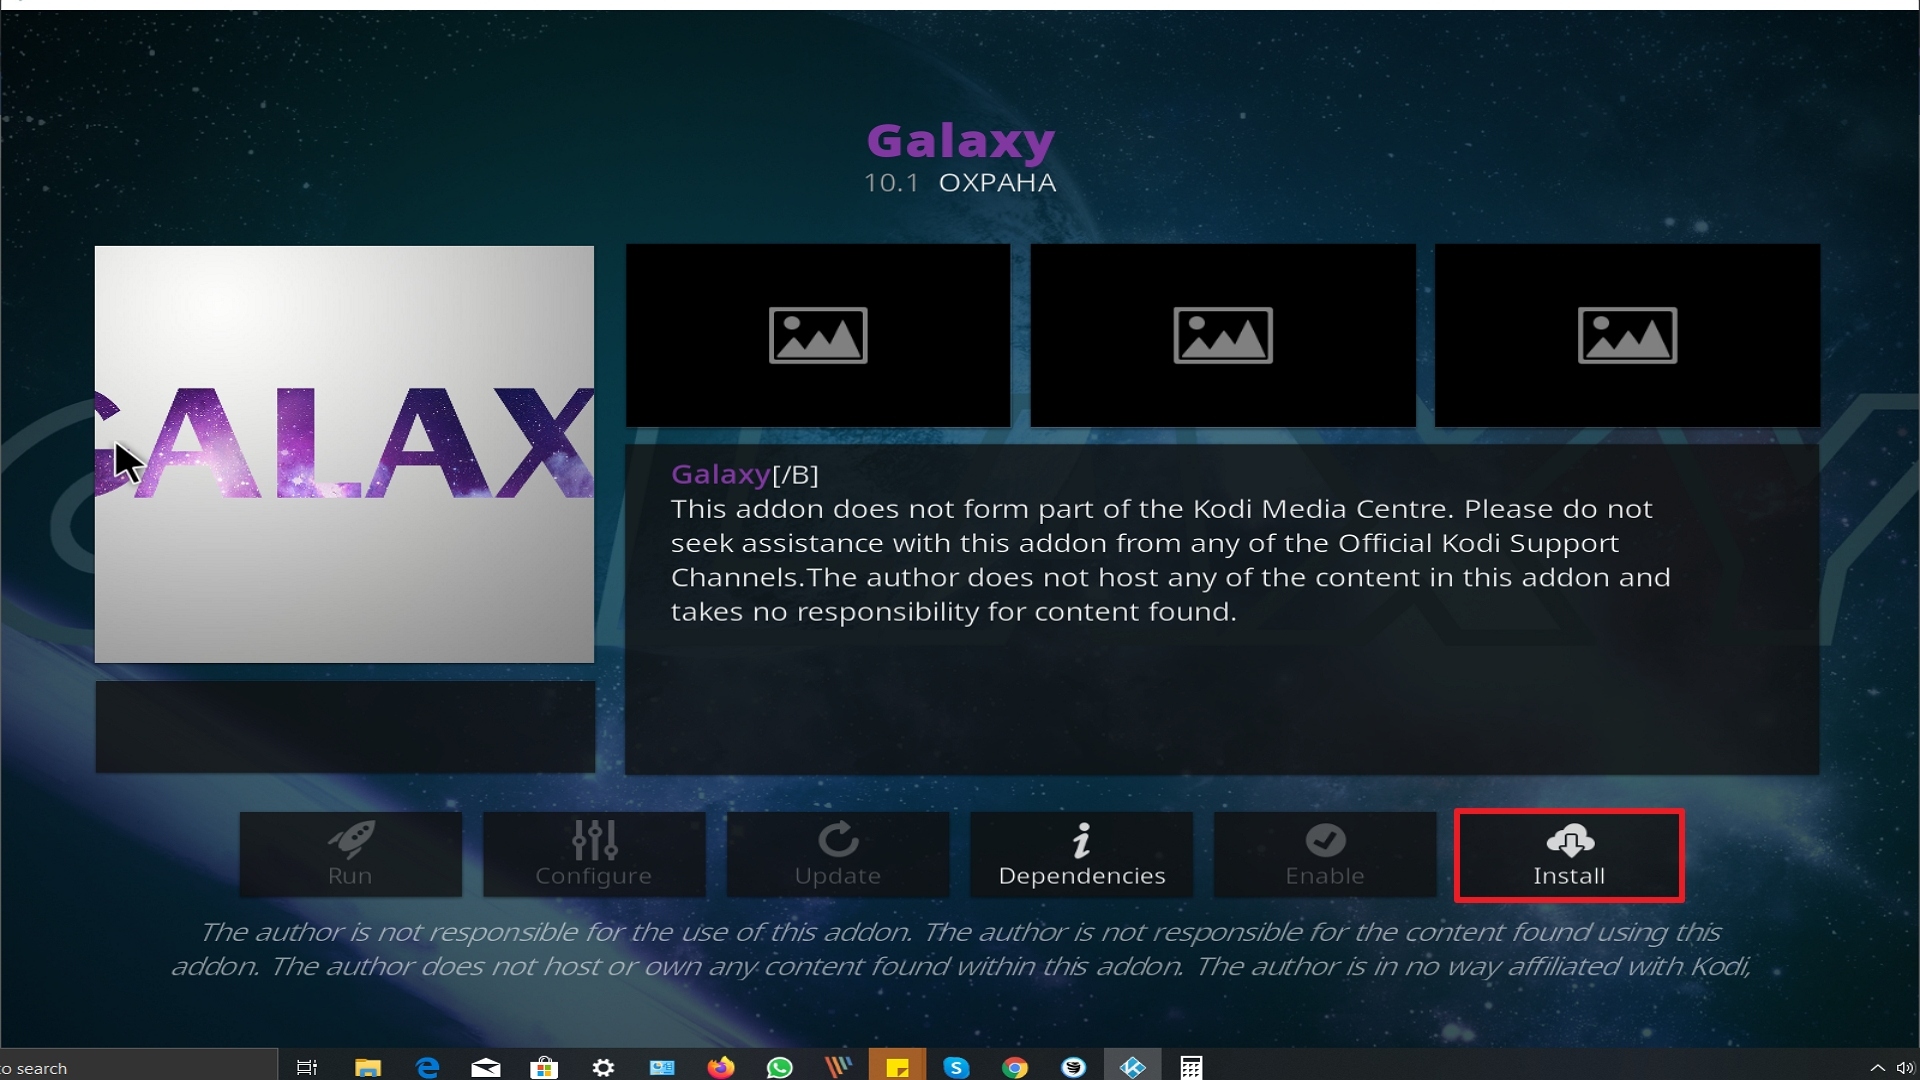
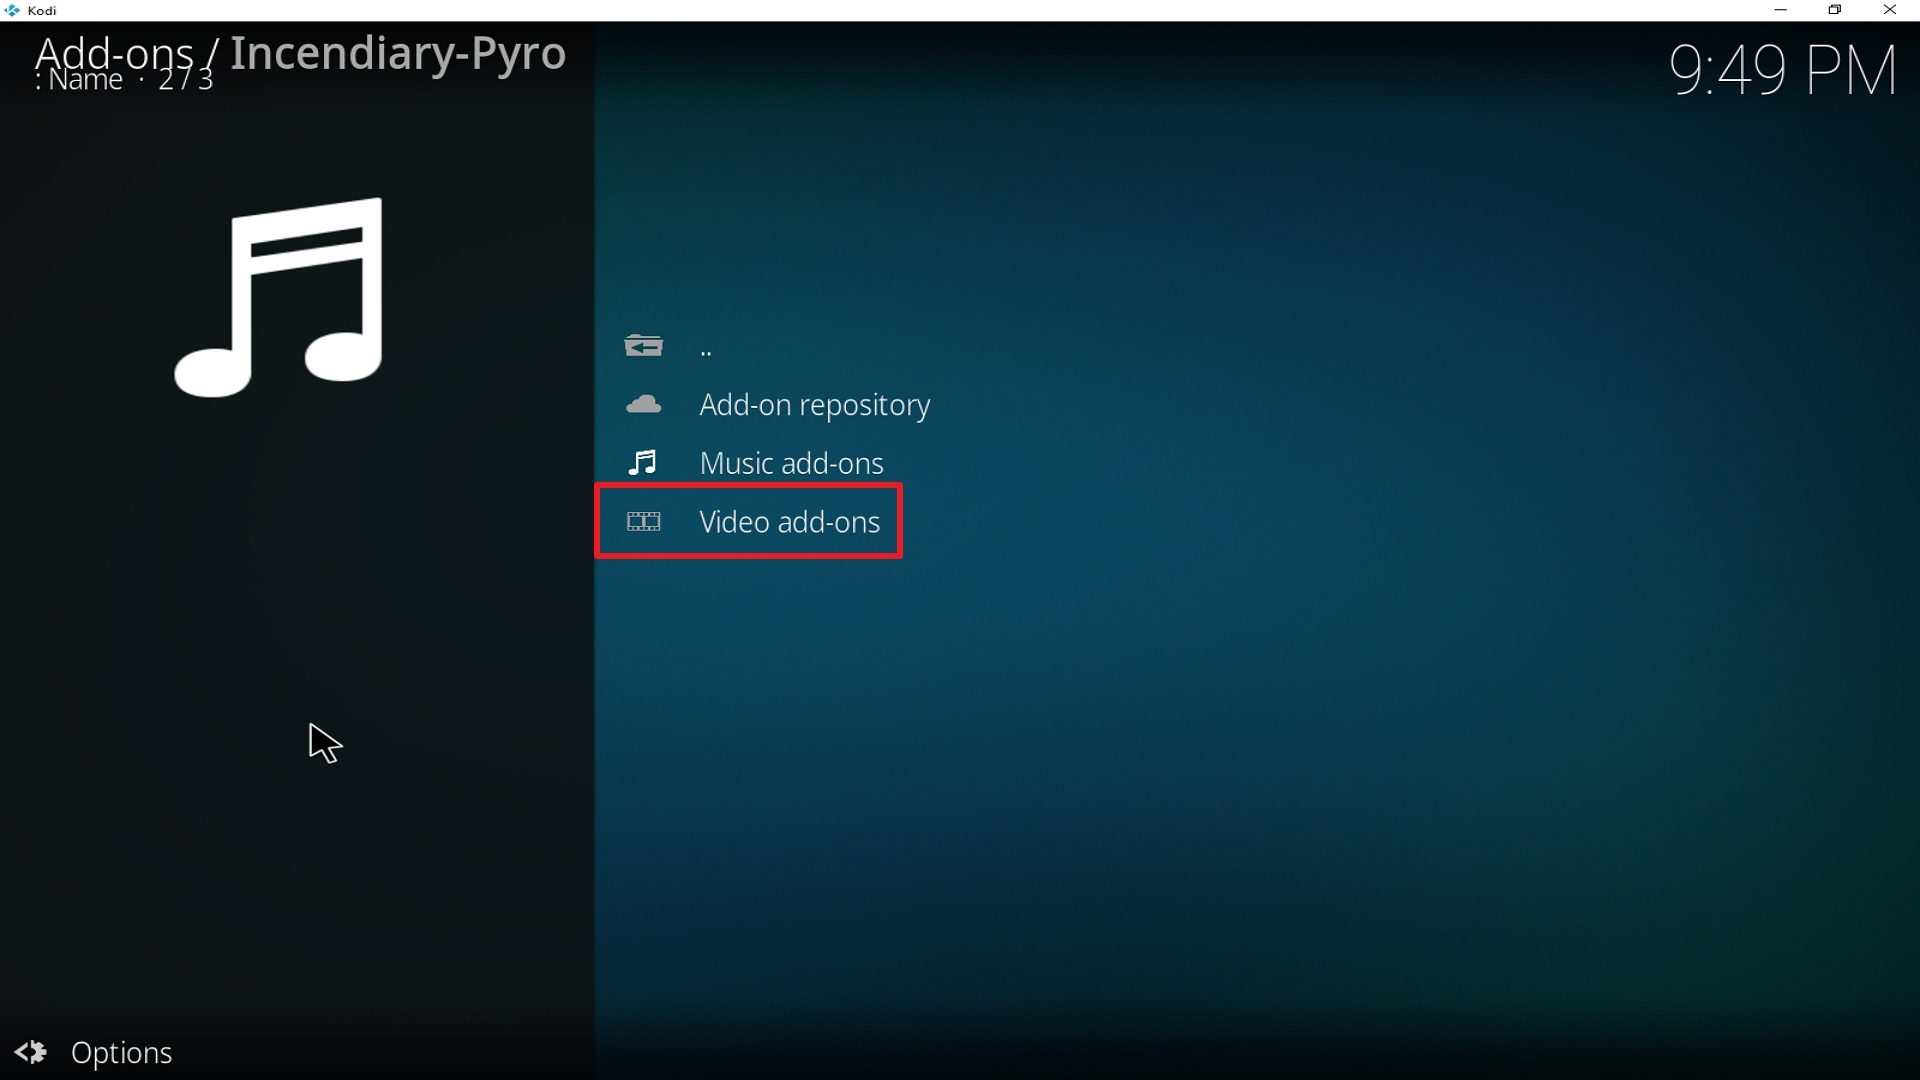
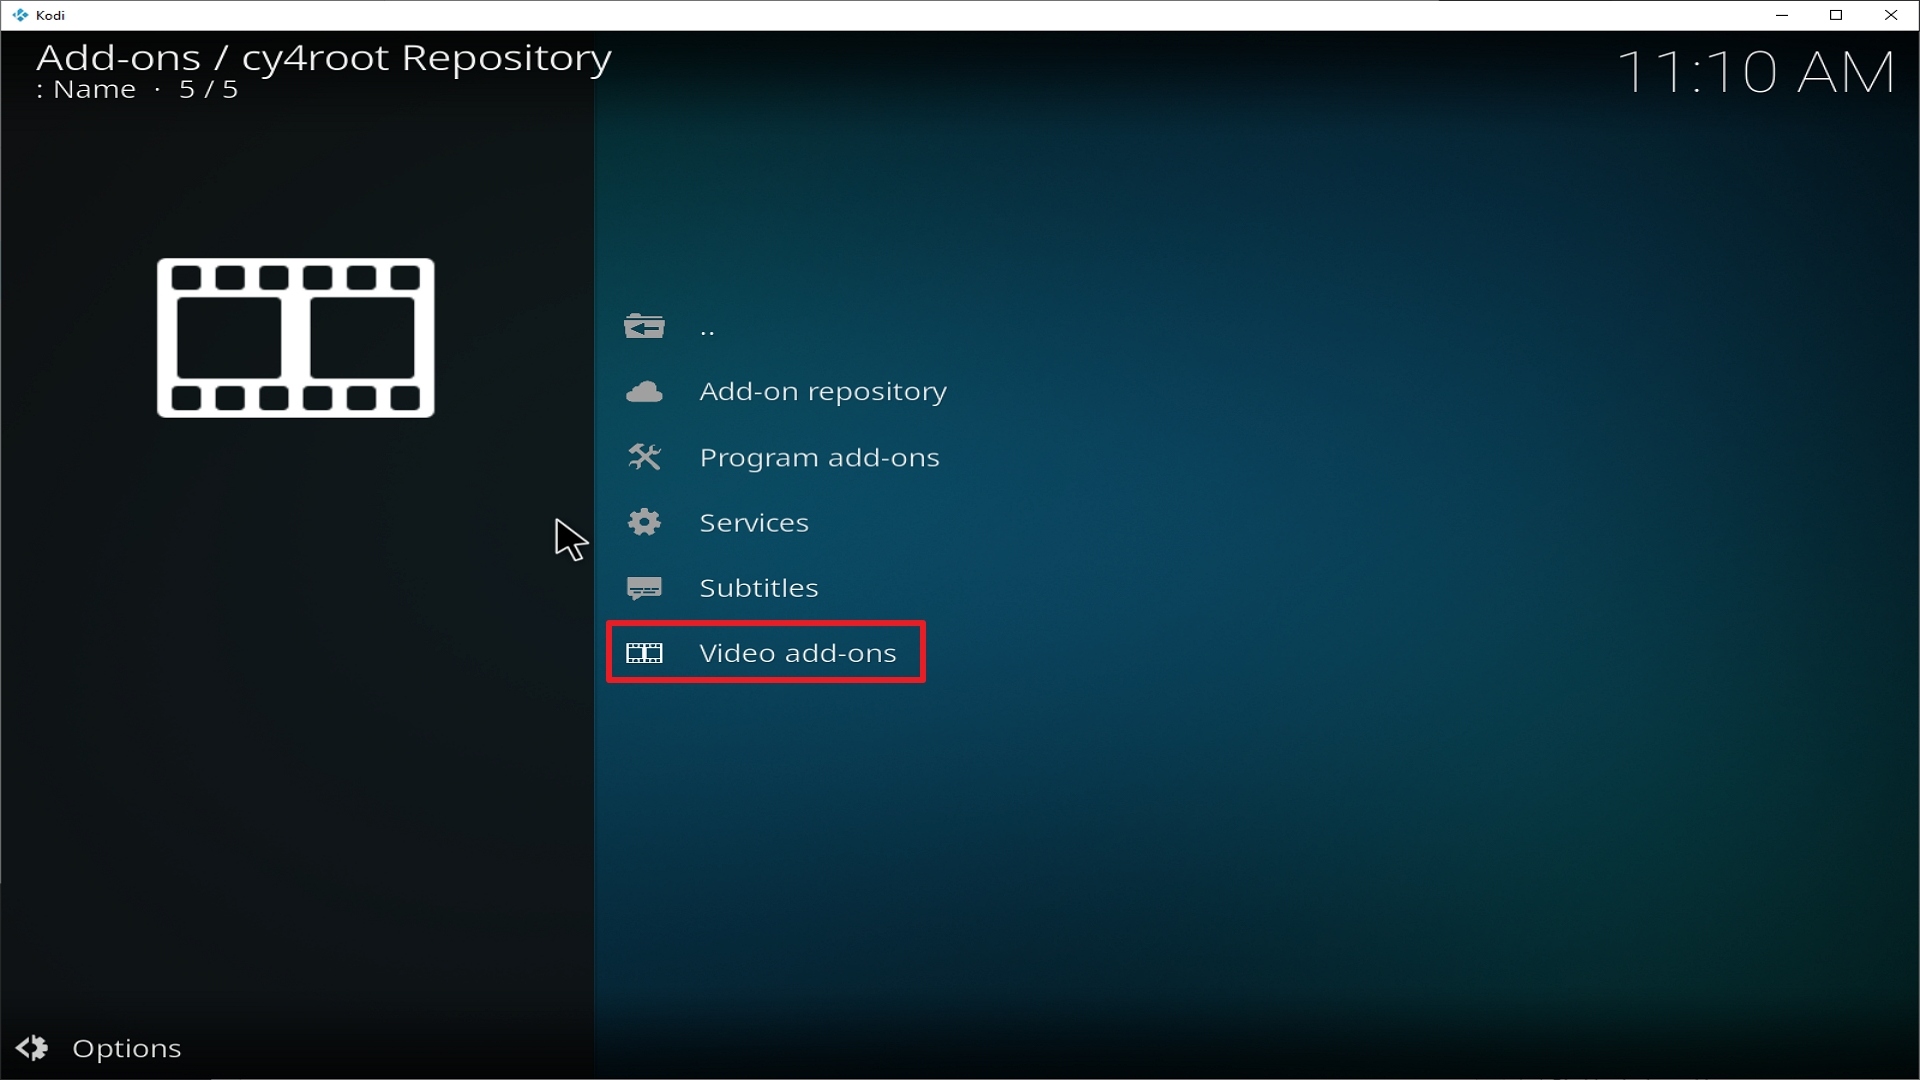
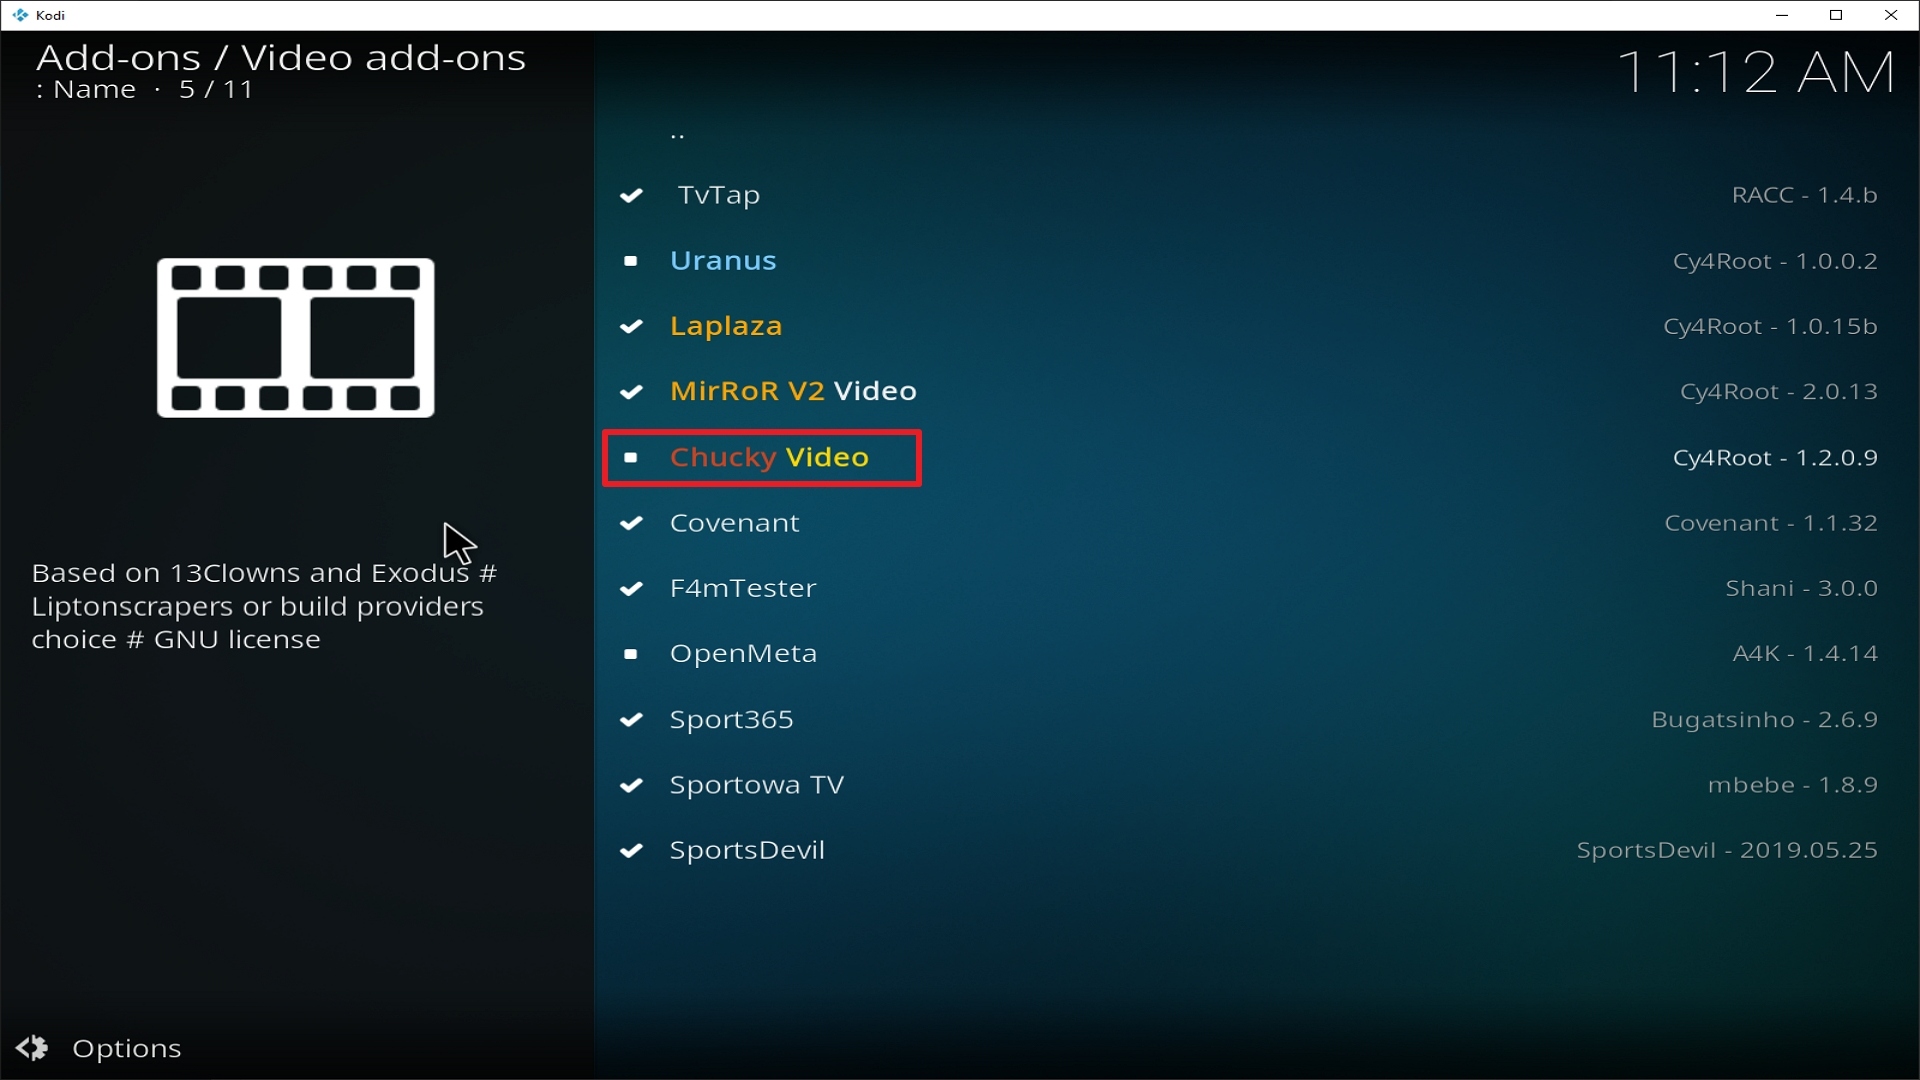
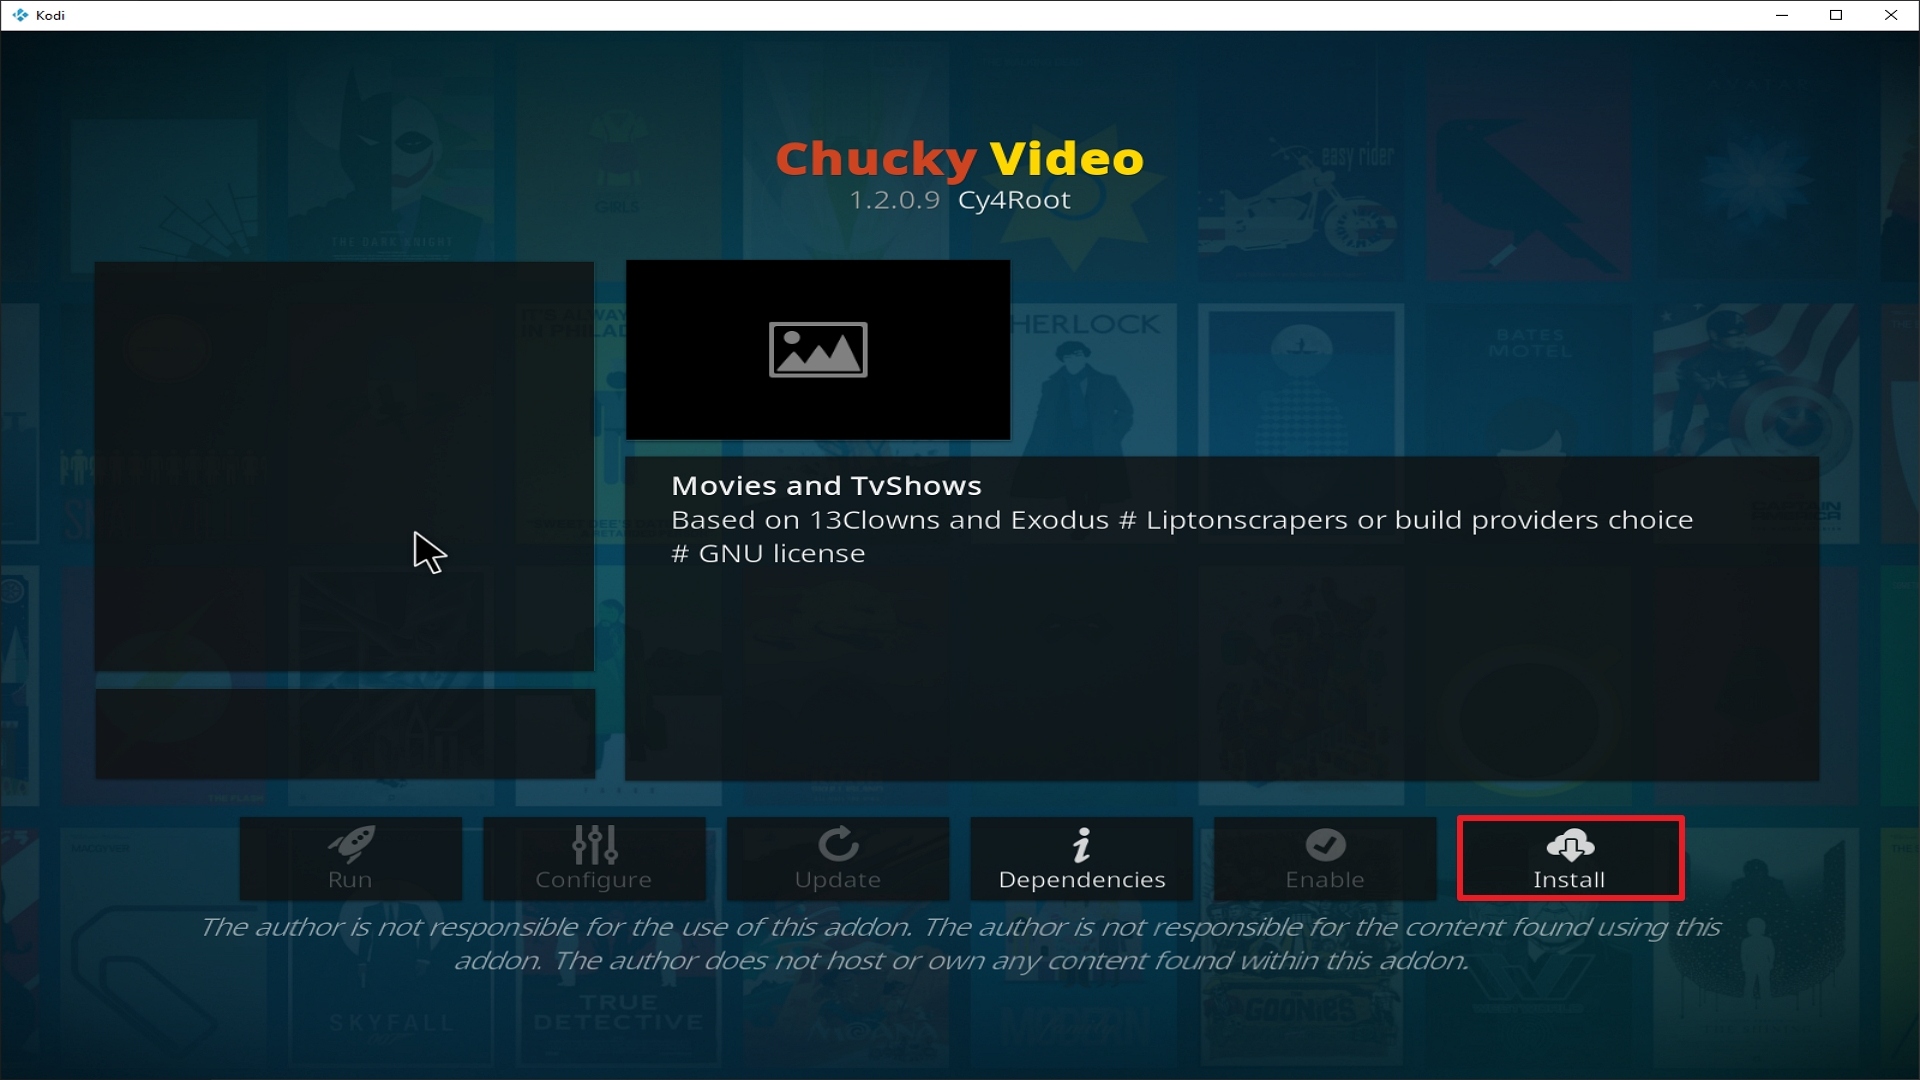
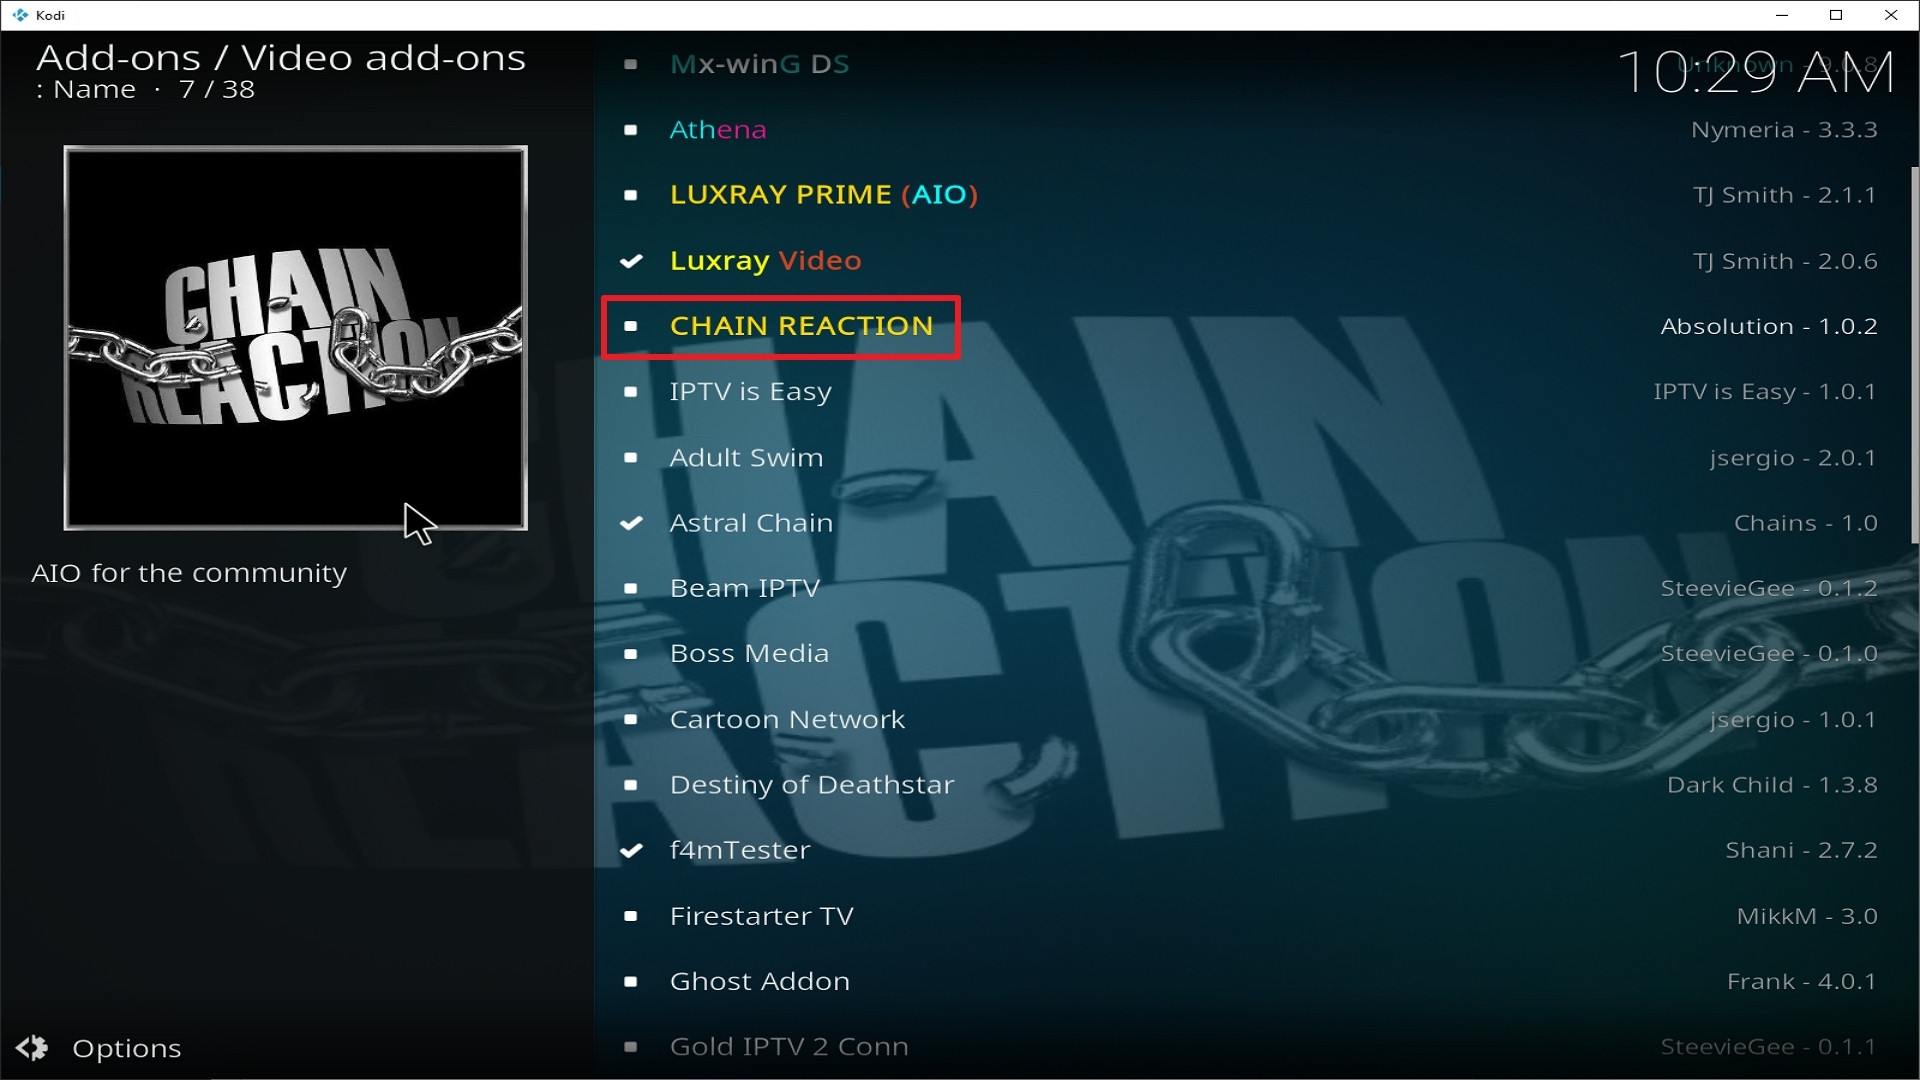
  14. Open “Video Add-ons” and Choose “Galaxy” and “Install”
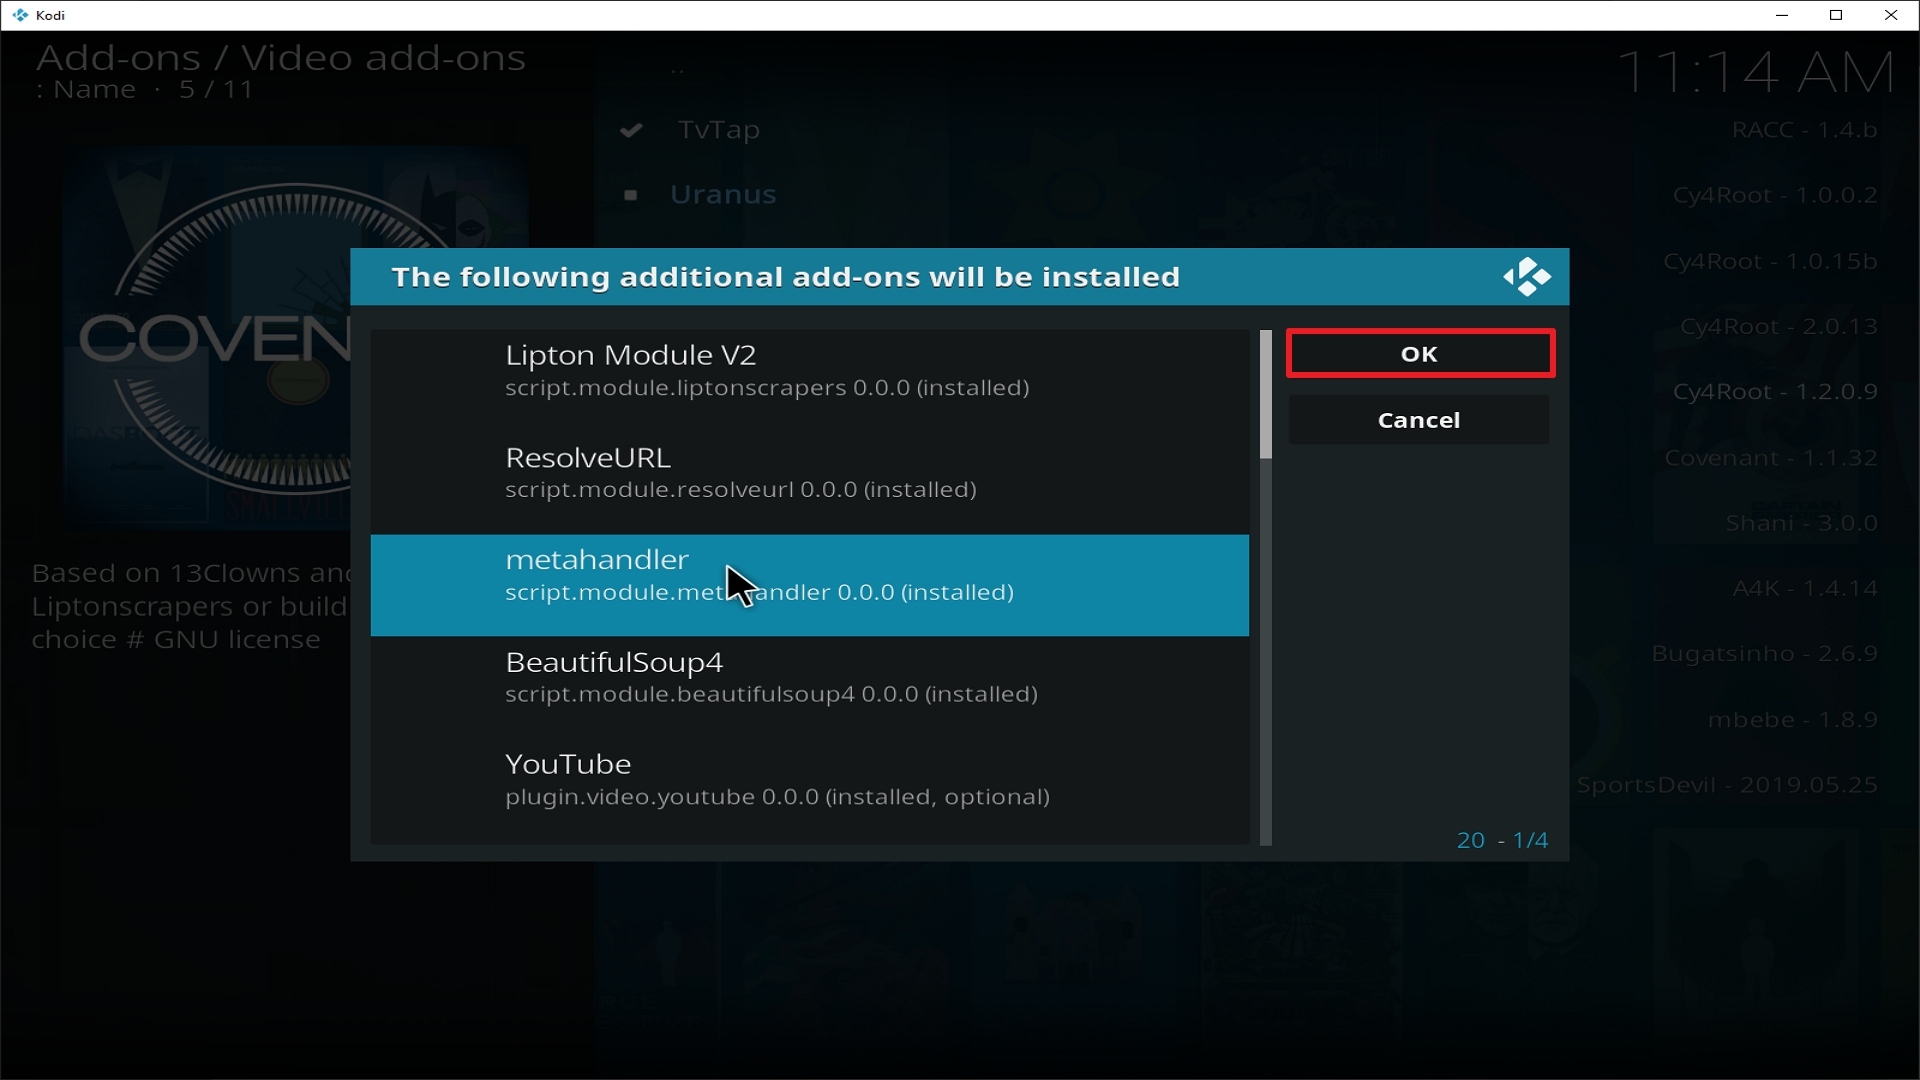
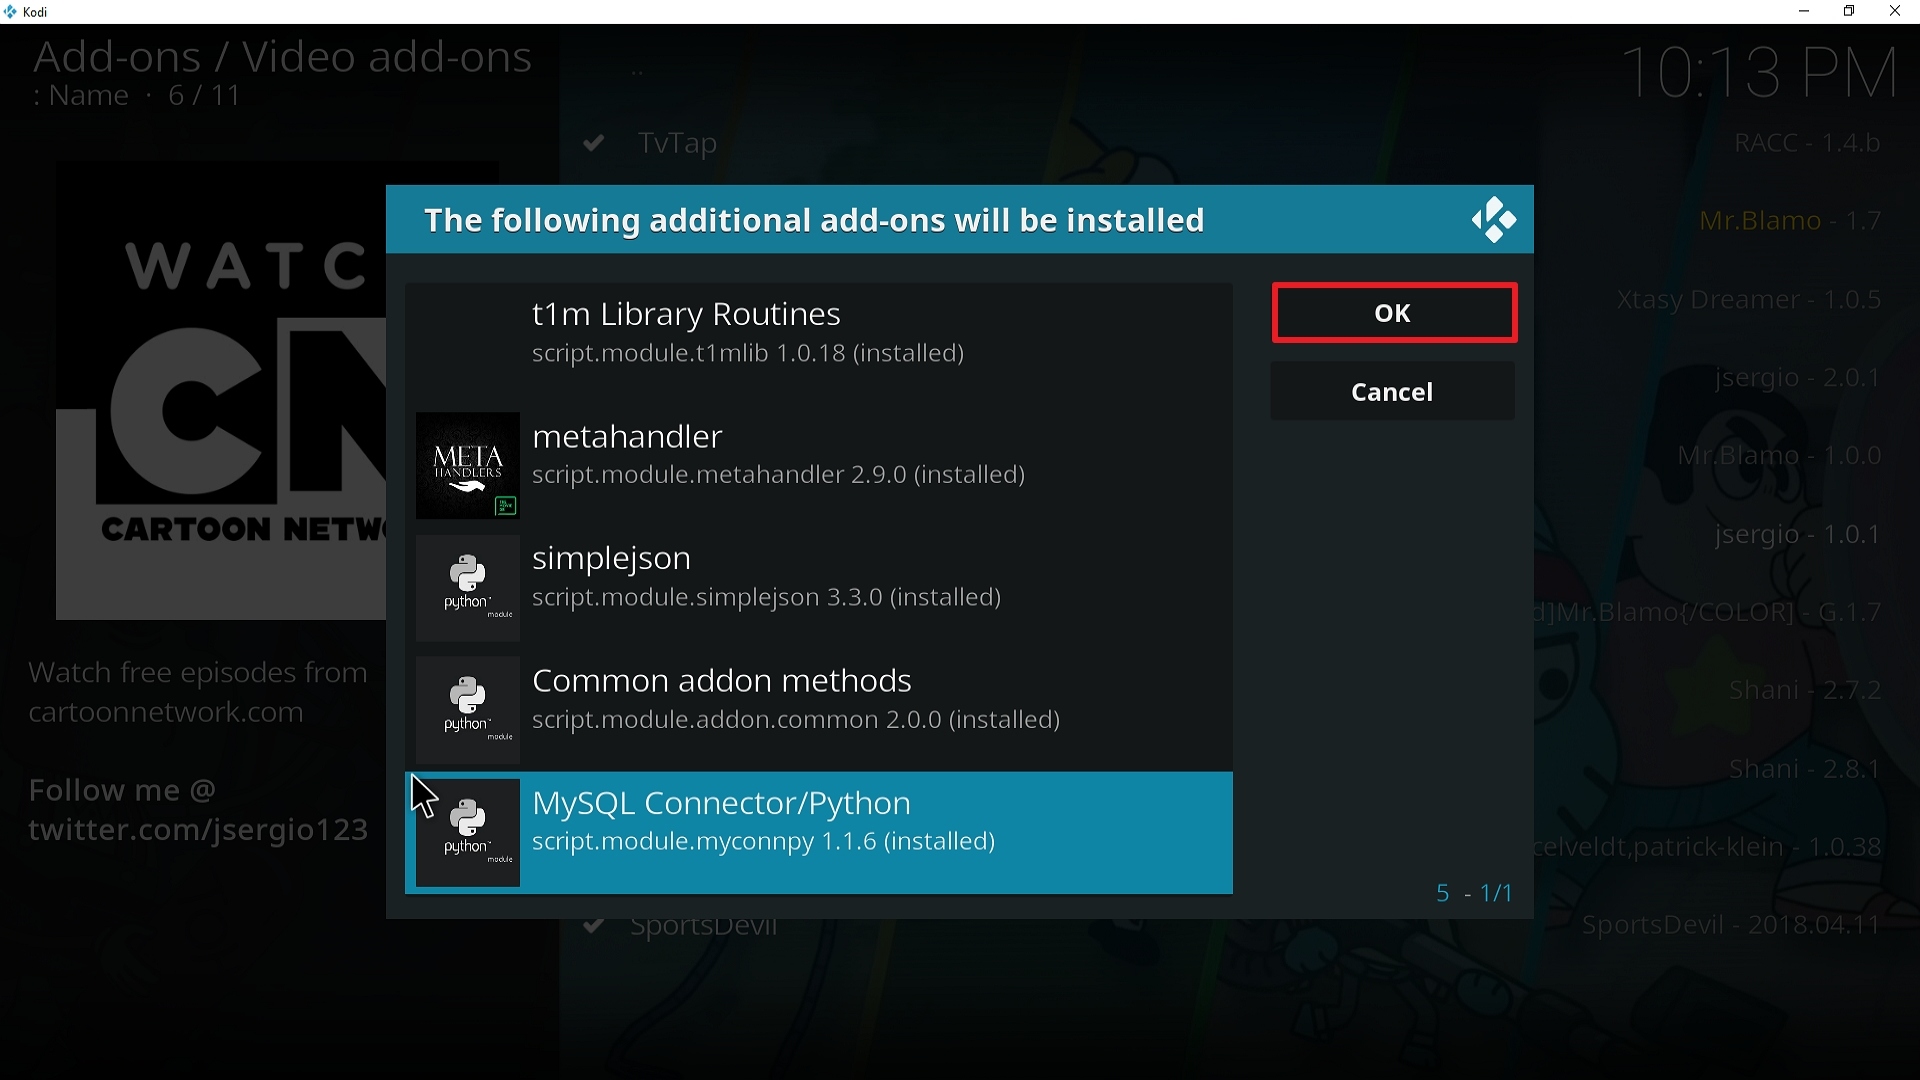
  15. Select “Ok” when a notification “the following add-ons will be installed” appears and wait for Galaxy Add-on to install
  16. Once the add-on is installed go back to the home screen and select “add-ons”
  17. Choose “Video add-ons” and select “Galaxy”
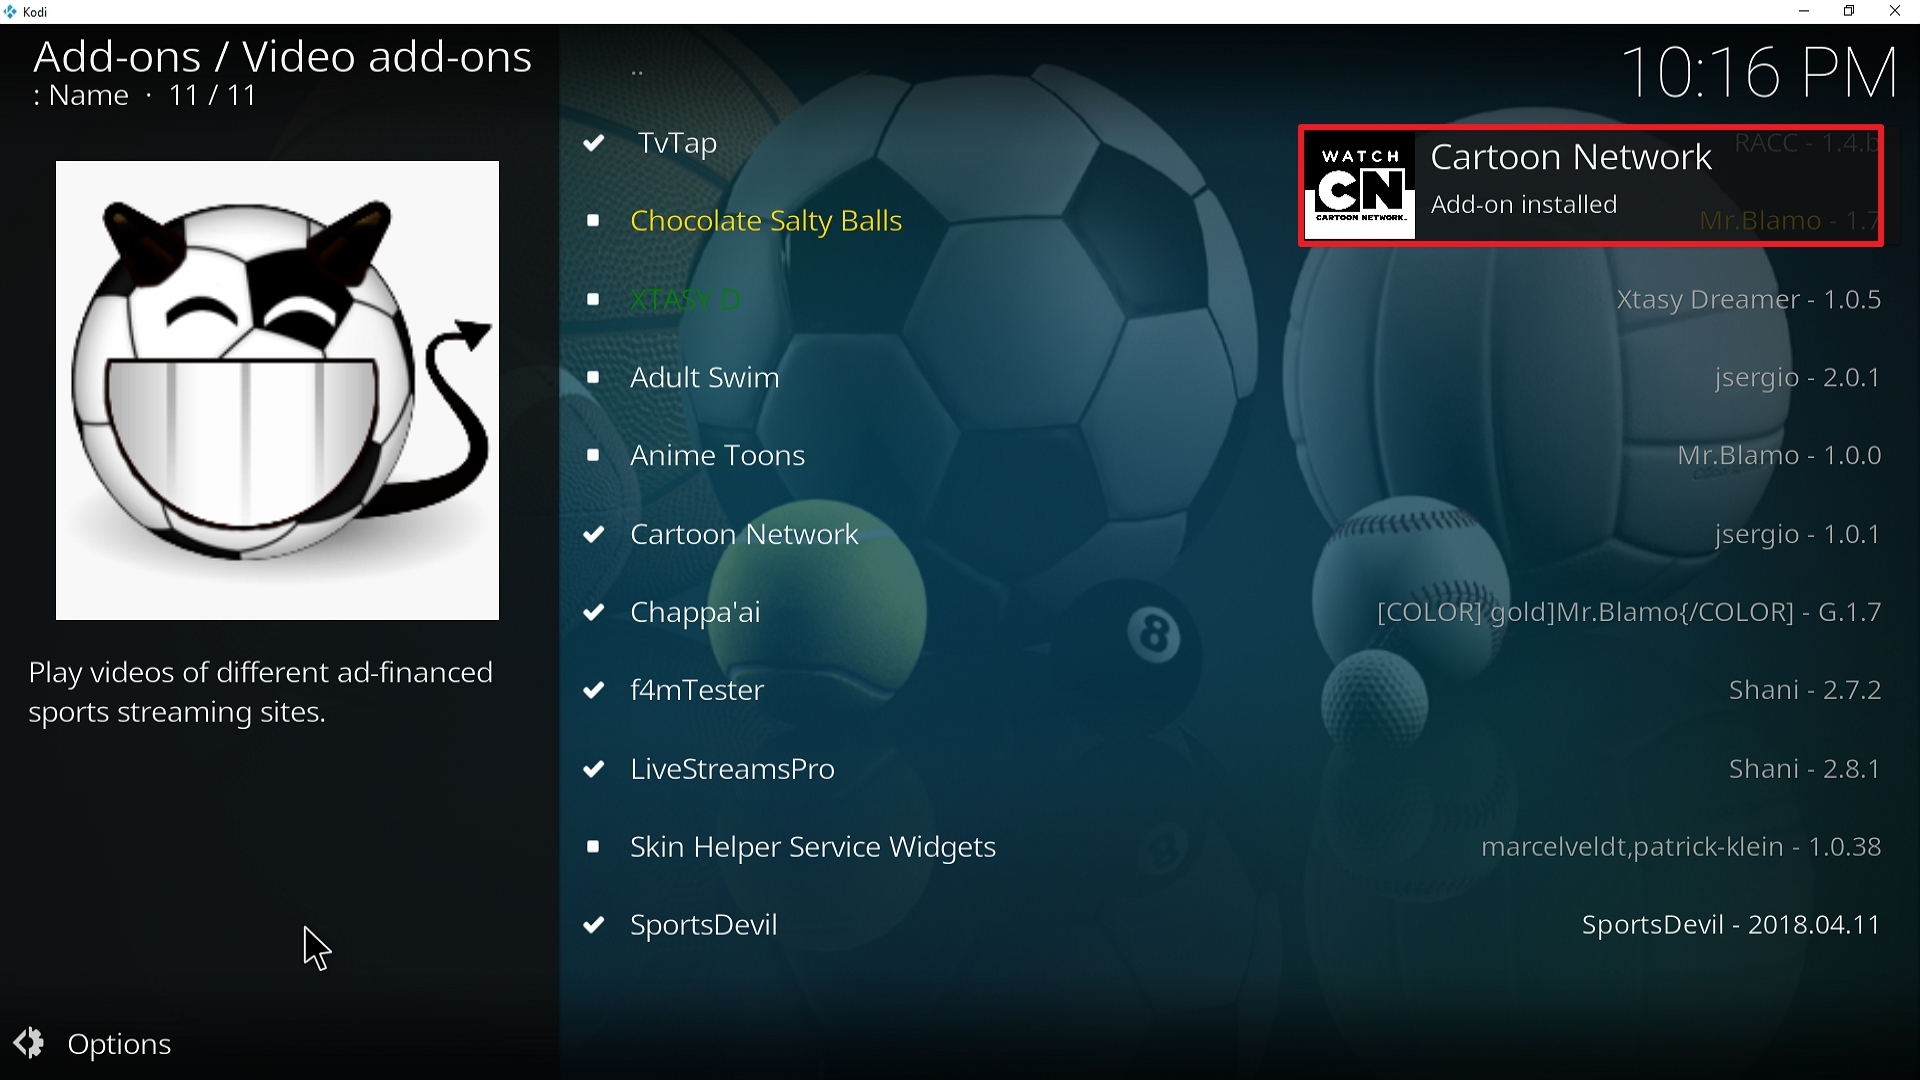
  18. There you go, Galaxy is now installed.


YOUR INTERNET ACTIVITY IS BEING WATCHED

ReviewVPN cannot attest to the legality, security and privacy of the applications discussed on this site. It is highly recommended that you use a VPN service while streaming or using Kodi.

Currently, your IP 216.73.217.150 is visible to everyone and your Browser is being tracked by Advertisers & ISP Provider.

Save 65% Now

Limited Time Offer

Here are the main reasons why you must use a VPN:

  • Your activities are hidden from your ISP, the government, and from the apps you are using.
  • You can access additional movies and TV streams.
  • ISP attempts to throttle are thrwarted thus reducing buffering issues.
  • Geographically restricted content like Netflix and Hulu can be unblocked.

A VPN works be replacing your ISP-assigned IP address and creating an encrypted tunnel. We recommend the no log service offered by IPVanish. It works well on a Firestick and offers the fastest possible speeds.

Special Limited Time Offer - Get IPVanish


How to Install  the Galaxy on Kodi with Screenshots

1. From the home screen, select the cogwheel at the upper left.

Step 1 Installing Galaxy addon on Kodi

2. Select System in the bottom right corner.

Step 2 Installing Galaxy addon on Kodi


3. Select Add-ons on the left side of the screen.

Step 3 Installing Galaxy addon on Kodi


4. Select Unknown sources.

Step 4 Installing Galaxy addon on Kodi


5. Click Yes to allow unknown sources.

Step 5 Installing Galaxy addon on Kodi


6. Select File manager.

Step 6 Installing Galaxy on Kodi


7. Click Add source.

Step 7 Installing Galaxy addon on Kodi


8. Click on <None>.

Step 8 Installing Galaxy addon on Kodi


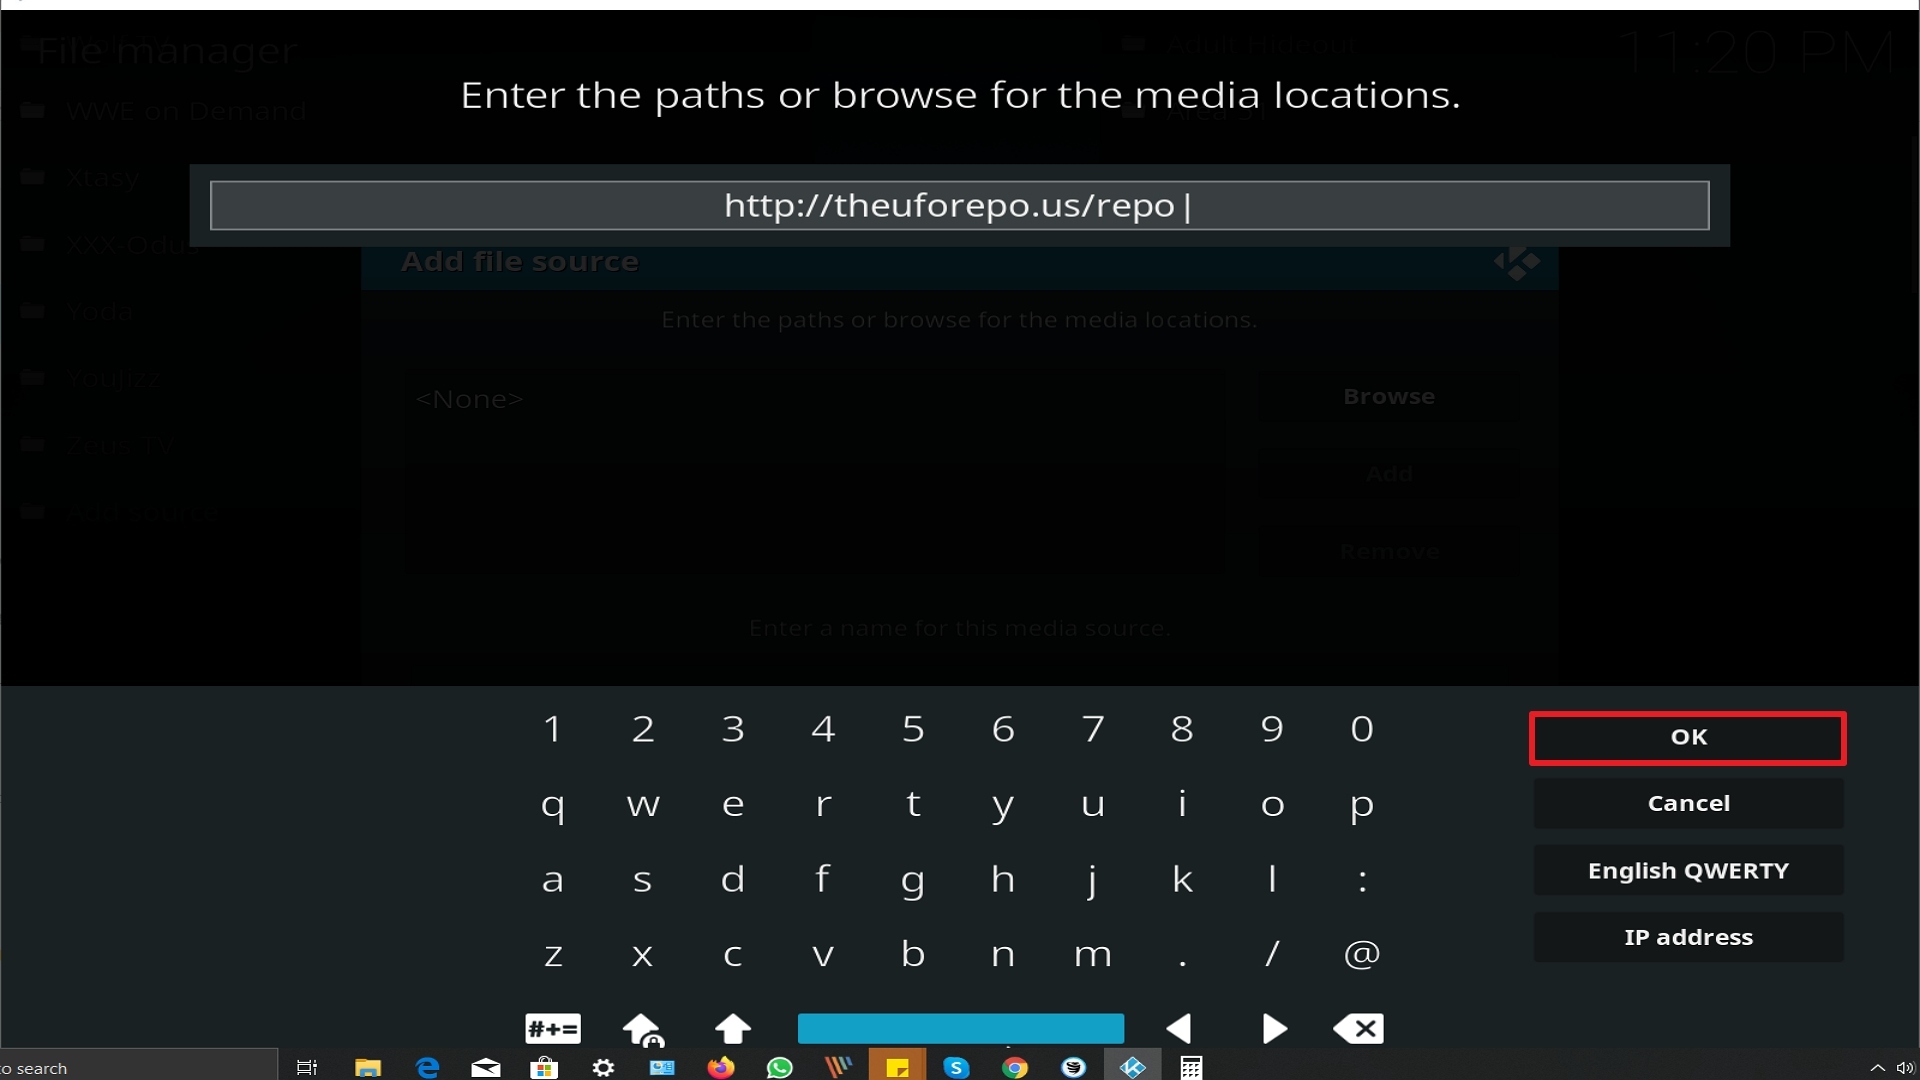
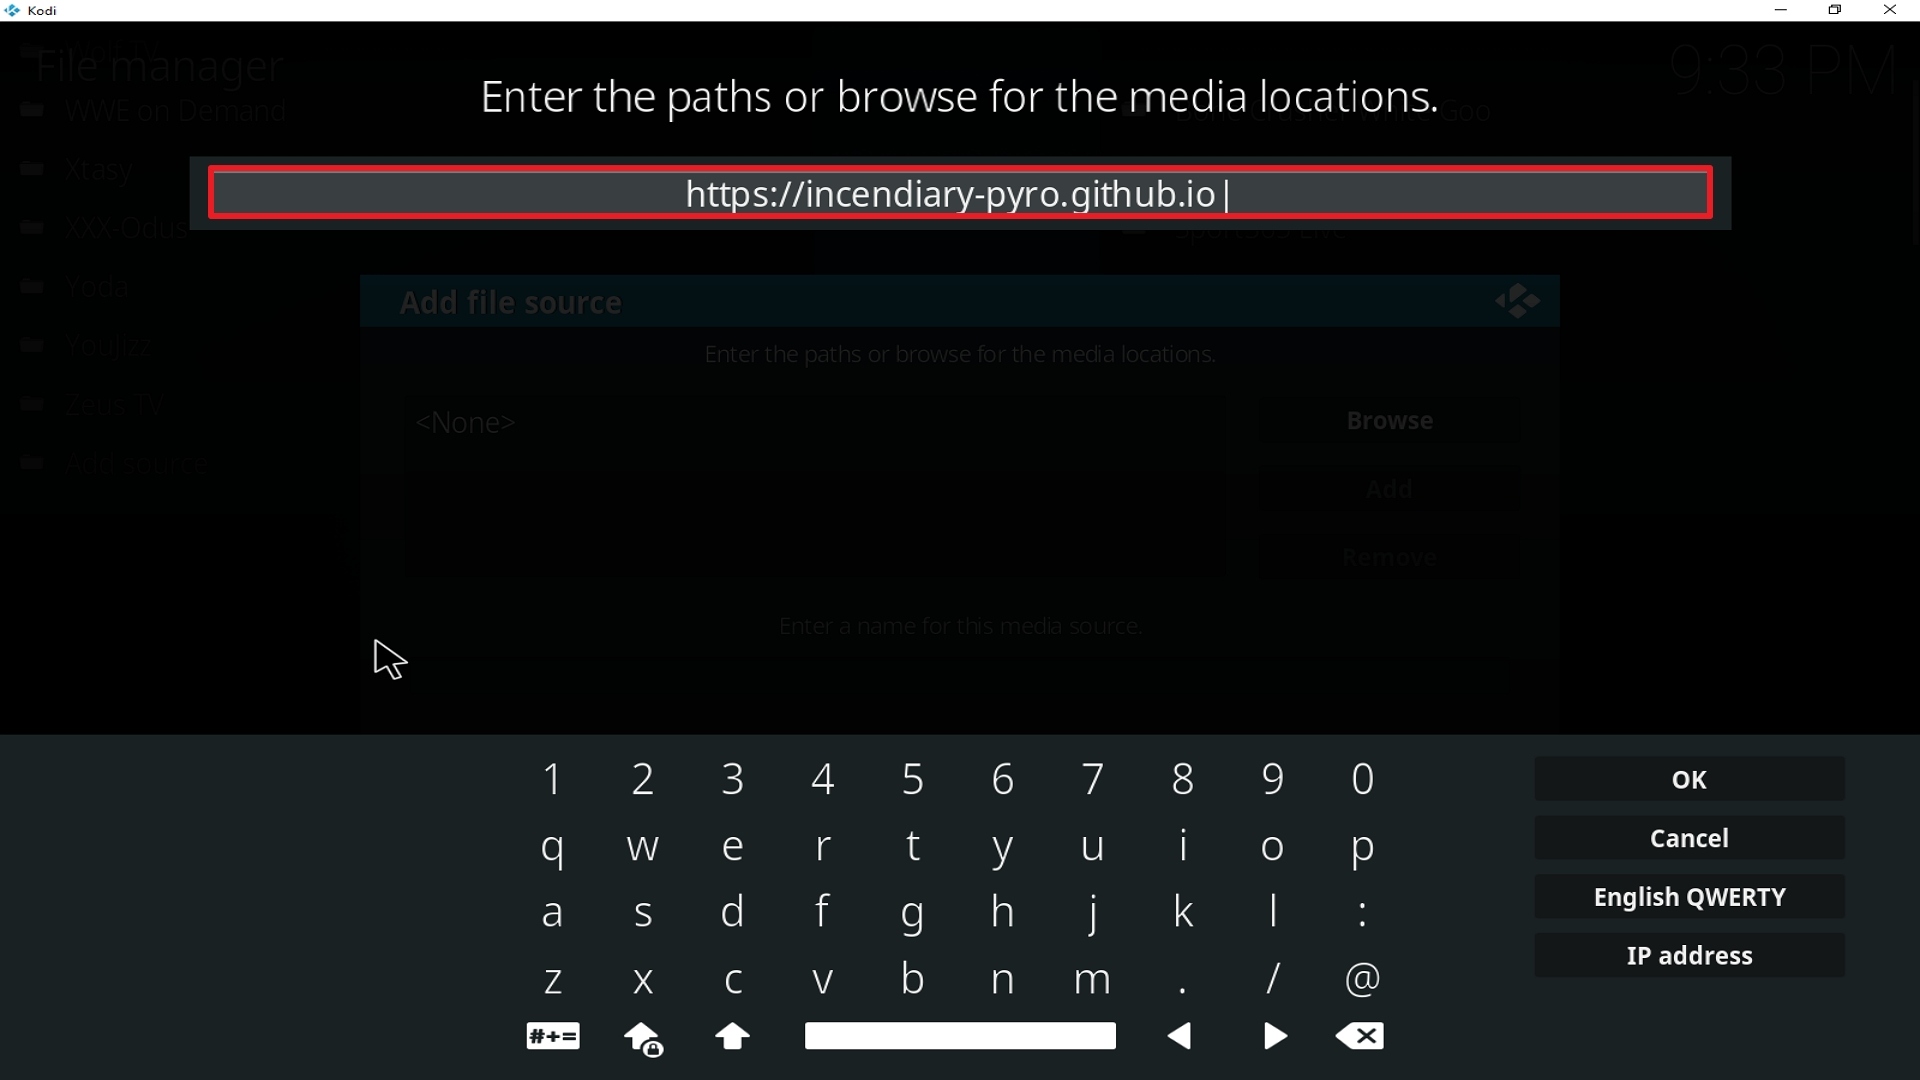
9. Type exactly: http://theuforepo.us/repo
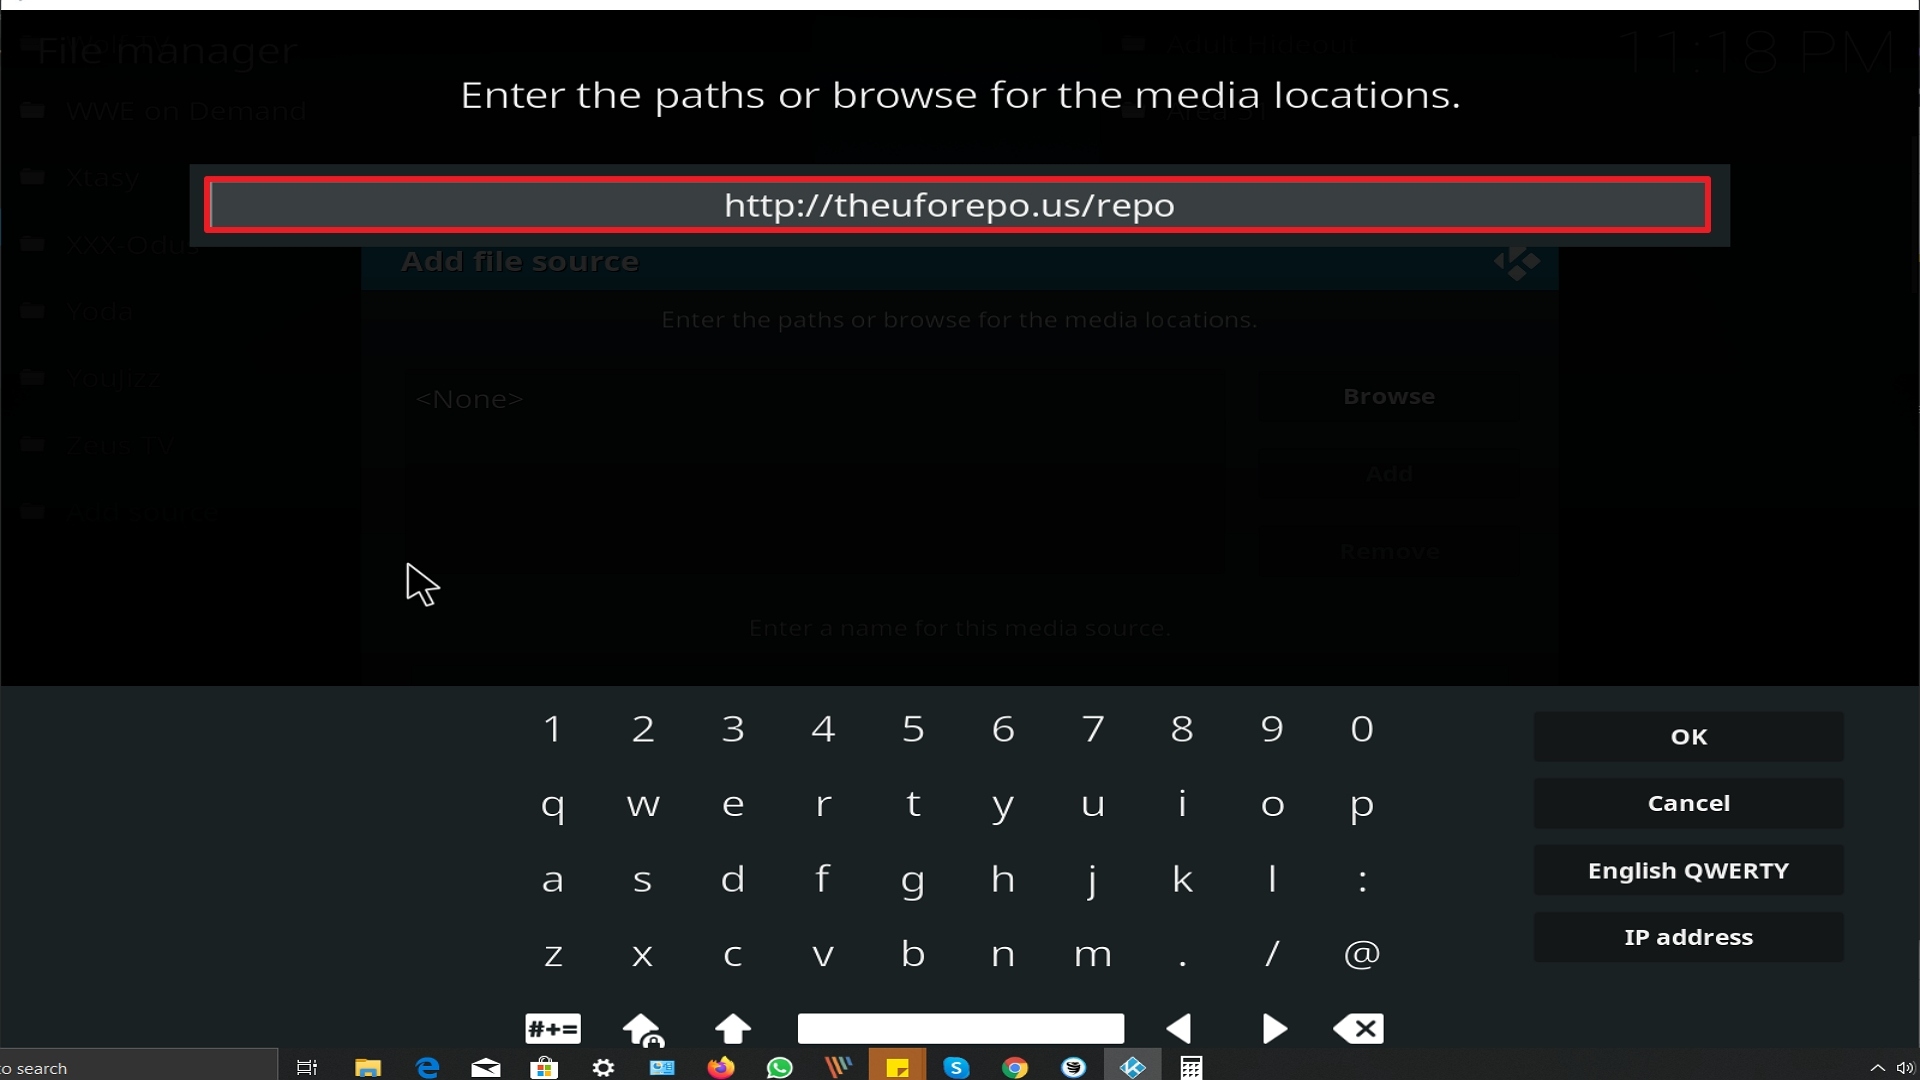
Step 9 Installing Galaxy addon on Kodi


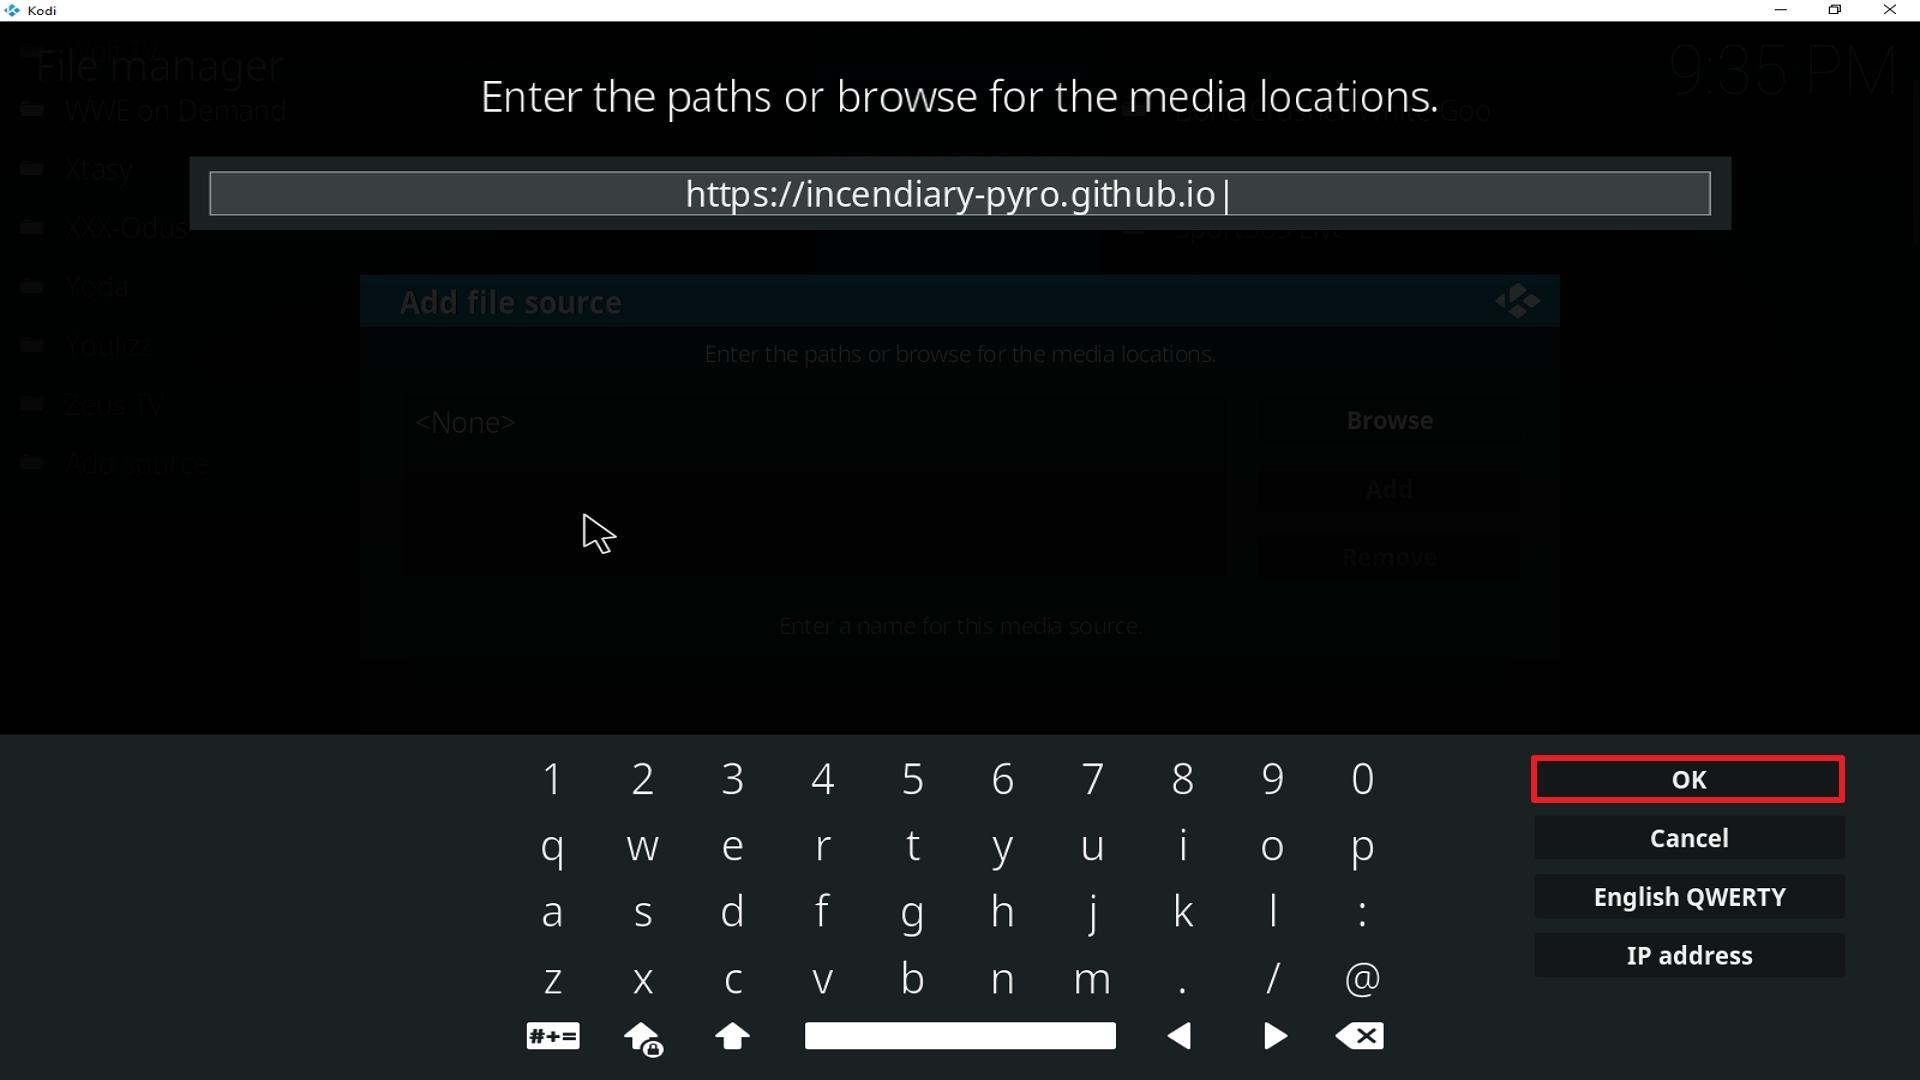
10. Click on OK.

Step 10 Installing Galaxy addon on Kodi


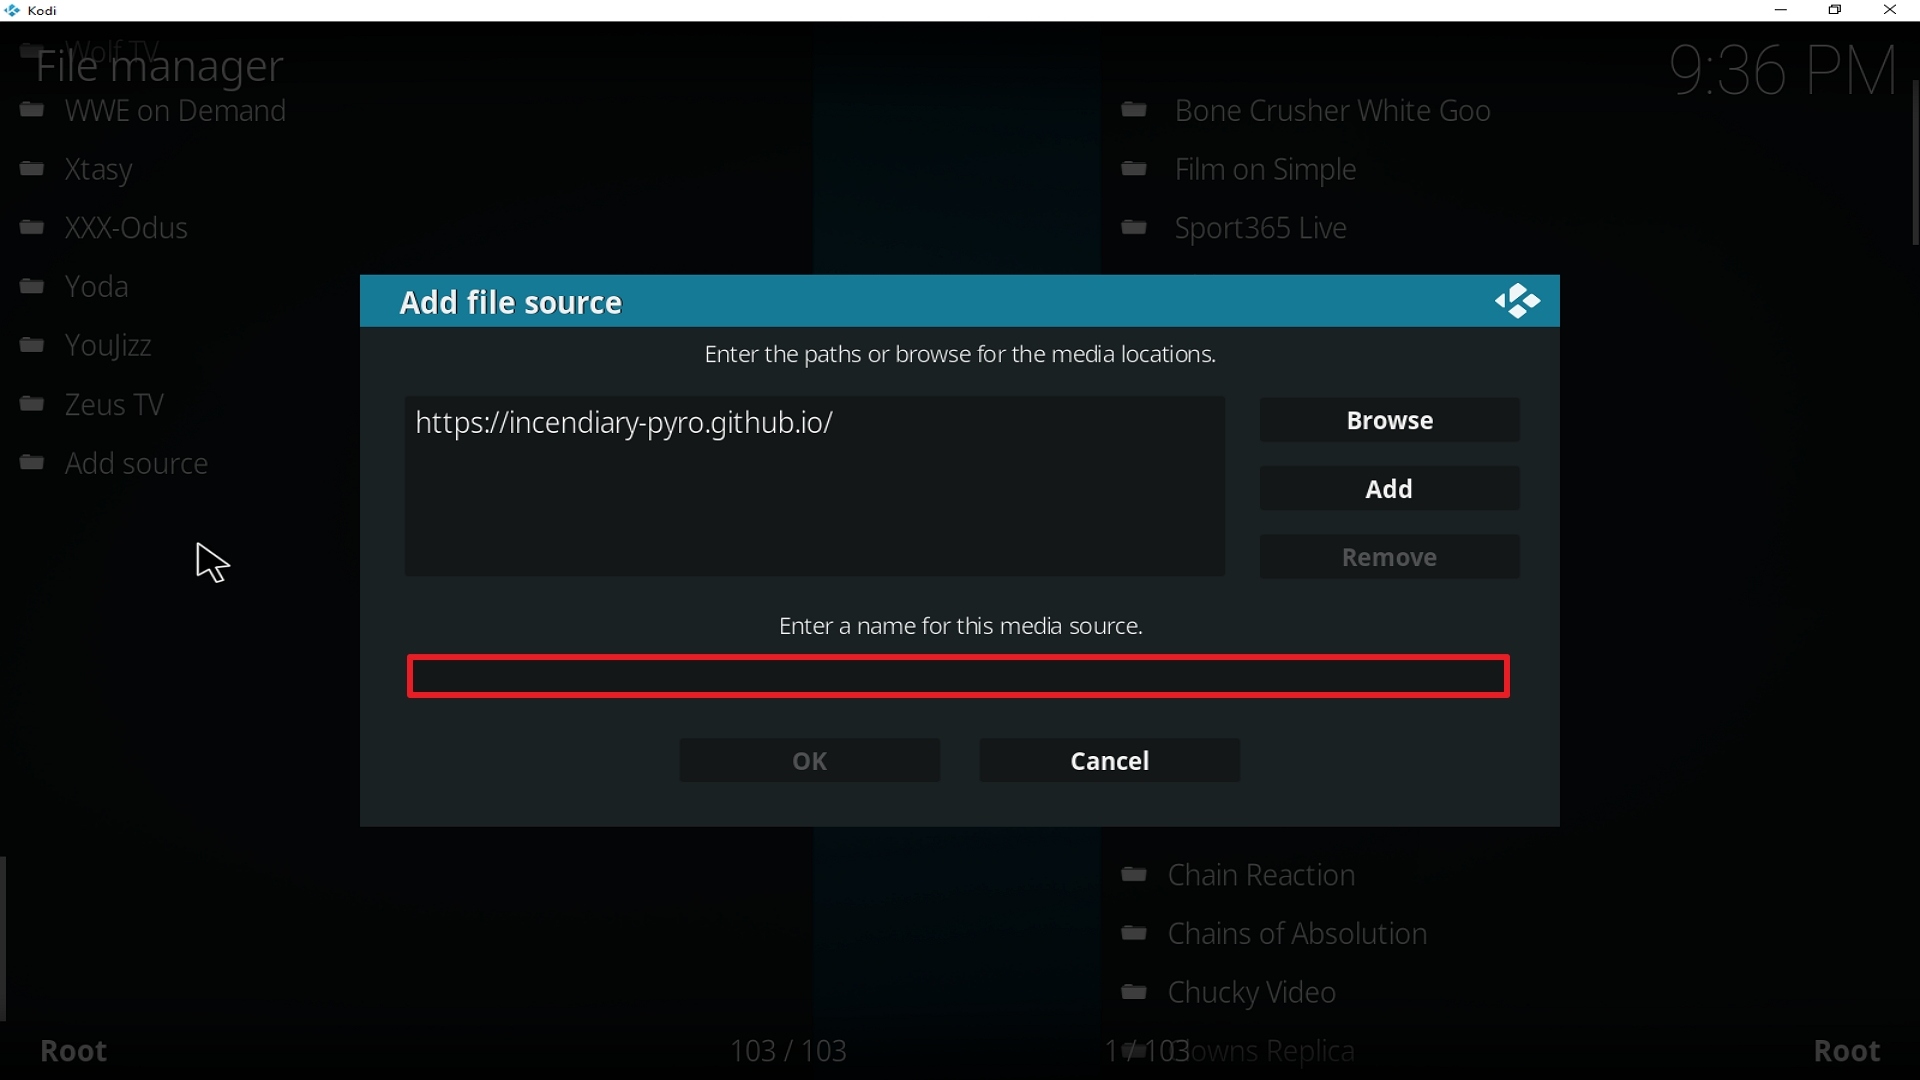
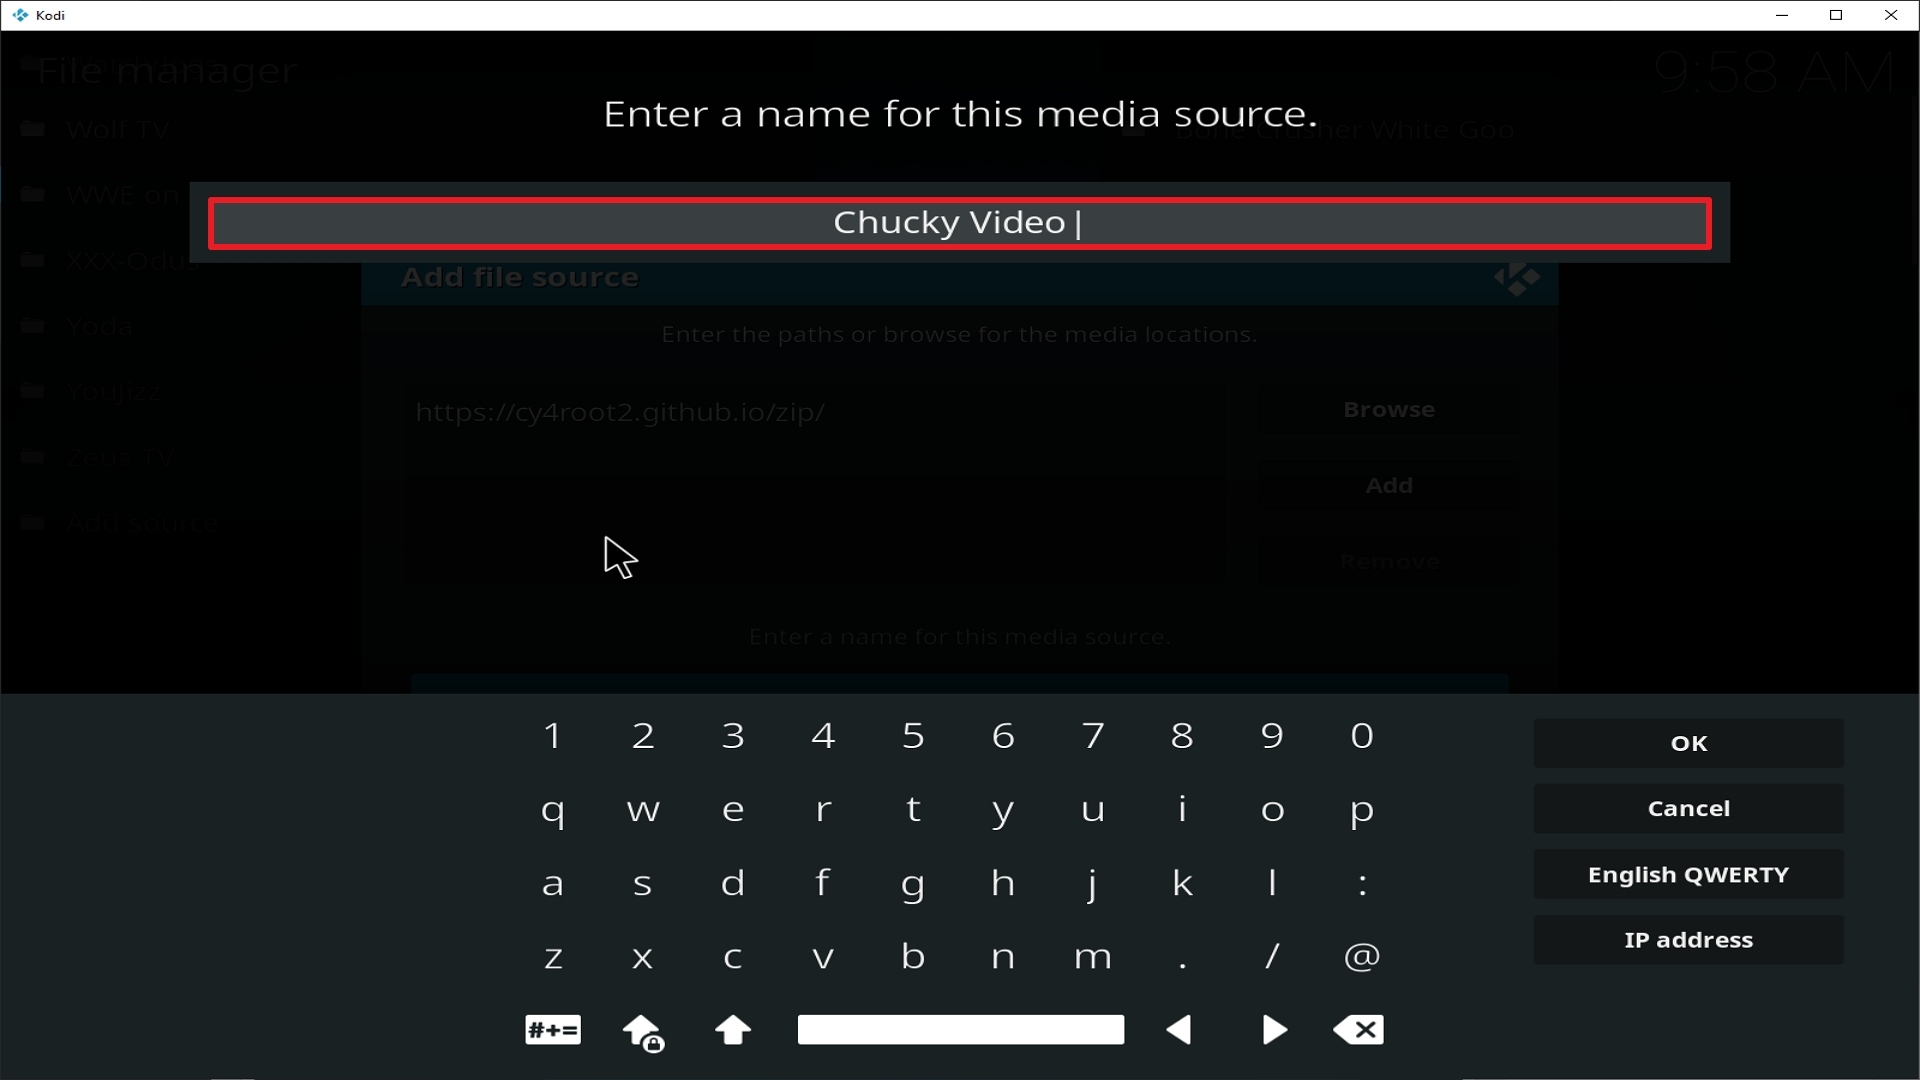
11. Select enter a name for this media source.
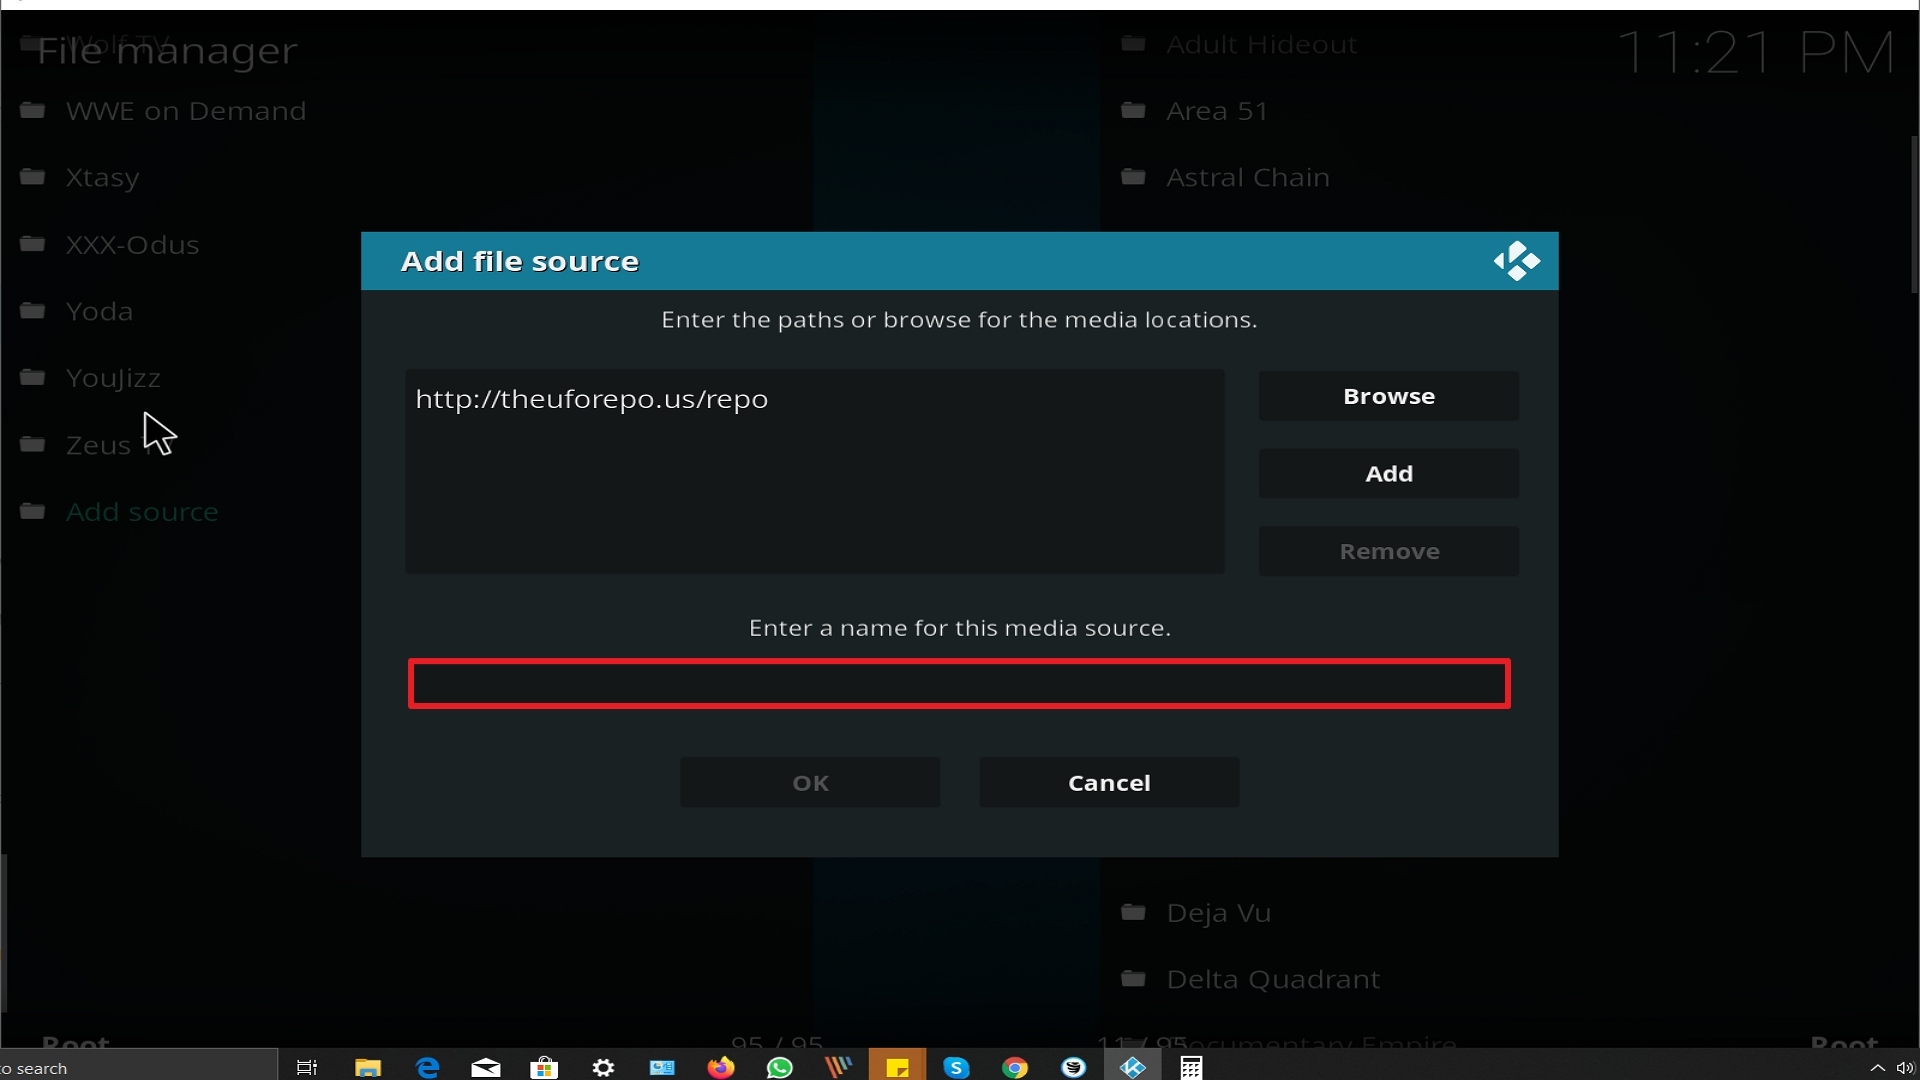
Step 11 Installing Galaxy addon on Kodi


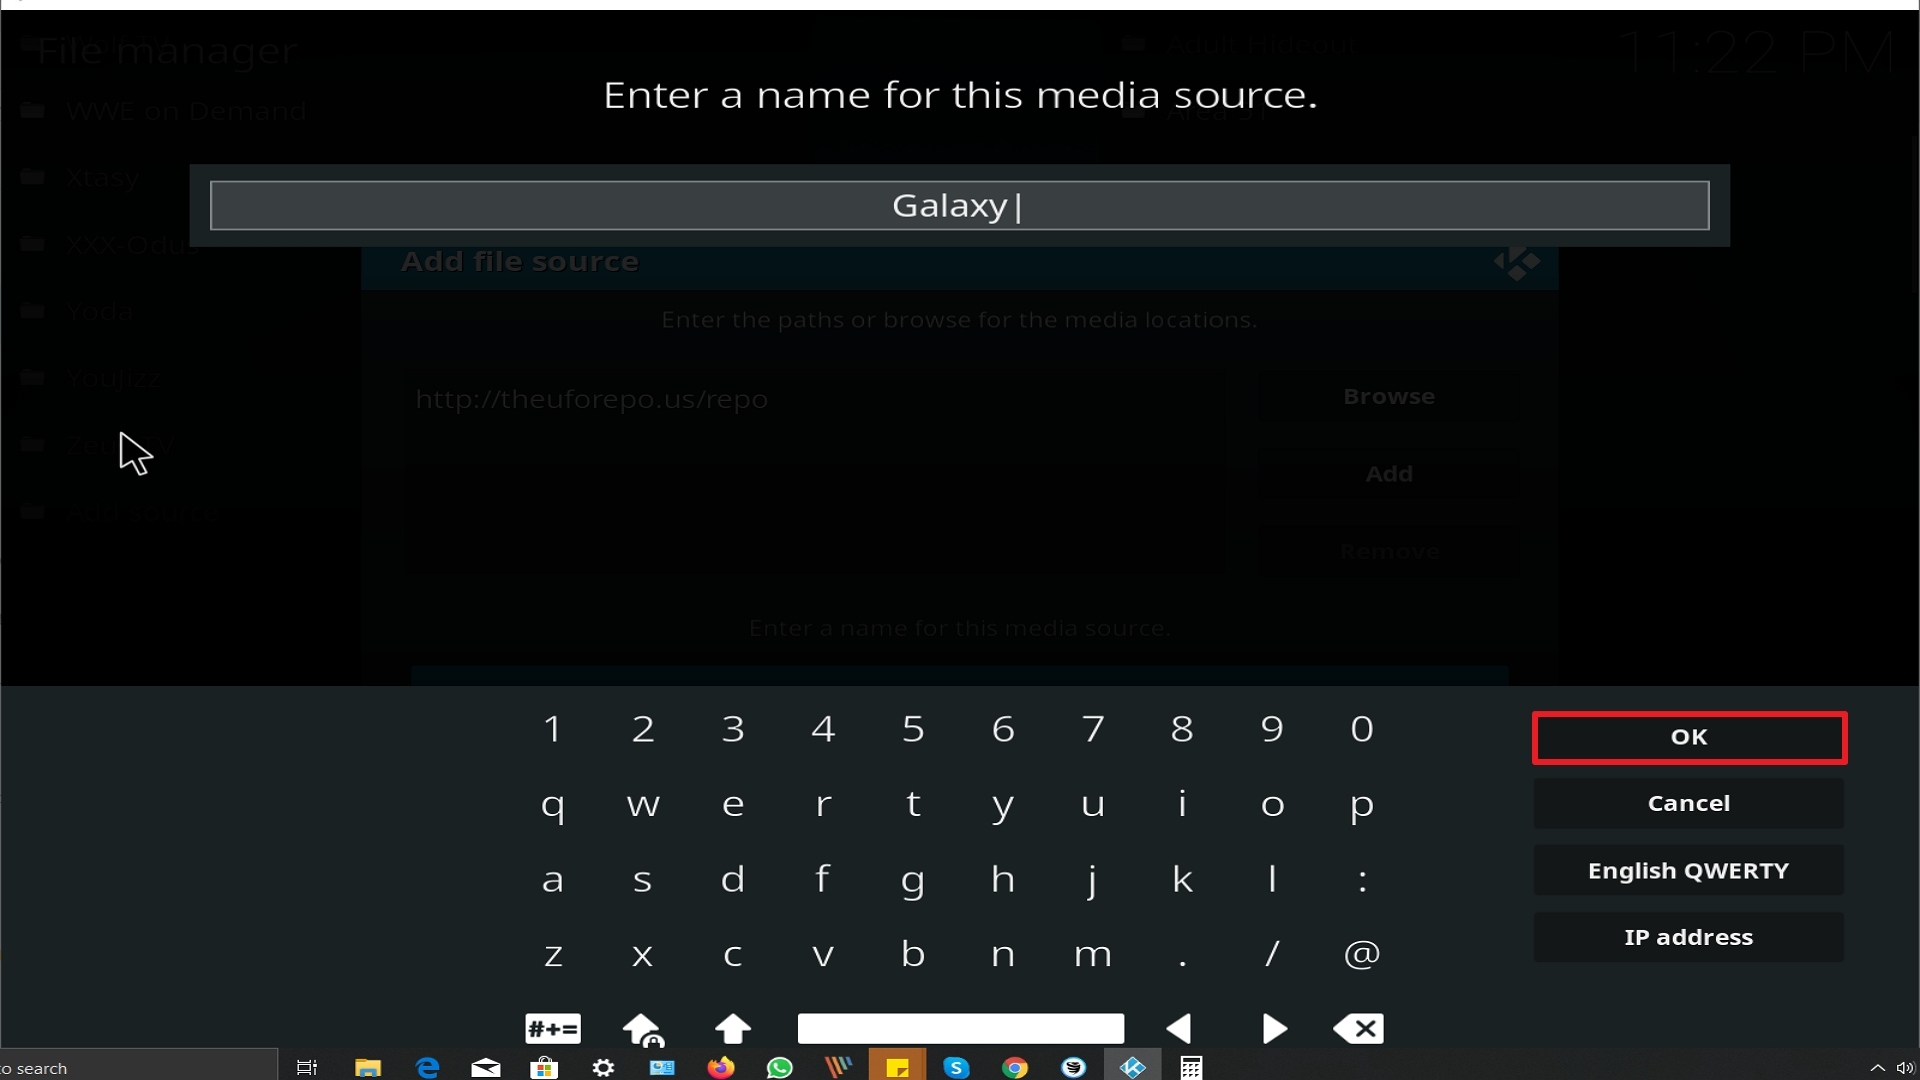
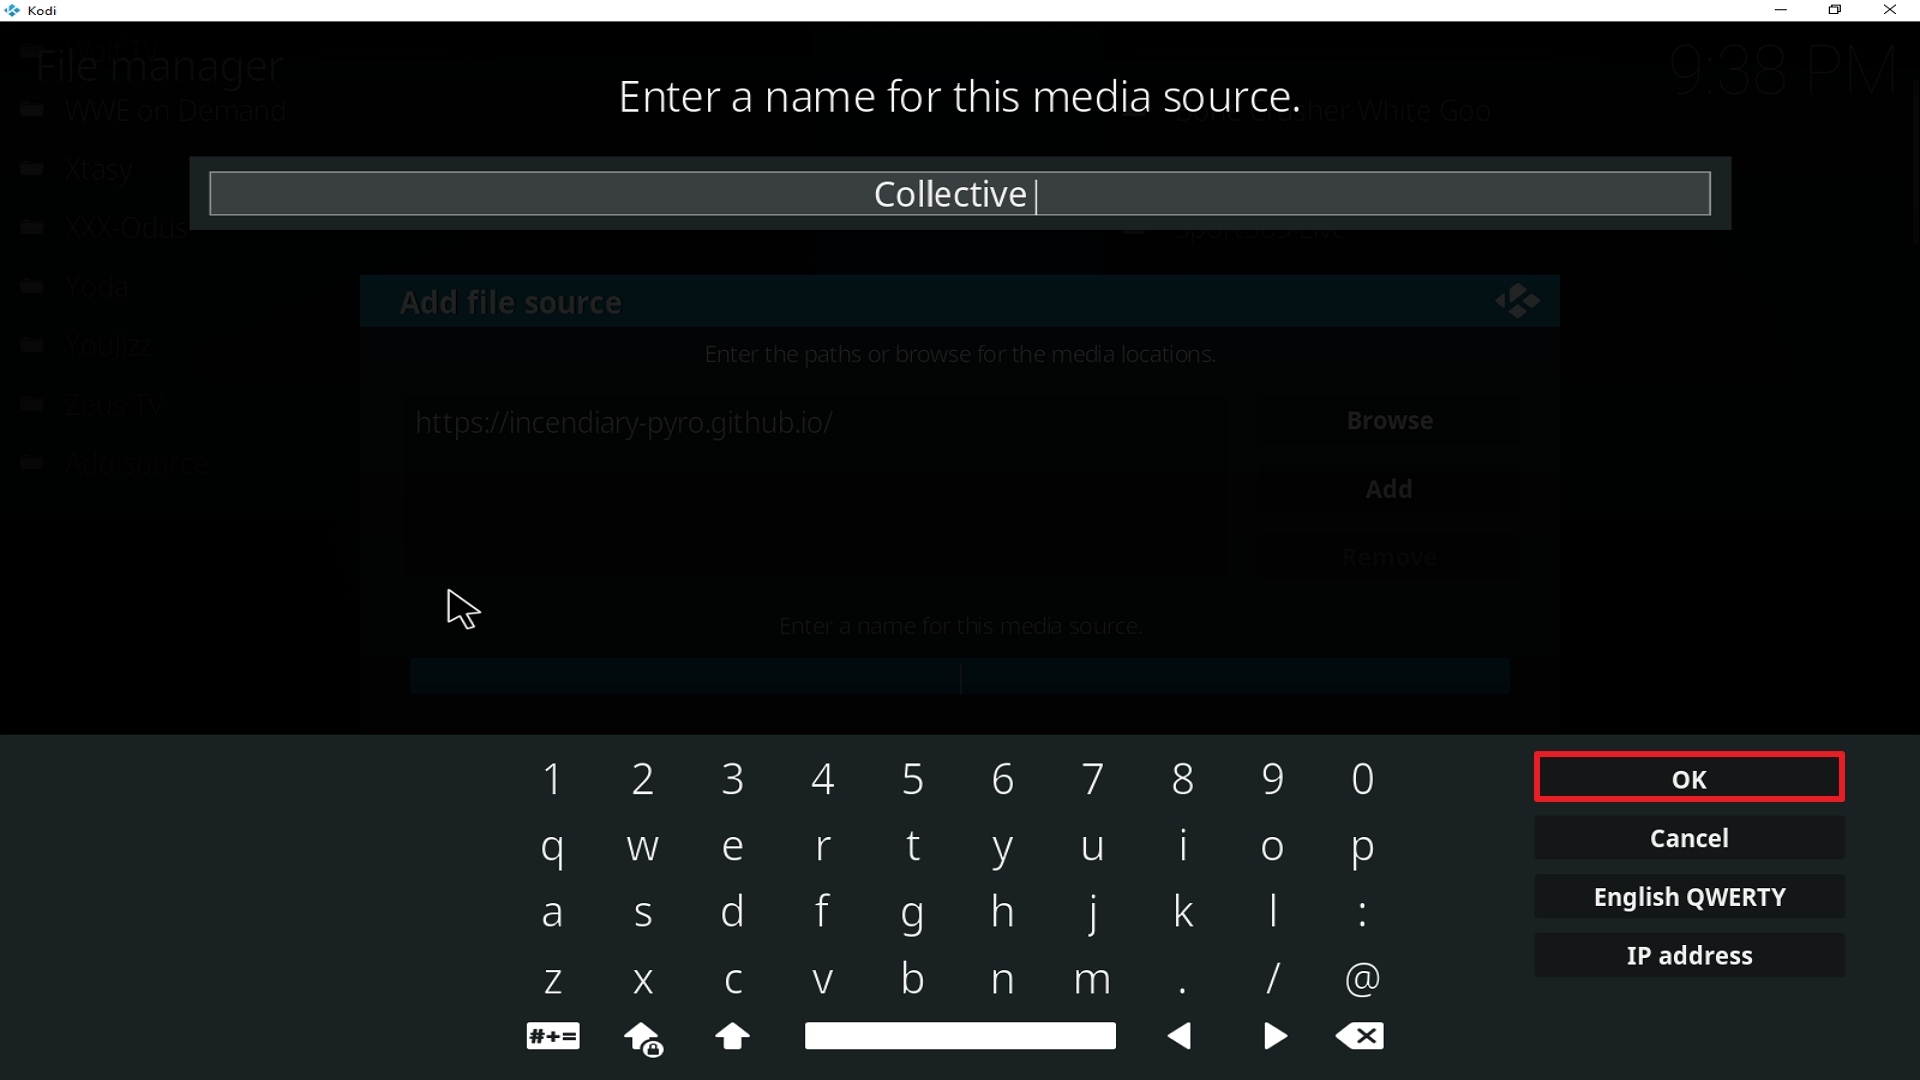
12. Name is Galaxy (this part isn’t critical as long as you remember the name).
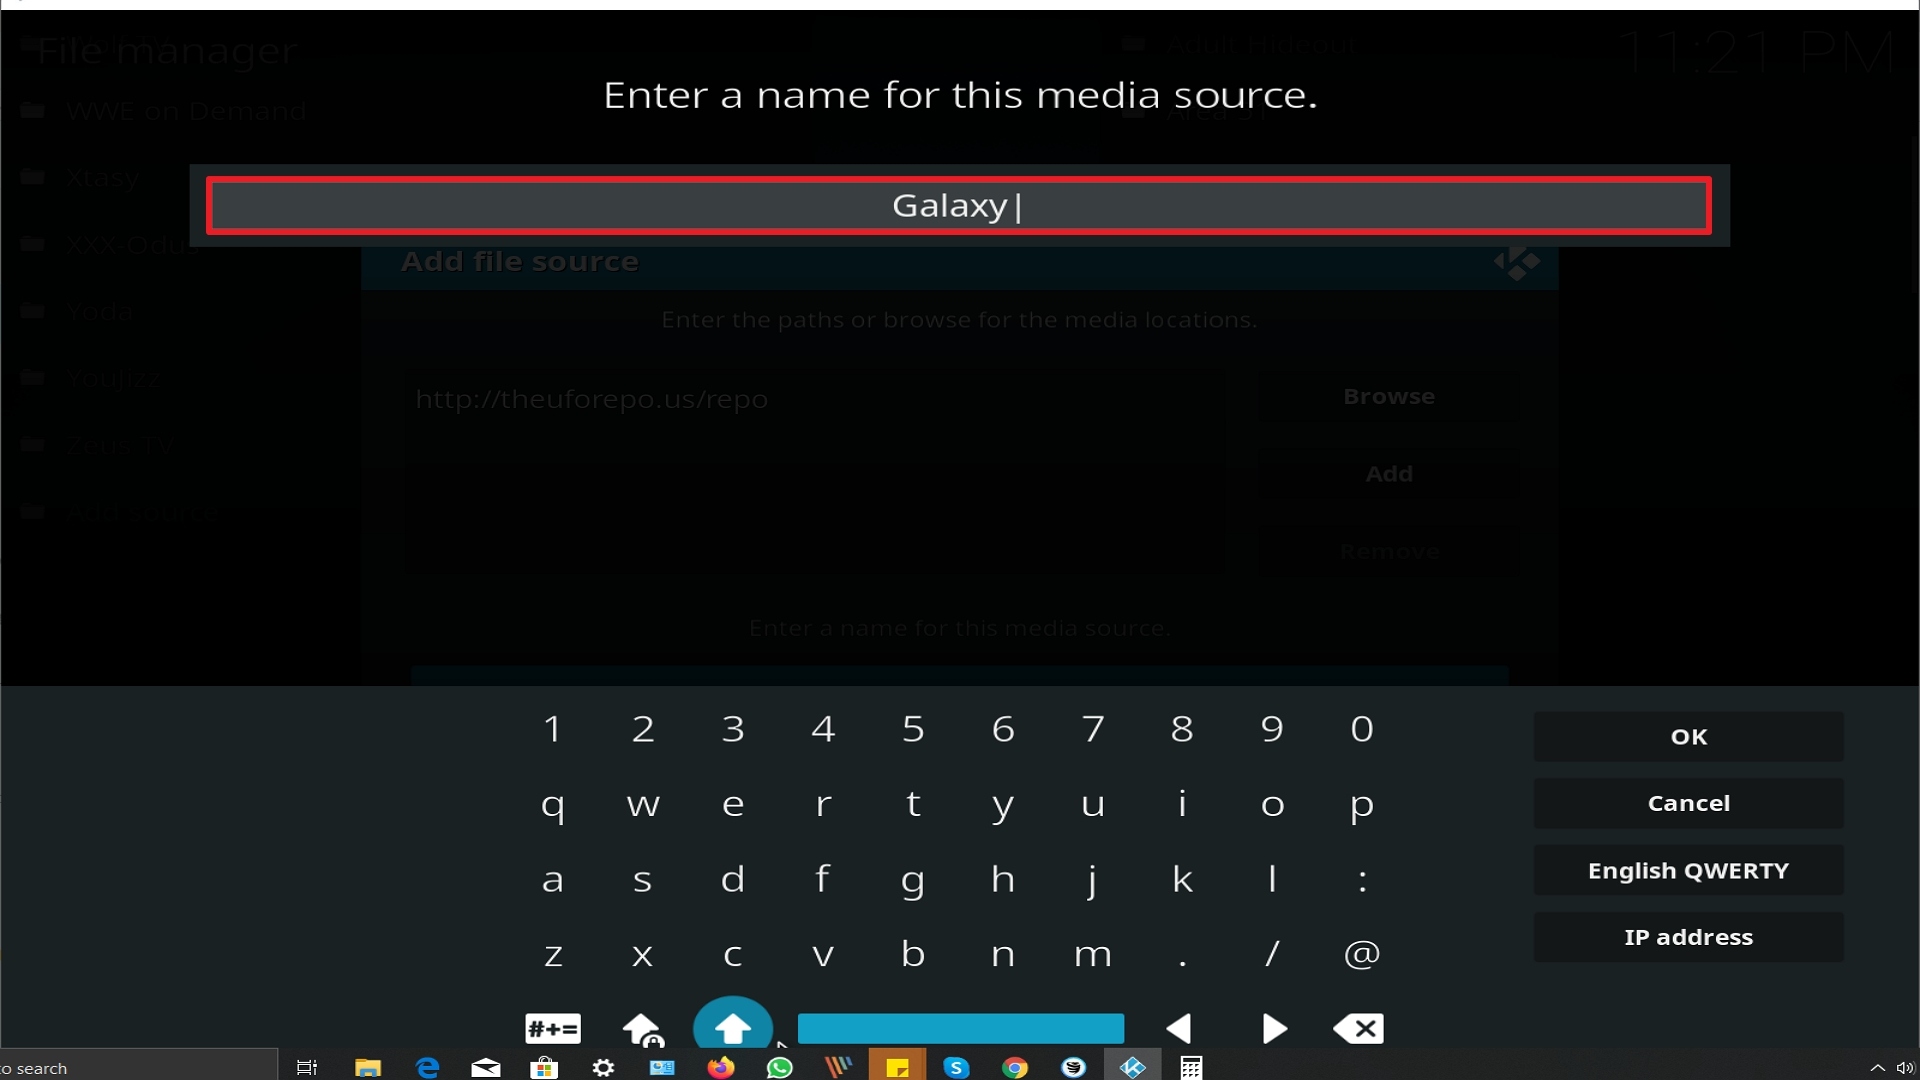
Step 12 Installing Galaxy addon on Kodi


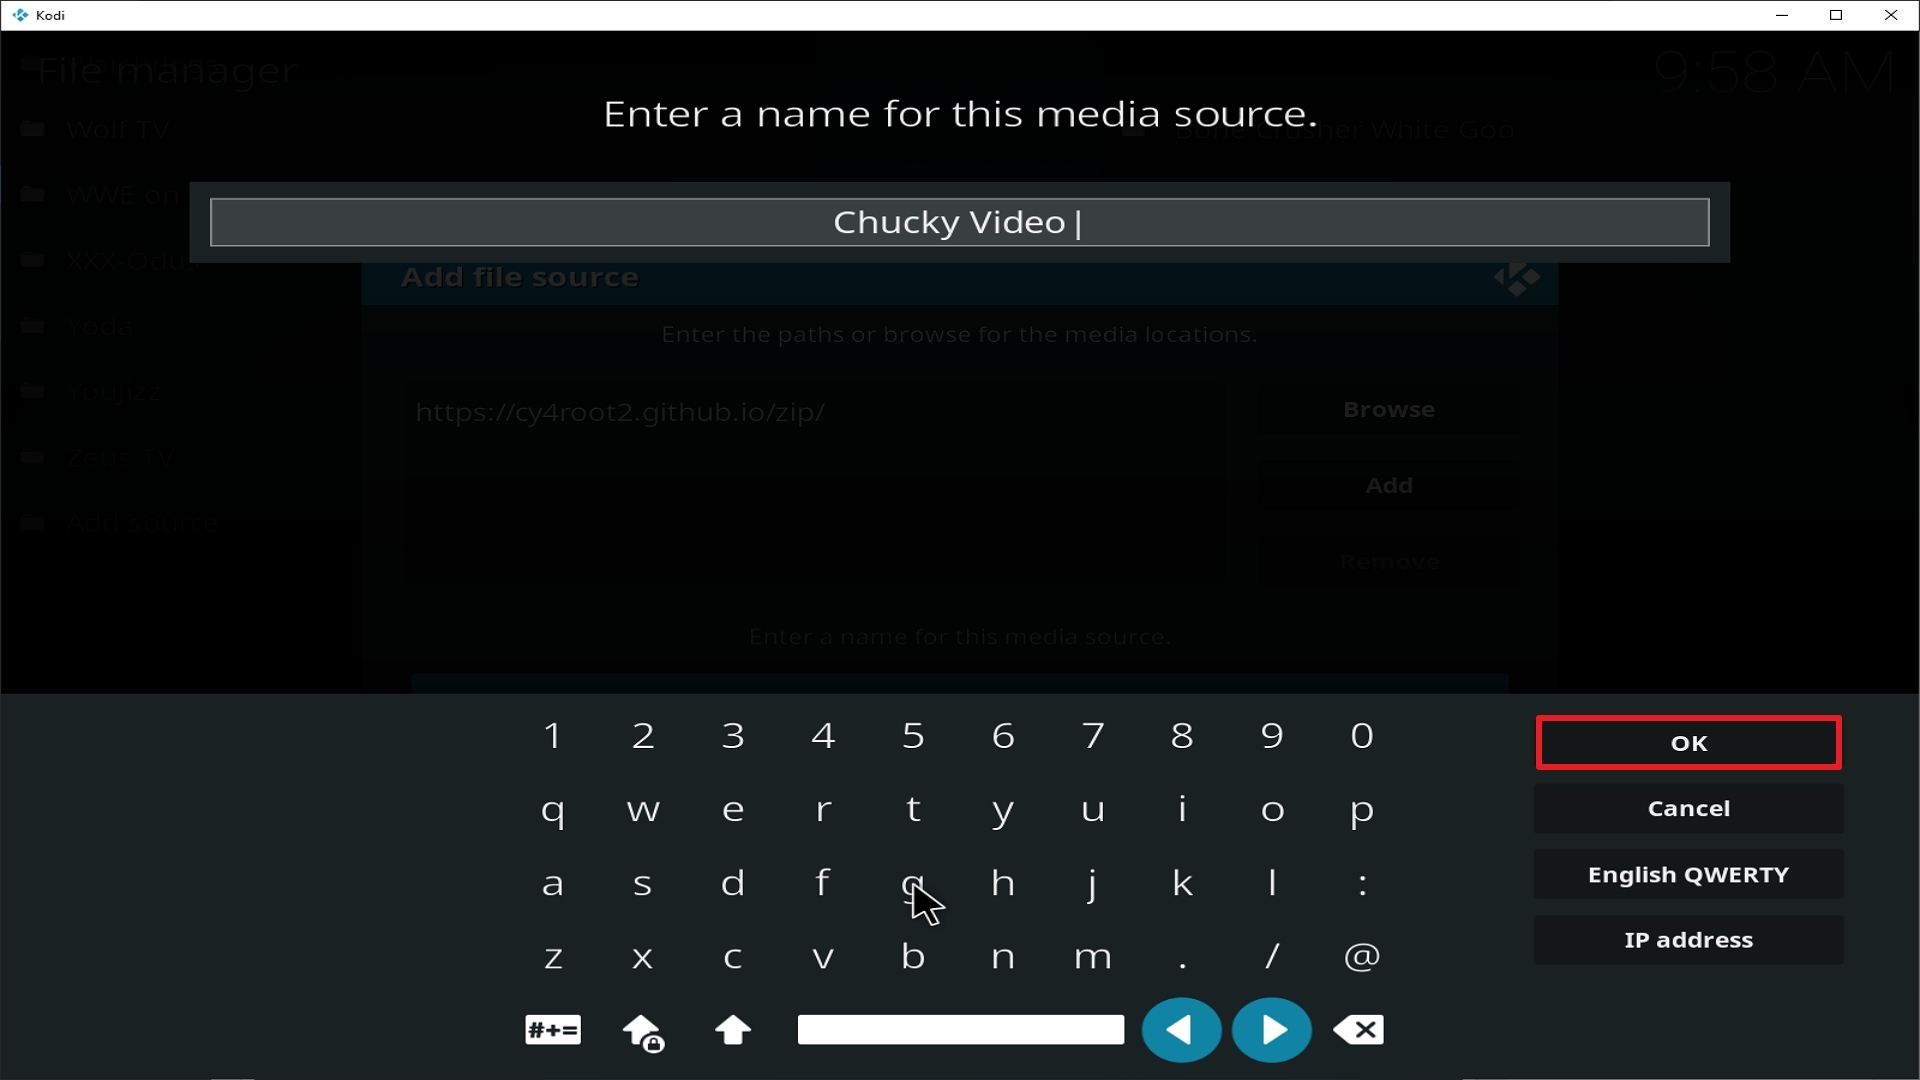
13. Click on OK.

Step 13 Installing Galaxy addon on Kodi


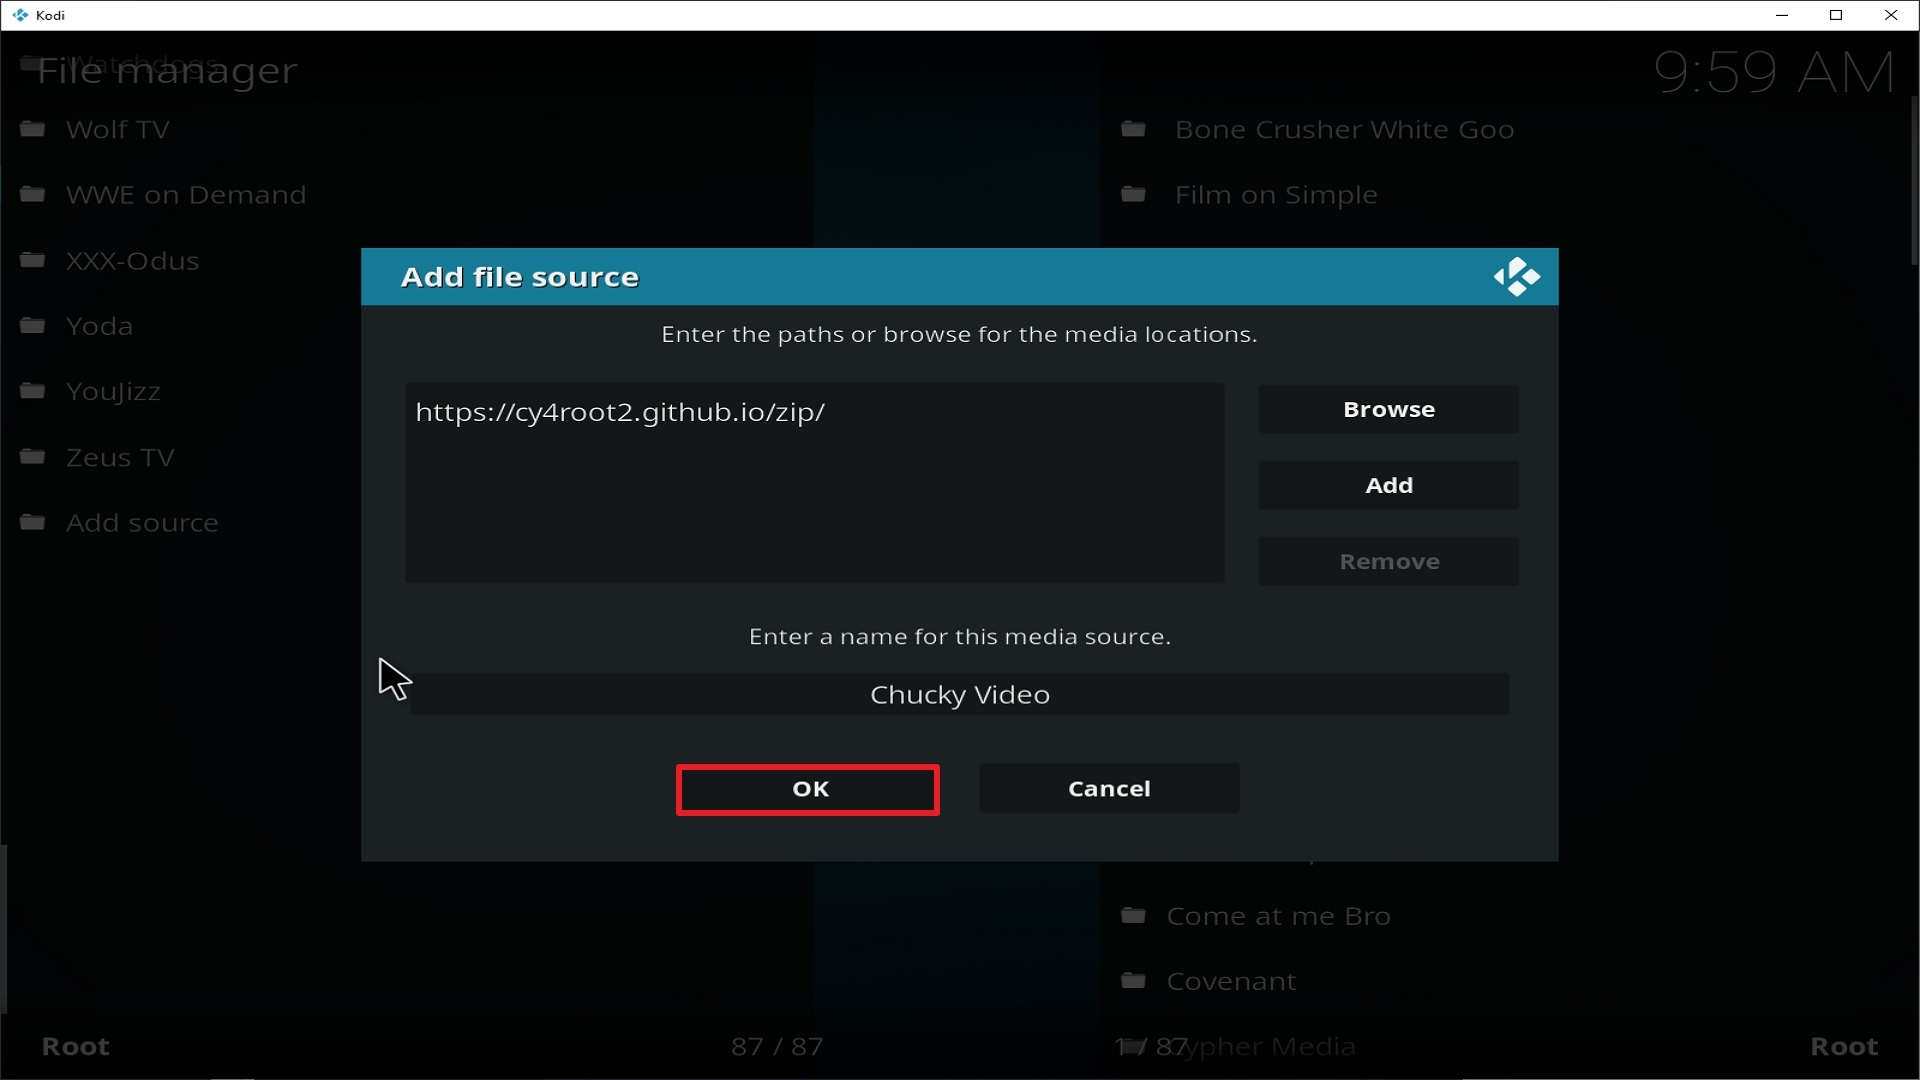
14. Click on OK.

Step 14 Installing Galaxy addon on Kodi


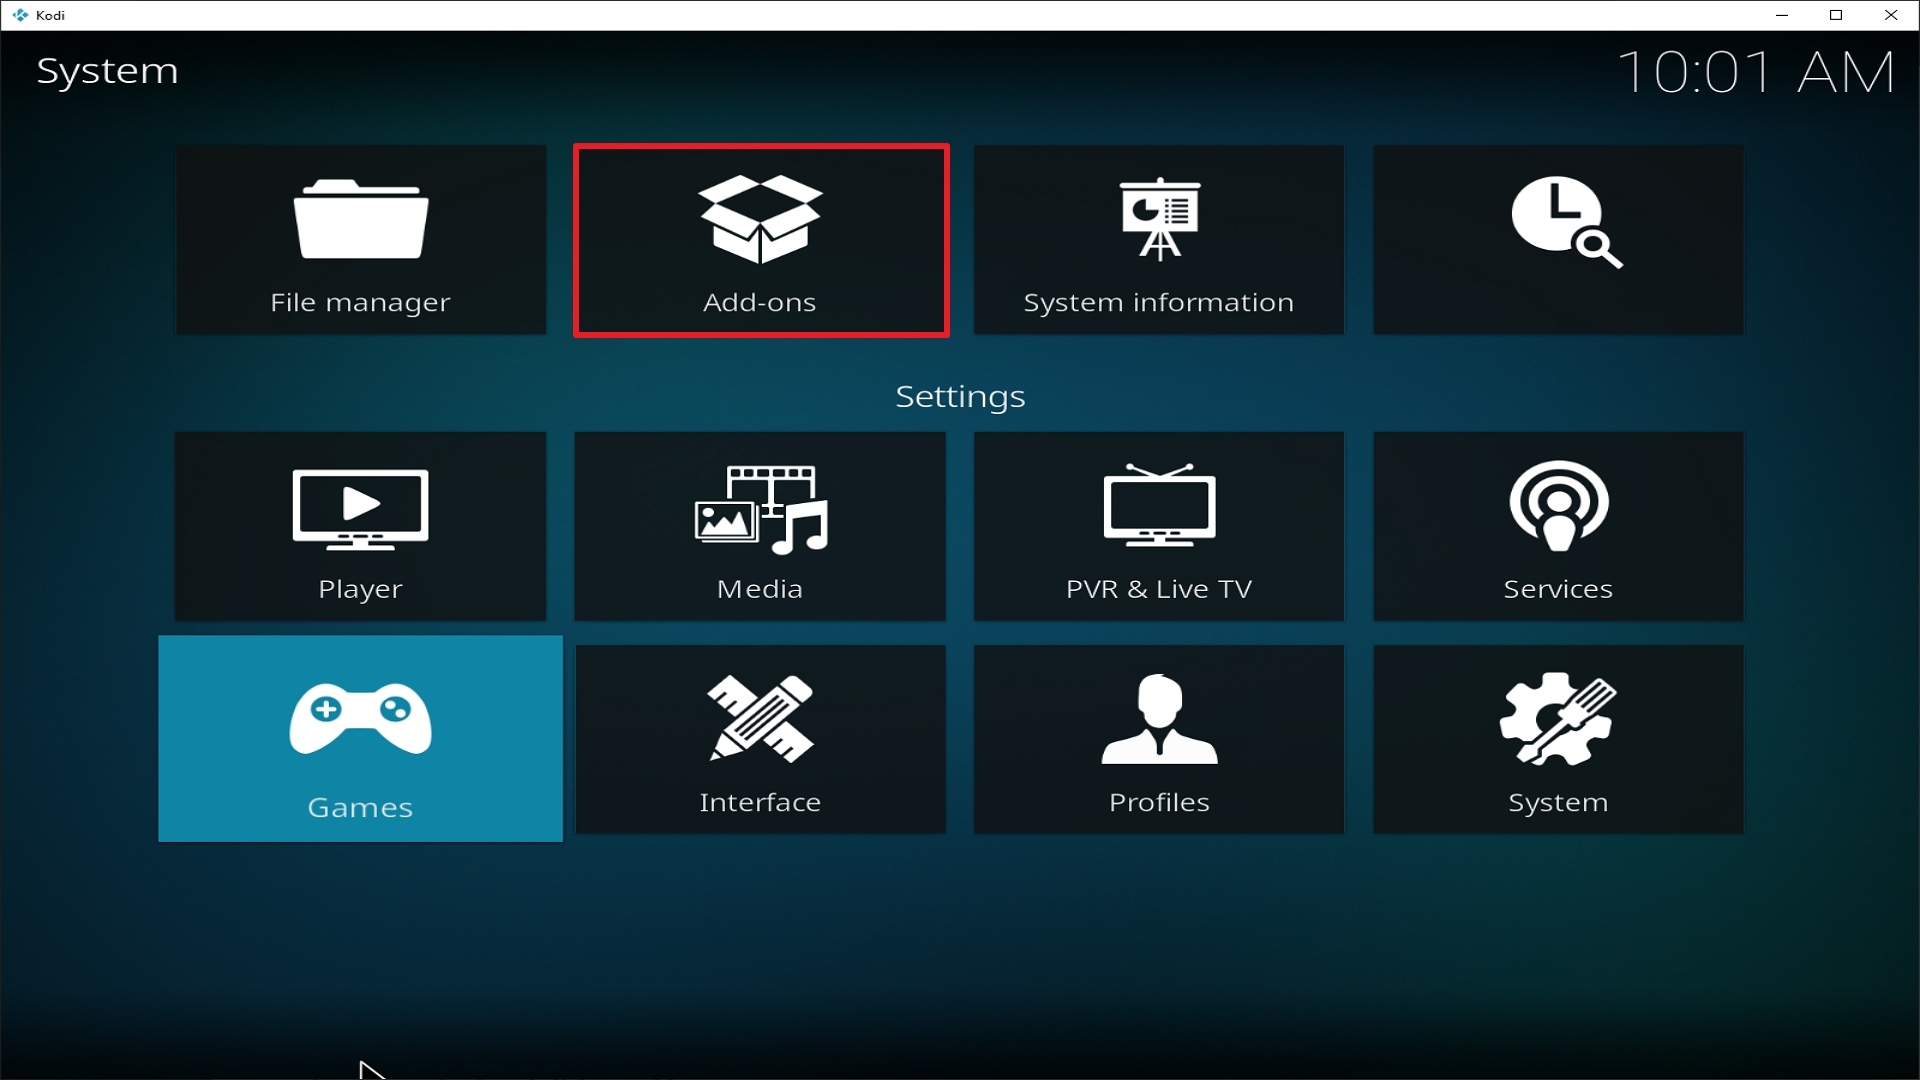
15. Take one step back and click on Add-ons.
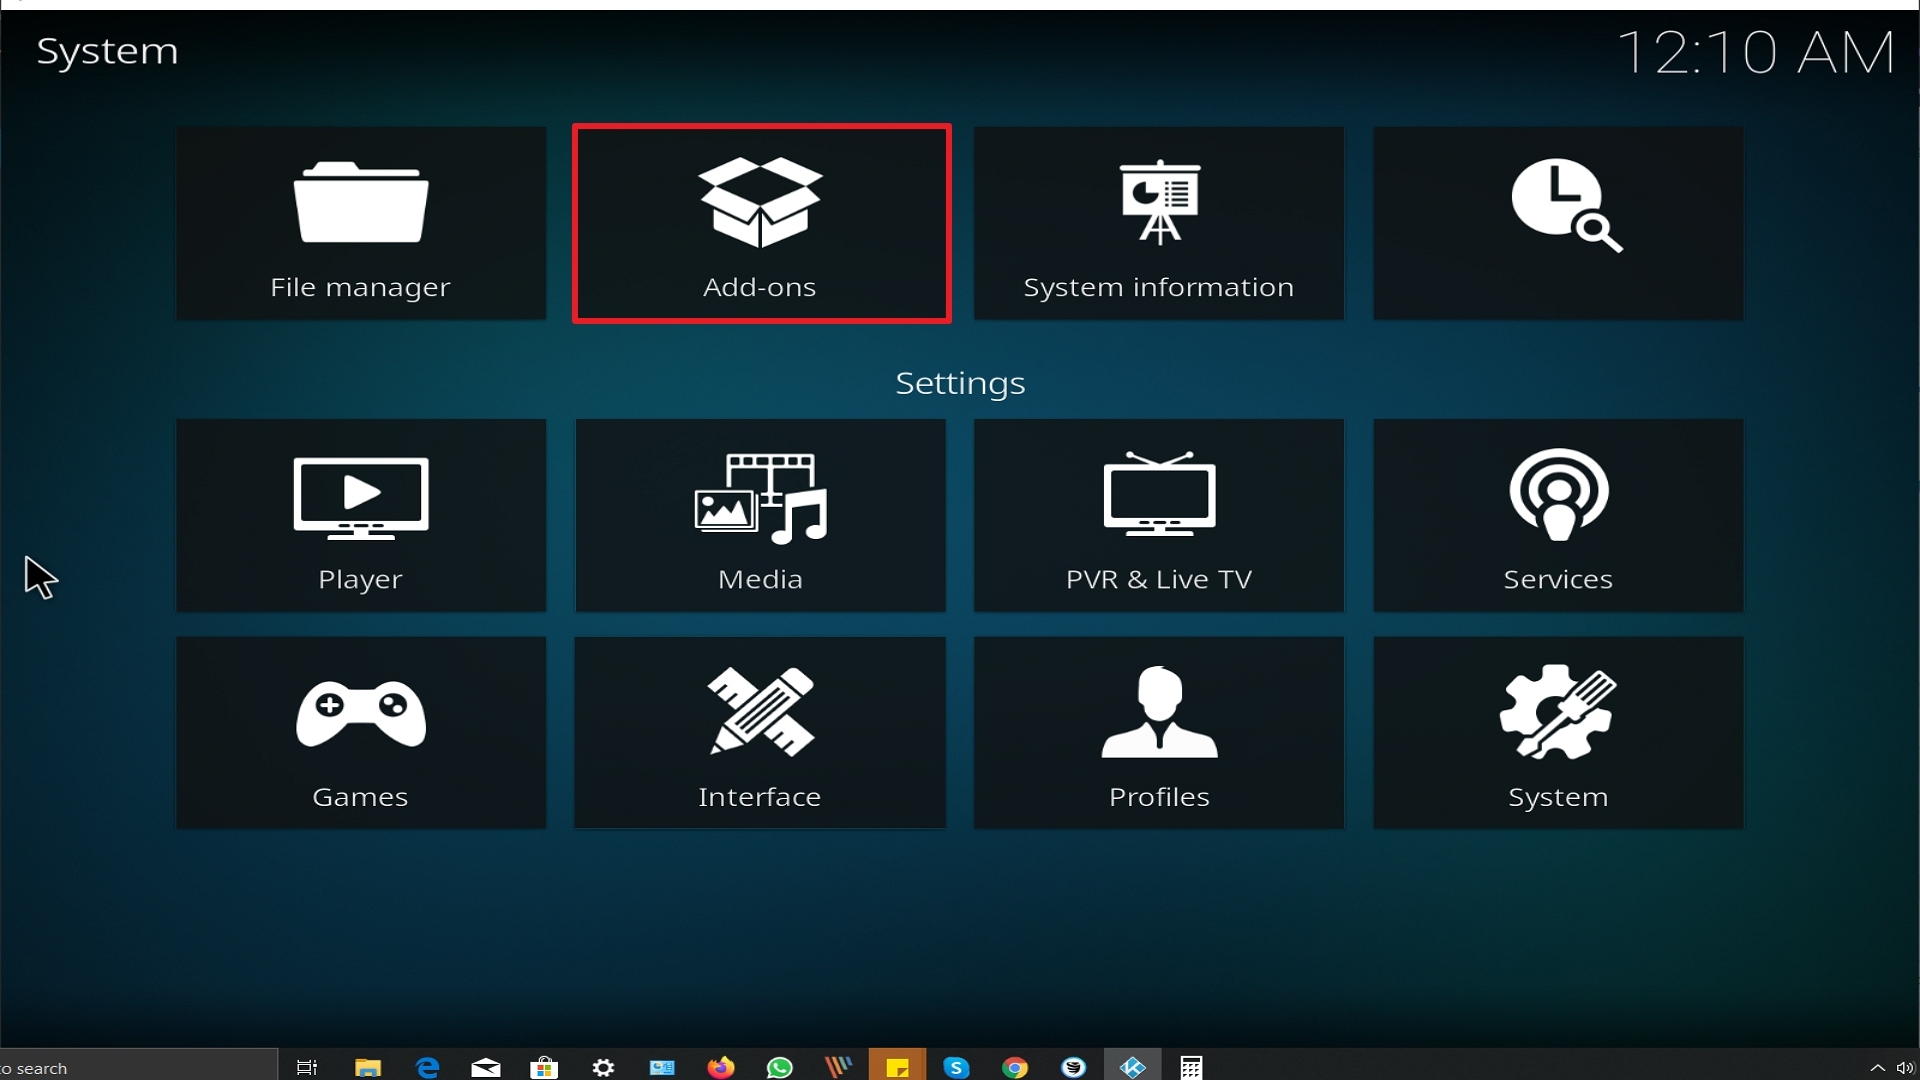
Step 15 Installing Galaxy addon on Kodi


16. Select install from zip file.

Step 16 Installing Galaxy addon on Kodi


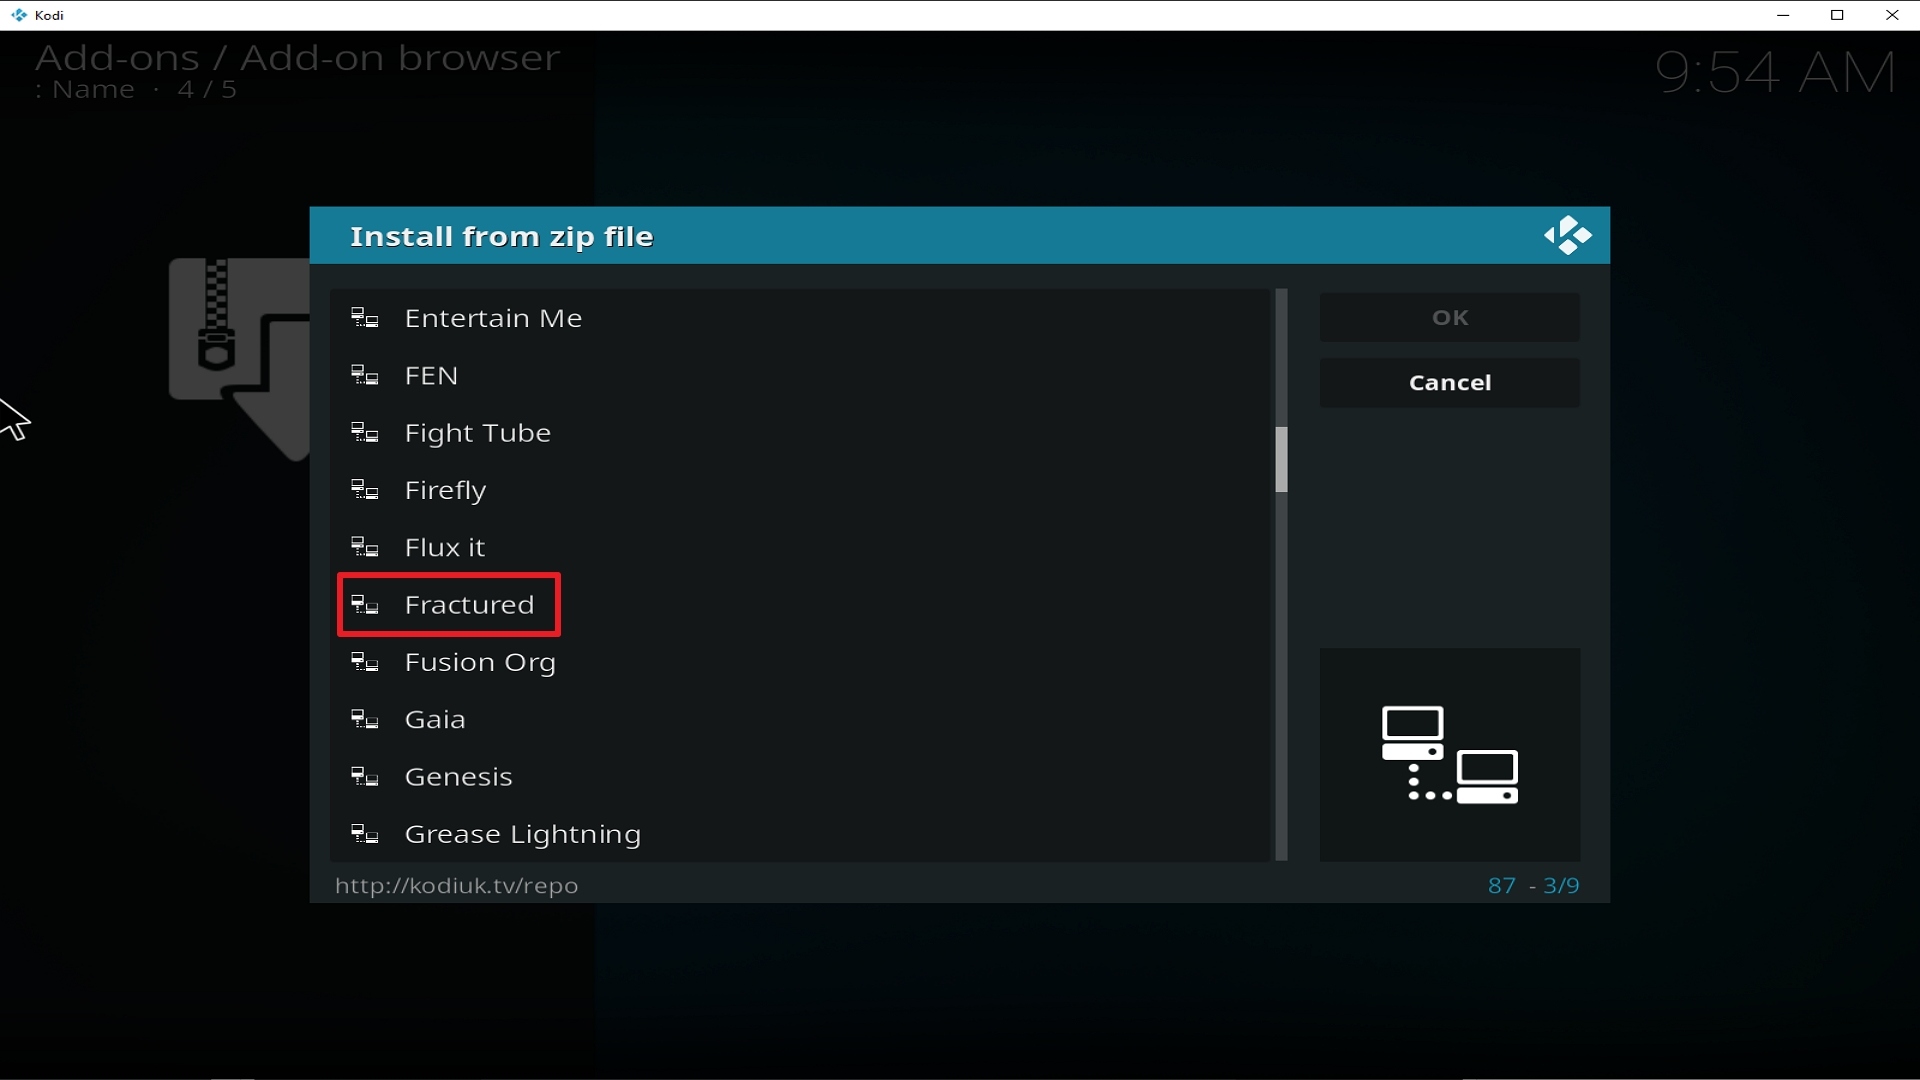
17. Click on Galaxy (or whatever you named the source).
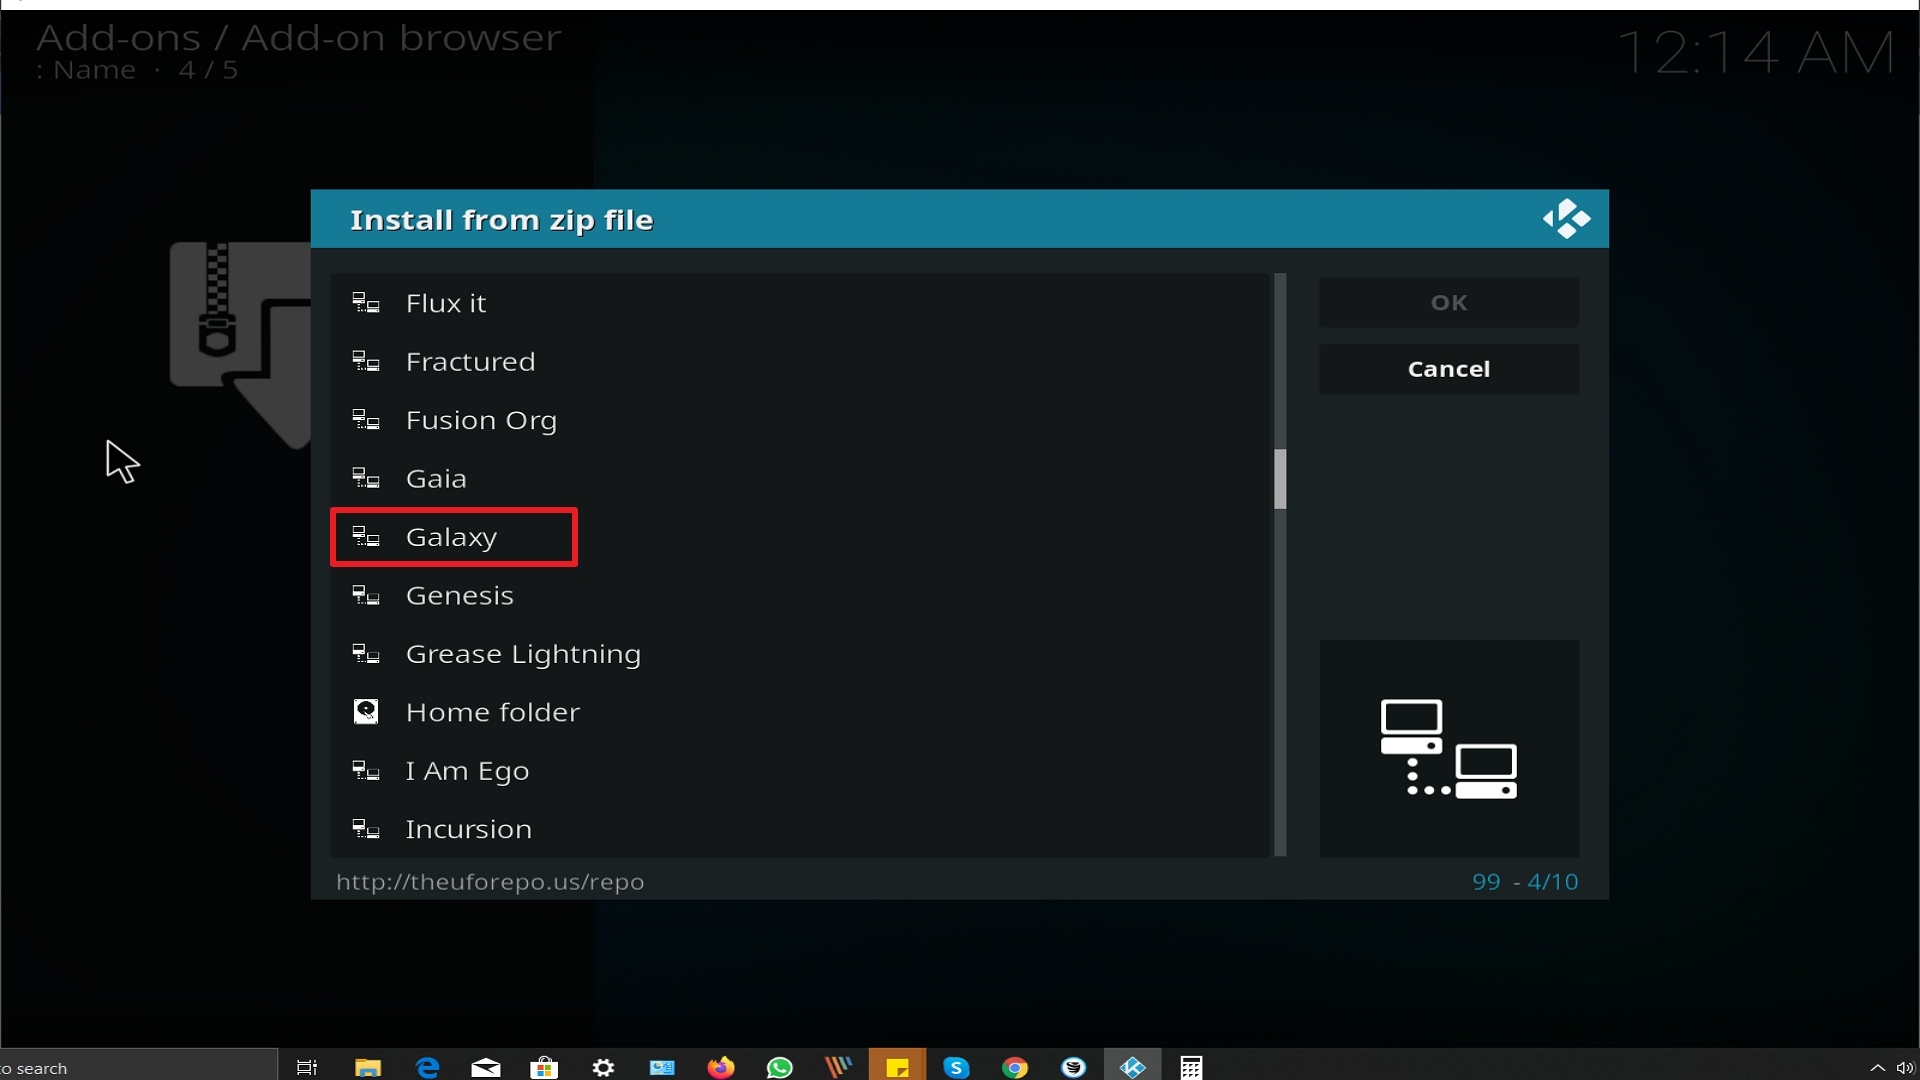
Step 17 Installing Galaxy addon on Kodi


18. Click on repository.ufo-repo-1.000.000.zip
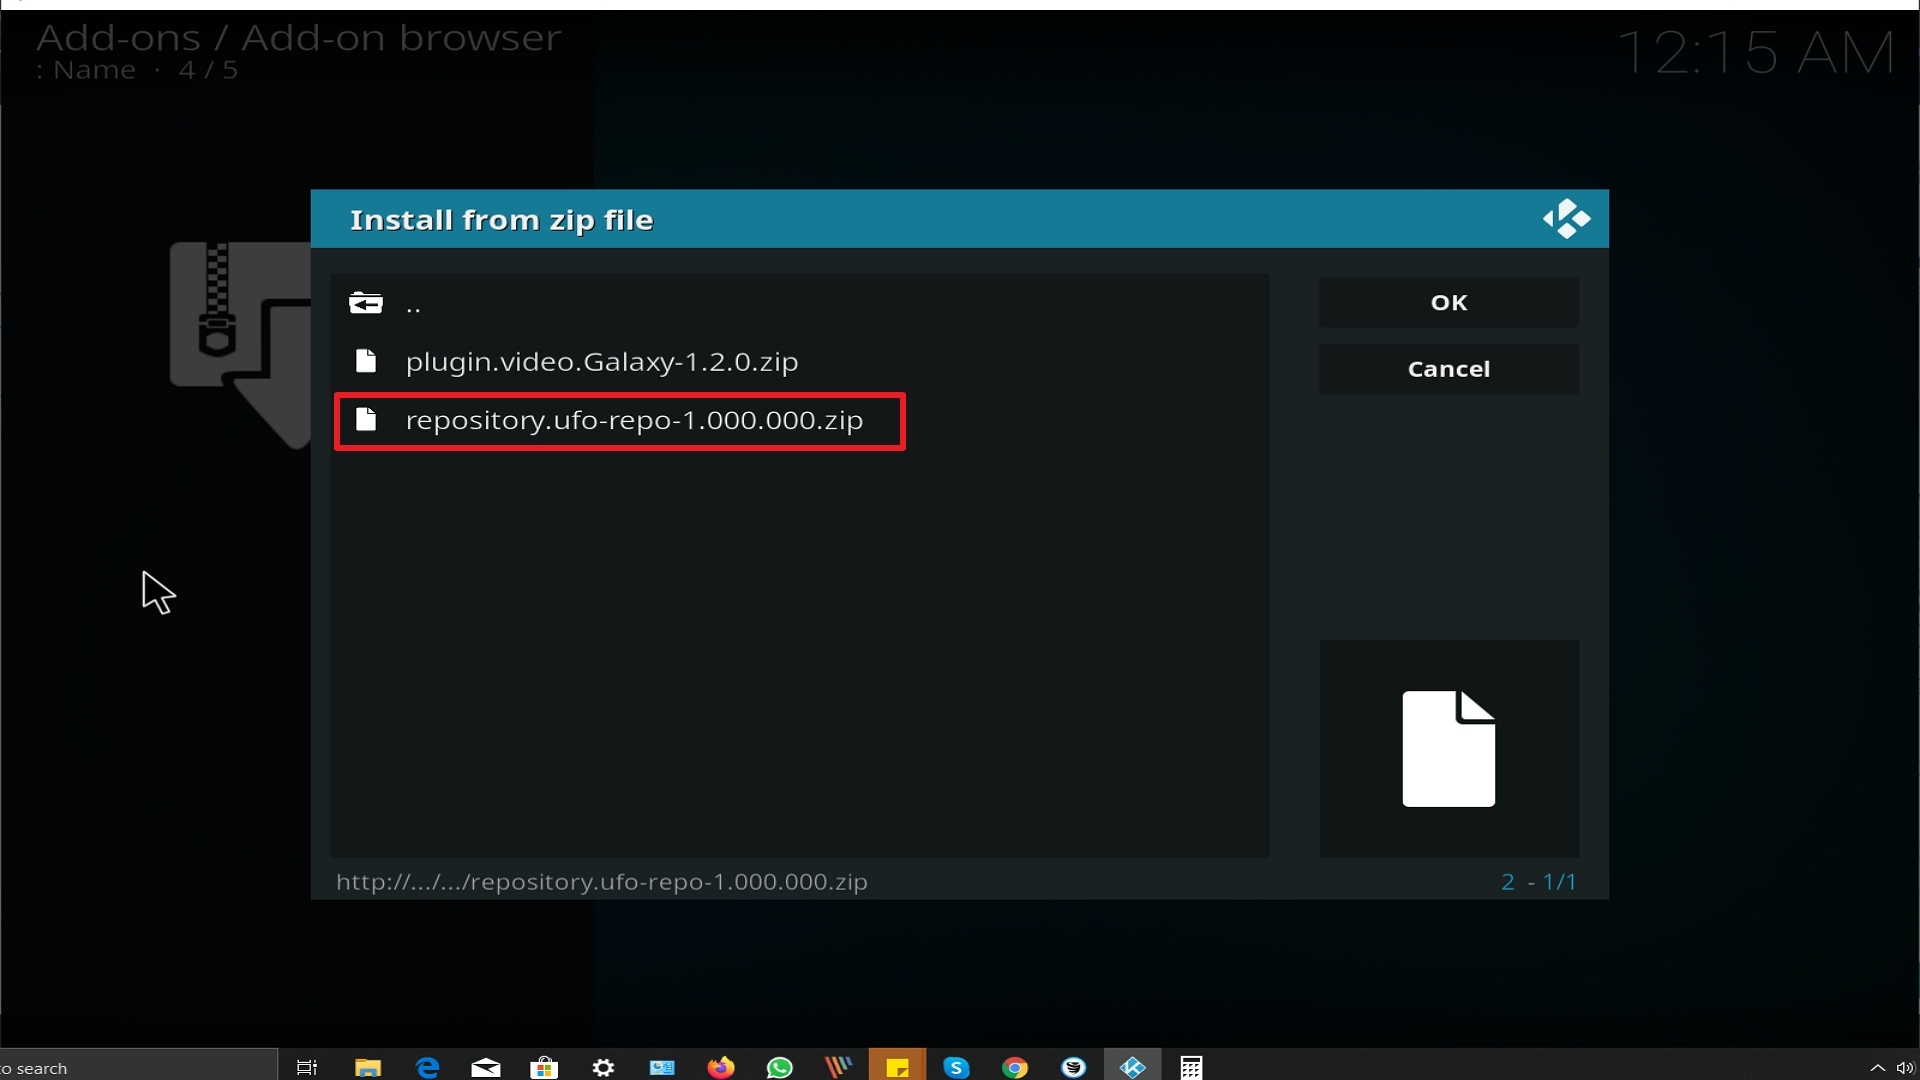
Step 18 Installing Galaxy addon on Kodi


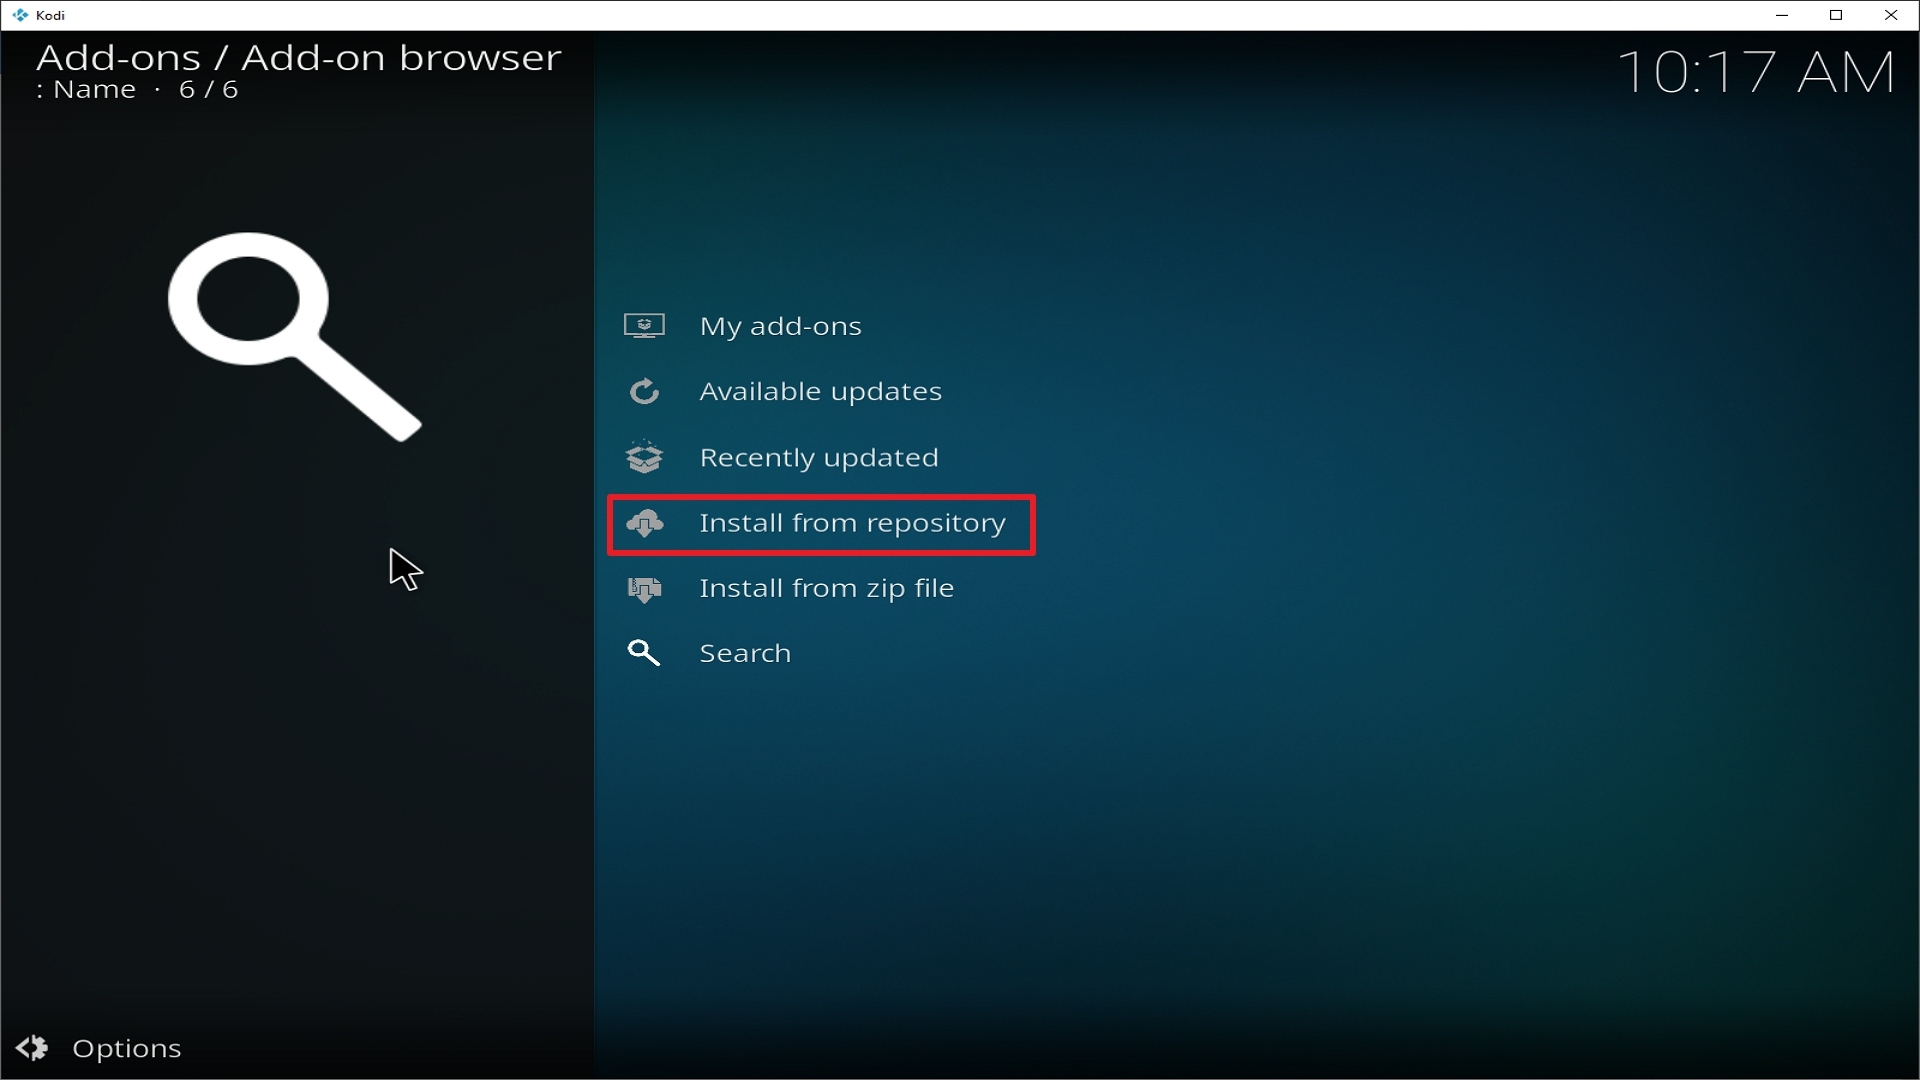
19. Select on Install from repository.
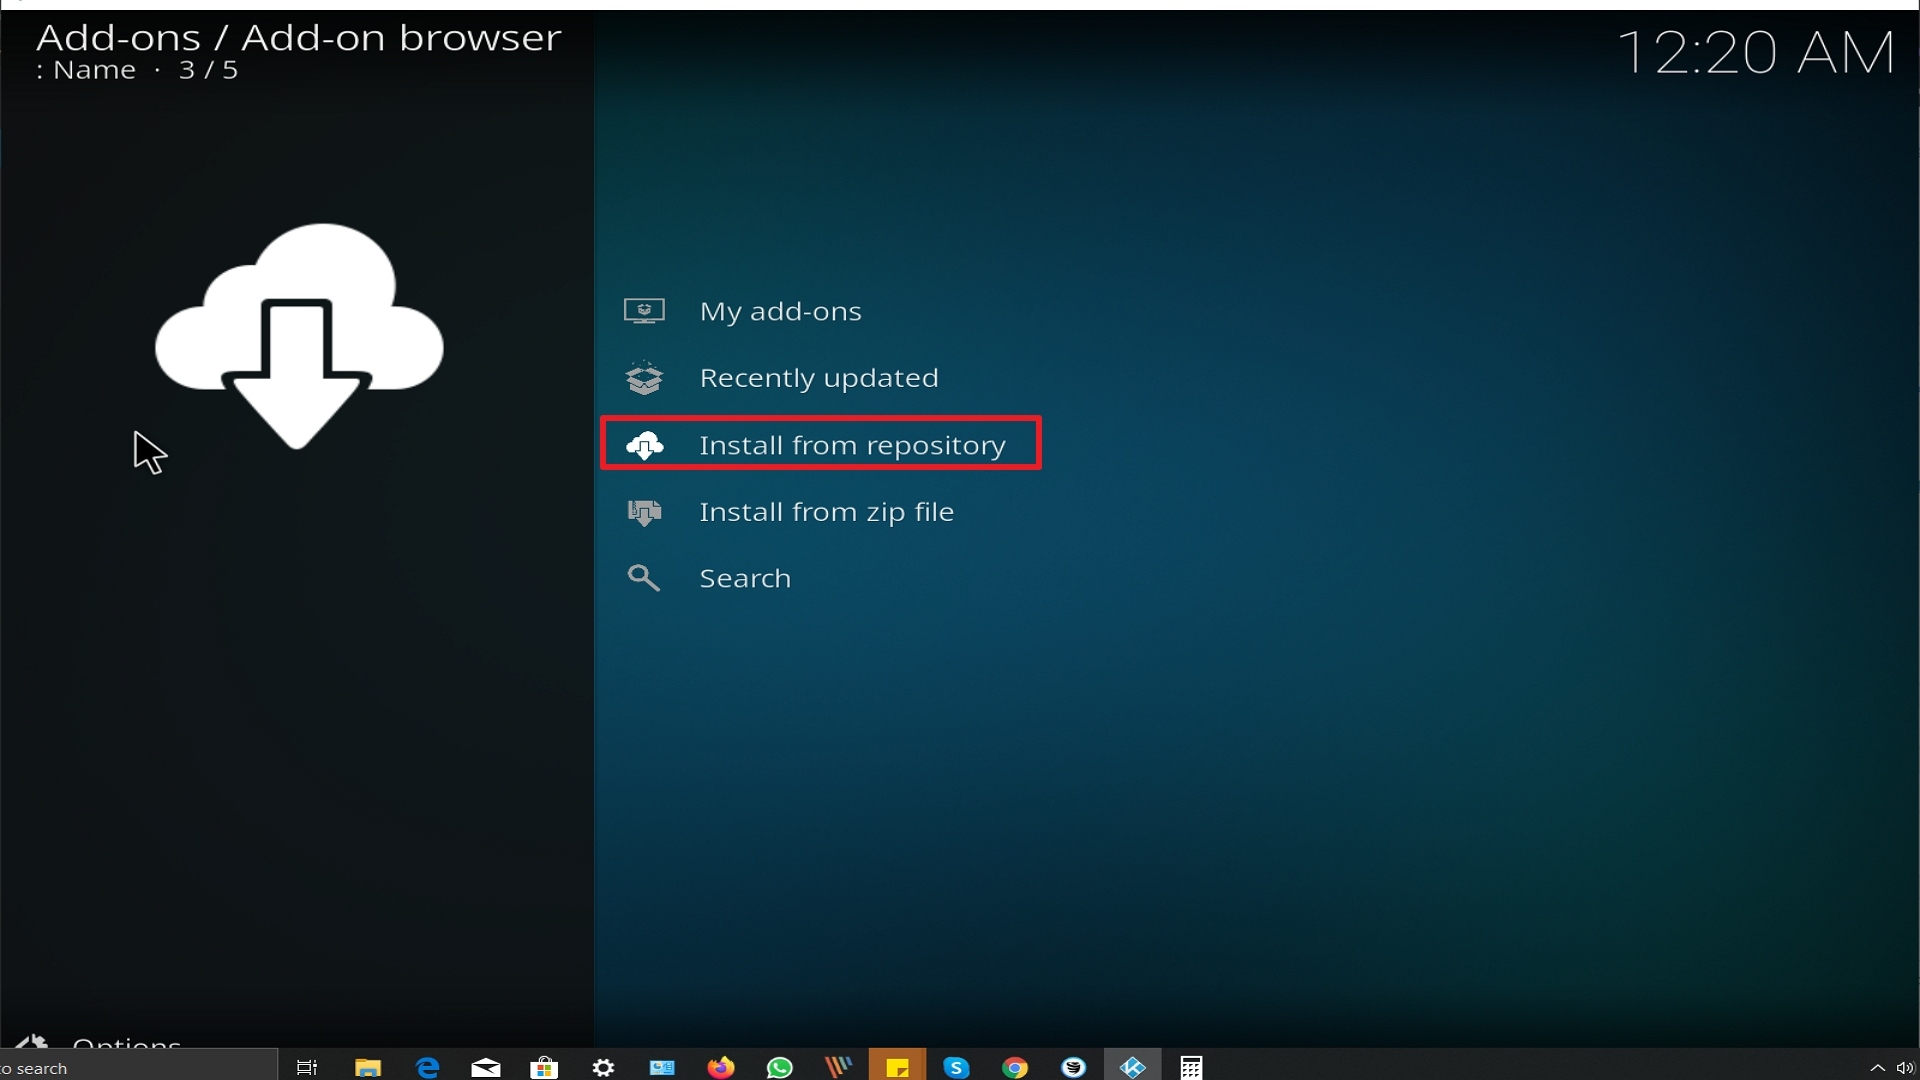
Step 19 Installing Galaxy addon on Kodi


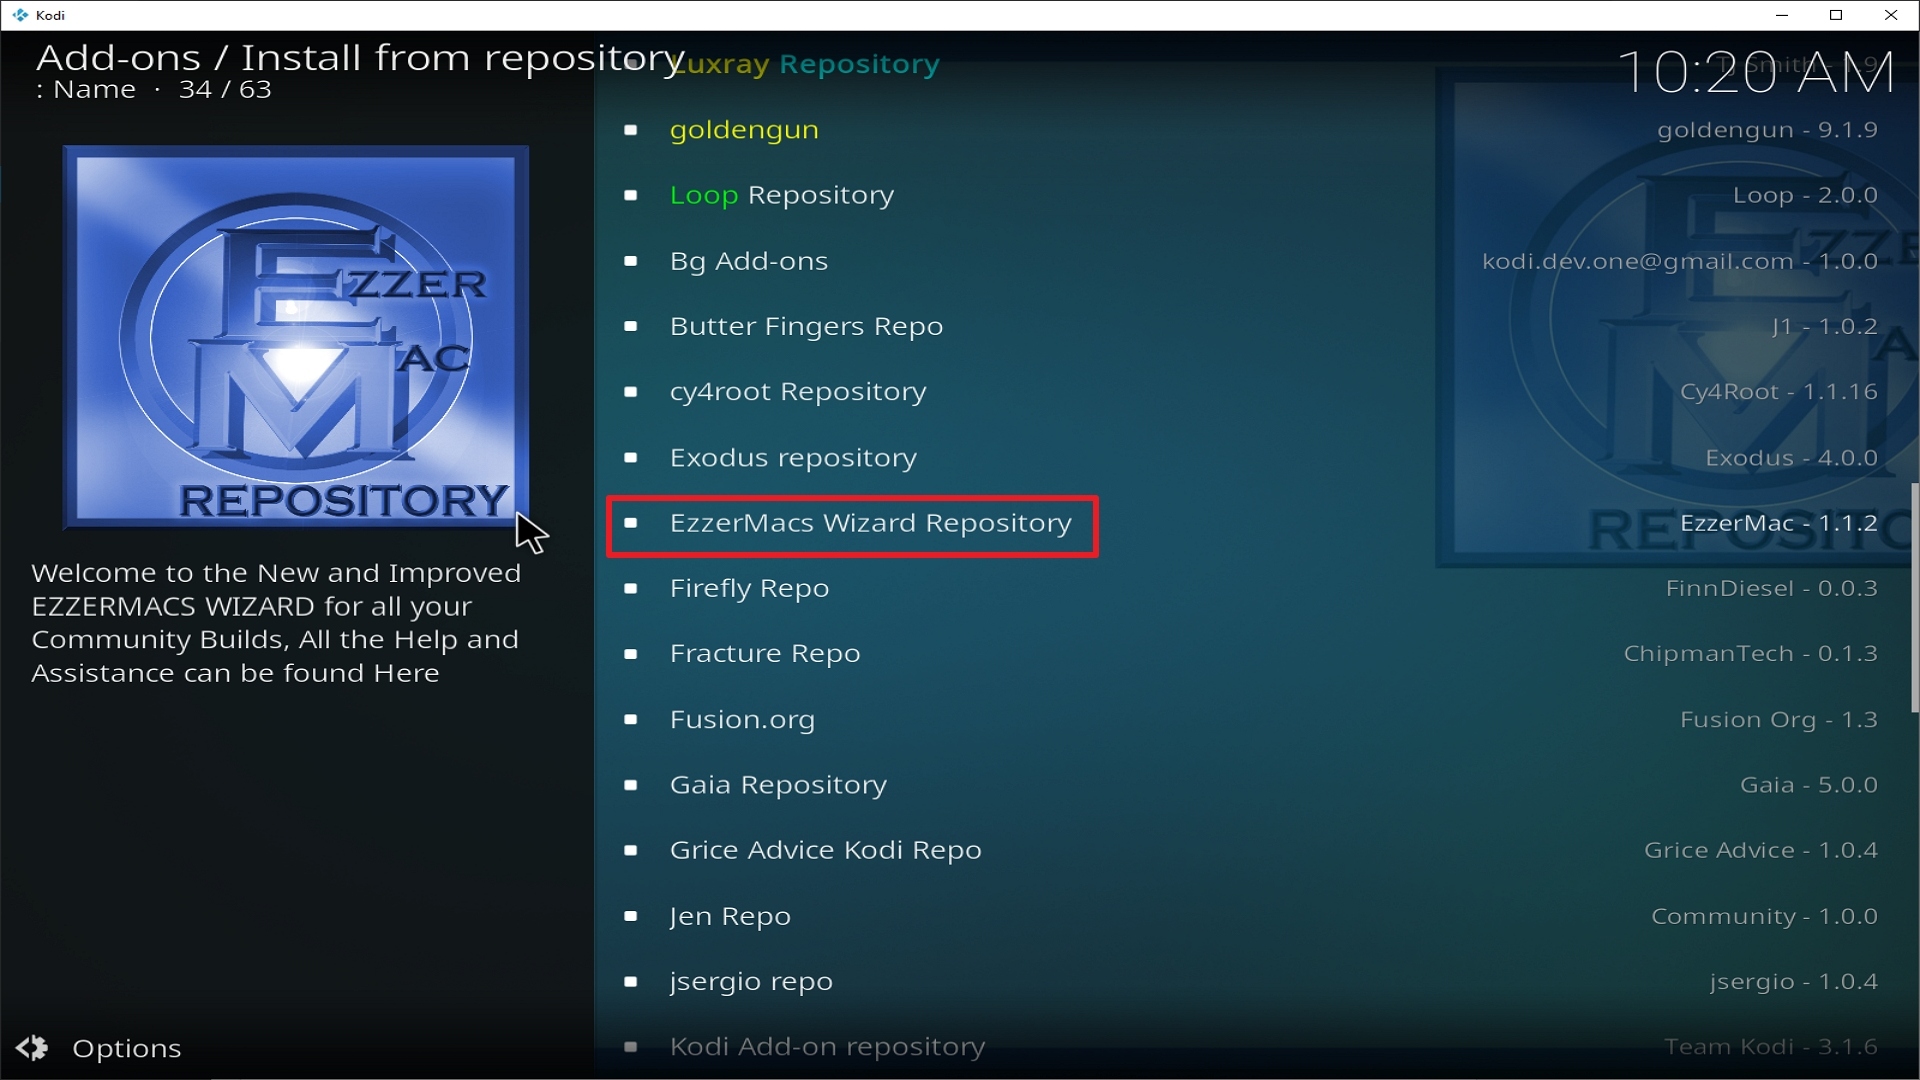
20. Click on UFO Repo.

Step 20 Installing Galaxy addon on Kodi


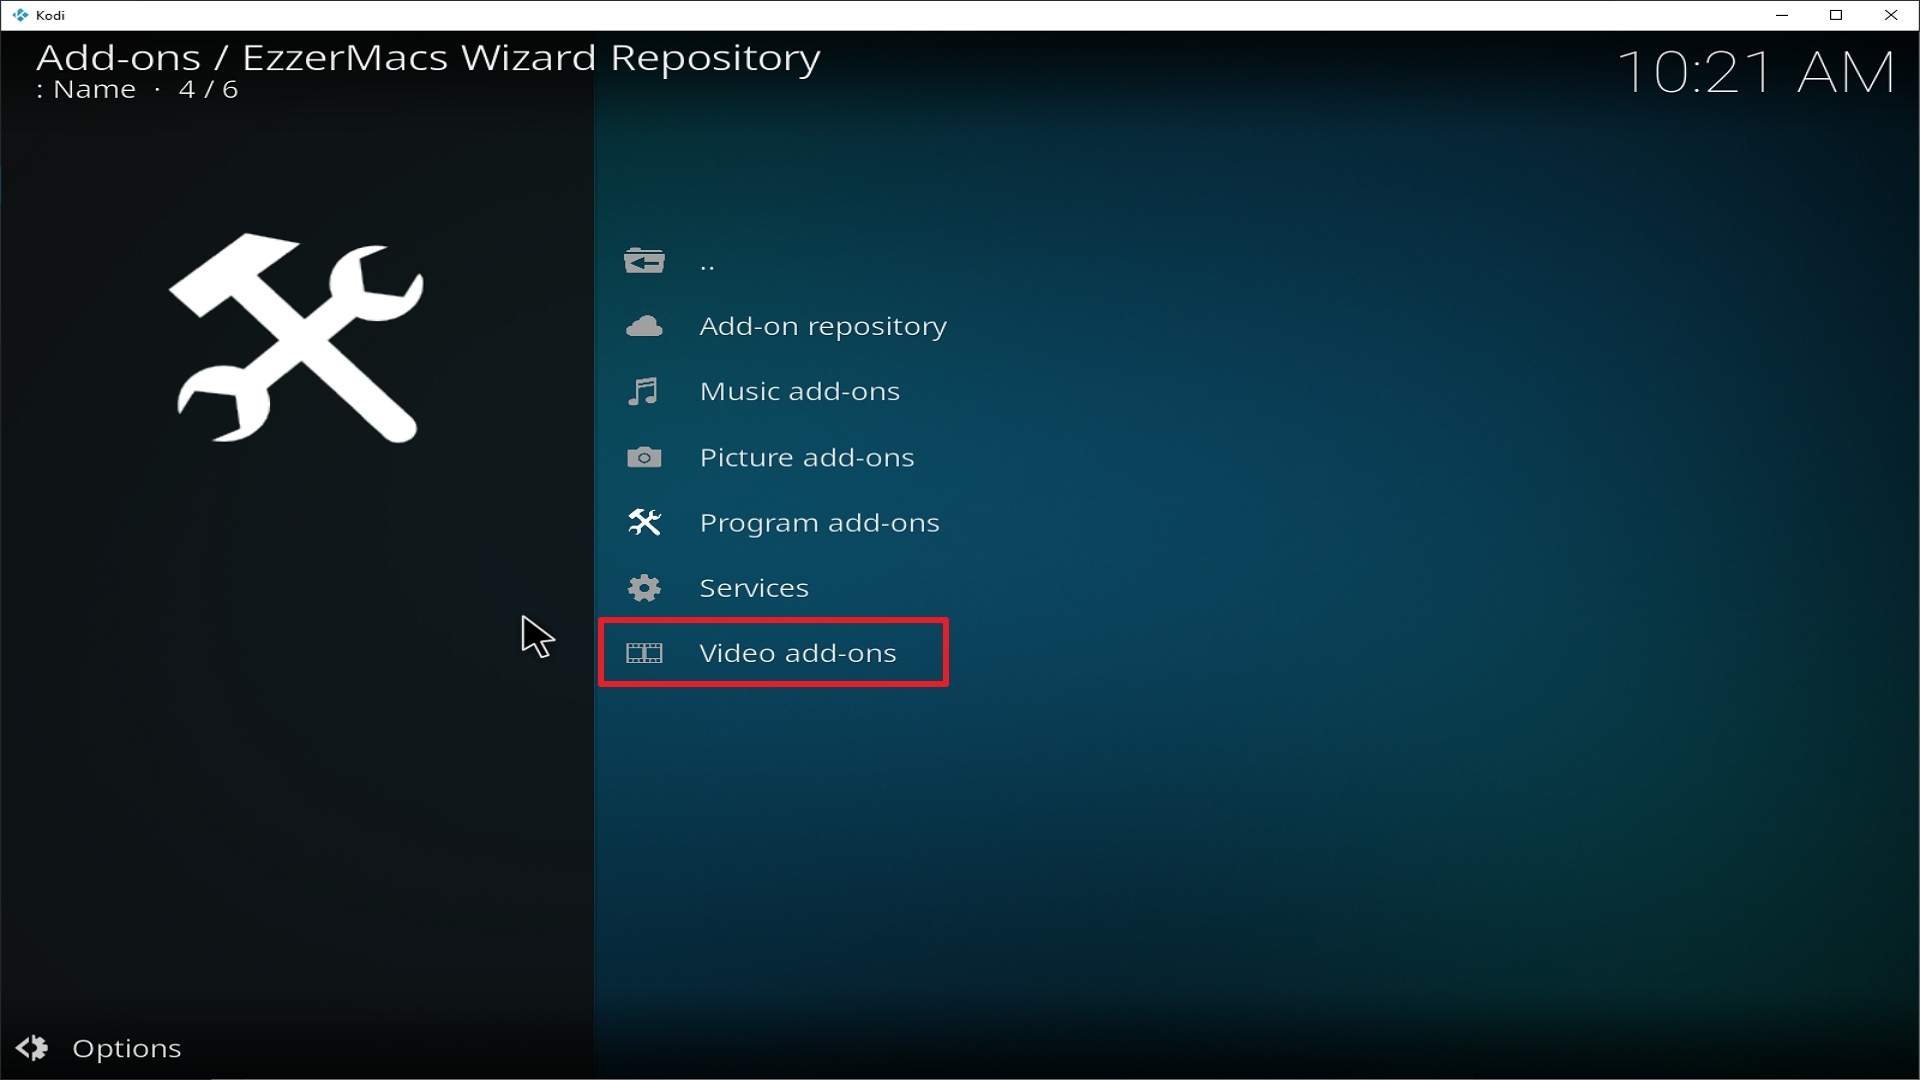
21. Pick Video add-ons.

Step 21 Installing Galaxy addon on Kodi


22. Select Galaxy again.

Step 22 Installing Galaxy addon on Kodi


23. Click on Install.

Step 23 Installing Galaxy addon on Kodi


24. Select OK after reviewing the add-ons that will be installed.
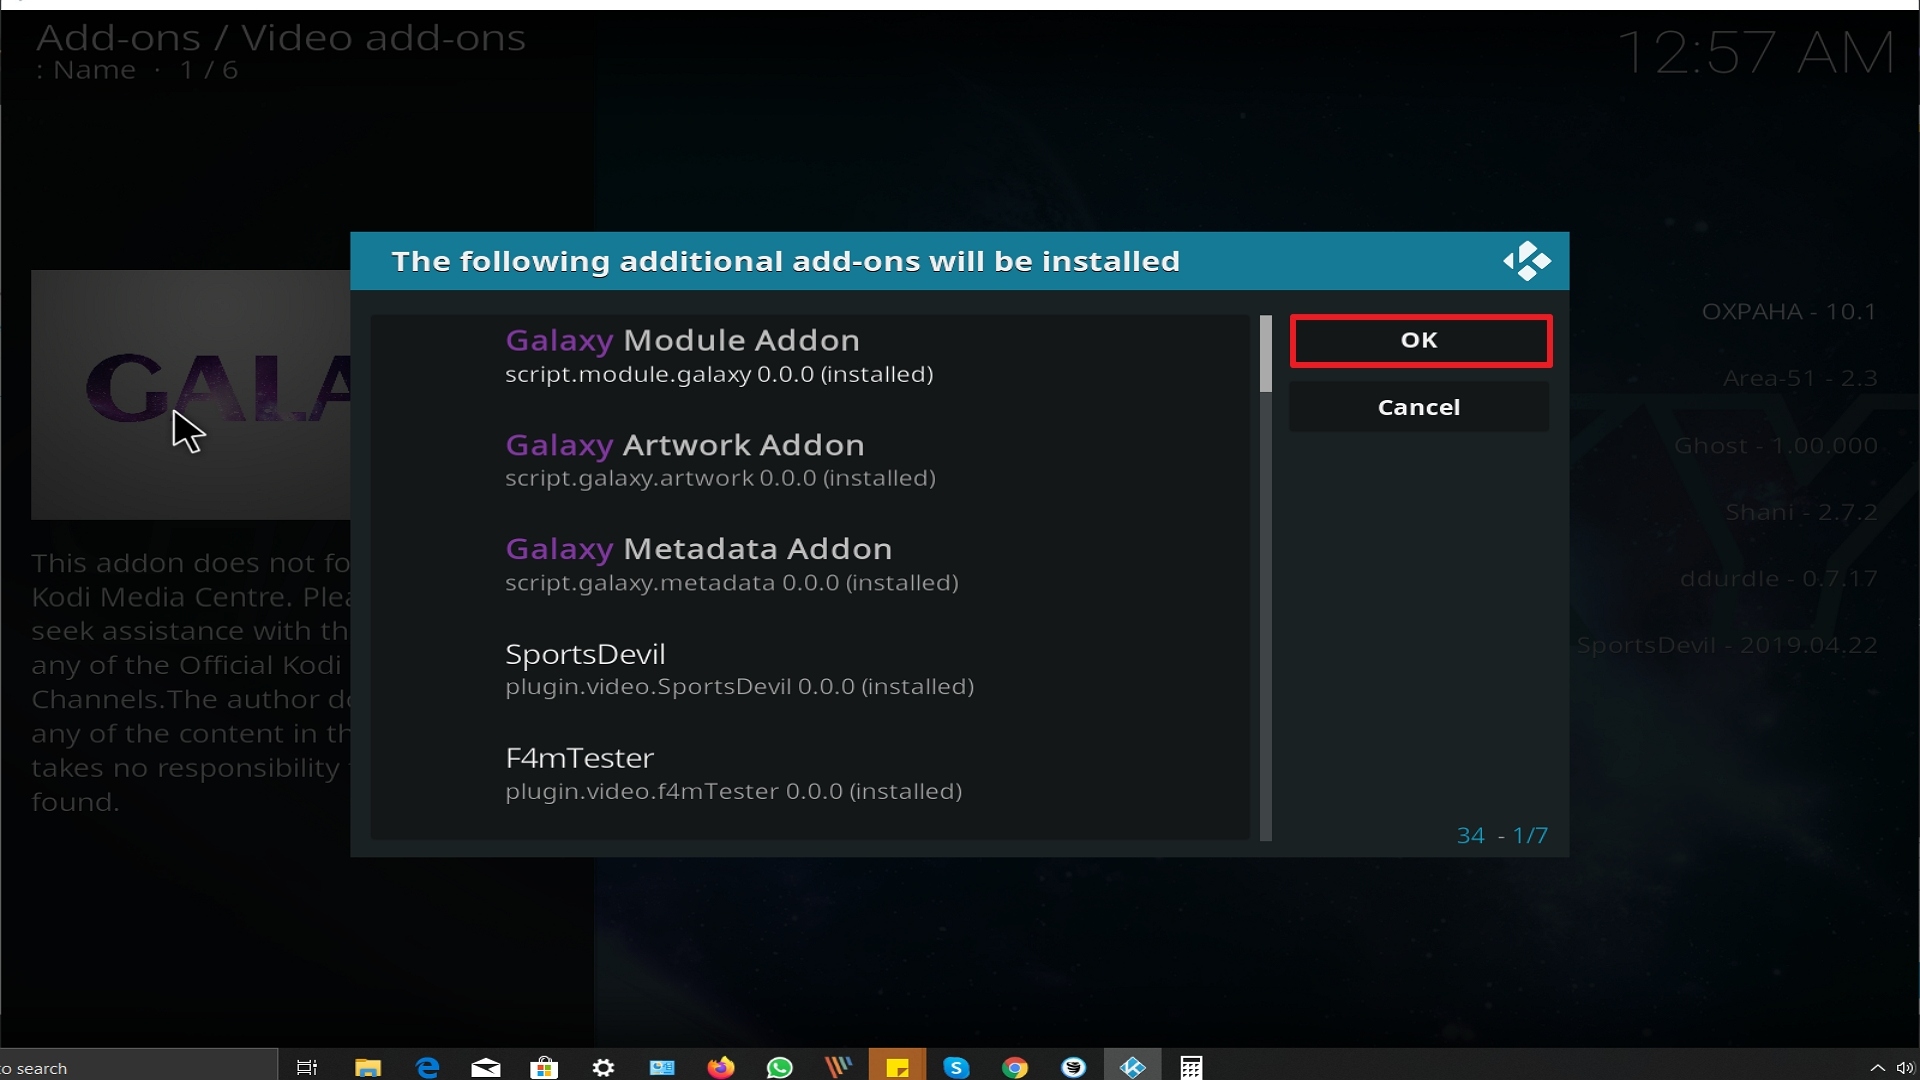
Step 24 Installing Galaxy addon on Kodi


25. You should see a popup in the upper right corner saying Galaxy has installed. There will actually be multiple popups for the various components.
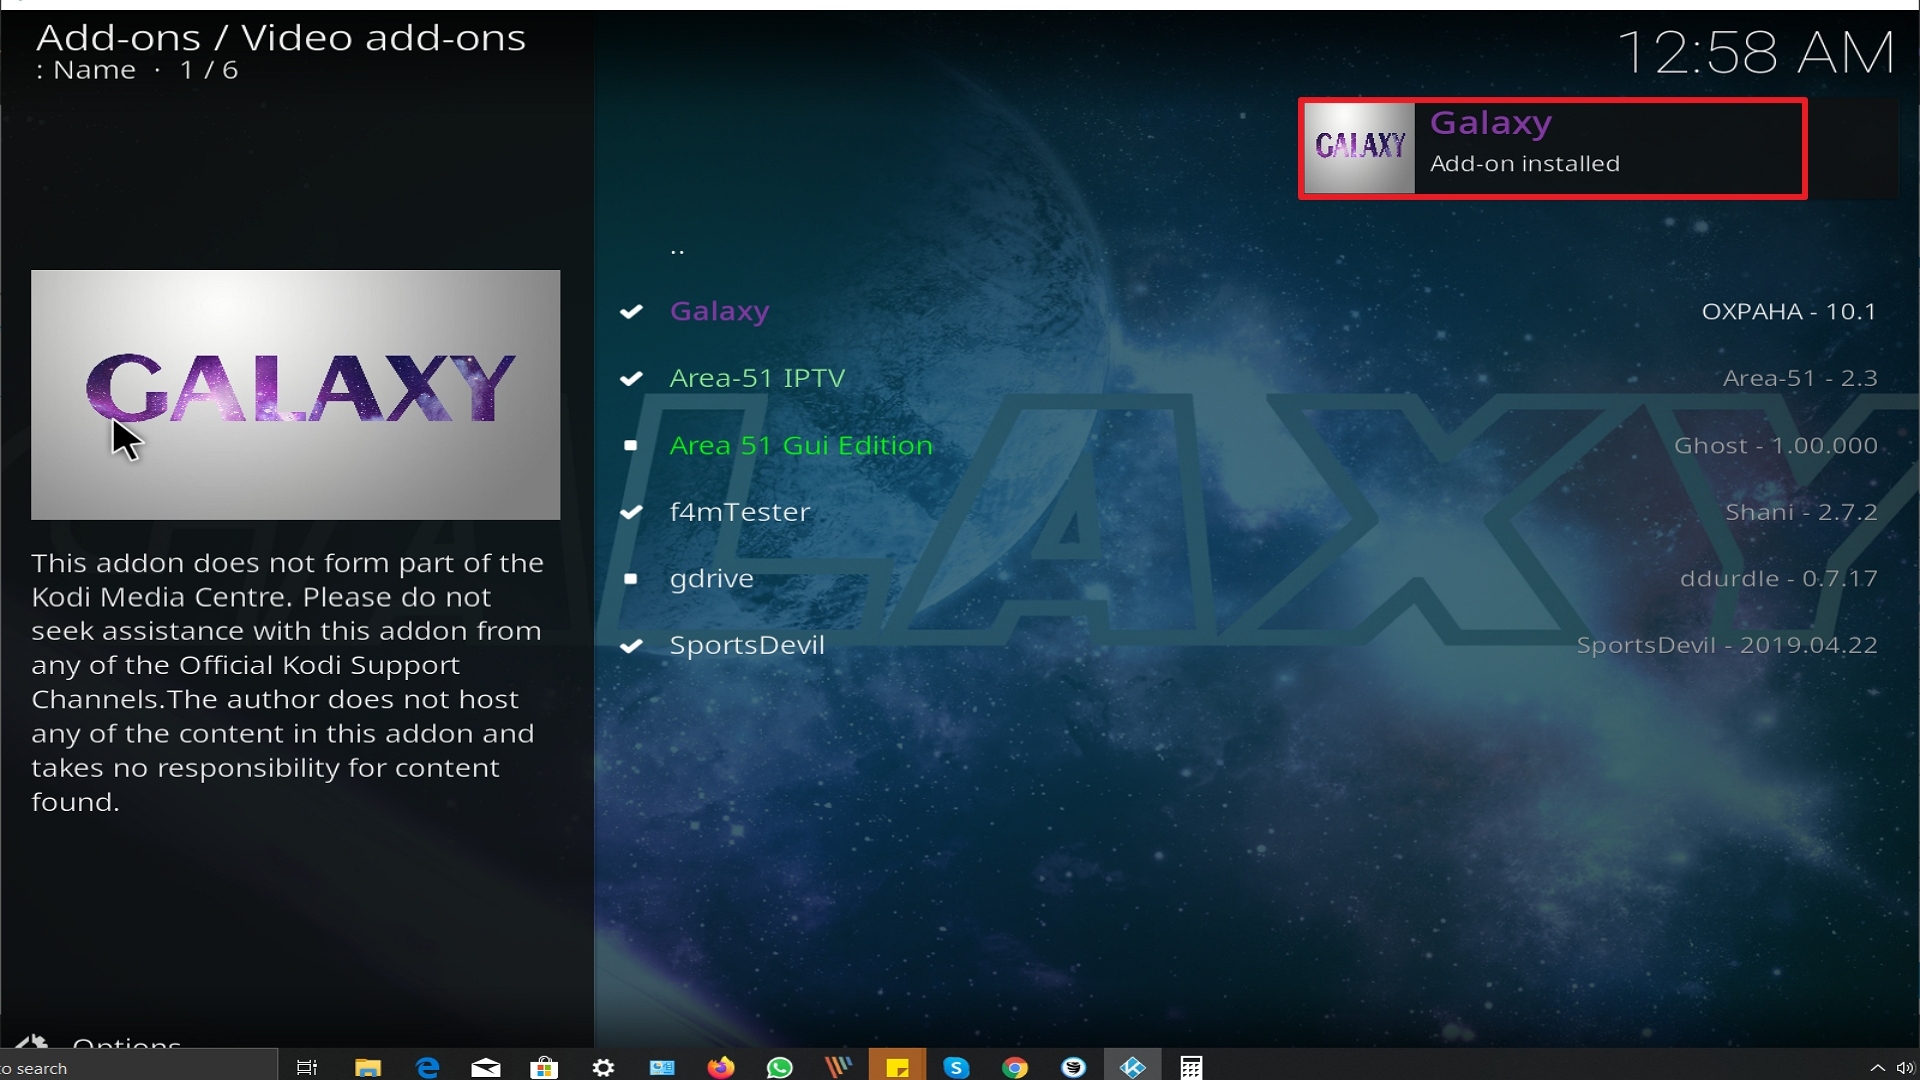
Step 25 Installing Galaxy addon on Kodi


26. Click on Open to start Galaxy add-on.
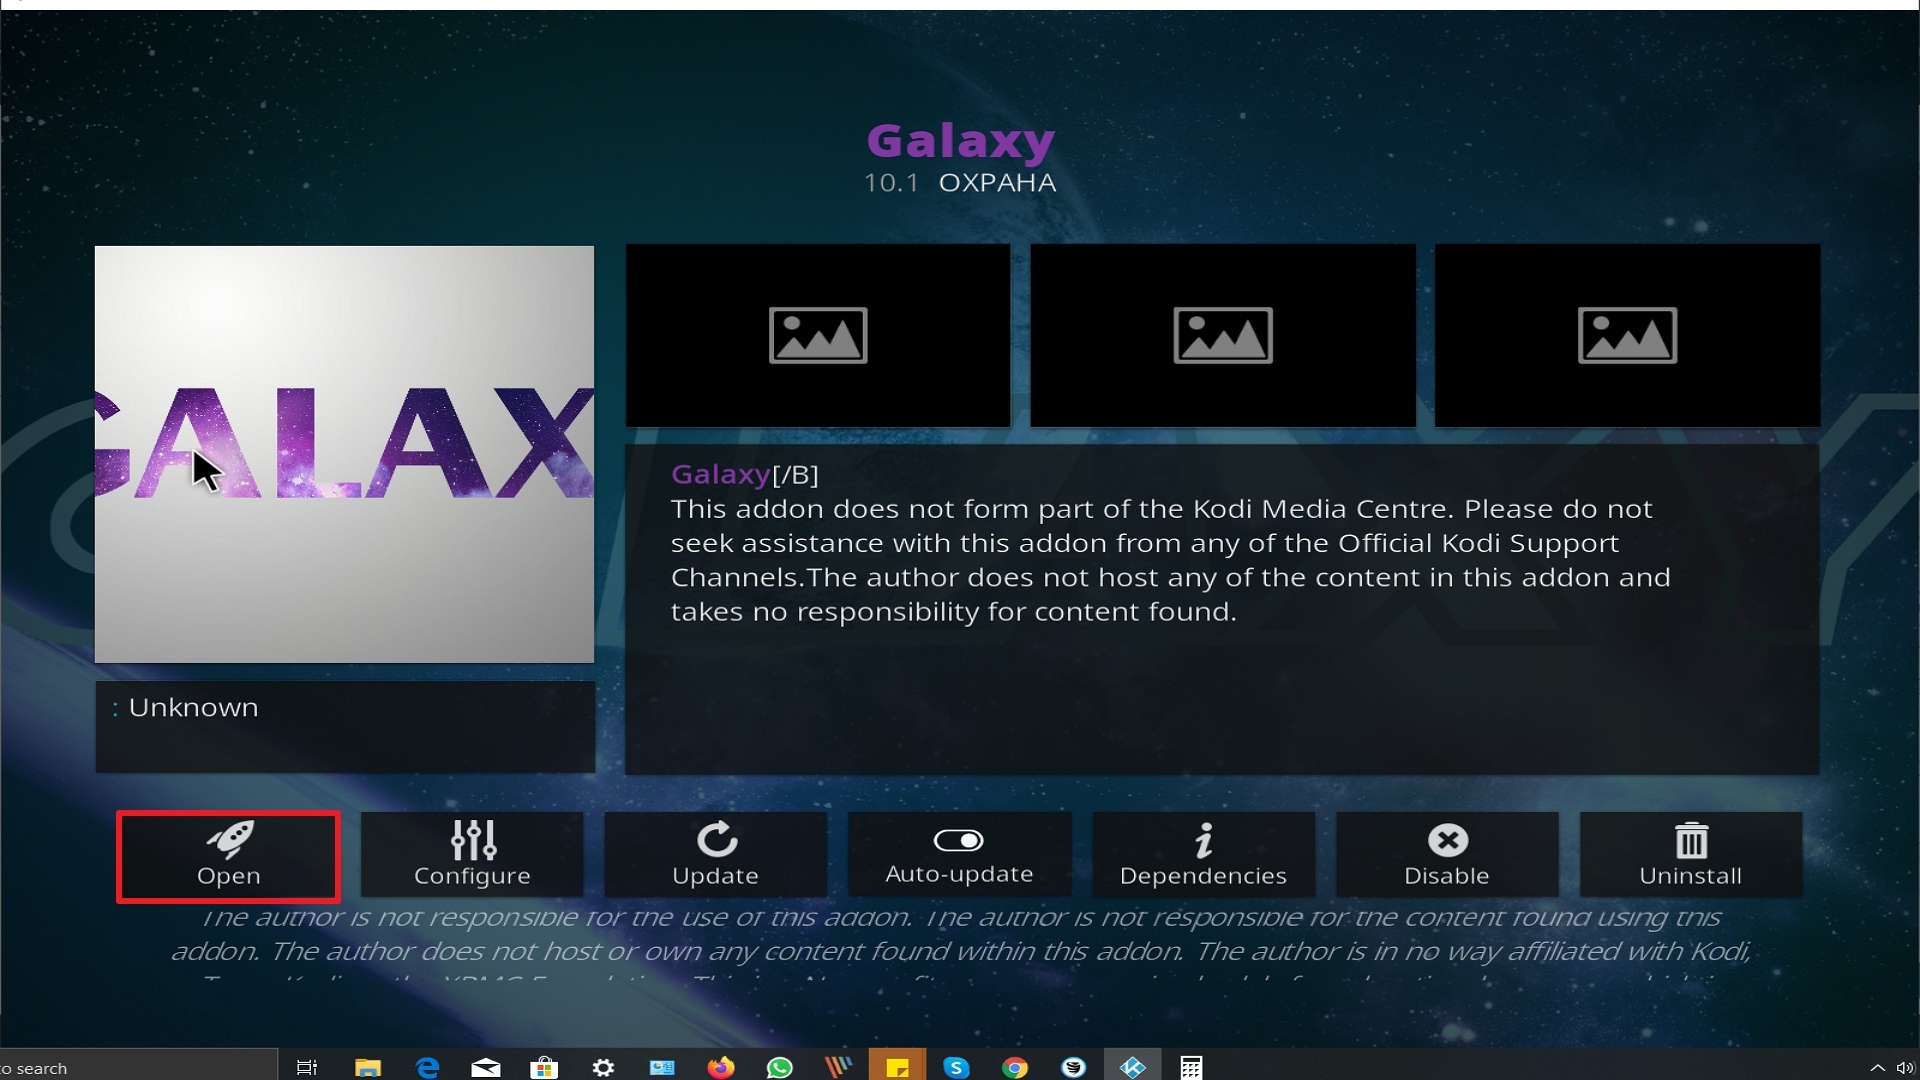
Step 26 Installing Galaxy addon on Kodi


Alternatives

A good back-up plan is always desired because you will never know if an issue suddenly emerges and that might leave you hanging. We always recommend that you secure yourself a secondary option which you can obtain from trusted sources if ever the need arises. Although we find plenty of other add-ons to choose from to substitute Galaxy add on, the following add-ons have very similar content and function like this one. Here they are:

  • Exodus
  • Exodus Redux
  • Primal
  • Covenant

These add-ons can be used as a replacement if and when the need arises. But all-in-all, Galaxy will work out just fine.


Common errors

These are some of the things that may cause an issue when installing Galaxy Add-on:

  1.     Unable to connect to URL/Download

If you are having difficulties downloading the Galaxy add-on this may mean that the repository is unstable and that the IP may be unavailable. It is also worth checking out if you have typed the correct URL that you have downloaded Wolf Pack from the right repository. Also, make sure that you have a stable internet connection and that you are secured by a VPN. If your country has stricter rules regarding censorship, you may find that it is blocked because it may contain adult content and that it is collected illegally. Your ISP constantly monitors your activity and may block certain websites from being accessed. To fix this, use a VPN to make your connection encrypted and anonymous so that your tracks will be covered. Check here for the best VPN deal.


  1.     Script Error

This error occurs due to the add-on itself or on the manner Kodi has been installed. Make sure that you have installed everything properly. If this problem persists, try reinstalling the add-on or there may be a need to update or reinstall Kodi. To figure out how to do this and other fixes read our in-depth guide linked above.


  1.     Kodi Check Log Error

Check Log Errors usually happen often as you use Kodi until you get familiar with it. This usually happens when your media cache is full. Your device will always cache a clip every time you watch media to allow faster loading time. In the long run, this cache gets full thus creating this issue. An in-depth guide on how to empty your cache is provided at the link above.


  1.     Source not working/slow/frozen

Galaxy add-on does not store any of the content on its servers, these are all accumulated through 3rd party sites. Give the source up to 15 seconds to load and then you can try other suggestions. For other solutions please take time to read our in-depth guide linked above.


Do I need a VPN?

Whenever you stream using third-party add-ons, it is much better if you are using a Virtual Private Network to ensure your safety. Having a VPN is like having an online companion that will ensure your safety and privacy while streaming on these services. One of the best and most recommended VPNs is Surfshark. As you connected to this VOPn it will automatically hide all of your online activities and keep you anonymous. The good thing is, this VPN also ensures that you are safe from any threats and allow you to access any content that you want.

Read our Surfshark Review if you want to learn more about this VPN.

Here’s are the reasons why it is our VPN of choice:
  • It bypasses restrictions and geo-blocks to let you access any restricted content. 
  • This VPN service offers over 3200+ servers in 65 countries.
  • Military-grade AES-256 encryption adheres to FIPS (Federal Information Processing Standards), which control how sensitive data is handled.
  • It adheres to a strict no-log policy.
  • By default, DNS Leak Protection is enabled.
  • There are no bandwidth restrictions, so you can use your VPN connection at maximum speed without any throttling.
  • It can secure an unlimited number of devices and works on all of them.
  • Customer service is available around the clock.
  • More content is available, and you can even unblock Netflix and other platforms.
  • Supports peer-to-peer file sharing, making it suitable for torrenting.


Grab your subscription now!

Click here to get the lowest price on Surfshark through our exclusive limited-time offer.


How to Install Surfshark VPN on Firestick

If your Firestick still has the older interface, read this article to learn how to update it: Update Firestick Interface.

Follow our screenshots below to install the SurfShark VPN app on your Fire TV stick.

1. Go to the Home screen of your Firestick.
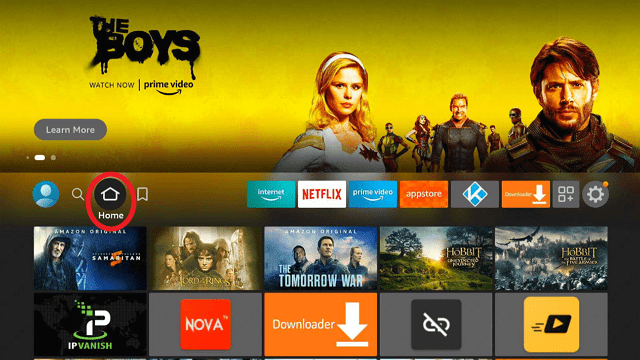
step 1 Install Surfshark VPN on Firestick


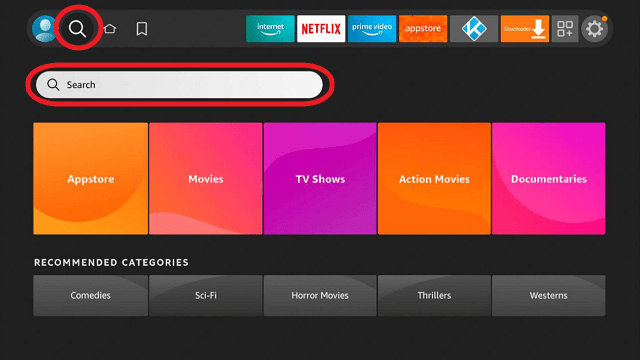
2. Navigate towards the Find tab. Press the Search button from the resulting dropdown.
step 2 Install Surfshark VPN on Firestick


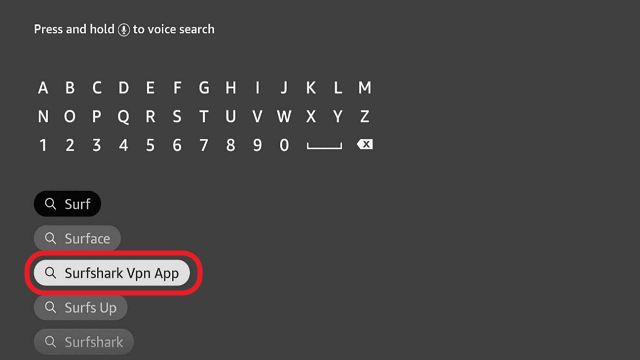
3. Type in the keyword of SurfShark and select from the suggestions that will appear.
step 3 Install Surfshark VPN on Firestick


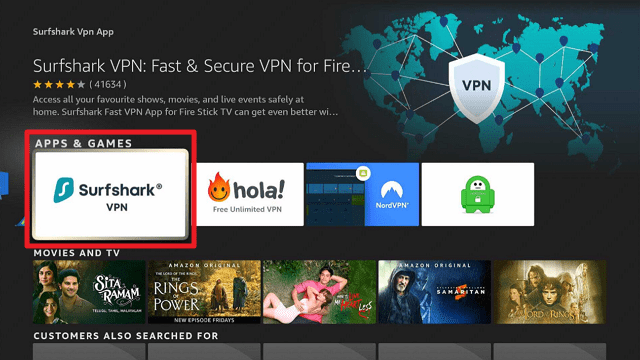
4. Click the official SurfShark icon from your search results.
step 4 Install Surfshark VPN on Firestick


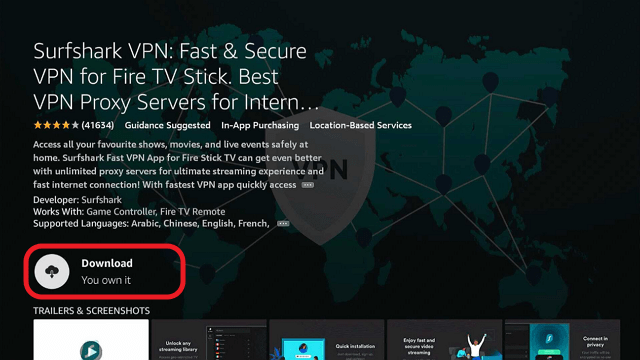
5. Press the Download (You own it) button.
step 5 Install Surfshark VPN on Firestick


6. The SurfShark VPN installer will download on your device.
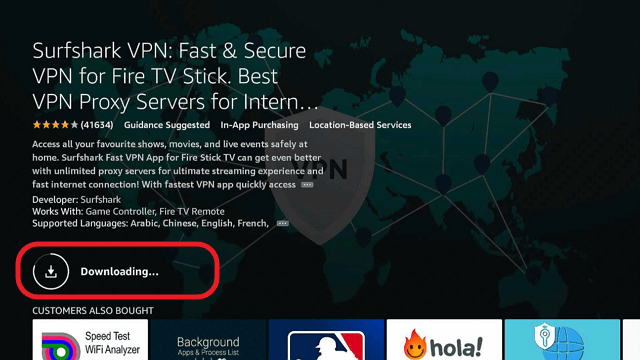
step 6 Install Surfshark VPN on Firestick


7. SurfShark VPN’s app will automatically install itself on your Fire TV stick.
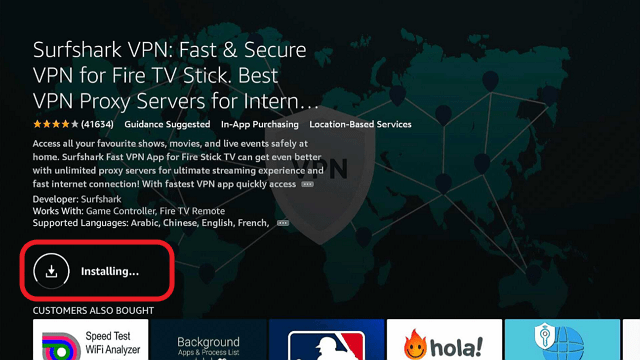
step 7 Install Surfshark VPN on Firestick


8. Press the Open button after completing SurfShark VPN’s installation process.
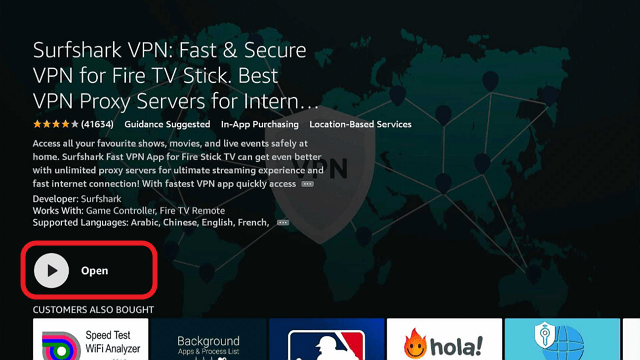
step 8 Install Surfshark VPN on Firestick


9. Please wait for the SurfShark VPN to load its user interface.
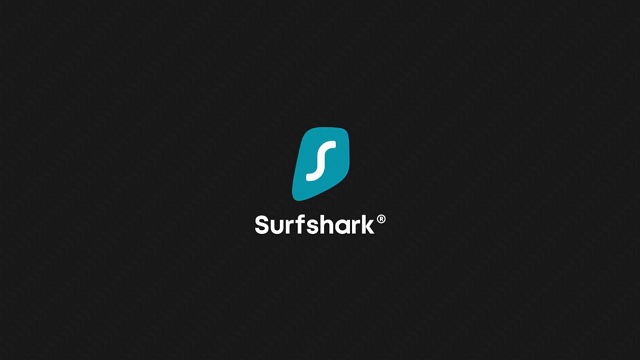
step 9 Install Surfshark VPN on Firestick


10. You can now log in with your SurfShark VPN account credentials.
step 10 Install Surfshark VPN on Firestick

Learn more about Surfshark and Grab the Best Surfshark Deal Now!


Install Surfshark on Firestick
Best Surfshark Deal


Other VPNs to Consider

NordVPN (Best for Streaming)

Best Features

  • 5000+ Server in 50+ Countries 
  • Military-Grade Encryption
  • Fast Connection Speed
  • Suitable to a lot of devices
  • No-Log Policy

Prices
  • Complete $5.89 per month (64% Discount)
  • Plus $4.59 per month (56% Discount)
  • Standard $3.69 per month (55% Discount)

Best Features

  • 750+ High-speed VPN Servers in 43 Locations
  • Military-Grade Encryption
  • Fastest HD Streaming and Gaming
  • 30-Day Money-Back Guarantee
  • Unlimited Data & Devices
  • No-Log Policy

Prices
  • 3 Years $1.99 per month (82% Discount)
  • 1 Years $3.29 per month (70% Discount)
  • 1 Month $10.99 per month

IPVanish VPN (Most Secure)

Best Features

  • 1200+ Servers in 60+ Countries around the world
  • Unlimited Connections
  • No-Log Policy
  • Top Notch Military-Grade VPN Protocols and Encryptions
  • 100% Safe and Secured
  • Most Trusted VPN
  • Best VPN for Firestick
  • 30-Day Money-Back Guarantee

Prices
  • Yearly $3.99 per month (63% Discount) – 30 days risk free + Ransomware & Malware Protection
  • Quarterly $5.32 per month (51% Discount)
  • Monthly $10.99 per month


For more VPN discounts, go to ReviewVPN Deals and purchase the best VPN for you.

Click here to get the lowest price on Surfshark through our exclusive limited-time offer.


Conclusion

Galaxy Kodi Video Add-on is a very useful add-on in terms of the content that it has to offer. It provides a great number of high-quality streaming links that you can enjoy. It is also a good choice because the easy user interface that it has will be very helpful in searching for the content that you wish to see. Although there are more updated add-ons compared to the Galaxy add-on, this one has endured and is still highly functional compared to the old and ancient ones. We hope that this guide enlightens you and helps you with your Kodi experience. Questions and queries are highly entertained so please do not be afraid to ask or suggest a comment here on our website and our other social media platforms. Thank you and have a great day ahead!

Install Fractured Kodi Addon

Fractured Kodi Video Addon

In this article, we will help you install Fractured Kodi Addon on Firestick.


Source: http://insanity-builds.tk/fracturedrepo/

There may be well around 100 add-ons out there on the web to search for, but you don’t have any idea where to start let alone know which are the best ones. Some users prefer a very simple list while others who are more detail-oriented prefer a long list. It will always depend upon the user on which add-on is the perfect fit for him/her. If you are a very detailed person and search content based on a lot of factors this may well be the perfect fit for you. We introduce to you Fractured Kodi Video Add-on.

Fractured comes from the Repository under the same name. It offers pretty decent Movies and Tv Shows with a broad category to choose from. It also provides boxset collections that bundles of movies that have prequels or sequels which makes it convenient if you are on a movie marathon.


ANONYMOUSLY

Features

        TMDB Movies and TV Shows

  •   Popular Movies, Movies, Top Rated Movies, Movie Genres, Boxset Collection, Horror Boxset Collection, Kid and Family Boxset Collection, Movie Years, Actors, Actresses, Directors, Productions, Movie Calendars, Popular TV Shows, Top Rated TV Shows, TV Shows Airing Todays, TV Shows on the air in the next 7 days, TV Shows Genre, TV Show Networks, Search TMDB

        Trakt Movies and TV Shows

  •   Trending Movies, Popular Movies, Various Movie Lists, B-Movie Lists, 1001 Movies You Must See Before You Die, Actors, Actresses, Decades 1910s to 2010s, TV Shows Calendar, Trending TV Shows, Popular TV Shows, TV Networks, TV Shows List, Decades 1960s to 2010s, Search Trakt

        Real-Debrid Movies

  •   New Released Movies, Movies of all Genres and Years

        Fanatics

  •   A section that is devoted to Movie Fans of Star Wars and Harry Potter. Also has a subcategory for Stoner Movies, Forgotten Movies, CBS Radio Mystery Theater, Black and White Movies, Creative Feature, and The Duke

        Watch Your TV

        Assorted Youtube Playlists

        Moviefone Trailers

        Search Moviefone Trailers

        Live TV

        Fractured Music

        Kids

        Documentaries

        24/7

        Newscasts by State

        Just For Kicks


YOUR INTERNET ACTIVITY IS BEING WATCHED

ReviewVPN cannot attest to the legality, security and privacy of the applications discussed on this site. It is highly recommended that you use a VPN service while streaming or using Kodi.

Currently, your IP 216.73.217.150 is visible to everyone and your Browser is being tracked by Advertisers & ISP Provider.

Save 65% Now

Limited Time Offer

Here are the main reasons why you must use a VPN:

  • Your activities are hidden from your ISP, the government, and from the apps you are using.
  • You can access additional movies and TV streams.
  • ISP attempts to throttle are thrwarted thus reducing buffering issues.
  • Geographically restricted content like Netflix and Hulu can be unblocked.

A VPN works be replacing your ISP-assigned IP address and creating an encrypted tunnel. We recommend the no log service offered by IPVanish. It works well on a Firestick and offers the fastest possible speeds.

Special Limited Time Offer - Get IPVanish


Legal Disclaimer: ReviewVPN.com does not encourage or endorse any illegal activity involved in the usage of services and applications referenced on this site. We do not verify the licensing agreements of services. The end-user is wholly responsible for ensuring that any media accessed through these services does not violate copyright and/or licensing laws. ReviewVPN does not promote, link to, or receive compensation from any Apps and IPTV services.


Install Surfshark on Firestick

Best Surfshark Deal


Installation Guide

  1. Launch Kodi on your device
  2. Open the “Gear Icon” and choose “System”
  3. Select the add-ons menu, turn on the “Unknown Sources” by clicking “Yes”
  4. Go back to the “Systems” page and choose “File Manager”
  5. Choose Add source and select “None”
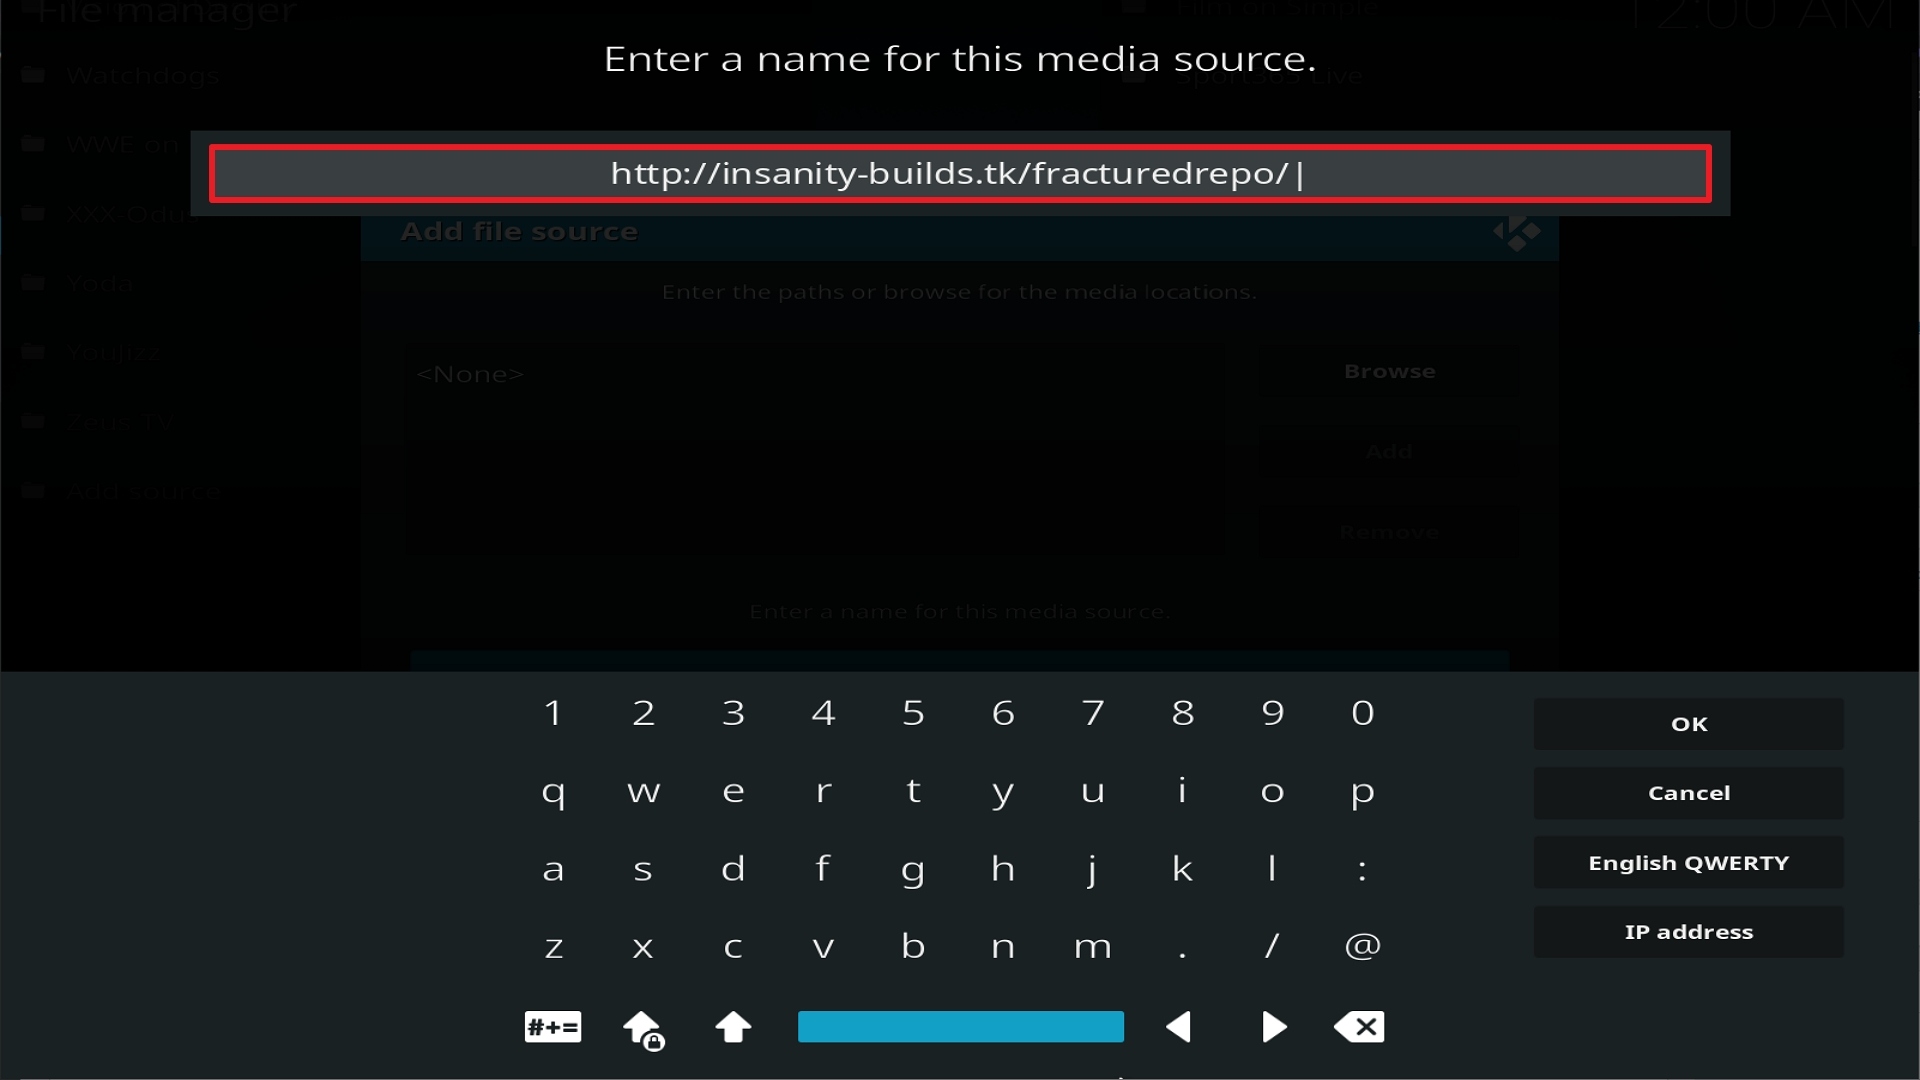
  6. Go to http://insanity-builds.tk/fracturedrepo/
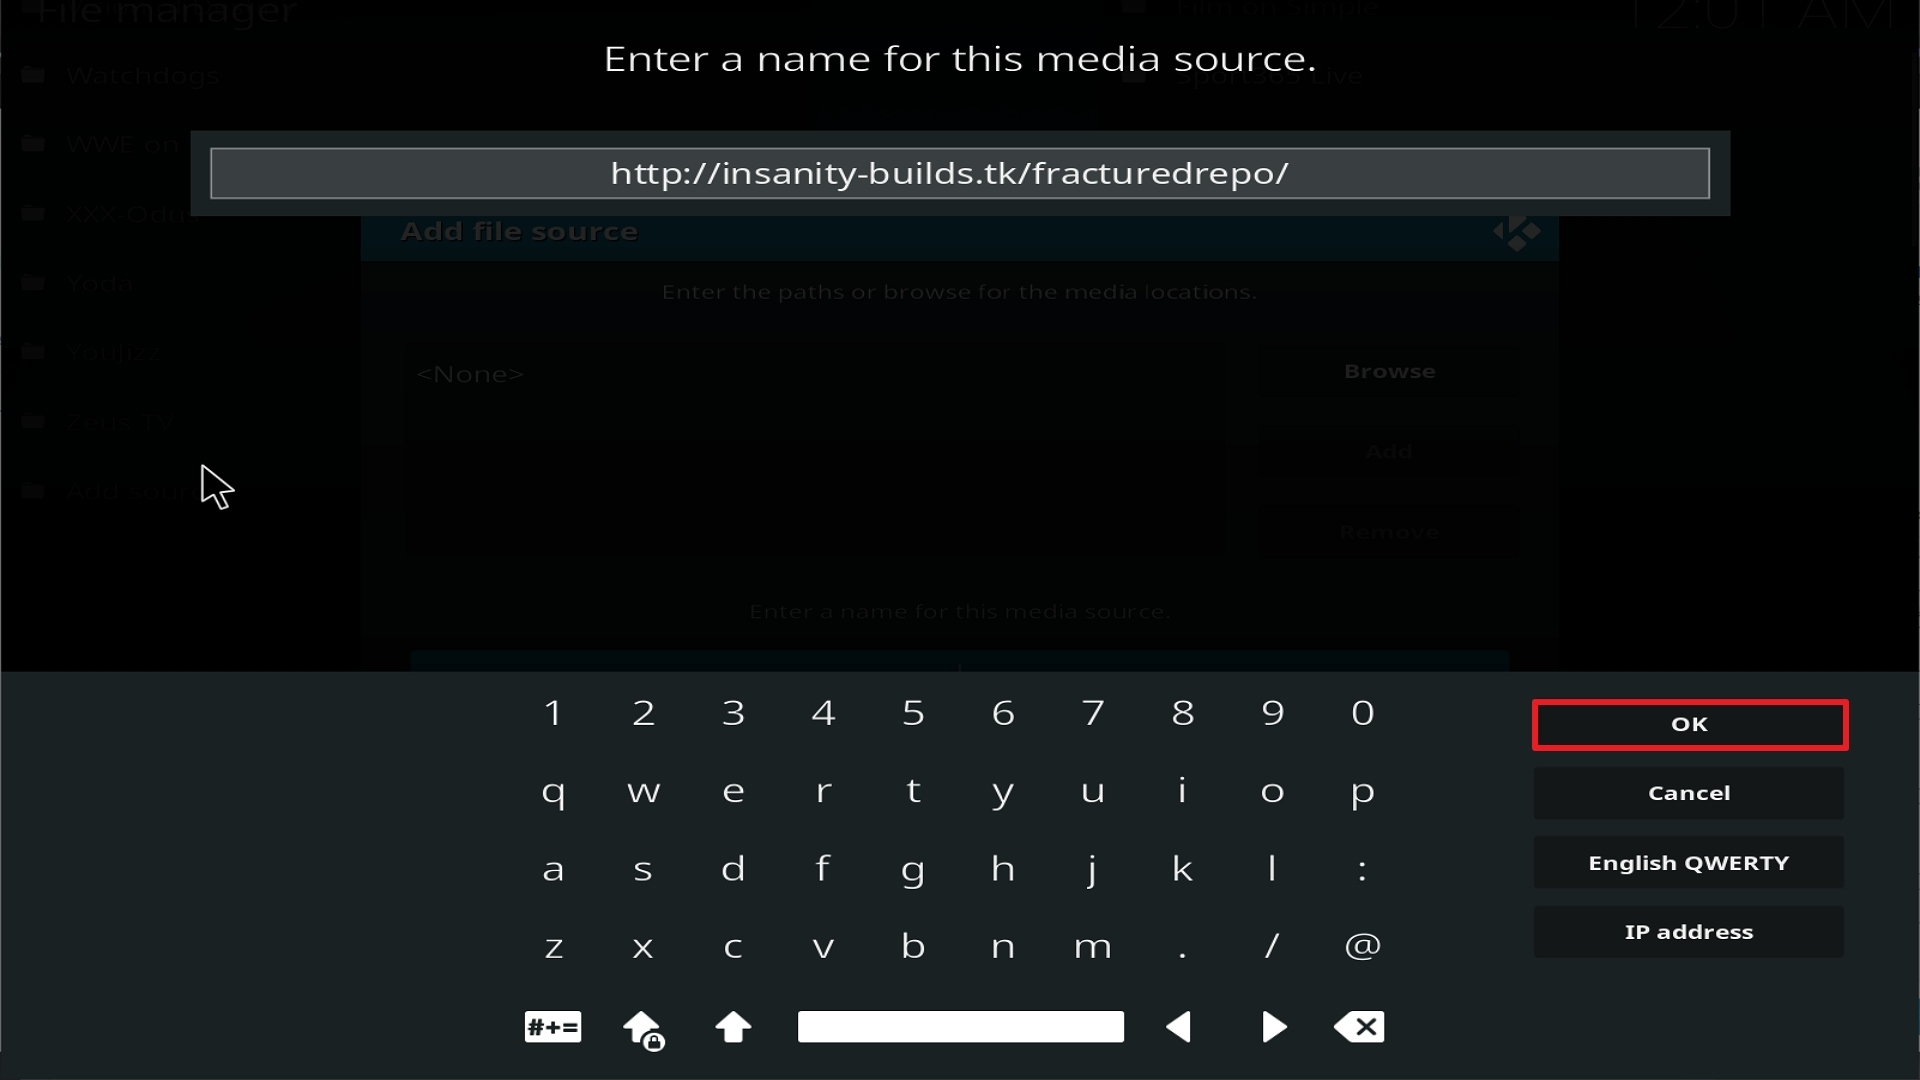
  7. Highlight the source and rename it to “Fractured Repo” or any name you would like to use to identify this particular source and click “Ok”
  8. Go back to the System Screen and click “Add-ons”
  9. Choose “Install Zip File” and choose “Fractured Repo” or whatever you renamed the file.
  10. Choose the zip file URLrepository.fracturedrepo-0.1.5.zip
  11. Wait for the notification “Fractured Add-on Repo Installed” to appear.
  12. Click on “Install Repository”
  13. Select “Fractured Repo”
  14. Open “Video Add-ons” and Choose “Fractured” and “Install”
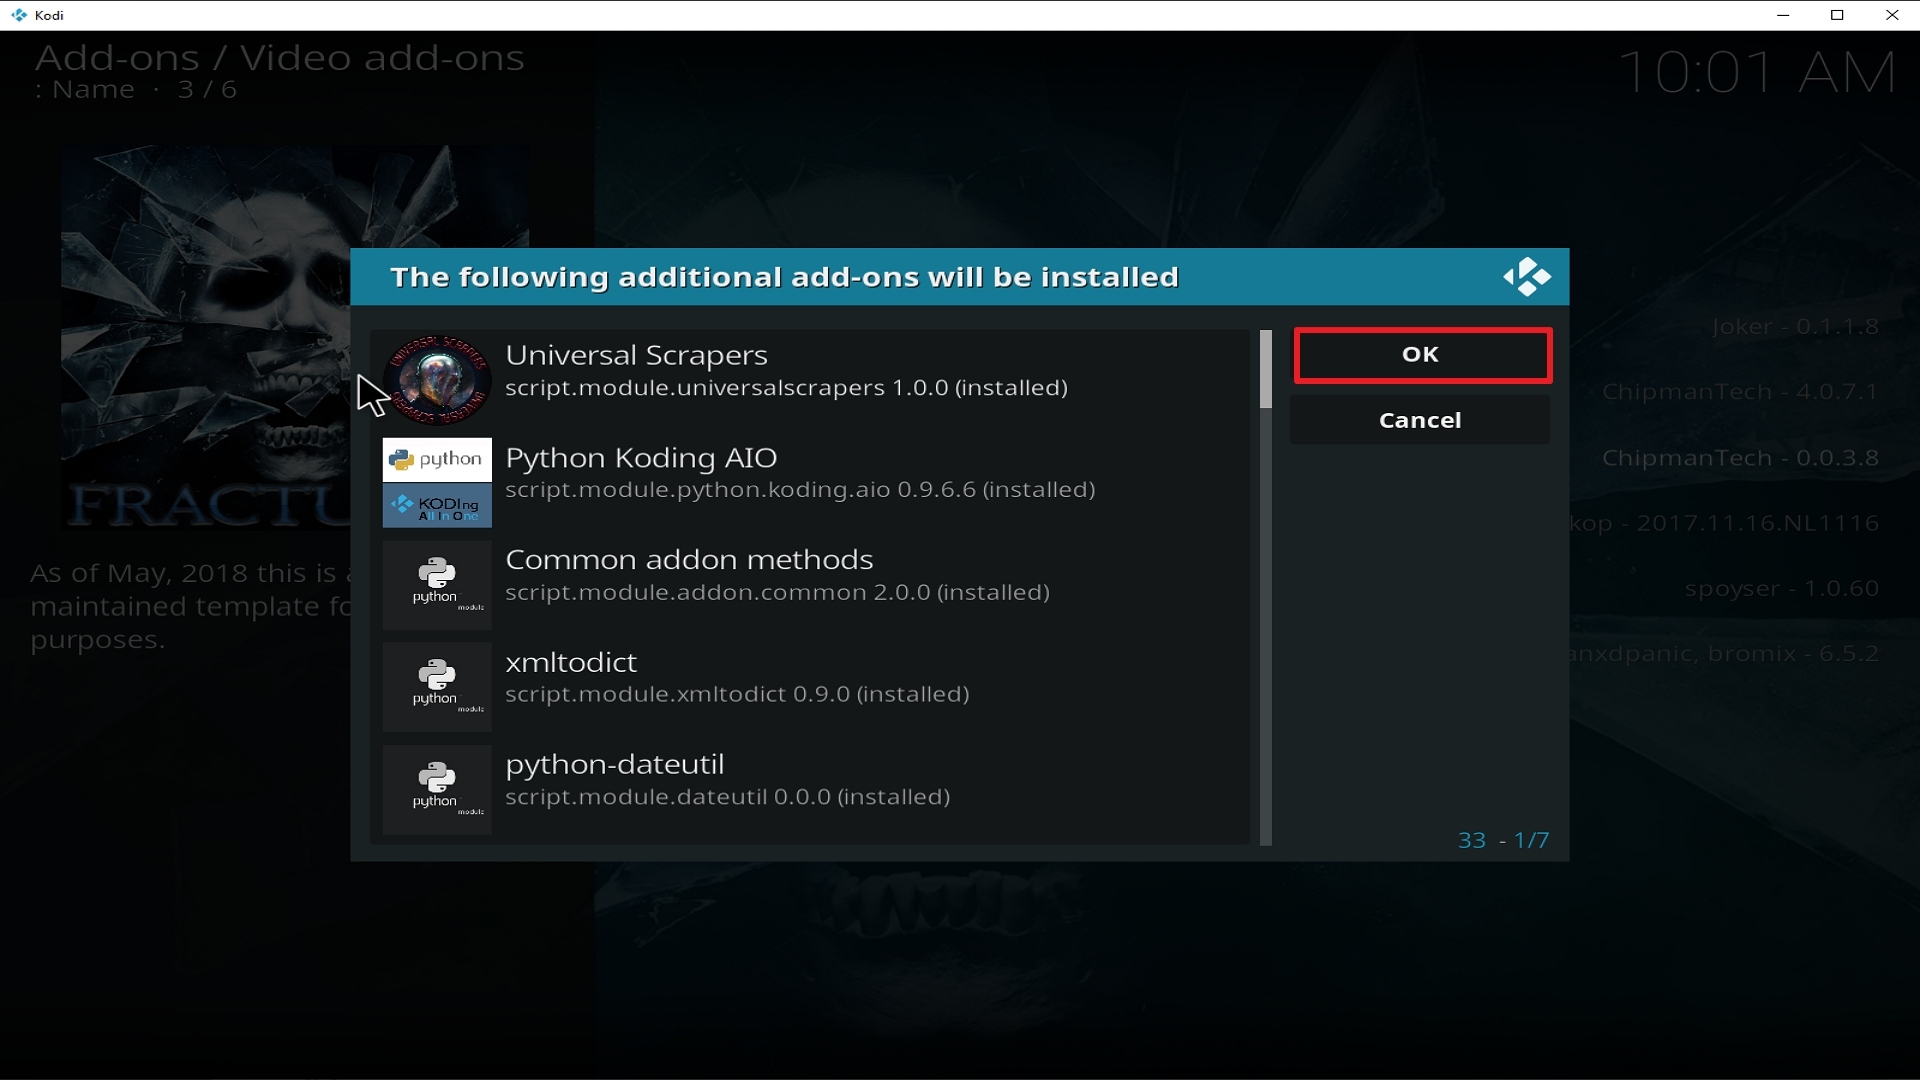
  15. Select “Ok” when a notification “the following add-ons will be installed” appears and wait for Fractured Add-on to install
  16. Once the add-on is installed go back to the home screen and select “Add-ons”
  17. Choose “Video add-ons” and select “Fractured”
  18. There you go, Fractured is now installed.


How to Install Fractured on Kodi with Screenshots

1. From the home screen, select the cogwheel at the upper left.

Step 1 Installing Fractured addon on Kodi


2. Select System in the bottom right corner.

Step 2 Installing Fractured addon on Kodi


3. Select Add-ons on the left side of the screen.

Step 3 Installing Fractured addon on Kodi


4. Select Unknown sources.

Step 4 Installing Fractured addon on Kodi


5. Click Yes to allow unknown sources.

Step 5 Installing Fractured addon on Kodi


6. Select File manager.

Step 6 Installing Fractured on Kodi


7. Click Add source.

Step 7 Installing Fractured addon on Kodi


8. Click on <None>.

Step 8 Installing Fractured addon on Kodi


9. Type exactly: http://insanity-builds.tk/fracturedrepo/

Step 9 Installing Fractured addon on Kodi


10. Click on OK.

Step 10 Installing Fractured addon on Kodi


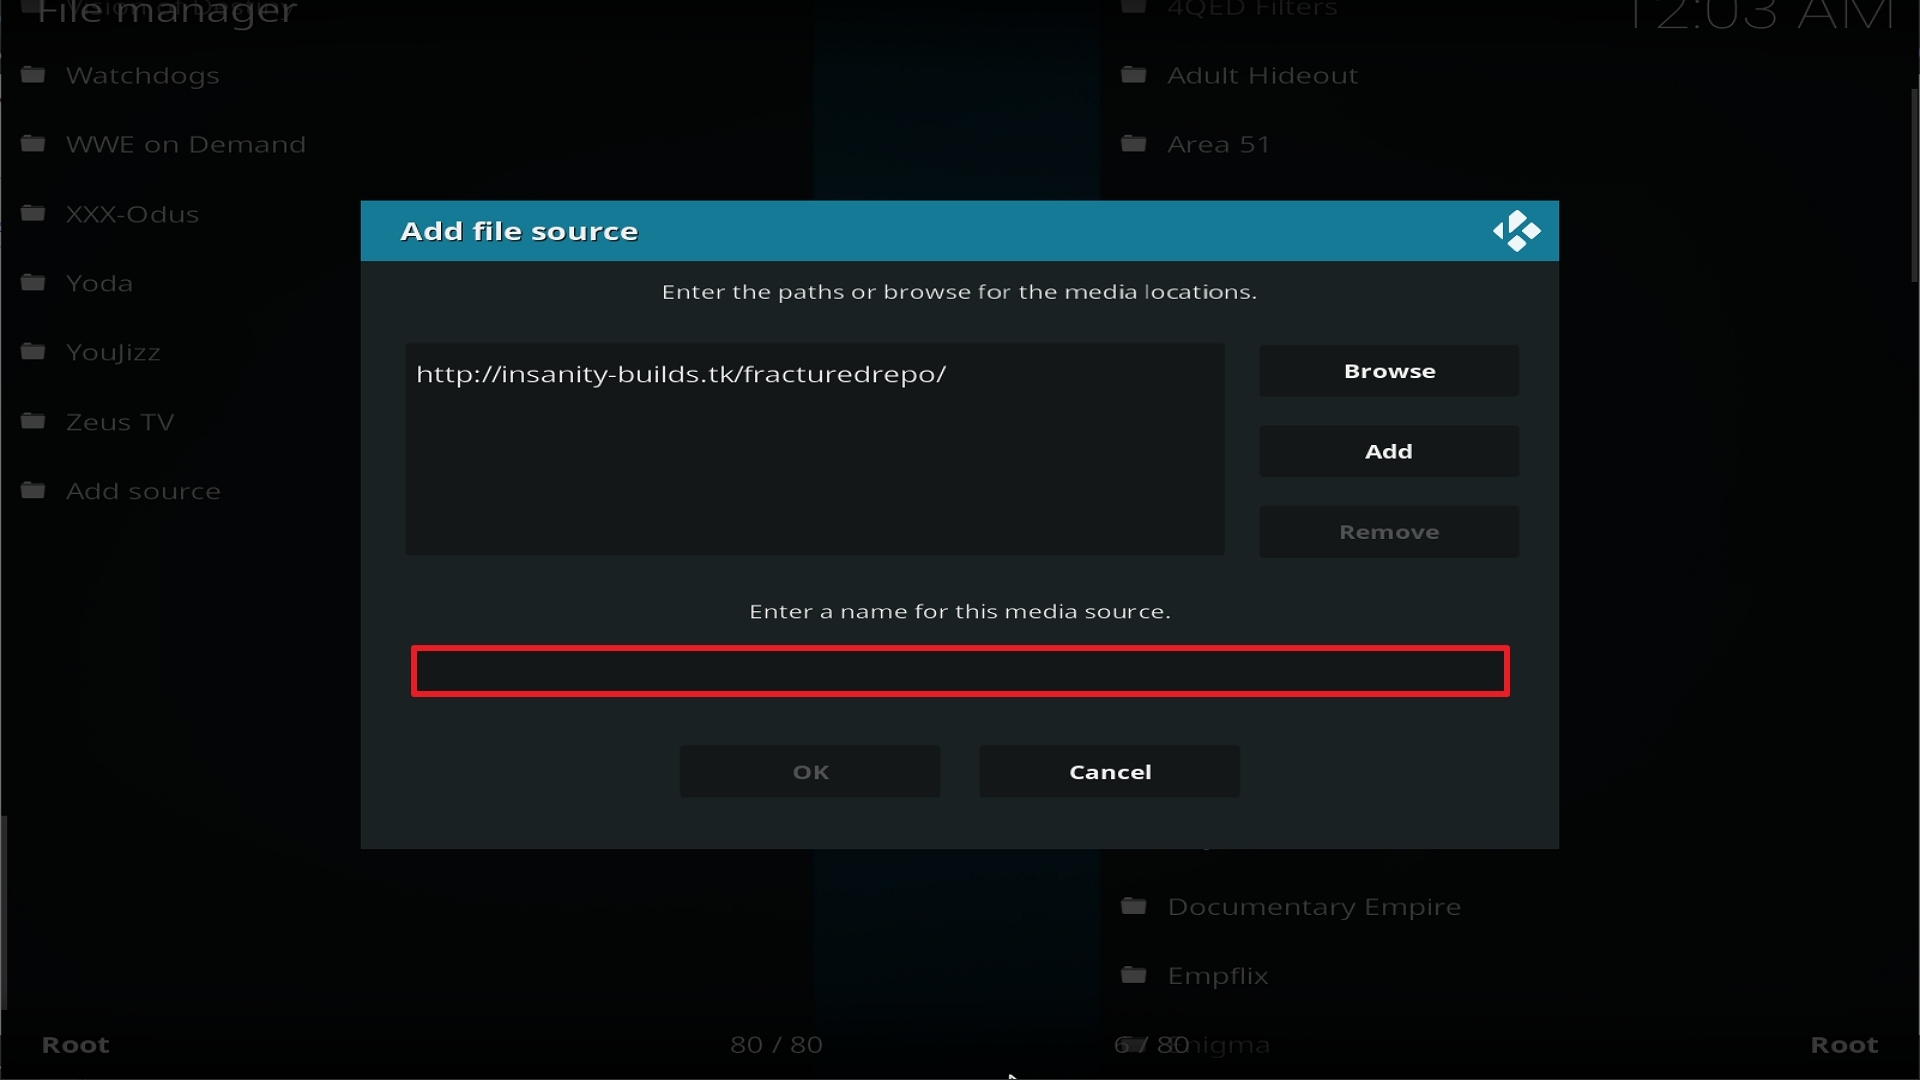
11. Select enter a name for this media source.

Step 11 Installing Fractured addon on Kodi


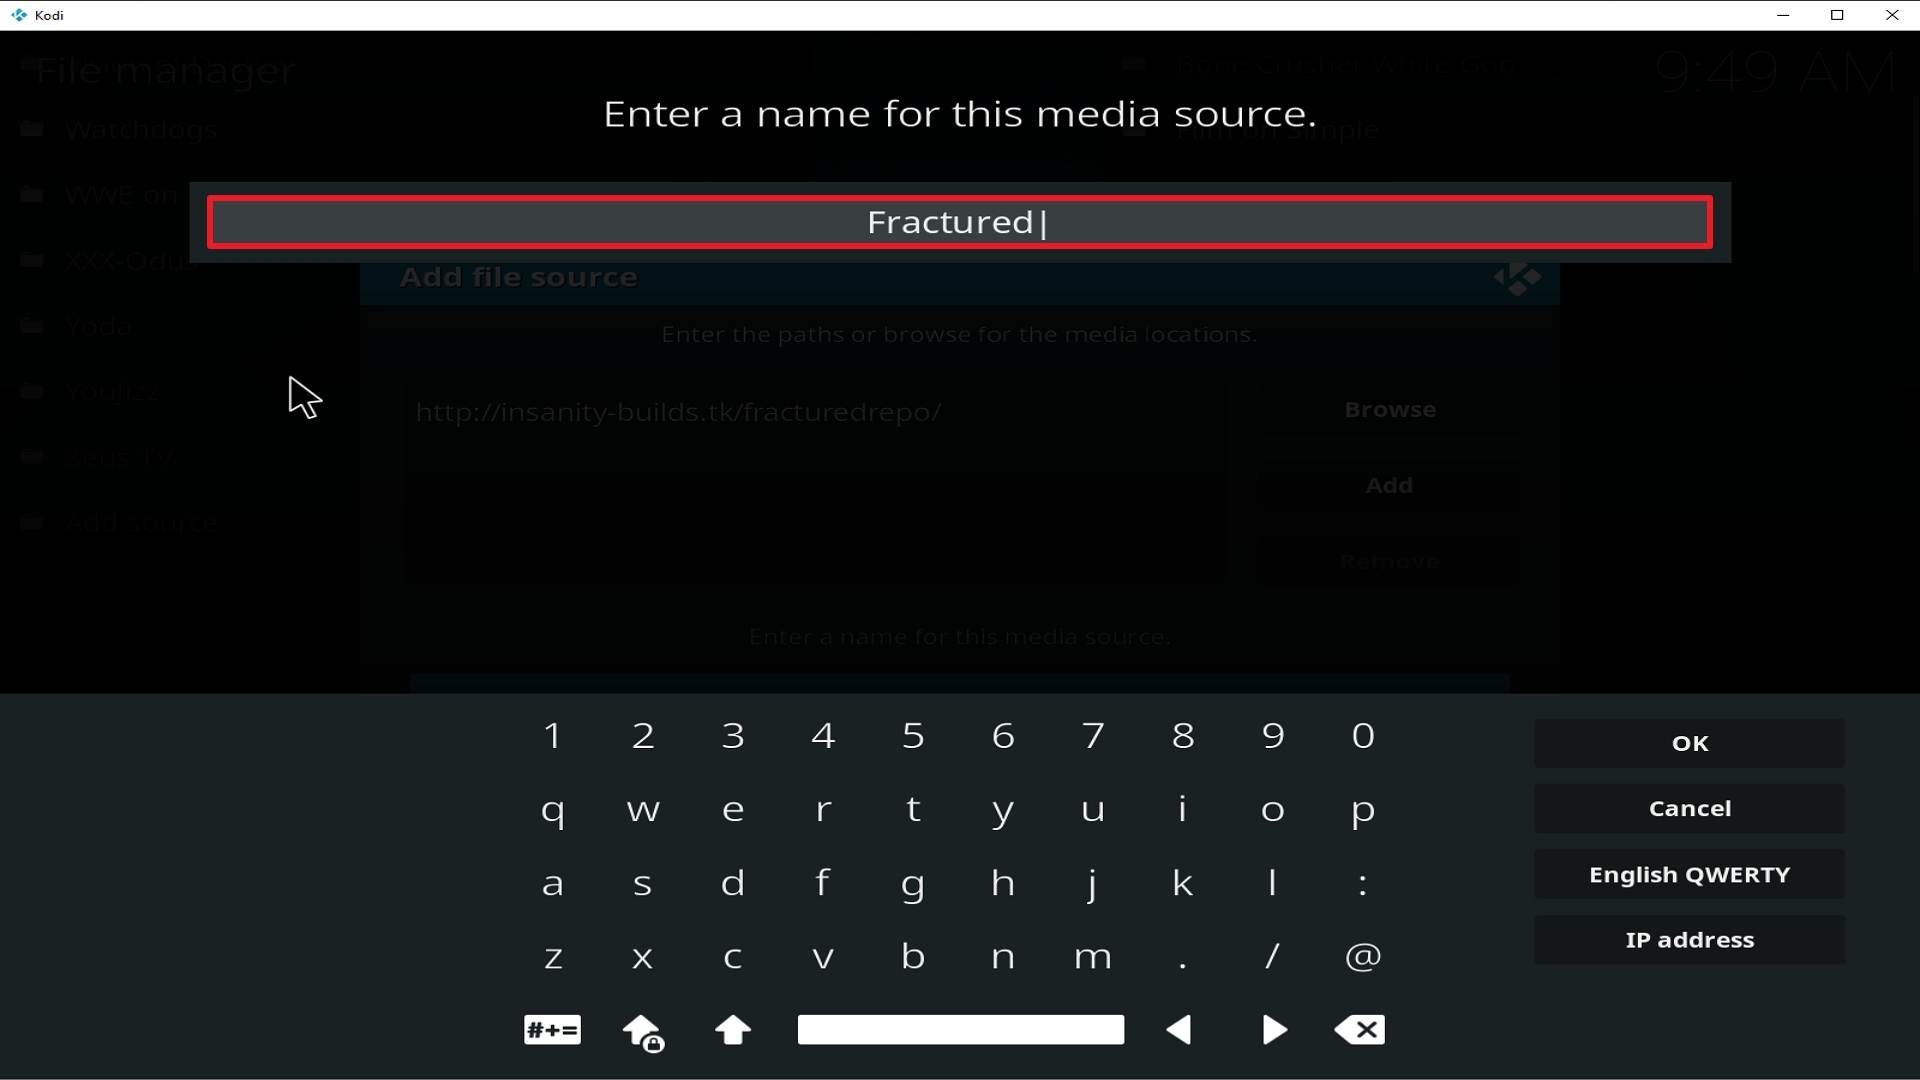
12. Name is Fractured (this part isn’t critical as long as you remember the name).

Step 12 Installing Fractured addon on Kodi


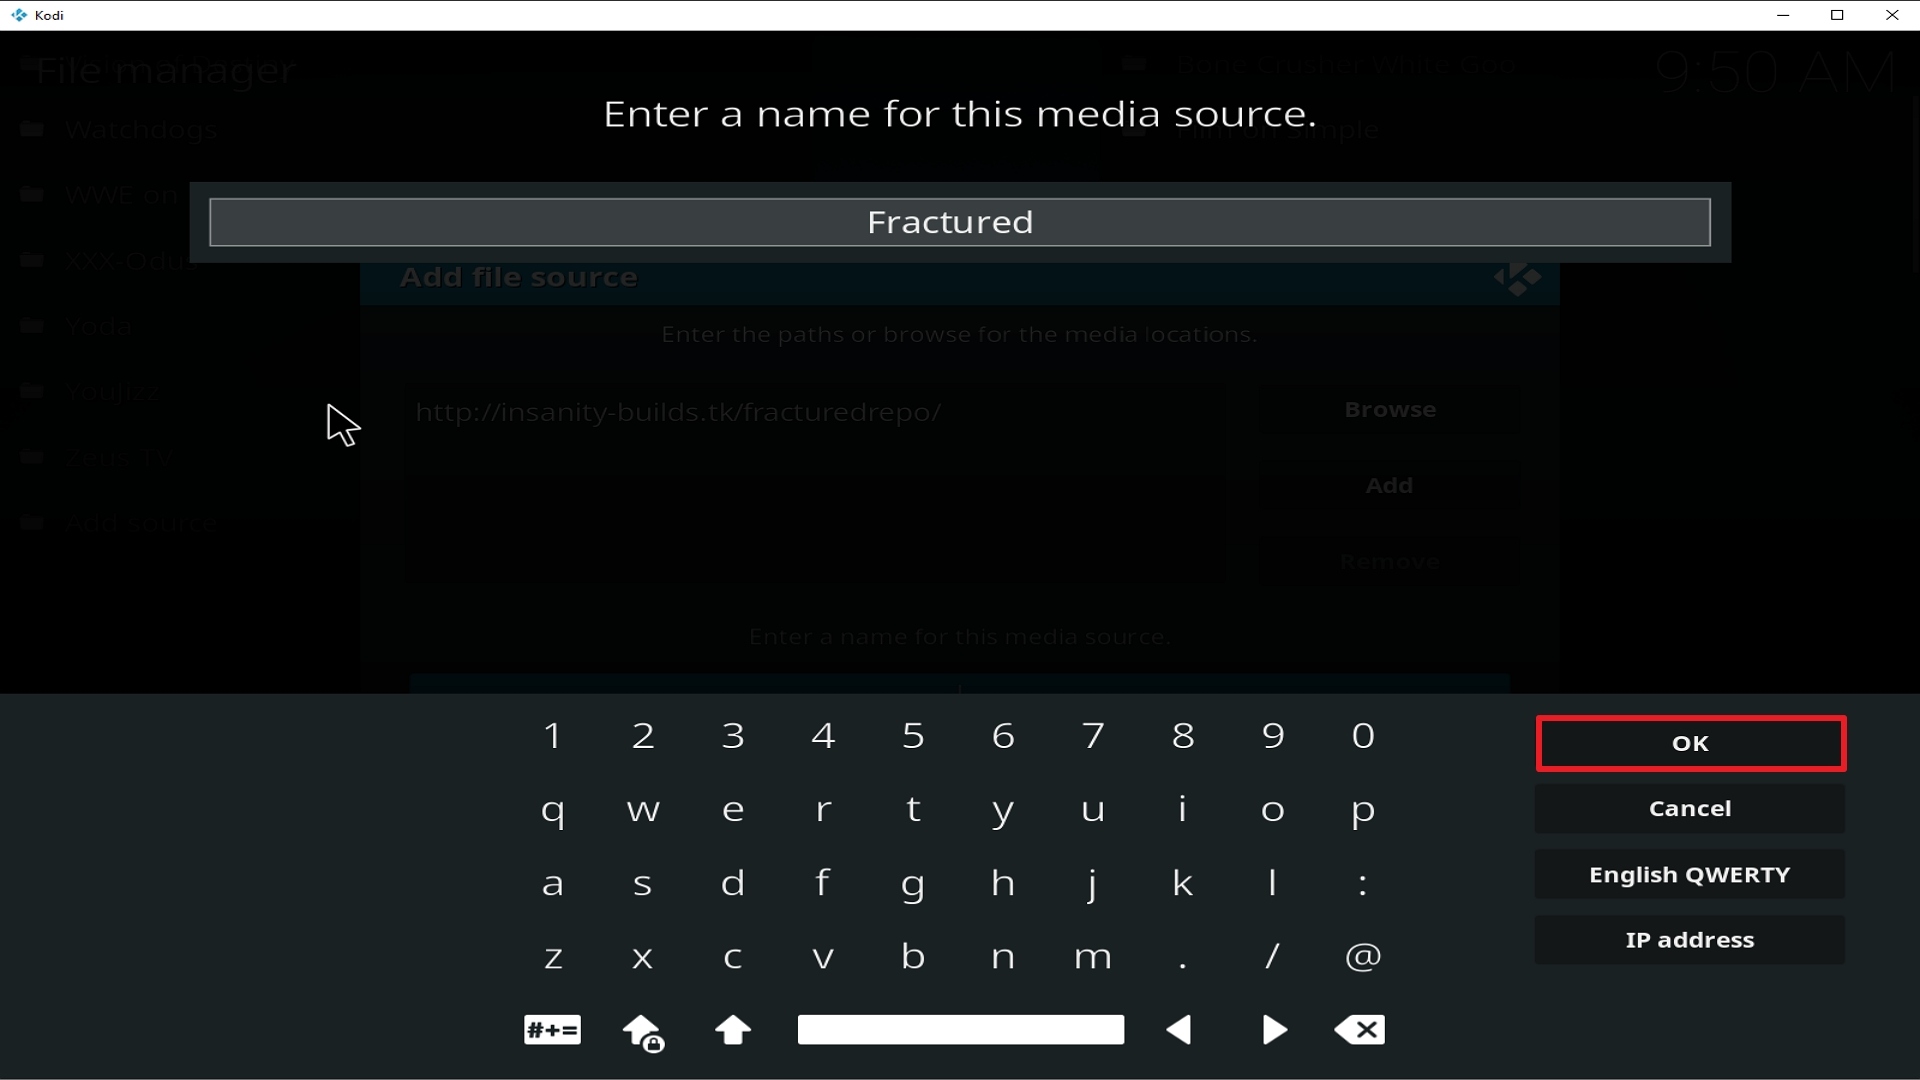
13. Click on OK.

Step 13 Installing Fractured addon on Kodi


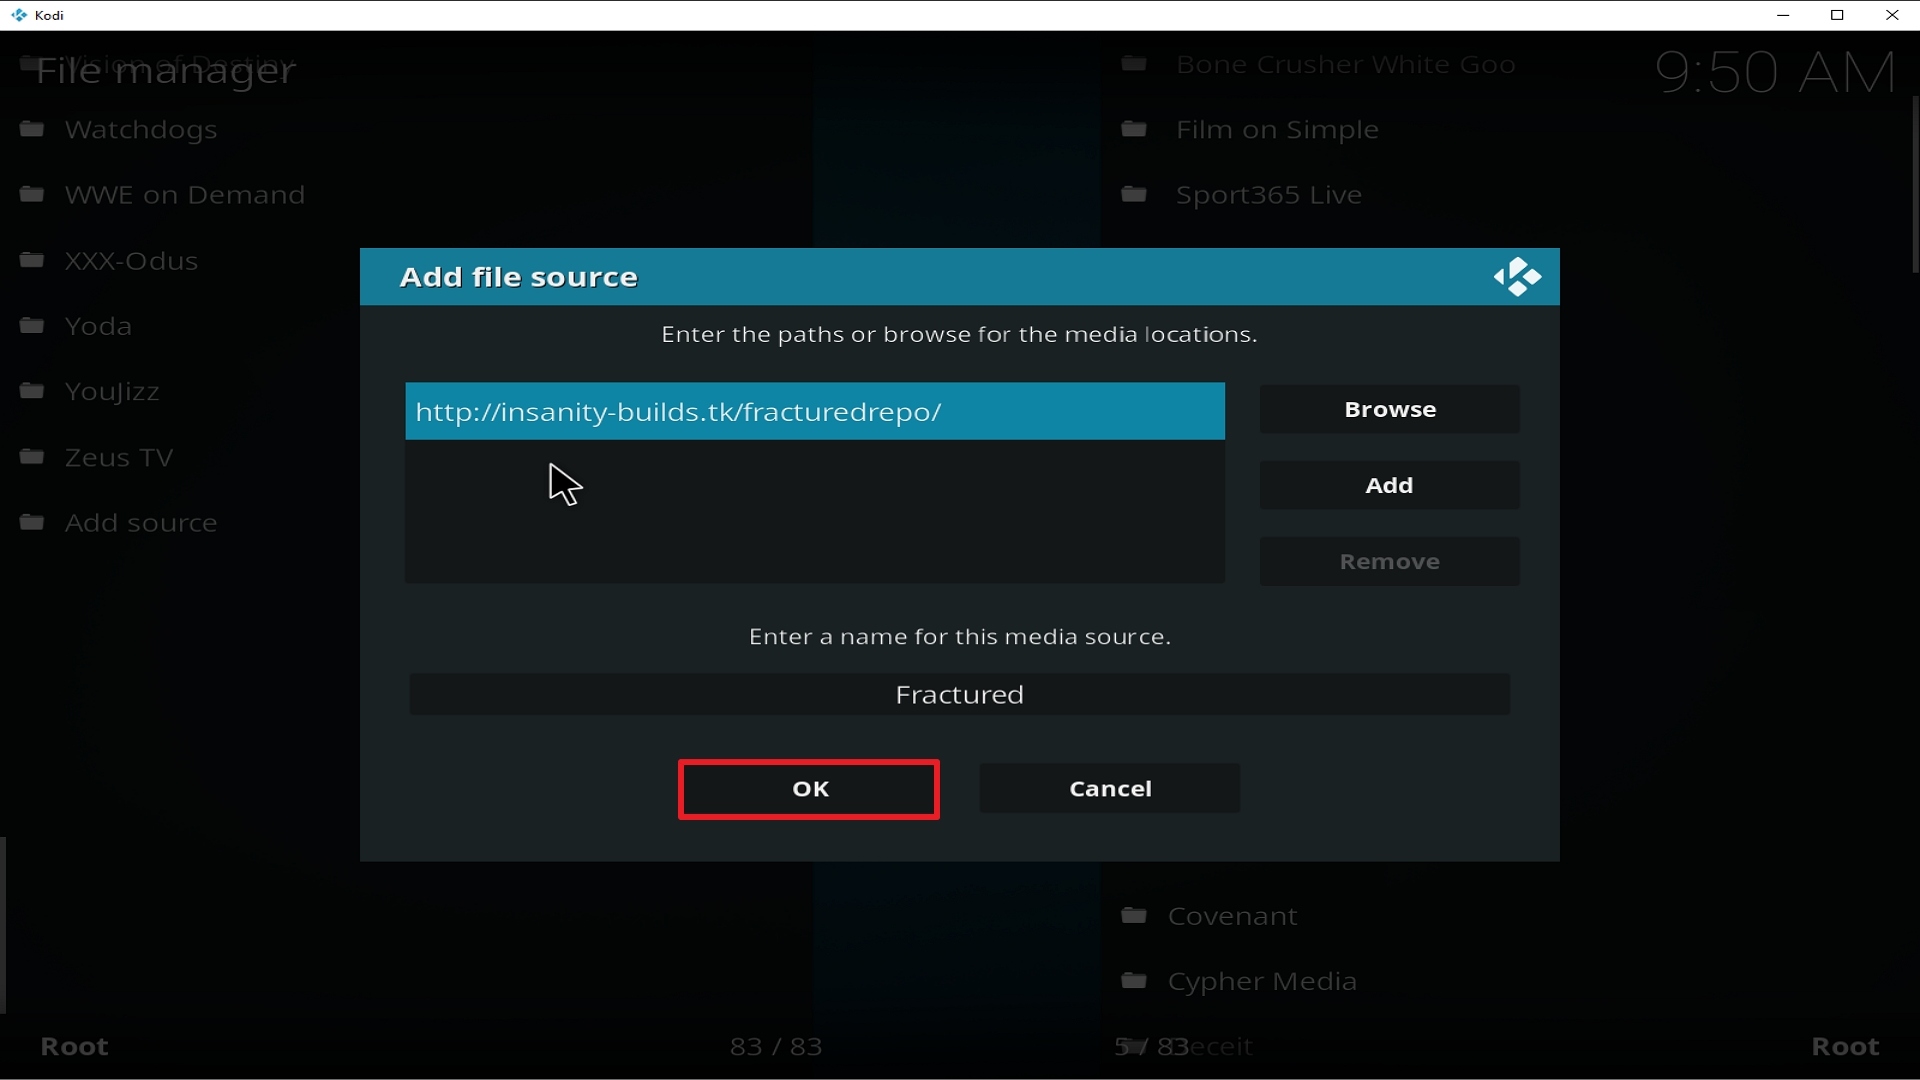
14. Click on OK.

Step 14 Installing Fractured addon on Kodi


15. Take one step back and click on Add-ons.

Step 15 Installing Fractured addon on Kodi


16. Select install from zip file.

Step 16 Installing Fractured addon on Kodi


17. Click on Fractured (or whatever you named the source).

Step 17 Installing Fractured addon on Kodi


18. Click on repository.fracturedrepo-0.1.3.zip

Step 18 Installing Fractured addon on Kodi


19. Select on Install from repository.

Step 19 Installing Fractured addon on Kodi


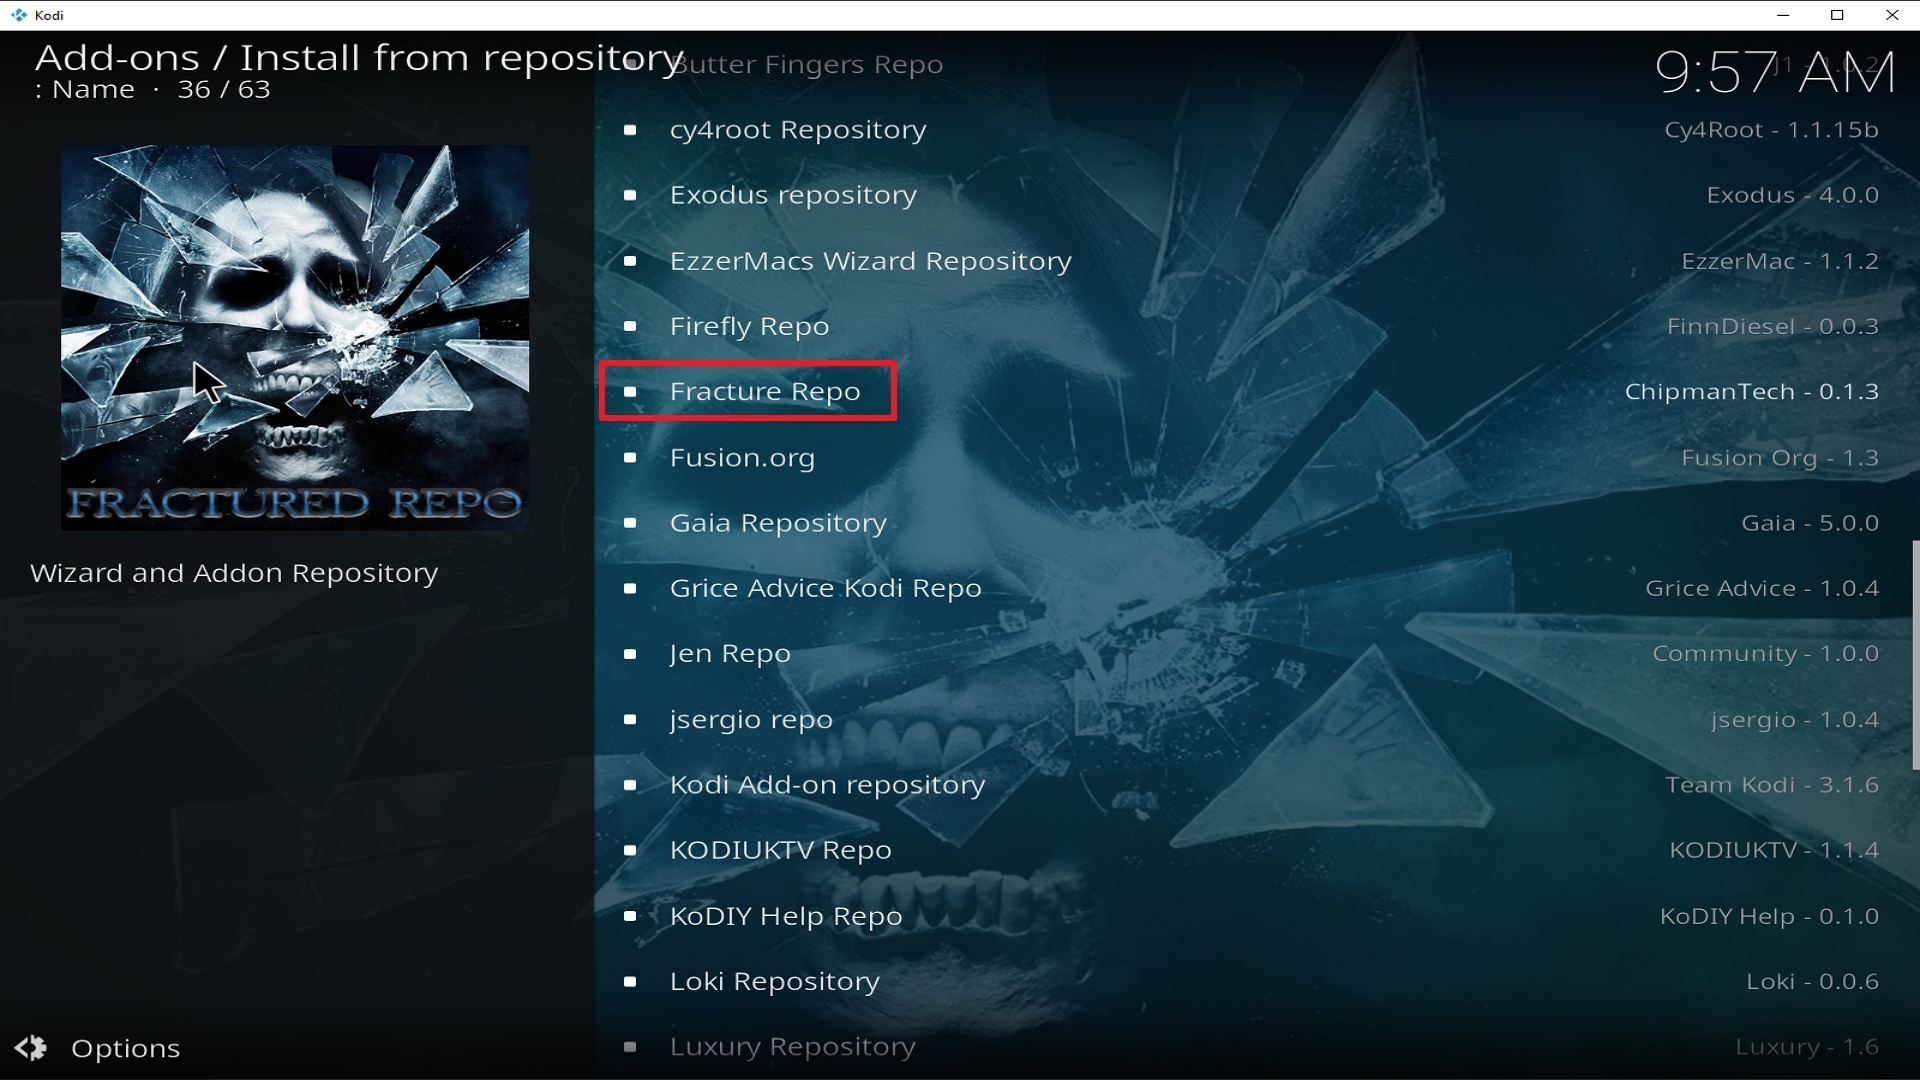
20. Click on Fracture Repo.

Step 20 Installing Fractured addon on Kodi


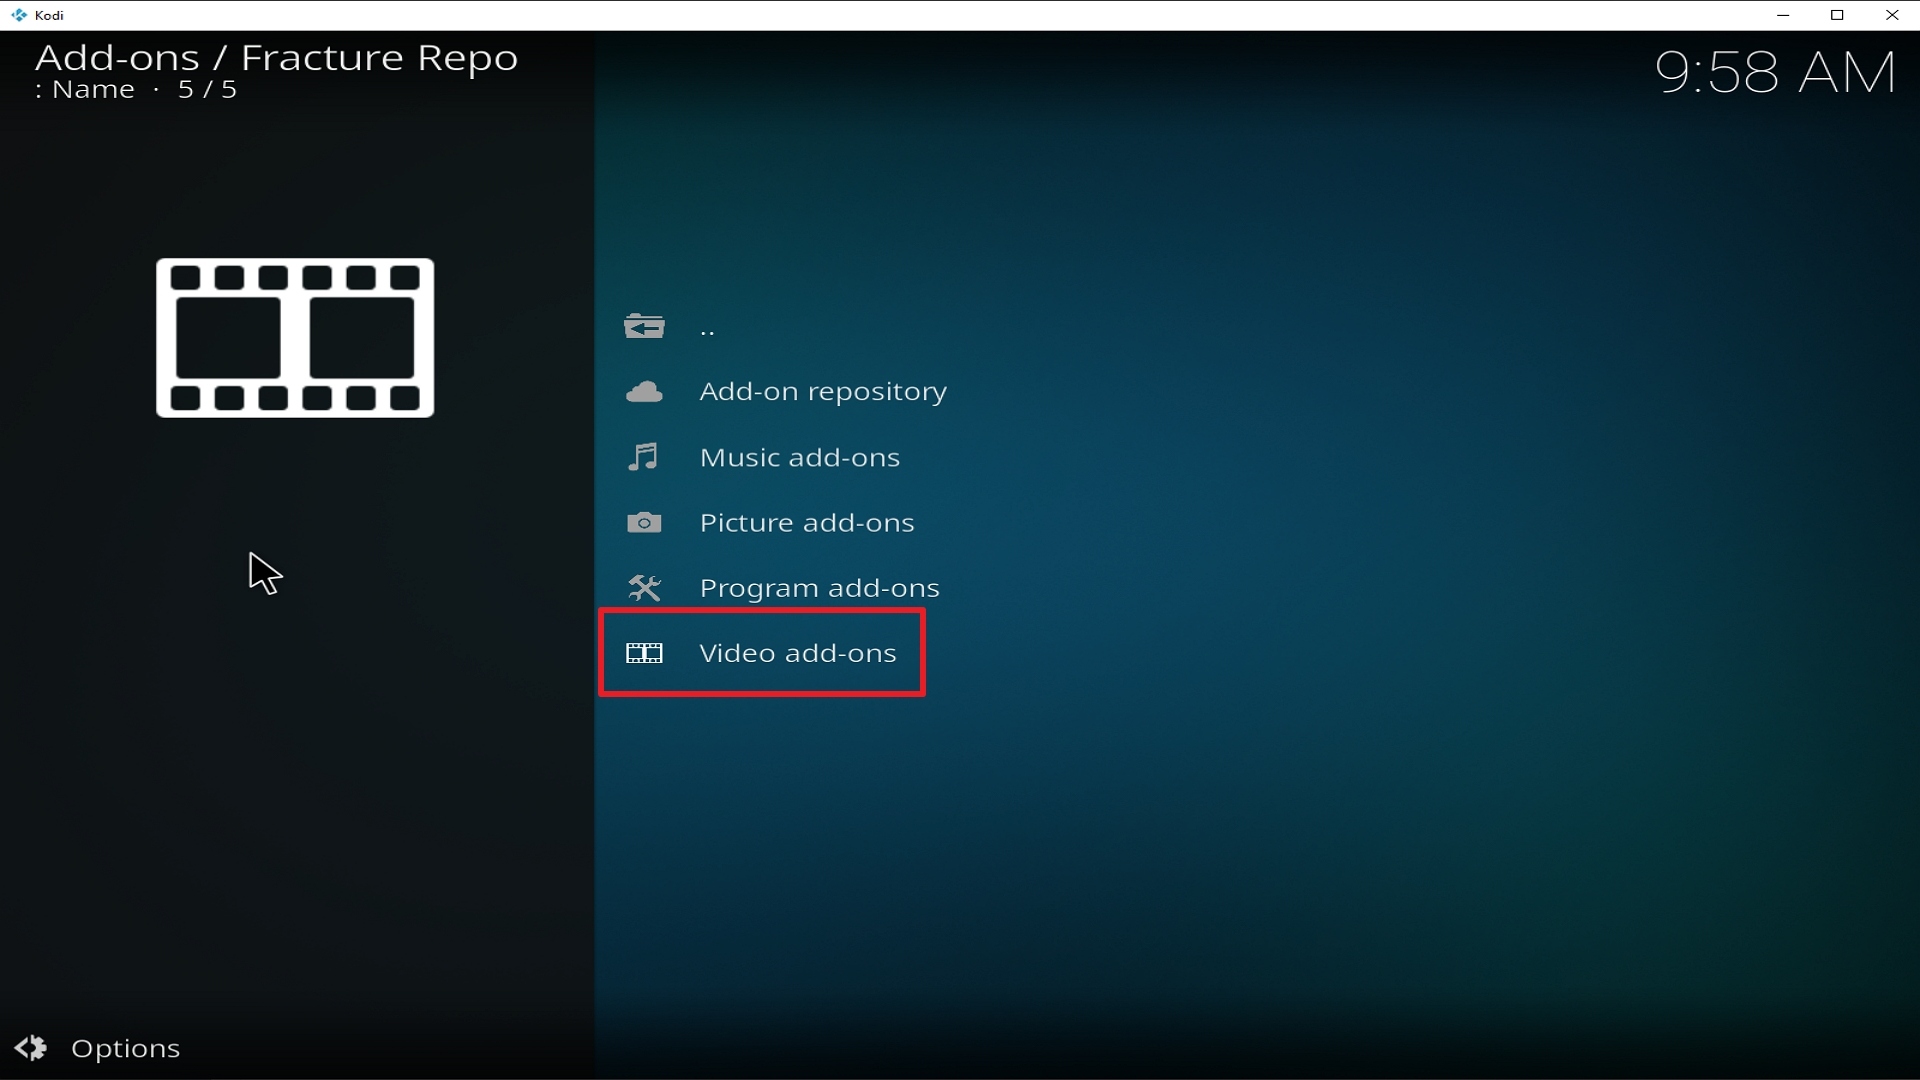
21. Pick Video add-ons.

Step 21 Installing Fractured addon on Kodi


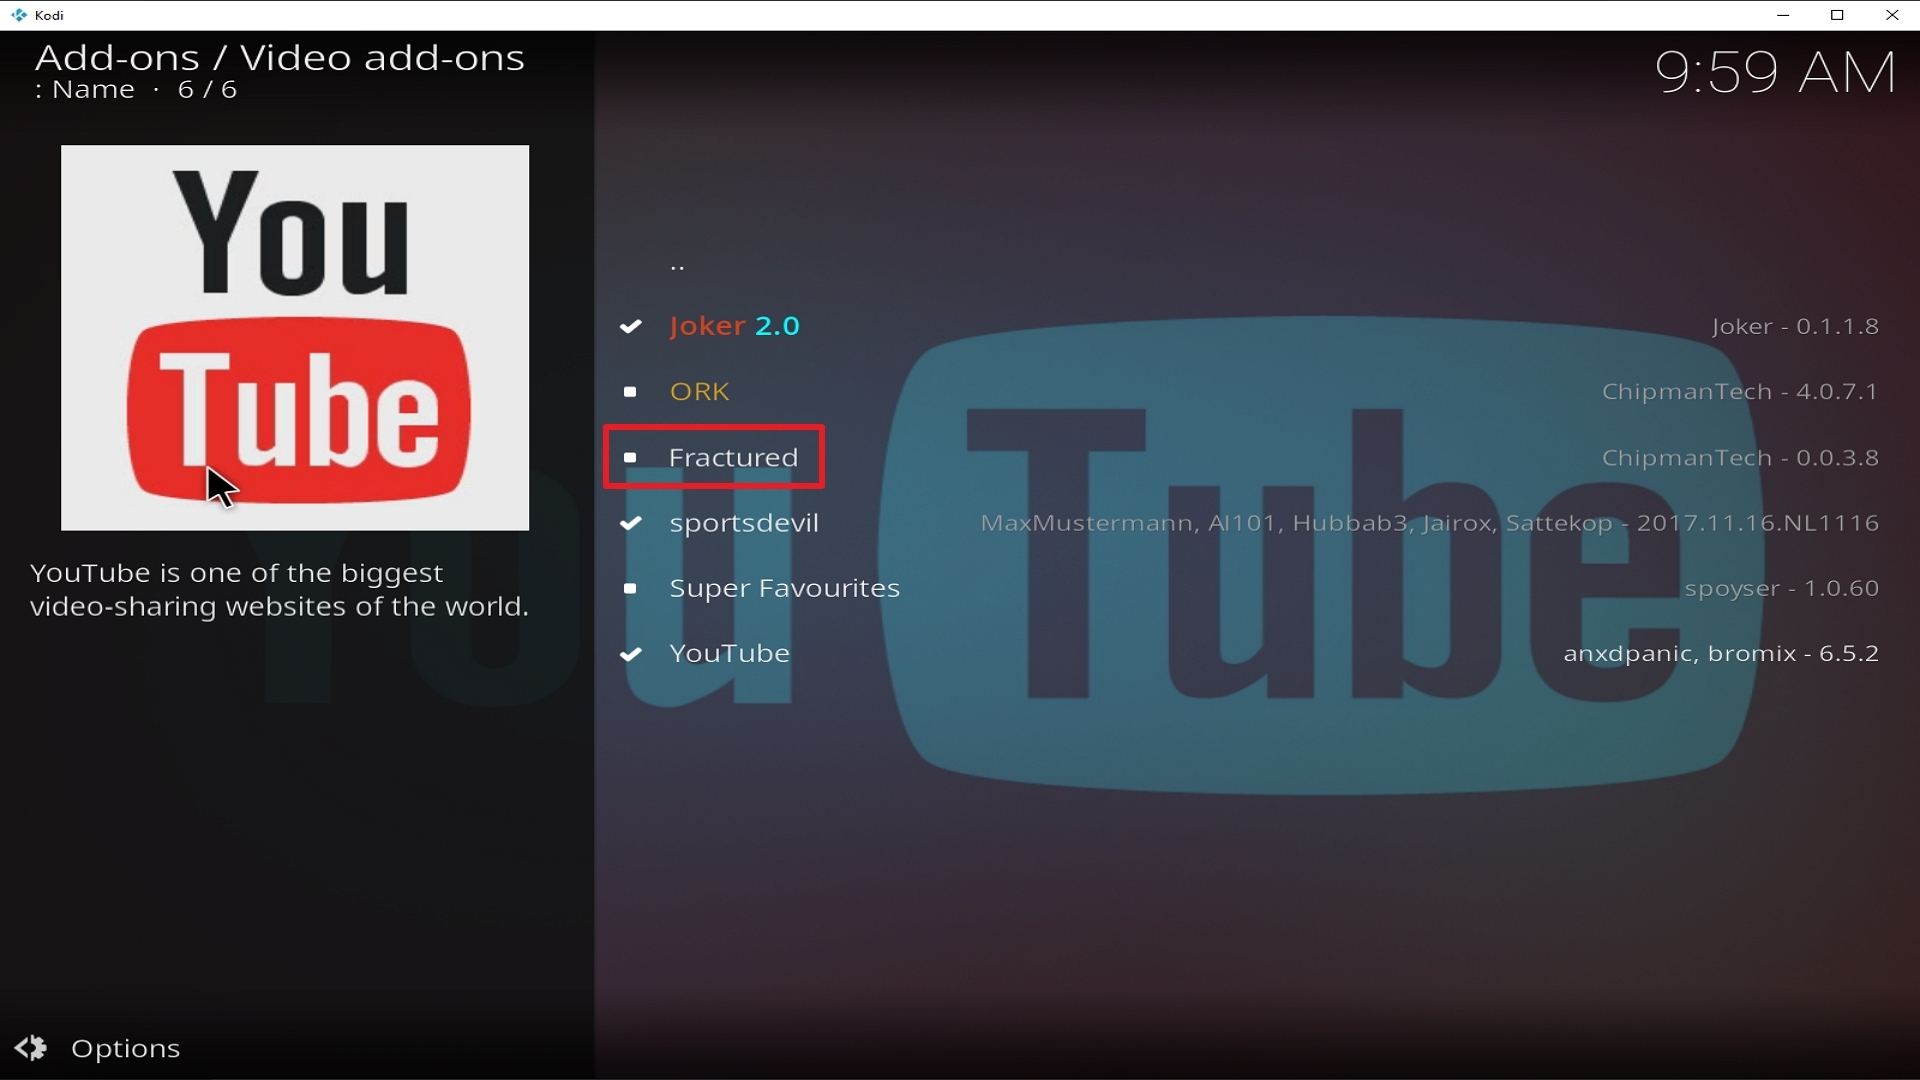
22. Select Fractured Video again.

Step 22 Installing Fractured addon on Kodi


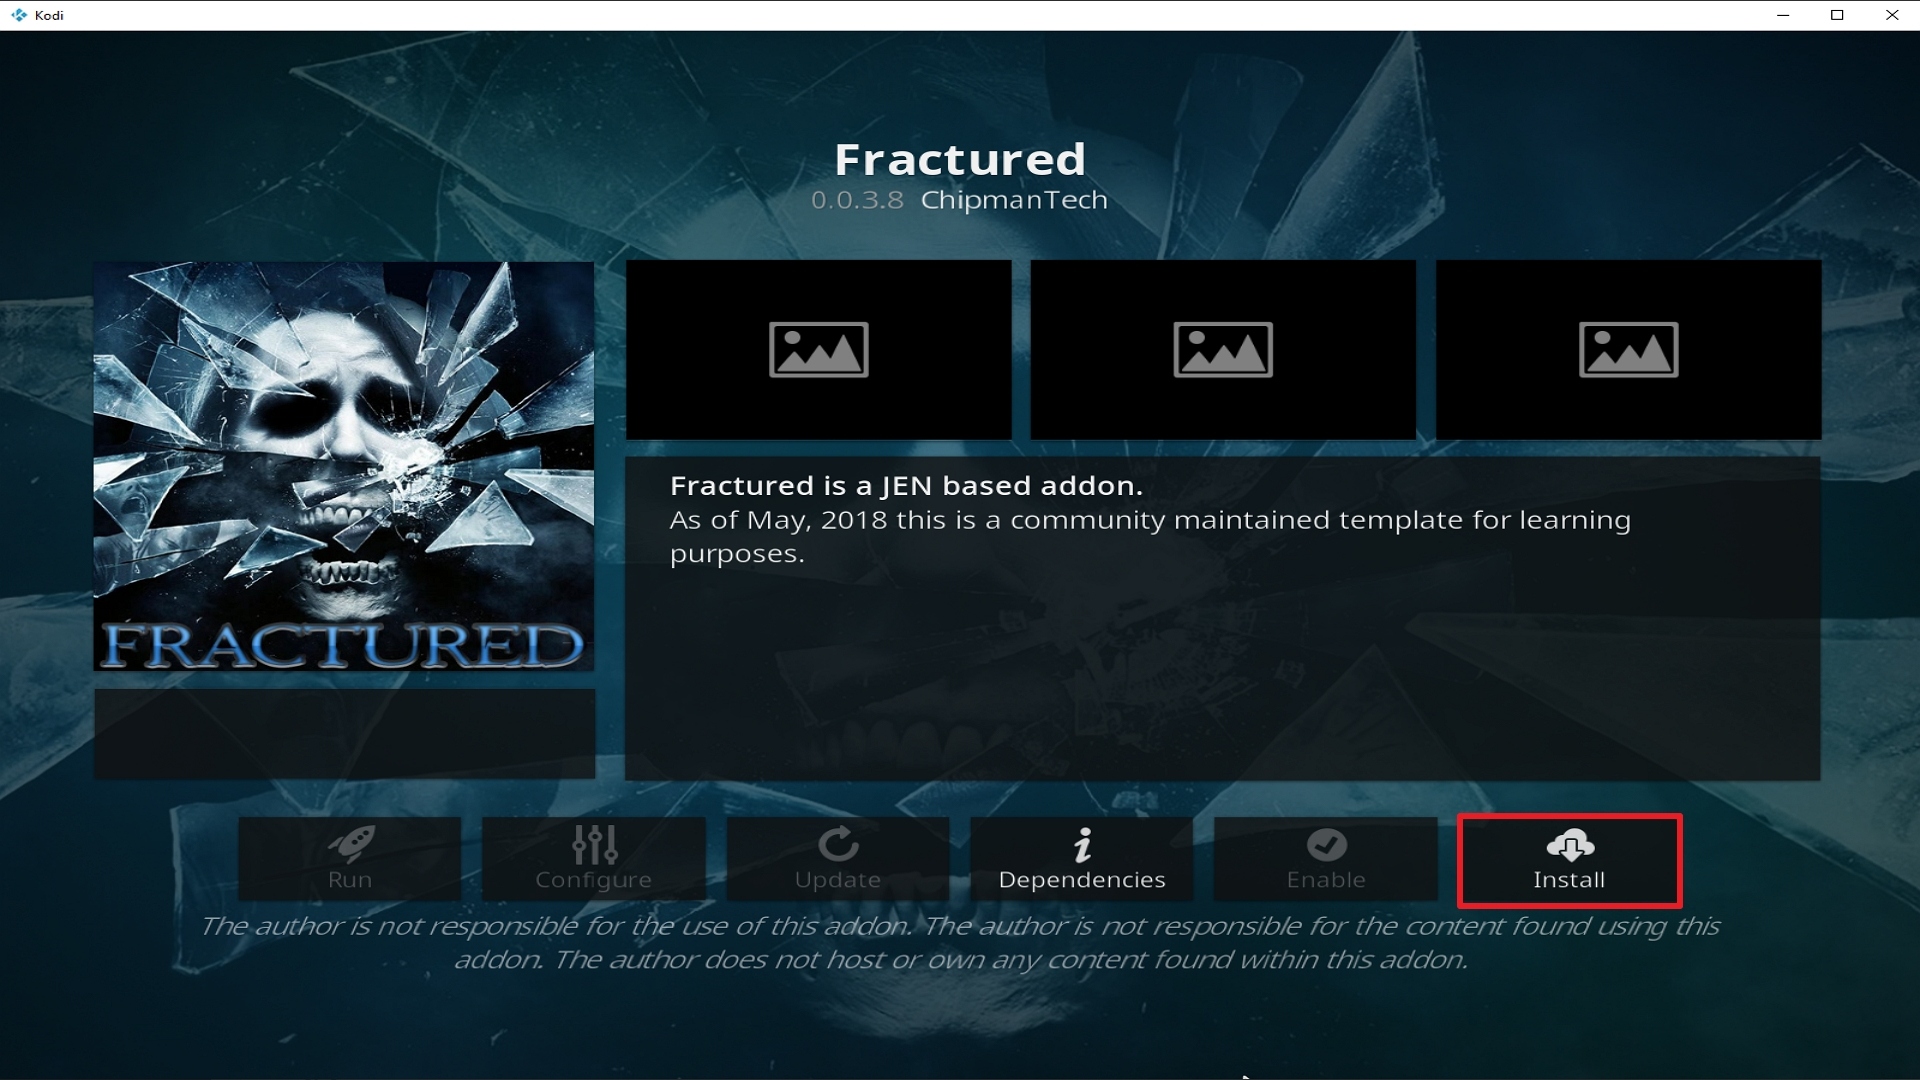
23. Click on Install.

Step 23 Installing Fractured addon on Kodi


24. Select OK after reviewing the add-ons that will be installed.

Step 24 Installing Fractured addon on Kodi


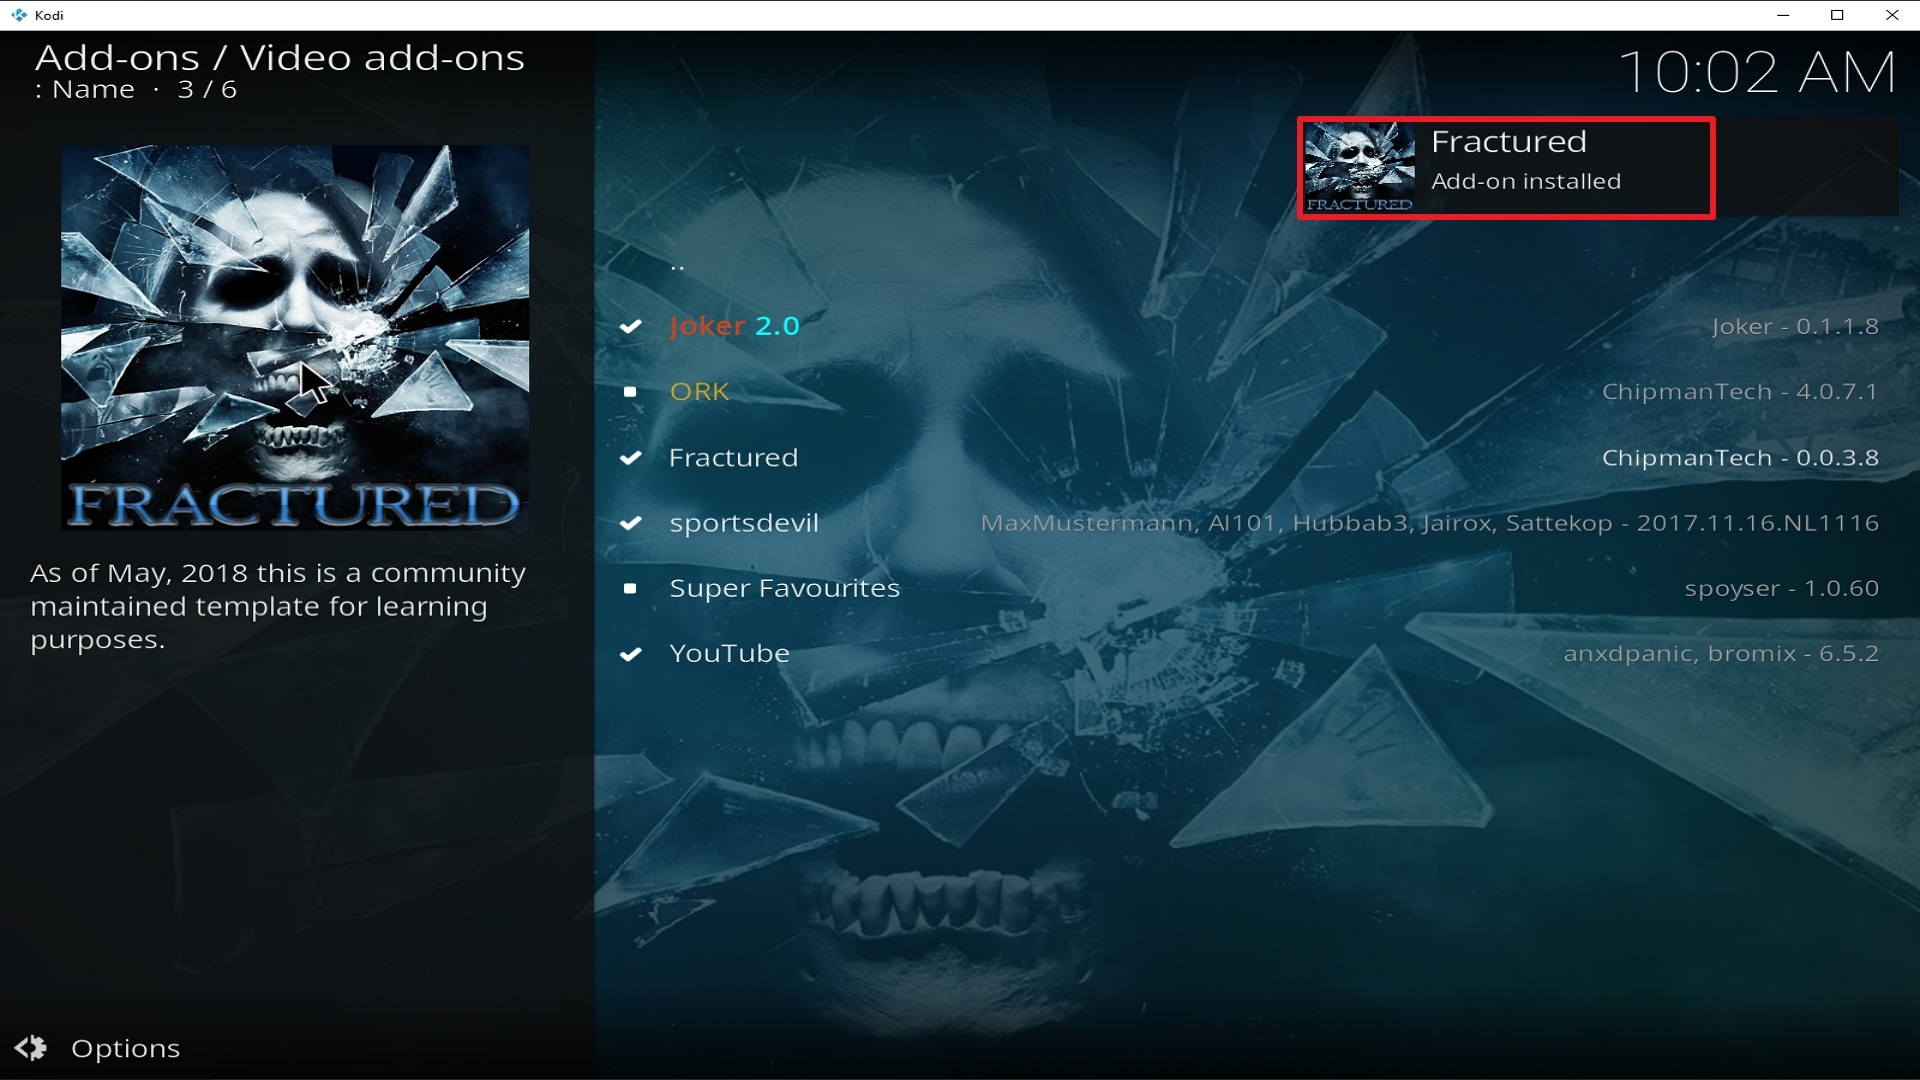
25. You should see a popup in the upper right corner saying Fractured has installed. There will actually be multiple popups for the various components.

Step 25 Installing Fractured addon on Kodi


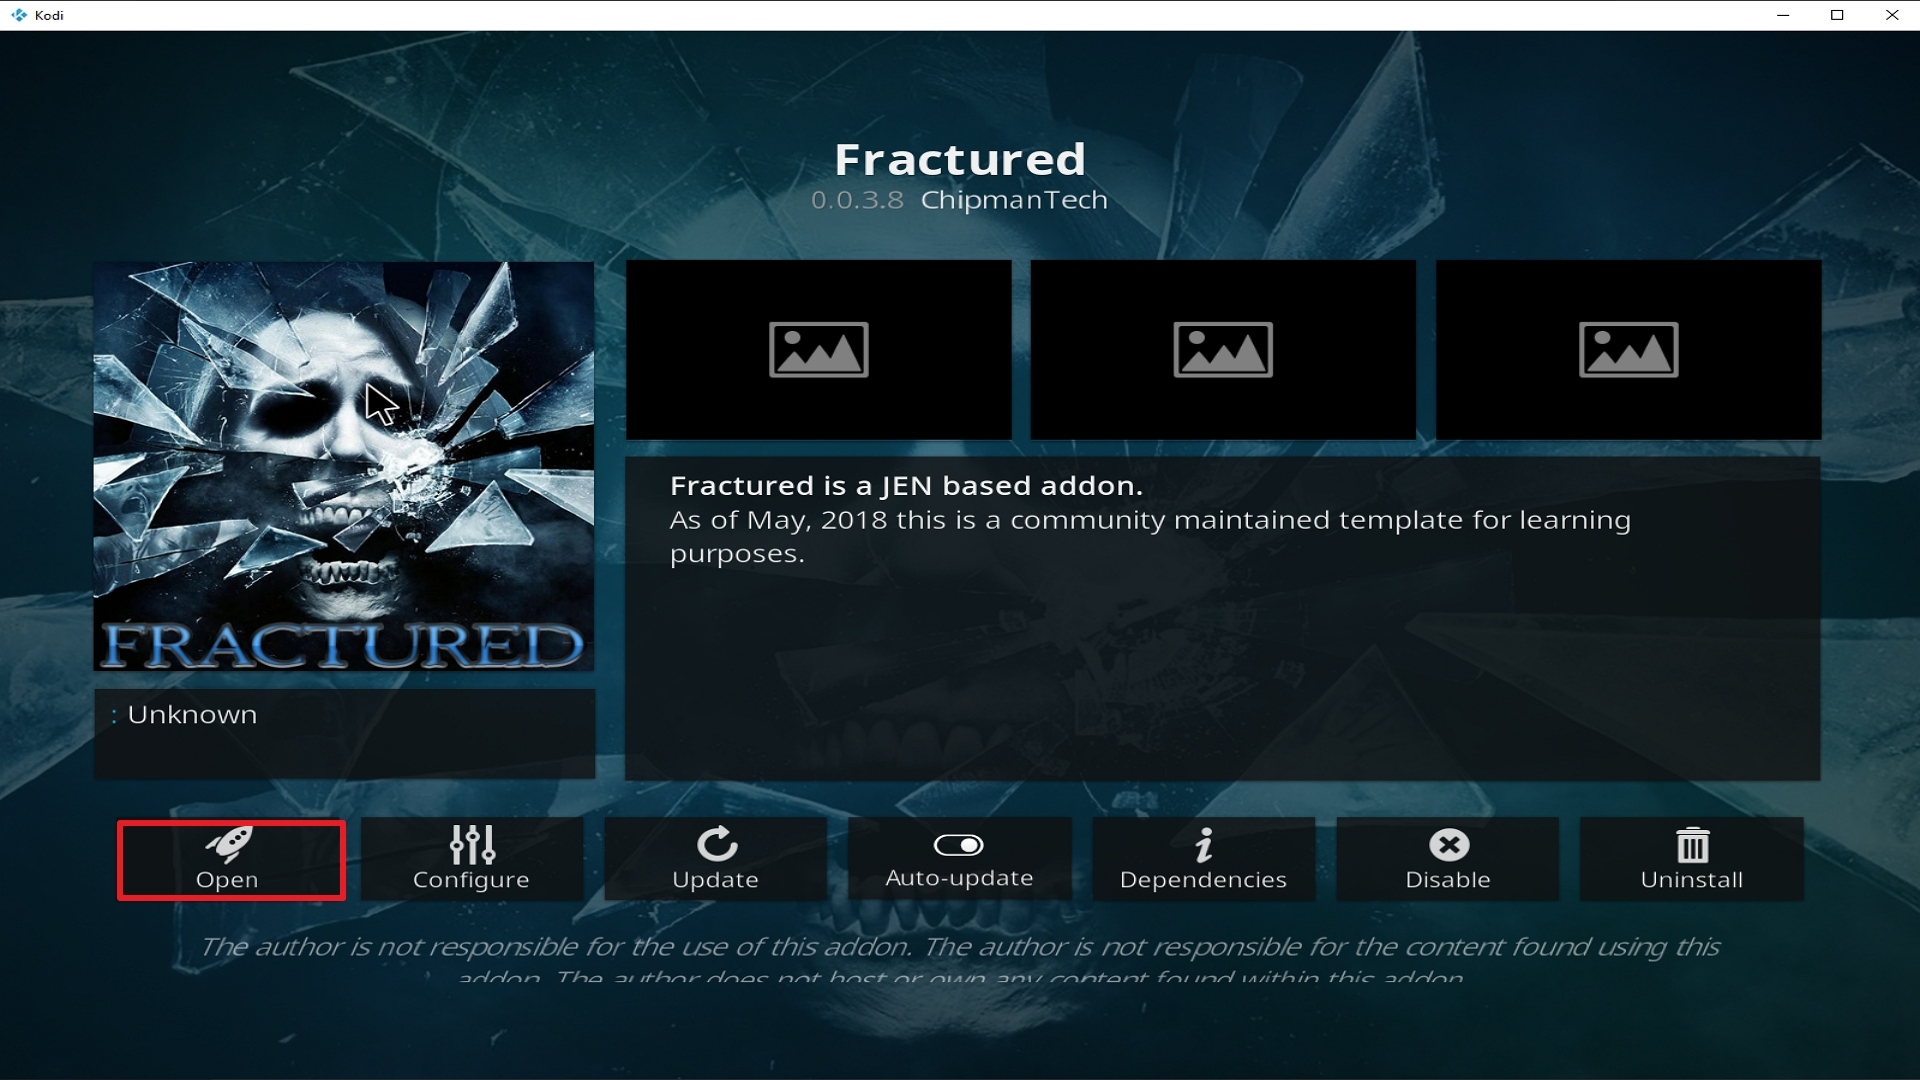
26. Click on Open to start the Fractured add-on.

Step 26 Installing Fractured addon on Kodi


Alternatives

There will be times when a Kodi Add-on wouldn’t work properly and that is inevitable. It may be due to some glitch or your connection is not very stable. What we always suggest is to always have an alternative so that your viewing experience doesn’t get interrupted. We always remind our subscribers to get their content from trusted and reliable sources. We always strive to give an honest review regarding add-ons and as much as possible, we only give you the best out there. Given the huge scope that Fractured Add-on covers, there are only a few add-ons that can match its capabilities and they are as follows:

  • The USS Defiant Add-on
  • Leviathan Add-on
  • Chain Reaction Add-on
  • Chucky Add-on
  • Bumblebee Add-on
  • Midian Add-on


Common errors

These are some of the things that may cause an issue when installing Fractured Add-on:

  1.     Unable to connect to URL/Download

If you are having difficulties downloading Fractured add-on this may mean that the repository is unstable and that the IP may be unavailable. It is also worth checking out if you have typed the correct URL that you have downloaded Fractured from the right repository. Also, make sure that you have a stable internet connection and that you are secured by a VPN. If your country has stricter rules regarding censorship, you may find that it is blocked because it may contain adult content and that it is collected illegally. Your ISP constantly monitors your activity and may block certain websites from being accessed. To fix this, use a VPN to make your connection encrypted and anonymous so that your tracks will be covered. Check here for the best VPN deal.


  1.     Script Error

This error occurs due to the add-on itself or on the manner Kodi has been installed. Make sure that you have installed everything properly. If this problem persists, try reinstalling the add-on or there may be a need to update or reinstall Kodi. To figure out how to do this and other fixes read our in-depth guide linked above.


  1.     Kodi Check Log Error

Check Log Errors usually happen often as you use Kodi until you get familiar with it. This usually happens when your media cache is full. Your device will always cache a clip every time you watch media to allow faster loading time. In the long run, this cache gets full thus creating this issue. An in-depth guide on how to empty your cache is provided at the link above.


  1.     Source not working/slow/frozen

Fractured add-on does not store any of the content on its servers, these are all accumulated through 3rd party sites. Give the source up to 15 seconds to load and then you can try other suggestions. For other solutions please take time to read our in-depth guide linked above.


Always Use a VPN On Kodi

It is advisable to install a VPN on your streaming device. This is because any time you are streaming content online, your online data is vulnerable and you are being monitored on the internet service provider’s network. 

Not only that, but you will also experience location restrictions. Using a VPN will save you that headache and stress and you will be safe and secure while streaming content online. We recommend Surfshark as it offers high security and privacy with a zero-log policy with DNS leak protection. 

Note: For more information about Surfshark, please read our Surfshark Review.


Grab your subscription now!


How to Install Surfshark VPN on Firestick

If your Firestick still has the older interface, read this article to learn how to update it: Update Firestick Interface.

Follow our screenshots below to install the SurfShark VPN app on your Fire TV stick.

1. Go to the Home screen of your Firestick.

step 1 Install Surfshark VPN on Firestick


2. Navigate towards the Find tab. Press the Search button from the resulting dropdown.

step 2 Install Surfshark VPN on Firestick


3. Type in the keyword of SurfShark and select from the suggestions that will appear.

step 3 Install Surfshark VPN on Firestick


4. Click the official SurfShark icon from your search results.

step 4 Install Surfshark VPN on Firestick


5. Press the Download (You own it) button.

step 5 Install Surfshark VPN on Firestick


6. The SurfShark VPN installer will download on your device.

step 6 Install Surfshark VPN on Firestick


7. SurfShark VPN’s app will automatically install itself on your Fire TV stick.

step 7 Install Surfshark VPN on Firestick


8. Press the Open button after completing SurfShark VPN’s installation process.

step 8 Install Surfshark VPN on Firestick


9. Please wait for the SurfShark VPN to load its user interface.

step 9 Install Surfshark VPN on Firestick


10. You can now log in with your SurfShark VPN account credentials.

step 10 Install Surfshark VPN on Firestick

Learn more about Surfshark and Grab the Best Surfshark Deal Now!


Install Surfshark on Firestick

Best Surfshark Deal


Other VPNs to Consider

NordVPN (Best for Streaming)

Best Features

  • 5000+ Server in 50+ Countries 
  • Military-Grade Encryption
  • Fast Connection Speed
  • Suitable to a lot of devices
  • No-Log Policy

Prices
  • Complete $5.89 per month (64% Discount)
  • Plus $4.59 per month (56% Discount)
  • Standard $3.69 per month (55% Discount)

Best Features

  • 750+ High-speed VPN Servers in 43 Locations
  • Military-Grade Encryption
  • Fastest HD Streaming and Gaming
  • 30-Day Money-Back Guarantee
  • Unlimited Data & Devices
  • No-Log Policy

Prices
  • 3 Years $1.99 per month (82% Discount)
  • 1 Years $3.29 per month (70% Discount)
  • 1 Month $10.99 per month

IPVanish VPN (Most Secure)

Best Features

  • 1200+ Servers in 60+ Countries around the world
  • Unlimited Connections
  • No-Log Policy
  • Top Notch Military-Grade VPN Protocols and Encryptions
  • 100% Safe and Secured
  • Most Trusted VPN
  • Best VPN for Firestick
  • 30-Day Money-Back Guarantee

Prices
  • Yearly $3.99 per month (63% Discount) – 30 days risk free + Ransomware & Malware Protection
  • Quarterly $5.32 per month (51% Discount)
  • Monthly $10.99 per month


For more VPN discounts, go to ReviewVPN Deals and purchase the best VPN for you.

Click here to get the lowest price on Surfshark through our exclusive limited-time offer.


Conclusion

We believe that one of the many attractive features of Fractured is that it is Real-Debrid and Trakt Integrated. This was you can always get updated on your favorite shows. Also, there is the boxset feature that lessens the need to go back and forth within the app searching for the next installment.

One other thing is that the Fanatic Feature lets you watch movies that have sequels without running around within the App. Also worth mentioning is the Retro section which features movies and TV Shows from the 1950s up to 2010s, it lets you get a glimpse of the past without the hassle of searching everywhere.

Ultimately, Fractured is an all-around add-on that you can rely on in terms of content. You just have to be patient and diligent in navigating its interface. We hope that this article has been educational and helpful to you. If you have questions or suggestions, please do drop us a message on the comments section below or on any of our other social media platforms. Thank you and happy watching!

Install Leviathan Kodi Addon

Leviathan Kodi Addon

Source: http://teamfalcon.exposed/repository/


According to Jewish Folklore, the Leviathan was three of the primordial creatures created. It was said that it was the most powerful of the three and the most feared of all. Given that this add-on was named after a creature so powerful, there are certain expectations that come with the name. So can this add-on live up to its name? We will see it shortly in this article.

Leviathan Kodi Video Add-on is under the Team Falcon Repository that offers high-quality Movies and TV Shows. In order for it to work, you must also install another add-on from the same repository.


ANONYMOUSLY


Features

        Easy User Interface

        Real-Debrid Integration to improve streaming

        A wide variety of content to choose from its streaming categories:

  • Hot Movie List
  • Spotlight
  • Movies
  • Decades
  • Collection
  • Rated
  • TV Shows
  • Cartoons
  • Channels

        Trakt Integration


YOUR INTERNET ACTIVITY IS BEING WATCHED

ReviewVPN cannot attest to the legality, security and privacy of the applications discussed on this site. It is highly recommended that you use a VPN service while streaming or using Kodi.

Currently, your IP 216.73.217.150 is visible to everyone and your Browser is being tracked by Advertisers & ISP Provider.

Save 65% Now

Limited Time Offer

Here are the main reasons why you must use a VPN:

  • Your activities are hidden from your ISP, the government, and from the apps you are using.
  • You can access additional movies and TV streams.
  • ISP attempts to throttle are thrwarted thus reducing buffering issues.
  • Geographically restricted content like Netflix and Hulu can be unblocked.

A VPN works be replacing your ISP-assigned IP address and creating an encrypted tunnel. We recommend the no log service offered by IPVanish. It works well on a Firestick and offers the fastest possible speeds.

Special Limited Time Offer - Get IPVanish


 Installation Guide

  1.  Launch Kodi on your device
  2.  Click on the “Gear Icon” and select “System”
  3.  At the add-ons menu, turn on the “Unknown Sources” by clicking “yes”
  4.  Go back to the “systems” page and choose “File Manager”
  5.  Choose Add source and select “none”
  6.  Type in http://teamfalcon.exposed/repository/
  7.  Highlight the source and rename it to “Falcon” or any name you would like to use to identify this particular source and click “ok”
  8.  Go back to the System Screen and click “Add-ons”
  9.  Select “Install Zip File” choose “Falcon” or whatever you renamed the file.
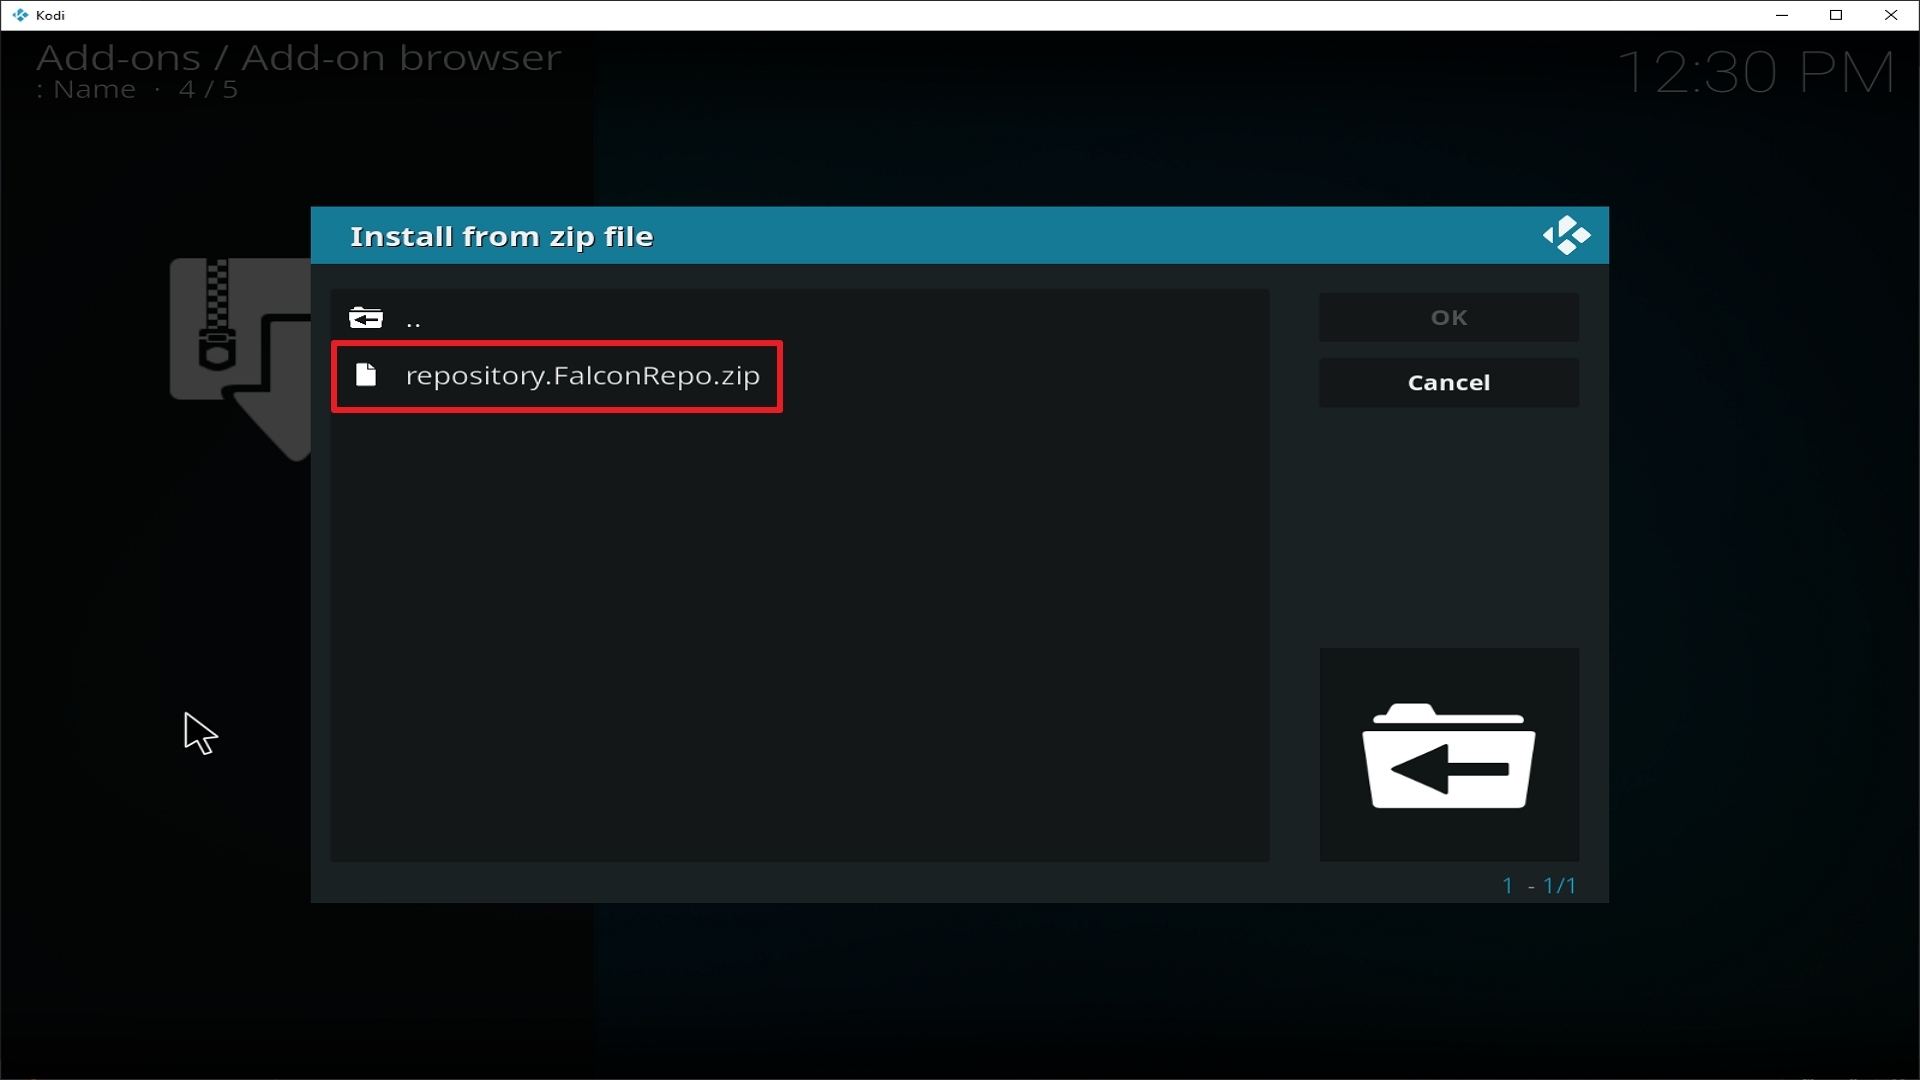
  10. Select the zip file URL- – repository.FalconRepo.zip
  11. Wait for the notification “Falcon Repo Add-on Installed” to appear.
  12. Select “Install Repository”
  13. Choose “Team Falcon Repo”
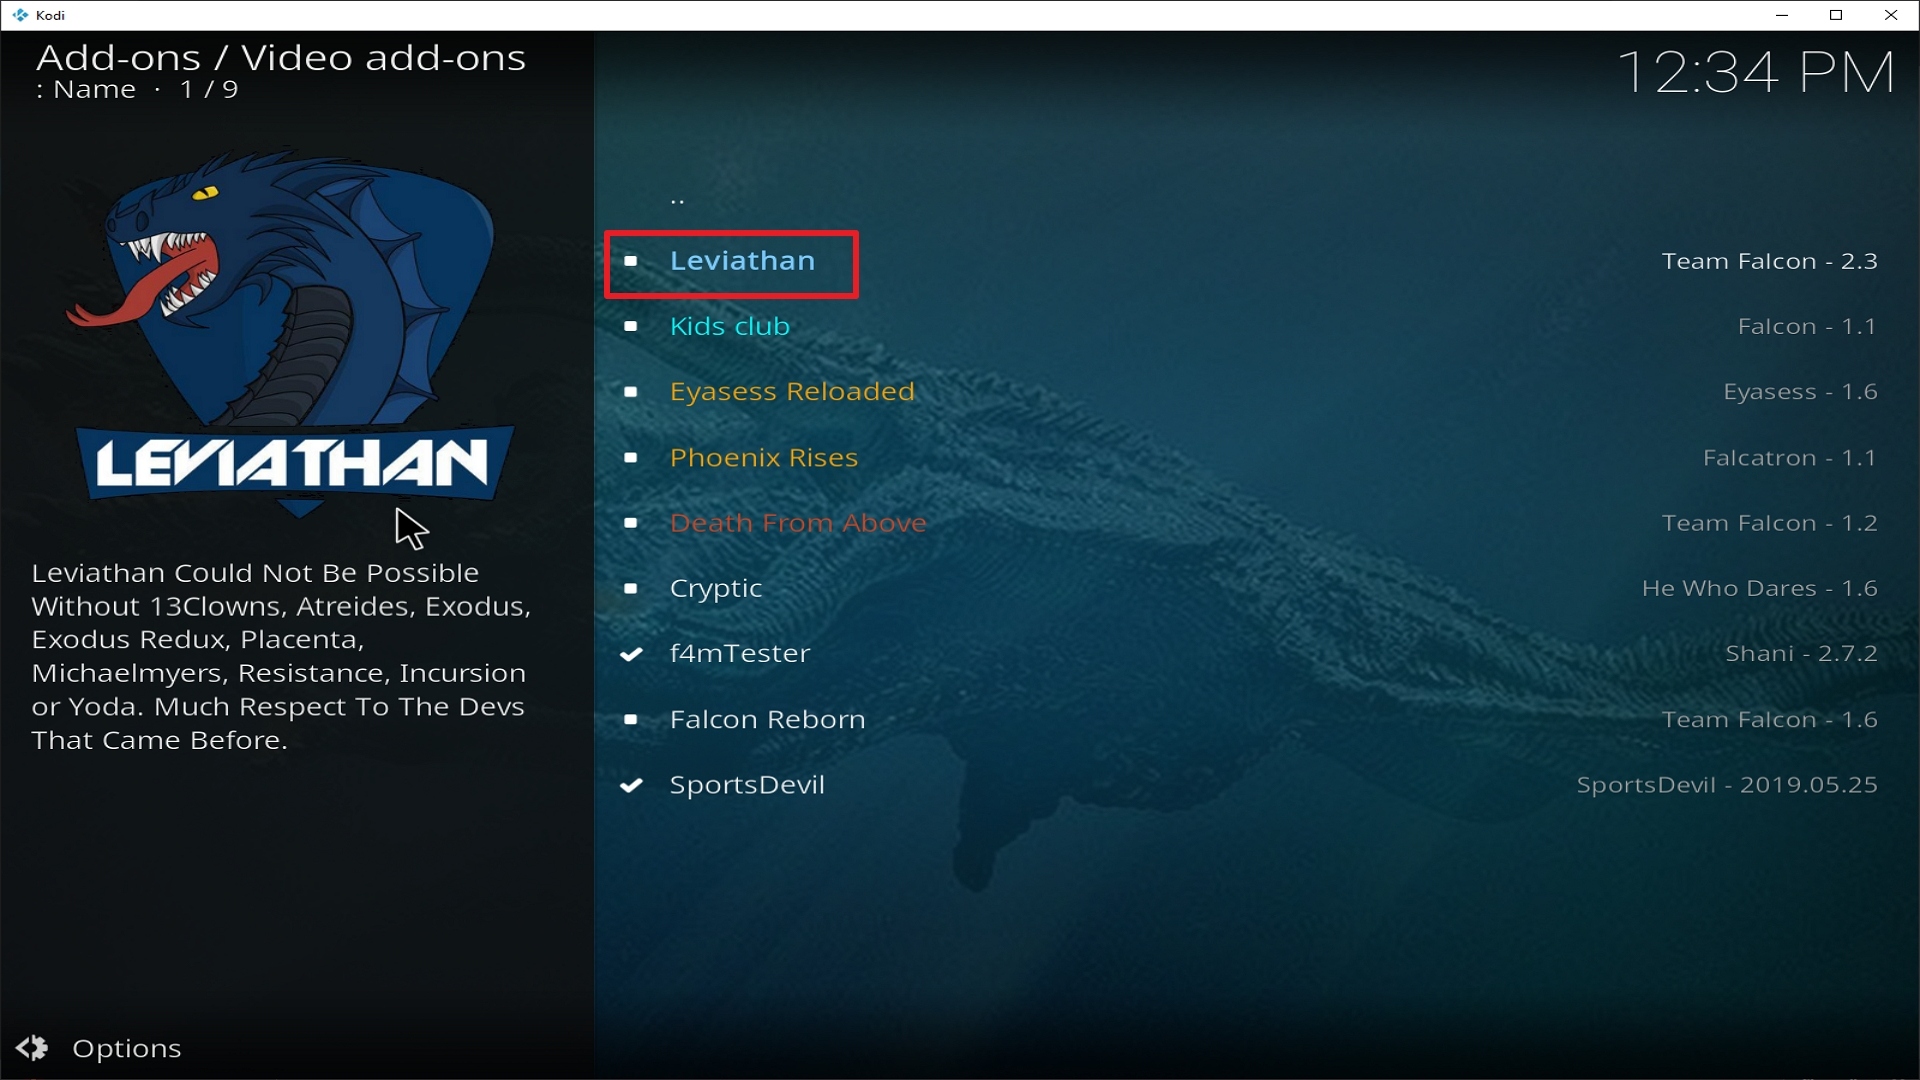
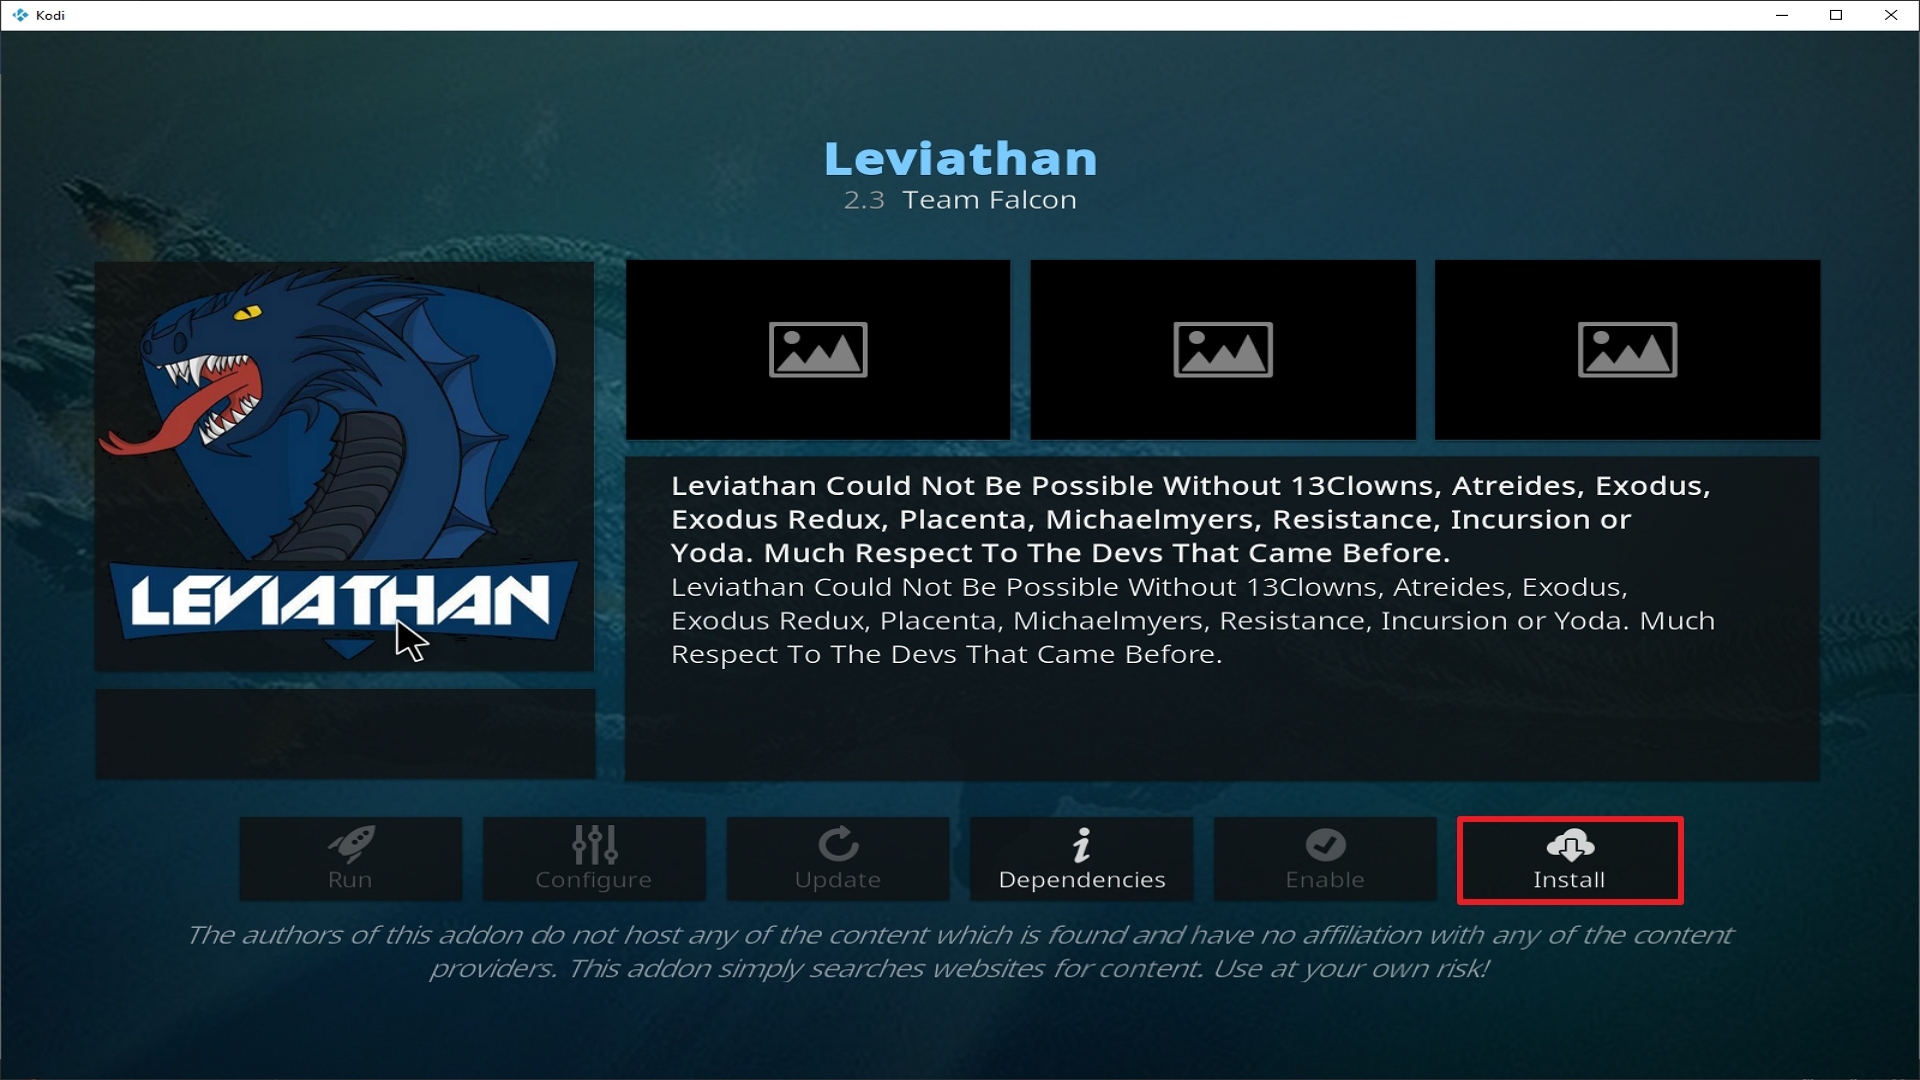
  14. Click on “Video Add-ons” and select “Leviathan” and “Install”
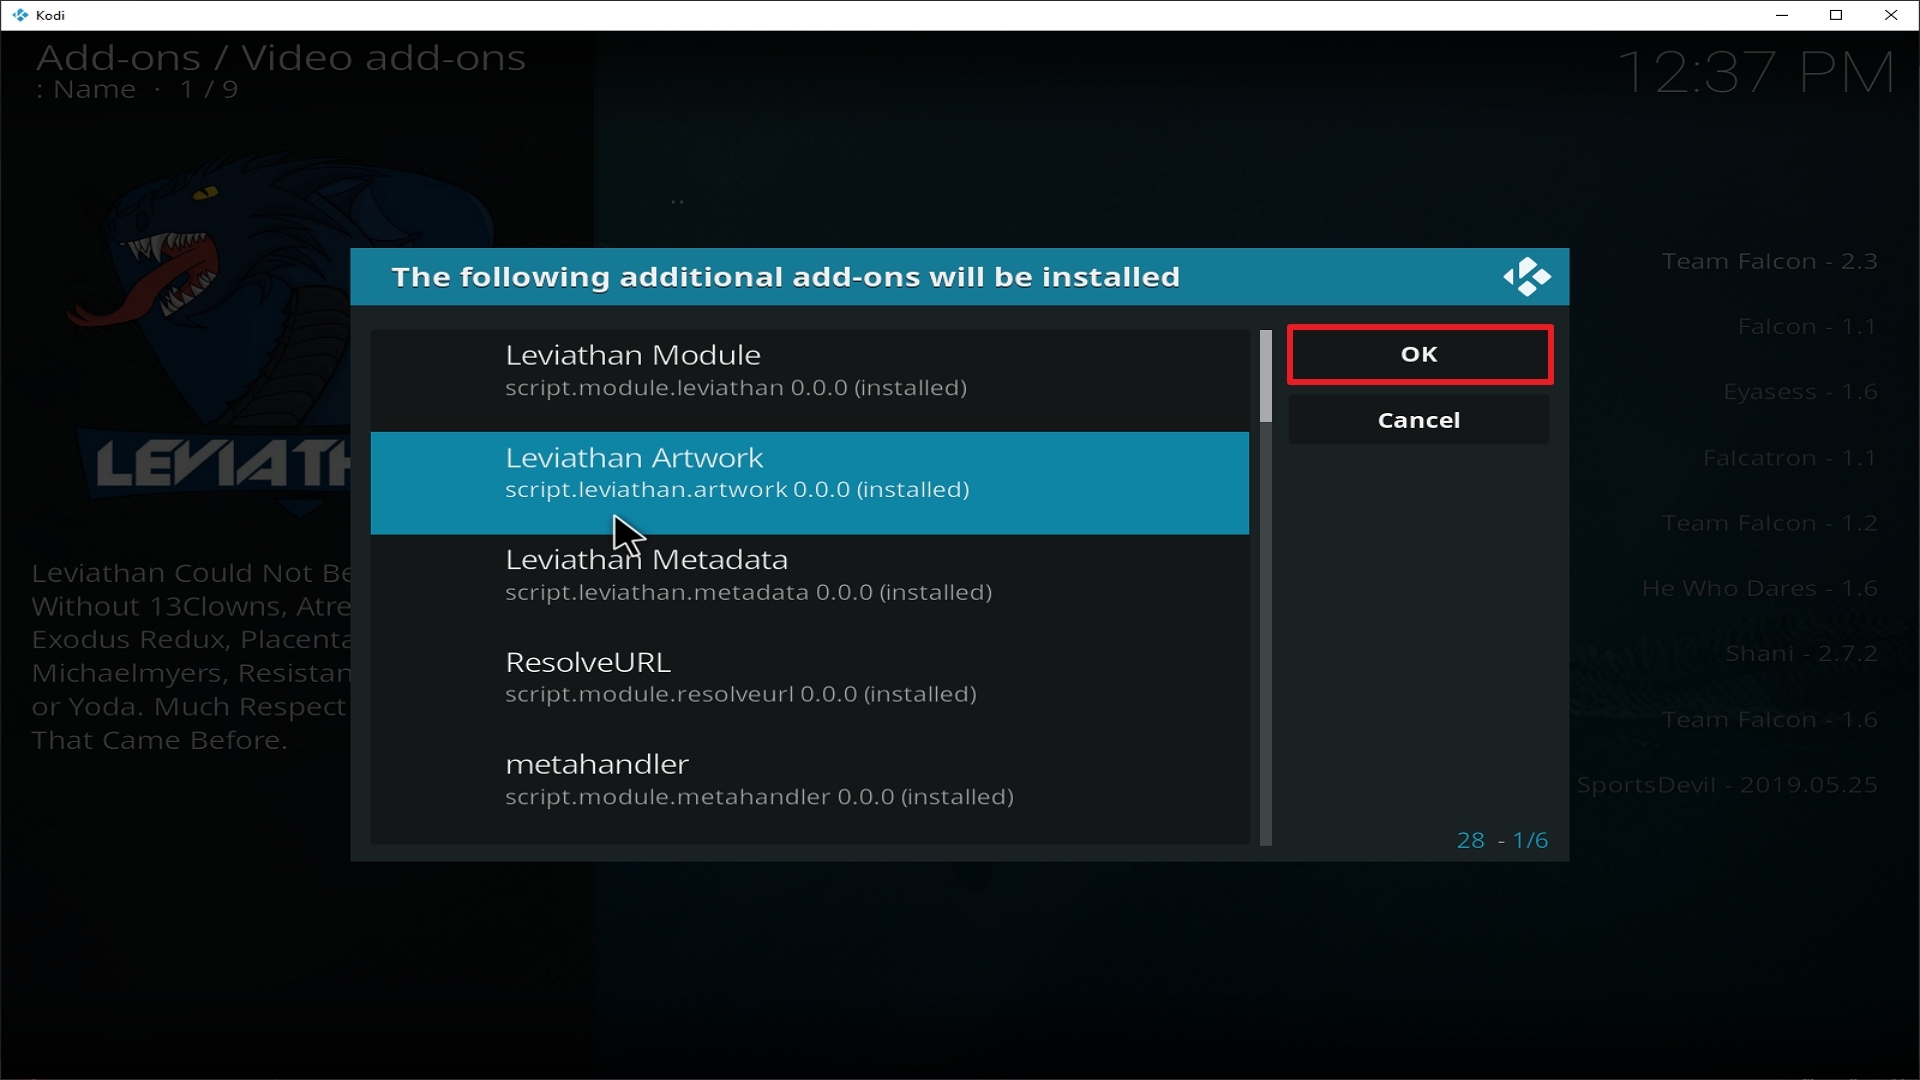
  15. Click “Ok” when a notification “the following add-ons will be installed” appears and wait for Leviathan Add-on to install
  16. Once the add-on is installed go back to the home screen and select “add-ons”
  17. Choose “Video add-ons” and select “Leviathan”
  18. There you go, Leviathan is now installed.


Real-Debrid Integration

  1. If you don’t possess a Real-Debrid account yet, you must register.
  2. When Launching Leviathan add-on you will be notified with this message. Write down the code that will be given.
  3. Launch a web browser on a different device and enter https://real-debrid.com/device.
  4. Type in the code you got and select “Continue”
  5. You will then be granted your Real-Debrid Account
  6. Go back to Leviathan and a notification that shows another successful authorization message will appear, select “ok”
  7. If notified with a changelog, just press the “ok” button on your remote and voila! Leviathan is now Real-Debrid ready.


How to Install Leviathan on Kodi with Screenshots

1. From the home screen, select the cogwheel at the upper left.

Step 1 Installing Leviathan addon on Kodi

2. Select System in the bottom right corner.

Step 2 Installing Leviathan addon on Kodi


3. Select Add-ons on the left side of the screen.

Step 3 Installing Leviathan addon on Kodi


4. Select Unknown sources.

Step 4 Installing Leviathan addon on Kodi


5. Click Yes to allow unknown sources.

Step 5 Installing Leviathan addon on Kodi


6. Select File manager.

Step 6 Installing Leviathan on Kodi


7. Click Add source.

Step 7 Installing Leviathan addon on Kodi


8. Click on <None>.

Step 8 Installing Leviathan addon on Kodi


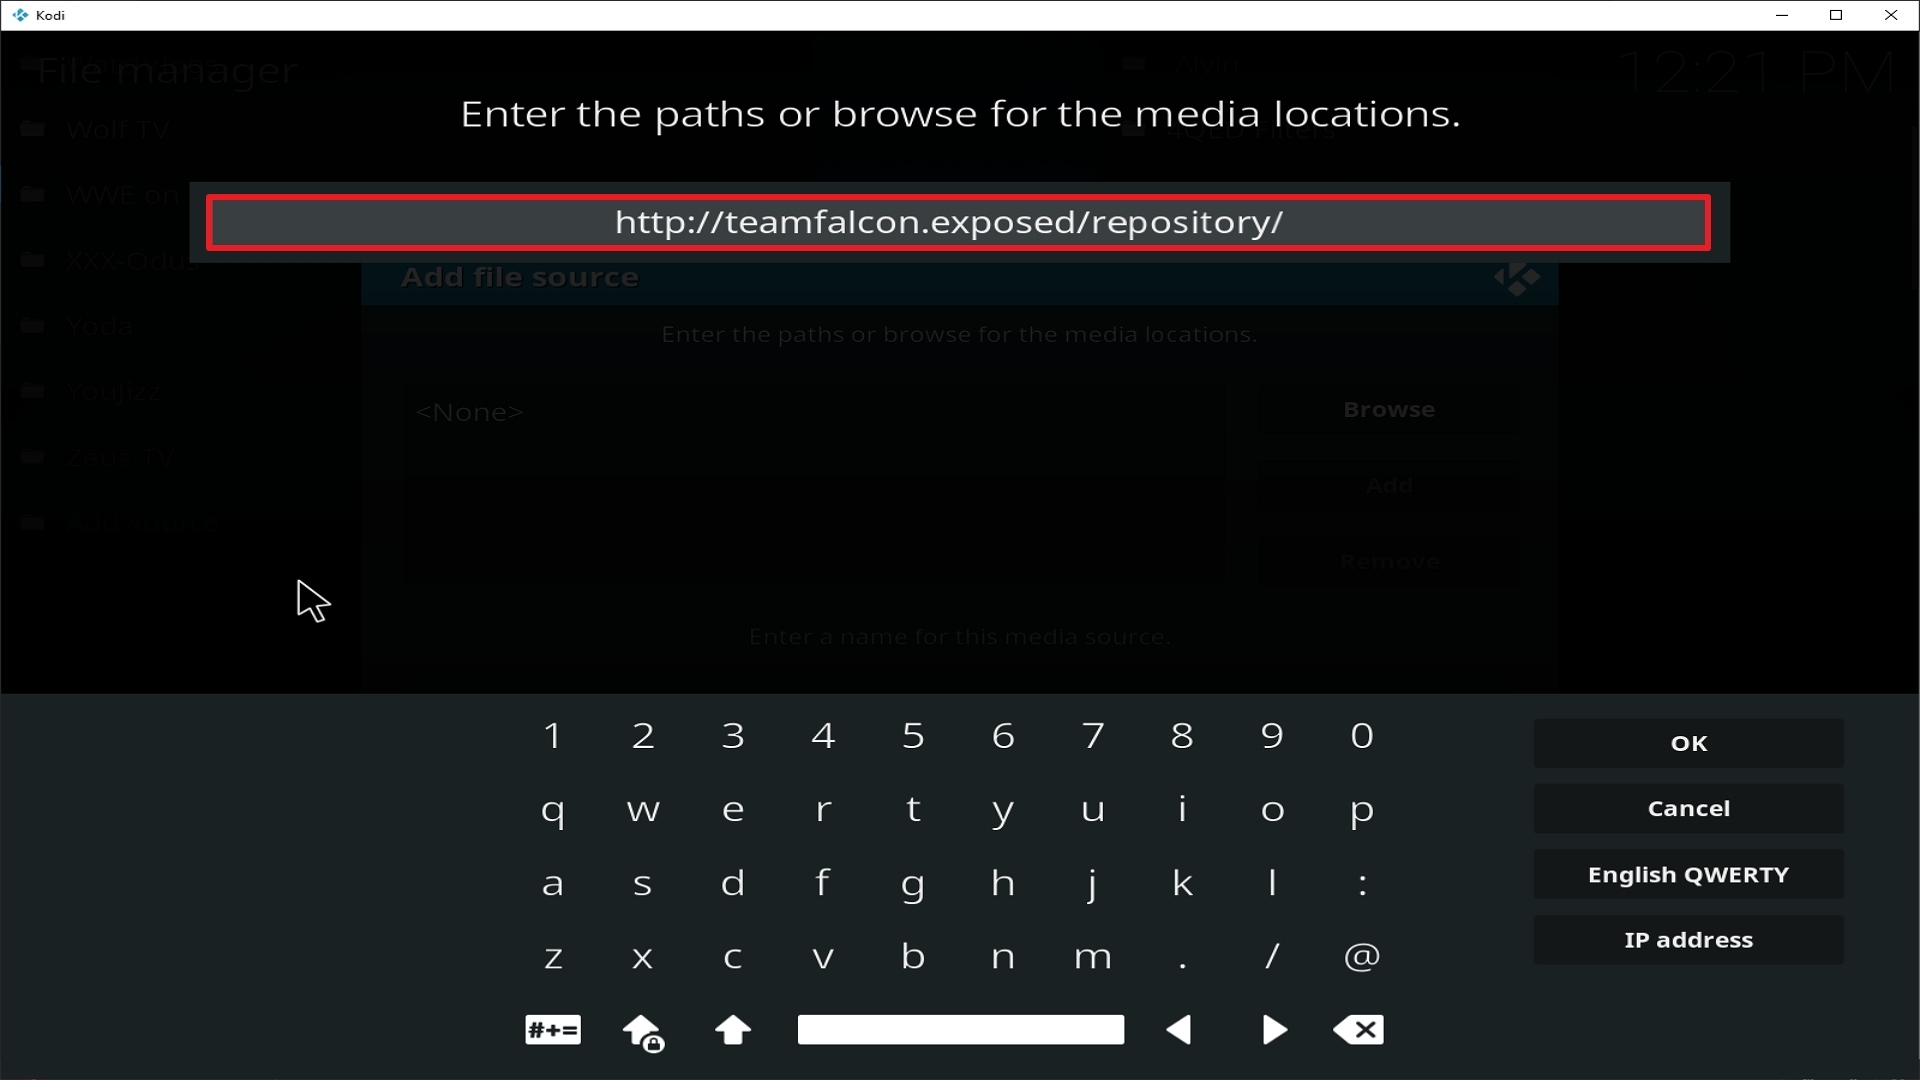
9. Type exactly: http://teamfalcon.exposed/repository/

Step 9 Installing Leviathan addon on Kodi


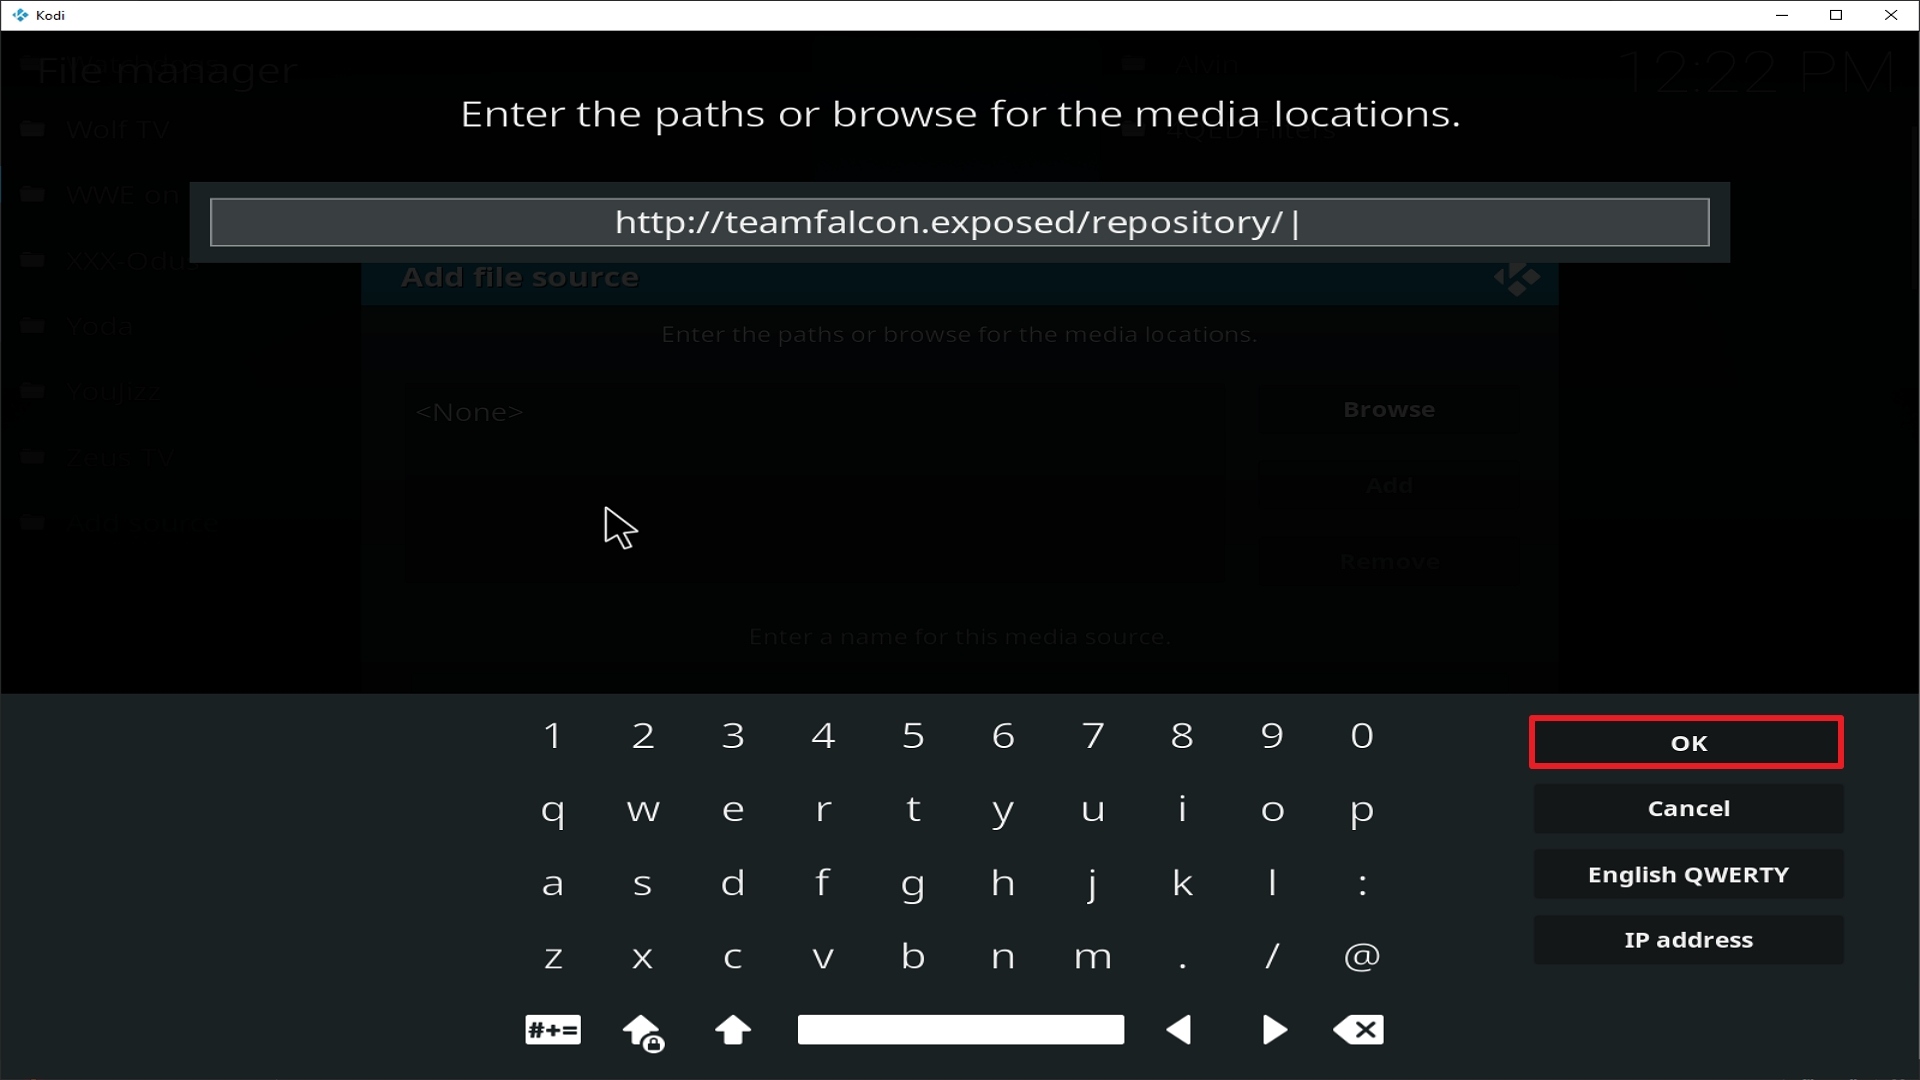
10. Click on OK.

Step 10 Installing Leviathan addon on Kodi


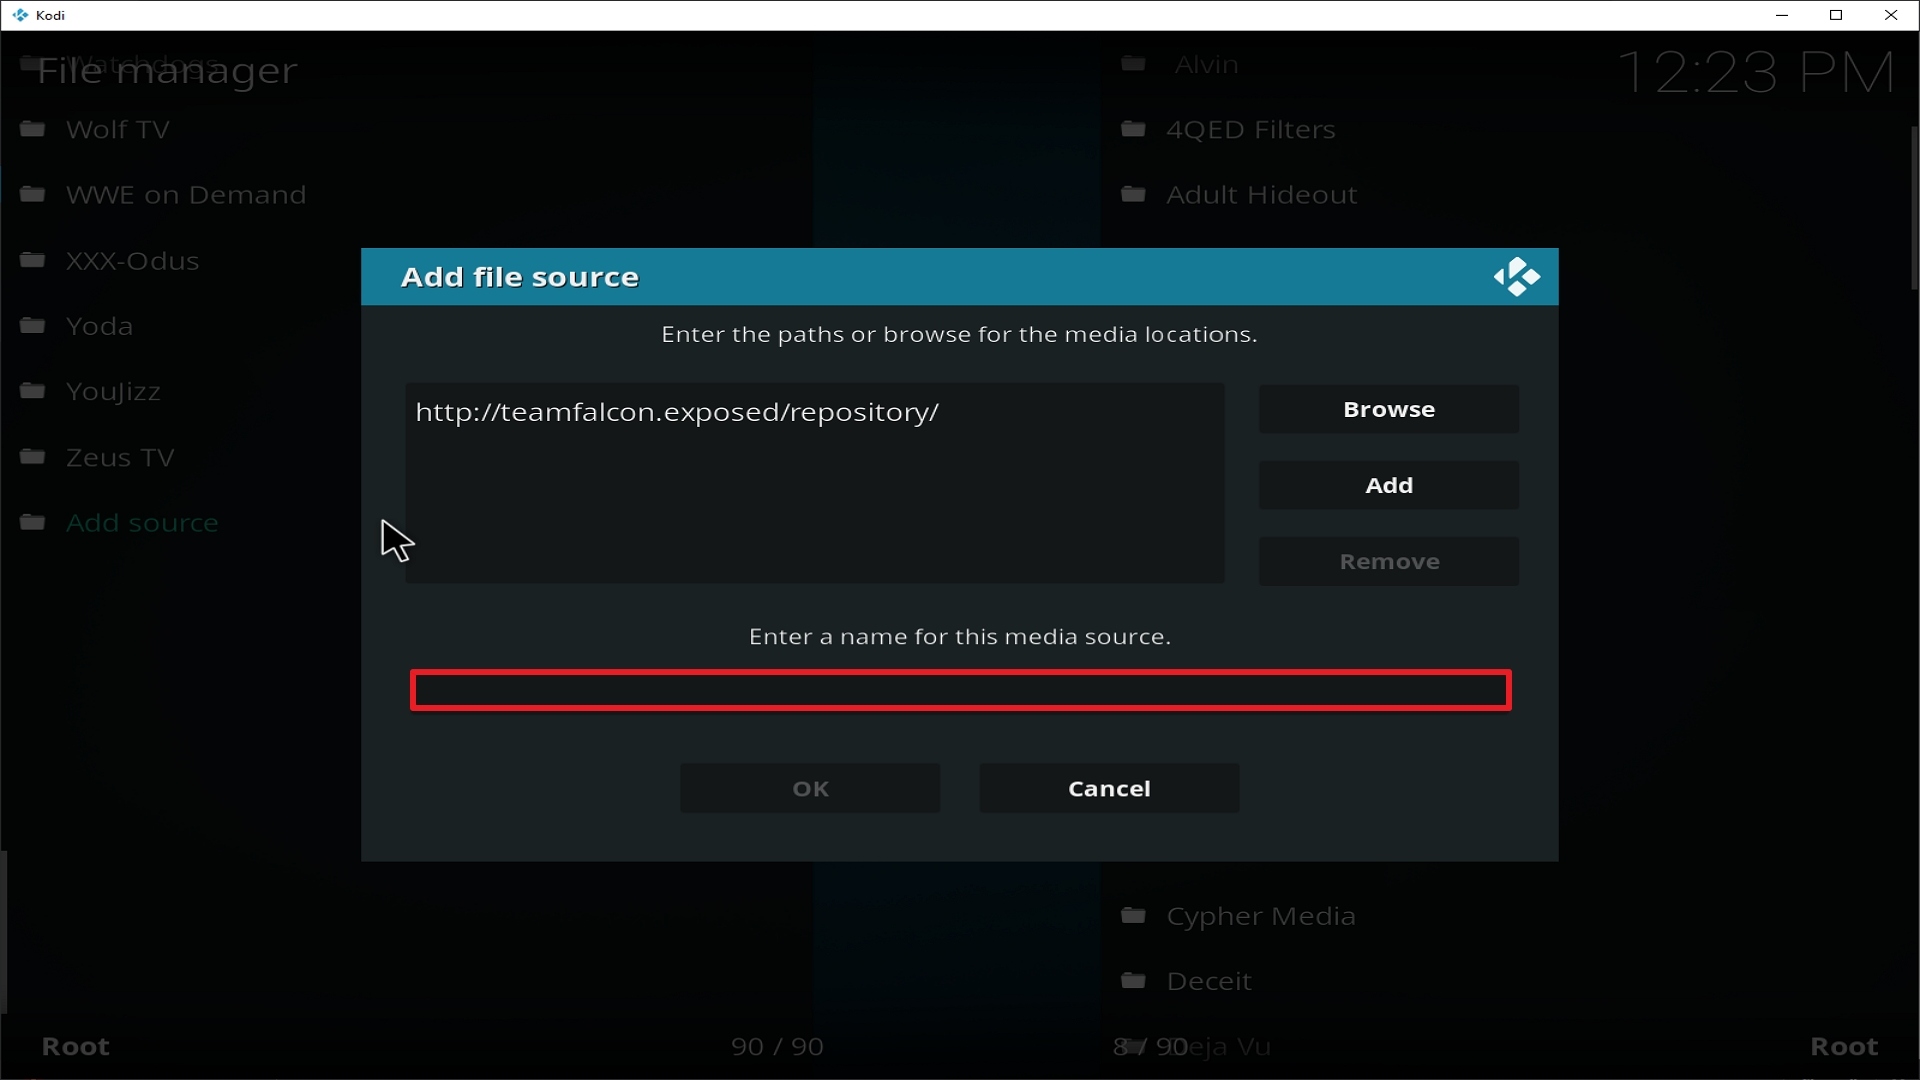
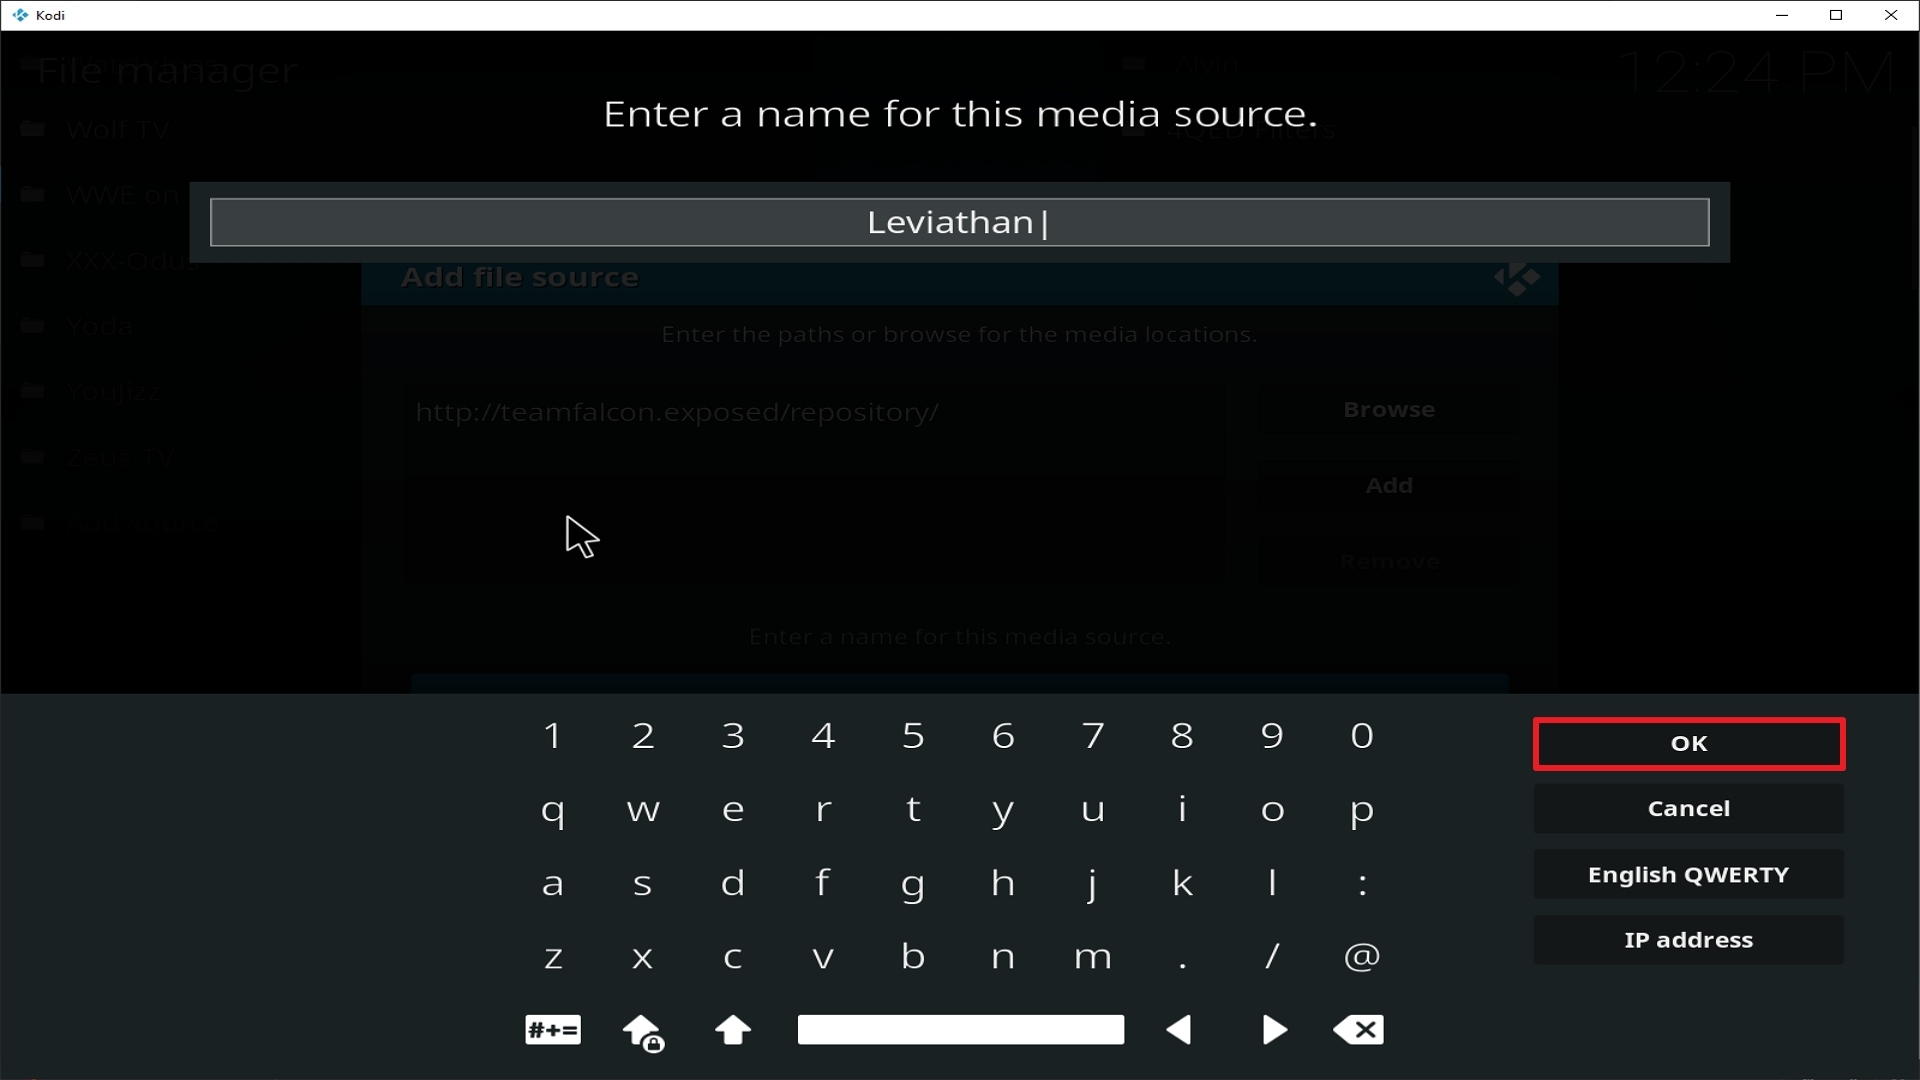
11. Select enter a name for this media source.

Step 11 Installing Leviathan addon on Kodi


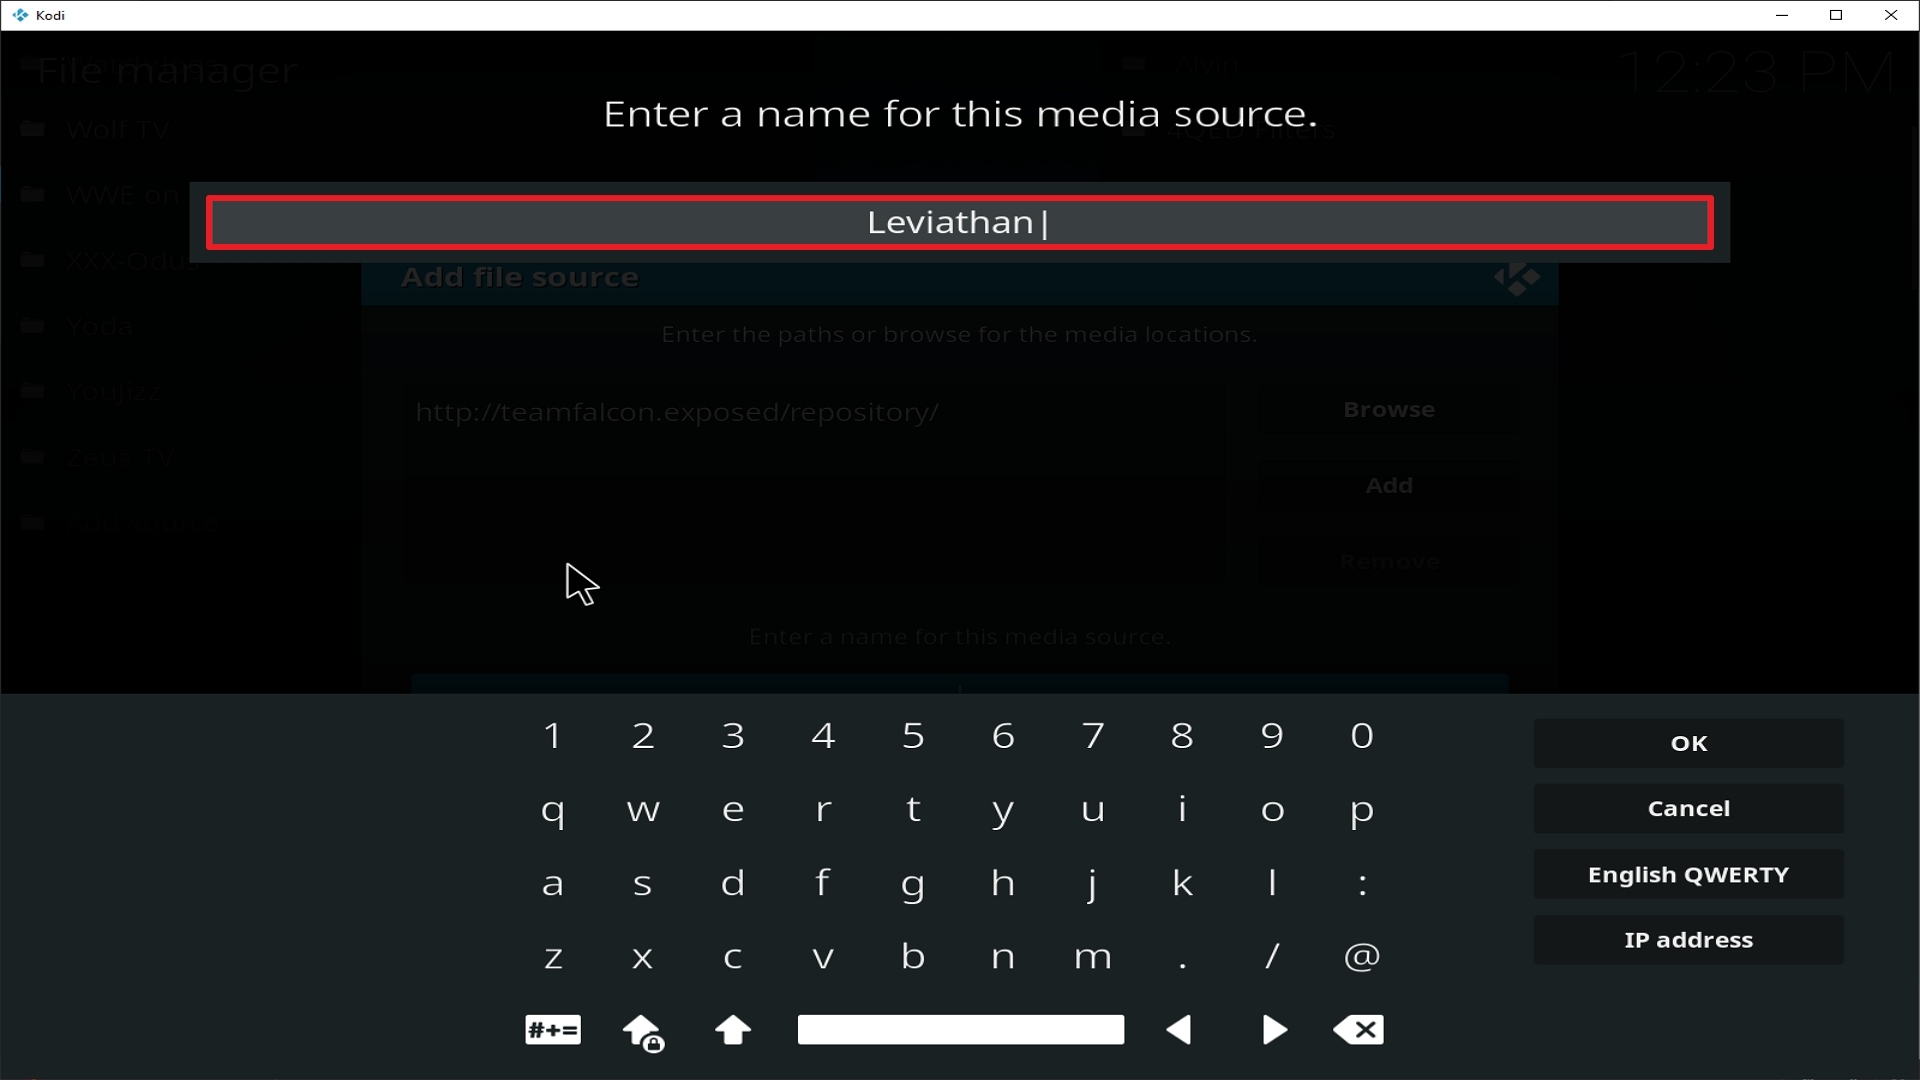
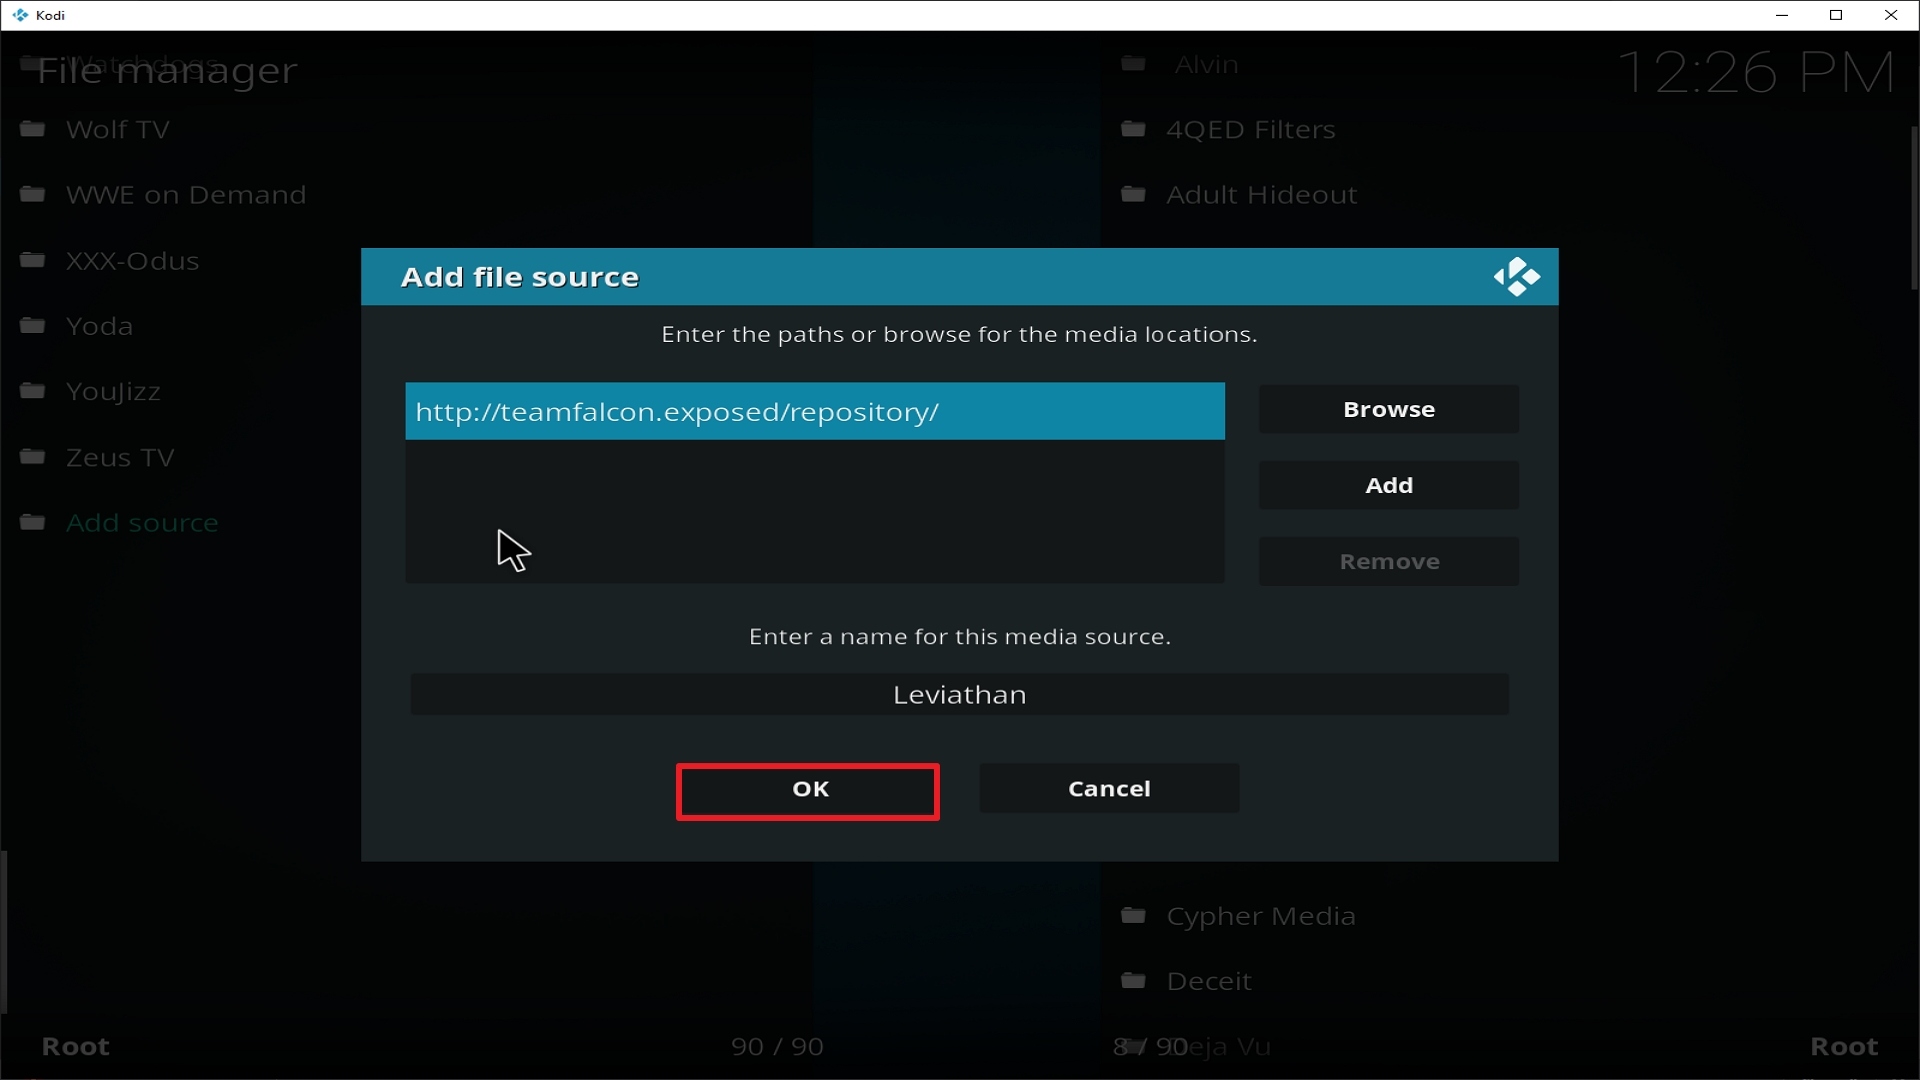
12. Name is Leviathan (this part isn’t critical as long as you remember the name).

Step 12 Installing Leviathan addon on Kodi


13. Click on OK.

Step 13 Installing Leviathan addon on Kodi


14. Click on OK.

Step 14 Installing Leviathan addon on Kodi


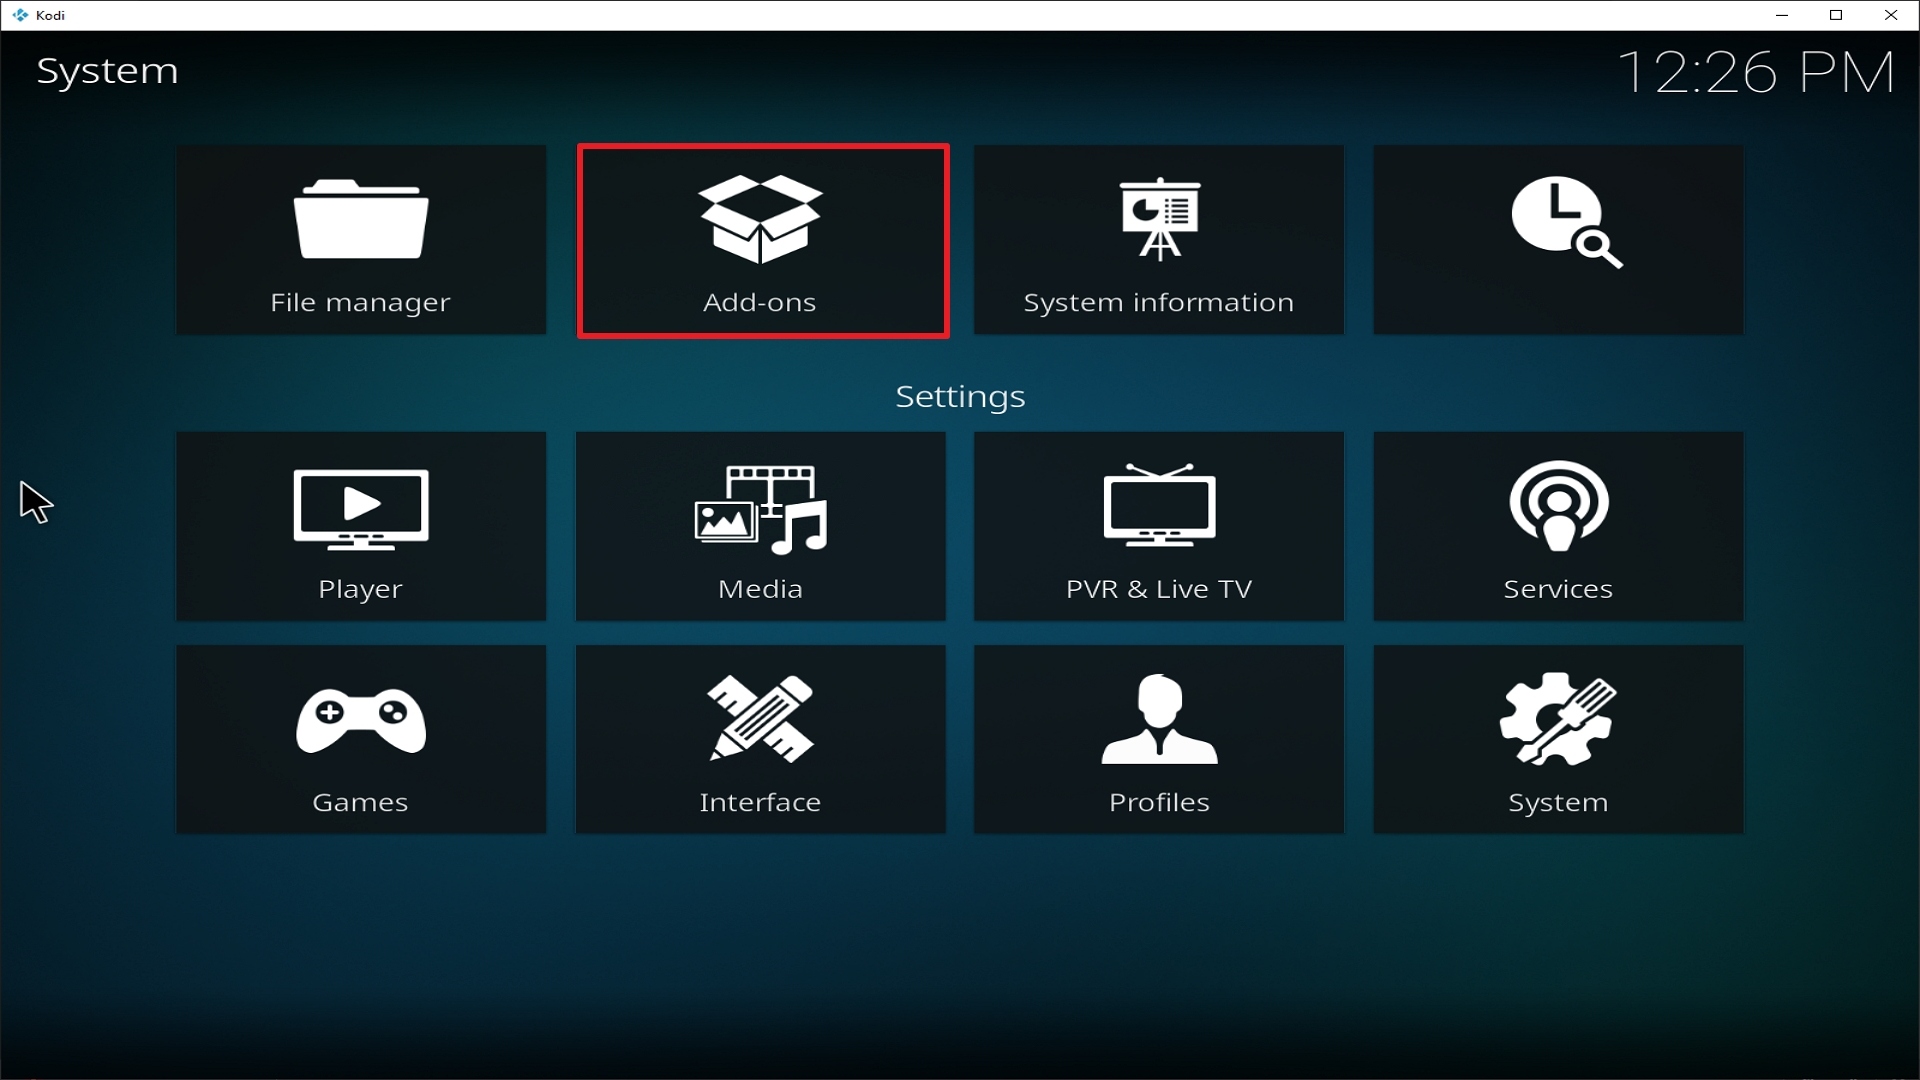
15. Take one step back and click on Add-ons.

Step 15 Installing Leviathan addon on Kodi


16. Select install from zip file.

Step 16 Installing Leviathan addon on Kodi


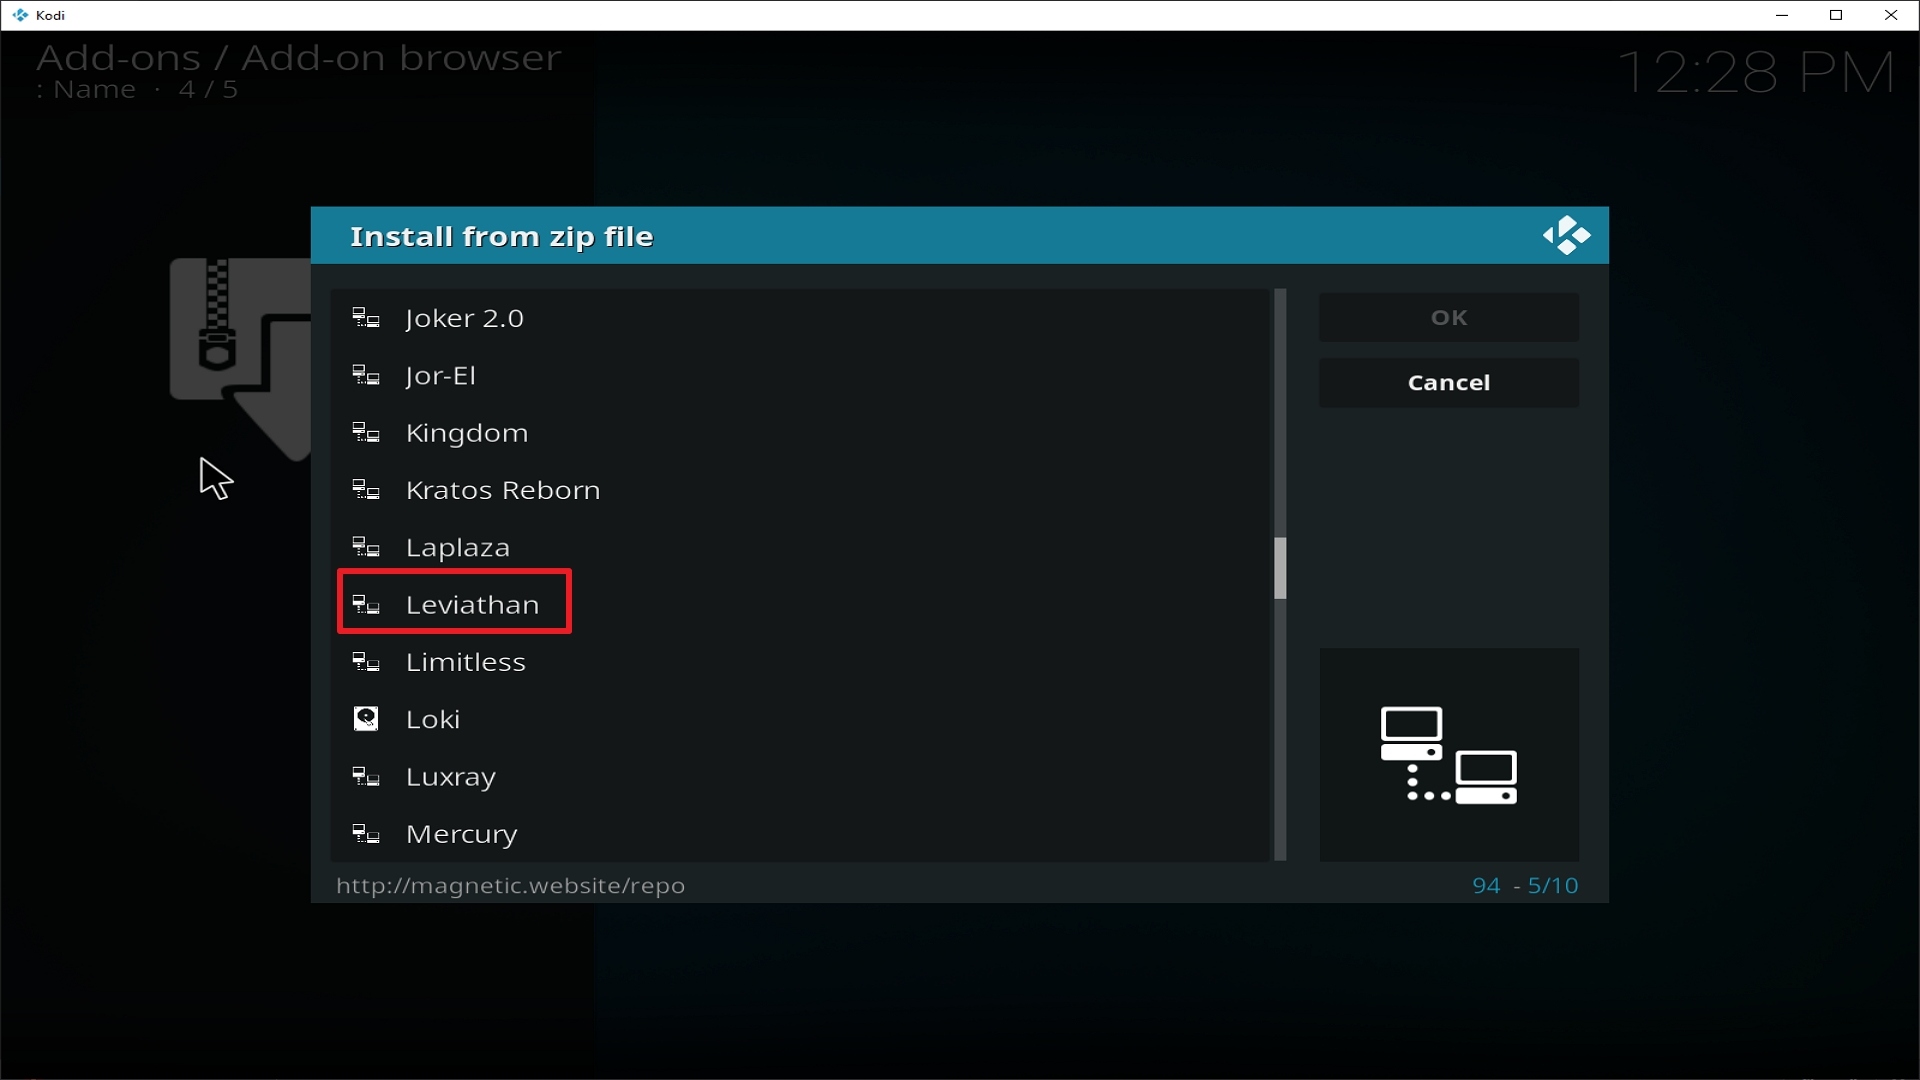
17. Click on Leviathan  (or whatever you named the source).

Step 17 Installing Leviathan addon on Kodi


18. Click on repository.FalconRepo.zip

Step 18 Installing Leviathan addon on Kodi


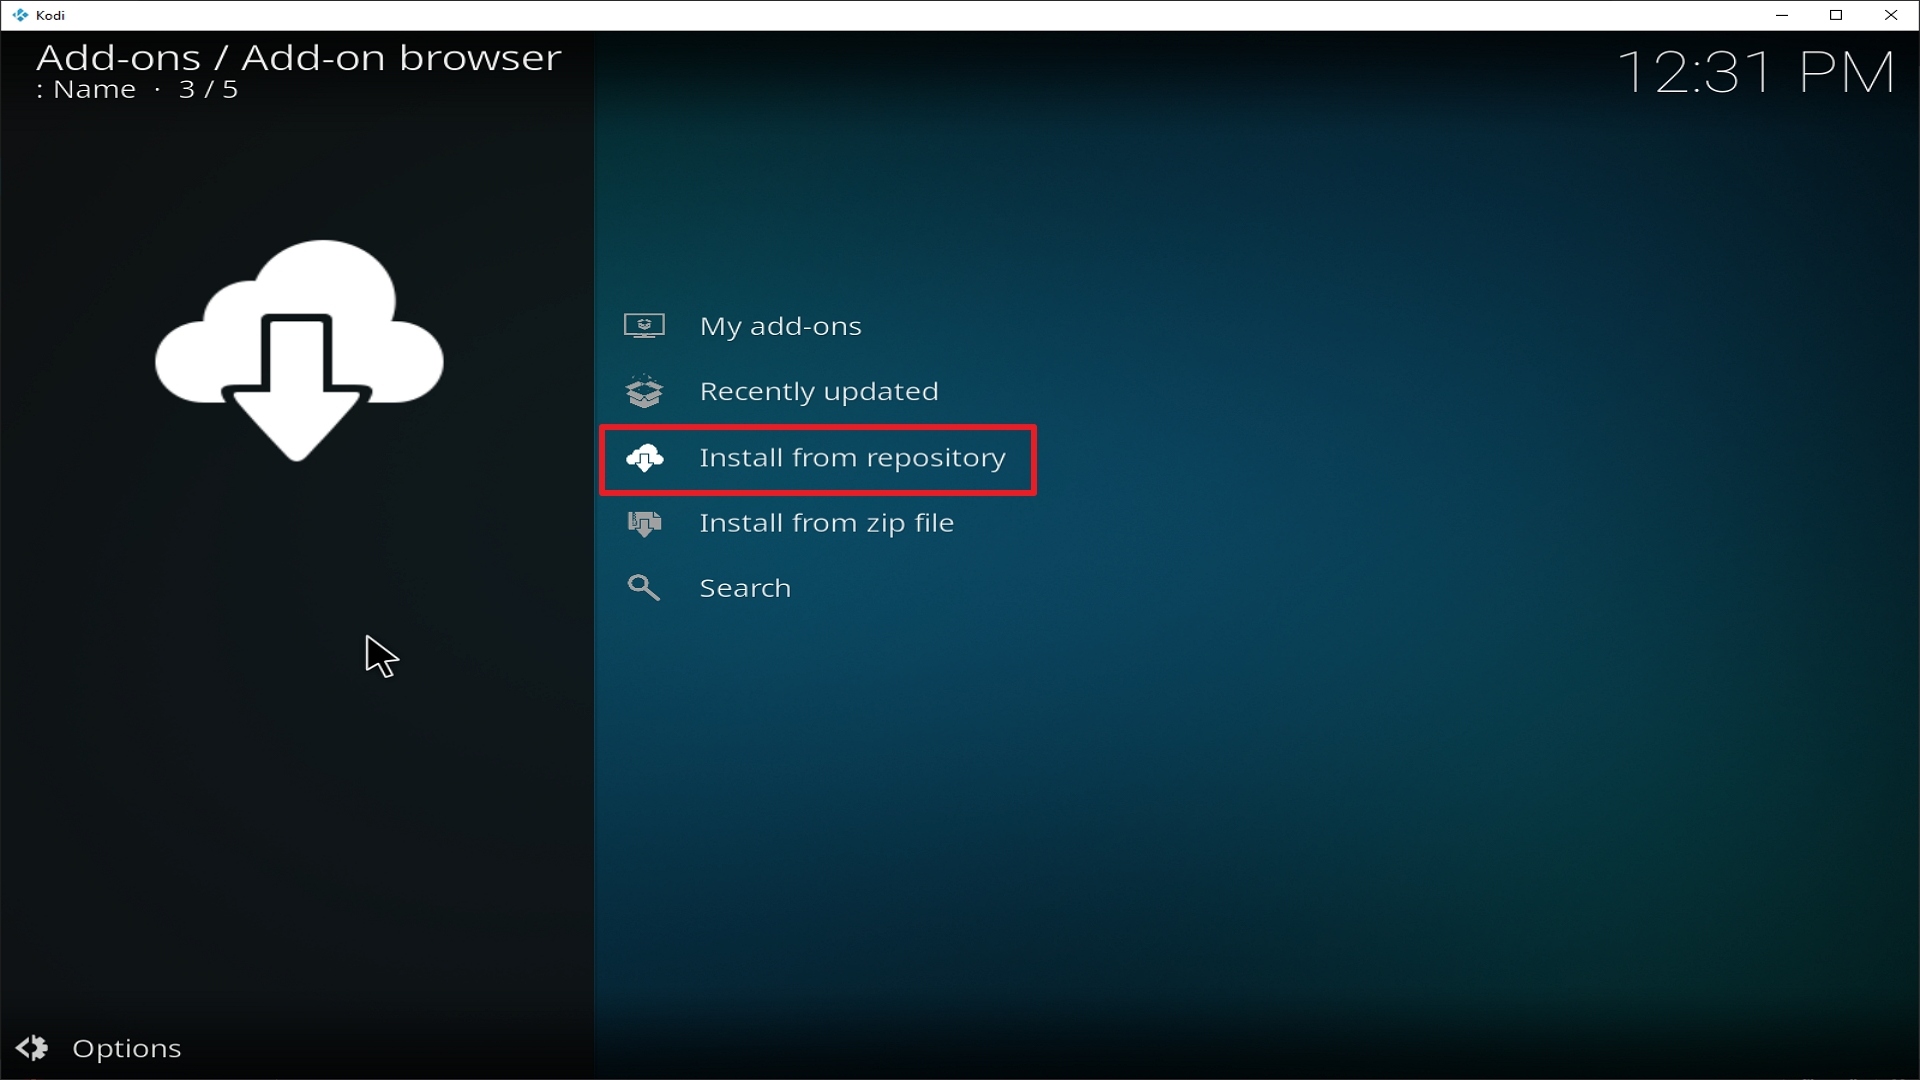
19. Select on Install from repository.

Step 19 Installing Leviathan addon on Kodi


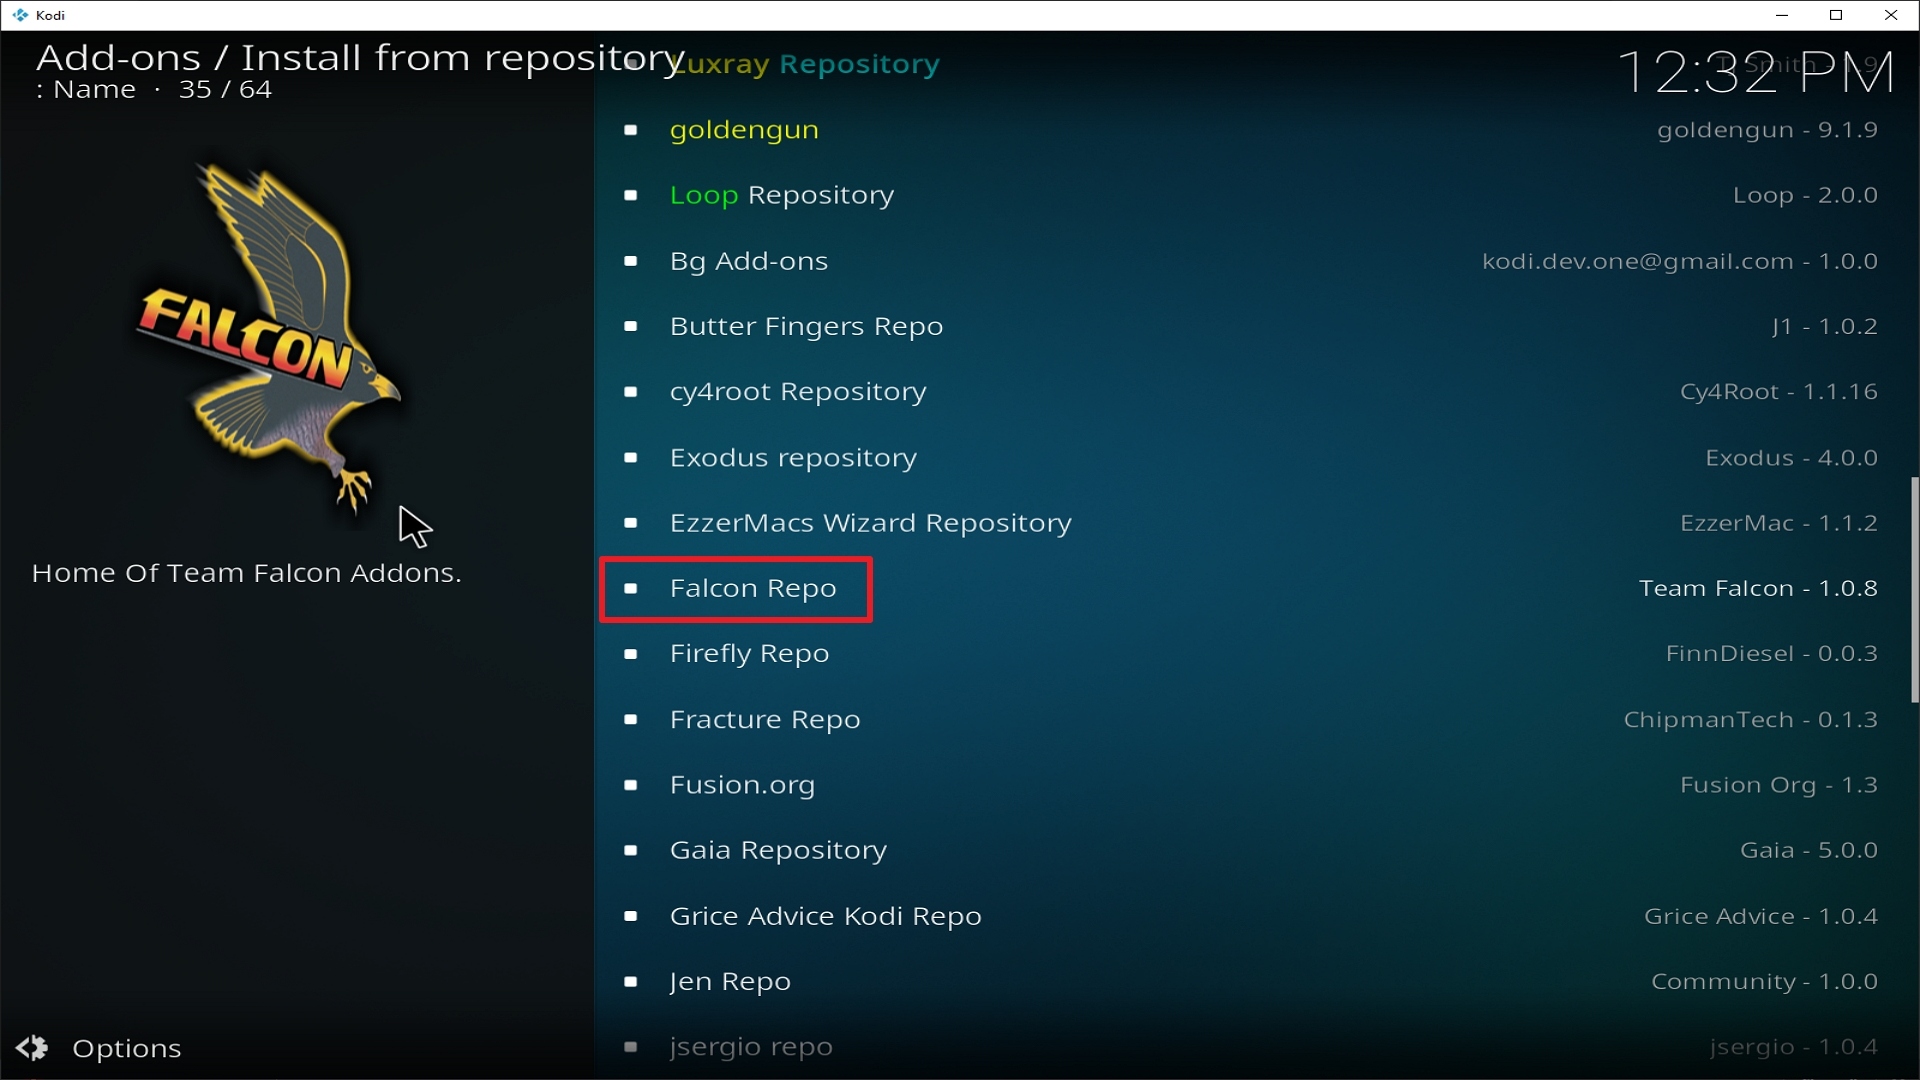
20. Click on Falcon Repo.

Step 20 Installing Leviathan addon on Kodi


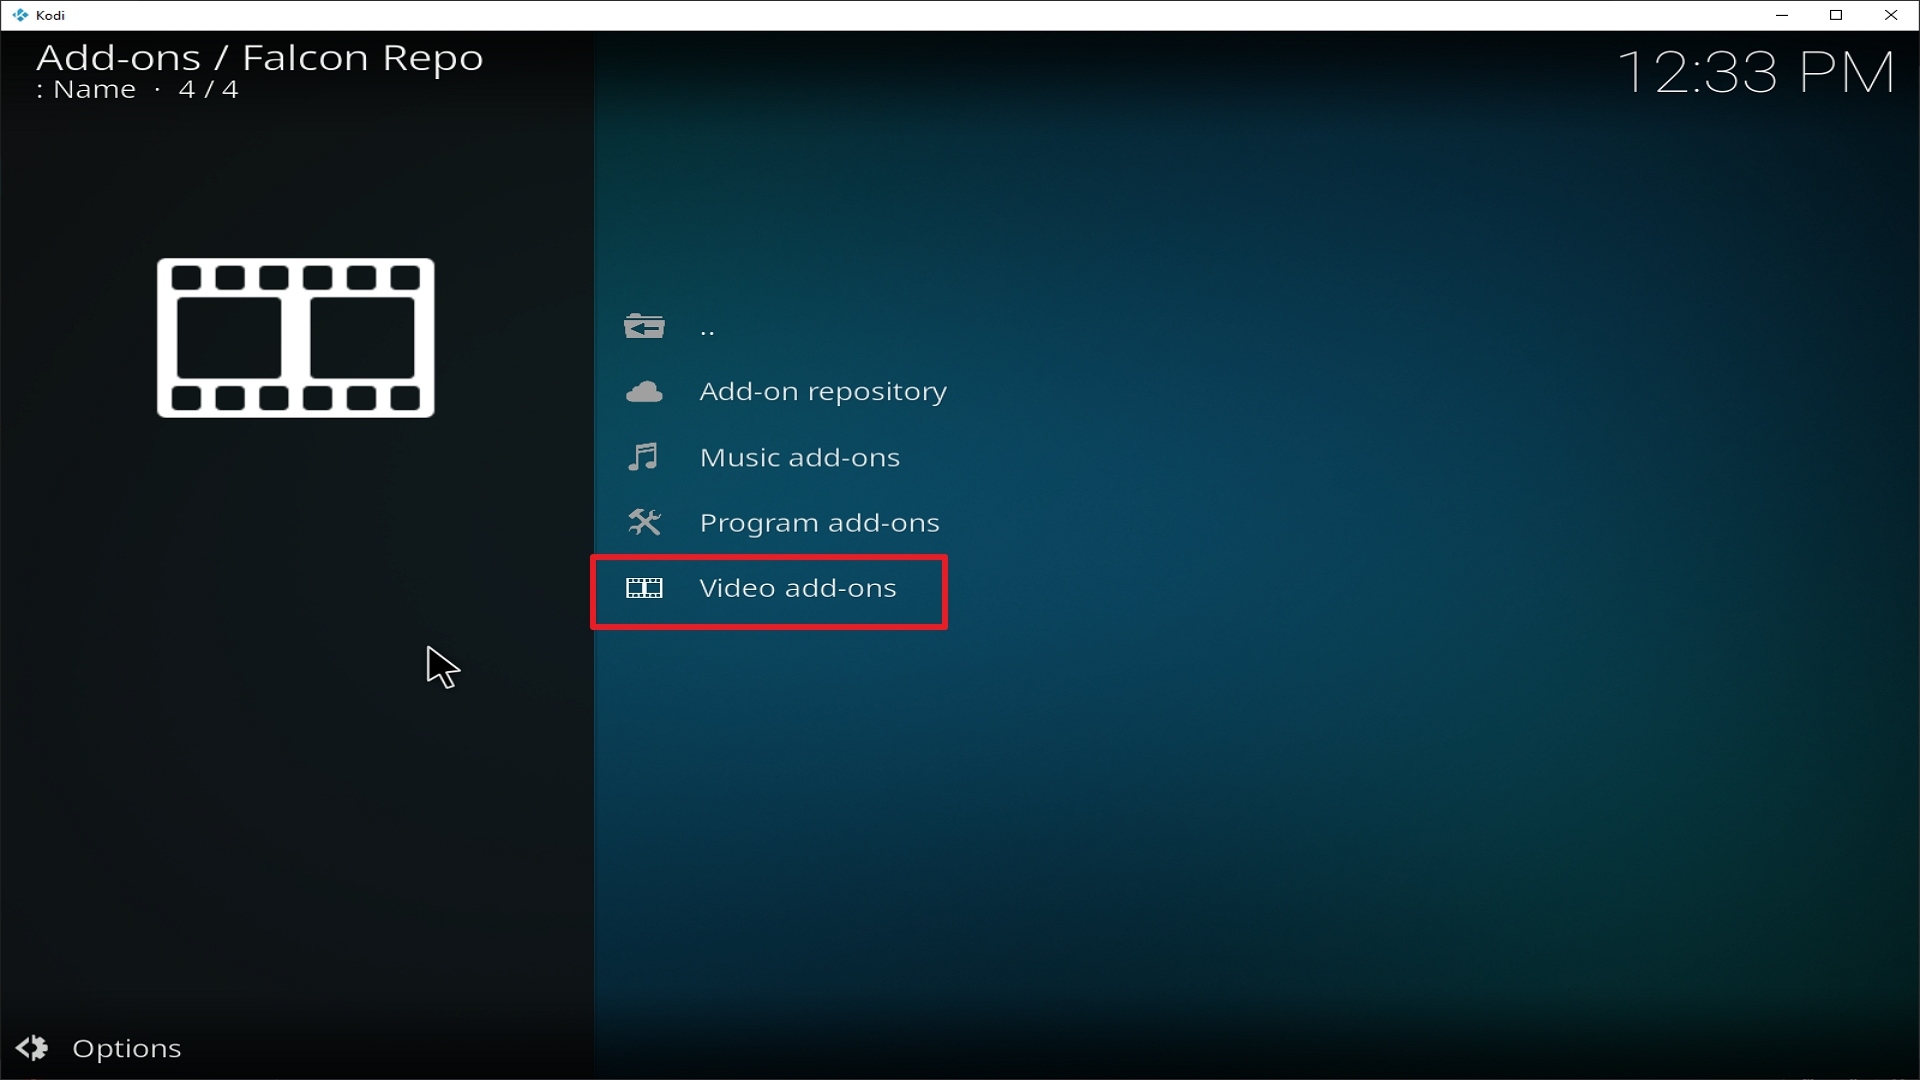
21. Pick Video add-ons.

Step 21 Installing Leviathan addon on Kodi


22. Select Leviathan again.

Step 22 Installing Leviathan addon on Kodi


23. Click on Install.

Step 23 Installing Leviathan addon on Kodi


24. Select OK after reviewing the add-ons that will be installed.

Step 24 Installing Leviathan addon on Kodi


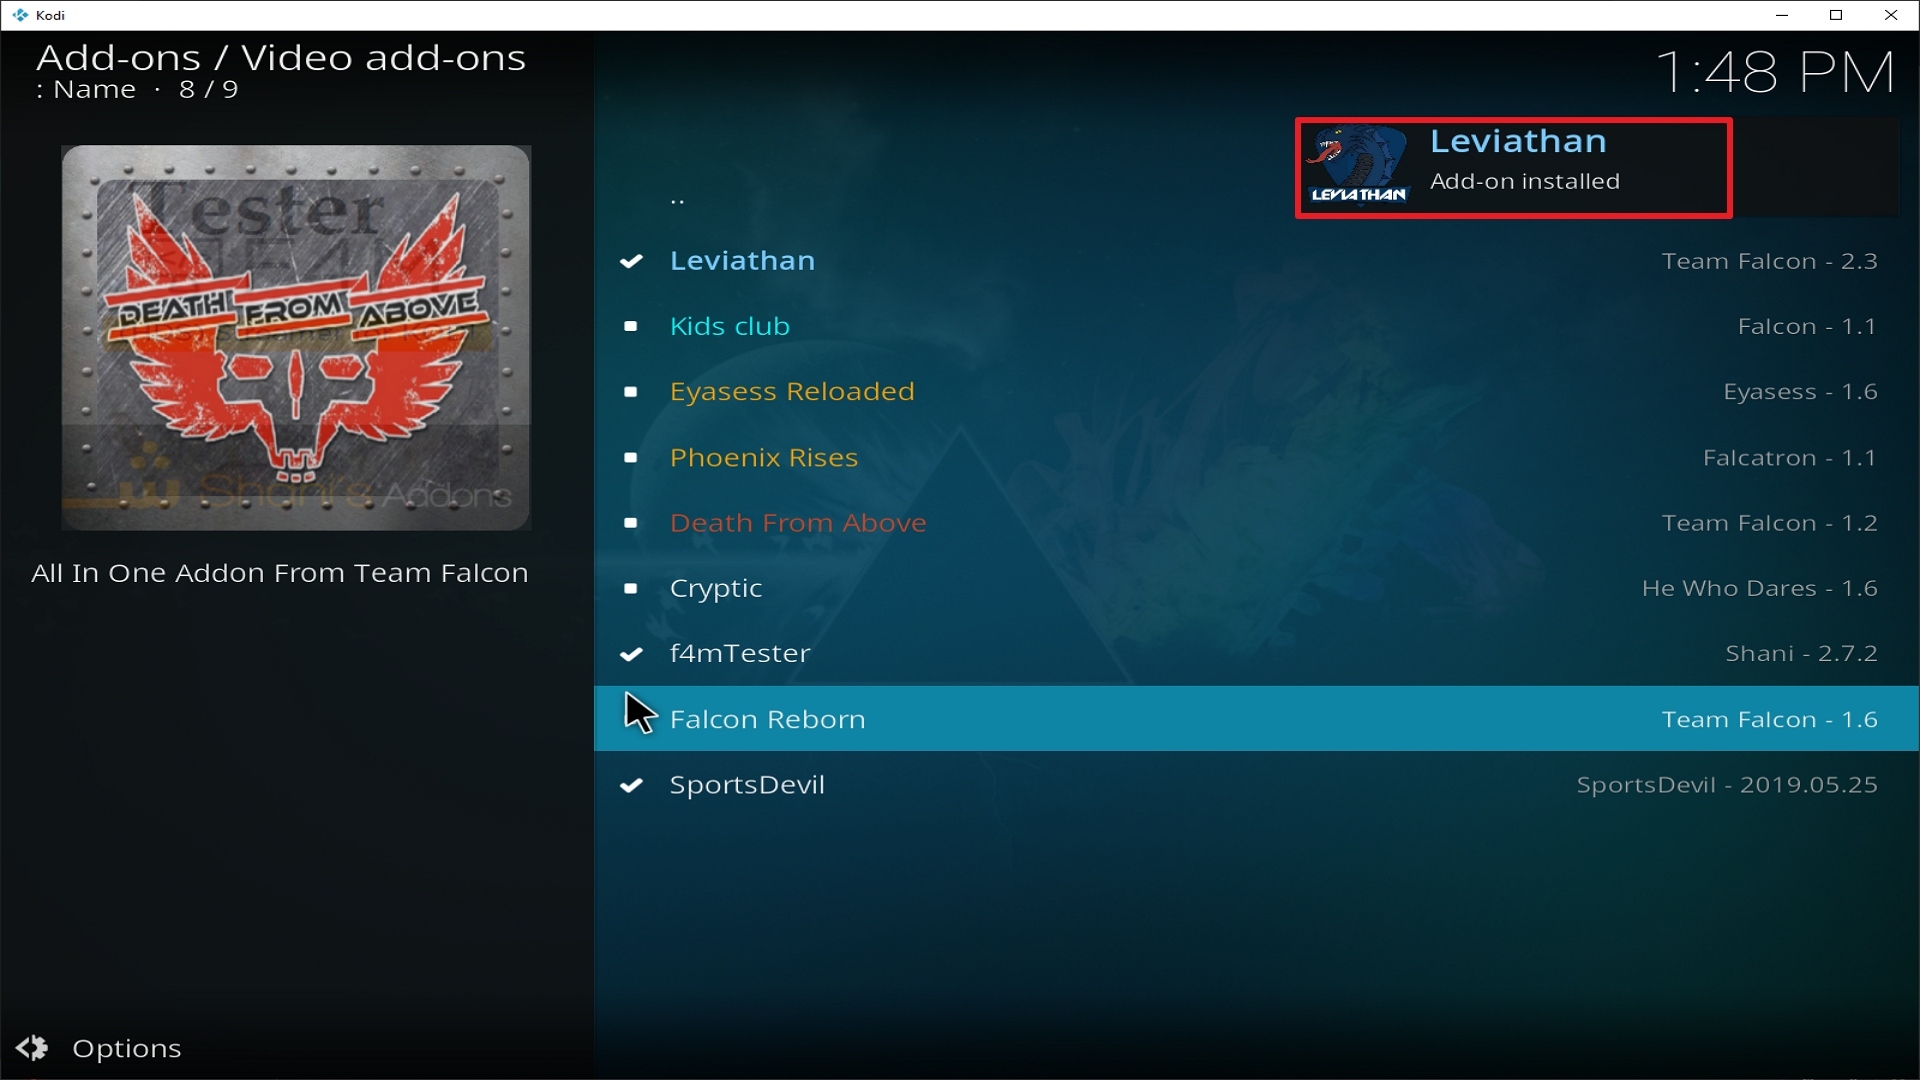
25. You should see a popup in the upper right corner saying Leviathan has installed. There will actually be multiple popups for the various components.

Step 25 Installing Leviathan addon on Kodi


26. Click on Open to start the Leviathan add-on.

Step 12 Installing Leviathan addon on Kodi


Alternatives

We are assuming that you are already familiar with how Kodi works and that sometimes there are unforeseen circumstances that may arise. So we always recommend to our subscribers to always have a backup plan in case something happens with Leviathan’s run. Given the specs and features of Leviathan, it is very hard to find worthy alternatives for it. But lucky for you, we here at ReviewVPN only recommend the best add-ons that we get from trusted sources. The following may serve as substitutes for Leviathan:

        Primal

        Exodus

        Exodus Redux

        Bumblebee

        Locutus


Install Surfshark on Firestick

Best Surfshark Deal


Legal Disclaimer: ReviewVPN.com does not encourage or endorse any illegal activity involved in the usage of services and applications referenced on this site. We do not verify the licensing agreements of services. The end-user is wholly responsible for ensuring that any media accessed through these services does not violate copyright and/or licensing laws. ReviewVPN does not promote, link to, or receive compensation from any Apps and IPTV services.


YOUR INTERNET ACTIVITY IS BEING WATCHED

ReviewVPN cannot attest to the legality, security and privacy of the applications discussed on this site. It is highly recommended that you use a VPN service while streaming or using Kodi.

Currently, your IP 216.73.217.150 is visible to everyone and your Browser is being tracked by Advertisers & ISP Provider.

Save 65% Now

Limited Time Offer

Here are the main reasons why you must use a VPN:

  • Your activities are hidden from your ISP, the government, and from the apps you are using.
  • You can access additional movies and TV streams.
  • ISP attempts to throttle are thrwarted thus reducing buffering issues.
  • Geographically restricted content like Netflix and Hulu can be unblocked.

A VPN works be replacing your ISP-assigned IP address and creating an encrypted tunnel. We recommend the no log service offered by IPVanish. It works well on a Firestick and offers the fastest possible speeds.

Special Limited Time Offer - Get IPVanish


Common errors

These are some of the things that may cause an issue when installing Phoenix Rises:

  1. Unable to connect to URL/Download

If you are having difficulties downloading Leviathan this may mean that the repository is unstable and that the IP may be unavailable. It is also worth checking out if you have typed the correct URL that you have downloaded Leviathan from the right repository. Also, make sure that you have a stable internet connection and that you are secured by a VPN. If your country has stricter rules regarding censorship, you may find that it is blocked because it may contain adult content and that it is collected illegally. Your ISP constantly monitors your activity and may block certain websites from being accessed. To fix this, use a VPN to make your connection encrypted and anonymous so that your tracks will be covered. Check here for the best VPN deal.


  1. Script Error

This error occurs due to the add-on itself or the manner Kodi has been installed. Make sure that you have installed everything properly. If this problem persists, try reinstalling the add-on or there may be a need to update or reinstall Kodi. To figure out how to do this and other fixes read our in-depth guide linked above.


  1. Kodi Check Log Error

Check Log Errors usually happen often as you use Kodi until you get familiar with it. This usually happens when your media cache is full. Your device will always cache a clip every time you watch media to allow faster loading time. In the long run, this cache gets full thus creating this issue. An in-depth guide on how to empty your cache is provided at the link above.


  1. Source not working/slow/frozen

Leviathan does not keep any of the content on its servers, these are all coursed through 3rd party sites. Give the source up to 15 seconds to load and then you can try other suggestions. For other solutions please take the time to read our in-depth guide linked above.


How to Install Surfshark VPN on Firestick

If your Firestick still has the older interface, read this article to learn how to update it: Update Firestick Interface.

You can download Surfshark directly from the Amazon App store. It will be easy for you to find Surfshark with your Firestick’s Find feature. Refer to our screenshots below.

1. Go to the Home screen of your Firestick.

step 1 Install Surfshark VPN on Firestick


2. Navigate towards the Find tab. Press the Search button from the resulting dropdown.

step 2 Install Surfshark VPN on Firestick


3. Type in the keyword of SurfShark and select from the suggestions that will appear.

step 3 Install Surfshark VPN on Firestick


4. Click the official SurfShark icon from your search results.

step 4 Install Surfshark VPN on Firestick


5. Press the Download (You own it) button.

step 5 Install Surfshark VPN on Firestick


6. The SurfShark VPN installer will download on your device.

step 6 Install Surfshark VPN on Firestick


7. SurfShark VPN’s app will automatically install itself on your Fire TV stick.

step 7 Install Surfshark VPN on Firestick


8. Press the Open button after completing SurfShark VPN’s installation process.

step 8 Install Surfshark VPN on Firestick


9. Please wait for the SurfShark VPN to load its user interface.

step 9 Install Surfshark VPN on Firestick


10. You can now log in with your SurfShark VPN account credentials.

step 10 Install Surfshark VPN on Firestick

Learn more about Surfshark and Grab the Best Surfshark Deal Now!


Install Surfshark on Firestick

Best Surfshark Deal


Other VPNs to Consider

NordVPN (Best for Streaming)

Best Features

  • 5000+ Server in 50+ Countries 
  • Military-Grade Encryption
  • Fast Connection Speed
  • Suitable to a lot of devices
  • No-Log Policy

Prices
  • Complete $5.89 per month (64% Discount)
  • Plus $4.59 per month (56% Discount)
  • Standard $3.69 per month (55% Discount)

Best Features

  • 750+ High-speed VPN Servers in 43 Locations
  • Military-Grade Encryption
  • Fastest HD Streaming and Gaming
  • 30-Day Money-Back Guarantee
  • Unlimited Data & Devices
  • No-Log Policy

Prices
  • 3 Years $1.99 per month (82% Discount)
  • 1 Years $3.29 per month (70% Discount)
  • 1 Month $10.99 per month

IPVanish VPN (Most Secure)

Best Features

  • 1200+ Servers in 60+ Countries around the world
  • Unlimited Connections
  • No-Log Policy
  • Top Notch Military-Grade VPN Protocols and Encryptions
  • 100% Safe and Secured
  • Most Trusted VPN
  • Best VPN for Firestick
  • 30-Day Money-Back Guarantee

Prices
  • Yearly $3.99 per month (63% Discount) – 30 days risk free + Ransomware & Malware Protection
  • Quarterly $5.32 per month (51% Discount)
  • Monthly $10.99 per month


For more VPN discounts, go to ReviewVPN Deals and purchase the best VPN for you.

Click here to get the lowest price on Surfshark through our exclusive limited-time offer.


Conclusion

Leviathan Kodi Video add-on really lives up to its name. It provides high-quality links that don’t buffer and only take a little time to load. Aside from that, it gives its users a wide range of choices to choose from due to its wide range of categories. Ultimately, we can call Leviathan an all-around add-on. So if you are looking for an add-on that does the job? Seek no more, Leviathan is here. Please feel free to leave your suggestions below and through any of our other social media platforms. Thank you and God Speed!

Install Jen of Debrid Kodi Addon

Jen of Debrid Kodi Addon

http://repo.rubyjewelwizard.com/


A lot of people today rely on Netflix, Hulu, HOOQ, Iflix, and others for their daily dose of movies and/or TV Shows. These platforms require a certain amount in order to avail of their services.

Netflix, for example, requires $10/month to be a member. Some may find that cheap and some may find it expensive.  But for those who are very practical and don’t want to spend money, and want to maximize the money they pay for their internet connection, they rely on Kodi and many of its add-ons.

The majority of the add-ons we have today provide links from file hosts. Only a few are out there who provide content via torrent cache and one of those add-ons is Jen of Debrid.

Jen of Debrid Kodi Video Add-on is one of the unique add-ons under the Diamond Wizard Repository that uses torrent caches to provide content to its users. It can only be run by having a Real-Debrid account.


ANONYMOUSLY


Key Features

        Real-Debrid Integration

        -Torrent-based streaming links (The Pirate Bay, EZTV, Glow Torrents, and recently YTS)

        Trakt Integration

        Diamond Movie Playlists

        Extensive categories to choose from


YOUR INTERNET ACTIVITY IS BEING WATCHED

ReviewVPN cannot attest to the legality, security and privacy of the applications discussed on this site. It is highly recommended that you use a VPN service while streaming or using Kodi.

Currently, your IP 216.73.217.150 is visible to everyone and your Browser is being tracked by Advertisers & ISP Provider.

Save 65% Now

Limited Time Offer

Here are the main reasons why you must use a VPN:

  • Your activities are hidden from your ISP, the government, and from the apps you are using.
  • You can access additional movies and TV streams.
  • ISP attempts to throttle are thrwarted thus reducing buffering issues.
  • Geographically restricted content like Netflix and Hulu can be unblocked.

A VPN works be replacing your ISP-assigned IP address and creating an encrypted tunnel. We recommend the no log service offered by IPVanish. It works well on a Firestick and offers the fastest possible speeds.

Special Limited Time Offer - Get IPVanish


Easy Installation Guide

  1. Open Kodi on your device
  2. Click on the “Gear Icon” and select “System”
  3. At the add-ons menu, turn on the “Unknown Sources” by clicking “yes”
  4. Go back to the “systems” page and choose “File Manager”
  5. Choose Add source and select “none”
  6. Type in http://repo.rubyjewelwizard.com
  7. Highlight the source and rename it to “diamond” or any name you would like to use to identify this particular source and click “ok”
  8. Go back to the System Screen and click “Add-ons”
  9. Select “Install Zip File” choose “diamond” or whatever you renamed the file.
  10. Select the zip file URL- repository.Diamond-Wizard-Repo-3.9.6.zip
  11. Wait for the notification “Diamond Build Add-on Repo Installed” to appear.
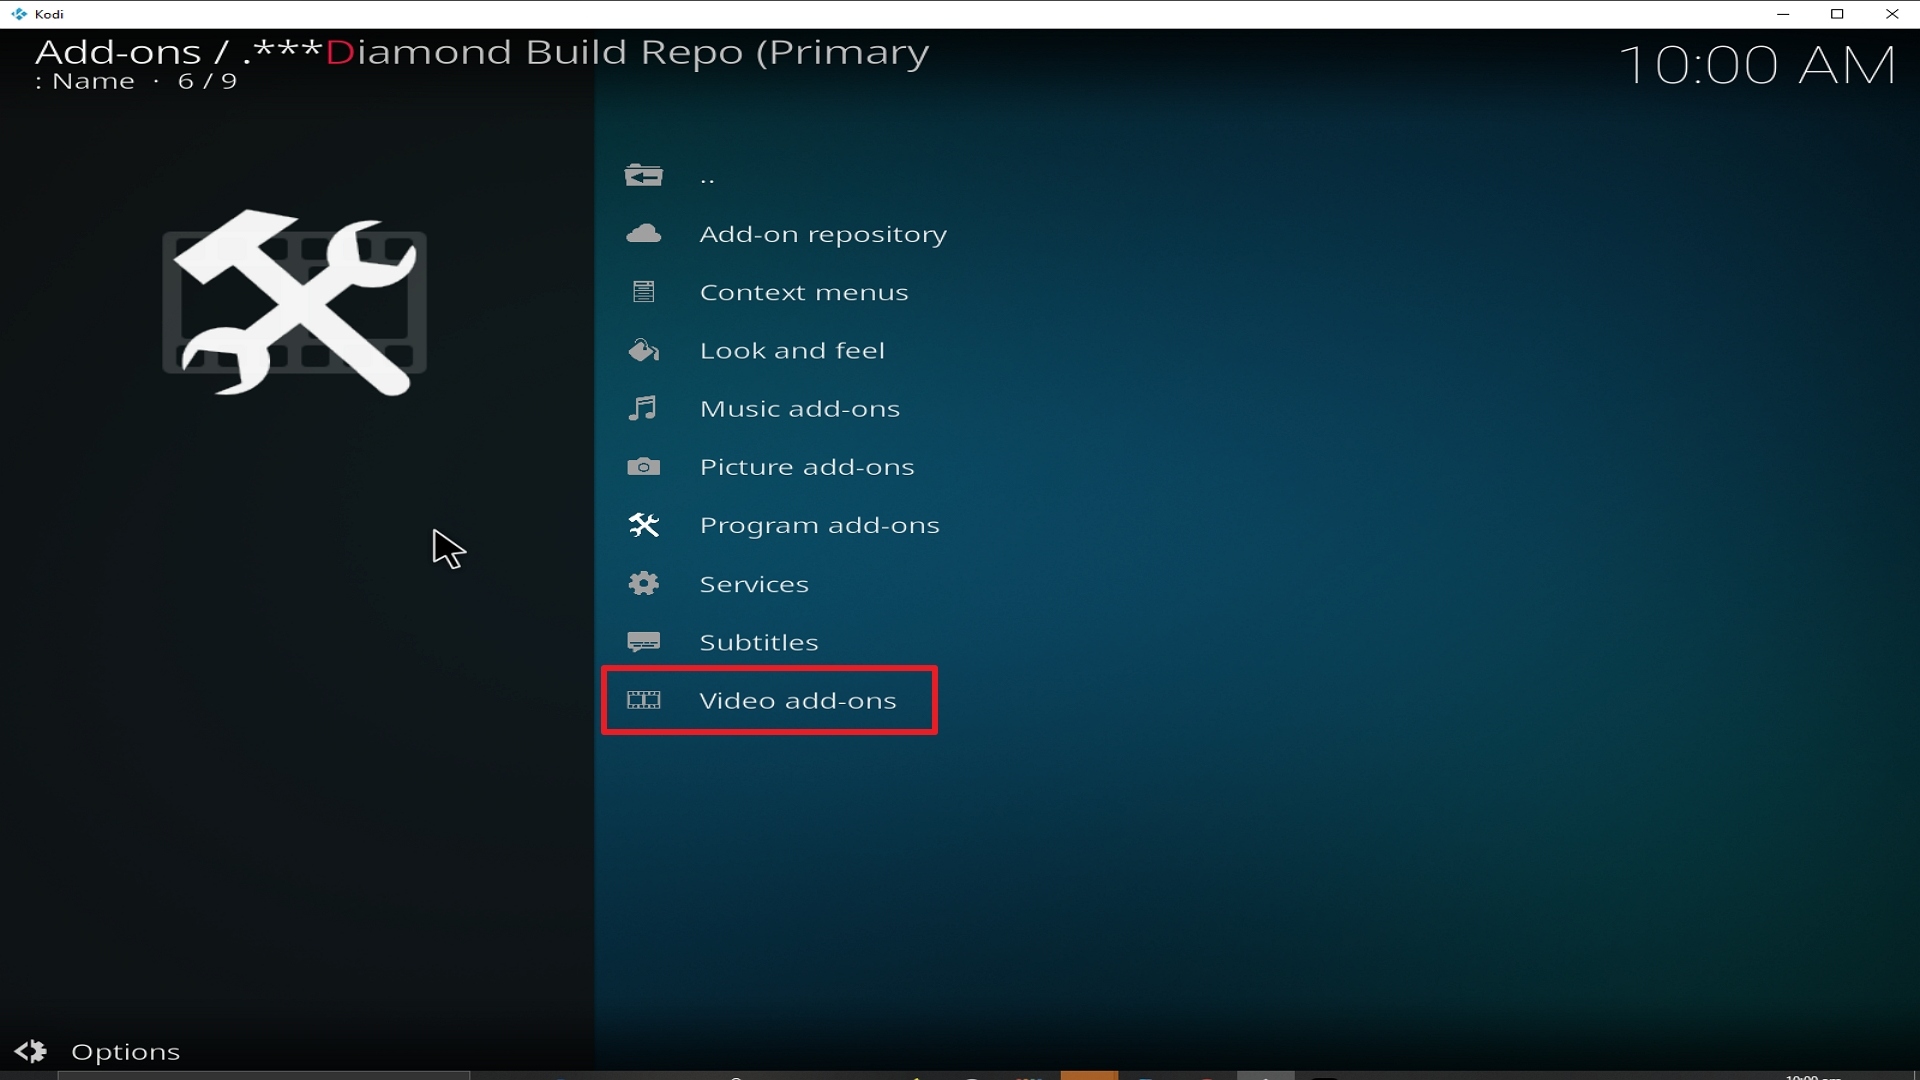
  12. Select “Install Repository”
  13. Choose “Diamond Build Repo”
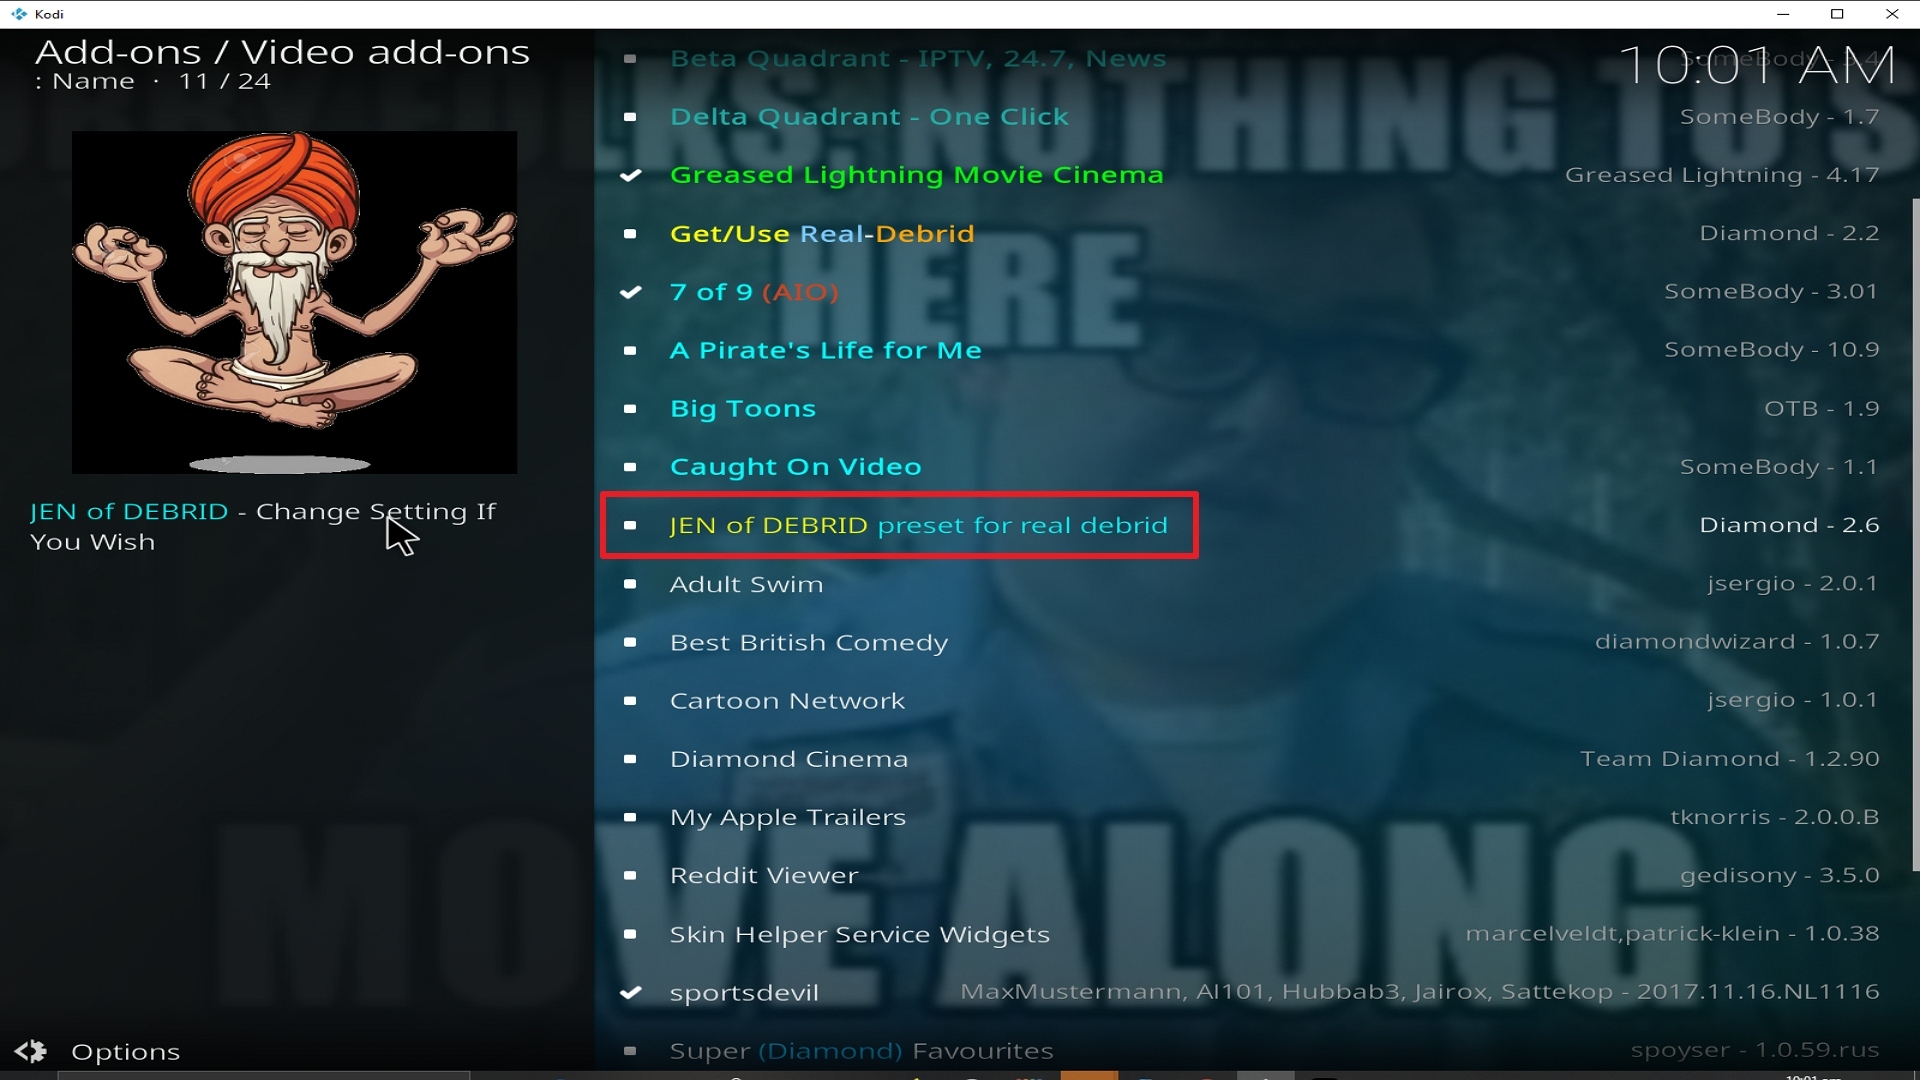
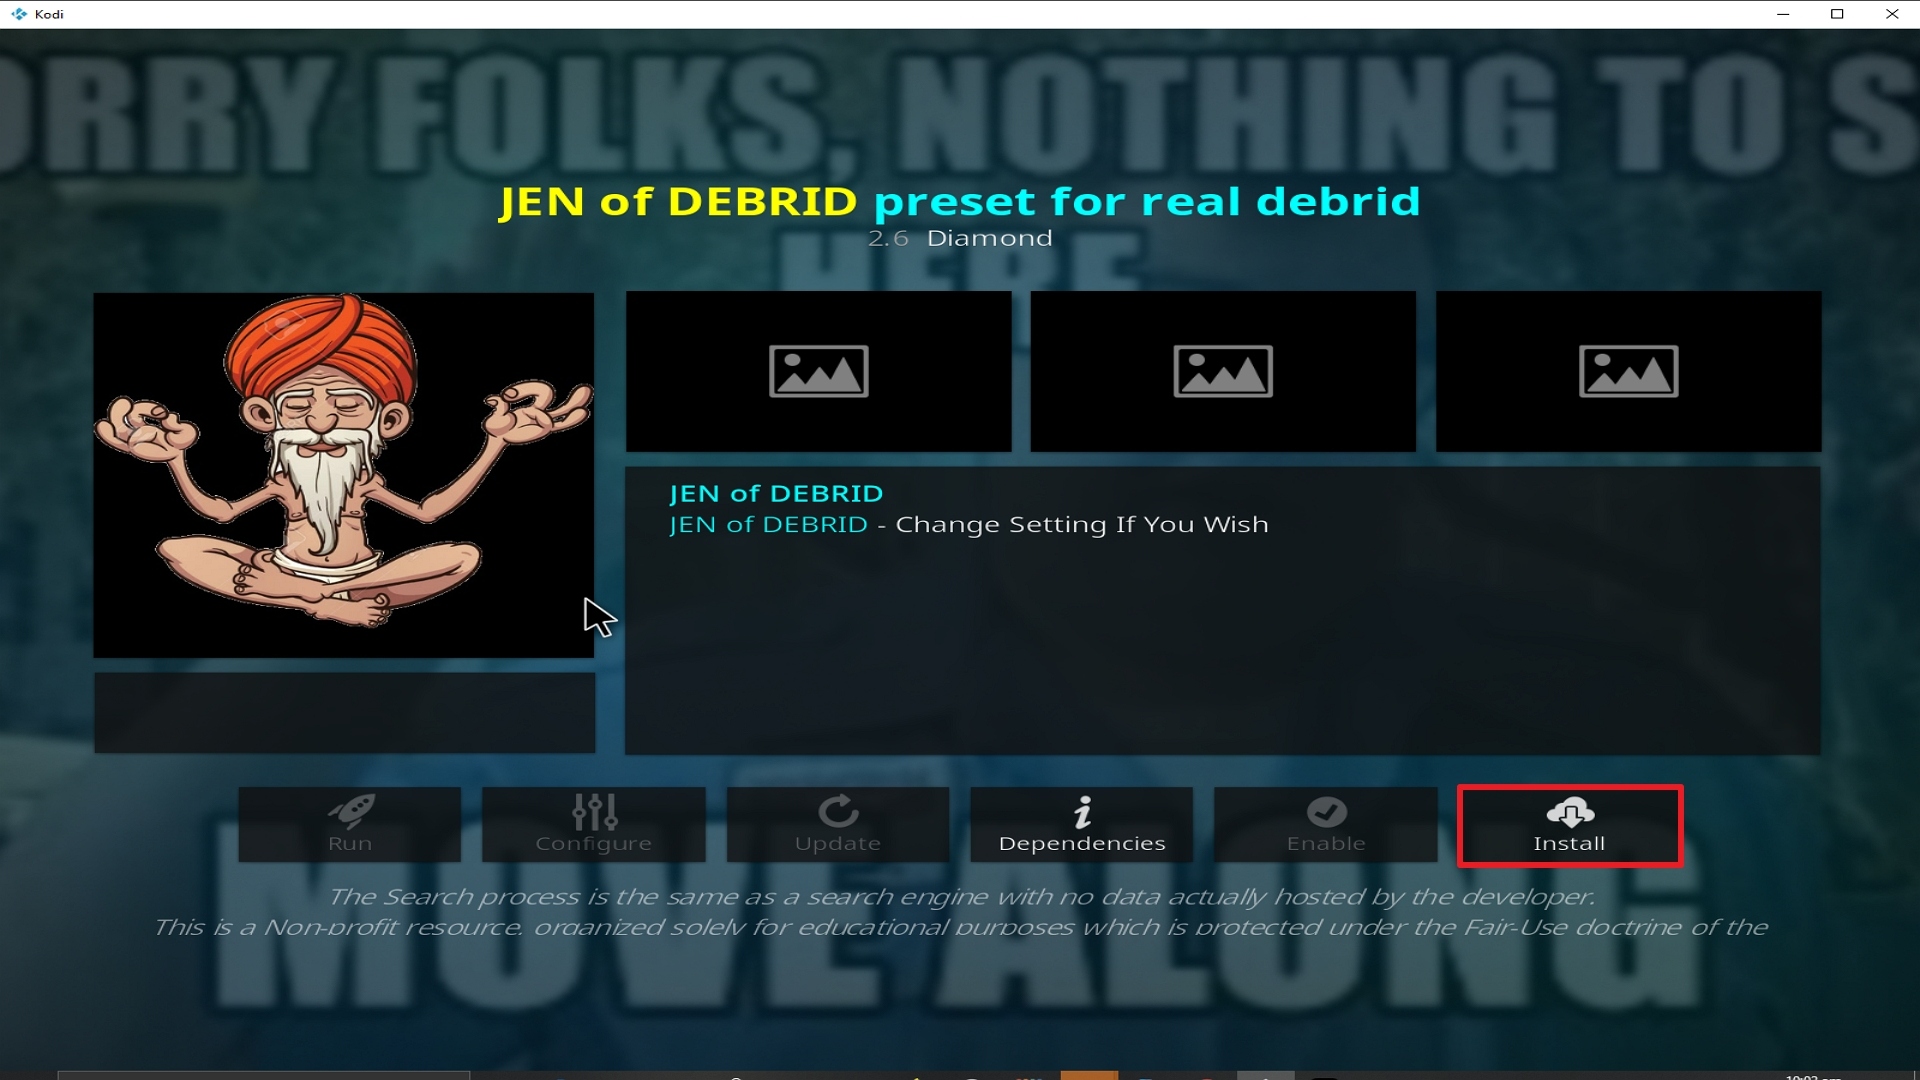
  14. Click on “Video Add-ons” and select “Jen of Debrid” and “Install”
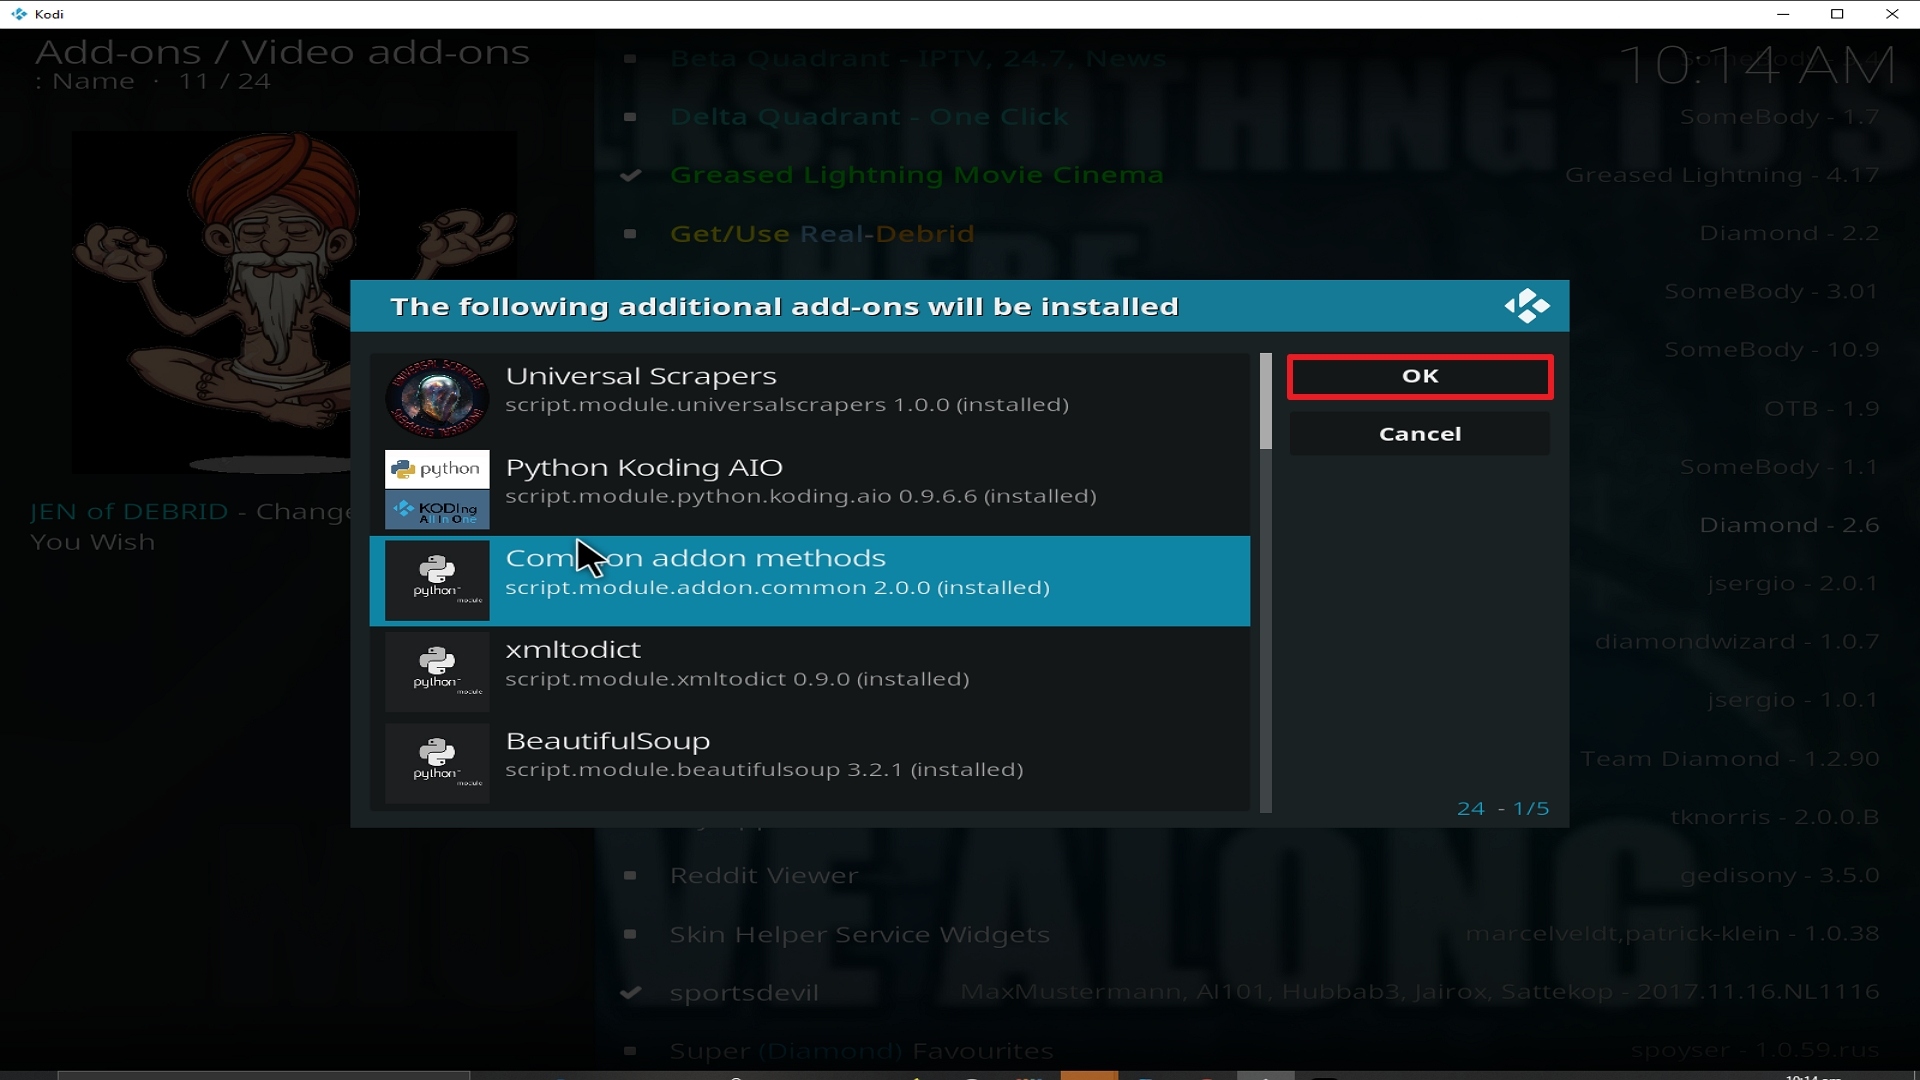
  15. Click “Ok” when a notification “the following add-ons will be installed” appears and wait for Jen of Debrid Add-on to install
  16. Once the add-on is installed go back to the home screen and select “add-ons”
  17. Choose “Video add-ons” and select “Jen of Debrid”
  18. There you go, Jen of Debrid is now installed.

Real-Debrid Integration

  1. If you don’t possess a Real-Debrid account yet, you must register.
  2. When Launching Jen of Debrid add-on you will be notified with this message. Write down the code that will be given.
  3. Launch a web browser on a different device and enter https://real-debrid.com/device.
  4. Type in the code you got and select “Continue”
  5. You will then be granted your Real-Debrid Account
  6. Go back to Jen of Debrid and a notification that shows another successful authorization message will appear, select “ok”
  7. If notified with a changelog, just press the “ok” button on your remote and voila! Jen of Debrid is now Real-Debrid ready.

How to Install Jen of Debrid on Kodi with Screenshots

1. From the home screen, select the cogwheel at the upper left.

Step 1 Installing Jen of Debrid addon on Kodi

2. Select System in the bottom right corner.

Step 2 Installing Jen of Debrid addon on Kodi


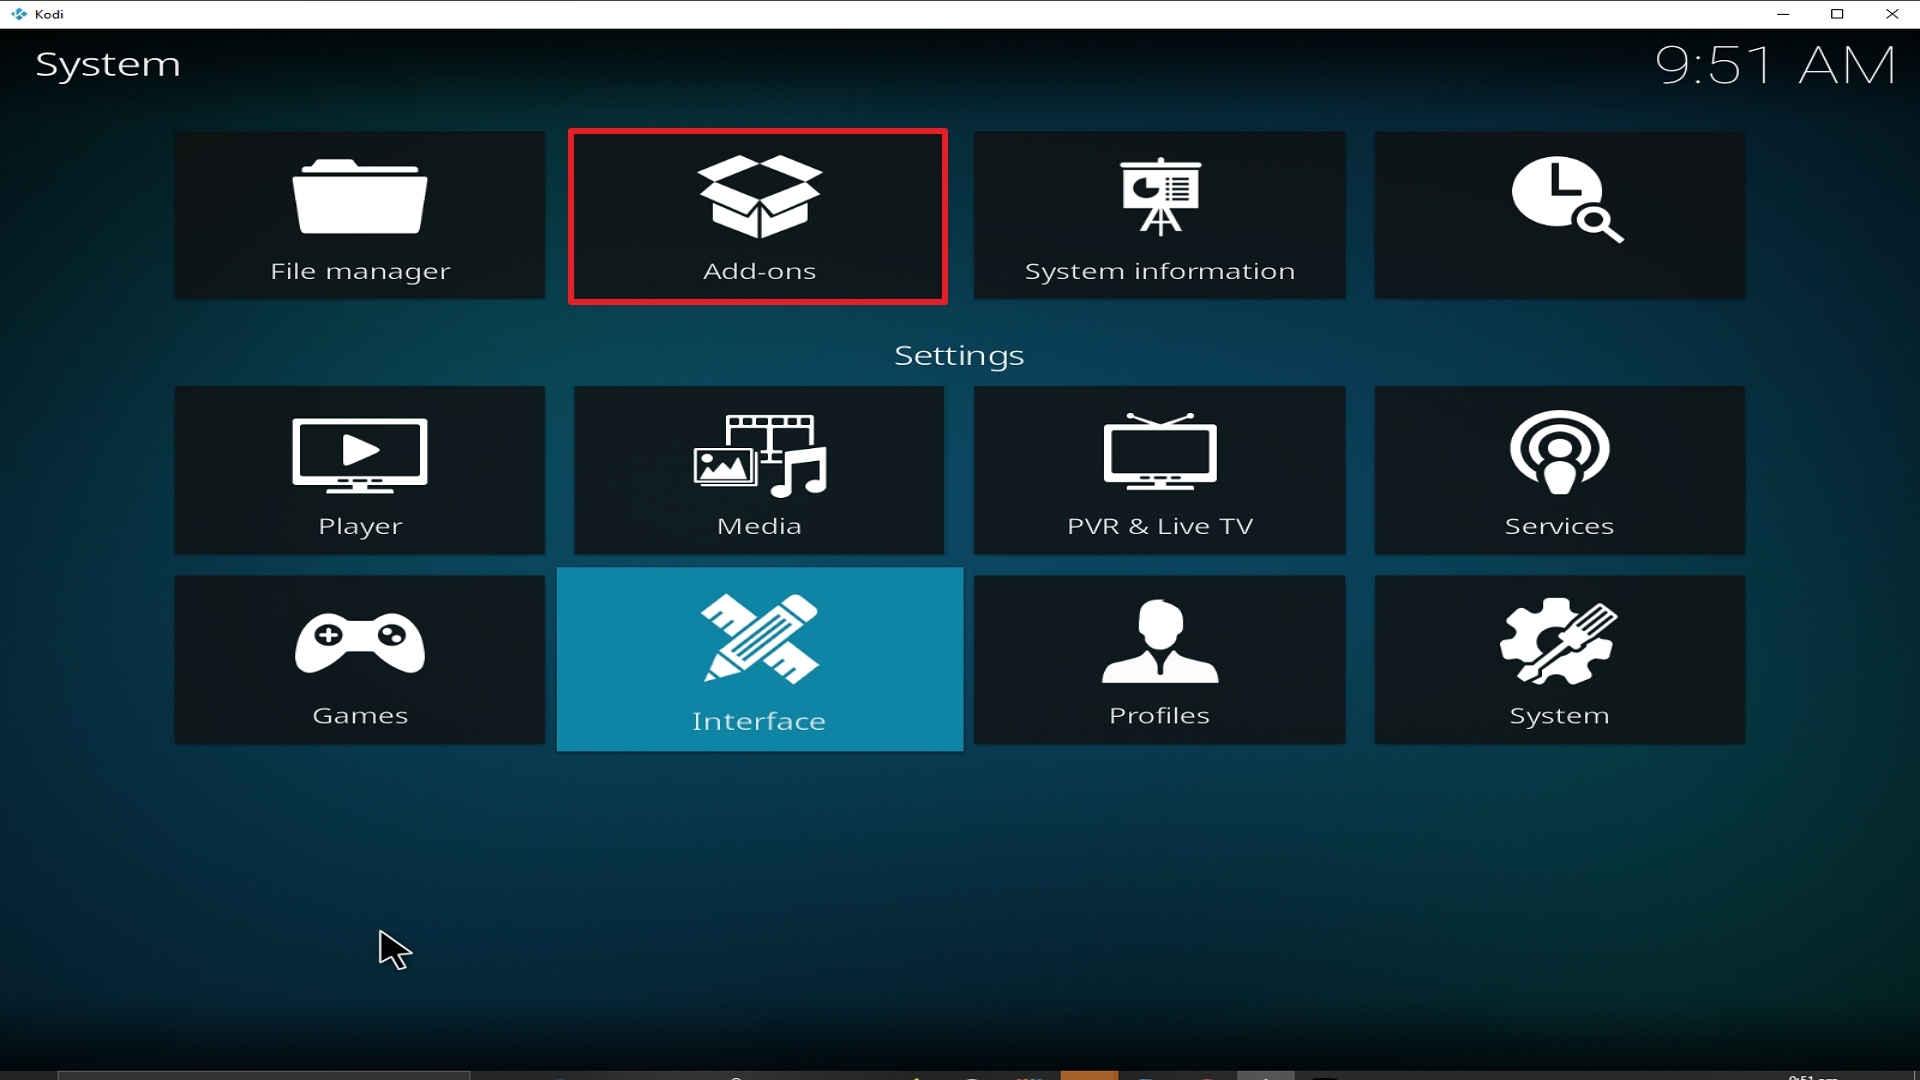
3. Select Add-ons on the left side of the screen.

Step 3 Installing Jen of Debrid addon on Kodi


4. Select Unknown sources.

Step 4 Installing Jen of Debrid addon on Kodi


5. Click Yes to allow unknown sources.

Step 5 Installing Jen of Debrid addon on Kodi


6. Select File manager.

Step 6 Installing Jen of Debrid on Kodi


7. Click Add source.

Step 7 Installing Jen of Debrid addon on Kodi


8. Click on <None>.

Step 8 Installing Jen of Debrid addon on Kodi


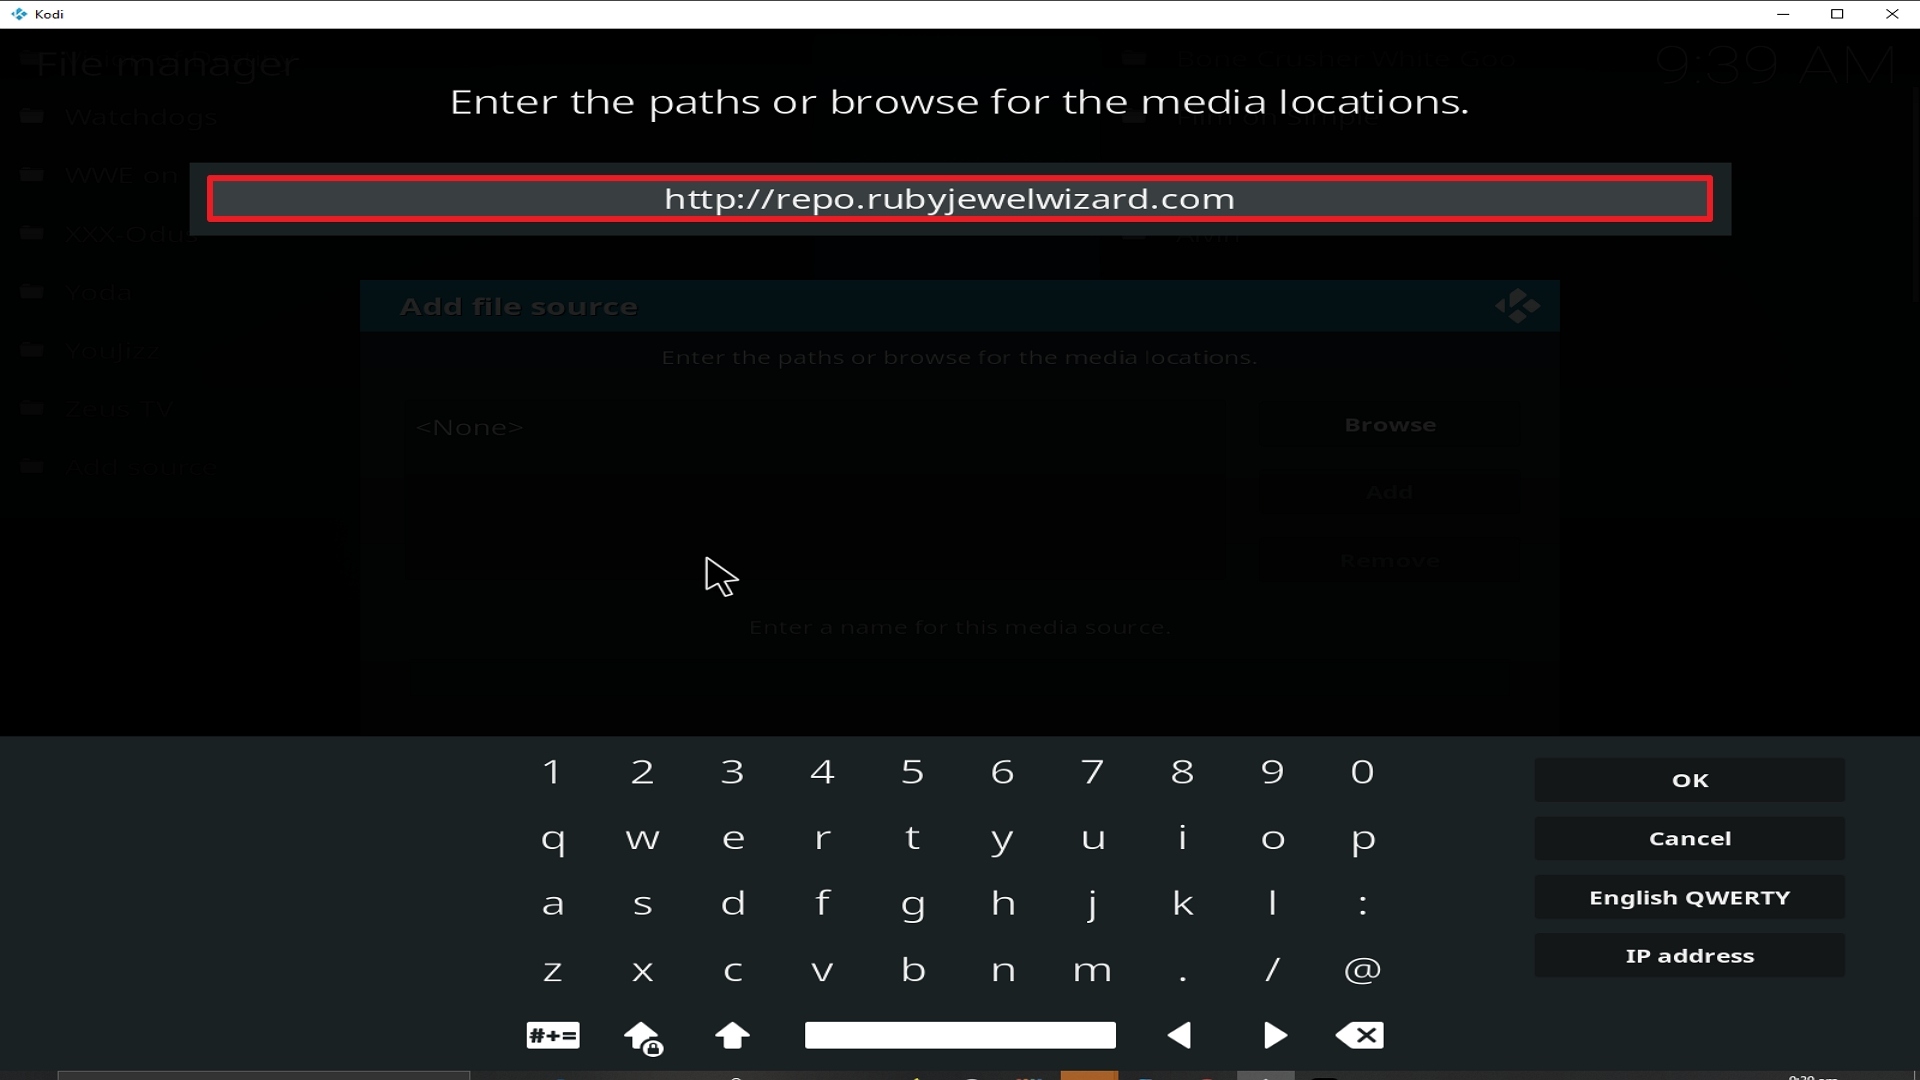
9. Type exactly: http://repo.rubyjewelwizard.com/

Step 9 Installing Jen of Debrid addon on Kodi


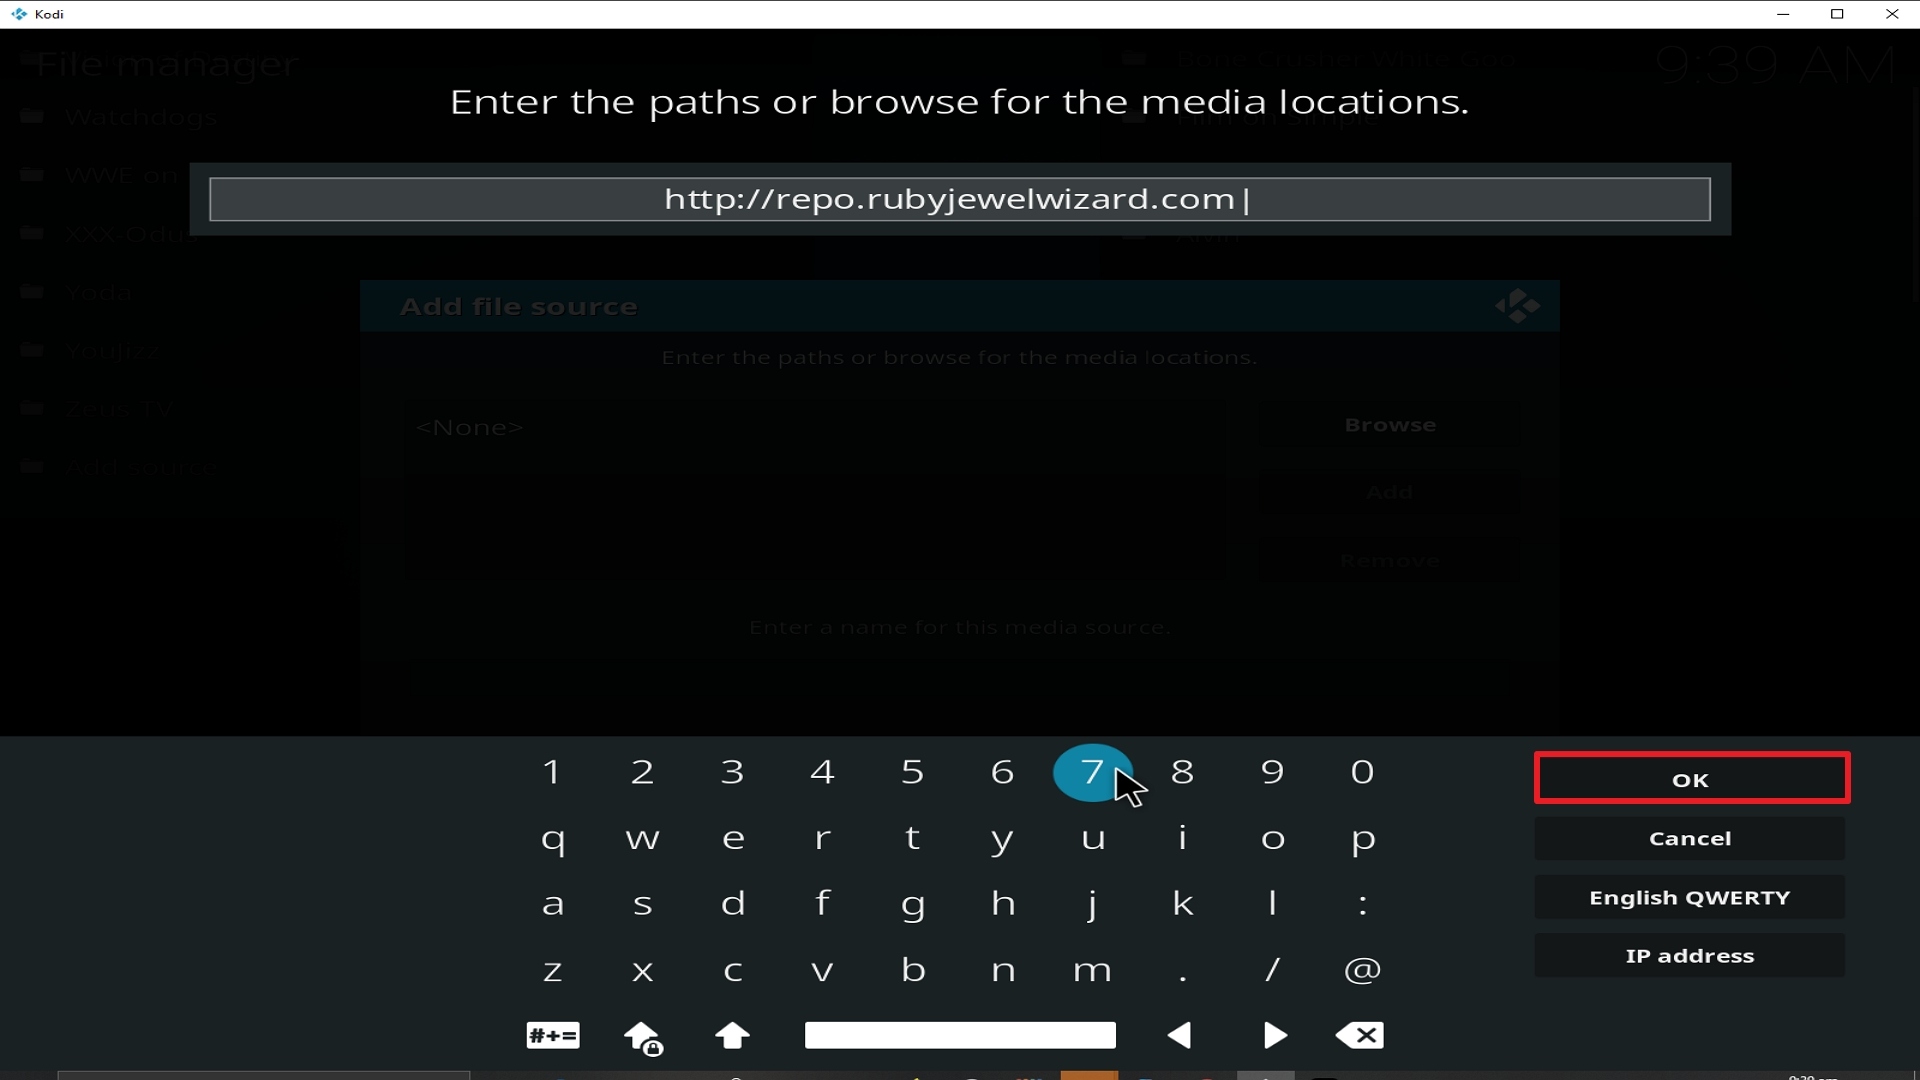
10. Click on OK.

Step 10 Installing Jen of Debrid addon on Kodi


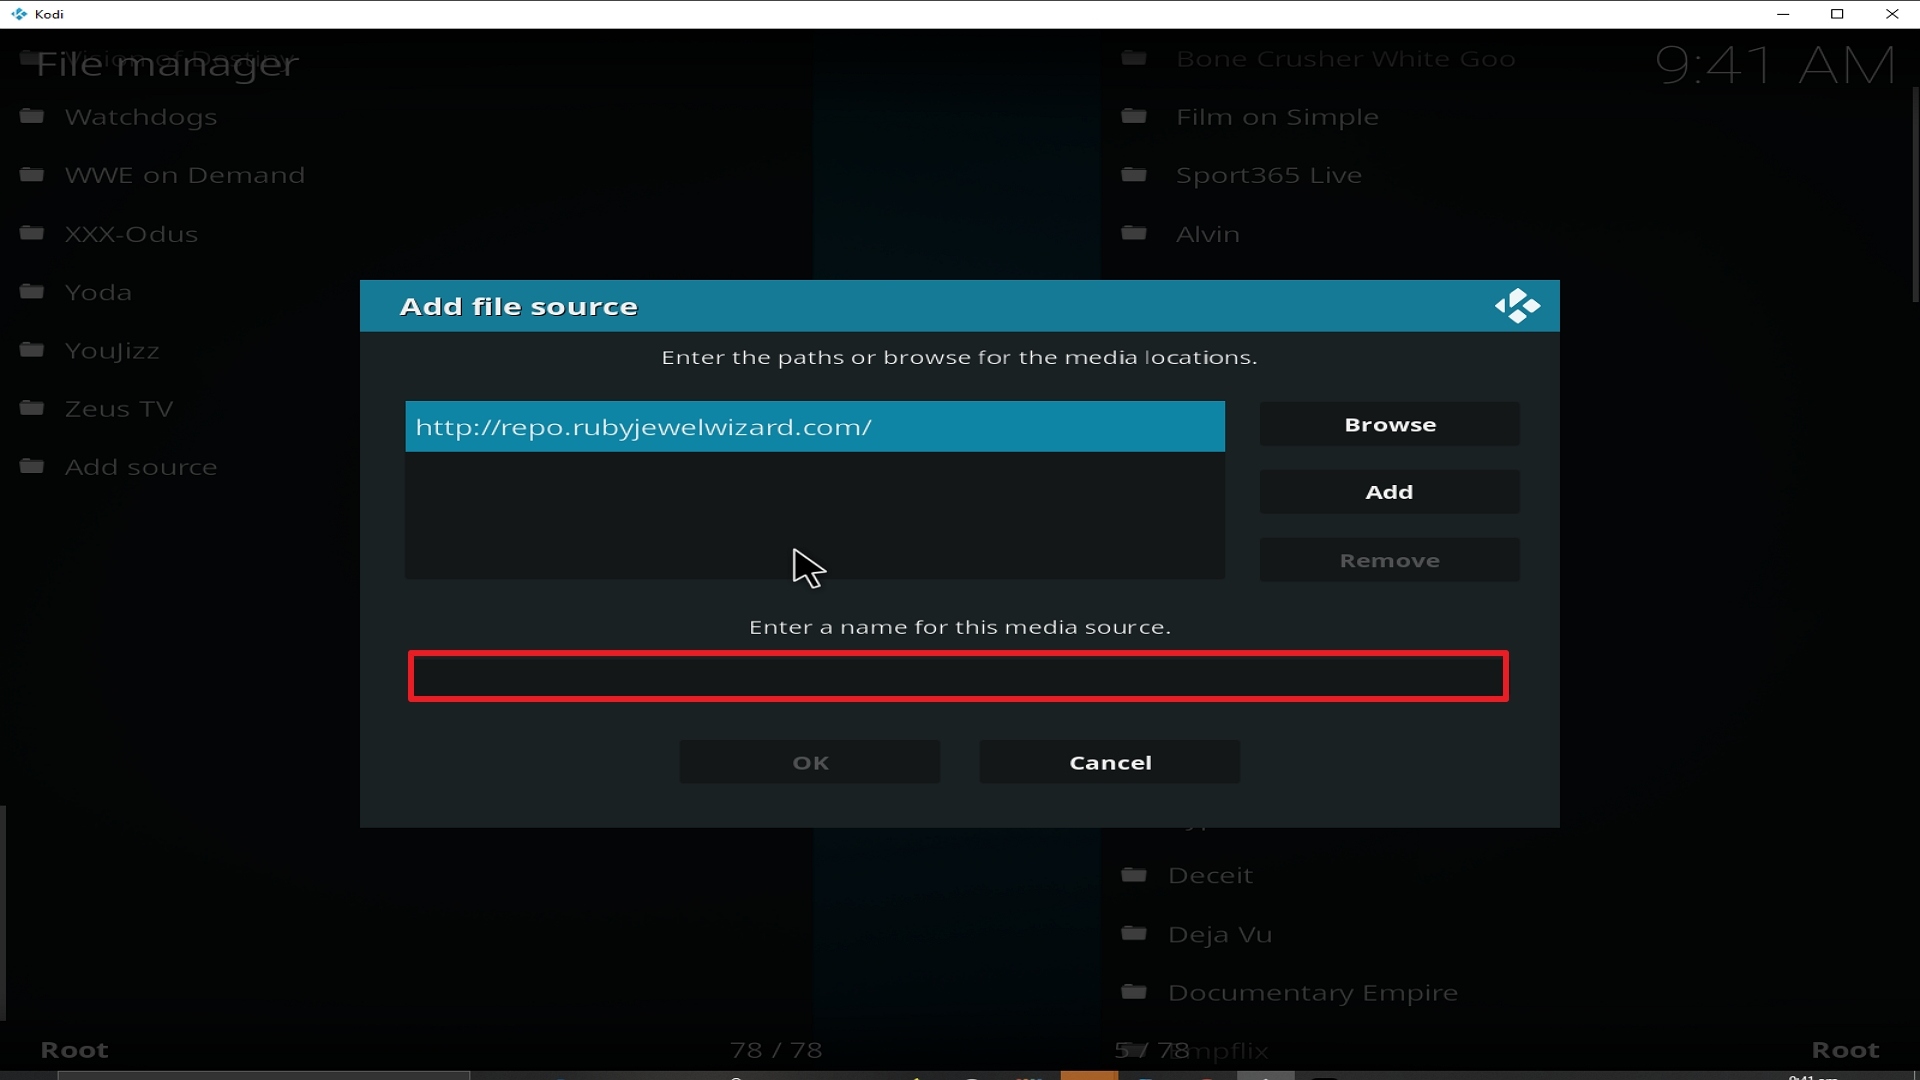
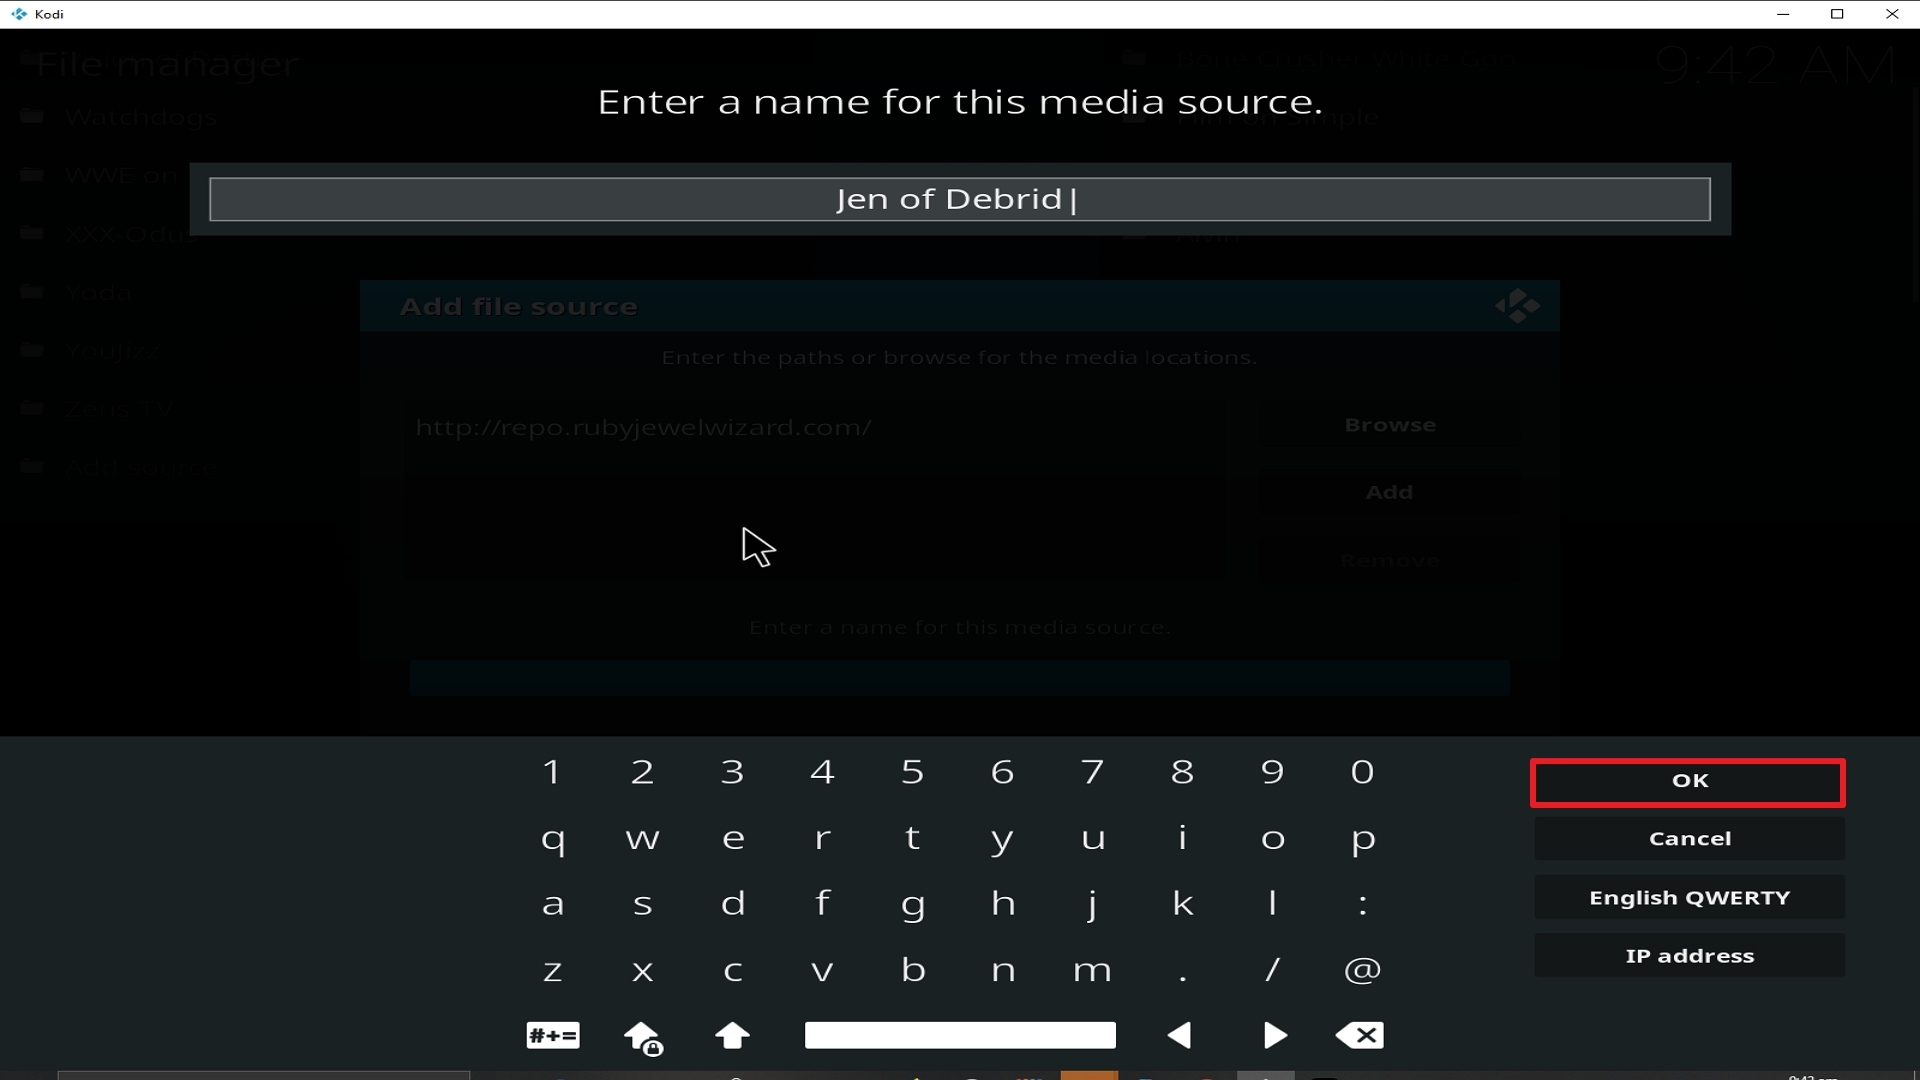
11. Select enter a name for this media source.

Step 11 Installing Jen of Debrid addon on Kodi


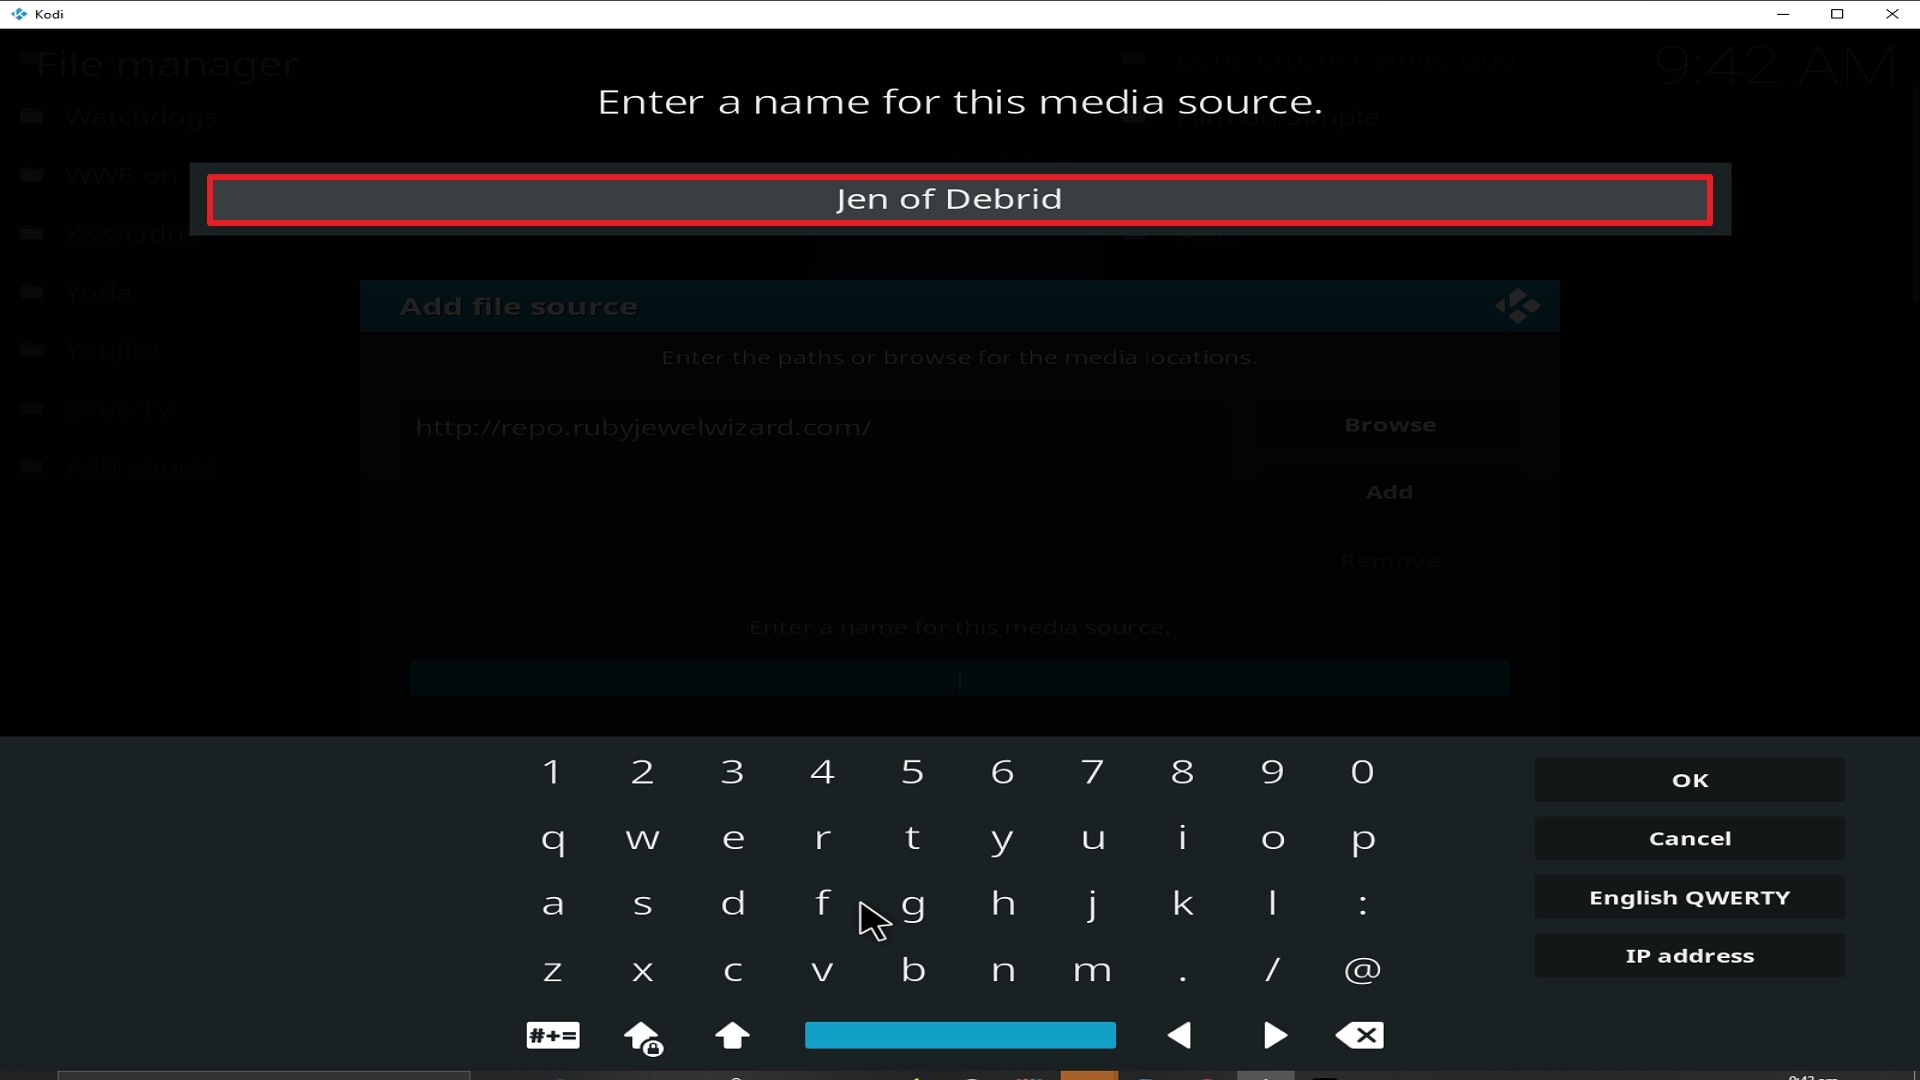
12. Name is Jen of Debrid (this part isn’t critical as long as you remember the name).

Step 12 Installing Jen of Debrid addon on Kodi


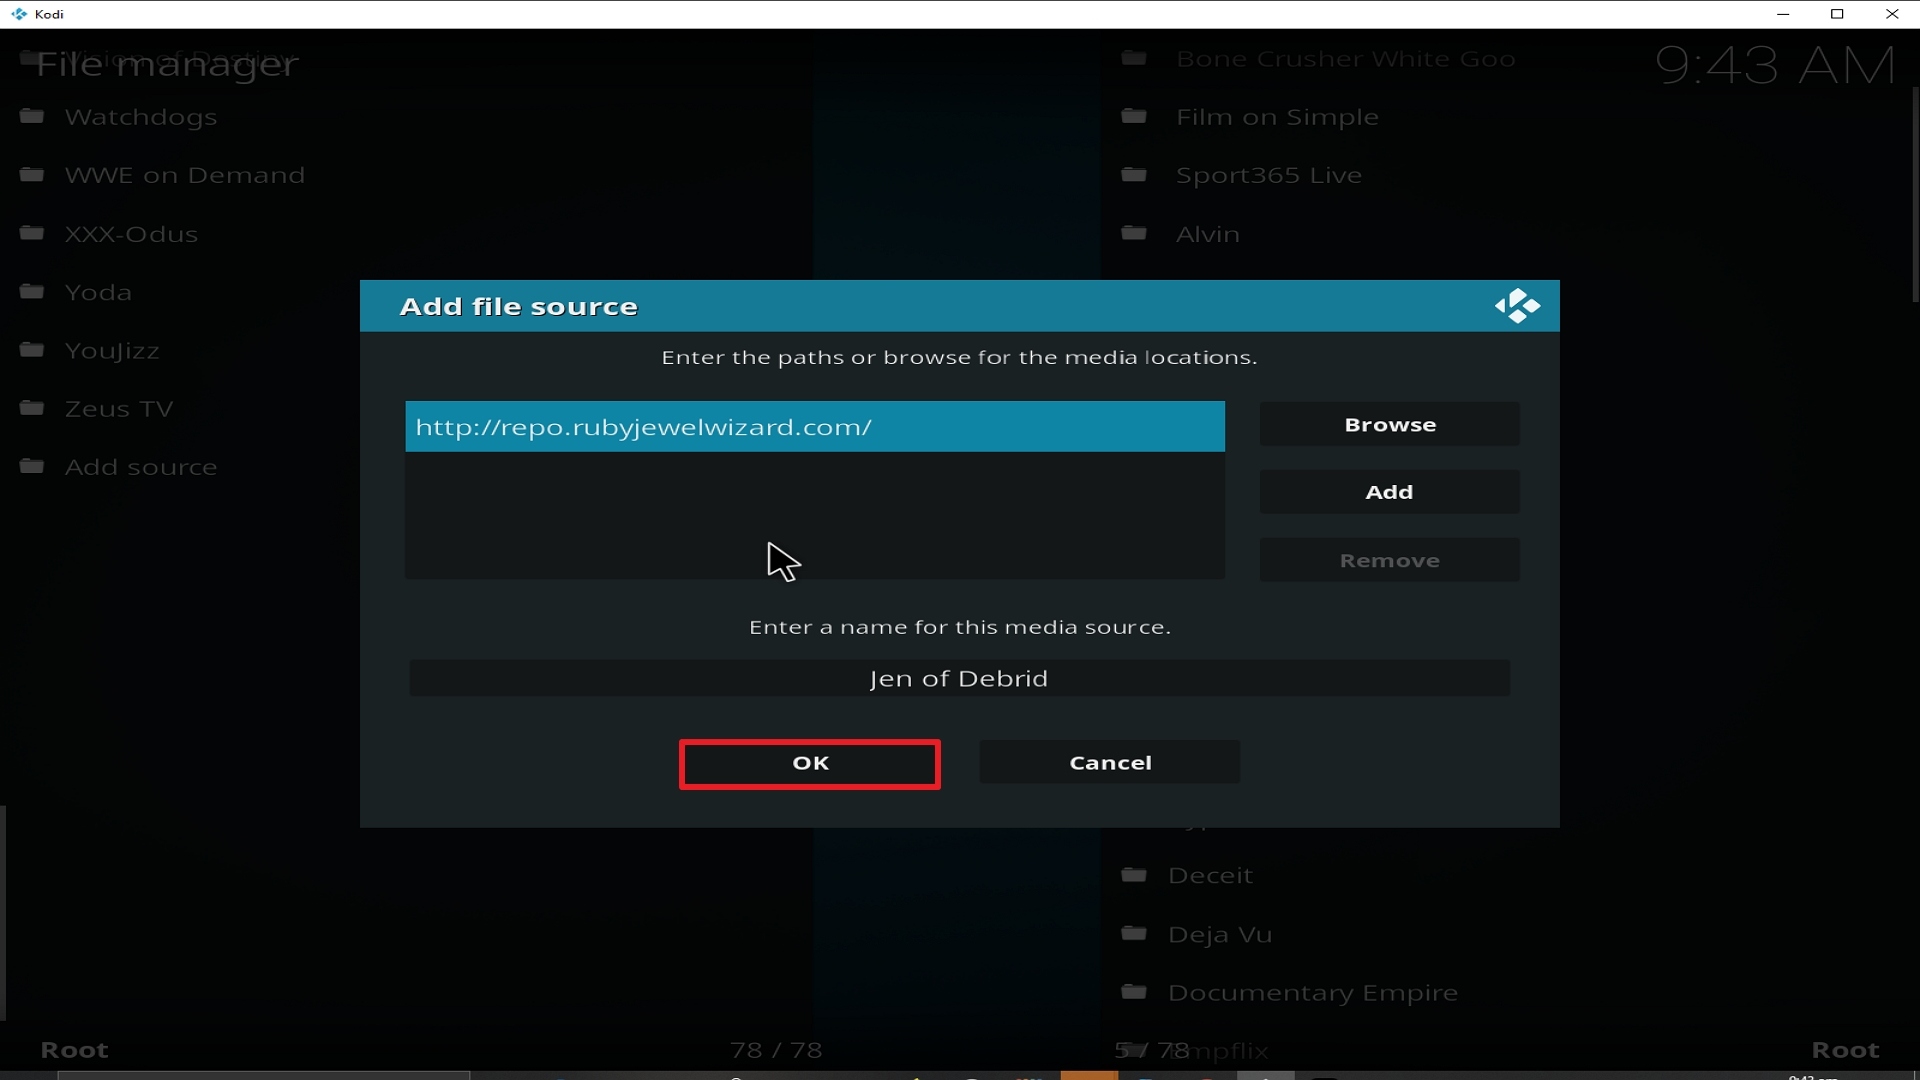
13. Click on OK.

Step 13 Installing Jen of Debrid addon on Kodi


14. Click on OK.

Step 14 Installing Jen of Debrid addon on Kodi


15. Take one step back and click on Add-ons.

Step 15 Installing Jen of Debrid addon on Kodi


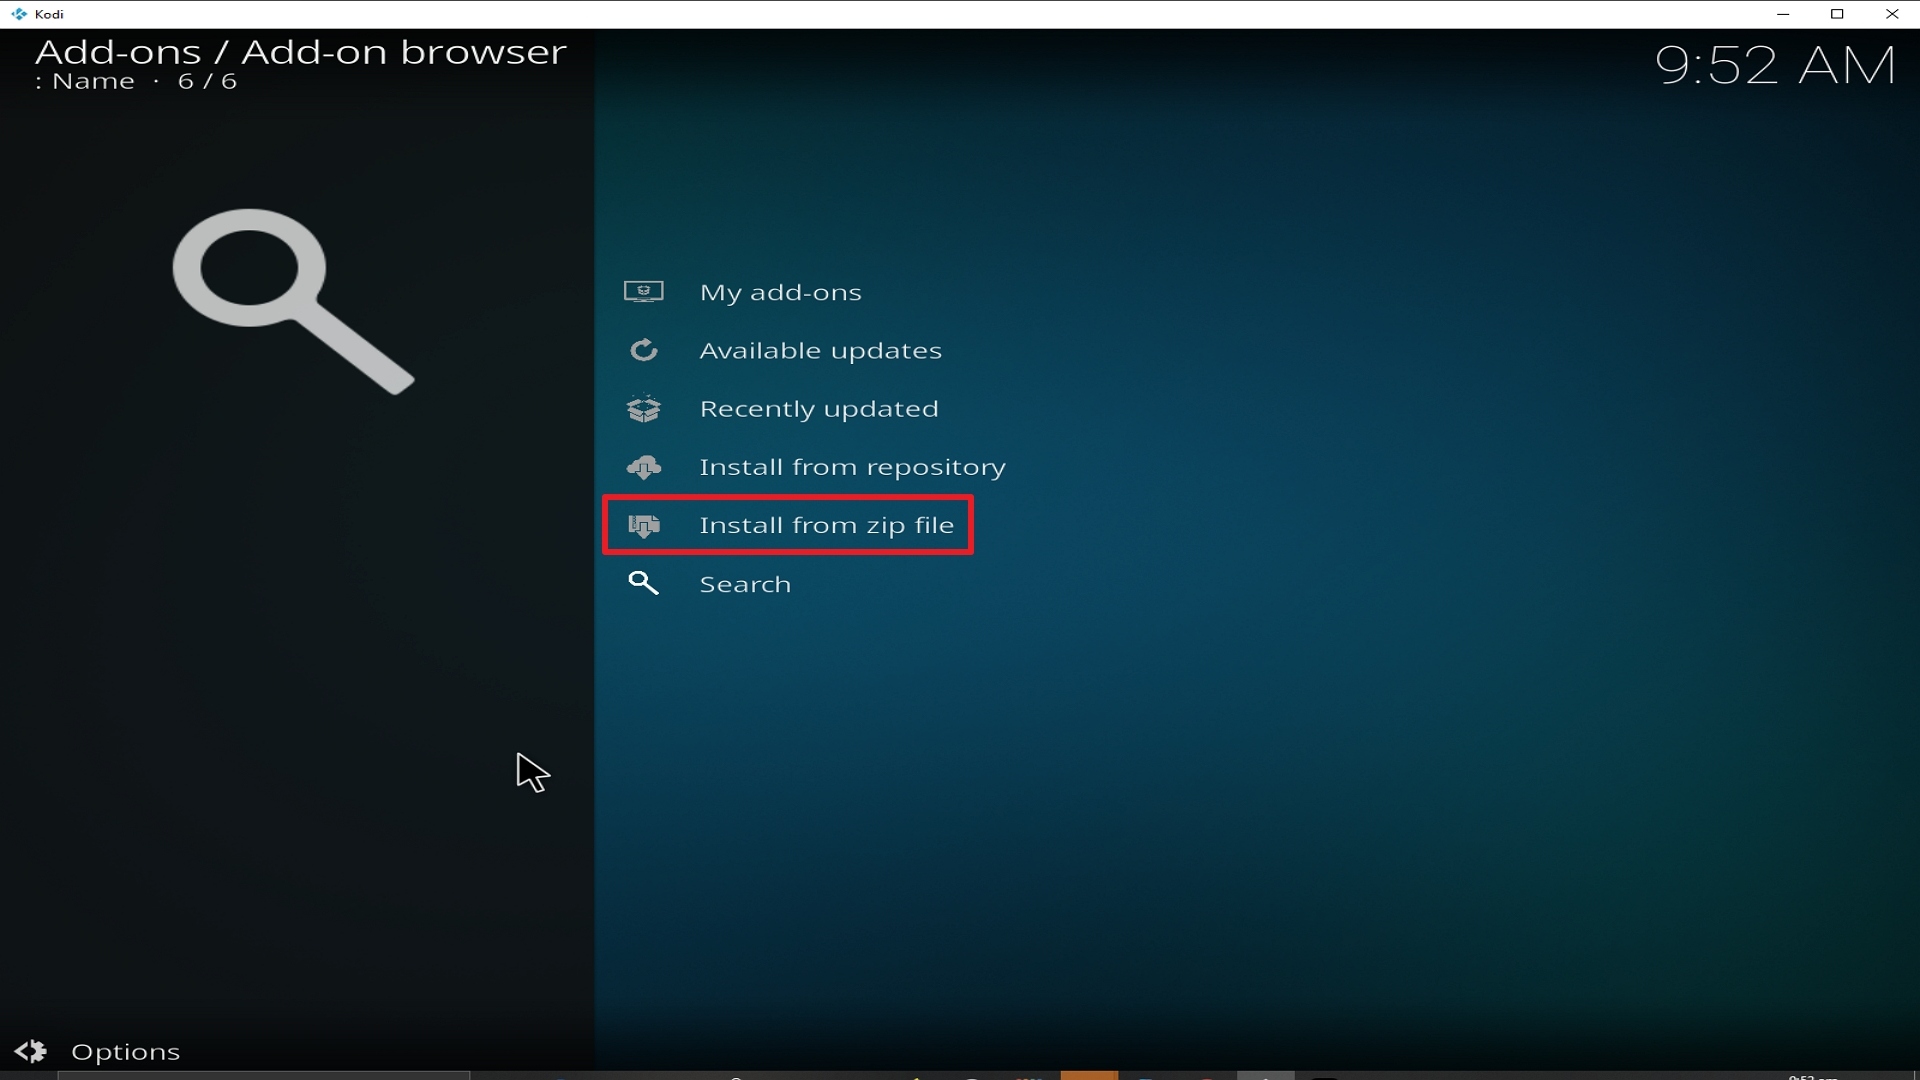
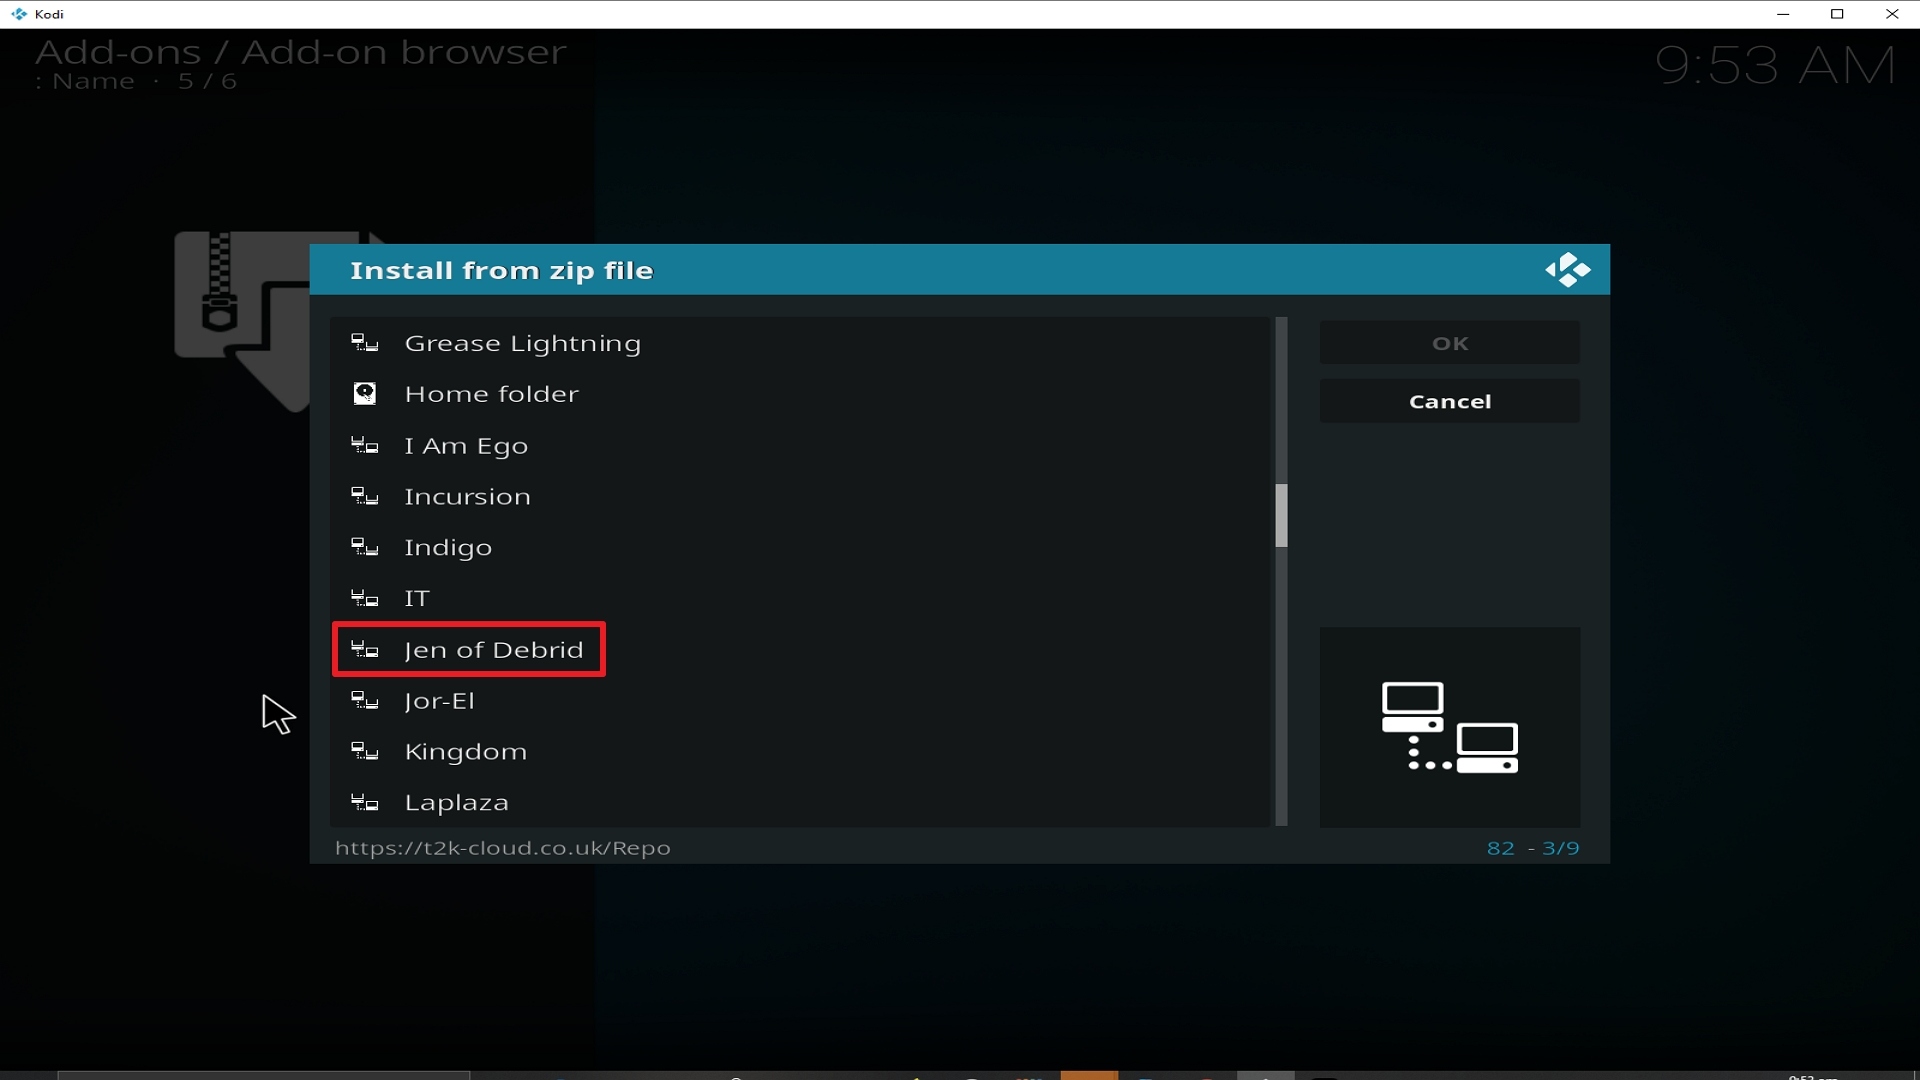
16. Select install from zip file.

Step 16 Installing Jen of Debrid addon on Kodi


17. Click on Jen of Debrid(or whatever you named the source).

Step 17 Installing Jen of Debrid addon on Kodi


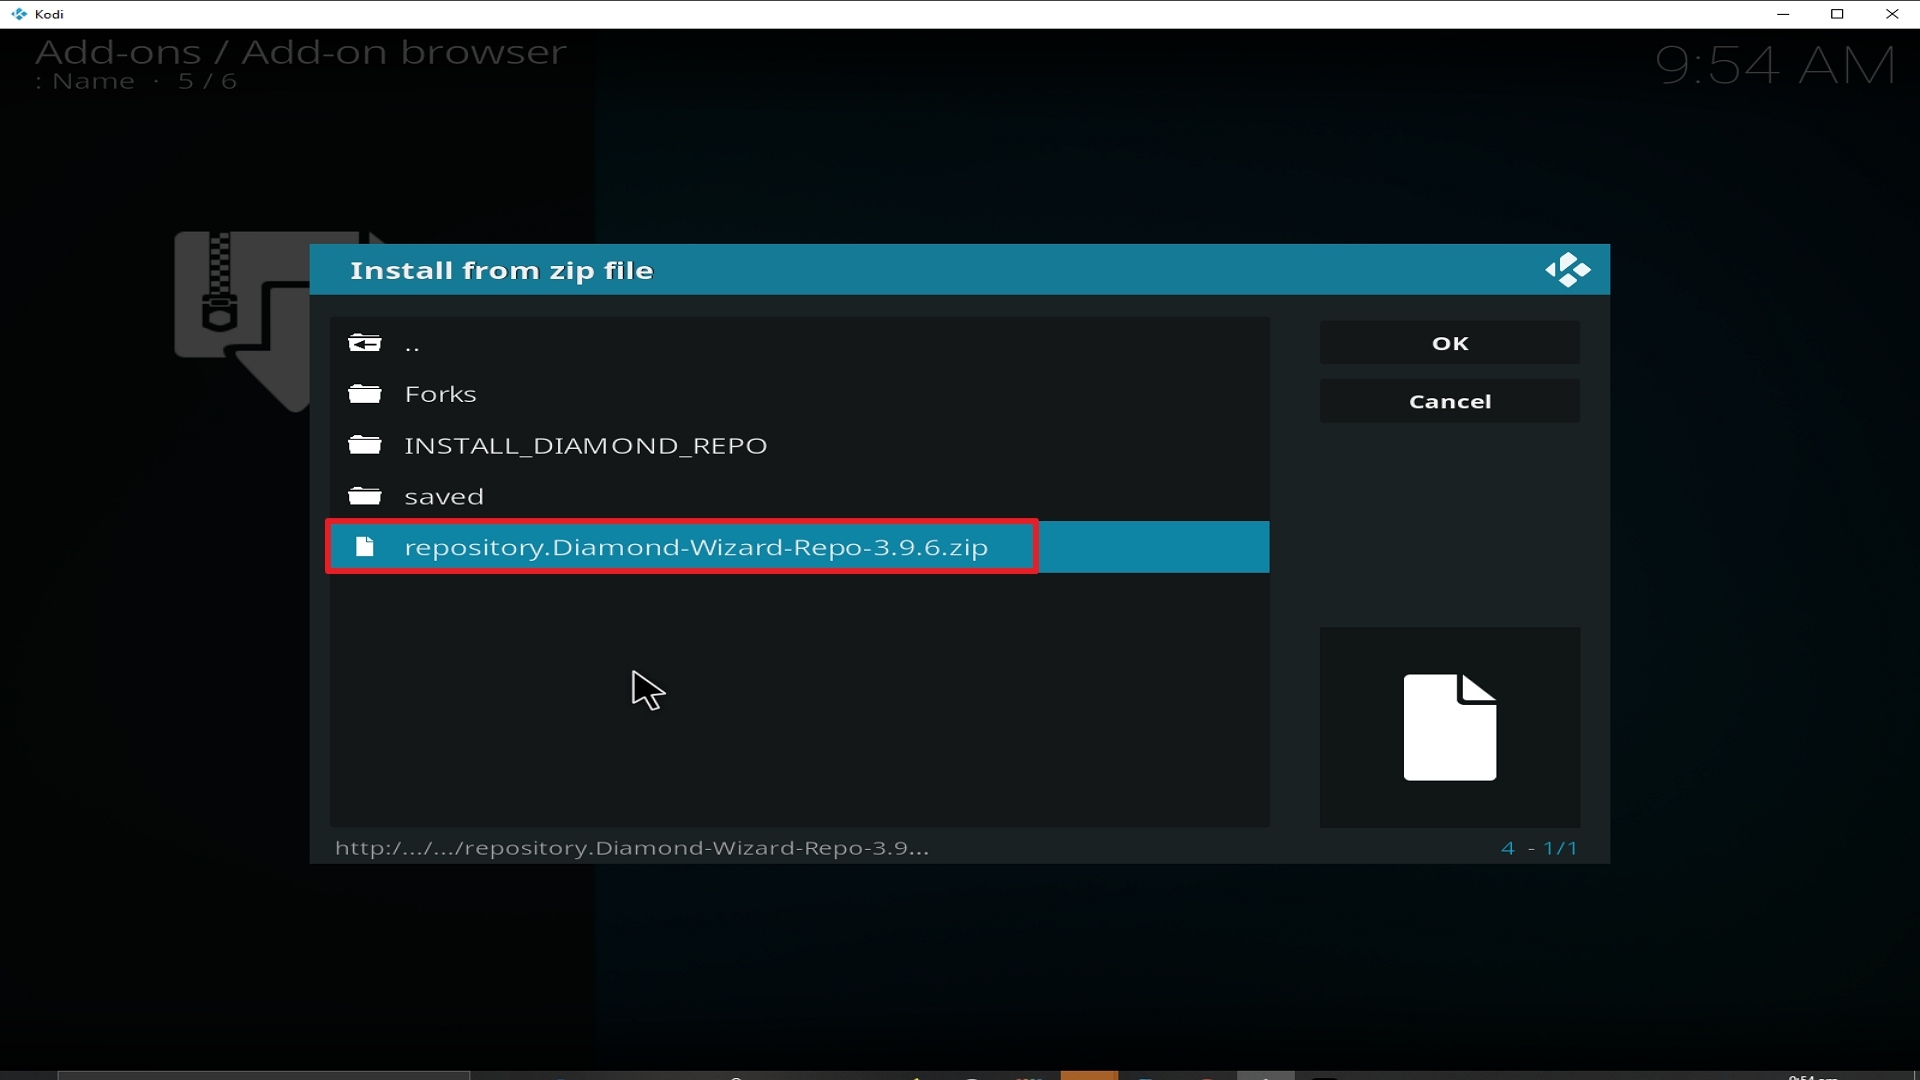
18. Click on repository.Diamond-Wizard-Repo-3.9.6.zip

Step 18 Installing Jen of Debrid addon on Kodi


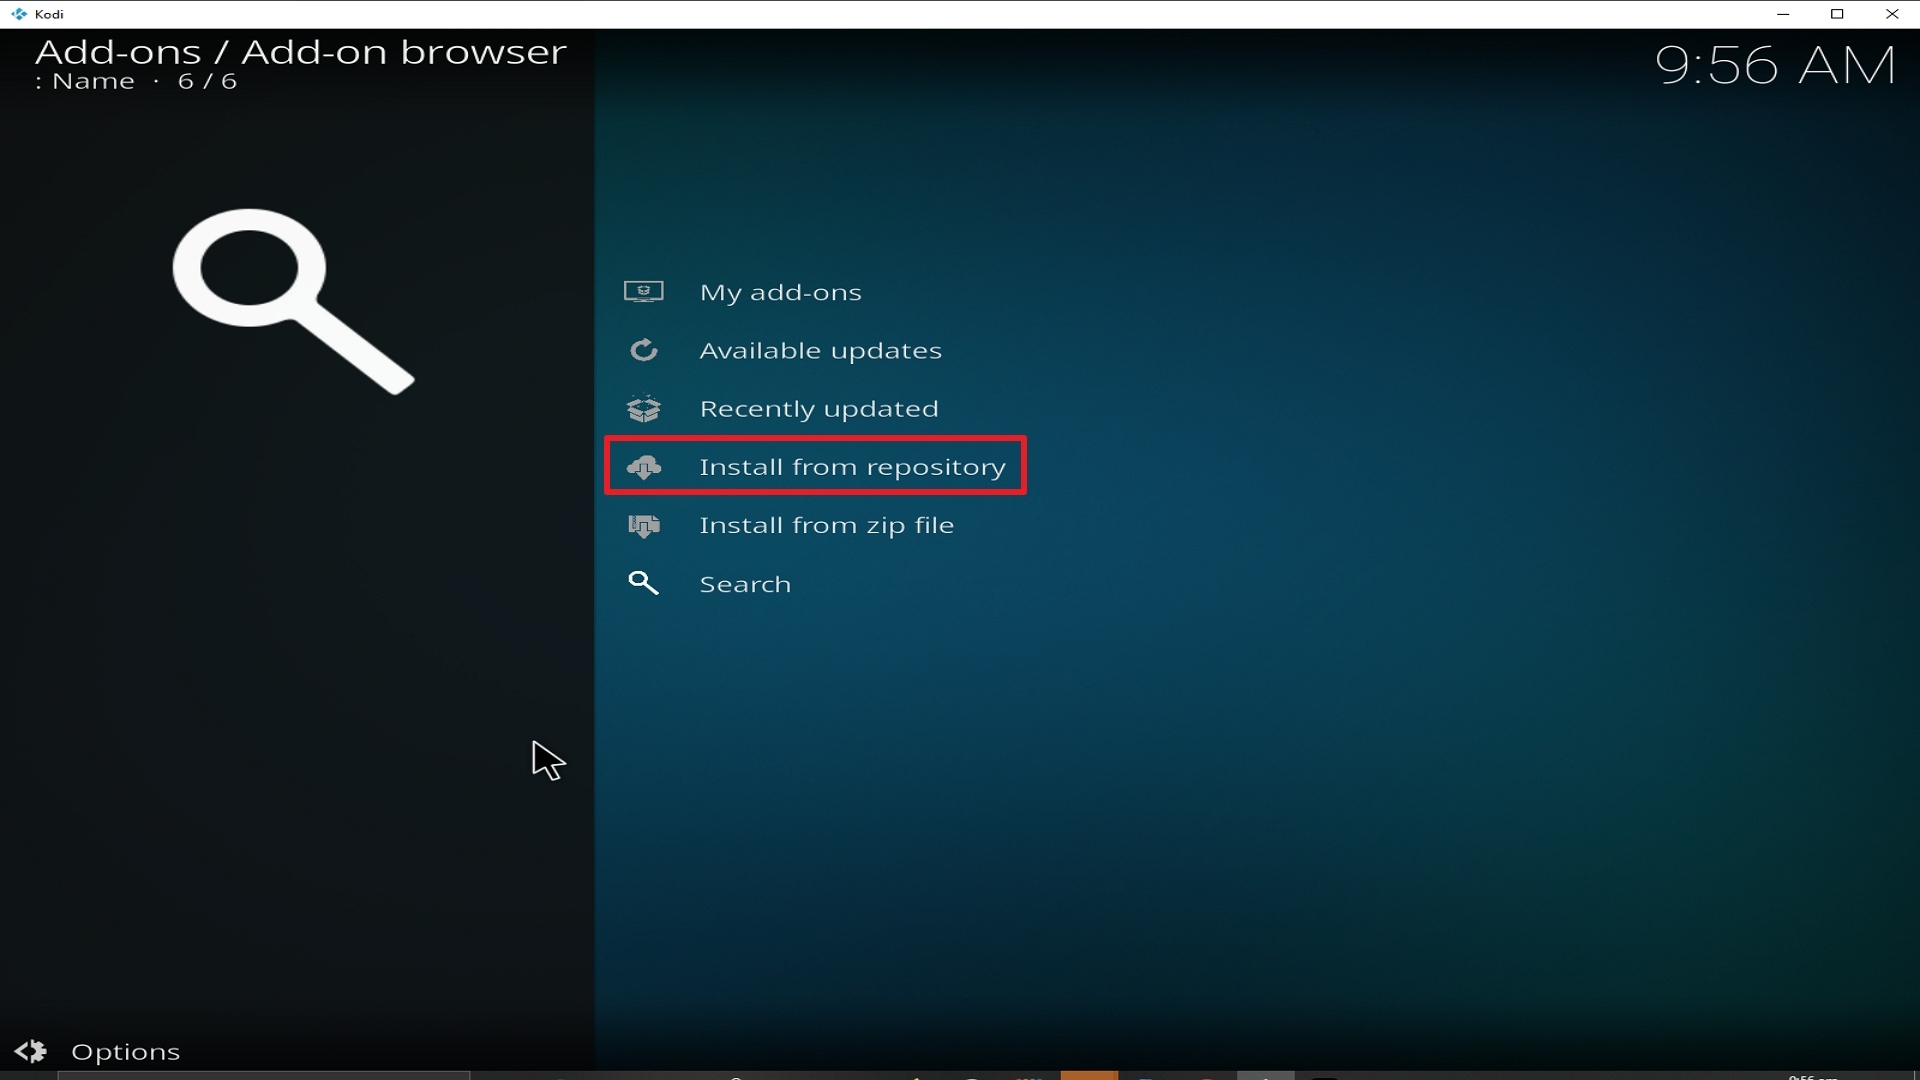
19. Select on Install from repository.

Step 19 Installing Jen of Debrid addon on Kodi


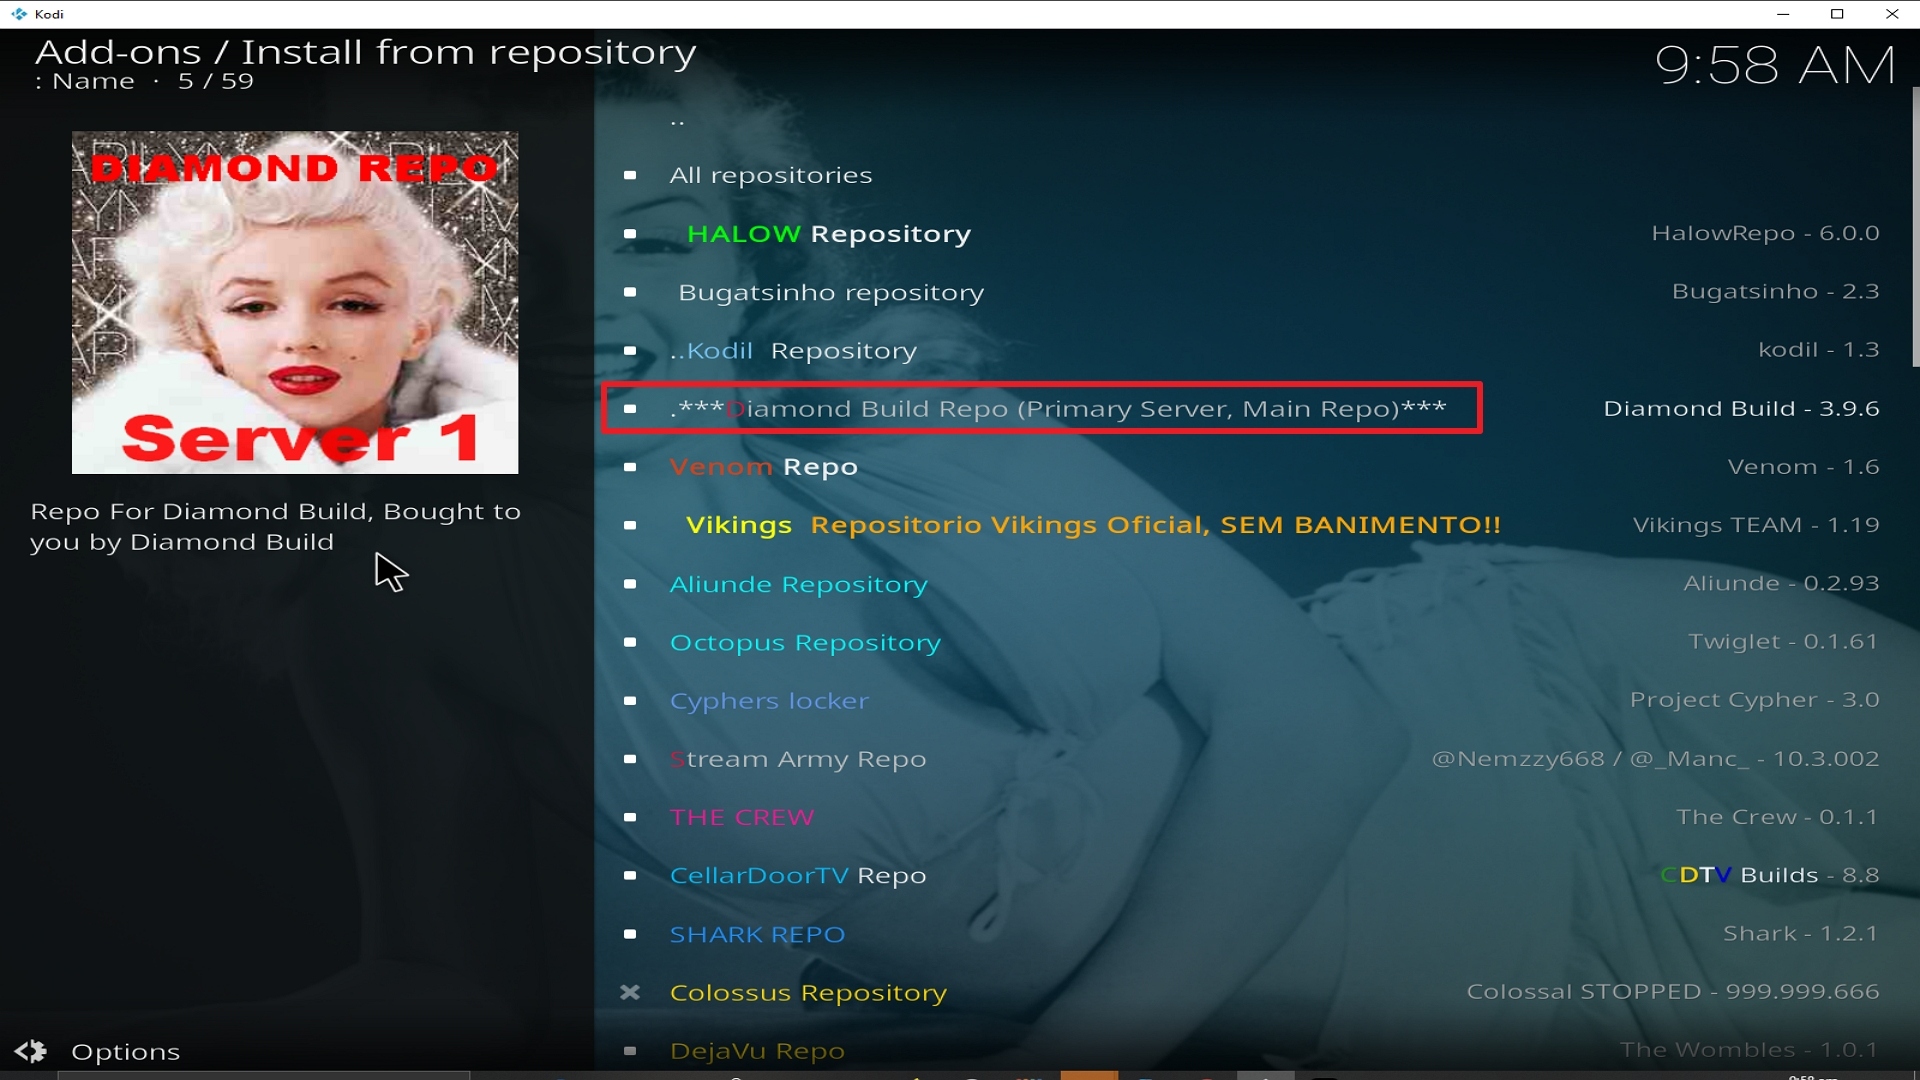
20. Click on Diamond Repo.

Step 20 Installing Jen of Debrid addon on Kodi


21. Pick Video add-ons.

Step 21 Installing Jen of Debrid addon on Kodi


22. Select Jen of Debrid again.

Step 22 Installing Jen of Debrid addon on Kodi


23. Click on Install.

Step 23 Installing Jen of Debrid addon on Kodi


24. Select OK after reviewing the add-ons that will be installed.

Step 24 Installing Jen of Debrid addon on Kodi


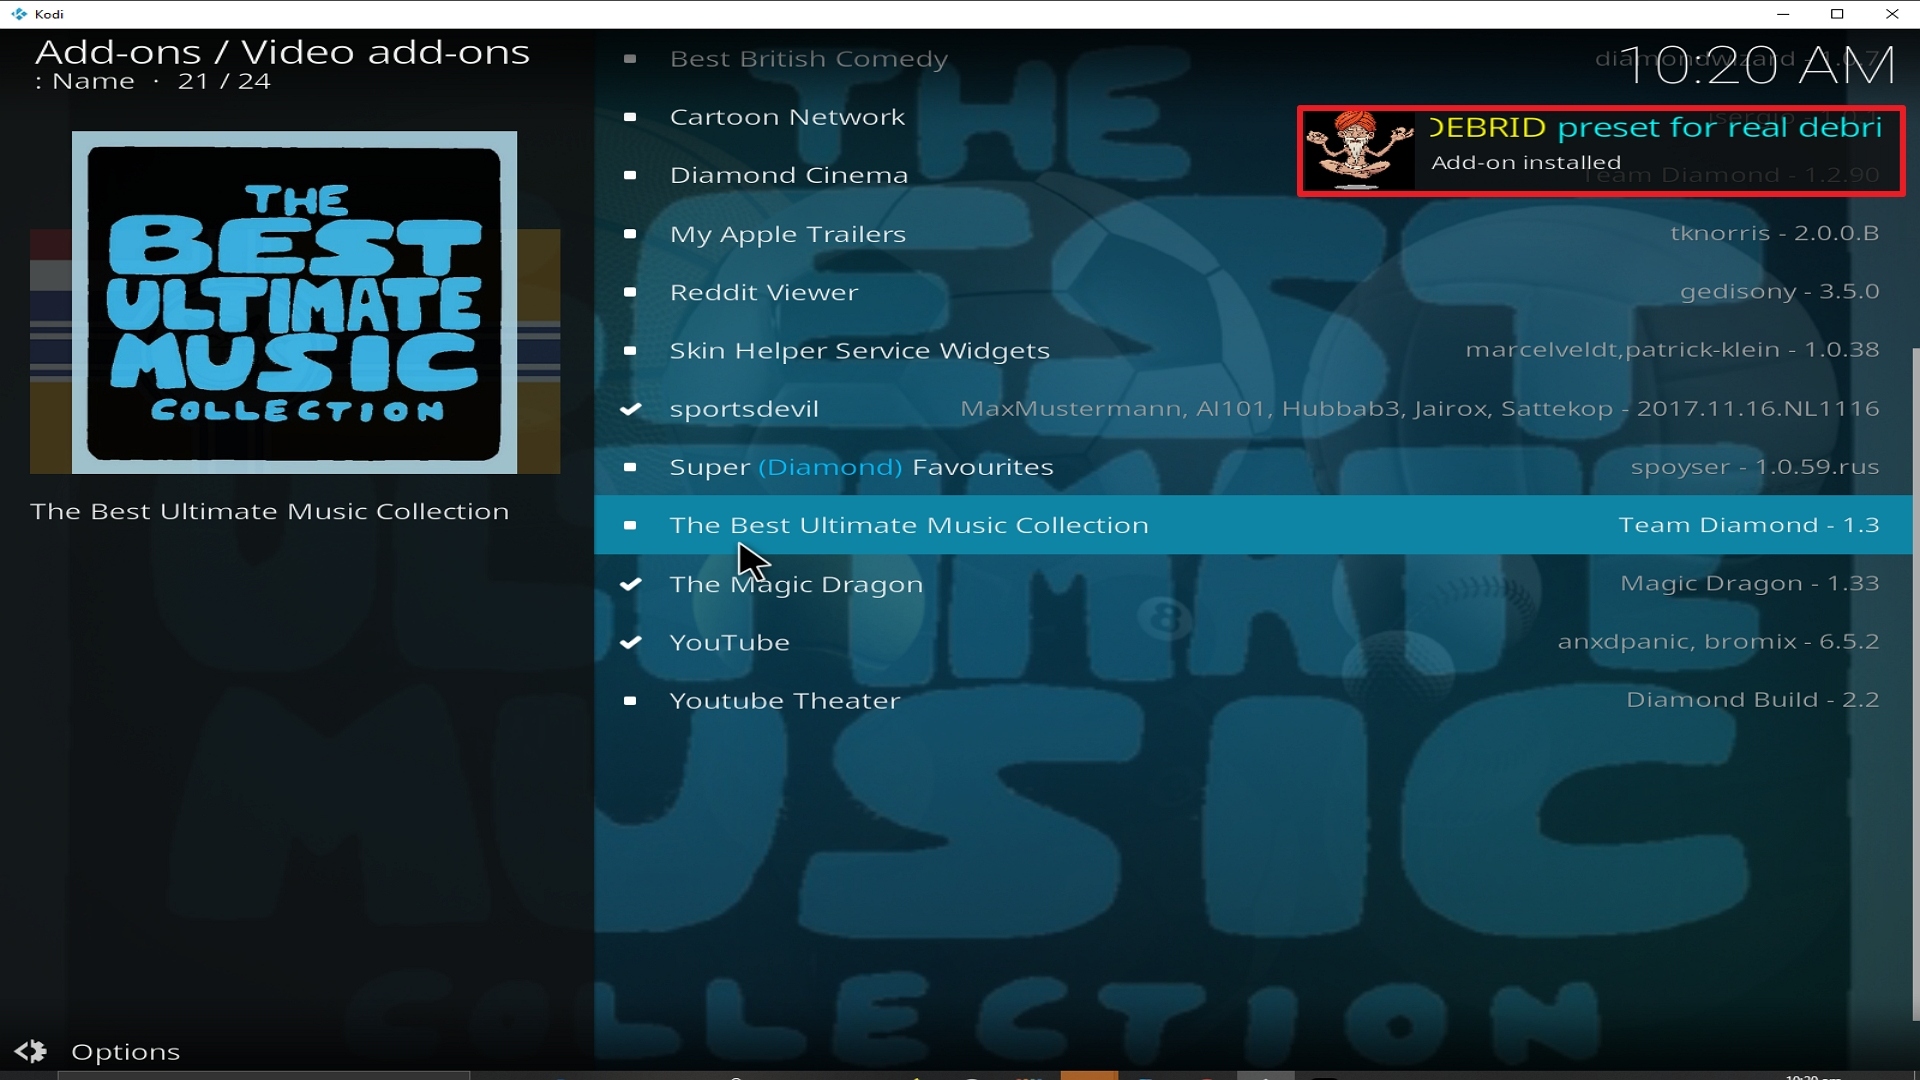
25. You should see a popup in the upper right corner saying Jen of Debrid has installed. There will actually be multiple popups for the various components.

Step 25 Installing Jen of Debrid addon on Kodi


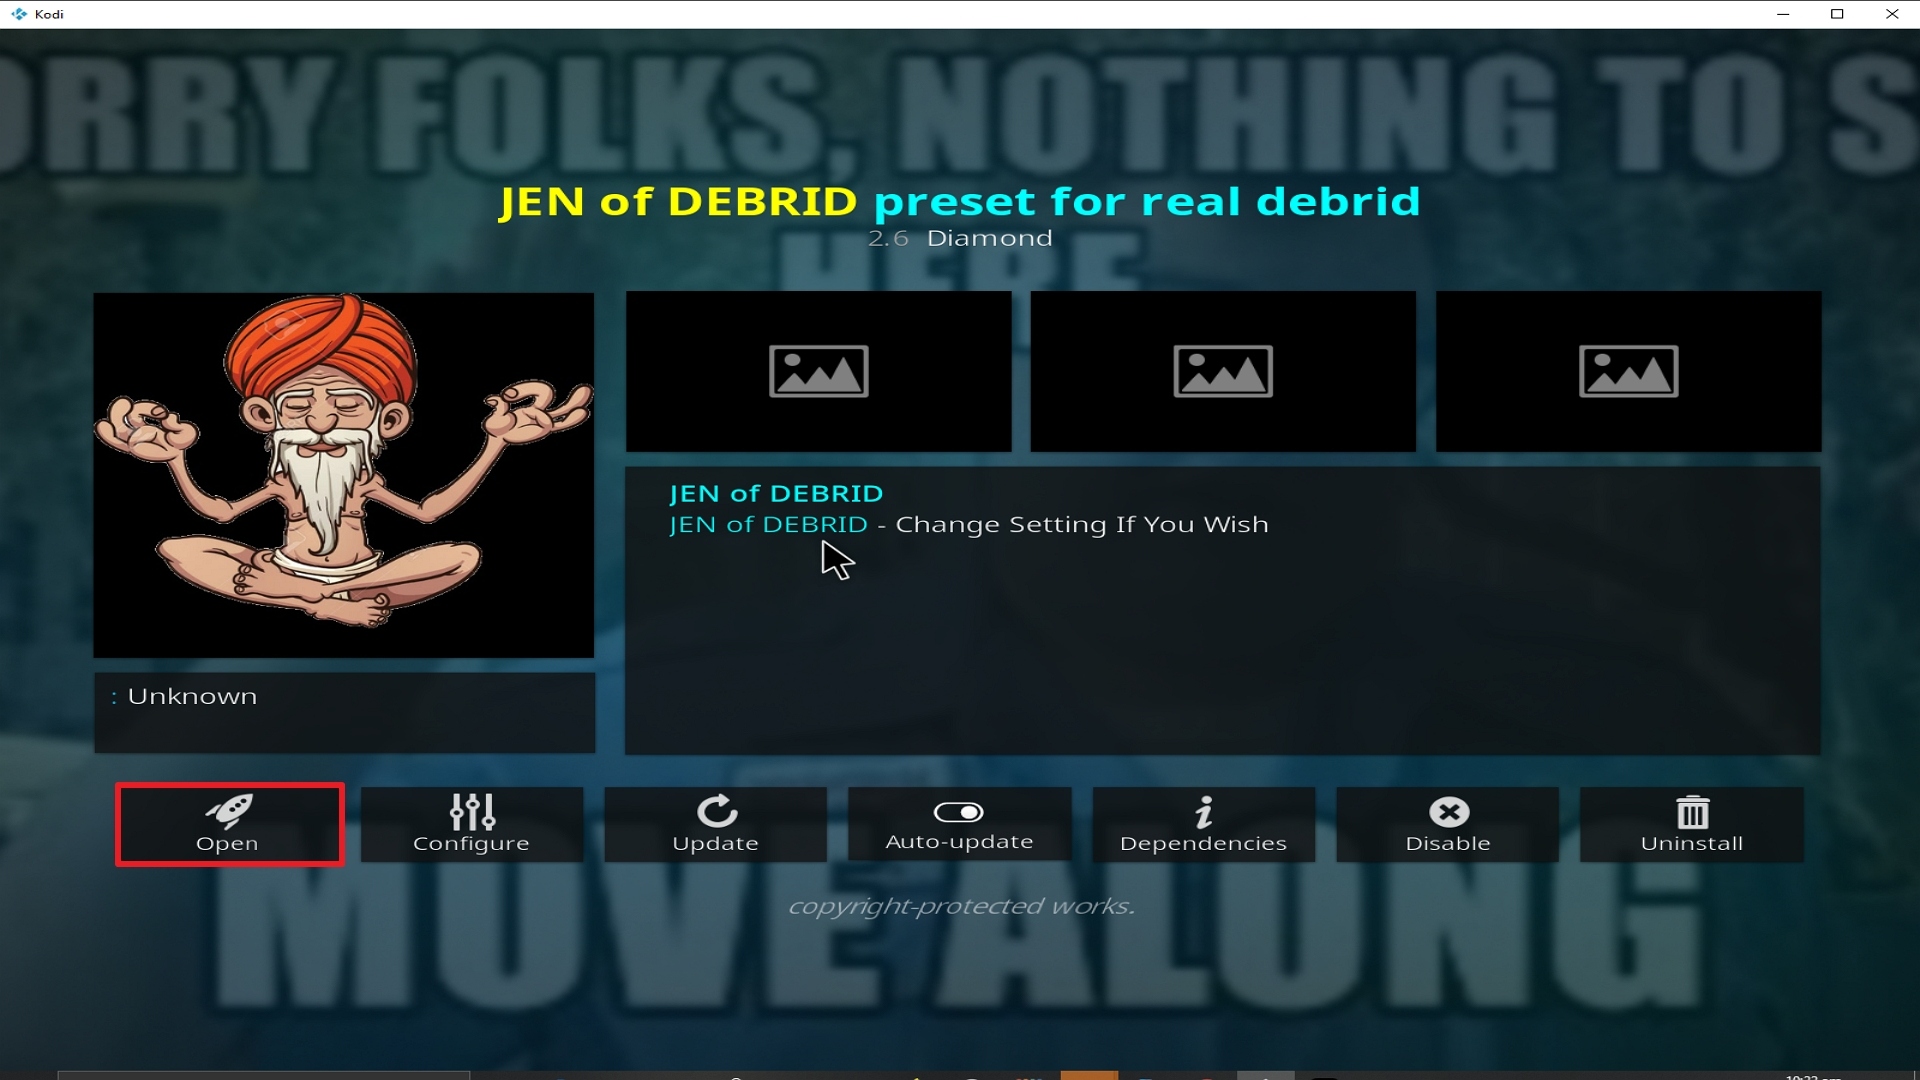
26. Click on Open to start the Jen of Debrid add-on.

Step 26 Installing Jen of Debrid addon on Kodi


Install Surfshark on Firestick

Best Surfshark Deal


Alternatives

Rule of thumb that we always suggest is that you always have a back-up plan if ever things go sideways. This way, your viewing experience remains uninterrupted. Having said that, only a handful of add-ons host torrent cache for viewing. For its unique nature, the following add-ons that we are going to recommend are from trusted sources and believe that we only suggest only the best here at ReviewVPN. The following may be considered as alternatives for Jen of Debrid

        Kratos Reborn Add-on

        A Pirates Life For Me Add-on

        Open Meta Add-on

A Pirates Life for Me and Jen of Debrid come from the same repository so it should come as a surprise that both have the same features and abilities.


Common Errors

These are some of the things that may cause an issue when installing Jen of Debrid:

  1.    Unable to connect to URL/Download

Your URL address should be written correctly or else this issue will arise. Also, be sure that your Repository is properly installed and the guide above will help you with that. Although cached torrents do not require VPN because you are accessing the torrent directly unlike torrent clients which act as middlemen, to be on the safer side of things, we still advise you to have a reliable VPN installed. Check here for the best VPN deal.


  1.     Script Error

Make sure that the Kodi App is properly installed on your device to avoid this error. Also, you have to double-check if the add-on is installed correctly if not, reinstall it. Please refer to the guide above to help you in installing the add-on properly. An in-depth guide is also provided in this article with regards to the proper installation of Kodi.


  1.     Kodi Check Log Error

This occurs when your media cache is full. We can prevent this by emptying your cache and making sure that it gets cleaned on a regular basis. Cache build is quite common nowadays because it is one way of making our streaming experience smoother.


  1.     Source not working/slow/frozen

Jen of Debrid supports torrent cached streaming and does not keep any content in its servers. If this issue arises, you may want to wait for a few seconds until the results refresh and choose a working link.


How to Install Surfshark VPN on Firestick

If your Firestick still has the older interface, read this article to learn how to update it: Update Firestick Interface.

Follow our screenshots below to install the SurfShark VPN app on your Fire TV stick.

1. Go to the Home screen of your Firestick.

step 1 Install Surfshark VPN on Firestick


2. Navigate towards the Find tab. Press the Search button from the resulting dropdown.

step 2 Install Surfshark VPN on Firestick


3. Type in the keyword of SurfShark and select from the suggestions that will appear.

step 3 Install Surfshark VPN on Firestick


4. Click the official SurfShark icon from your search results.

step 4 Install Surfshark VPN on Firestick


5. Press the Download (You own it) button.

step 5 Install Surfshark VPN on Firestick


6. The SurfShark VPN installer will download on your device.

step 6 Install Surfshark VPN on Firestick


7. SurfShark VPN’s app will automatically install itself on your Fire TV stick.

step 7 Install Surfshark VPN on Firestick


8. Press the Open button after completing SurfShark VPN’s installation process.

step 8 Install Surfshark VPN on Firestick


9. Please wait for the SurfShark VPN to load its user interface.

step 9 Install Surfshark VPN on Firestick


10. You can now log in with your SurfShark VPN account credentials.

step 10 Install Surfshark VPN on Firestick

Learn more about Surfshark and Grab the Best Surfshark Deal Now!


Install Surfshark on Firestick

Best Surfshark Deal


Other VPNs to Consider

NordVPN (Best for Streaming)

Best Features

  • 5000+ Server in 50+ Countries 
  • Military-Grade Encryption
  • Fast Connection Speed
  • Suitable to a lot of devices
  • No-Log Policy

Prices
  • Complete $5.89 per month (64% Discount)
  • Plus $4.59 per month (56% Discount)
  • Standard $3.69 per month (55% Discount)

Best Features

  • 750+ High-speed VPN Servers in 43 Locations
  • Military-Grade Encryption
  • Fastest HD Streaming and Gaming
  • 30-Day Money-Back Guarantee
  • Unlimited Data & Devices
  • No-Log Policy

Prices
  • 3 Years $1.99 per month (82% Discount)
  • 1 Years $3.29 per month (70% Discount)
  • 1 Month $10.99 per month

IPVanish VPN (Most Secure)

Best Features

  • 1200+ Servers in 60+ Countries around the world
  • Unlimited Connections
  • No-Log Policy
  • Top Notch Military-Grade VPN Protocols and Encryptions
  • 100% Safe and Secured
  • Most Trusted VPN
  • Best VPN for Firestick
  • 30-Day Money-Back Guarantee

Prices
  • Yearly $3.99 per month (63% Discount) – 30 days risk free + Ransomware & Malware Protection
  • Quarterly $5.32 per month (51% Discount)
  • Monthly $10.99 per month


For more VPN discounts, go to ReviewVPN Deals and purchase the best VPN for you.

Click here to get the lowest price on Surfshark through our exclusive limited-time offer.


Conclusion

Comparing traditional file hosts and cache torrents do have a lot of differences. For instance, traditional file hosts produce a lot of buffering due to bandwidth allocation. The files are compressed a lot and the resulting images/videos will be grainy and pixelated.

Jen of Debrid which hosts cached torrents moves otherwise. While regular torrent clients help you download the file, Jen of Debrid helps you by streaming those torrent links. It is an advantage for you if you do not have a high storage capacity as it saves you space from your hard drive.

We hope that this guide will be useful in your endeavor. If you have questions or suggestions, please feel free to drop a comment below or contact us through any of our social media platforms. Thank you for reading!

Install Fight Club Kodi Addon

Install Surfshark on Firestick

Best Surfshark Deal

Fight Club Kodi Addon

Source: http://streamarmy.co.uk/repo

Hulk Hogan, Steve Austin, Randy Savage, Ric Flair, and Shawn Michaels. Ring any bells? Anyone from the 90’s generation would definitely know these men. It was back then that the World Wrestling Federation (WWE now) became a regular staple for any household.

It became a thing for a father and son to watch such entertainment. Back then we thought that it was real and not staged entertainment. But now that we have grown up, we already know the hoax. But still, a lot of people remained loyal and still continued to patronize it up to this day. True, it is still very entertaining and may serve as a stress reliever.


Presently, cable and satellite TV subscriptions have become expensive. You pay $150 a month for something that you do not necessarily use 24/7. You either browse channels for an hour or two when you get home from work but not necessarily stay up late to watch anything. We believe that it is not worth every penny you pay. It just so happens that a certain group of people decided to create an App that can help you minimize your entertainment experience expenses, and that is the Kodi App.

With the Kodi App, you can stream anything you want for free. Why? Because it has an add-on feature and these add-ons help you navigate the web and search for free stuff. Good Deal? Absolutely!

There are so many add-ons to choose from each packed with content that caters to anyone’s preferences and needs. One such add-on is called the Fight Club Kodi Video Add-on. Hailing from the Stream Army Repository, Fight club mainly focuses on the world of wrestling and martial arts. It provides high-quality streaming links for your viewing pleasure.


ANONYMOUSLY


Features

  1. WWE
  • Pay-per-view
  •  Raw
  • Smackdown
  • NXT
  • Network
  • Network Livestream
  • NXT UK
  • Main Event
  • This Week


  1.     Tribute to the troops
  2.     UFC
  • Fight Night
  • PPV
  1. The Ultimate Fighter
  • Tuesday Night Contender Series
  1. AEW
  • Dynamite
  • Dark
  • PPV
  • Single Matches
  1. Impact
  • Wrestling weekly
  • PPV
  1. ROH
  • PPV
  1.     NJPW
  • PPV
  1.     Boxing
  • PPV
  1.   Indy Wrestling Shows
  2.   Wrestling Archives – Replays


YOUR INTERNET ACTIVITY IS BEING WATCHED

ReviewVPN cannot attest to the legality, security and privacy of the applications discussed on this site. It is highly recommended that you use a VPN service while streaming or using Kodi.

Currently, your IP 216.73.217.150 is visible to everyone and your Browser is being tracked by Advertisers & ISP Provider.

Save 65% Now

Limited Time Offer

Here are the main reasons why you must use a VPN:

  • Your activities are hidden from your ISP, the government, and from the apps you are using.
  • You can access additional movies and TV streams.
  • ISP attempts to throttle are thrwarted thus reducing buffering issues.
  • Geographically restricted content like Netflix and Hulu can be unblocked.

A VPN works be replacing your ISP-assigned IP address and creating an encrypted tunnel. We recommend the no log service offered by IPVanish. It works well on a Firestick and offers the fastest possible speeds.

Special Limited Time Offer - Get IPVanish


Installation Guide

  1.  Launch Kodi on your device
  2.  Click on the “Gear Icon” and select “System”
  3.  At the add-ons menu, turn on the “Unknown Sources” by clicking “yes”
  4.  Go back to the “systems” page and choose “File Manager”
  5.  Choose Add source and select “none”
  6. Type in http://streamarmy.co.uk/repo
  7.  Highlight the source and rename it to “Stream Army” or any name you would like to use to identify this particular source and click “ok”
  8.  Go back to the System Screen and click “Add-ons”
  9. Select “Install Zip File” choose “Stream Army” or whatever you renamed the file.
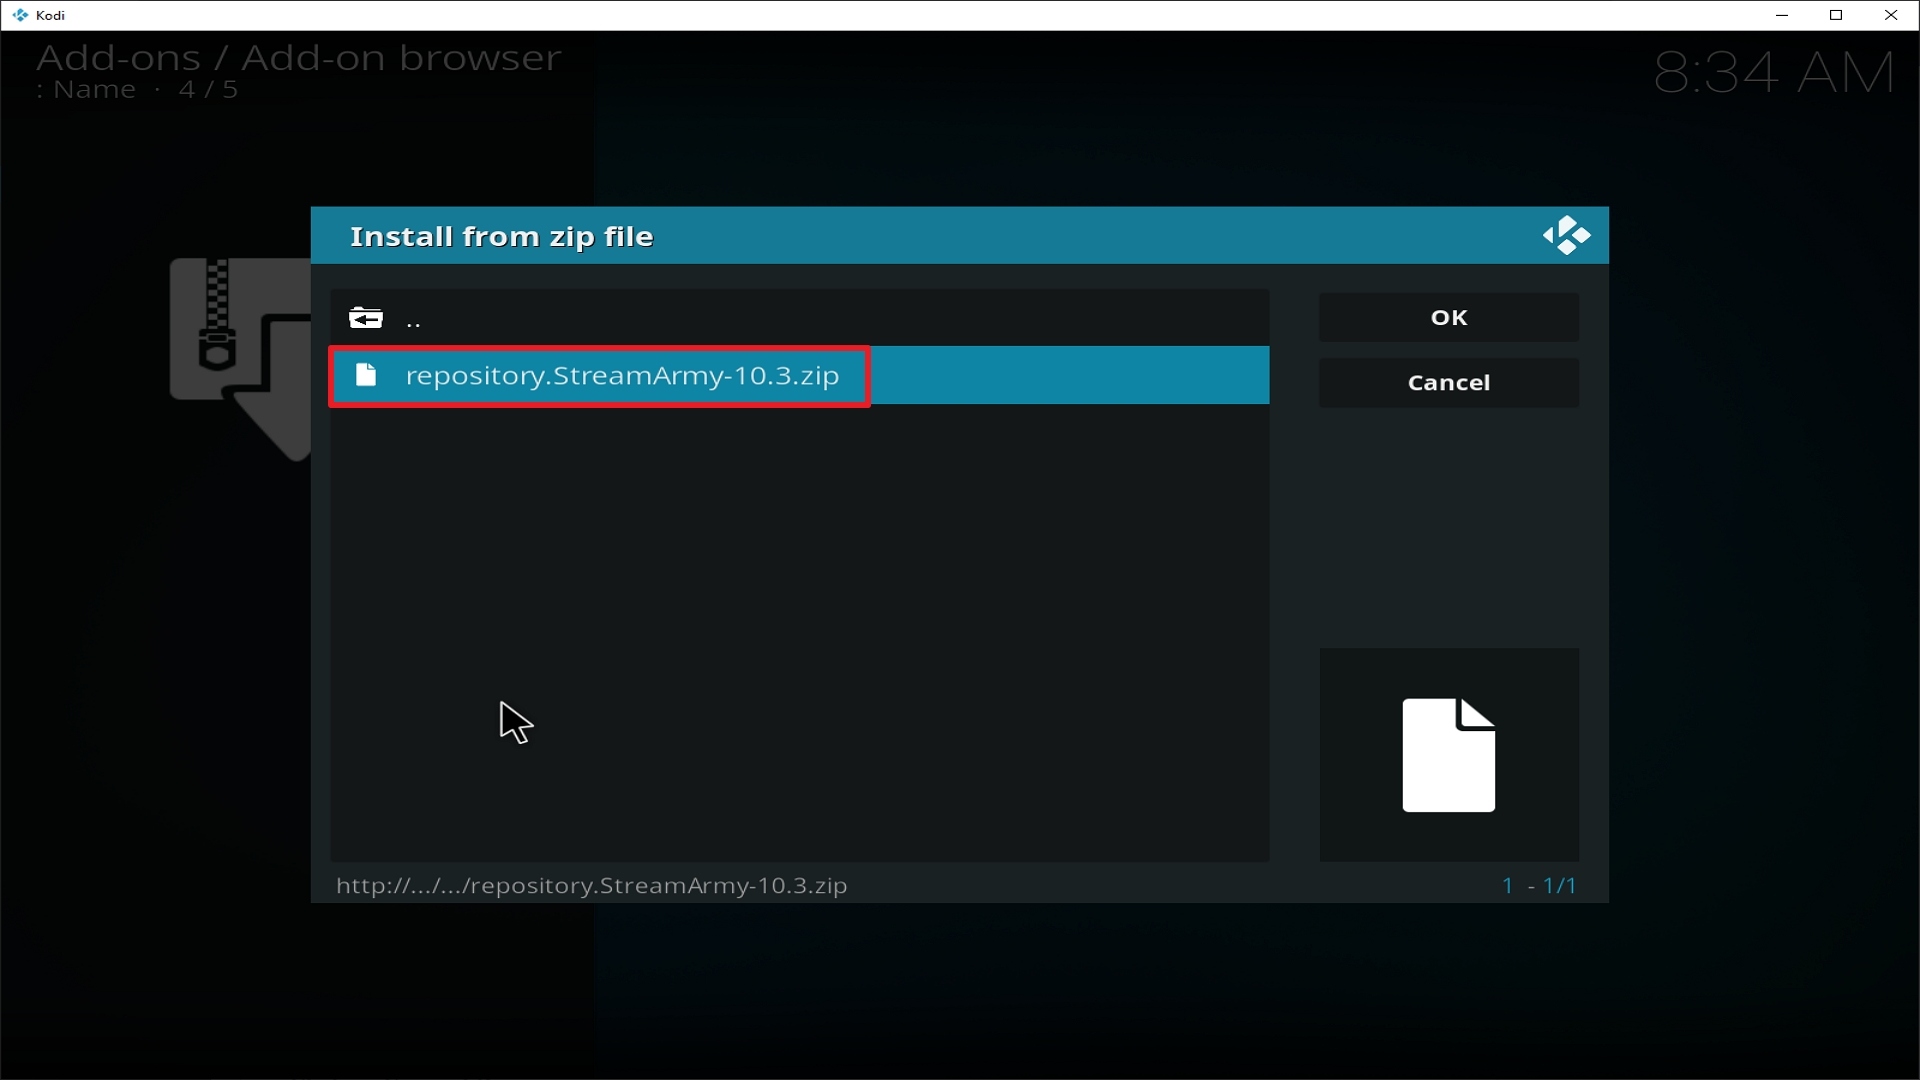
  10. Select the zip file URL- repository.StreamArmy-10.3.zip
  11. Wait for the notification “Stream Army Add-on Installed” to appear.
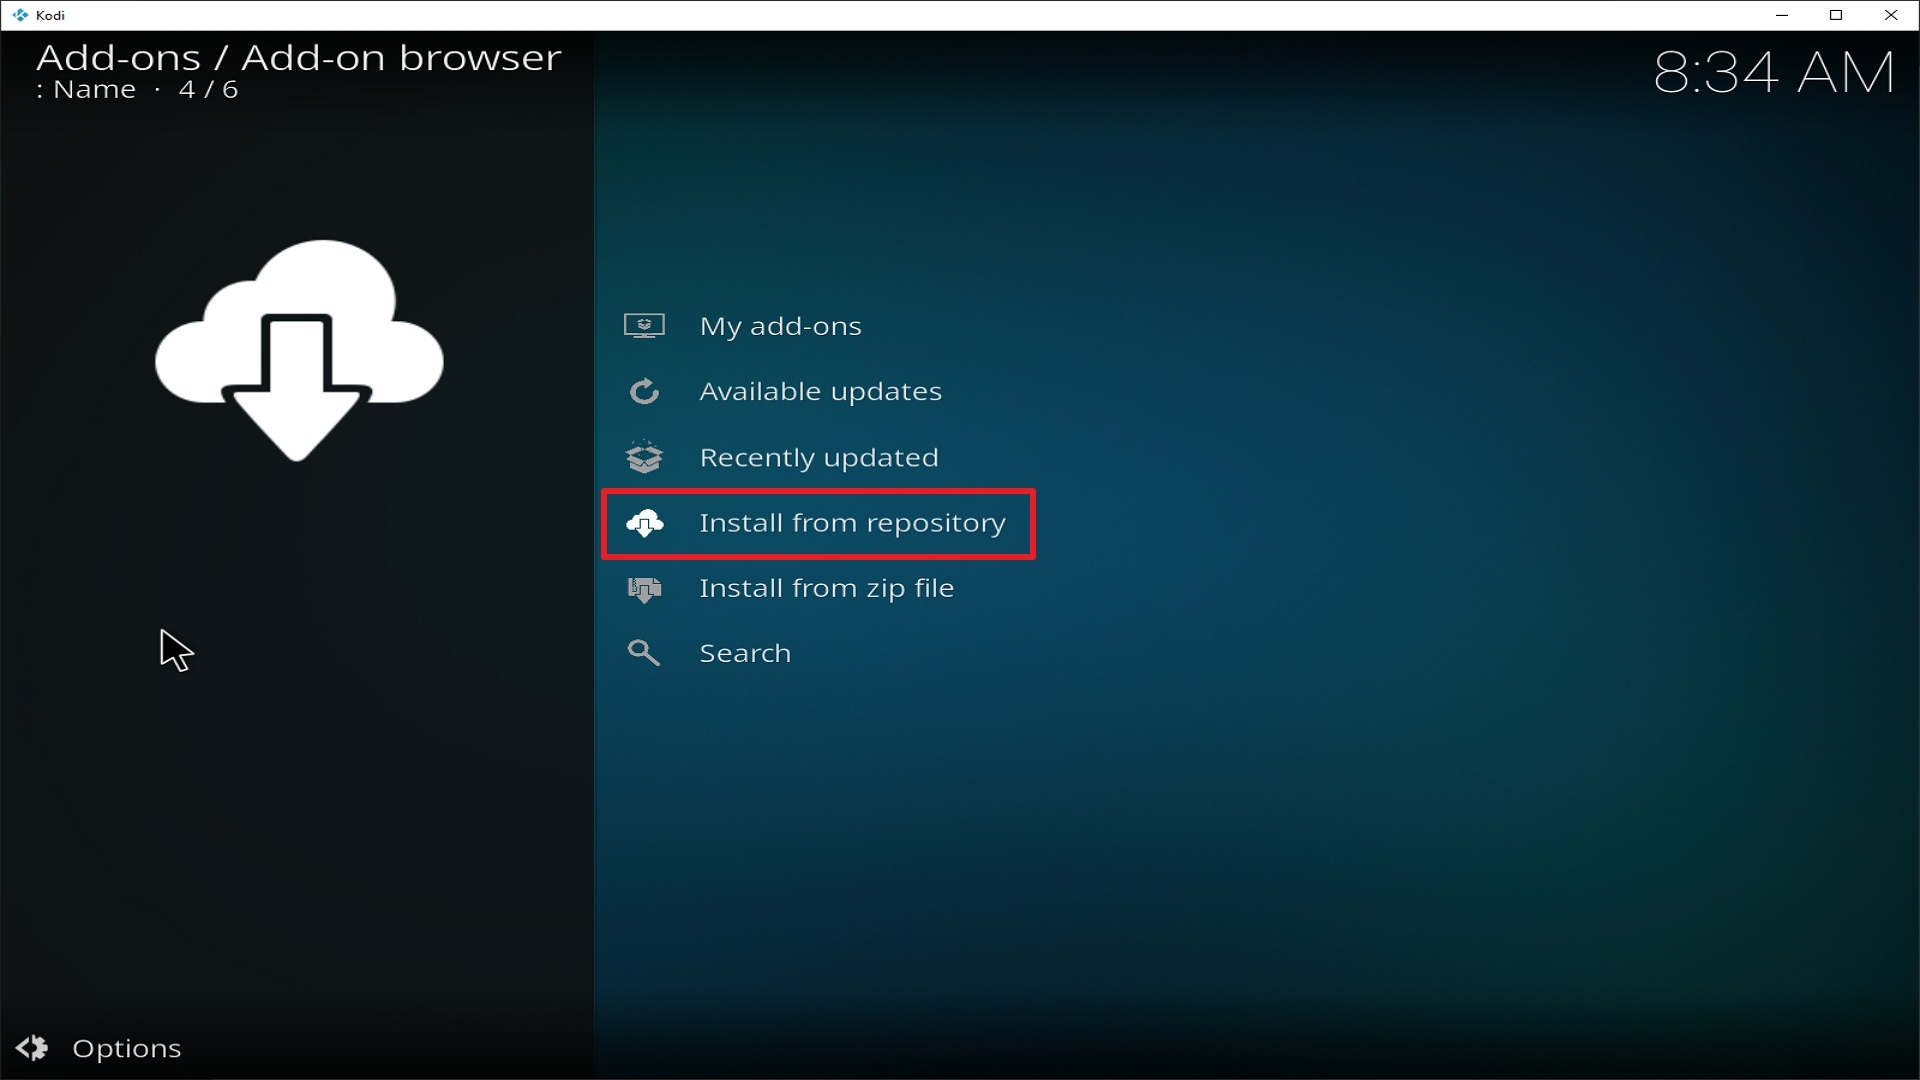
  12. Select “Install Repository”
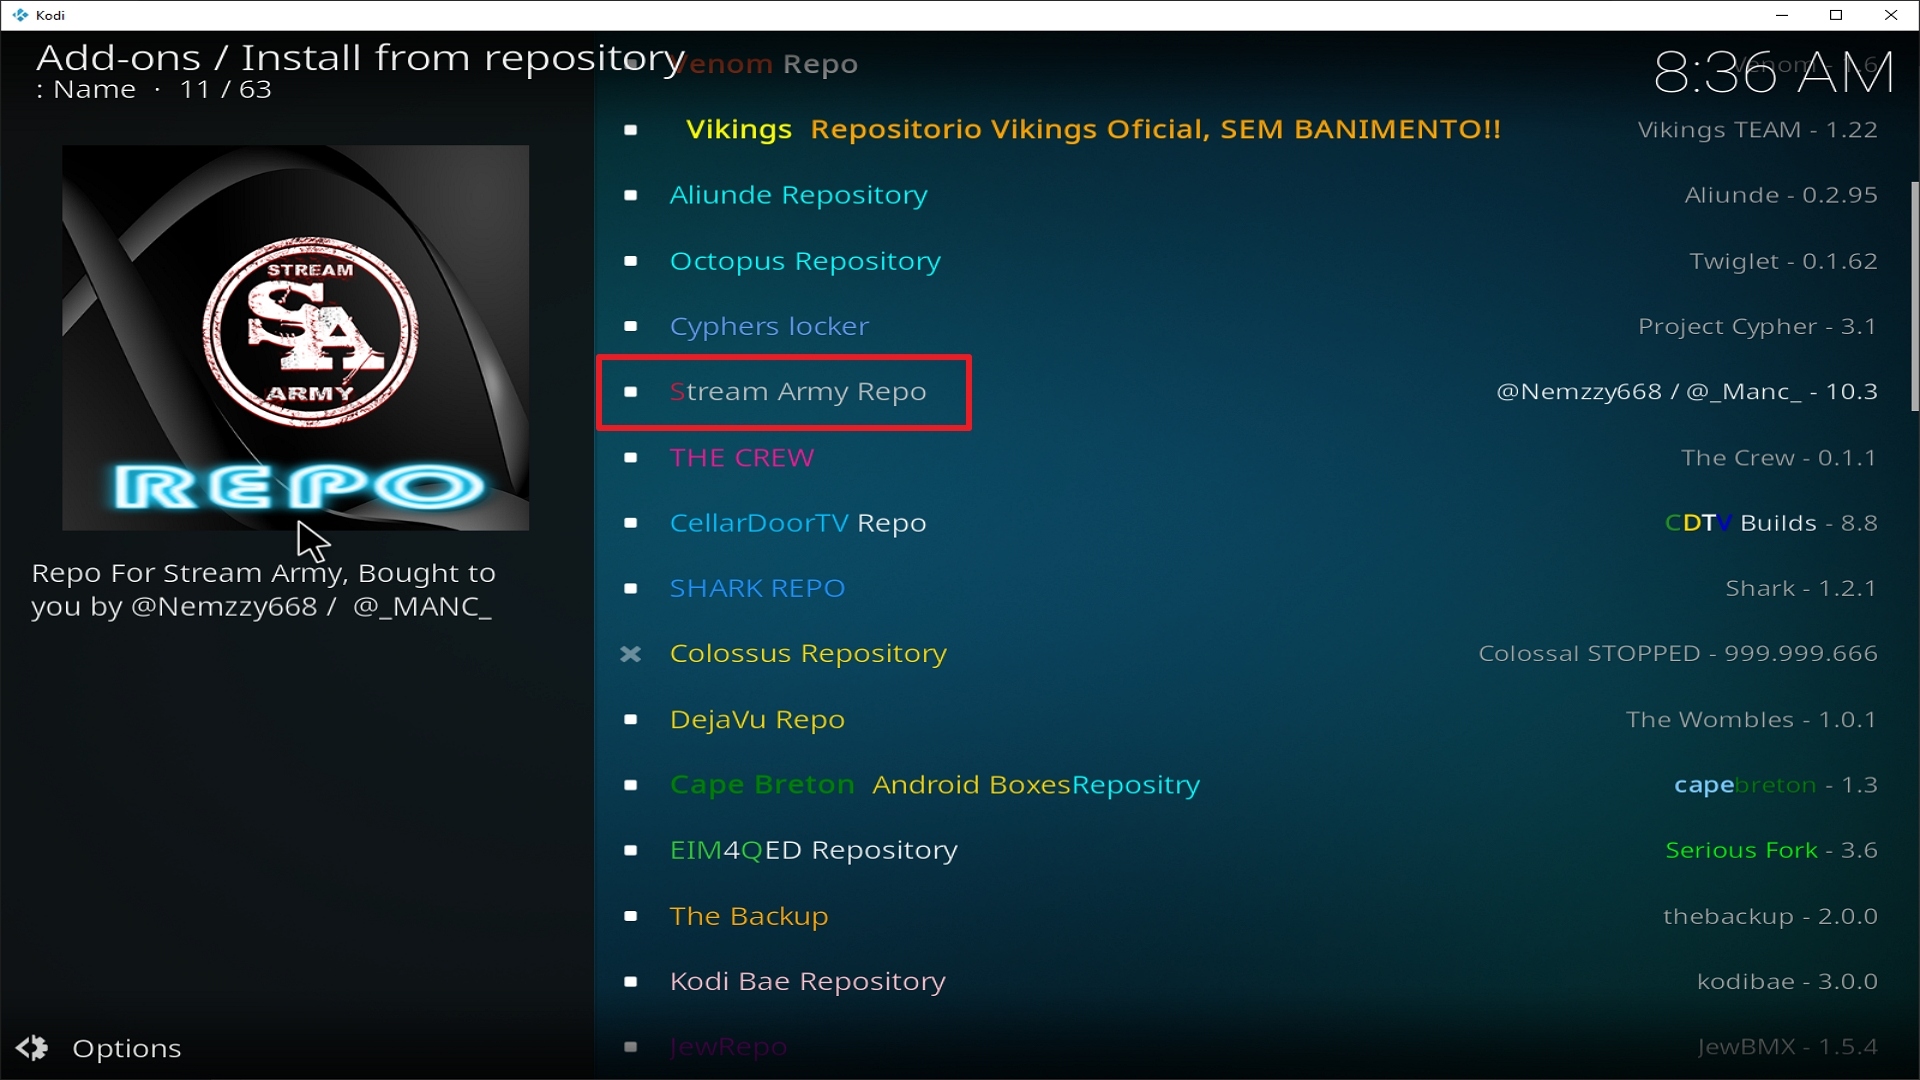
  13. Choose “Stream Army Repo”
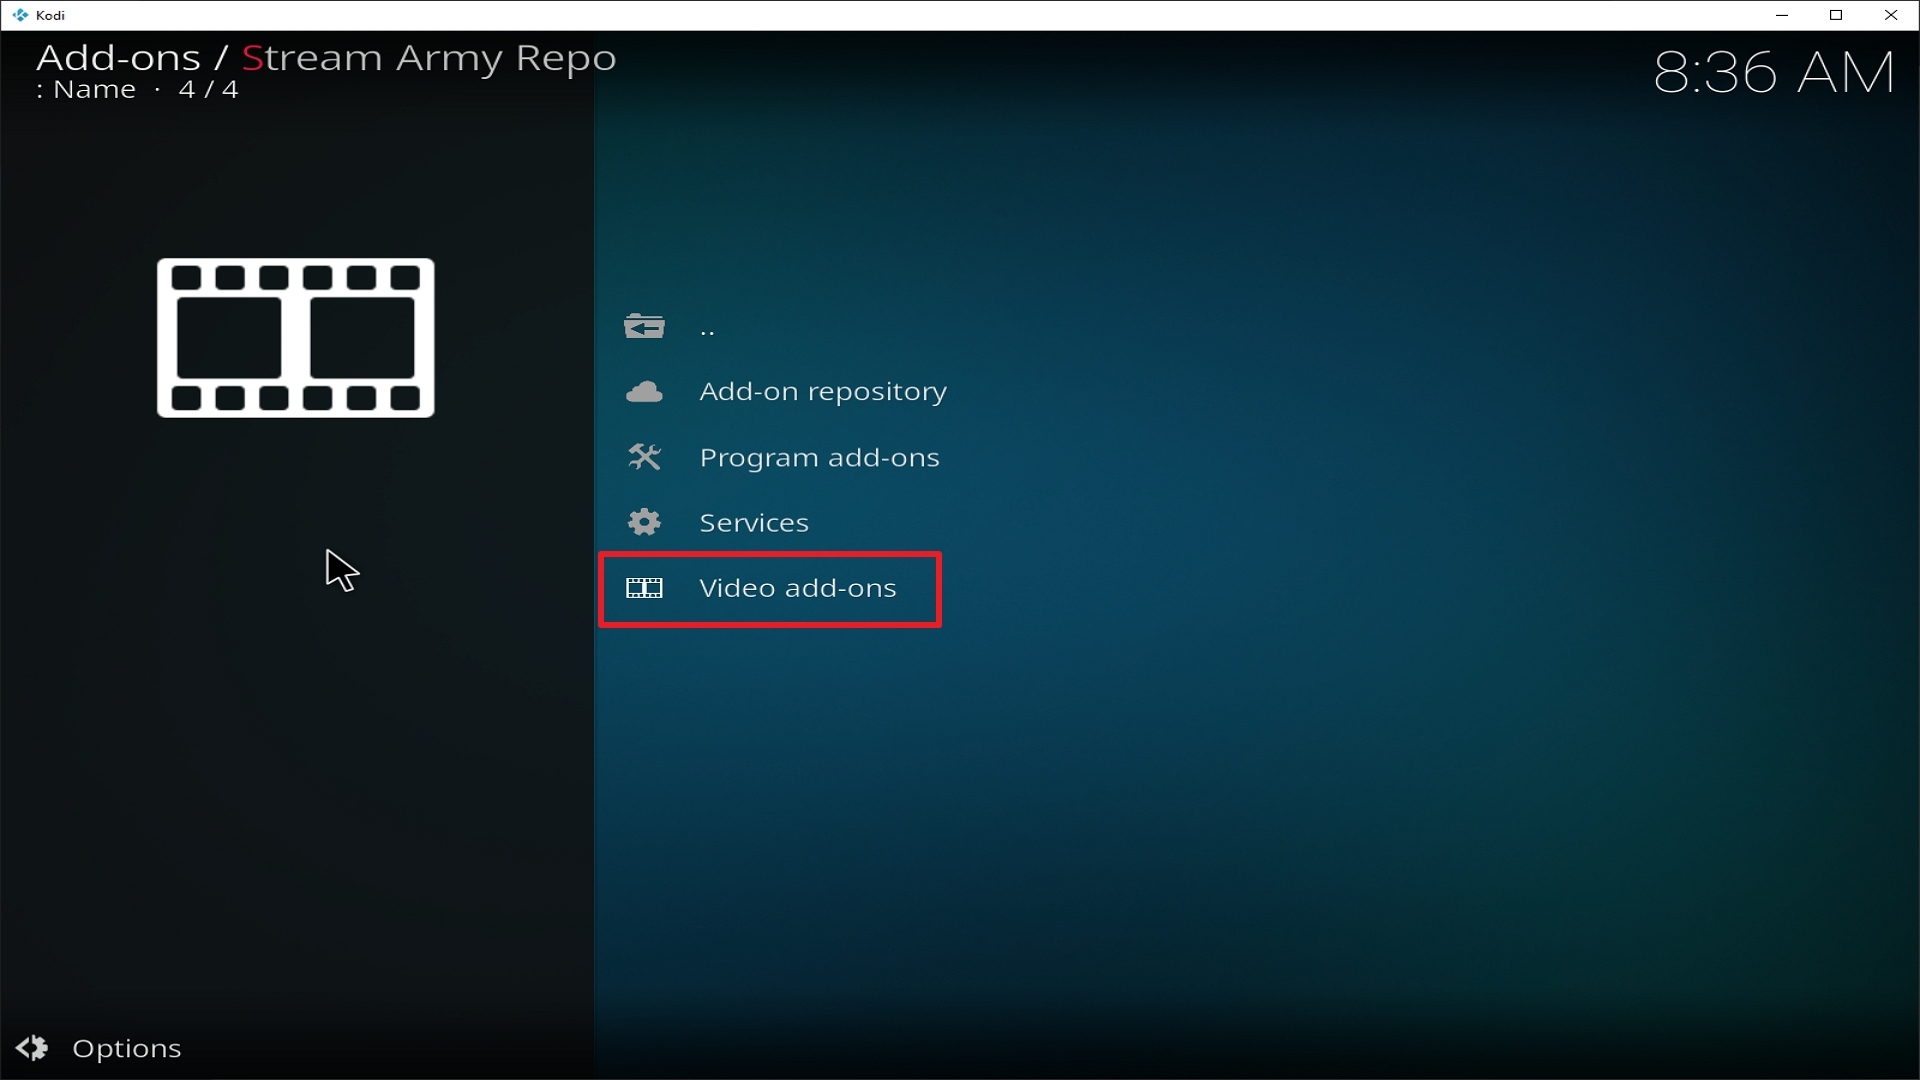
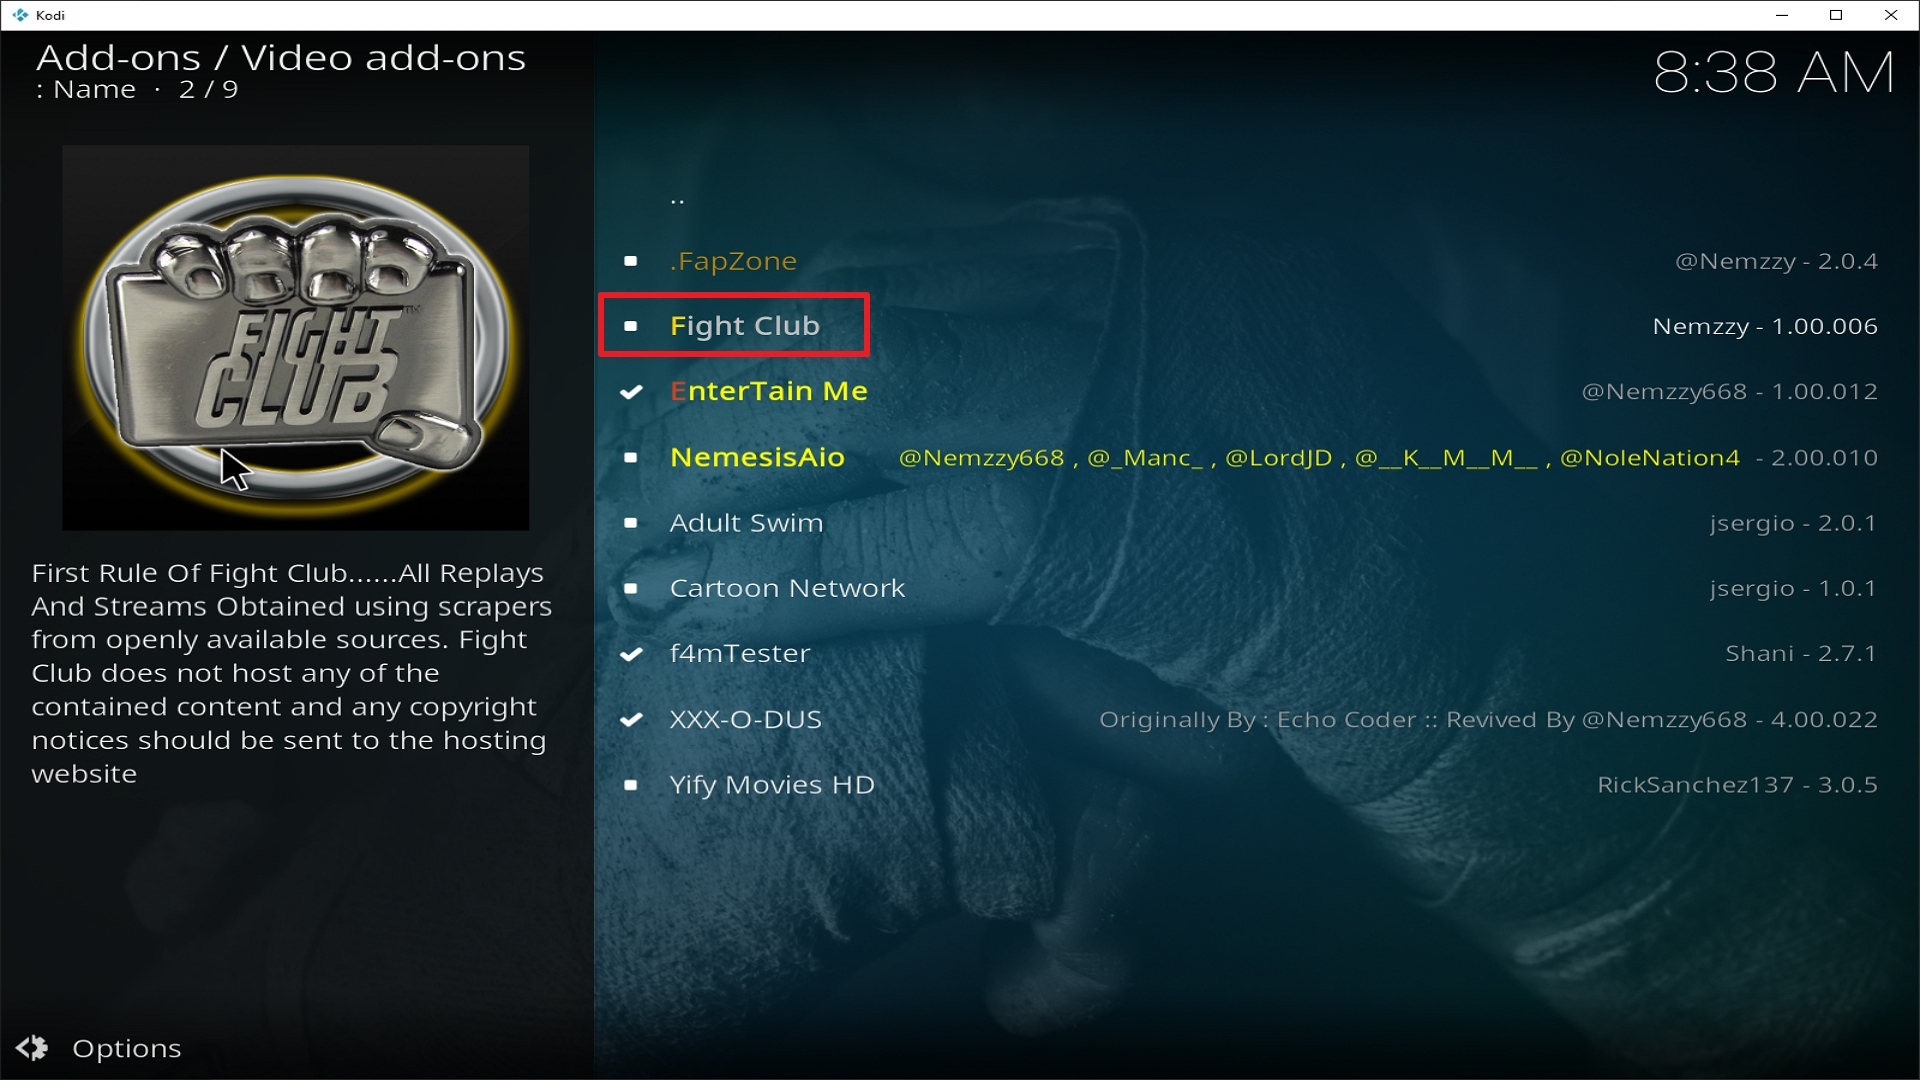
  14. Click on “Video Add-ons” and select “Fight Club” and “Install”
  15. Click “Ok” when a notification “the following add-ons will be installed” appears and wait for Fight Club Add-on to install
  16. Once the add-on is installed go back to the home screen and select “add-ons”
  17. Choose “Video add-ons” and select “Fight Club”
  18. There you go, Fight Club is now installed.

How to Install Fight Club on Kodi with Screenshots

1. From the home screen, select the cogwheel at the upper left.

Step 1 Installing Fight Club addon on Kodi

2. Select System in the bottom right corner.

Step 2 Installing Fight Club addon on Kodi


3. Select Add-ons on the left side of the screen.

Step 3 Installing Fight Club addon on Kodi


4. Select Unknown sources.

Step 4 Installing Fight Club addon on Kodi


5. Click Yes to allow unknown sources.

Step 5 Installing Fight Club addon on Kodi


6. Select File manager.

Step 6 Installing Fight Club on Kodi


7. Click Add source.

Step 7 Installing Fight Club addon on Kodi


8. Click on <None>.

Step 8 Installing Fight Club addon on Kodi


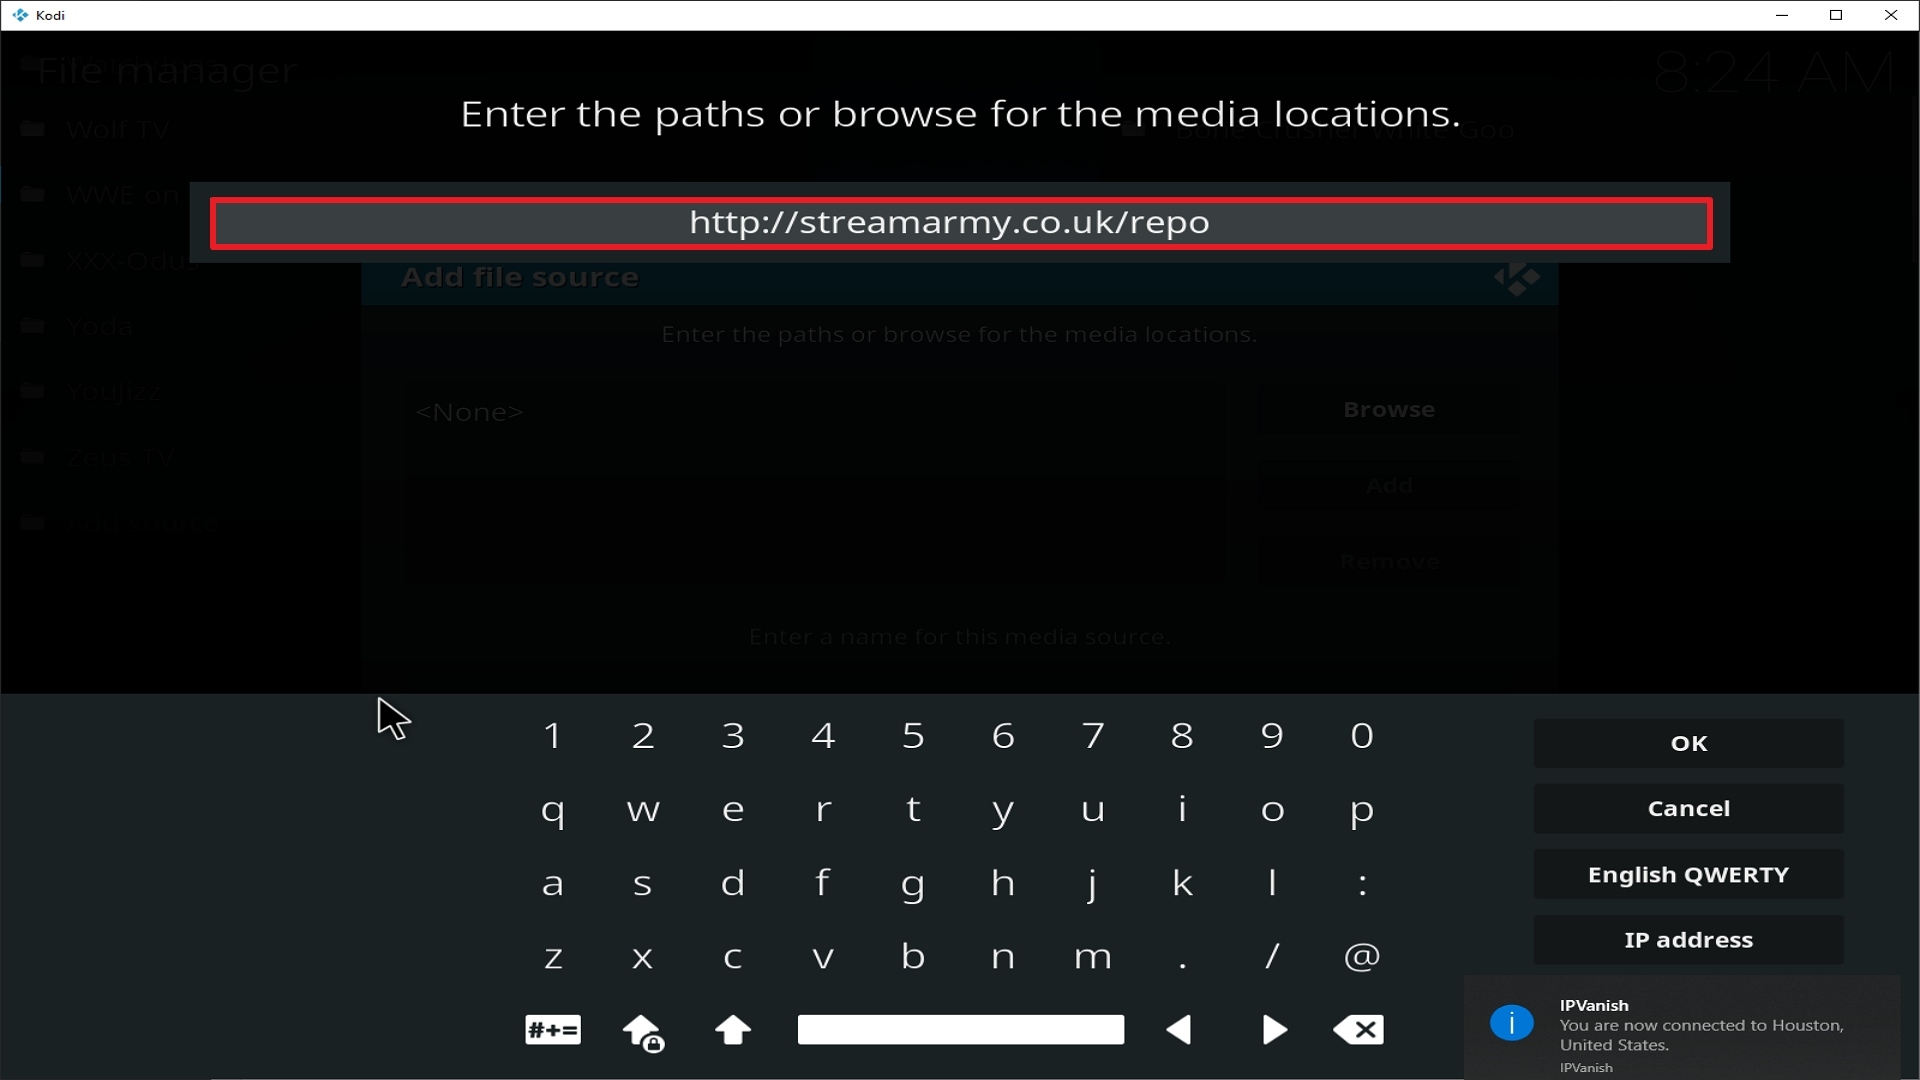
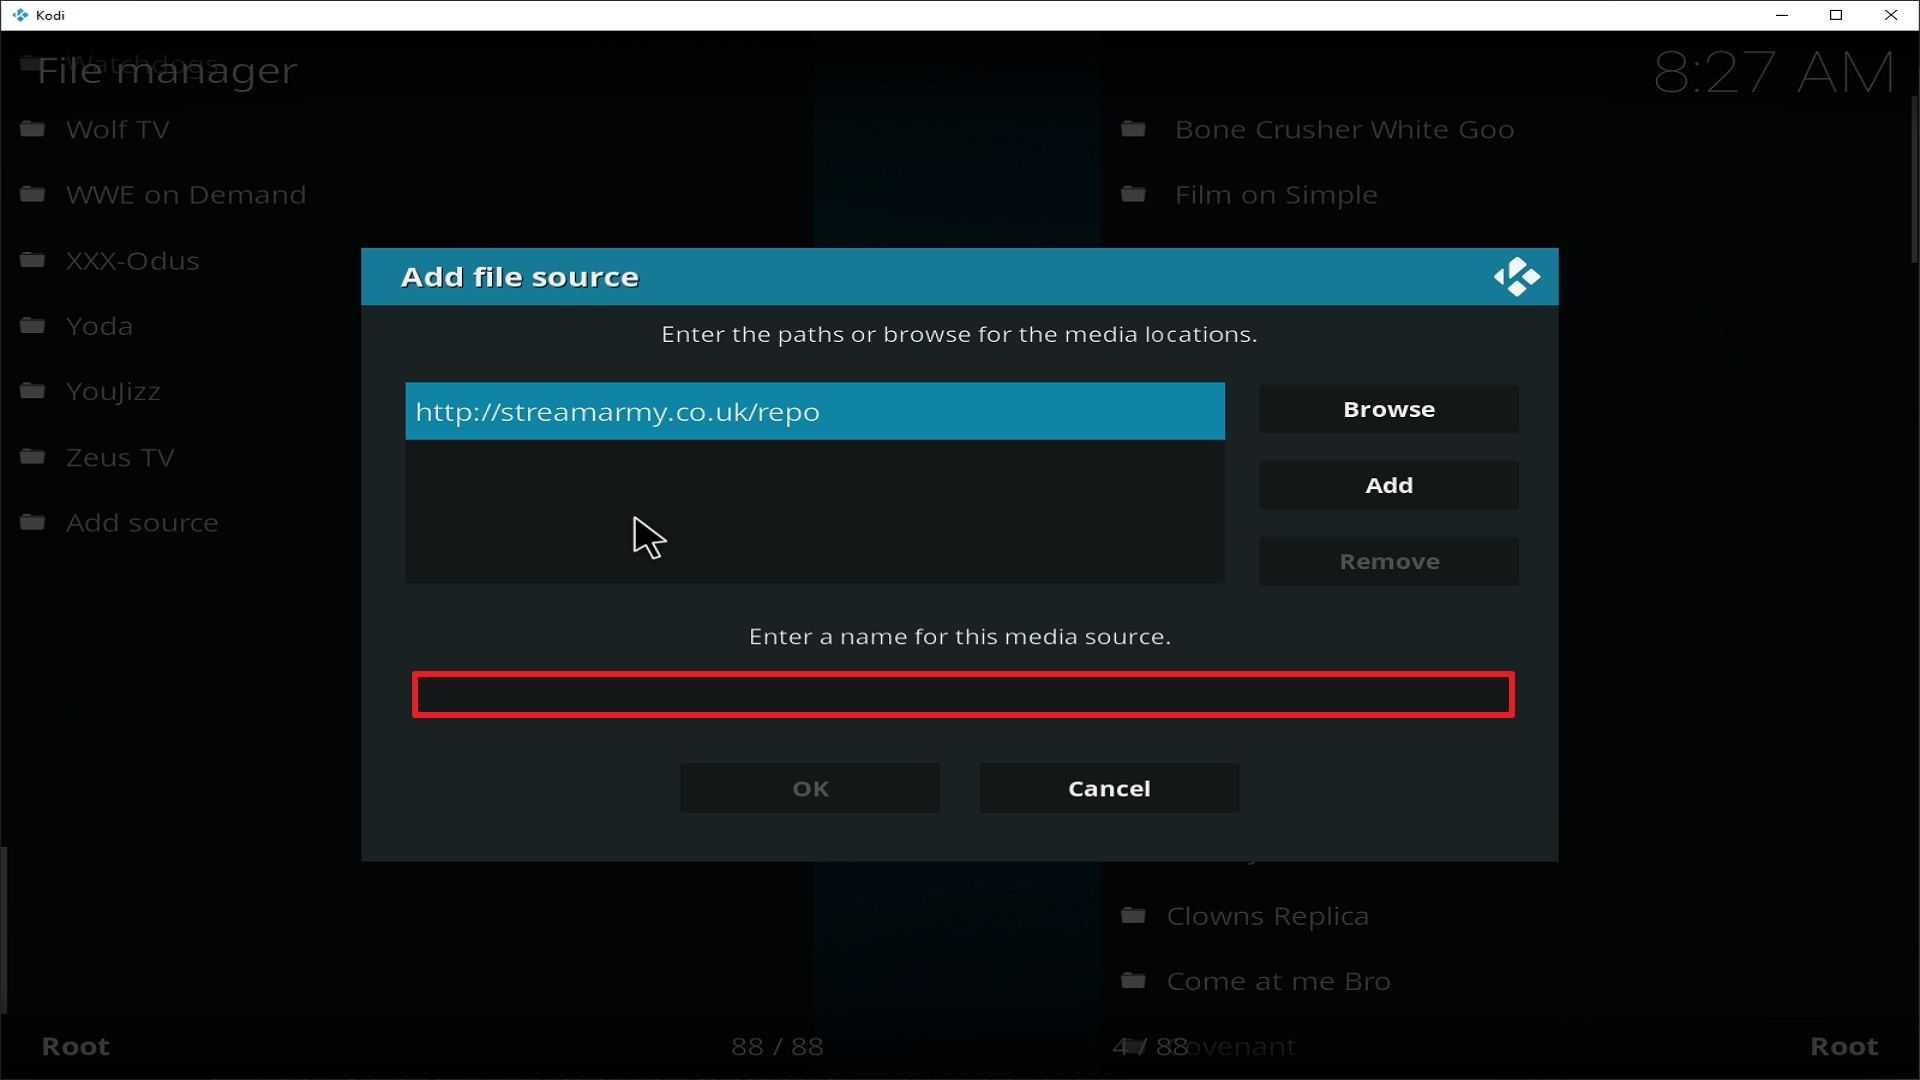
9. Type exactly: http://streamarmy.co.uk/repo

Step 9 Installing Fight Club addon on Kodi


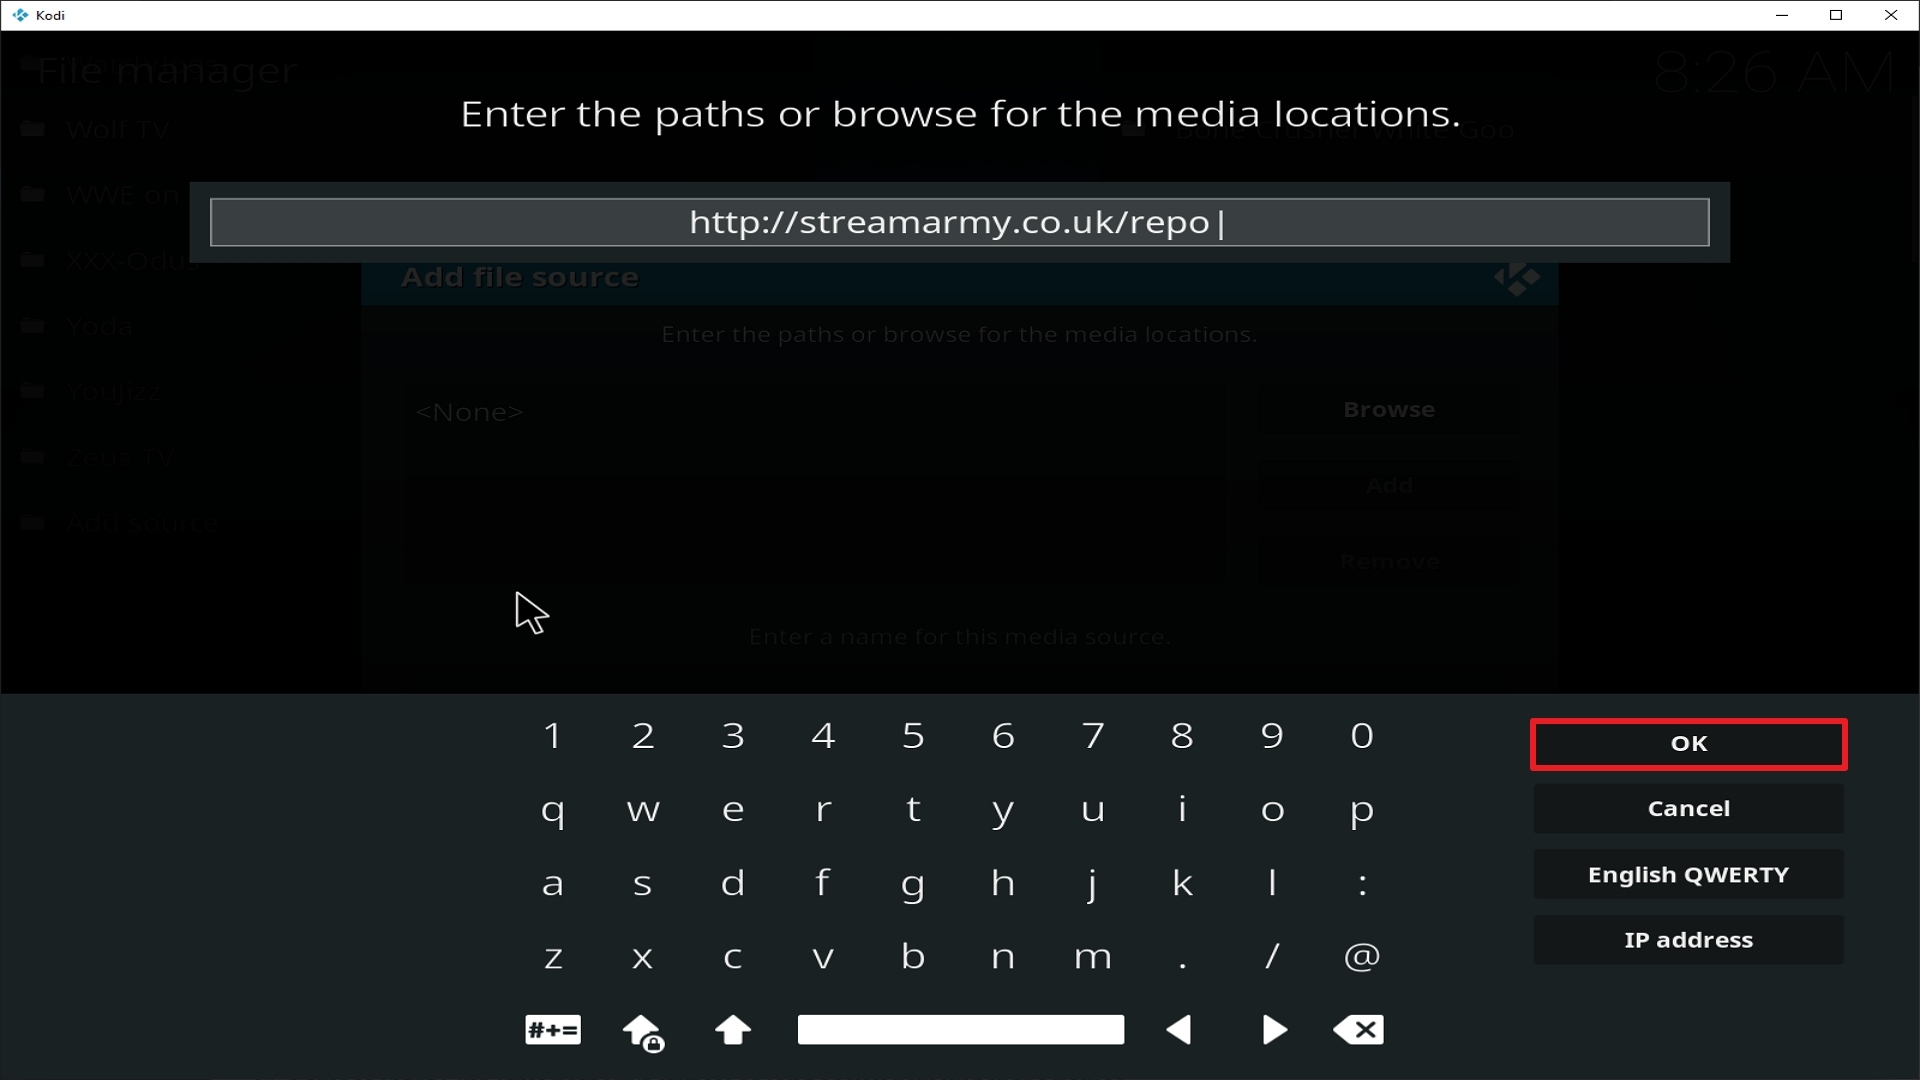
10. Click on OK.

Step 10 Installing Fight Club addon on Kodi


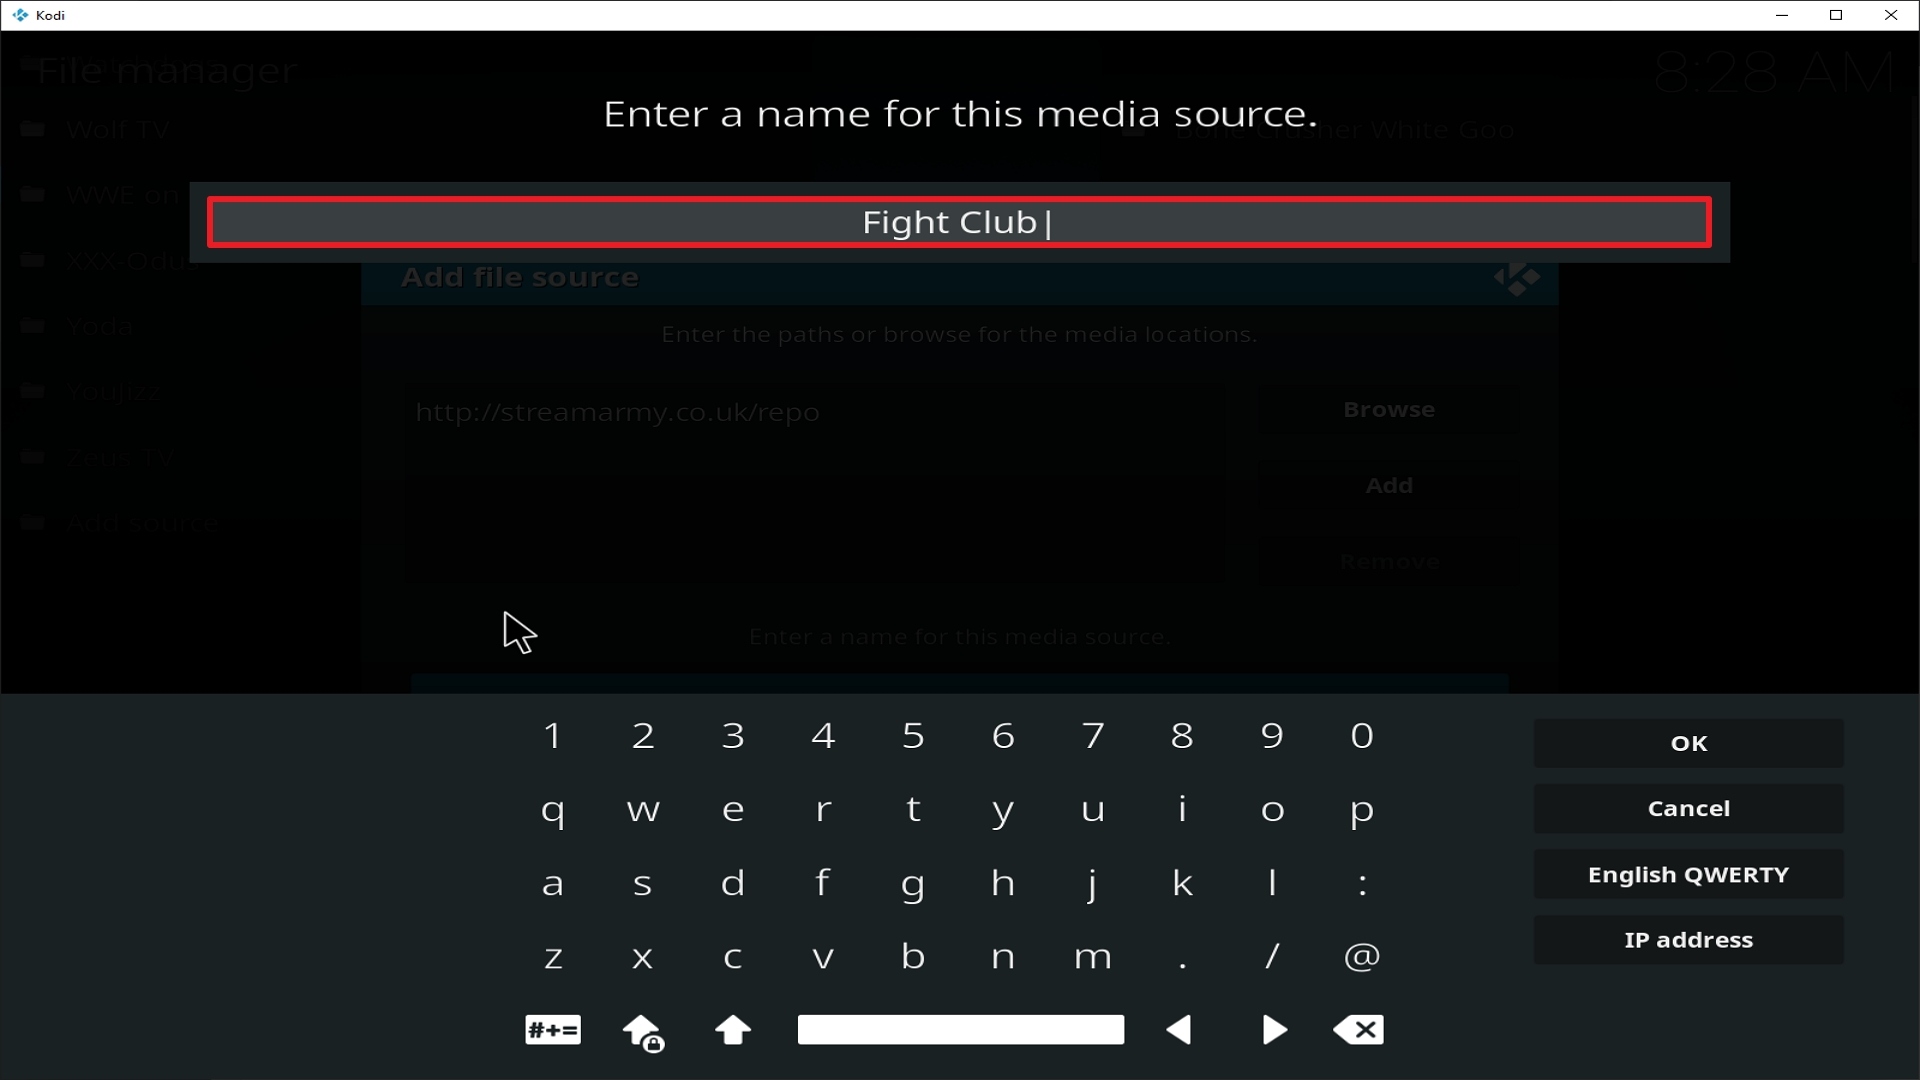
11. Select enter a name for this media source.

Step 11 Installing Fight Club addon on Kodi


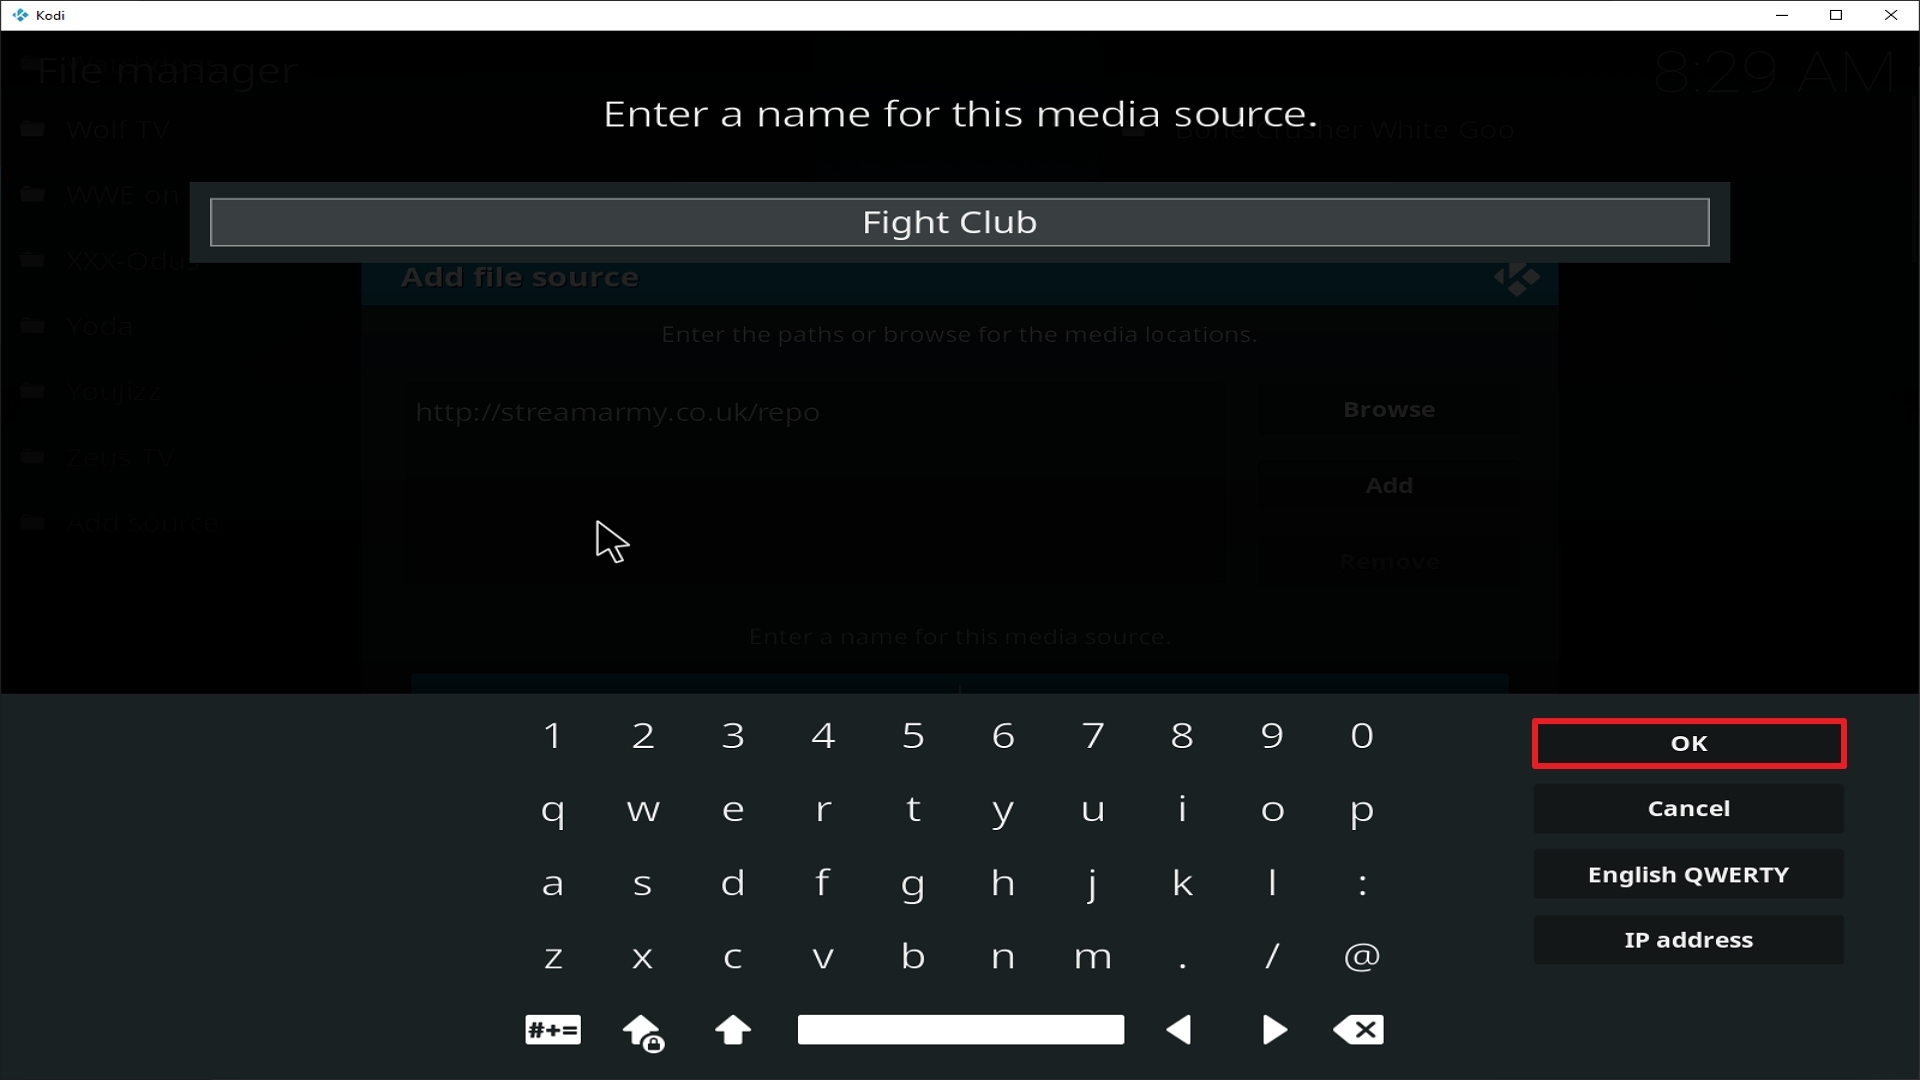
12. Name is Fight Club (this part isn’t critical as long as you remember the name).

Step 12 Installing Fight Club addon on Kodi


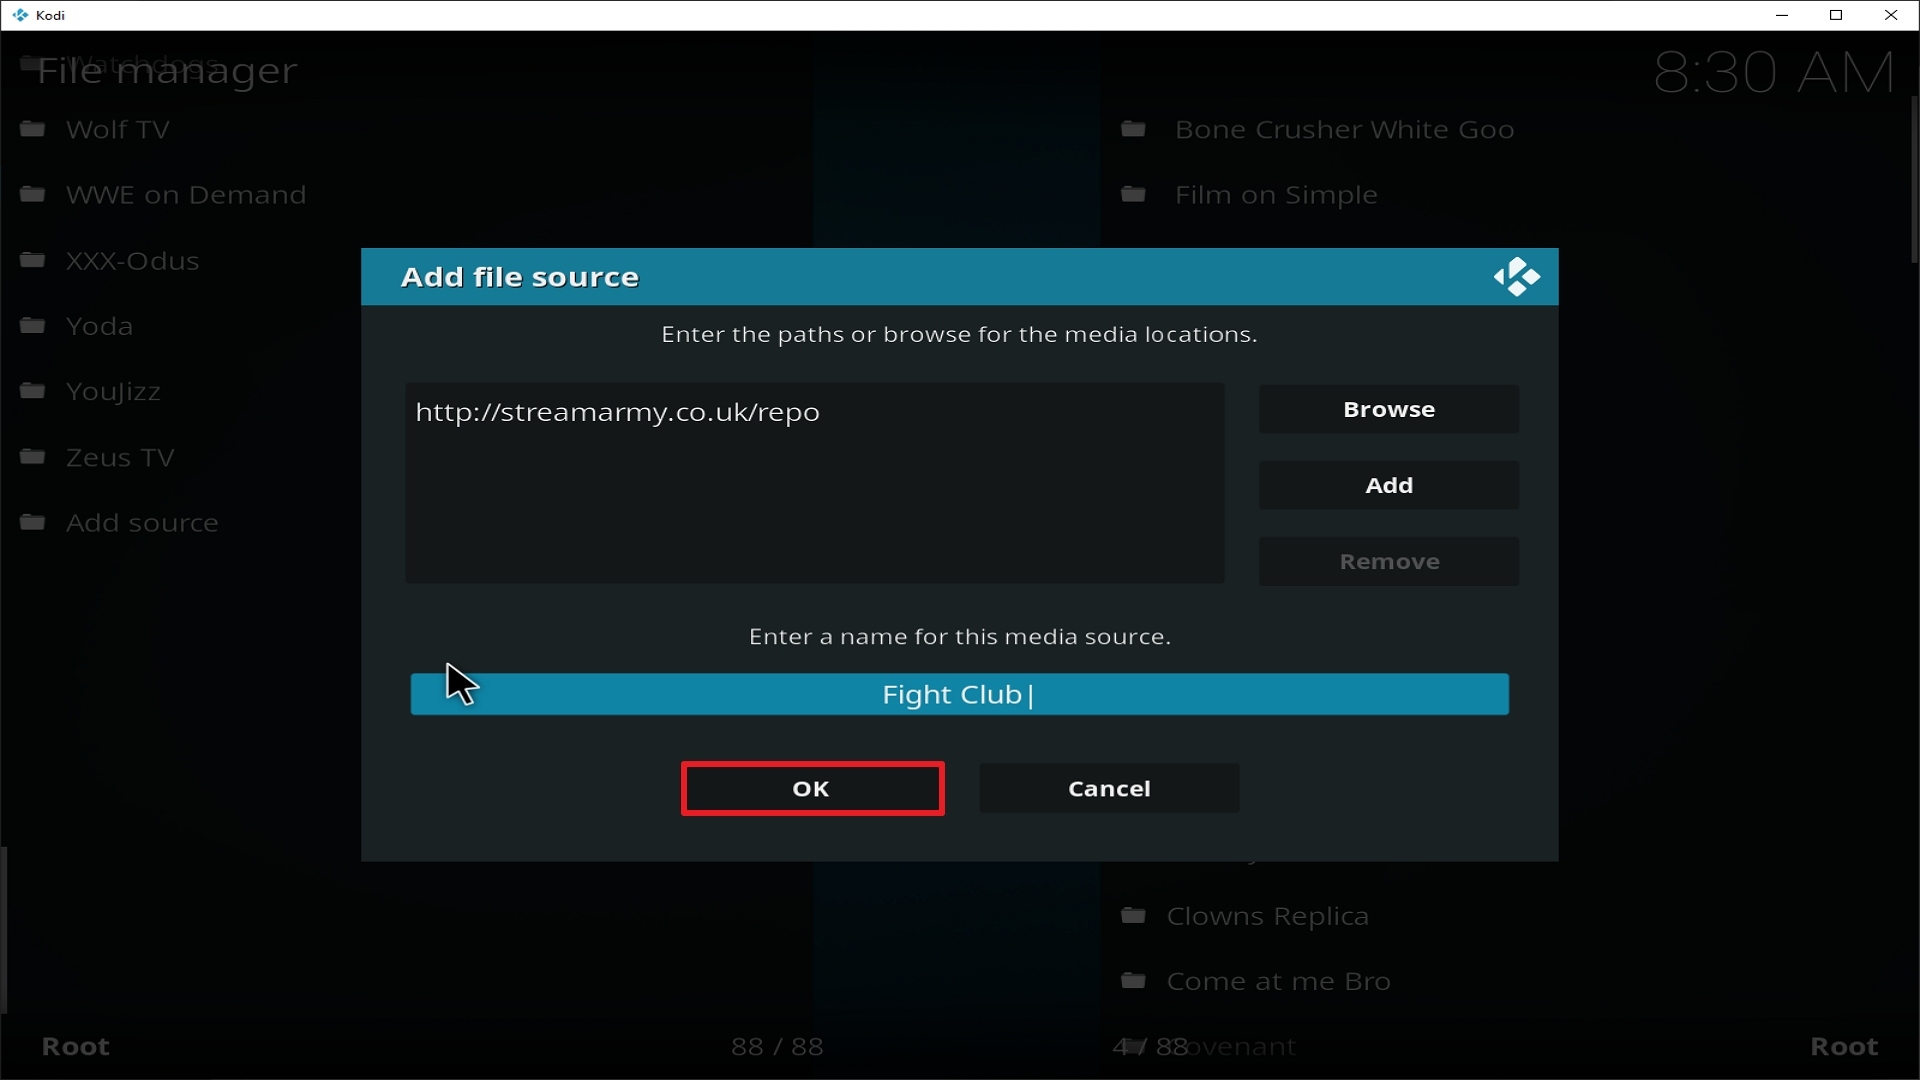
13. Click on OK.

Step 13 Installing Fight Club addon on Kodi


14. Click on OK.

Step 14 Installing Fight Club addon on Kodi


15. Take one step back and click on Add-ons.

Step 15 Installing Fight Club addon on Kodi


16. Select install from zip file.

Step 16 Installing Fight Club addon on Kodi


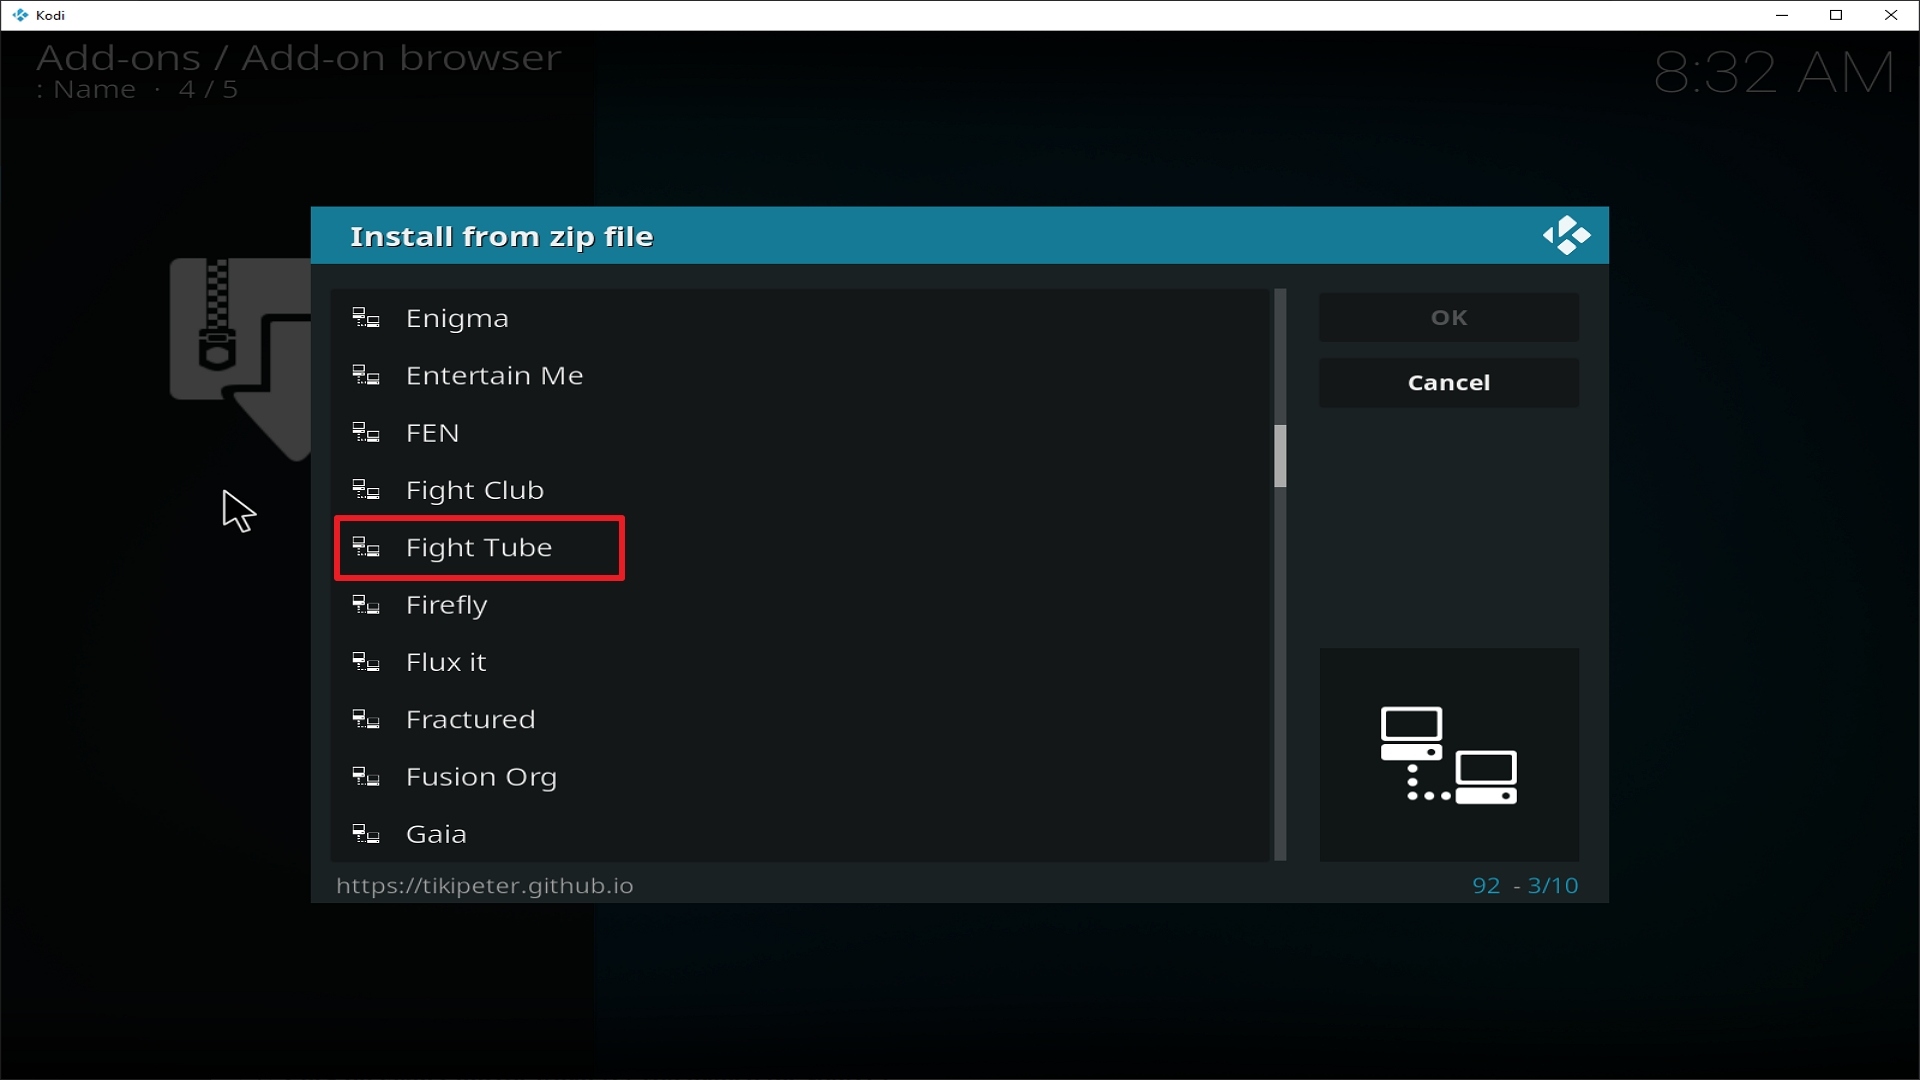
17. Click on Fight Club (or whatever you named the source).

Step 17 Installing Fight Club addon on Kodi


18. Click on repository.StreamArmy-10.3.zip

Step 18 Installing Fight Club addon on Kodi


19. Select on Install from repository.

Step 19 Installing Fight Club addon on Kodi


20. Click on Stream Army Repo.

Step 20 Installing Fight Club addon on Kodi


21. Pick Video add-ons.

Step 21 Installing Fight Club addon on Kodi


22. Select Fight Club again.

Step 22 Installing Fight Club addon on Kodi


23. Click on Install.

Step 23 Installing Fight Club addon on Kodi


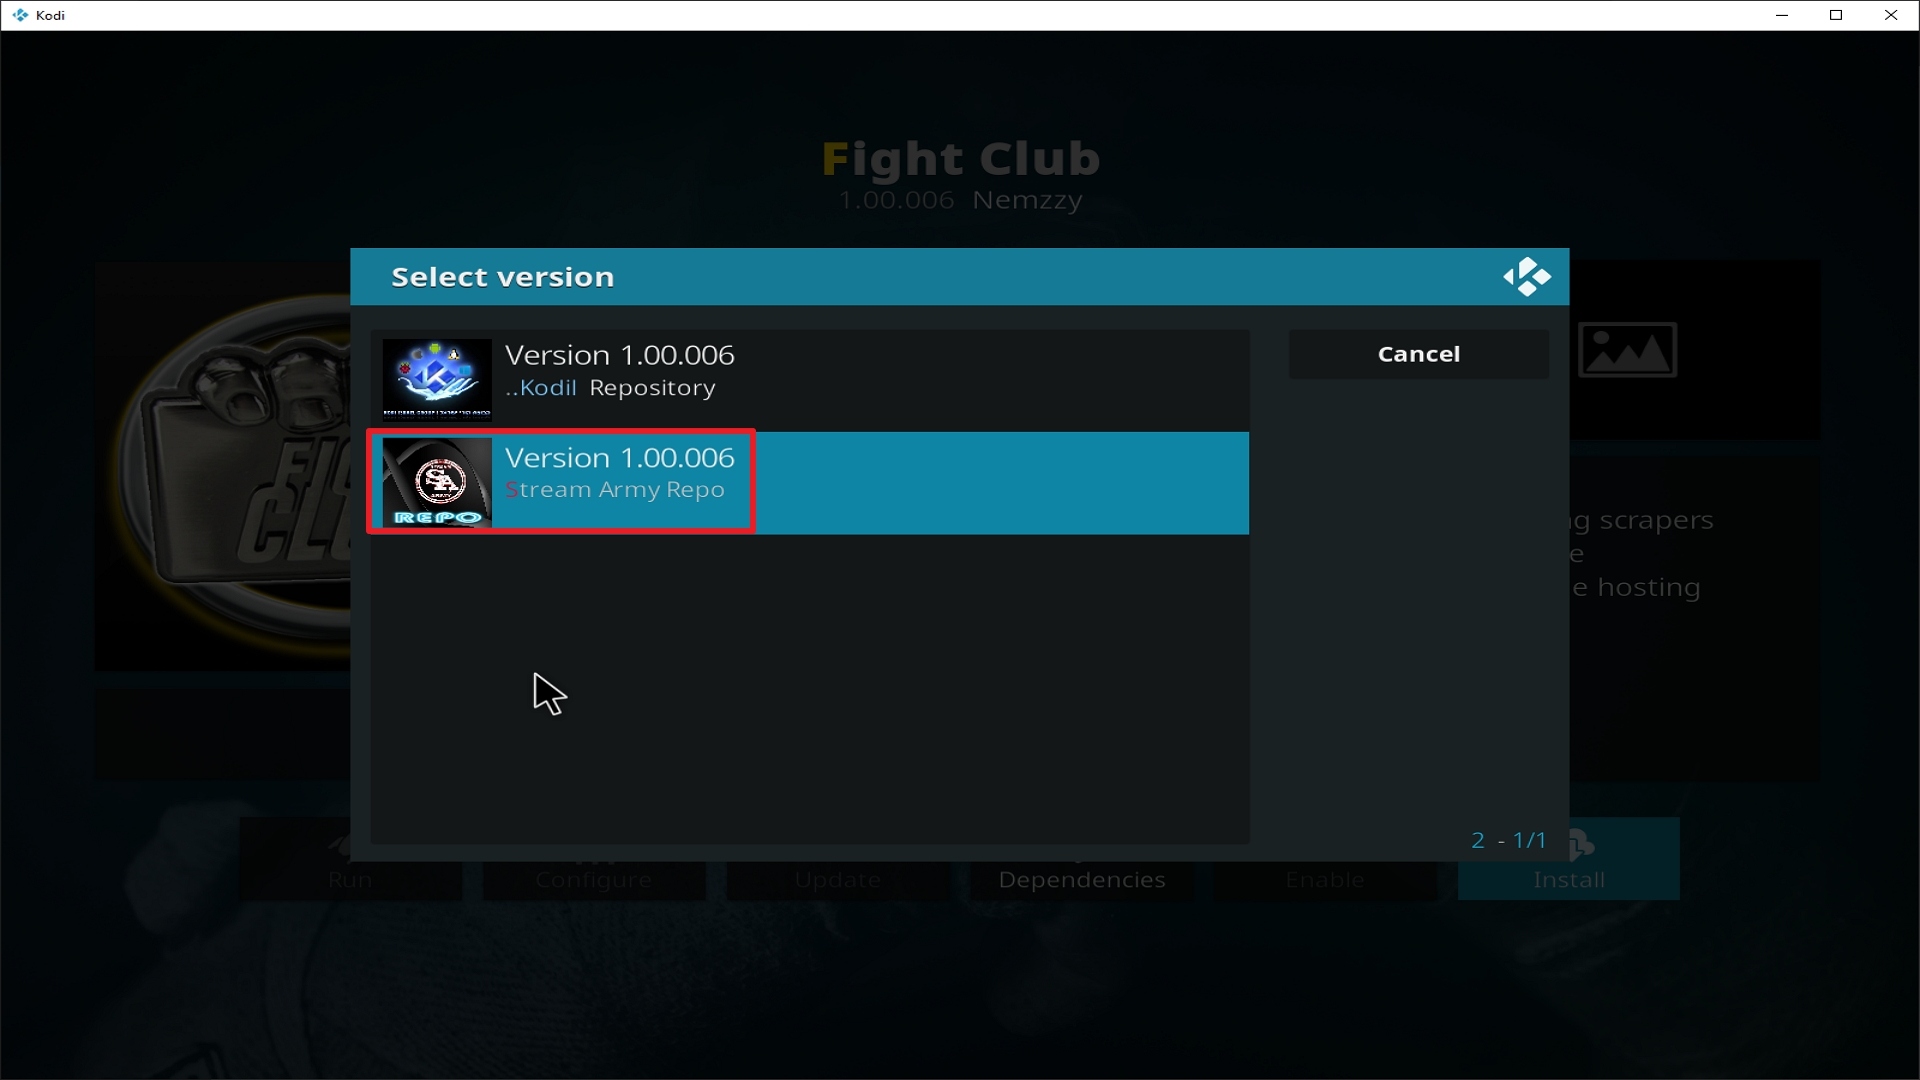
24. Select Version 1.00.006 Stream Army Repo

Step 24 Installing Fight Club addon on Kodi


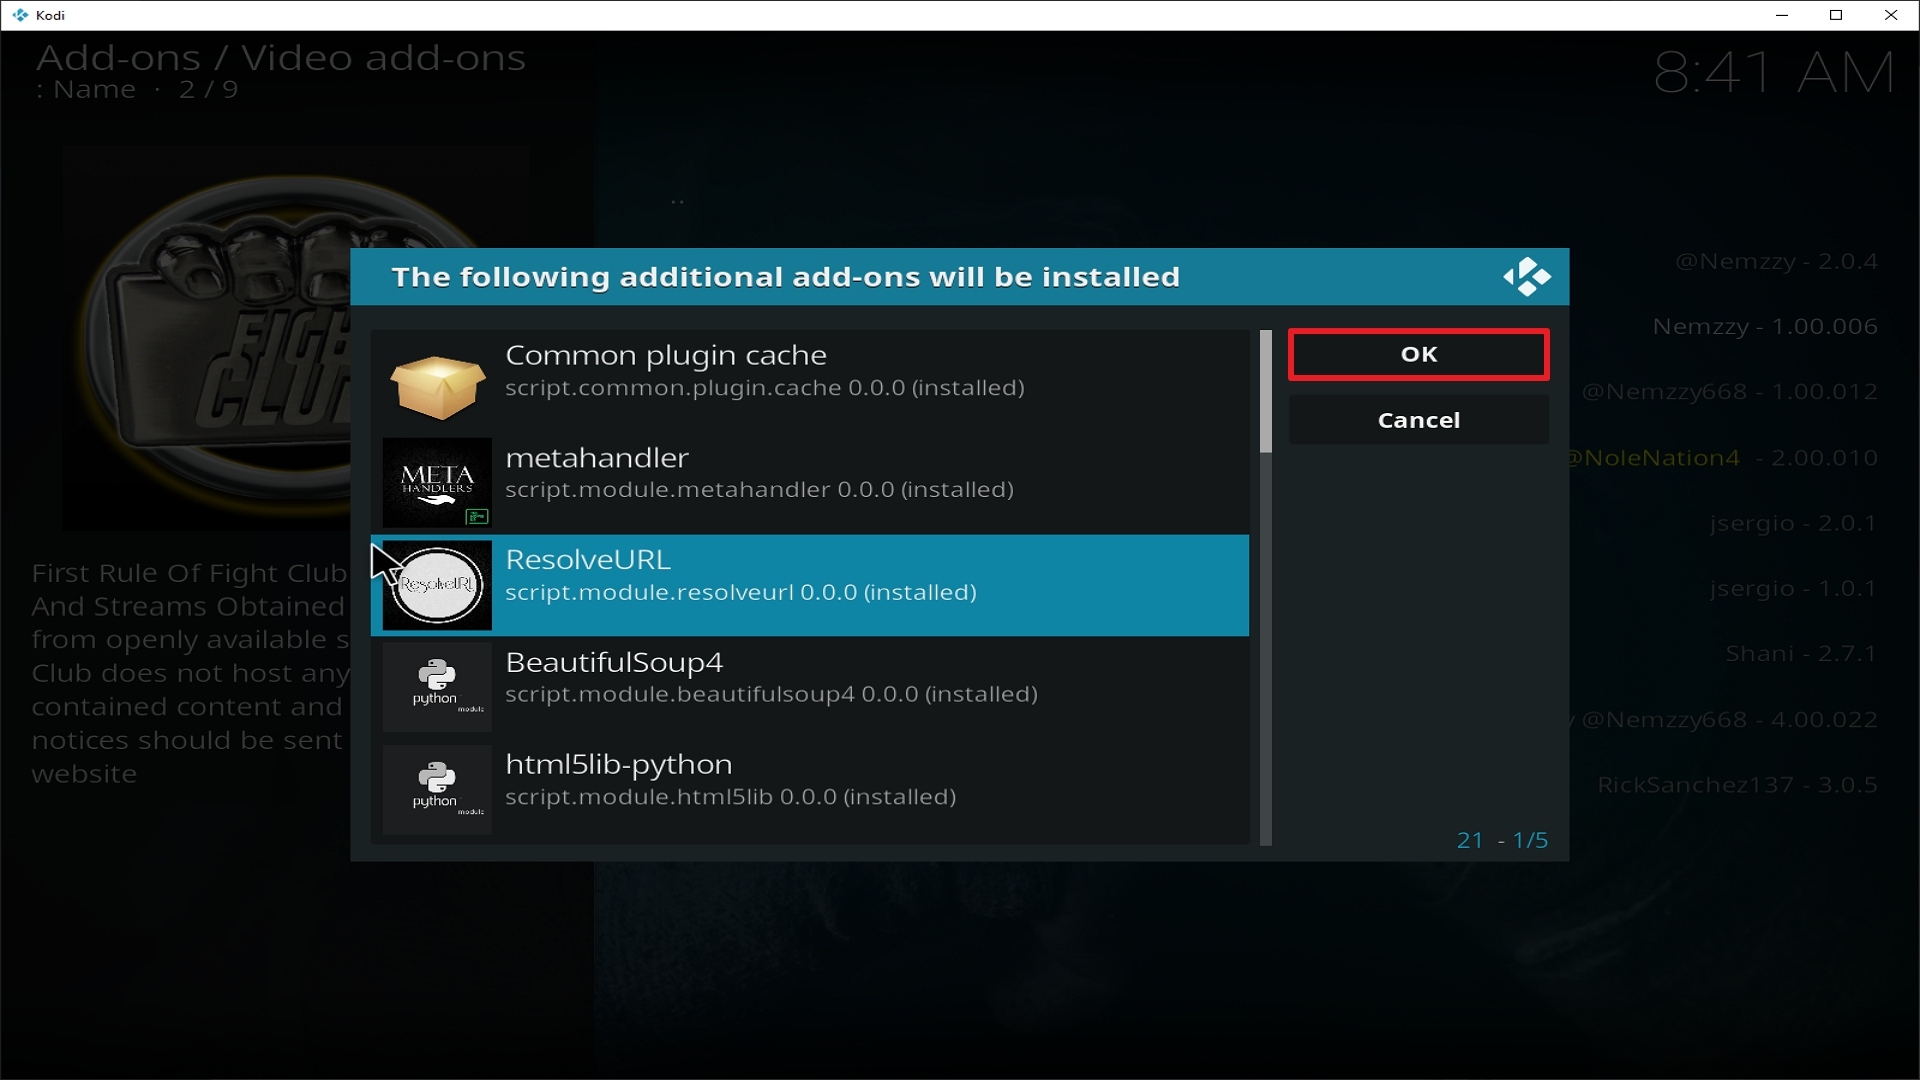
25. Select OK after reviewing the add-ons that will be installed.

Step 25 Installing Fight Club addon on Kodi


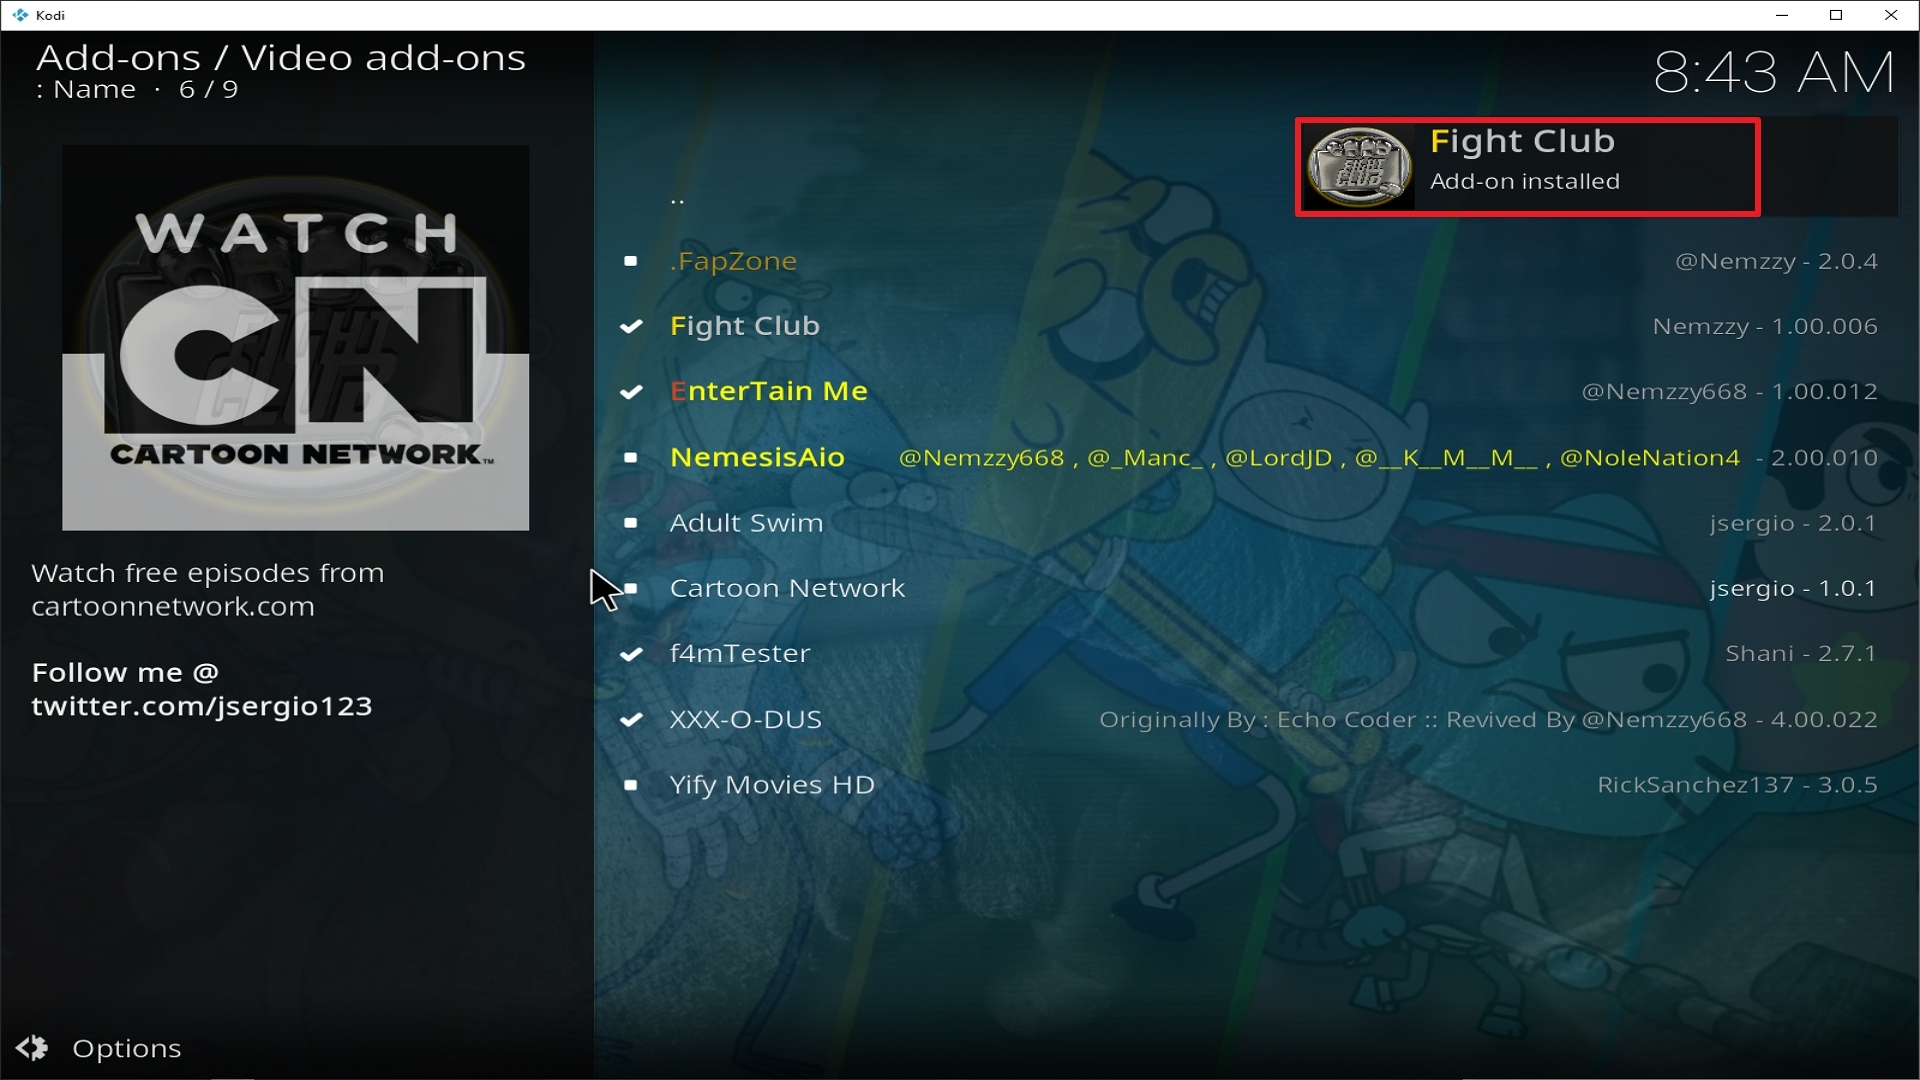
26. You should see a popup in the upper right corner saying Fight Club has installed. There will actually be multiple popups for the various components.

Step 26 Installing Fight Club addon on Kodi


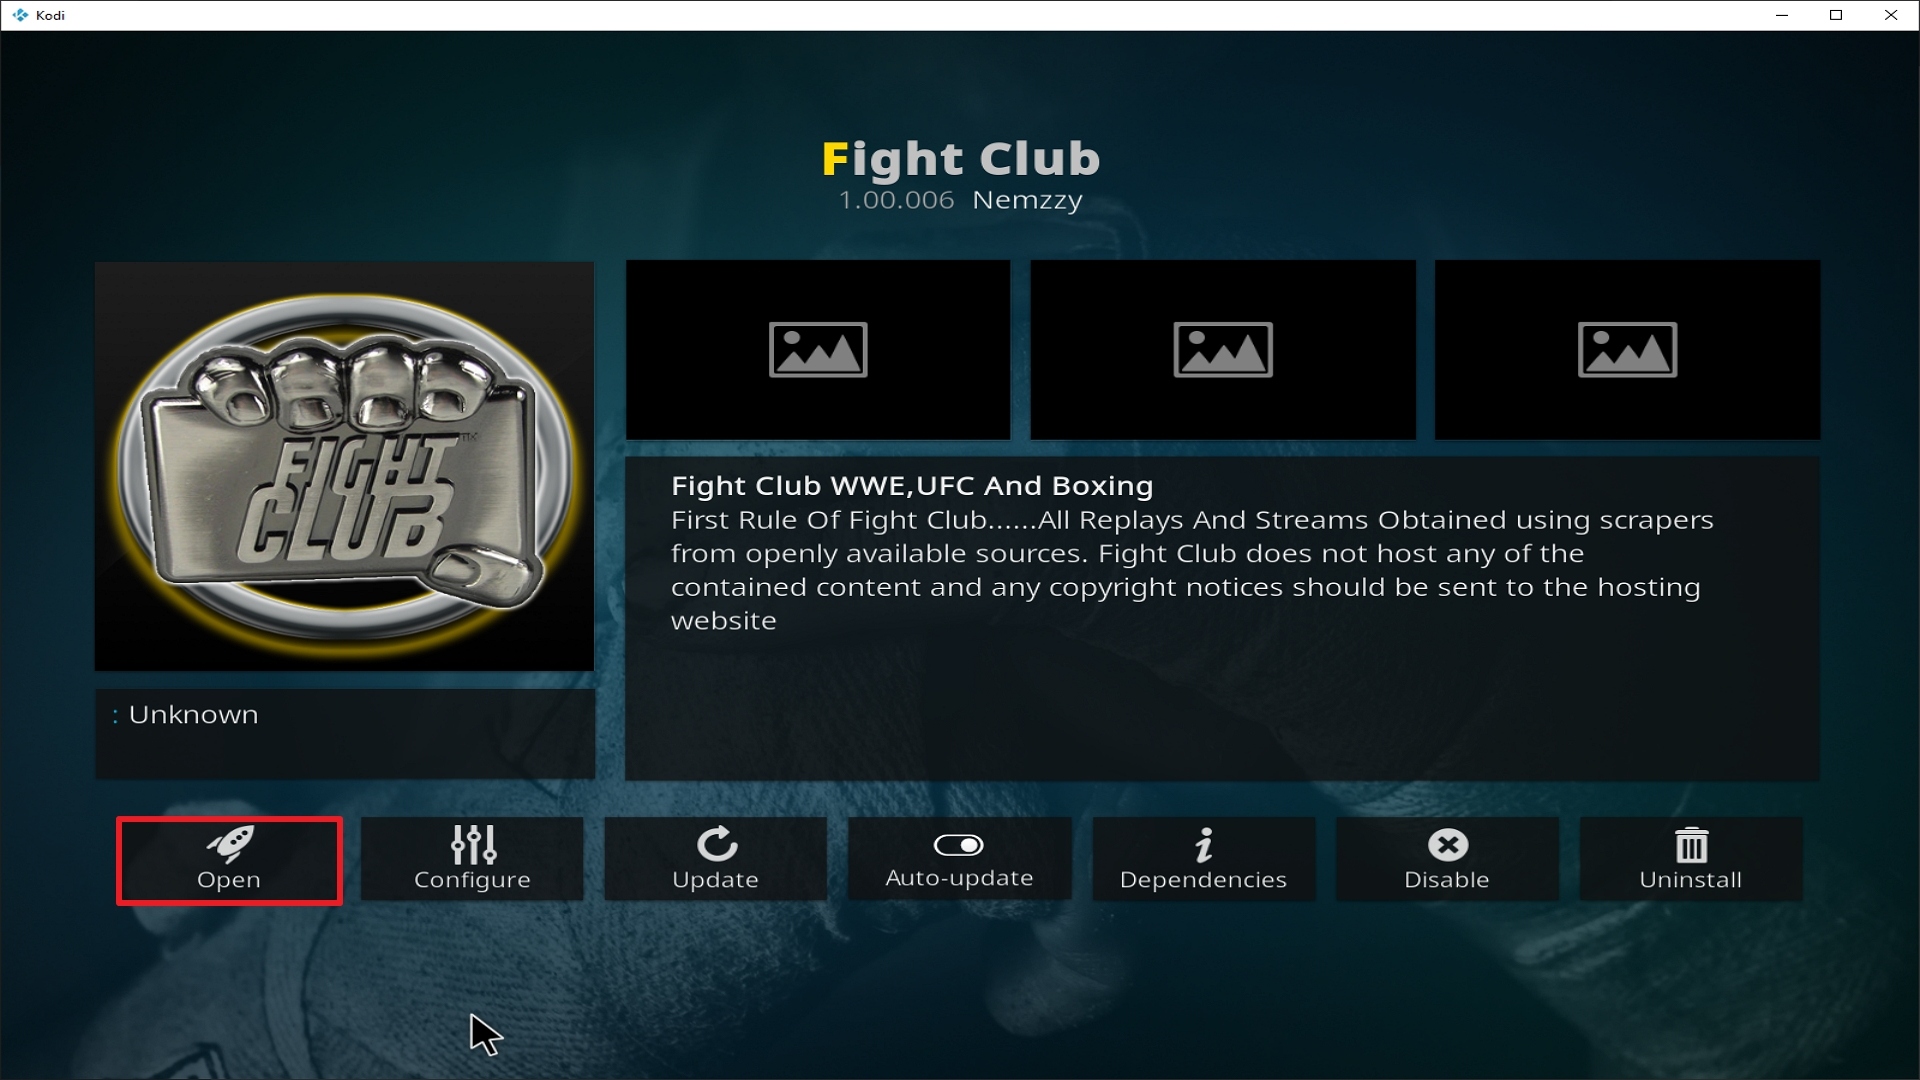
27. Click on Open to start the Fight Club add-on.

Step 27 Installing Fight Club addon on Kodi


Install Surfshark on Firestick

Best Surfshark Deal


Alternatives

There will always be instances that an add-on might not work perfectly thus we always suggest that you secure yourself a good backup from trusted sources and the only one we recommend here at ReviewVPN. The following add-ons are worthy of our praise so you can consider them as substitutes for the Fight Club:

        Castaway

        Wrestling on Demand

Although not as concentrated as Fight Club, the add-ons listed above will suffice whenever Fight Club experiences issues. But let us assure you that this add-on FIGHTS.


Common Errors

These are some of the things that may cause an issue when installing the Fight Club Add-on:


  1.    Unable to connect to URL/Download

Having a hard time downloading The Fight Club Add-on? This can only mean that the repository is incorrect, so please check if you have typed in the correct URL. Also, make sure that you have installed the correct repository. Checking your internet connection for stability can also help make sure that you are protected by a VPN. Your ISP constantly monitors your activity and may block certain websites from being accessed. To fix this, use a VPN to make your connection encrypted and anonymous so that your tracks will be covered. Check here for the best VPN deal.


  1.     Script Error

This error can occur maybe because of how Kodi was installed on your device. Follow the proper steps on how to install Kodi to avoid this type of issue. If the issue persists, you can proceed with reinstalling the add-on. If it should persist further, there may be a need to uninstall and reinstall the whole Kodi app itself.


  1.     Kodi Check Log Error

This occurs when your media cache is full. We can prevent this by emptying your cache and making sure that it gets cleaned on a regular basis. Cache build is quite common nowadays because it is one way of making our streaming experience smoother.


  1.     Source not working/slow/frozen

The Fight Club Add-on does not keep any of the content on its servers, these are all coursed through 3rd party sites. Wait for the source to load up to 15 seconds and then you can try other suggestions. For other solutions please take time to read our in-depth guide linked above.


How to Install Surfshark VPN on Firestick

If your Firestick still has the older interface, read this article to learn how to update it: Update Firestick Interface.

You can download Surfshark directly from the Amazon App store. It will be easy for you to find Surfshark with your Firestick’s Find feature. Refer to our screenshots below.

1. Go to the Home screen of your Firestick.

step 1 Install Surfshark VPN on Firestick


2. Navigate towards the Find tab. Press the Search button from the resulting dropdown.

step 2 Install Surfshark VPN on Firestick


3. Type in the keyword of SurfShark and select from the suggestions that will appear.

step 3 Install Surfshark VPN on Firestick


4. Click the official SurfShark icon from your search results.

step 4 Install Surfshark VPN on Firestick


5. Press the Download (You own it) button.

step 5 Install Surfshark VPN on Firestick


6. The SurfShark VPN installer will download on your device.

step 6 Install Surfshark VPN on Firestick


7. SurfShark VPN’s app will automatically install itself on your Fire TV stick.

step 7 Install Surfshark VPN on Firestick


8. Press the Open button after completing SurfShark VPN’s installation process.

step 8 Install Surfshark VPN on Firestick


9. Please wait for the SurfShark VPN to load its user interface.

step 9 Install Surfshark VPN on Firestick


10. You can now log in with your SurfShark VPN account credentials.

step 10 Install Surfshark VPN on Firestick

Learn more about Surfshark and Grab the Best Surfshark Deal Now!


Install Surfshark on Firestick

Best Surfshark Deal


Other VPNs to Consider

NordVPN (Best for Streaming)

Best Features

  • 5000+ Server in 50+ Countries 
  • Military-Grade Encryption
  • Fast Connection Speed
  • Suitable to a lot of devices
  • No-Log Policy

Prices
  • Complete $5.89 per month (64% Discount)
  • Plus $4.59 per month (56% Discount)
  • Standard $3.69 per month (55% Discount)

Best Features

  • 750+ High-speed VPN Servers in 43 Locations
  • Military-Grade Encryption
  • Fastest HD Streaming and Gaming
  • 30-Day Money-Back Guarantee
  • Unlimited Data & Devices
  • No-Log Policy

Prices
  • 3 Years $1.99 per month (82% Discount)
  • 1 Years $3.29 per month (70% Discount)
  • 1 Month $10.99 per month

IPVanish VPN (Most Secure)

Best Features

  • 1200+ Servers in 60+ Countries around the world
  • Unlimited Connections
  • No-Log Policy
  • Top Notch Military-Grade VPN Protocols and Encryptions
  • 100% Safe and Secured
  • Most Trusted VPN
  • Best VPN for Firestick
  • 30-Day Money-Back Guarantee

Prices
  • Yearly $3.99 per month (63% Discount) – 30 days risk free + Ransomware & Malware Protection
  • Quarterly $5.32 per month (51% Discount)
  • Monthly $10.99 per month


For more VPN discounts, go to ReviewVPN Deals and purchase the best VPN for you.

Click here to get the lowest price on Surfshark through our exclusive limited-time offer.


Conclusion

The Fight Club is the perfect fit for WWE enthusiasts. You don’t have to spend a lot of money just to get entertainment at its finest. With the help of Kodi and Fight Club Add-on, you can enjoy to your heart’s content. Have a beer and enjoy it with your peers or if you are going to watch with your son, let him have a sip! We hope that this guide may be able to help you in fulfilling your smackdown! Should any issue arise, do tell us by dropping a comment down below or by contacting us through our social media platforms. Thank you and be a STUNNER!


Install Delta Quadrant – One Click Kodi Addon

Delta Quadrant – One Click Kodi Addon

In this article, we will help you install Delta Quadrant Kodi Addon on Firestick.


Source: http://repo.rubyjewelwizard.com/

There is a saying “No Man Is An Island” which basically means, no one can do everything on his own. Just like in a basketball team, no point guard can win a game doing everything by himself. He will need cooperation and help from his teammates in order to win the game. We can say the same about Kodi, we will not have a wonderful entertainment experience without the collaboration of the App Creator and the add-ons that make it outstanding. The featured add-on for today is called Delta Quadrant. Delta Quadrant requires the installation of certain add-ons to make its features work. Well, is that a bad thing? We will see as this article progresses.

Delta Quadrant comes from the famous Diamond Wizard Repository which offers great content by collaborating with other add-ons. Think of it as a middleman that will automatically search for content through other add-ons without going back and forth.


ANONYMOUSLY

Features

–        Access to Live TV via Beta Quadrant Add-on

–        Access to Pluto TV via Pluto TV Add-on

–        Access to Xumo TV via Xumo TV Add-on

–        Access to Cached Torrents via A Pirates Life For Me Add-0n

–        Access to Popcornflix via its add-on

–        Access Crackle via its add-on

–        Access to Shout Factory TV via its Add-on

–        WNBC

–        Reddit

–        Youtube Theater

–        Film Rise

–        The Big Short

–        Creature feature Plus and many more


YOUR INTERNET ACTIVITY IS BEING WATCHED

ReviewVPN cannot attest to the legality, security and privacy of the applications discussed on this site. It is highly recommended that you use a VPN service while streaming or using Kodi.

Currently, your IP 216.73.217.150 is visible to everyone and your Browser is being tracked by Advertisers & ISP Provider.

Save 65% Now

Limited Time Offer

Here are the main reasons why you must use a VPN:

  • Your activities are hidden from your ISP, the government, and from the apps you are using.
  • You can access additional movies and TV streams.
  • ISP attempts to throttle are thrwarted thus reducing buffering issues.
  • Geographically restricted content like Netflix and Hulu can be unblocked.

A VPN works be replacing your ISP-assigned IP address and creating an encrypted tunnel. We recommend the no log service offered by IPVanish. It works well on a Firestick and offers the fastest possible speeds.

Special Limited Time Offer - Get IPVanish


Legal Disclaimer: ReviewVPN.com does not encourage or endorse any illegal activity involved in the usage of services and applications referenced on this site. We do not verify the licensing agreements of services. The end-user is wholly responsible for ensuring that any media accessed through these services does not violate copyright and/or licensing laws. ReviewVPN does not promote, link to, or receive compensation from any Apps and IPTV services.


Install Surfshark on Firestick

Best Surfshark Deal


Easy Installation Guide

  1. Launch Kodi on your device
  2. Click on the “Gear Icon” and select “System”
  3. At the add-ons menu, turn on the “Unknown Sources” by clicking “yes”
  4. Go back to the “systems” page and choose “File Manager”
  5. Choose Add source and select “none”
  6. Type in http://repo.rubyjewelwizard.com
  7. Highlight the source and rename it to “diamond” or any name you would like to use to identify this particular source and click “ok”
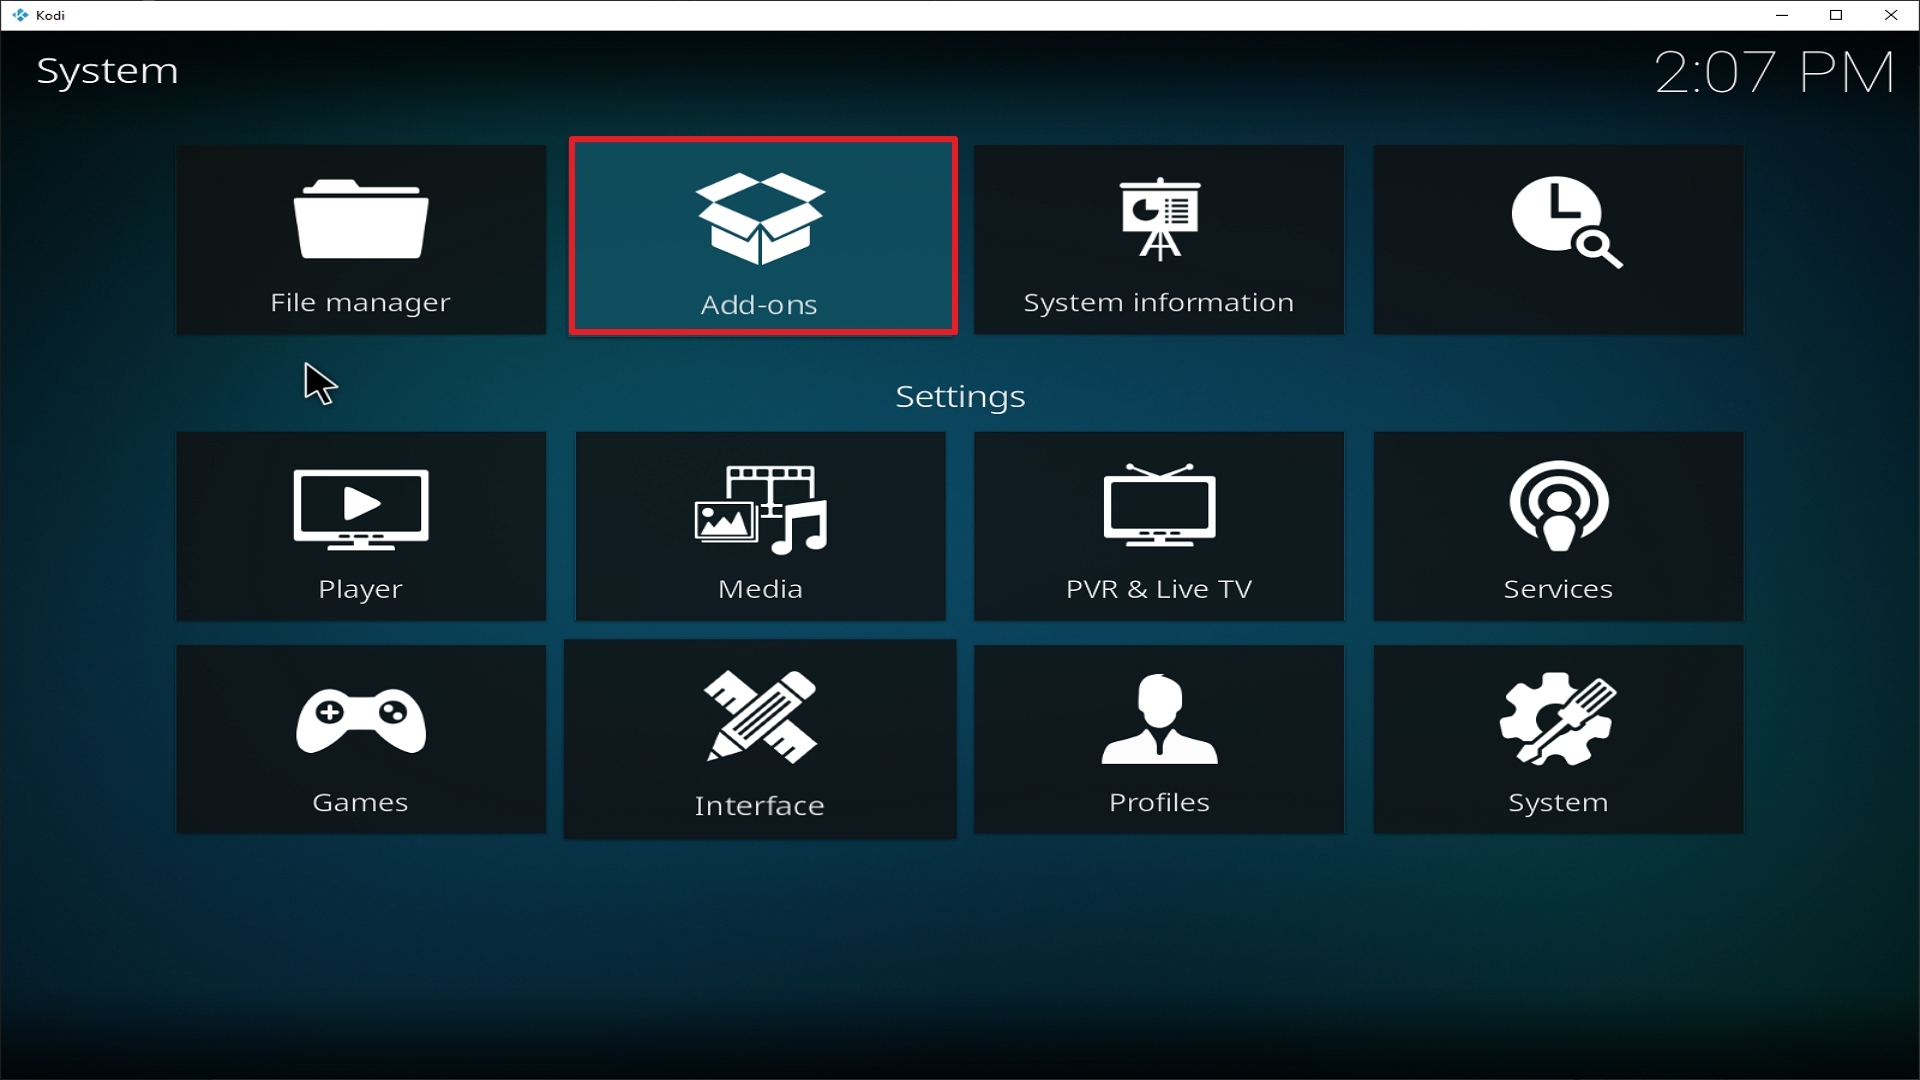
  8. Go back to the System Screen and click “Add-ons”
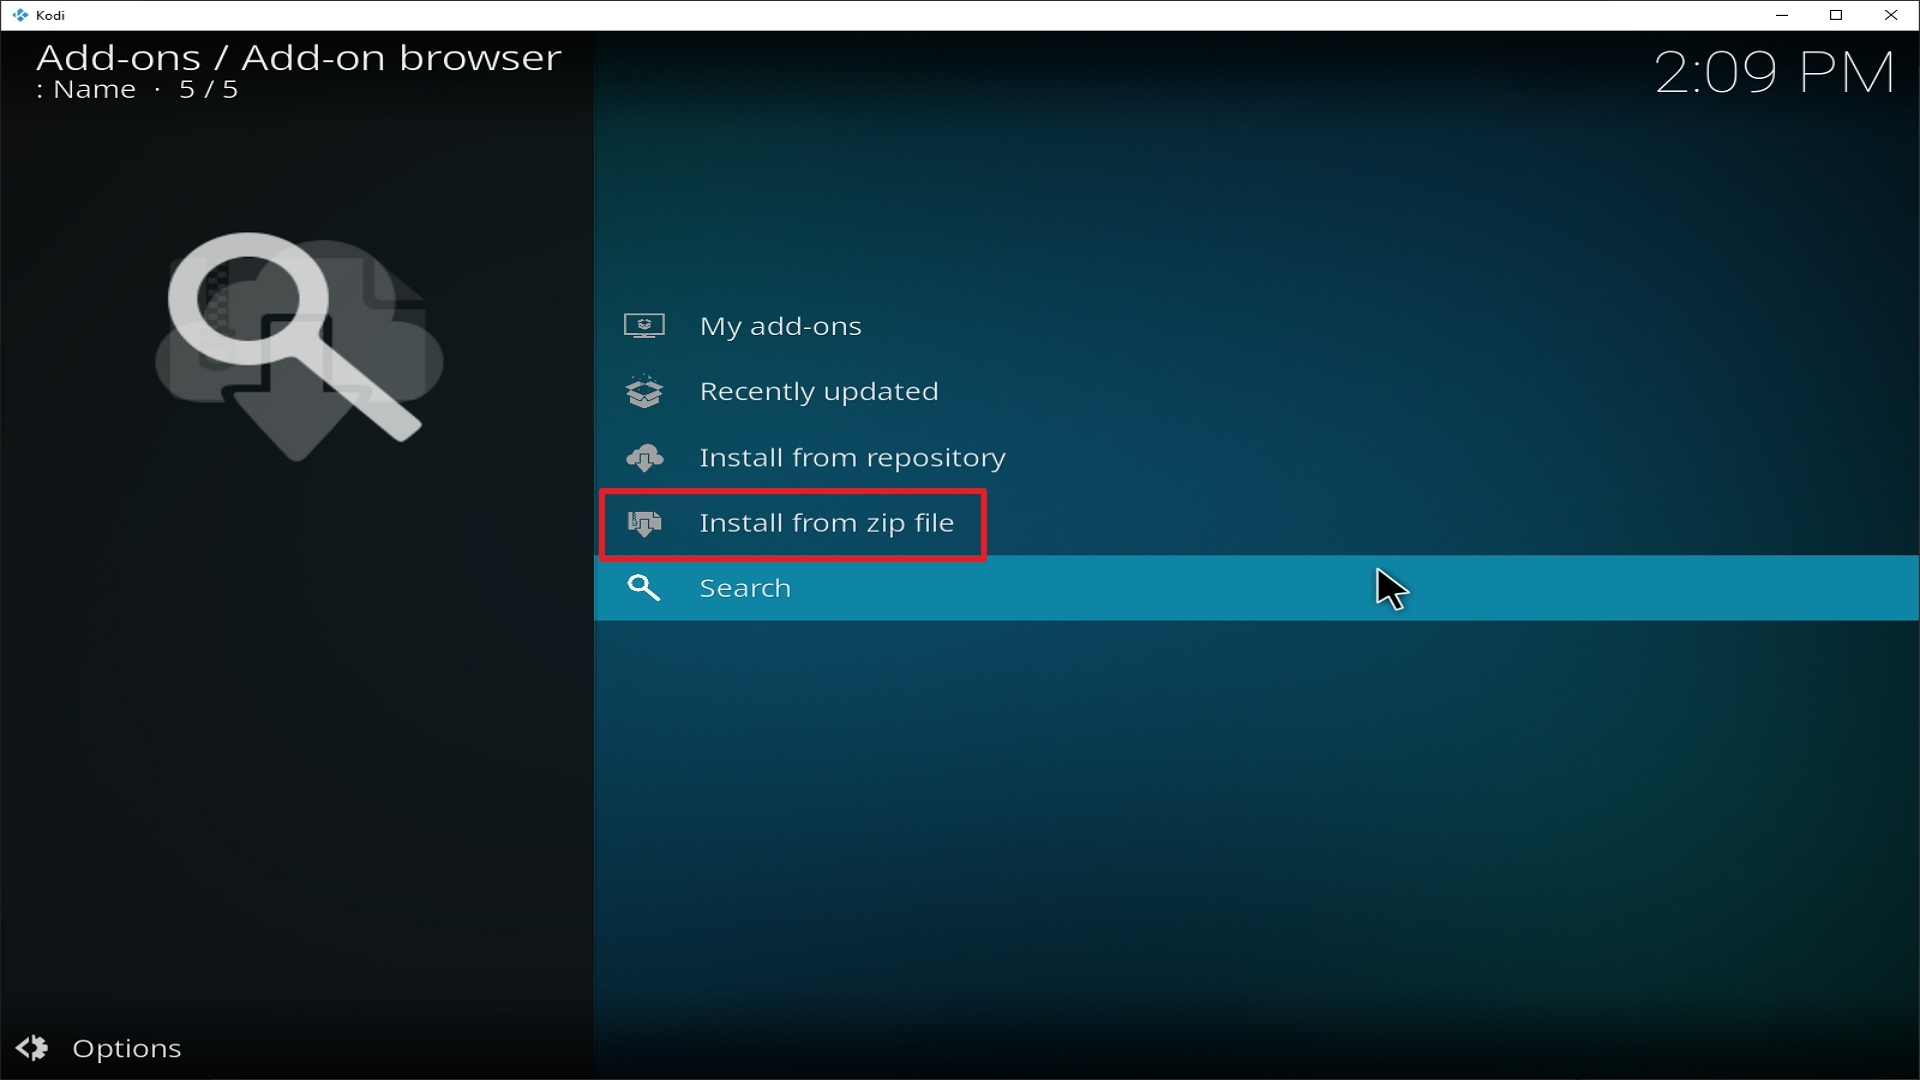
  9. Select “Install Zip File” choose “diamond” or whatever you renamed the file.
  10. Select the zip file URL- repository.Diamond-Wizard-Repo-3.9.6.zip
  11. Wait for the notification “Diamond Build Add-on Repo Installed” to appear.
  12. Select “Install Repository”
  13. Choose “Diamond Build Repo”
  14. Click on “Video Add-ons” and select “Delta Quadrant” and “Install”
  15. Click “Ok” when a notification “the following add-ons will be installed” appears and wait for Delta Quadrant Add-on to install
  16. Once the add-on is installed go back to the home screen and select “add-ons”
  17. Choose “Video add-ons” and select “Delta Quadrant”
  18. There you go, Delta Quadrant add-on is now installed.


How to Install Delta Quadrant – One Click on Kodi with Screenshots

1. From the home screen, select the cogwheel at the upper left.

Step 1 Installing Delta Quadrant addon on Kodi


2. Select System in the bottom right corner.

Step 2 Installing Delta Quadrant addon on Kodi


3. Select Add-ons on the left side of the screen.

Step 3 Installing Delta Quadrant addon on Kodi


4. Select Unknown sources.

Step 4 Installing Delta Quadrant addon on Kodi


5. Click Yes to allow unknown sources.

Step 5 Installing Delta Quadrant addon on Kodi


6. Select File manager.

Step 6 Installing Delta Quadrant on Kodi


7. Click Add source.

Step 7 Installing Delta Quadrant addon on Kodi


8. Click on <None>.

Step 8 Installing Delta Quadrant addon on Kodi


9. Type exactly: http://repo.rubyjewelwizard.com/

Step 9 Installing Delta Quadrant addon on Kodi


10. Click on OK.

Step 10 Installing Delta Quadrant addon on Kodi


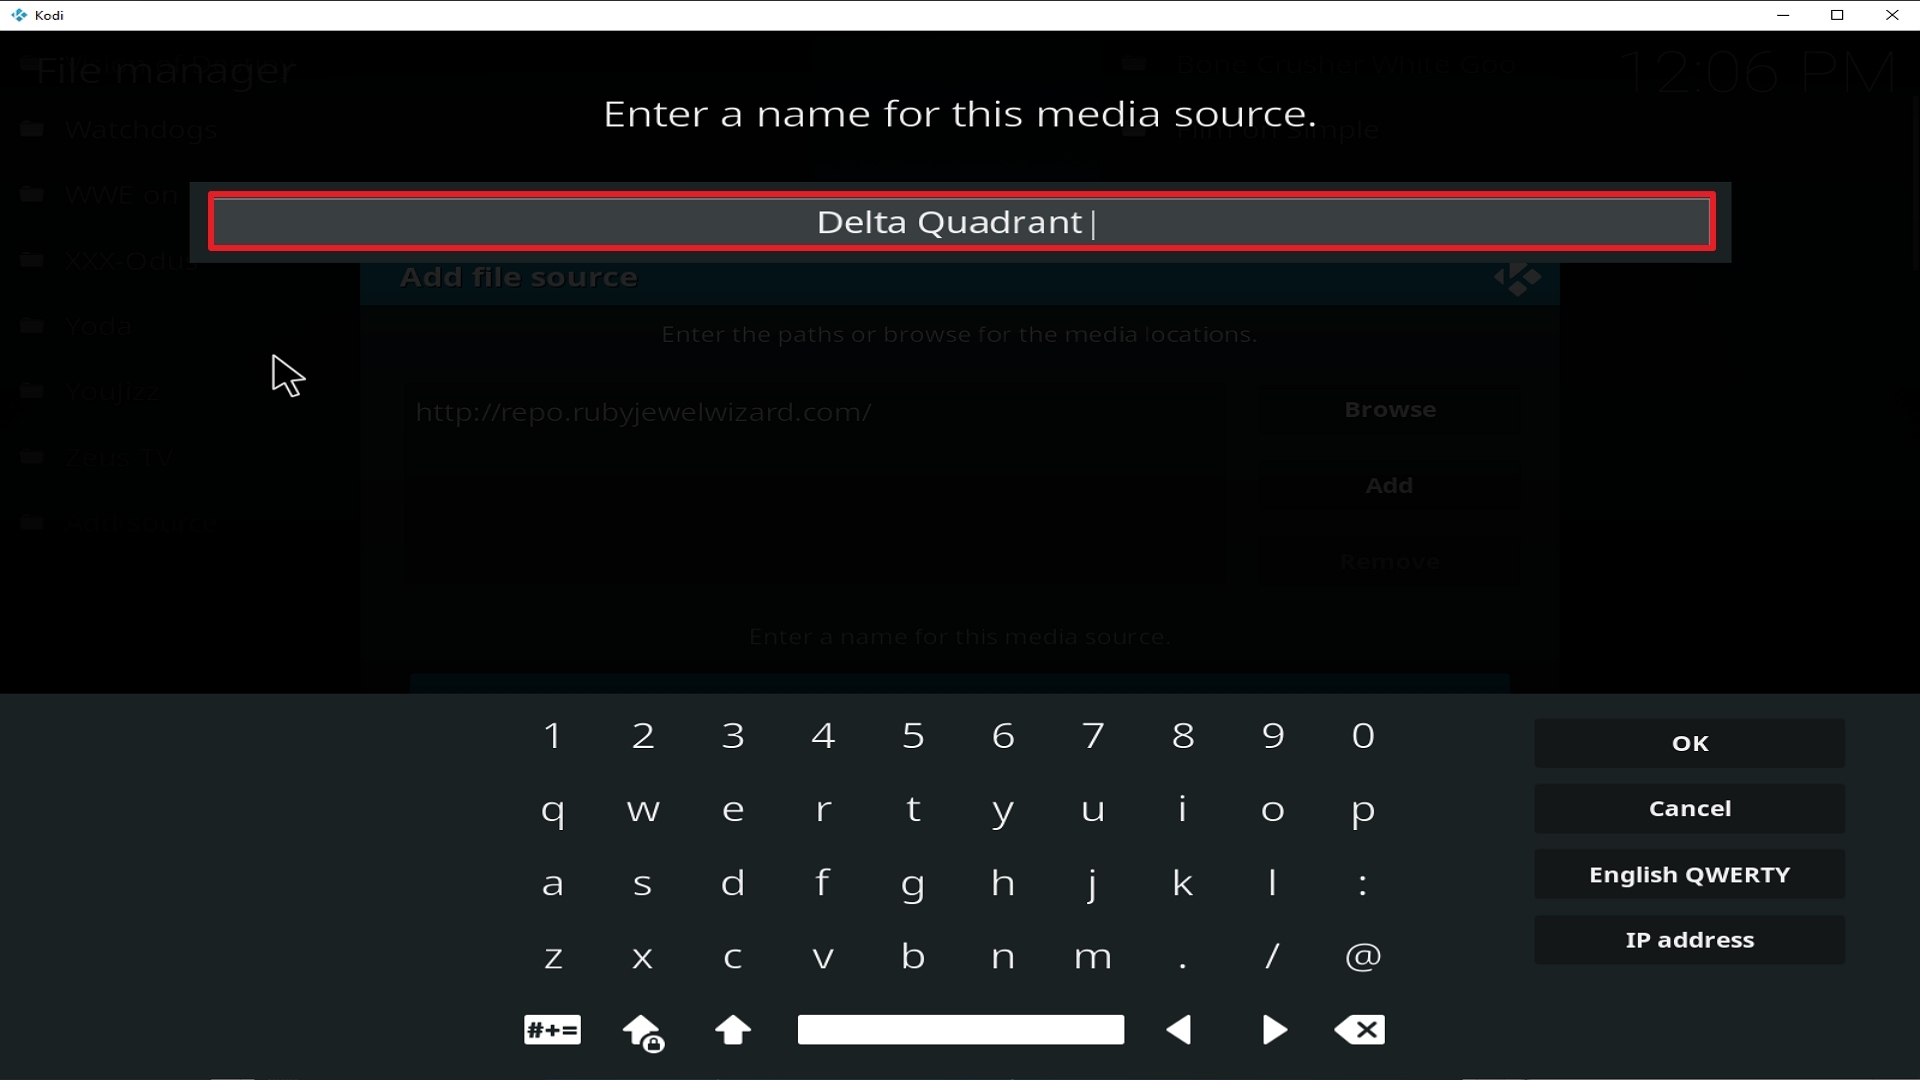
11. Select enter a name for this media source.

Step 11 Installing Delta Quadrant addon on Kodi


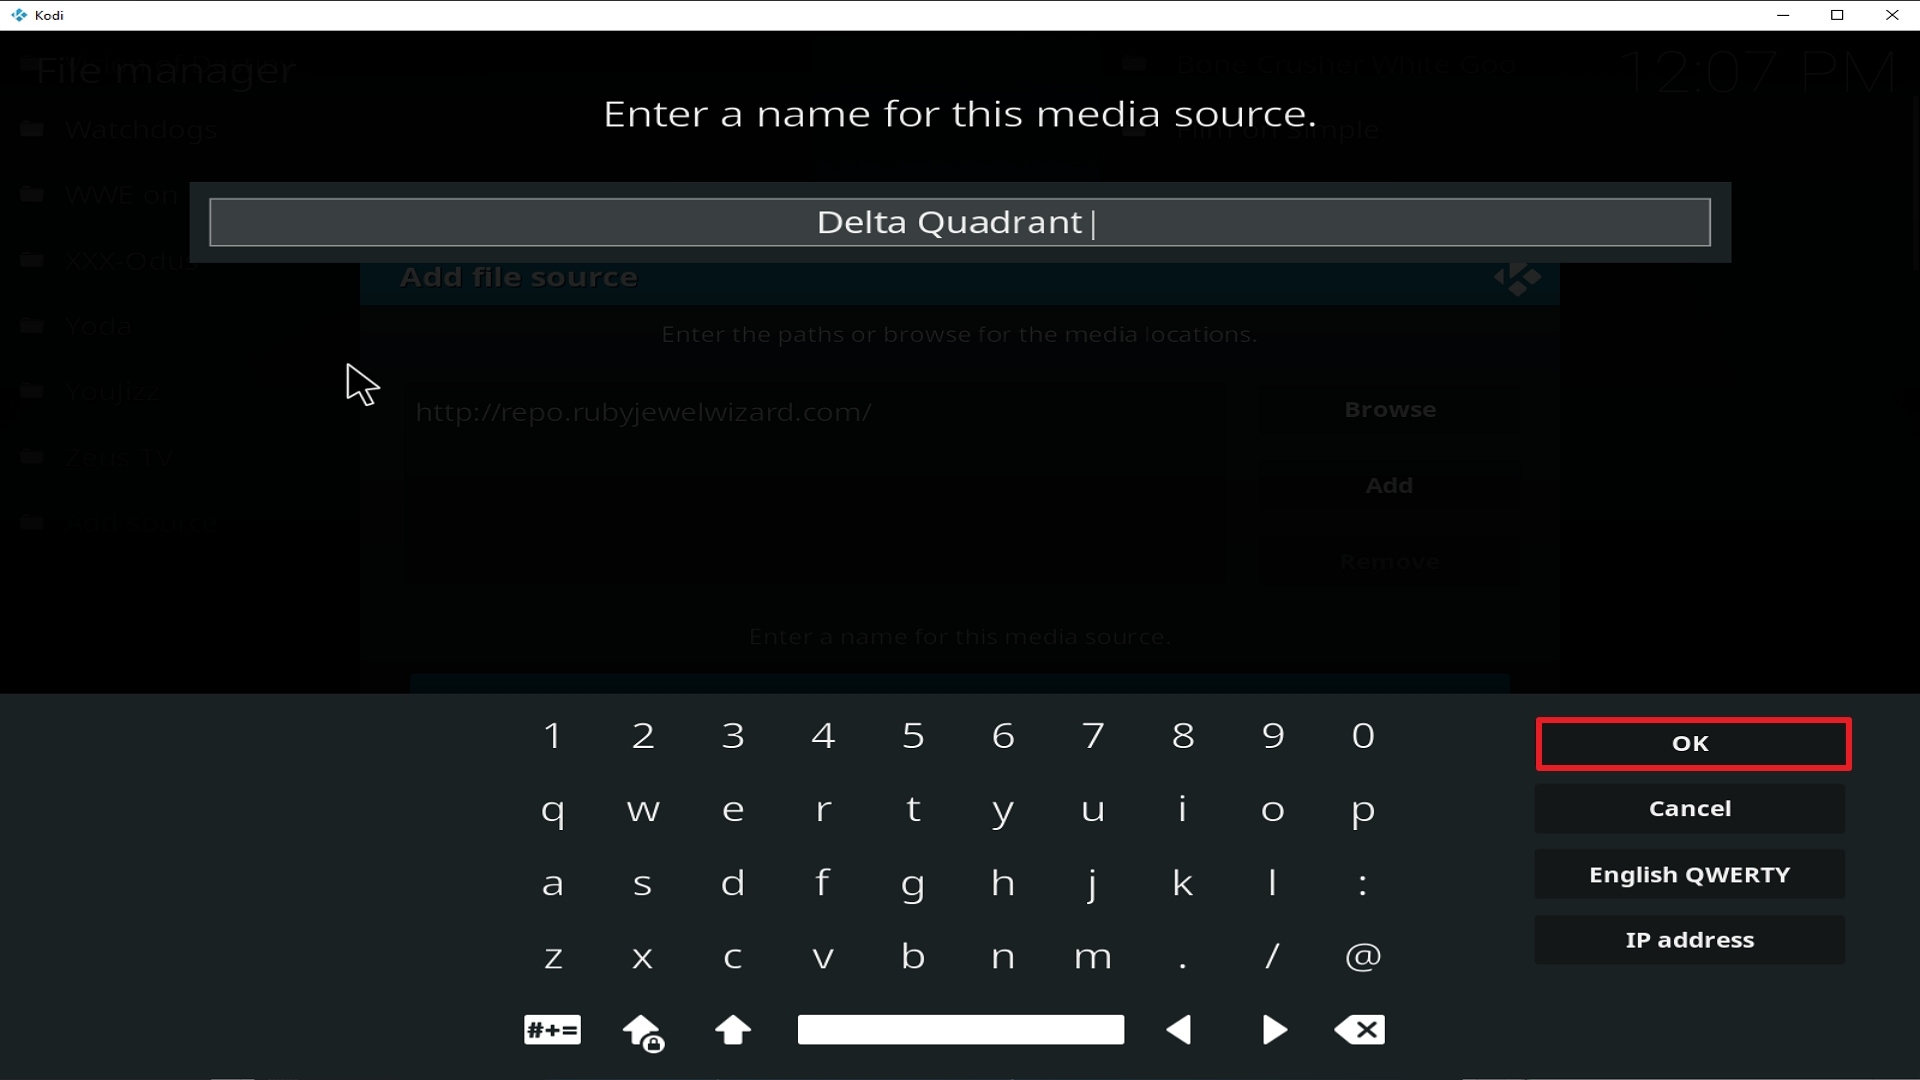
12. Name is Delta Quadrant (this part isn’t critical as long as you remember the name).

Step 12 Installing Delta Quadrant addon on Kodi


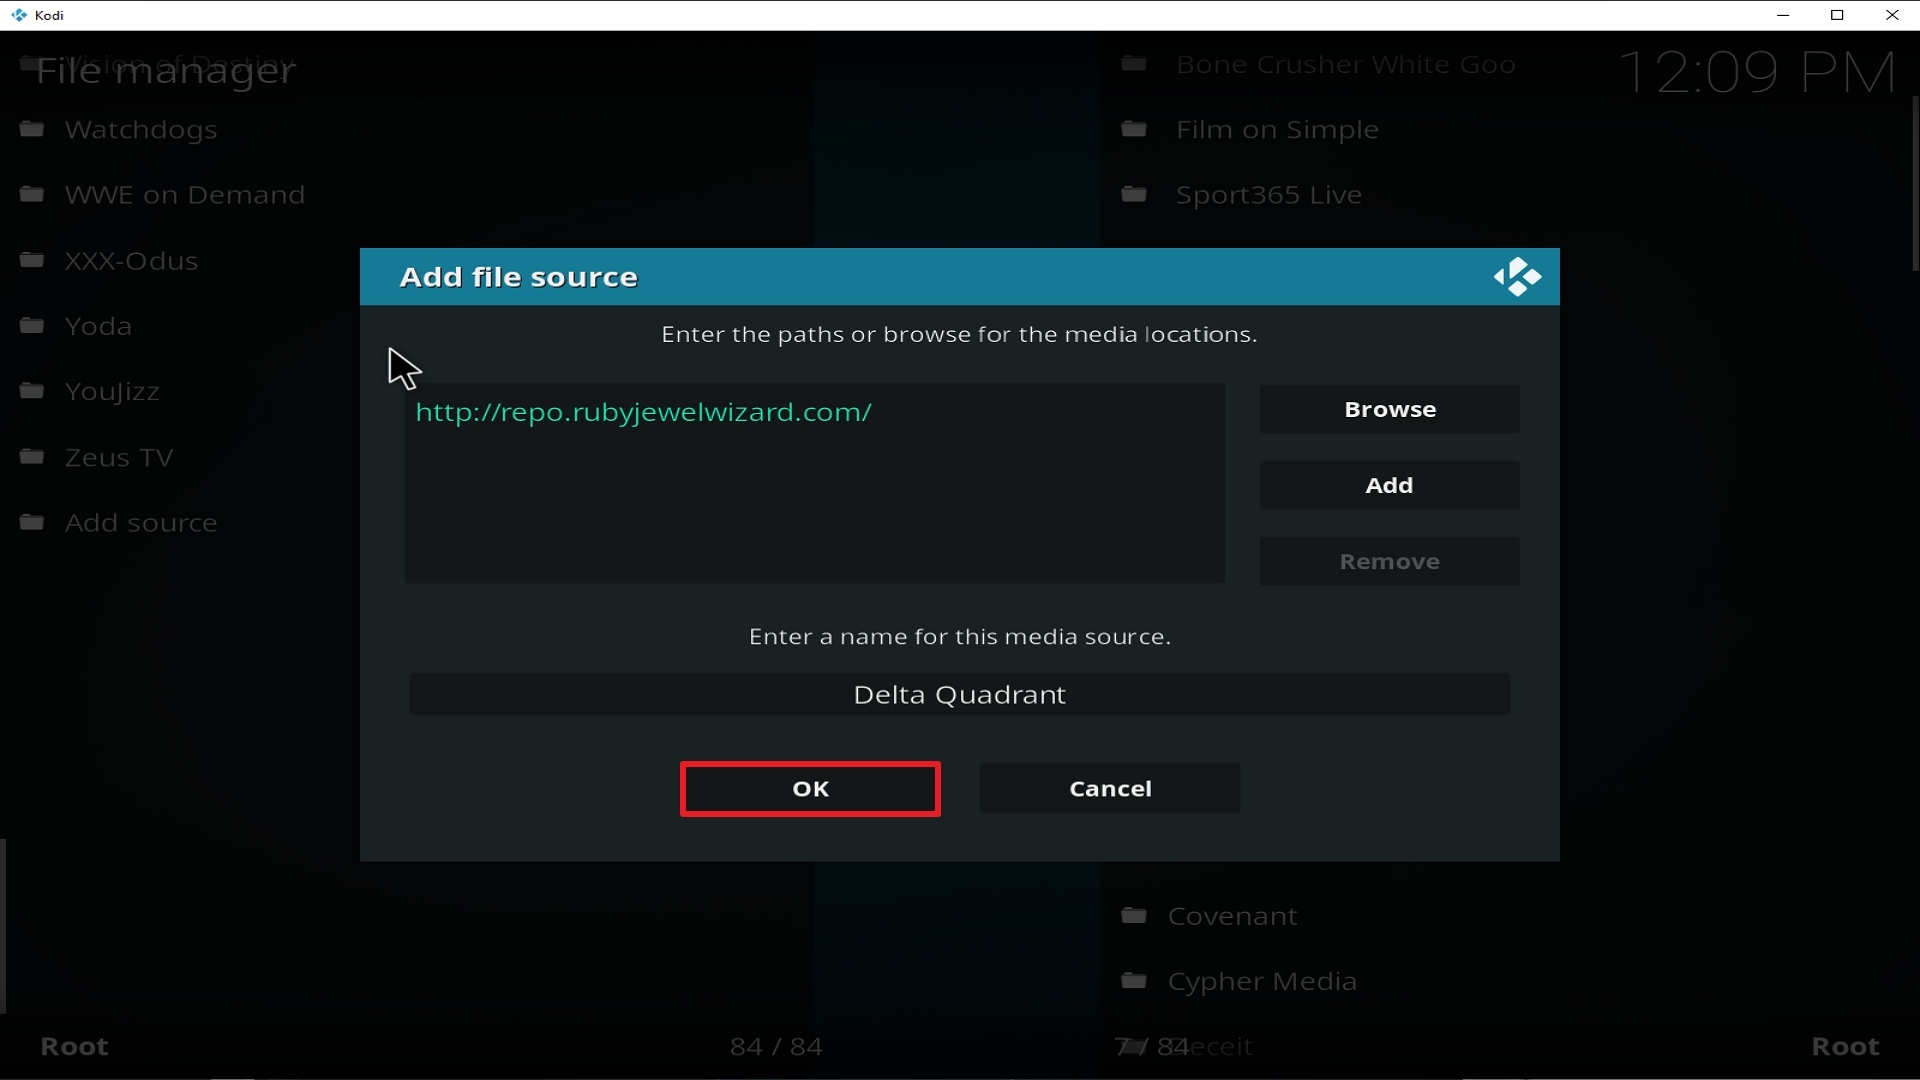
13. Click on OK.

Step 13 Installing Delta Quadrant addon on Kodi


14. Click on OK.

Step 14 Installing Delta Quadrant addon on Kodi


15. Take one step back and click on Add-ons.

Step 15 Installing Delta Quadrant addon on Kodi


16. Select install from zip file.

Step 16 Installing Delta Quadrant addon on Kodi


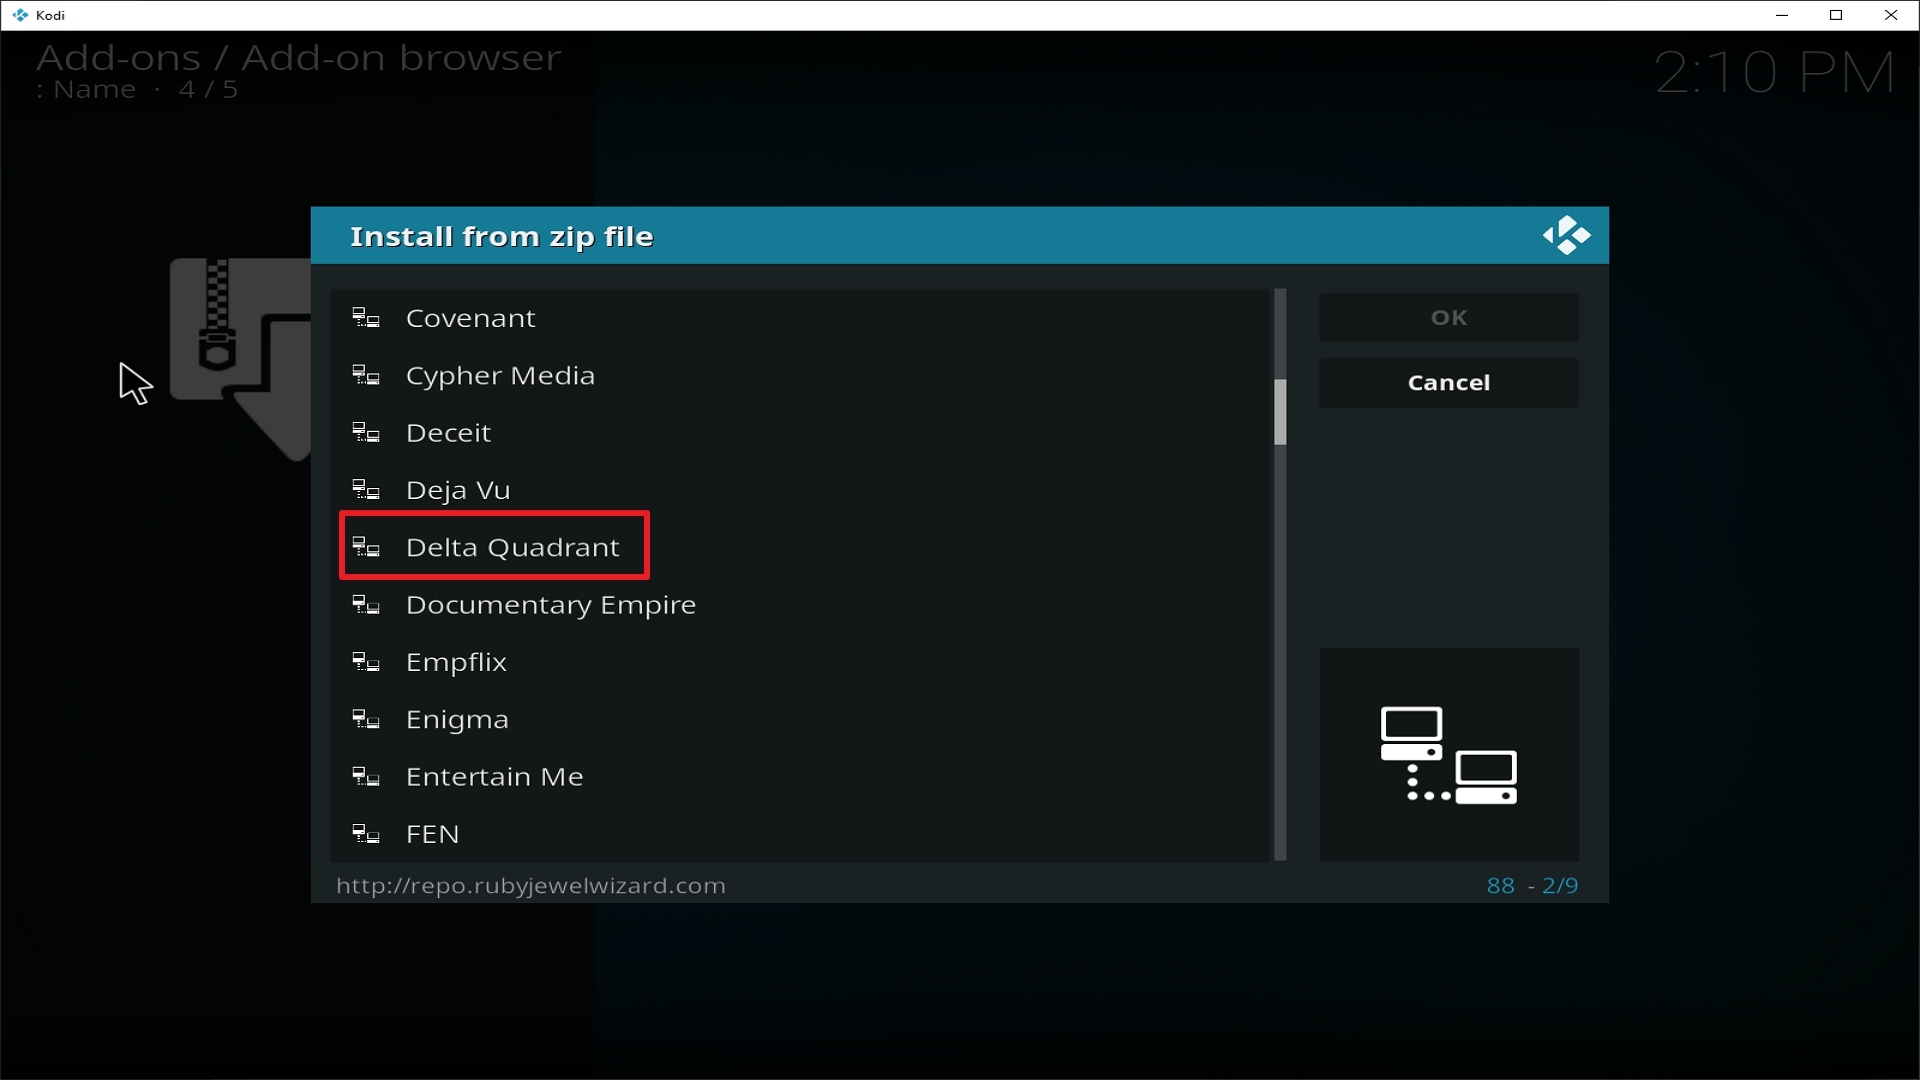
17. Click on Delta Quadrant (or whatever you named the source).

Step 17 Installing Delta Quadrant addon on Kodi


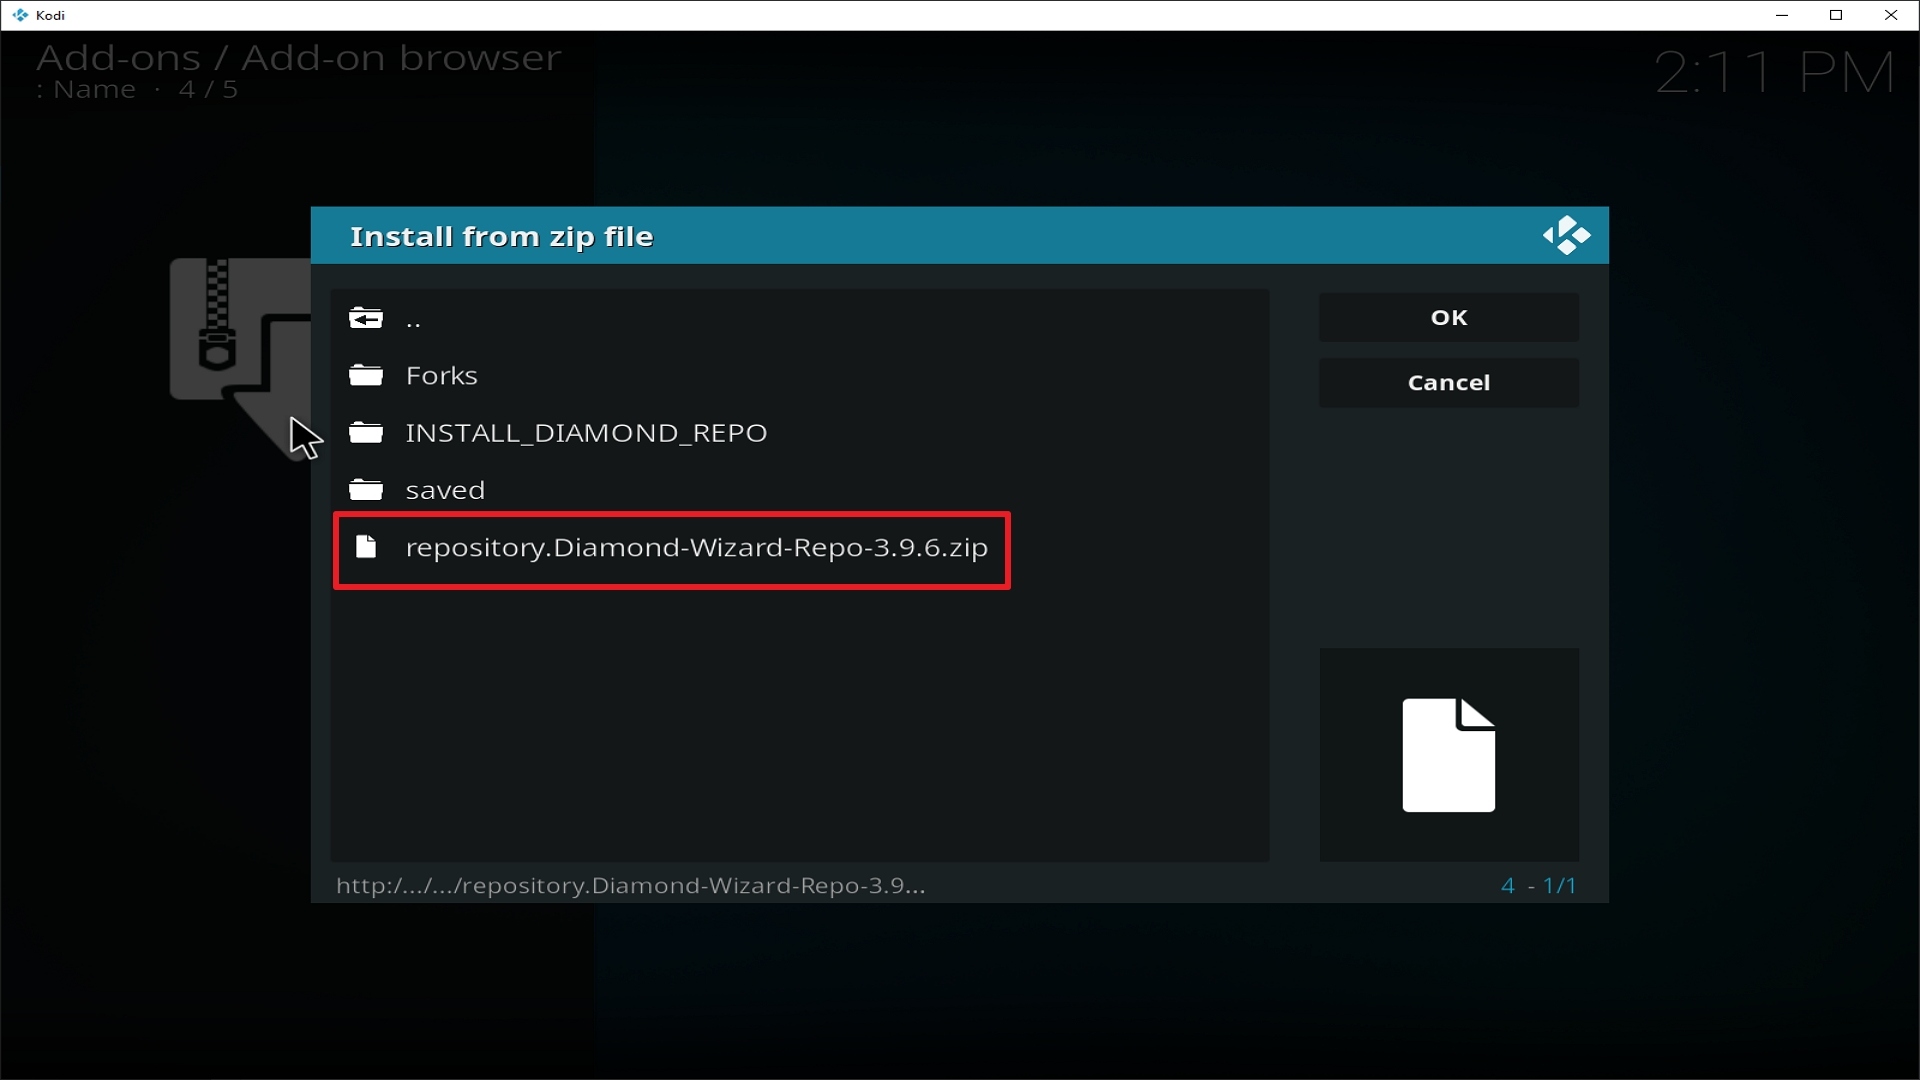
18. Click on repository.Diamond-Wizard-Repo-3.9.6.zip

Step 18 Installing Delta Quadrant addon on Kodi


19. Select on Install from repository.

Step 19 Installing Delta Quadrant addon on Kodi


20. Click on Diamond Repo.

Step 20 Installing Delta Quadrant addon on Kodi


21. Pick Video add-ons.Step 21 Installing Delta Quadrant addon on Kodi


22. Select Delta Quadrant again.

Step 22 Installing Delta Quadrant addon on Kodi


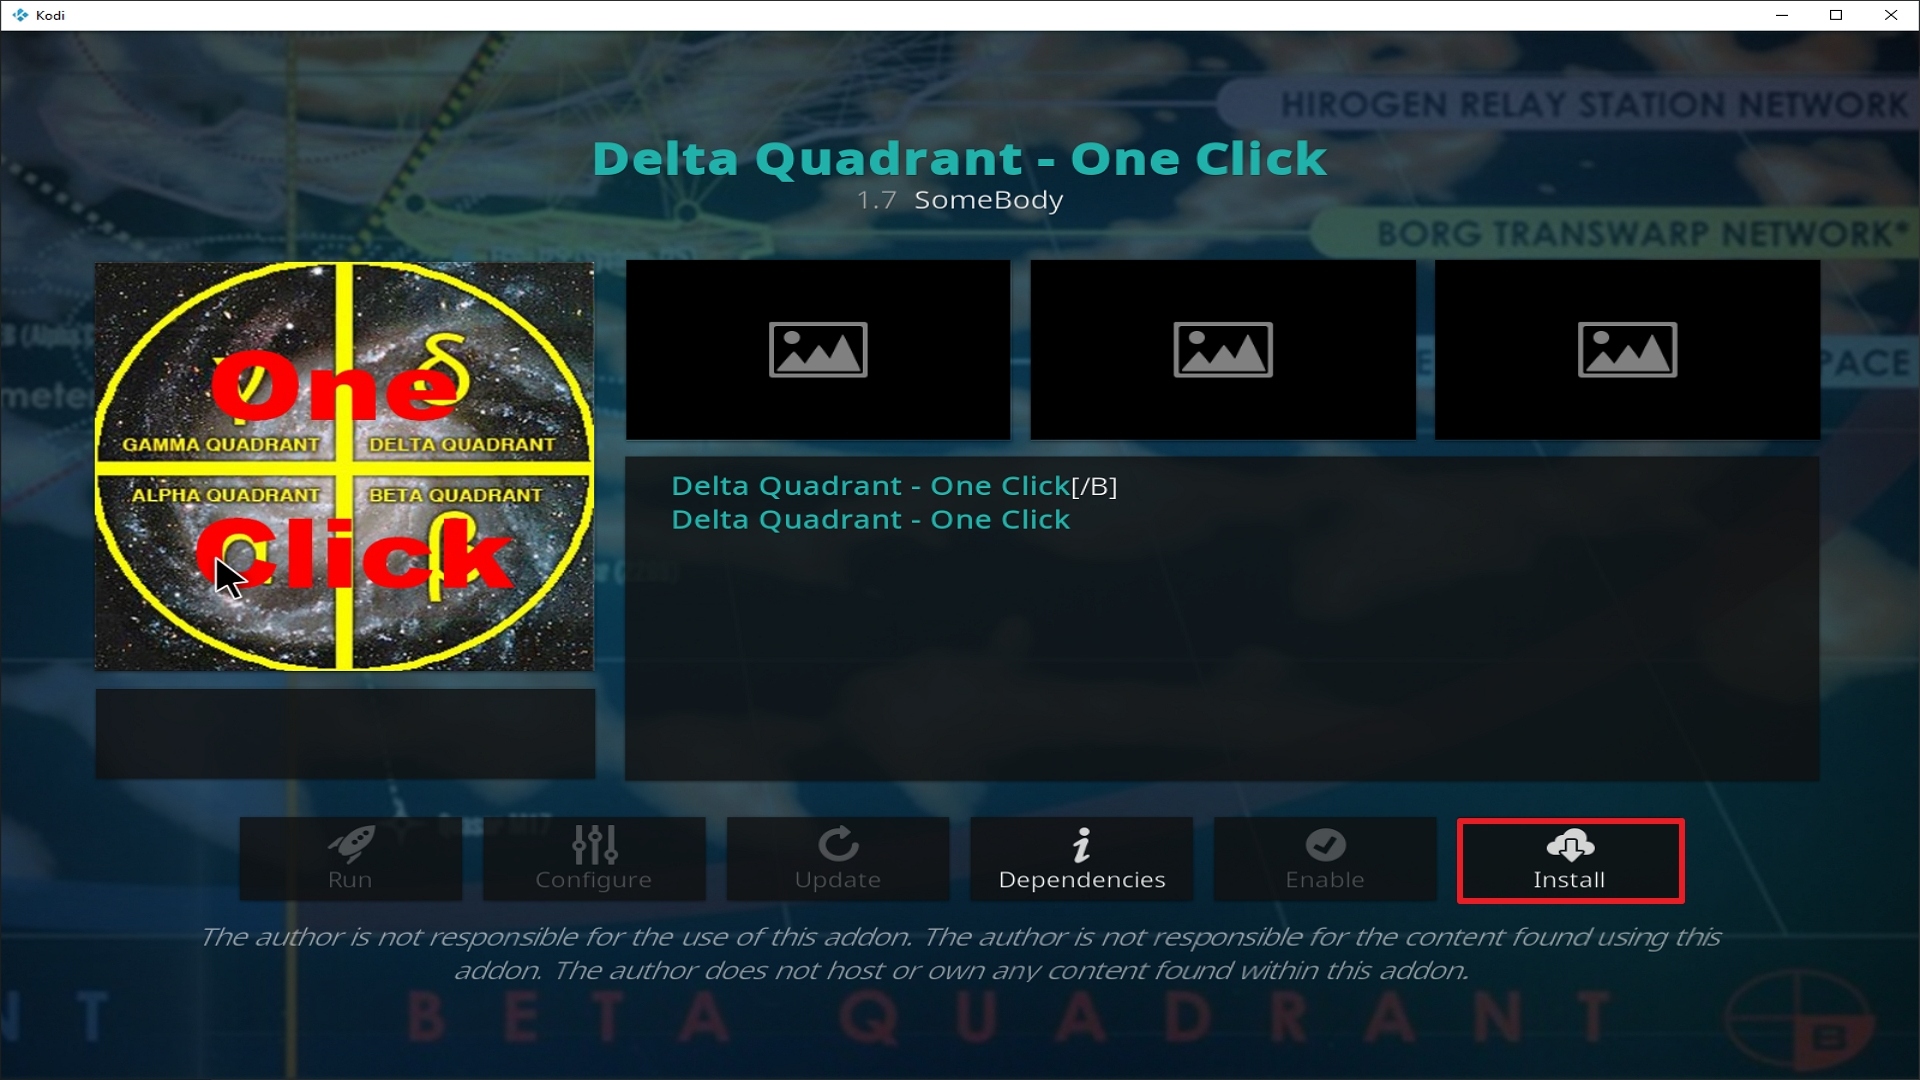
23. Click on Install.

Step 23 Installing Delta Quadrant addon on Kodi


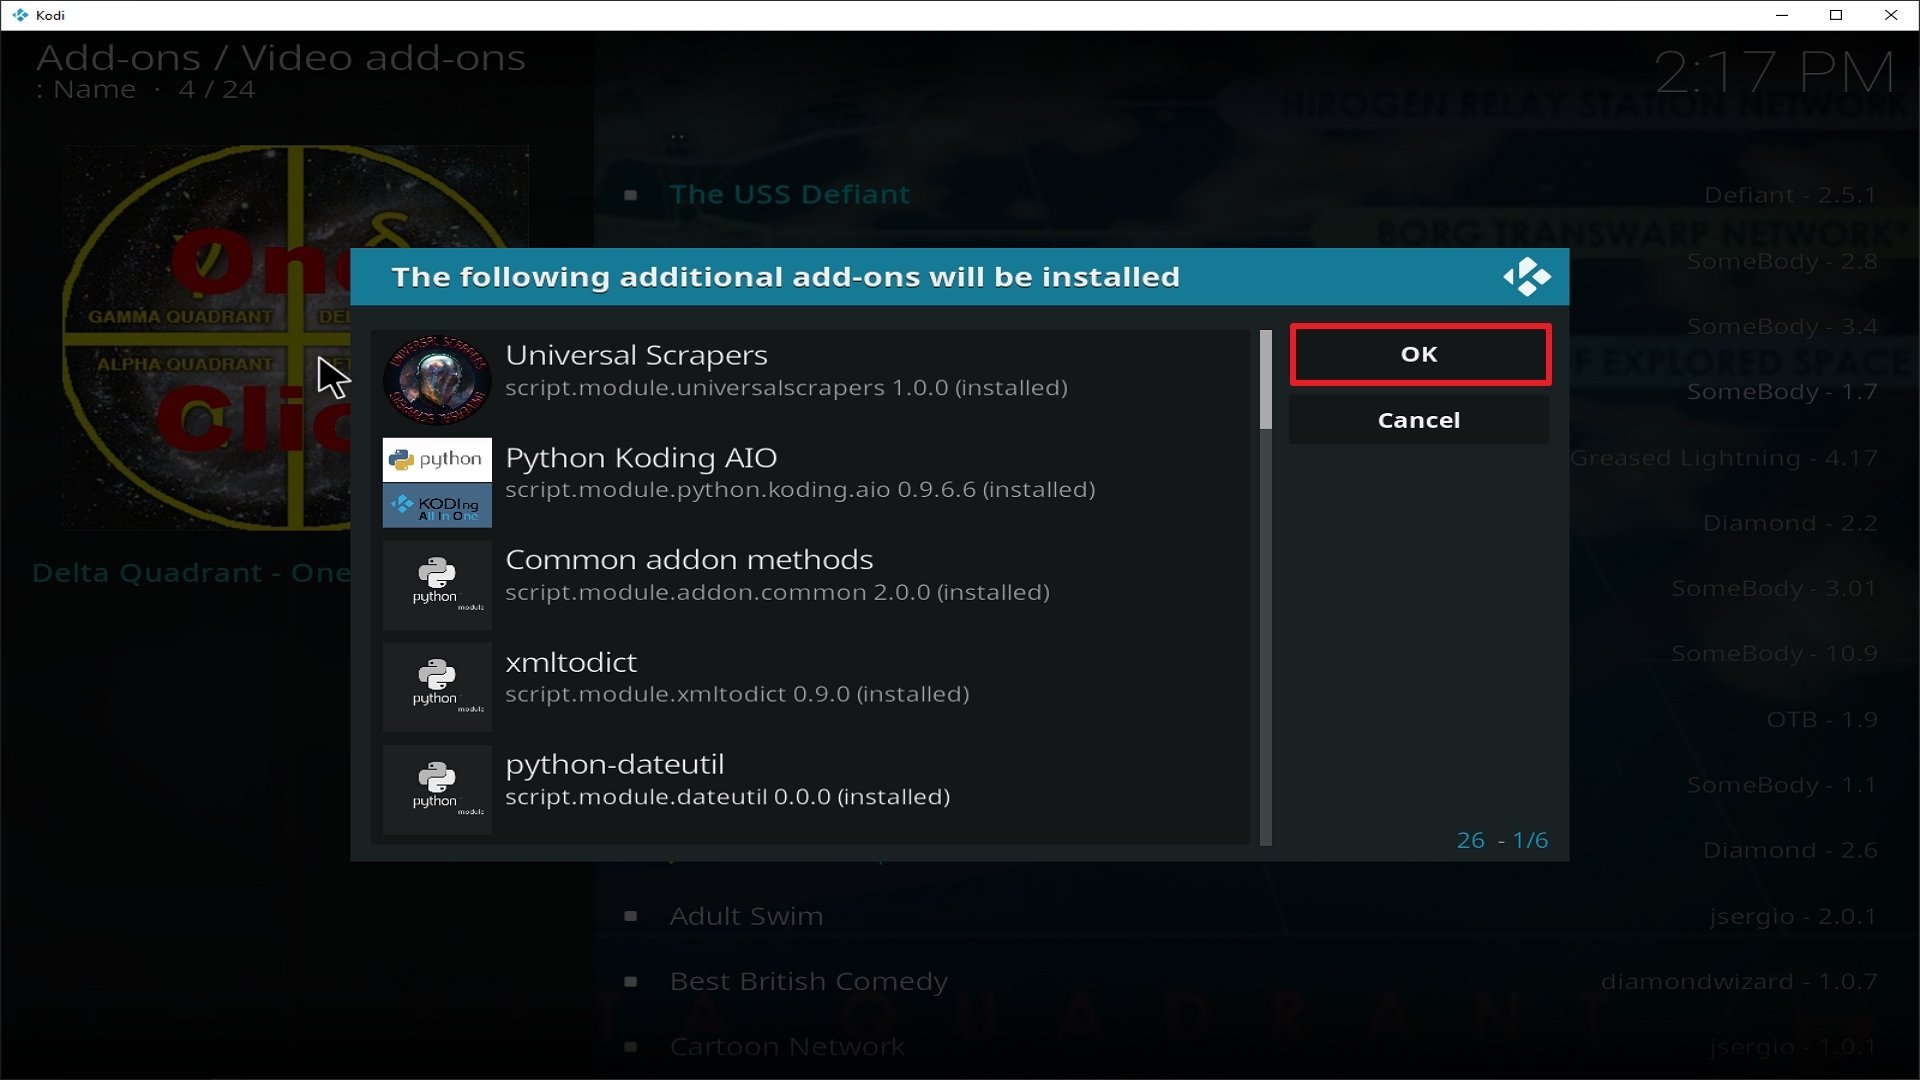
24. Select OK after reviewing the add-ons that will be installed.

Step 24 Installing Delta Quadrant addon on Kodi


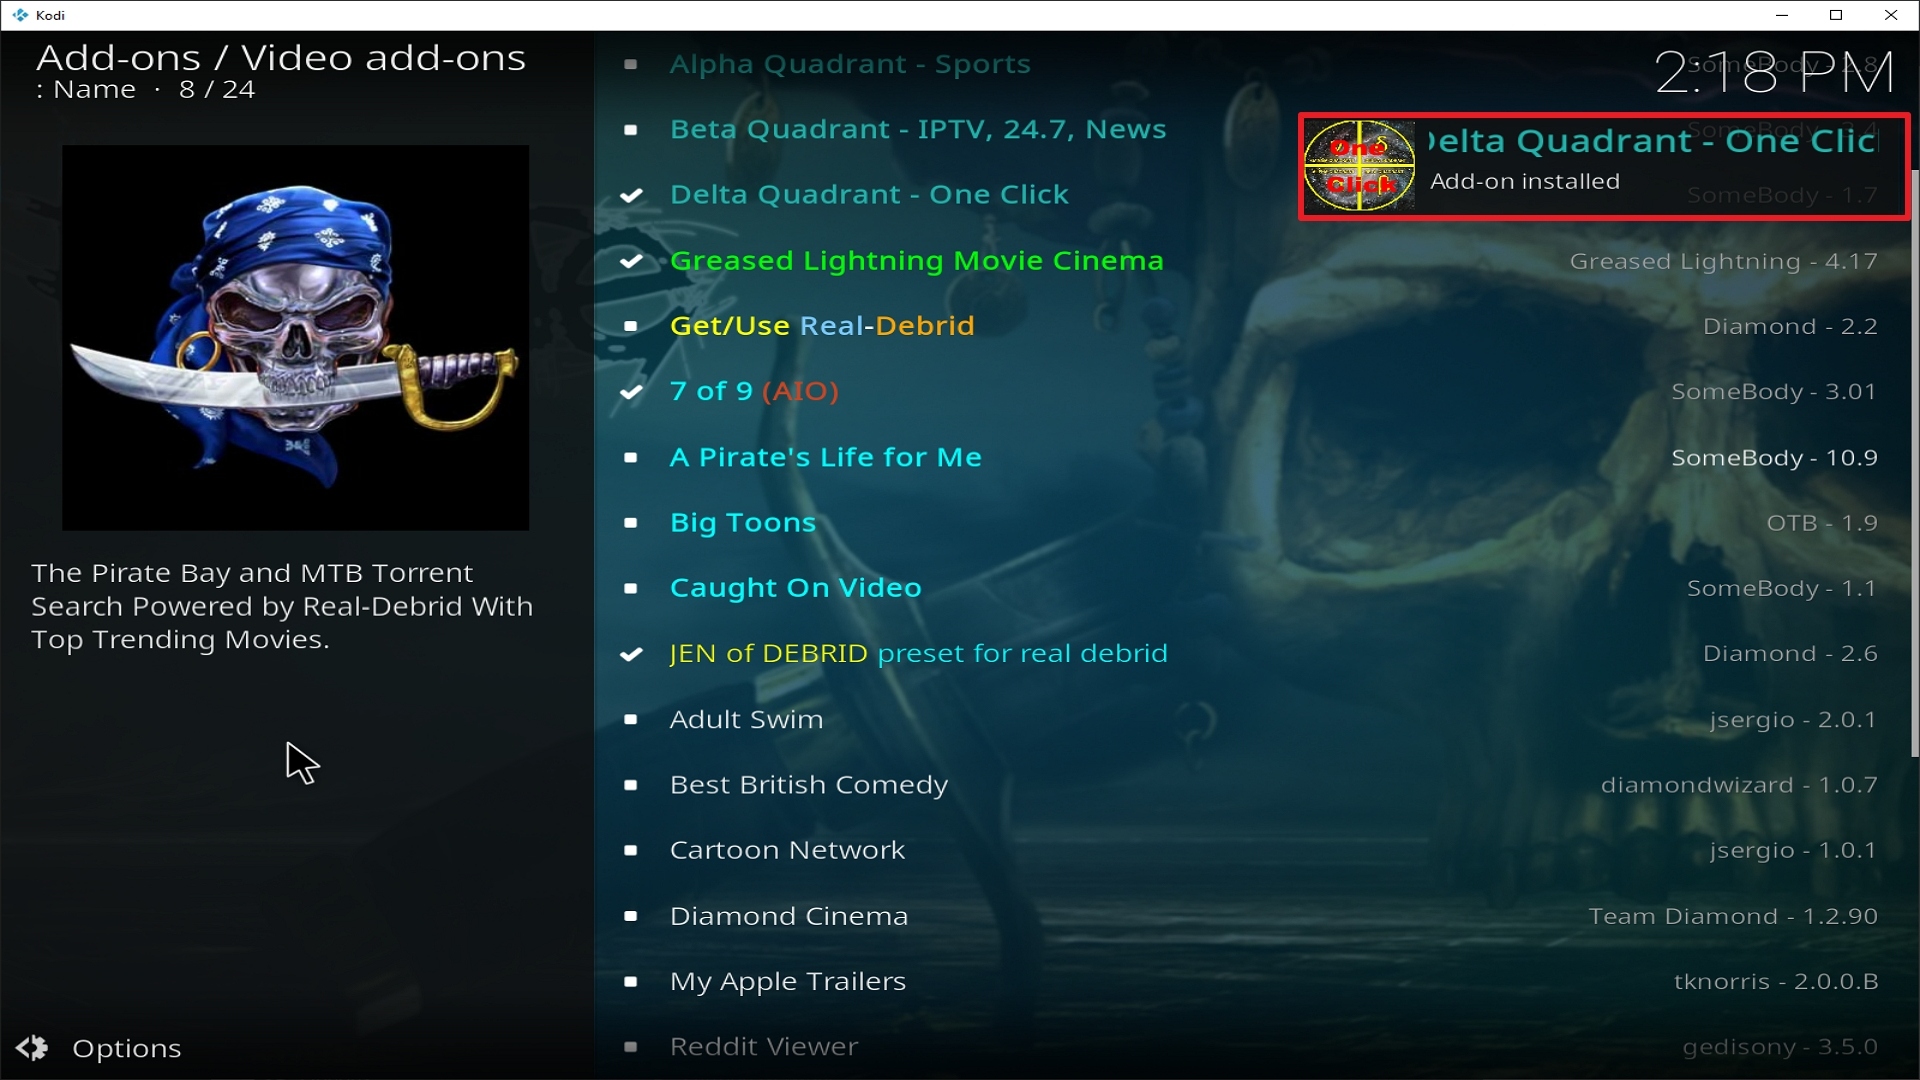
25. You should see a popup in the upper right corner saying Delta Quadrant has installed. There will actually be multiple popups for the various components.

Step 25 Installing Delta Quadrant addon on Kodi


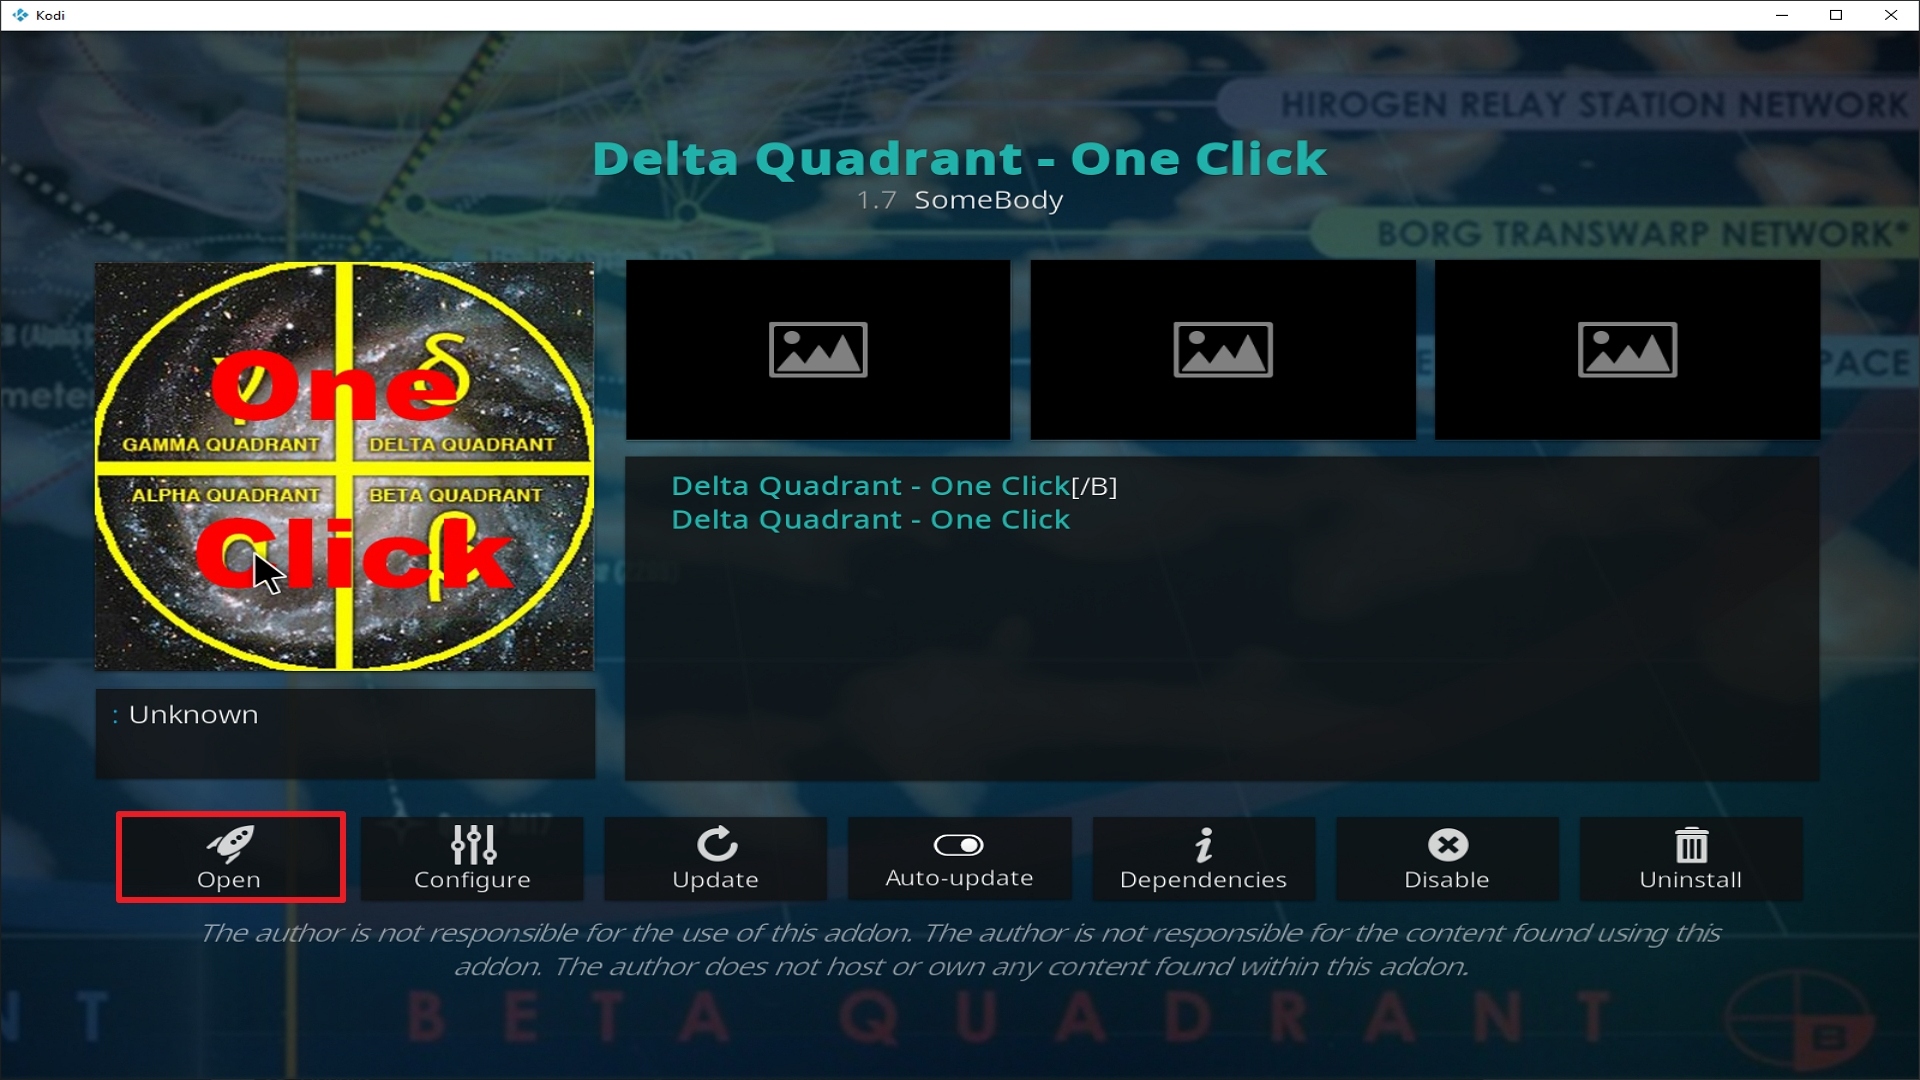
26. Click on Open to start the Delta Quadrant add-on.

Step 26 Installing Delta Quadrant addon on Kodi


Alternatives

When Delta Quadrant add-on encounters issues rendering it unable to function properly what do we do? We always suggest that our users create a backup plan so as to have their entertainment experience uninterrupted. This backup should be procured from a trusted source and here at ReviewVPN, we only suggest the best out of the best. The following add-ons can serve as a stand-in for Delta Quadrant:

–        Open Meta

These two add-ons have very similar natures that serve as intermediaries between other add-ons.


Common Errors

These are some of the things that may cause an issue when installing Delta Quadrant:

  1.    Unable to connect to URL/Download

One of the main reasons why this happens is that you might have written the wrong URL. Please be careful when typing in the URL because the slightest mistake can totally ruin your download. Secondly, having a stable internet connection is always desired as it does not impend the speed of your download. Lastly, to protect your identity and internet trail, you must have a reliable VPN to mask your online activities and will help you remain anonymous. Check here for the best VPN deal.


  1.     Script Error

This issue usually arises when Kodi is not properly installed or has lacking features for it to work properly. If that is the case, you can redownload Kodi and install it properly. An in-depth guide on how to install the Kodi app is provided on our website. Lastly, if the issue is with the add-on itself, you can reinstall it by following the procedure given above.


  1.     Kodi Check Log Error

A check log error only happens when your media cache is full. You can remedy this situation by emptying your cache. 


  1.     Source not working/slow/frozen

Delta Quadrant does not keep any of the content on its servers. It is distributed by 3rd party apps. Patience is key here, just wait for a couple of seconds for the other suggestions and click on them. For other solutions please take time to read our in-depth guide linked above. 


Should I Use This App With a VPN?

surfshark logo

We recommend you use a VPN for the following reasons:

  • Many of the addons you will access in Streamline will direct you to links for illegally distributed content. Without a VPN you may find many of these links do not work because your ISP is blocking your access
  • If you try to access Live TV Channels in other countries through Streamline your access may also be blocked. This is because these channels can detect your IP is not in that country and will block you from accessing their channels.
  • Using a VPN, you can encrypt your requests, change your IP, and also the location where your IP originates from. Thus, allowing you to circumvent any blocks or firewalls in place to do your accessing most restricted content
  • A VPN also helps you maintain anonymity, safety, and privacy online from unwanted third parties.

Note: For more information about Surfshark, please read our Surfshark Review.


Grab your subscription now!


How to Install Surfshark VPN on Firestick

If your Firestick still has the older interface, read this article to learn how to update it: Update Firestick Interface.

Follow our screenshots below to install the SurfShark VPN app on your Fire TV stick.

1. Go to the Home screen of your Firestick.

step 1 Install Surfshark VPN on Firestick


2. Navigate towards the Find tab. Press the Search button from the resulting dropdown.

step 2 Install Surfshark VPN on Firestick


3. Type in the keyword of SurfShark and select from the suggestions that will appear.

step 3 Install Surfshark VPN on Firestick


4. Click the official SurfShark icon from your search results.

step 4 Install Surfshark VPN on Firestick


5. Press the Download (You own it) button.

step 5 Install Surfshark VPN on Firestick


6. The SurfShark VPN installer will download on your device.

step 6 Install Surfshark VPN on Firestick


7. SurfShark VPN’s app will automatically install itself on your Fire TV stick.

step 7 Install Surfshark VPN on Firestick


8. Press the Open button after completing SurfShark VPN’s installation process.

step 8 Install Surfshark VPN on Firestick


9. Please wait for the SurfShark VPN to load its user interface.

step 9 Install Surfshark VPN on Firestick


10. You can now log in with your SurfShark VPN account credentials.

step 10 Install Surfshark VPN on Firestick

Learn more about Surfshark and Grab the Best Surfshark Deal Now!


Install Surfshark on Firestick

Best Surfshark Deal


Other VPNs to Consider

NordVPN (Best for Streaming)

Best Features

  • 5000+ Server in 50+ Countries 
  • Military-Grade Encryption
  • Fast Connection Speed
  • Suitable to a lot of devices
  • No-Log Policy

Prices
  • Complete $5.89 per month (64% Discount)
  • Plus $4.59 per month (56% Discount)
  • Standard $3.69 per month (55% Discount)

Best Features

  • 750+ High-speed VPN Servers in 43 Locations
  • Military-Grade Encryption
  • Fastest HD Streaming and Gaming
  • 30-Day Money-Back Guarantee
  • Unlimited Data & Devices
  • No-Log Policy

Prices
  • 3 Years $1.99 per month (82% Discount)
  • 1 Years $3.29 per month (70% Discount)
  • 1 Month $10.99 per month

IPVanish VPN (Most Secure)

Best Features

  • 1200+ Servers in 60+ Countries around the world
  • Unlimited Connections
  • No-Log Policy
  • Top Notch Military-Grade VPN Protocols and Encryptions
  • 100% Safe and Secured
  • Most Trusted VPN
  • Best VPN for Firestick
  • 30-Day Money-Back Guarantee

Prices
  • Yearly $3.99 per month (63% Discount) – 30 days risk free + Ransomware & Malware Protection
  • Quarterly $5.32 per month (51% Discount)
  • Monthly $10.99 per month


For more VPN discounts, go to ReviewVPN Deals and purchase the best VPN for you.

Click here to get the lowest price on Surfshark through our exclusive limited-time offer.


Conclusion

Delta Quadrant is a pretty useful add-on if you don’t have a lot of patience when it comes to switching add-ons here and there to get the content you like. It totally does the job for you and lessens the time you have to spend in navigating through other add-ons. Look at it as a mini assistant that does all the searching for you and provides results that exceed your expectations.

We hope that this guide has enlightened you regarding Delta Quadrant. For comments, questions, and suggestions, feel free to message us here on our website and through our other social media platforms. Thank you for reading and have a great day ahead!
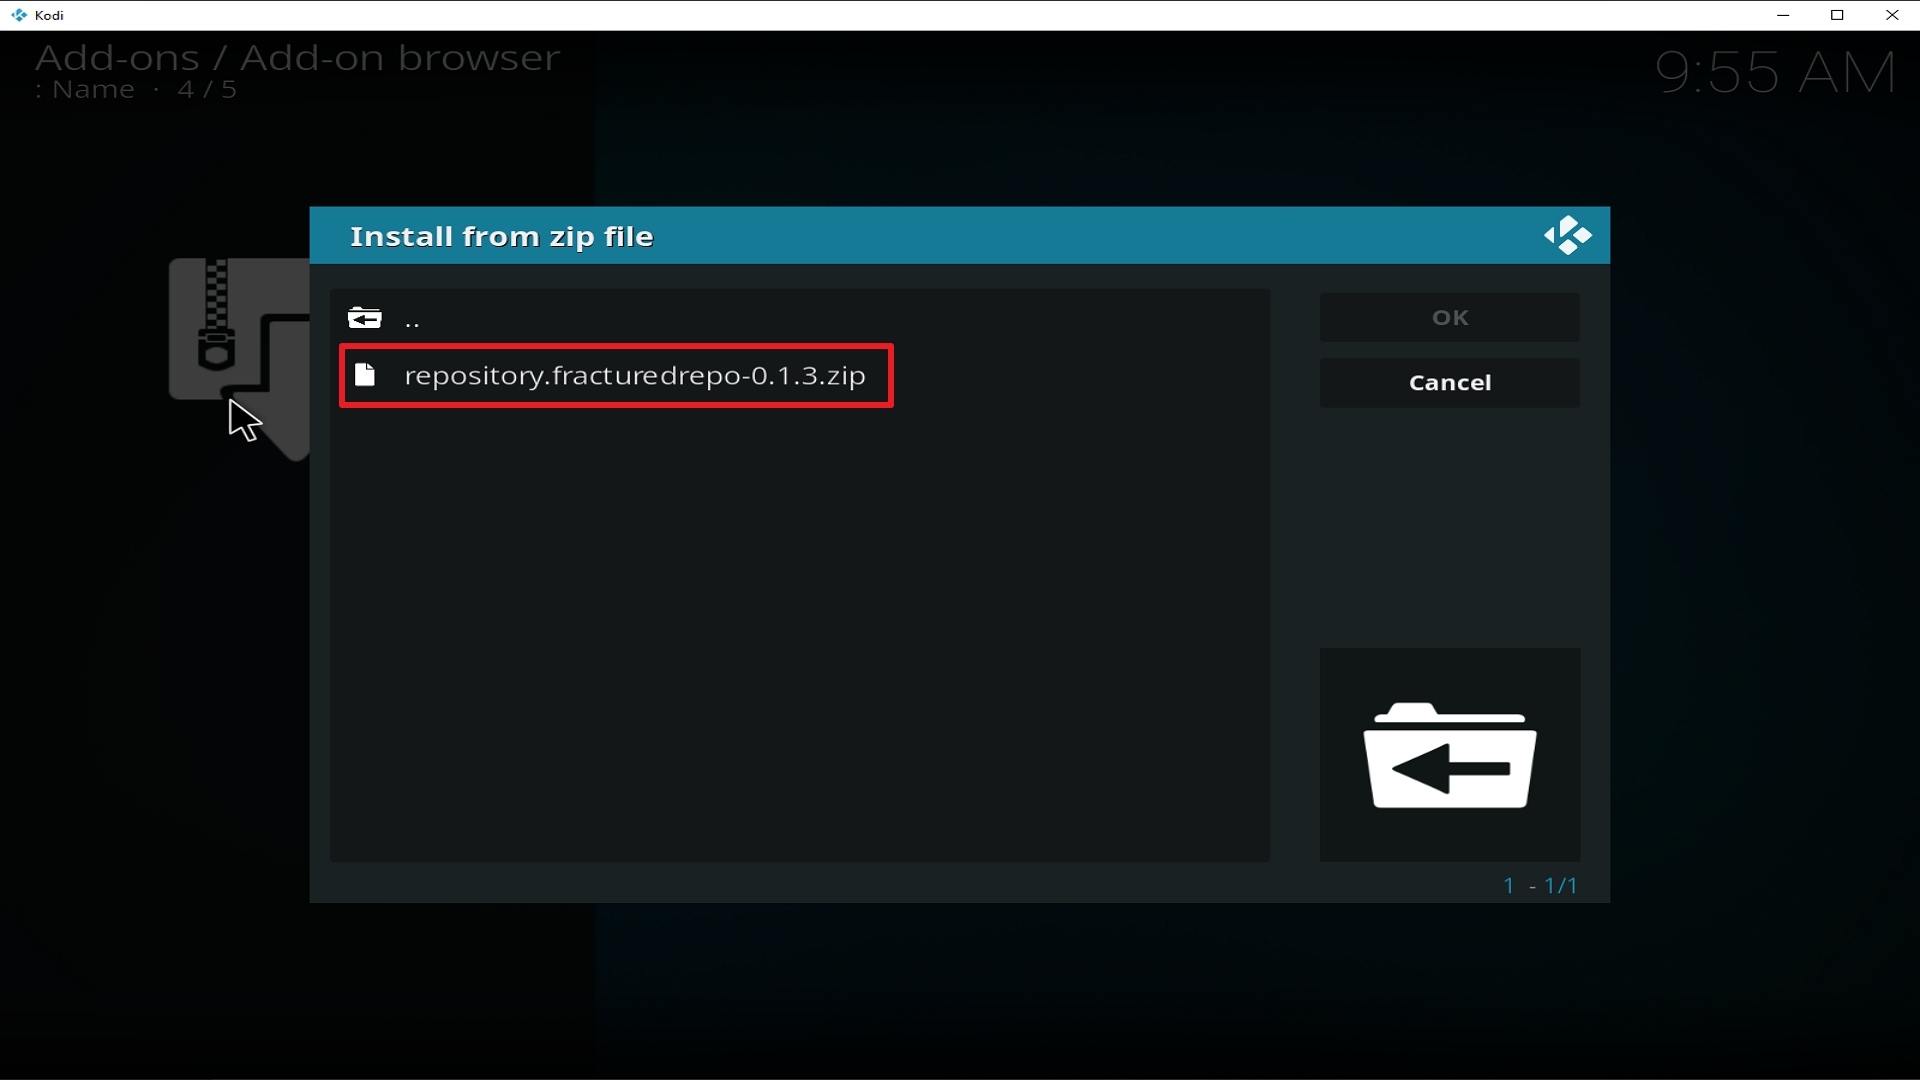
Install Collective Kodi Addon

Collective Kodi Video Add-on

Source: https://incendiary-pyro.github.io

Collective is a Kodi Video Add-on that is found under the Incendiary-Pyro Repository. It is very popular for the family-oriented sections that make it easier for the whole family to have a wonderful entertainment experience. Also, if you feel like walking down memory lane, this is the add-on for you as it has a huge list of videos that were played during to 1960s up to the 1980s. This will help in recalling tv shows that have been an integral part of our history and as a family. A huge bulk of its streams are pulled from Youtube and 1-click play.  Its sections include the following categories:

  • Classic TV
  • Music Hot List
  • Top Tracks
  • Temper
  • Tube-Toons
  • Tubeflix


Other Notable Categories Worth Mentioning

Under the Classic TV Section:

  • All-in-the-Family
  • Bonanza
  • Dragnet TV
  • Head of Class
  • Nancy Drew
  • Beverly Hillbillies

Under the Music Section:

  • Any Musical Genre ranging from Country, Pop, Rnb, Rock, Indie, Alternative, and many many more.


ANONYMOUSLY


Features

  1. Retro Channels that feature old tv shows with a complete episode guide with relevant information.
  2. Very easy to use interface
  3. A huge list of quality tv shows, music, and cartoons.
  4. 1-click play
  5. Family-friendly content

Installation Steps

  1. Begin by launching Kodi. At the Home Screen select the “System Settings” Icon
  2. Select “File Manager”
  3. On the left side of the panel click “Add Source”
  4. Click where it says “NONE”
  5. Input the URL: https://incendiary-pyro.github.io/
  6. Rename the box that will appear “Pyro”
  7. Check if everything is true and then click “ok”
  8. Head back to the main screen and select “Add-ons”
  9. Select the Add-on Package Installer Icon at the top left
  10. Choose “Install from zip file”
  11. A notification will appear and then choose “Pyro”
  12. Choose “repository.Incendiary-Pyro-1.0.0.zip”
  13. Hold on and wait until a notification says “Repo Installed”
  14. Select “Install from repository”
  15. Open “Incendiary-Pyro”
  16. Click on “Video Add-ons”
  17. Choose “Collective”
  18. Select “Install”
  19. You may now enjoy the content this add-on has.


YOUR INTERNET ACTIVITY IS BEING WATCHED

ReviewVPN cannot attest to the legality, security and privacy of the applications discussed on this site. It is highly recommended that you use a VPN service while streaming or using Kodi.

Currently, your IP 216.73.217.150 is visible to everyone and your Browser is being tracked by Advertisers & ISP Provider.

Save 65% Now

Limited Time Offer

Here are the main reasons why you must use a VPN:

  • Your activities are hidden from your ISP, the government, and from the apps you are using.
  • You can access additional movies and TV streams.
  • ISP attempts to throttle are thrwarted thus reducing buffering issues.
  • Geographically restricted content like Netflix and Hulu can be unblocked.

A VPN works be replacing your ISP-assigned IP address and creating an encrypted tunnel. We recommend the no log service offered by IPVanish. It works well on a Firestick and offers the fastest possible speeds.

Special Limited Time Offer - Get IPVanish


How to Install Collective on Kodi with Screenshots

1. From the home screen, select the cogwheel at the upper left.

Step 1 Installing Collective addon on Kodi

2. Select System in the bottom right corner.

Step 2 Installing Collective addon on Kodi


3. Select Add-ons on the left side of the screen.

Step 3 Installing Collective addon on Kodi


4. Select Unknown sources.

Step 4 Installing Collective addon on Kodi


5. Click Yes to allow unknown sources.

Step 5 Installing Collective addon on Kodi


6. Select File manager.

Step 6 Installing Collective on Kodi


7. Click Add source.

Step 7 Installing Collective addon on Kodi


8. Click on <None>.

Step 8 Installing Collective addon on Kodi


9. Type exactly: https://incendiary-pyro.github.io

Step 9 Installing Collective addon on Kodi


10. Click on OK.

Step 10 Installing Collective addon on Kodi


11. Select enter a name for this media source.

Step 11 Installing Collective addon on Kodi


12. Name is Collective (this part isn’t critical as long as you remember the name).

Step 12 Installing Collective addon on Kodi


13. Click on OK.

Step 13 Installing Collective addon on Kodi


14. Click on OK.

Step 14 Installing Collective addon on Kodi


15. Take one step back and click on Add-ons.

Step 15 Installing Collective addon on Kodi


16. Select install from zip file.

Step 16 Installing Collective addon on Kodi


17. Click on Collective (or whatever you named the source).

Step 17 Installing Collective addon on Kodi


18. Click on repository.Incendiary-Pyro-1.0.0.zip

Step 18 Installing Collective addon on Kodi


19. Select on Install from repository.

Step 19 Installing Collective addon on Kodi


20. Click on Incendiary-Pyro Repo

Step 20 Installing Collective addon on Kodi


21. Pick Video add-ons.

Step 21 Installing Collective addon on Kodi


22. Select Collective again.

Step 22 Installing Collective addon on Kodi


23. Click on Install.

Step 23 Installing Collective addon on Kodi


24.  Select OK after reviewing the add-ons that will be installed.

Step 24 Installing Collective addon on Kodi


25. You should see a popup in the upper right corner saying Collective has installed. There will actually be multiple popups for the various components.

Step 25 Installing Collective addon on Kodi


26. You should see a popup in the upper right corner saying Collective has installed. There will actually be multiple popups for the various components.

Step 26 Installing Collective addon on Kodi


Alternatives

There will be times when things don’t go as planned so it is wise to always have a backup plan. Here at ReviewVpn, we always advise that you get your content from trusted sources to avoid any issues that may arise in the future. The following add-ons may serve as a replacement to Collective whenever it encounters problems:

        Bretts Retro Tv Add-on

        Vintage Add-on

Searching for similar add-ons is very easy. Just type what you are looking for in Google, and a lot of results will yield. We highly recommend that you get them from trusted sources to avoid any issues. 

Common Errors

These are some of the things that may cause an issue when installing Collectives:

  1.    Unable to connect to URL/Download

One of the main reasons why this happens is that you might have written the wrong URL. Please be careful when typing in the URL because the slightest mistake can totally ruin your download. Secondly, having a stable internet connection is always desired as it does not impend the speed of your download. Lastly, to protect your identity and internet trail, you must have a reliable VPN to mask your online activities and will help you remain anonymous. Check here for the best VPN deal.


  1.     Script Error

This issue usually arises when Kodi is not properly installed or has lacking features for it to work properly. If that is the case, you can redownload Kodi and install it properly. An in-depth guide on how to install the Kodi app is provided here in our website. Lastly, if the issue is with the add-on itself, you can reinstall it by following the procedure given above.


  1.     Kodi Check Log Error

A check log error only happens when your media cache is full. You can remedy this situation by emptying your cache. 


  1.     Source not working/slow/frozen

Collective does not keep any of the content on its servers. It usually pulls its content from Youtube. Patience is key here, just wait for a couple of seconds for the other suggestions and click on them. For other solutions please take time to read our in-depth guide linked above. 


How to Install Surfshark VPN on Firestick

If your Firestick still has the older interface, read this article to learn how to update it: Update Firestick Interface.

Follow our screenshots below to install the SurfShark VPN app on your Fire TV stick.

1. Go to the Home screen of your Firestick.

step 1 Install Surfshark VPN on Firestick


2. Navigate towards the Find tab. Press the Search button from the resulting dropdown.

step 2 Install Surfshark VPN on Firestick


3. Type in the keyword of SurfShark and select from the suggestions that will appear.

step 3 Install Surfshark VPN on Firestick


4. Click the official SurfShark icon from your search results.

step 4 Install Surfshark VPN on Firestick


5. Press the Download (You own it) button.

step 5 Install Surfshark VPN on Firestick


6. The SurfShark VPN installer will download on your device.

step 6 Install Surfshark VPN on Firestick


7. SurfShark VPN’s app will automatically install itself on your Fire TV stick.

step 7 Install Surfshark VPN on Firestick


8. Press the Open button after completing SurfShark VPN’s installation process.

step 8 Install Surfshark VPN on Firestick


9. Please wait for the SurfShark VPN to load its user interface.

step 9 Install Surfshark VPN on Firestick


10. You can now log in with your SurfShark VPN account credentials.

step 10 Install Surfshark VPN on Firestick

Learn more about Surfshark and Grab the Best Surfshark Deal Now!


Install Surfshark on Firestick

Best Surfshark Deal


Other VPNs to Consider

NordVPN (Best for Streaming)

Best Features

  • 5000+ Server in 50+ Countries 
  • Military-Grade Encryption
  • Fast Connection Speed
  • Suitable to a lot of devices
  • No-Log Policy

Prices
  • Complete $5.89 per month (64% Discount)
  • Plus $4.59 per month (56% Discount)
  • Standard $3.69 per month (55% Discount)

Best Features

  • 750+ High-speed VPN Servers in 43 Locations
  • Military-Grade Encryption
  • Fastest HD Streaming and Gaming
  • 30-Day Money-Back Guarantee
  • Unlimited Data & Devices
  • No-Log Policy

Prices
  • 3 Years $1.99 per month (82% Discount)
  • 1 Years $3.29 per month (70% Discount)
  • 1 Month $10.99 per month

IPVanish VPN (Most Secure)

Best Features

  • 1200+ Servers in 60+ Countries around the world
  • Unlimited Connections
  • No-Log Policy
  • Top Notch Military-Grade VPN Protocols and Encryptions
  • 100% Safe and Secured
  • Most Trusted VPN
  • Best VPN for Firestick
  • 30-Day Money-Back Guarantee

Prices
  • Yearly $3.99 per month (63% Discount) – 30 days risk free + Ransomware & Malware Protection
  • Quarterly $5.32 per month (51% Discount)
  • Monthly $10.99 per month


For more VPN discounts, go to ReviewVPN Deals and purchase the best VPN for you.

Click here to get the lowest price on Surfshark through our exclusive limited-time offer.


Conclusion

Collective Kodi Video Add-on is great when it comes to Family-oriented content. We highly recommend this add-on if you wish to invoke good old memories. It is great for the whole family as it can help bridge the generational gap between adults and young ones. It can also be educational as it shows content not readily available on other platforms. So here in ReviewVpn, we give it 5 out of 5 stars.

Install Chucky Video Kodi Addon

Chucky Kodi Video Addon

In this article, we will help you install IT Kodi Addon on Firestick.


https://cy4root2.github.io/zip/

What comes into your mind when you read Chucky? Is it the murderous psychopathic doll that we have seen in the movies? Parents would usually reference that term to scare their kids into submission whenever they are acting out or throwing a fit. Indeed, it was very scary and it gave everyone nightmares. But this add-on is far from the Movie. It is not scary and it does not frighten people but actually the opposite. As we go along this write-up you will know why.

Chucky Kodi Video add-on is under the Cy4Root Repository and offers a lot of exciting content and categories to choose from. It also has a retro feature that highlights movies throughout the years.


ANONYMOUSLY

Key Features

  • Movies
  • Genres
  • Action, Adventure, Animation, Anime, Biography, Comedy, Crime, Documentary, Drama, Family, Fantasy, History, Horror, Music, Musical, Mystery, Romance, Science Fiction, Sport, Thriller, War, Western
  • Yea, People, Language, Certificate, Movie Mosts, Featured, Featured TMDB, Featured Trakt, People Watching, Most Popular, Popular, Popular TMDB, Most Voted, Top Rated, Premiere, In Theater (Old Style), In Theaters, Oscar Winners, My Movies, Search
  • Trakt Integration
  • Radio
  • Navi Zone
  • Tools
  • Providers
  • Search
  • News!!!
  • User-Friendly Interface


Installation Guide

  1. Launch Kodi on your device
  2. Open the “Gear Icon” and choose “System”
  3. Select the add-ons menu, turn on the “Unknown Sources” by clicking “Yes”
  4. Go back to the “Systems” page and choose “File Manager”
  5. Choose Add source and select “None”
  6. Go to https://cy4root2.github.io/zip/
  7. Highlight the source and rename it to “Chucky Repo” or any name you would like to use to identify this particular source and click “Ok”
  8. Go back to the System Screen and click “Add-ons”
  9. Choose “Install Zip File” and choose “Chucky Repo” or whatever you renamed the file.
  10. Choose the zip file URLrepository.cy4root-master.zip
  11. Wait for the notification “Chucky Add-on Repo Installed” to appear.
  12. Click on “Install Repository”
  13. Select “Chucky Repo”
  14. Open “Video Add-ons” and Choose “Chucky” and “Install”
  15. Select “Ok” when a notification “the following add-ons will be installed” appears and wait for Fractured Add-on to install
  16. Once the add-on is installed go back to the home screen and select “Add-ons”
  17. Choose “Video add-ons” and select “Chucky”
  18. There you go, Chucky is now installed.


YOUR INTERNET ACTIVITY IS BEING WATCHED

ReviewVPN cannot attest to the legality, security and privacy of the applications discussed on this site. It is highly recommended that you use a VPN service while streaming or using Kodi.

Currently, your IP 216.73.217.150 is visible to everyone and your Browser is being tracked by Advertisers & ISP Provider.

Save 65% Now

Limited Time Offer

Here are the main reasons why you must use a VPN:

  • Your activities are hidden from your ISP, the government, and from the apps you are using.
  • You can access additional movies and TV streams.
  • ISP attempts to throttle are thrwarted thus reducing buffering issues.
  • Geographically restricted content like Netflix and Hulu can be unblocked.

A VPN works be replacing your ISP-assigned IP address and creating an encrypted tunnel. We recommend the no log service offered by IPVanish. It works well on a Firestick and offers the fastest possible speeds.

Special Limited Time Offer - Get IPVanish


Legal Disclaimer: ReviewVPN.com does not encourage or endorse any illegal activity involved in the usage of services and applications referenced on this site. We do not verify the licensing agreements of services. The end-user is wholly responsible for ensuring that any media accessed through these services does not violate copyright and/or licensing laws. ReviewVPN does not promote, link to, or receive compensation from any Apps and IPTV services.


Install Surfshark on Firestick

Best Surfshark Deal


How to Install Chucky Video on Kodi with Screenshots

1. From the home screen, select the cogwheel at the upper left.

Step 1 Installing Chucky Video addon on Kodi


2. Select System in the bottom right corner.

Step 2 Installing Chucky Video addon on Kodi


3. Select Add-ons on the left side of the screen.

Step 3 Installing Chucky Video addon on Kodi


4. Select Unknown sources.

Step 4 Installing Chucky Video addon on Kodi


5. Click Yes to allow unknown sources.

Step 5 Installing Chucky Video addon on Kodi


6. Select File manager.

Step 6 Installing Chucky Video on Kodi


7. Click Add source.

Step 7 Installing Chucky Video addon on Kodi


8. Click on <None>.

Step 8 Installing Chucky Video addon on Kodi


9. Type exactly: https://cy4root2.github.io/zip/

Step 9 Installing Chucky Video addon on Kodi


10. Click on OK.

Step 10 Installing Chucky Video addon on Kodi


11. Select enter a name for this media source.

Step 11 Installing Chucky Video addon on Kodi


12. Name is Chucky Video (this part isn’t critical as long as you remember the name).

Step 12 Installing Chucky Video addon on Kodi


13. Click on OK.

Step 13 Installing Chucky Video addon on Kodi


14. Click on OK.

Step 14 Installing Chucky Video addon on Kodi


15. Take one step back and click on Add-ons.

Step 15 Installing Chucky Video addon on Kodi


16. Select install from zip file.

Step 16 Installing Chucky Video addon on Kodi


17. Click on Chucky Video (or whatever you named the source).

Step 17 Installing Chucky Video addon on Kodi


18. Click on repository.cy4root-master.zip

Step 18 Installing Chucky Video addon on Kodi


19. Select on Install from repository.

Step 19 Installing Chucky Video addon on Kodi


20. Click on Cy4root Repo.

Step 17 Installing Chucky Video addon on Kodi


21. Pick Video add-ons.

Step 21 Installing Chucky Video addon on Kodi


22. Select Chucky Video again.

Step 22 Installing Chucky Video addon on Kodi


23. Click on Install.

Step 23 Installing Chucky Video addon on Kodi


24. Select OK after reviewing the add-ons that will be installed.

Step 24 Installing Chucky Video addon on Kodi


25. You should see a popup in the upper right corner saying Chucky Video has installed. There will actually be multiple popups for the various components.

Step 25 Installing Chucky Video addon on Kodi


26. Click on Open to start the Chucky Video add-on.

Step 26 Installing Chucky Video addon on Kodi


Alternatives

Unexpected issues may arise during a run of an add-on, some of these are sometimes out of our control. So having a backup is always desirable and that is what we usually tell our readers. Here at ReviewVPN, we try our best to look for the most trusted and up-to-date add-ons. We only recommend what we have already tried and tested. Also, be sure to always obtain your content from trusted sources. The following are very similar in terms of capabilities to Chucky Video Add-on. They all have a very detailed category and a wide array of choices to choose from. Here they are:

        The USS Defiant Add-on

        Leviathan Add-on

        Chain Reaction Add-on

        Fractured

        Bumblebee Add-on

        Midian Add-on


Common errors

These are some of the things that may cause an issue when installing Chucky Add-on:

  1.     Unable to connect to URL/Download

If you are having difficulties downloading Chucky Video add-on this may mean that the repository is unstable and that the IP may be unavailable. It is also worth checking out if you have typed the correct URL that you have downloaded Fractured from the right repository. Also, make sure that you have a stable internet connection and that you are secured by a VPN. If your country has stricter rules regarding censorship, you may find that it is blocked because it may contain adult content and that it is collected illegally. Your ISP constantly monitors your activity and may block certain websites from being accessed. To fix this, use a VPN to make your connection encrypted and anonymous so that your tracks will be covered. Check here for the best VPN deal.


  1.     Script Error

This error occurs due to the add-on itself or on the manner Kodi has been installed. Make sure that you have installed everything properly. If this problem persists, try reinstalling the add-on or there may be a need to update or reinstall Kodi. To figure out how to do this and other fixes read our in-depth guide linked above.


  1.     Kodi Check Log Error

Check Log Errors usually happen often as you use Kodi until you get familiar with it. This usually happens when your media cache is full. Your device will always cache a clip every time you watch media to allow faster loading time. In the long run, this cache gets full thus creating this issue. An in-depth guide on how to empty your cache is provided at the link above.


  1.     Source not working/slow/frozen

Chucky add-on does not store any of the content on its servers, these are all accumulated through 3rd party sites. Give the source up to 15 seconds to load and then you can try other suggestions. For other solutions please take time to read our in-depth guide linked above.


Should I Use This App With a VPN?

surfshark logo

We recommend you use a VPN for the following reasons:

  • Many of the addons you will access in Streamline will direct you to links for illegally distributed content. Without a VPN you may find many of these links do not work because your ISP is blocking your access
  • If you try to access Live TV Channels in other countries through Streamline your access may also be blocked. This is because these channels can detect your IP is not in that country and will block you from accessing their channels.
  • Using a VPN, you can encrypt your requests, change your IP, and also the location where your IP originates from. Thus, allowing you to circumvent any blocks or firewalls in place to do your accessing most restricted content
  • A VPN also helps you maintain anonymity, safety, and privacy online from unwanted third parties.

Note: For more information about Surfshark, please read our Surfshark Review.


Grab your subscription now!


How to Install Surfshark VPN on Firestick

If your Firestick still has the older interface, read this article to learn how to update it: Update Firestick Interface.

Follow our screenshots below to install the SurfShark VPN app on your Fire TV stick.

1. Go to the Home screen of your Firestick.

step 1 Install Surfshark VPN on Firestick


2. Navigate towards the Find tab. Press the Search button from the resulting dropdown.

step 2 Install Surfshark VPN on Firestick


3. Type in the keyword of SurfShark and select from the suggestions that will appear.

step 3 Install Surfshark VPN on Firestick


4. Click the official SurfShark icon from your search results.

step 4 Install Surfshark VPN on Firestick


5. Press the Download (You own it) button.

step 5 Install Surfshark VPN on Firestick


6. The SurfShark VPN installer will download on your device.

step 6 Install Surfshark VPN on Firestick


7. SurfShark VPN’s app will automatically install itself on your Fire TV stick.

step 7 Install Surfshark VPN on Firestick


8. Press the Open button after completing SurfShark VPN’s installation process.

step 8 Install Surfshark VPN on Firestick


9. Please wait for the SurfShark VPN to load its user interface.

step 9 Install Surfshark VPN on Firestick


10. You can now log in with your SurfShark VPN account credentials.

step 10 Install Surfshark VPN on Firestick

Learn more about Surfshark and Grab the Best Surfshark Deal Now!


Install Surfshark on Firestick

Best Surfshark Deal


Other VPNs to Consider

NordVPN (Best for Streaming)

Best Features

  • 5000+ Server in 50+ Countries 
  • Military-Grade Encryption
  • Fast Connection Speed
  • Suitable to a lot of devices
  • No-Log Policy

Prices
  • Complete $5.89 per month (64% Discount)
  • Plus $4.59 per month (56% Discount)
  • Standard $3.69 per month (55% Discount)

Best Features

  • 750+ High-speed VPN Servers in 43 Locations
  • Military-Grade Encryption
  • Fastest HD Streaming and Gaming
  • 30-Day Money-Back Guarantee
  • Unlimited Data & Devices
  • No-Log Policy

Prices
  • 3 Years $1.99 per month (82% Discount)
  • 1 Years $3.29 per month (70% Discount)
  • 1 Month $10.99 per month

IPVanish VPN (Most Secure)

Best Features

  • 1200+ Servers in 60+ Countries around the world
  • Unlimited Connections
  • No-Log Policy
  • Top Notch Military-Grade VPN Protocols and Encryptions
  • 100% Safe and Secured
  • Most Trusted VPN
  • Best VPN for Firestick
  • 30-Day Money-Back Guarantee

Prices
  • Yearly $3.99 per month (63% Discount) – 30 days risk free + Ransomware & Malware Protection
  • Quarterly $5.32 per month (51% Discount)
  • Monthly $10.99 per month


For more VPN discounts, go to ReviewVPN Deals and purchase the best VPN for you.

Click here to get the lowest price on Surfshark through our exclusive limited-time offer.


Conclusion

By this time, we believe that the name Chucky would no longer elicit fear. Instead, you will remember it as an awesome Kodi Add-on that will surely exceed your expectations. With its extensive selection list, it will take you forever to fully navigate it and its content.

The good thing about Chucky Add-on is that it features Movies and TV Shows from every decade starting from the 1950s up to 2000s. A stroll down on memory lane is also a good thing, you get to reminisce how it was back then and relive some good old memories.

So there, we hope that this article gave you an insight into what this add-on is truly capable of. If you have any questions please feel free to drop a comment below or send us a message through any of our social media platforms. Thank you for reading and have a good day ahead!
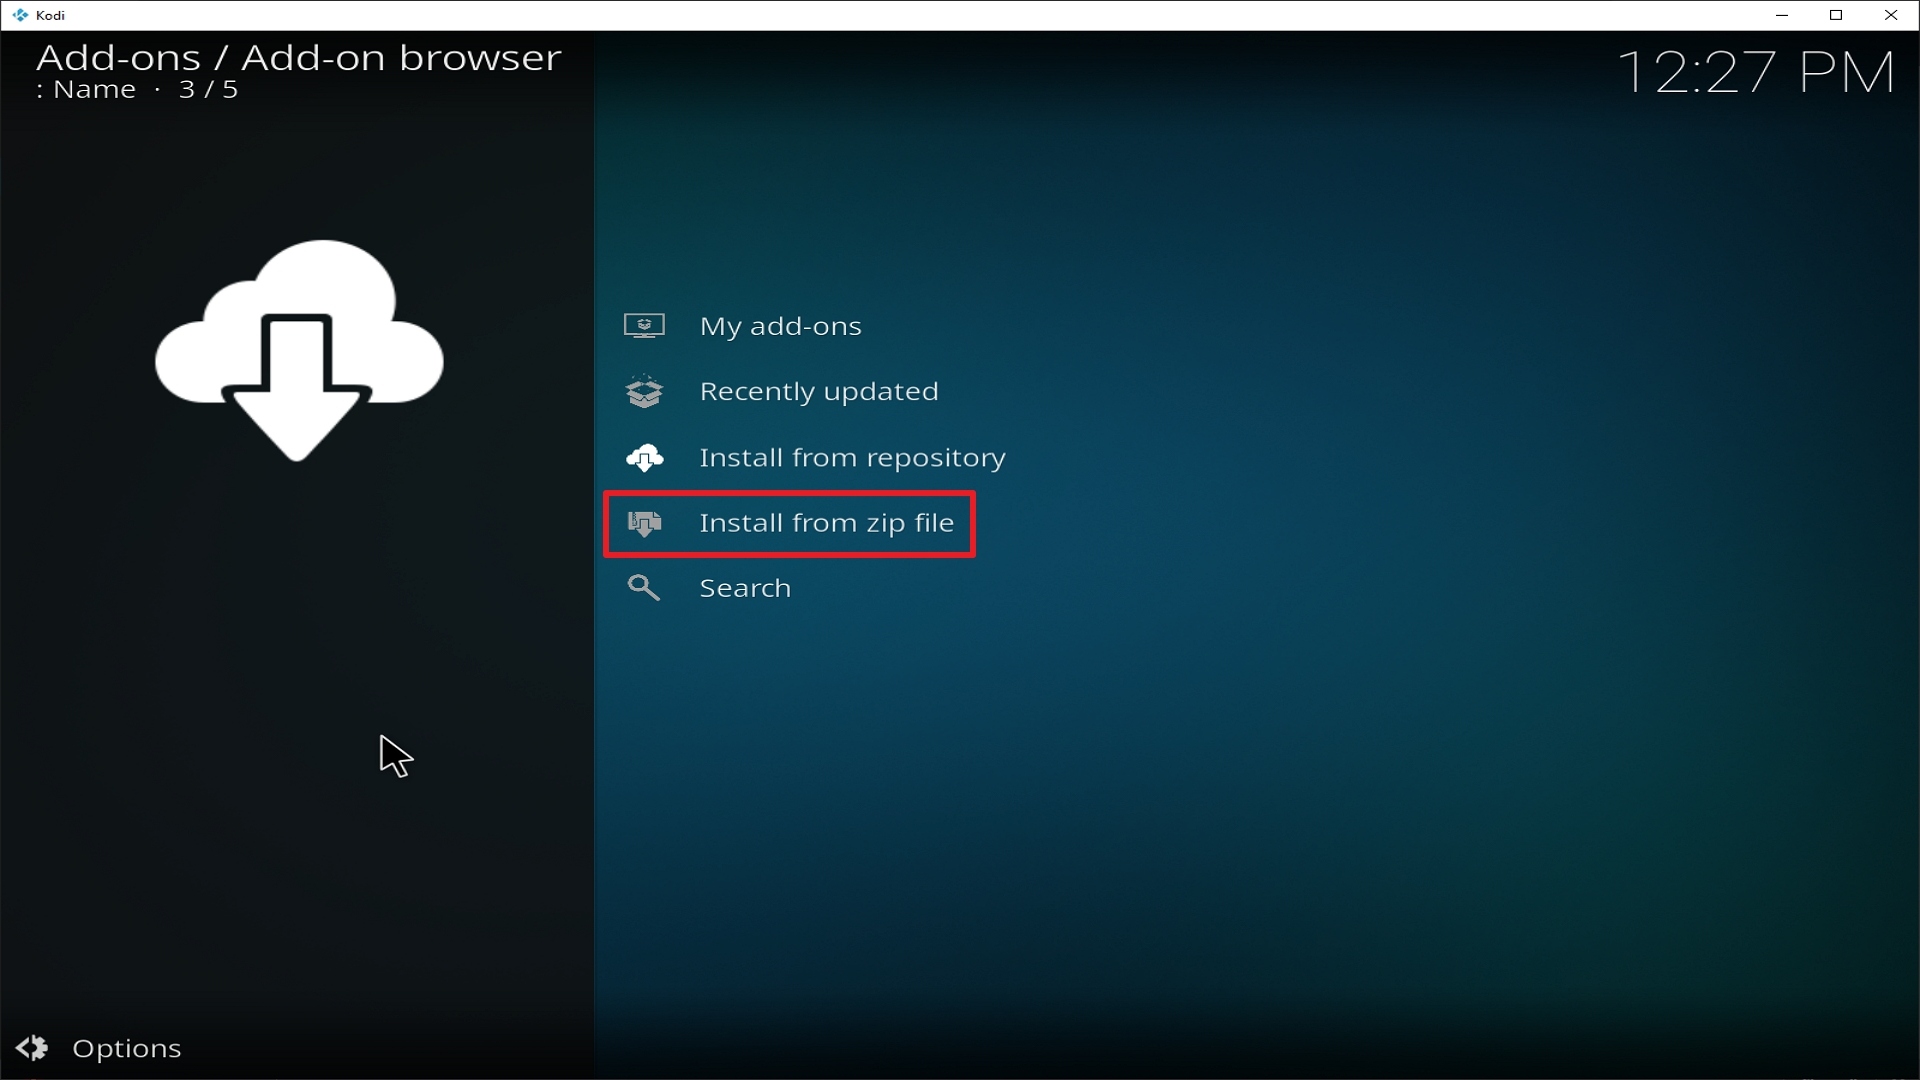
Install Chain Reaction Kodi Addon

Chain Reaction Kodi Addon

In this article, we will help you install Chain Reaction Kodi Addon on Firestick.


Source: http://www.ezzer-mac.com/repo

At this age, a lot of people are looking for free-content online. It depends on what avenue they get it from, some from torrents, some from file hosts, and a lot from Netflix.

If you can spare $10 a month for Netflix, then well and good for you. But if you are on a tight budget and want to watch content for free how do we do that? That is very easy. As long as you have a working device may it be Android, Amazon, or other platforms you can download the Kodi App on your device and start exploring the wonders of the App.

Furthermore, to maximize Kodi’s capabilities and you must install add-ons. These add-ons provide content like movies, tv shows, documentaries, etc. One such ass-on that has almost everything you need is called Chain Reaction Kodi Video Add-on.

Coming from the Ezzer Macs Wizard Repository, Chain Reaction provides endless content that is stable, reliable, and of high quality.


ANONYMOUSLY

Installation Guide for Chain Reaction Kodi Video Add-on

  1. Open Kodi on your device
  2. Click on the “Gear Icon” and select “System”
  3. At the add-ons menu, turn on the “Unknown Sources” by clicking “yes”
  4. Go back to the “systems” page and choose “File Manager”
  5. Choose Add source and select “none”
  6. Type in http://ezzer-mac.com/repo
  7. Highlight the source and rename it to “Ezzer  Macs Wizard Repo” or any name you would like to use to identify this particular source and click “ok”
  8. Go back to the System Screen and click “Add-ons”
  9. Select “Install Zip File” choose “Ezzer Macs Wizard Repo” or whatever you renamed the file.
  10. Select the zip file URL- repository.EzzerMacsWizard.zip
  11. Wait for the notification “Ezzer Macs Wizard Add-on Repo Installed” to appear.
  12. Select “Install Repository”
  13. Choose “Ezzer Macs Wizard Repo”
  14. Click on “Video Add-ons” and select “Chain Reaction” and “Install”
  15. Click “Ok” when a notification “the following add-ons will be installed” appears and wait for Chain Reaction Add-on to install
  16. Once the add-on is installed go back to the home screen and select “add-ons”
  17. Choose “Video add-ons” and select “Chain Reaction”
  18. There you go, Chain Reaction is now installed.


YOUR INTERNET ACTIVITY IS BEING WATCHED

ReviewVPN cannot attest to the legality, security and privacy of the applications discussed on this site. It is highly recommended that you use a VPN service while streaming or using Kodi.

Currently, your IP 216.73.217.150 is visible to everyone and your Browser is being tracked by Advertisers & ISP Provider.

Save 65% Now

Limited Time Offer

Here are the main reasons why you must use a VPN:

  • Your activities are hidden from your ISP, the government, and from the apps you are using.
  • You can access additional movies and TV streams.
  • ISP attempts to throttle are thrwarted thus reducing buffering issues.
  • Geographically restricted content like Netflix and Hulu can be unblocked.

A VPN works be replacing your ISP-assigned IP address and creating an encrypted tunnel. We recommend the no log service offered by IPVanish. It works well on a Firestick and offers the fastest possible speeds.

Special Limited Time Offer - Get IPVanish


How to Install Chain Reaction on Kodi with Screenshots

1. From the home screen, select the cogwheel at the upper left.

Step 1 Installing Chain Reaction addon on Kodi


2. Select System in the bottom right corner.

Step 2 Installing Chain Reaction addon on Kodi


3. Select Add-ons on the left side of the screen.

Step 3 Installing Chain Reaction addon on Kodi


4. Select Unknown sources.

Step 4 Installing Chain Reaction addon on Kodi


5. Click Yes to allow unknown sources.

Step 5 Installing Chain Reaction addon on Kodi


6. Select File manager.

Step 6 Installing Chain Reaction on Kodi


7. Click Add source.

Step 7 Installing Chain Reaction addon on Kodi


8. Click on <None>.

Step 8 Installing Chain Reaction addon on Kodi


9. Type exactly: http://www.ezzer-mac.com/repo

Step 9 Installing Chain Reation addon on Kodi


10. Click on OK.

Step 10 Installing Chain Reation addon on Kodi


11. Select enter a name for this media source.

Step 11 Installing Chain Reation addon on Kodi


12. Name is Chain Reaction (this part isn’t critical as long as you remember the name).

Step 12 Installing Chain Reation addon on Kodi


13. Click on OK.

Step 13 Installing Chain Reation addon on Kodi


14. Click on OK.

Step 14 Installing Chain Reation addon on Kodi


15. Take one step back and click on Add-ons.

Step 15 Installing Chain Reation addon on Kodi


16. Select install from the zip file.

Step 16 Installing Chain Reation addon on Kodi


17. Click on Chain Reaction  (or whatever you named the source).

Step 17 Installing Chain Reation addon on Kodi


18. Click on repository.EzzerMacsWizard.zip

Step 18 Installing Chain Reation addon on Kodi


19. Select Install from repository.

Step 19 Installing Chain Reation addon on Kodi


20. Click on Ezzermacz Wizard Repo.

Step 20 Installing Chain Reation addon on Kodi


21. Pick Video add-ons.

Step 21 Installing Chain Reation addon on Kodi


22. Select Chain Reaction again.

Step 22 Installing Chain Reation addon on Kodi


23. Click on Install.

Step 23 Installing Chain Reation addon on Kodi


24. Select OK after reviewing the add-ons that will be installed.

Step 24 Installing Chain Reation addon on Kodi


25. You should see a popup in the upper right corner saying Chain Reaction has been installed. There will be multiple popups for the various components.

Step 25 Installing Chain Reation addon on Kodi


26. Click on Open to start the Chain Reaction add-on.

Step 26 Installing Chain Reation addon on Kodi


Legal Disclaimer: ReviewVPN.com does not encourage or endorse any illegal activity involved in the usage of services and applications referenced on this site. We do not verify the licensing agreements of services. The end-user is wholly responsible for ensuring that any media accessed through these services does not violate copyright and/or licensing laws. ReviewVPN does not promote, link to, or receive compensation from any Apps and IPTV services.


Install Surfshark on Firestick

Best Surfshark Deal

Features

  • Search
    • Movies, Movies Trakt, TV Shows, TV Shows Trakt
  • Real-Debrid Integration
  • Trakt Integration
  • Movies
    • IMDB, New Releases, Legacy of Rage, 4k Ultra Movie, Movie Vault (Retro), and Musicals
  • TV Shows
    • IMDB TV Shows, TV Shows, Paranormal TV, TV Vault (Retro), Netflix Content, Popular US Networks, Kids Zone, Documentaries, and some WWE (PPV and Replays)
  • Music Zone
  • Search, Music Videos, Concerts
  • 460p Video Quality
  • Almost Limitless Content
  • Broken Chains (Non-Debrid Section)
  • SHHH!! (Adult Content)

 

Pros & Cons

Pros

  • It has WWE content
  • Allows for the integration of real-debrid and Trakt accounts.
  • Content from IMDB is available.
  • Includes adult content that is not available through other Add-ons.

Cons

  • Can have higher-quality video streams.
  • Some sources are inaccessible.


Alternatives

Back-up plans are always good to have because you will never know when a problem might arise. You always need to obtain your content from trusted sources that are already tried and tested. Here at ReviewVPN, we always do our best in providing reviews on what are the most reliable and stable add-ons out there. Should there be any issue you may encounter with Chain reaction the following add-ons are good alternatives:

  • Bumblebee
  • Open Meta
  • The Magic dragon
  • Primal
  • Locutus

These add-ons have very similar features to Chain Reaction and would run smoothly on your device.


Should I Use Chain Reaction With a VPN?

https://get.surfshark.net/aff_c?offer_id=865&aff_id=12312

We recommend you use a VPN for the following reasons:

  • Many of the addons you will access in Streamline will direct you to links for illegally distributed content. Without a VPN you may find many of these links do not work because your ISP is blocking your access
  • If you try to access Live TV Channels in other countries through Streamline your access may also be blocked. This is because these channels can detect your IP is not in that country and will block you from accessing their channels.
  • Using a VPN, you can encrypt your requests, change your IP, and also the location where your IP originates from. Thus, allowing you to circumvent any blocks or firewalls in place to do your accessing most restricted content
  • A VPN also helps you maintain anonymity, safety, and privacy online from unwanted third parties.

Note: For more information about SurfShark, please read our SURFSHARK REVIEW.


Grab your subscription now!
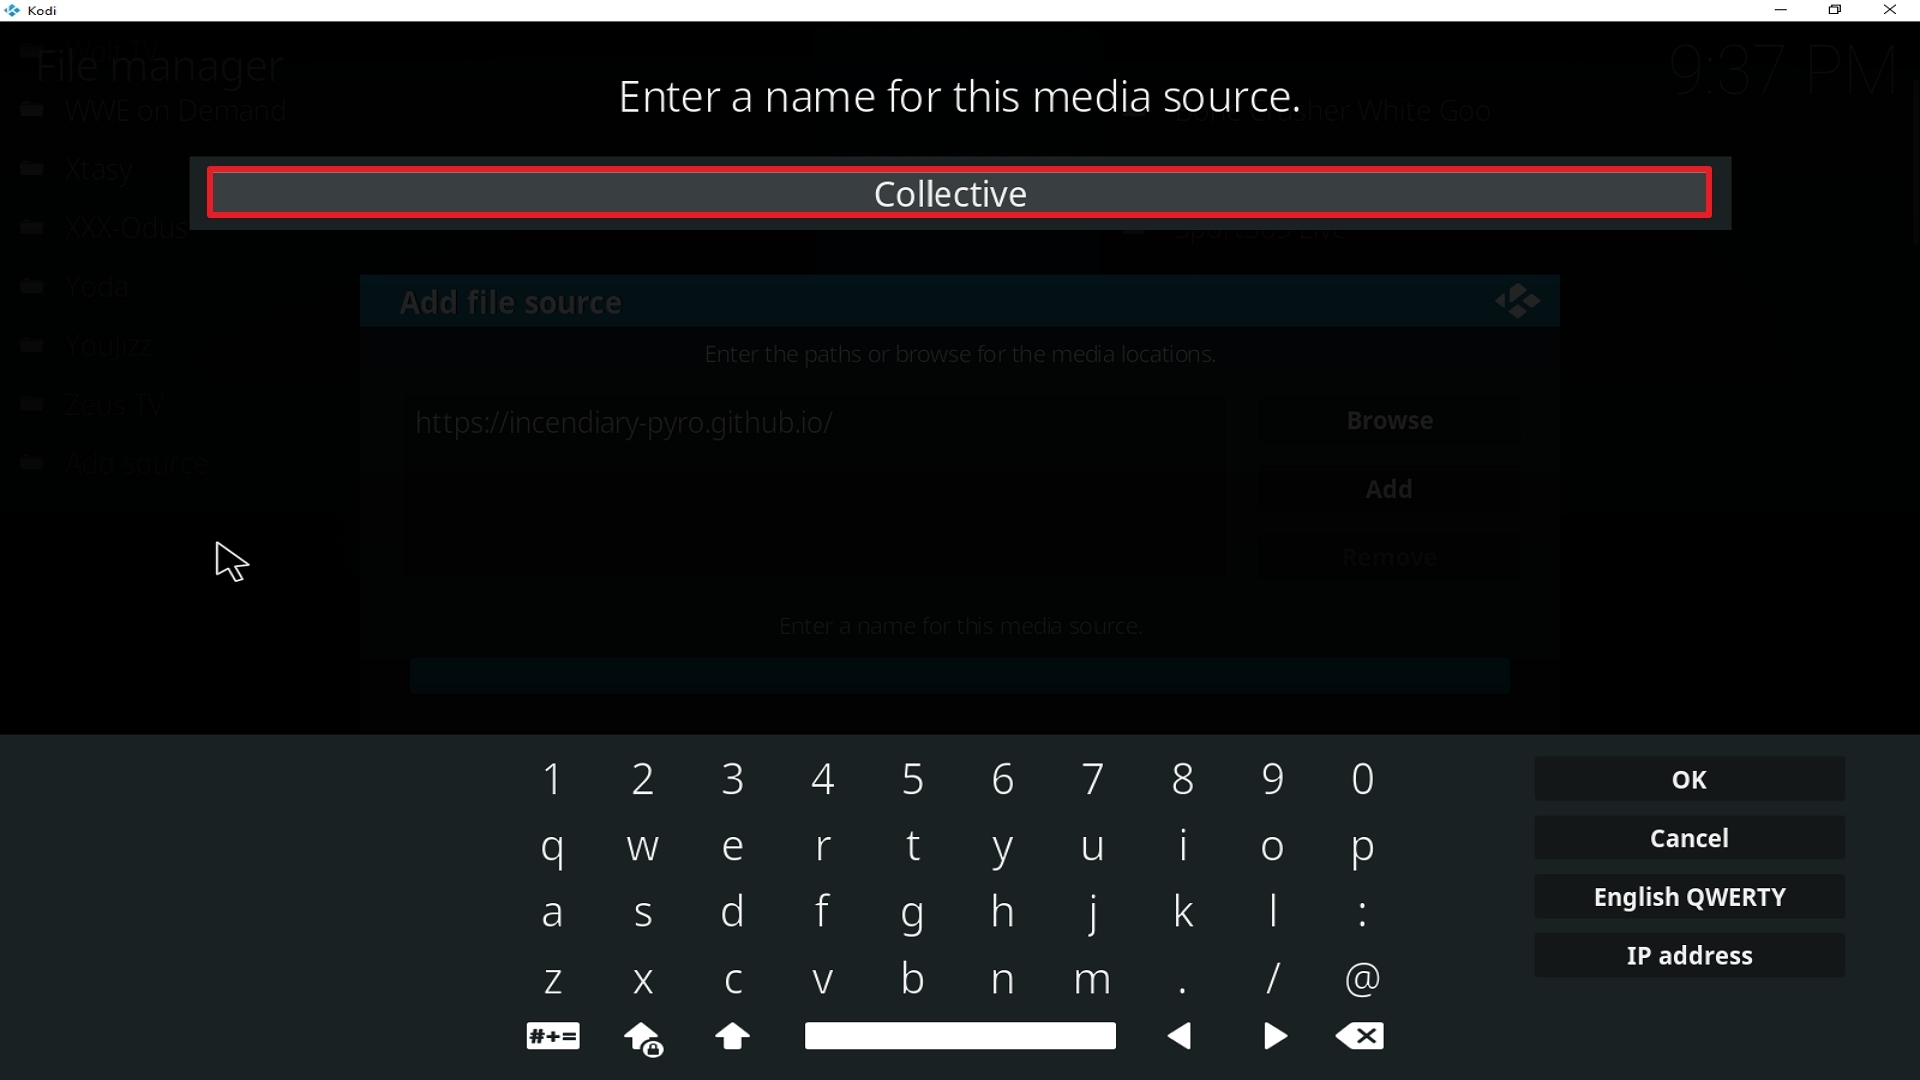
Click here to get the lowest price on Surfshark through our exclusive limited-time offer.


How to Install Surfshark VPN on Firestick

If your Firestick still has the older interface, read this article to learn how to update it: Update Firestick Interface.

You can download Surfshark directly from the Amazon App store. It will be easy for you to find Surfshark with your Firestick’s Find feature. Refer to our screenshots below.

1. Go to the Home screen of your Firestick.

step 1 Install Surfshark VPN on Firestick


2. Navigate towards the Find tab. Press the Search button from the resulting dropdown.

step 2 Install Surfshark VPN on Firestick


3. Type in the keyword of SurfShark and select from the suggestions that will appear.

step 3 Install Surfshark VPN on Firestick


4. Click the official SurfShark icon from your search results.

step 4 Install Surfshark VPN on Firestick


5. Press the Download (You own it) button.

step 5 Install Surfshark VPN on Firestick


6. The SurfShark VPN installer will download on your device.

step 6 Install Surfshark VPN on Firestick


7. SurfShark VPN’s app will automatically install itself on your Fire TV stick.

step 7 Install Surfshark VPN on Firestick


8. Press the Open button after completing SurfShark VPN’s installation process.

step 8 Install Surfshark VPN on Firestick


9. Please wait for the SurfShark VPN to load its user interface.

step 9 Install Surfshark VPN on Firestick


10. You can now log in with your SurfShark VPN account credentials.

step 10 Install Surfshark VPN on Firestick

How to Install Surfshark VPN on Firestick

If your Firestick still has the older interface, read this article to learn how to update it: Update Firestick Interface.

Follow our screenshots below to install the SurfShark VPN app on your Fire TV stick.

1. Go to the Home screen of your Firestick.

step 1 Install Surfshark VPN on Firestick


2. Navigate towards the Find tab. Press the Search button from the resulting dropdown.

step 2 Install Surfshark VPN on Firestick


3. Type in the keyword of SurfShark and select from the suggestions that will appear.

step 3 Install Surfshark VPN on Firestick


4. Click the official SurfShark icon from your search results.

step 4 Install Surfshark VPN on Firestick


5. Press the Download (You own it) button.

step 5 Install Surfshark VPN on Firestick


6. The SurfShark VPN installer will download on your device.

step 6 Install Surfshark VPN on Firestick


7. SurfShark VPN’s app will automatically install itself on your Fire TV stick.

step 7 Install Surfshark VPN on Firestick


8. Press the Open button after completing SurfShark VPN’s installation process.

step 8 Install Surfshark VPN on Firestick


9. Please wait for the SurfShark VPN to load its user interface.

step 9 Install Surfshark VPN on Firestick


10. You can now log in with your SurfShark VPN account credentials.

step 10 Install Surfshark VPN on Firestick

Learn more about Surfshark and Grab the Best Surfshark Deal Now!


Install Surfshark on Firestick

Best Surfshark Deal


Other VPNs to Consider

NordVPN (Best for Streaming)

Best Features

  • 5000+ Server in 50+ Countries 
  • Military-Grade Encryption
  • Fast Connection Speed
  • Suitable to a lot of devices
  • No-Log Policy

Prices
  • Complete $5.89 per month (64% Discount)
  • Plus $4.59 per month (56% Discount)
  • Standard $3.69 per month (55% Discount)

Best Features

  • 750+ High-speed VPN Servers in 43 Locations
  • Military-Grade Encryption
  • Fastest HD Streaming and Gaming
  • 30-Day Money-Back Guarantee
  • Unlimited Data & Devices
  • No-Log Policy

Prices
  • 3 Years $1.99 per month (82% Discount)
  • 1 Years $3.29 per month (70% Discount)
  • 1 Month $10.99 per month

IPVanish VPN (Most Secure)

Best Features

  • 1200+ Servers in 60+ Countries around the world
  • Unlimited Connections
  • No-Log Policy
  • Top Notch Military-Grade VPN Protocols and Encryptions
  • 100% Safe and Secured
  • Most Trusted VPN
  • Best VPN for Firestick
  • 30-Day Money-Back Guarantee

Prices
  • Yearly $3.99 per month (63% Discount) – 30 days risk free + Ransomware & Malware Protection
  • Quarterly $5.32 per month (51% Discount)
  • Monthly $10.99 per month


For more VPN discounts, go to ReviewVPN Deals and purchase the best VPN for you.

Click here to get the lowest price on Surfshark through our exclusive limited-time offer.


FAQs

What is Chain Reaction Kodi Addon?

The Chain Reaction Kodi Add-on lets you stream movies and TV series from its library as well as from your Trakt account. It also includes IMDb shows, TV shows, Netflix content, and US networks, among so many other stuff. Furthermore, if you’re looking for an add-on that offers WWE content, this is the one for you.


Is Chain Reaction Kodi Addon safe?

It is safe to install it on your device. However, for enhanced security, we recommend that you use a VPN with your connection.


Is Chain Reaction Kodi Addon legal?

We have no way of knowing whether the streams it gives to its users are legal. As a result, we recommend that you utilize a VPN to avoid any legal issues while streaming.


Conclusion

A lot of good things are contained within this add-on. It is tailor-made for Netflix fans out there who wish to spend less money. It has all the TV Shows, Movies, Documentaries, and even concerts that Netflix has to offer. Also, if there are those of you who are huge fans of Asian Dramas and TV Shows, this add-on is for you.

You will popular Korean Dramas like Kingdom here. What else is there to say? Chain Reaction seems to be everything that is out there. So what are you waiting for? Try it out and you will not have any regret. If you guys have comments, questions, and suggestions, please feel free to drop us a message below or at any of our other social media platforms.

We hope that we were able to help you in any capacity we can. Thank you for reading!

Install Cartoon Network Kodi Addon

Cartoon Network Kodi Video Add-on

Source: http://revelationmedia.tk/blamo/

You have to admit it whether you are in your 50’s already there will always be a cartoon or animation that will remain close to your heart. There is  Mightor, Moby Dick, He-man and the Guardians of the Universe, She-ra, Gem and the Holograms, and so on and so forth.


No matter what your age is, there will always be that little child in you that will want to see these old-time classics whether you admit it or not. Nowadays, when our kids take over the television they will opt to watch cartoons and they will definitely choose Cartoon Network, Disney, or Boomerang.

What if you can’t afford a cable service but you still want to make your child happy and contented? Worry no more, this is where Kodi comes in and becomes a powerful ally for you. 

The Cartoon Network Add-on comes from the Blamo repository. It provides users their favorite TV cartoon shows and animated movies. 


ANONYMOUSLY


Features:

  • A very sufficient list of cartoons
  • High-quality streaming links
  • Easy User Interface


Installation Guide

  1. Launch Kodi on your device
  2. On the top left corner of the Home Screen, click “Settings
  3. Choose “File Manager
  4. Select “Add Source”
  5. Choose “None”
  6. Enter the URL http://revelationmedia.tk/blamo/
  7. Rename it to “Blamo”
  8. Fill all the boxes and select “Ok”
  9. Head back to the Home Screen and choose “Add-ons”
  10. Select the “Box” icon from the top left corner
  11. Choose “Install from zip file”
  12. A notification will appear, then choose “Blamo”
  13. Select – repository.blamo-1.1.8.zip
  14. A notification will appear stating “Blamo Repository Installed”
  15. Select “Install from Repository”
  16. Choose “Blamo Repository”
  17. Select “Video Add-ons”
  18. Choose “Cartoon Network” and click “Install”


YOUR INTERNET ACTIVITY IS BEING WATCHED

ReviewVPN cannot attest to the legality, security and privacy of the applications discussed on this site. It is highly recommended that you use a VPN service while streaming or using Kodi.

Currently, your IP 216.73.217.150 is visible to everyone and your Browser is being tracked by Advertisers & ISP Provider.

Save 65% Now

Limited Time Offer

Here are the main reasons why you must use a VPN:

  • Your activities are hidden from your ISP, the government, and from the apps you are using.
  • You can access additional movies and TV streams.
  • ISP attempts to throttle are thrwarted thus reducing buffering issues.
  • Geographically restricted content like Netflix and Hulu can be unblocked.

A VPN works be replacing your ISP-assigned IP address and creating an encrypted tunnel. We recommend the no log service offered by IPVanish. It works well on a Firestick and offers the fastest possible speeds.

Special Limited Time Offer - Get IPVanish


How to Install Cartoon Network on Kodi with Screenshots

1. From the home screen, select the cogwheel at the upper left.

Step 1 Installing Cartoon Network addon on Kodi

2. Select System in the bottom right corner.

Step 2 Installing Cartoon Network addon on Kodi


3. Select Add-ons on the left side of the screen.

Step 3 Installing Cartoon Network addon on Kodi


4. Select Unknown sources.

Step 4 Installing Cartoon Network addon on Kodi


5. Click Yes to allow unknown sources.

Step 5 Installing Cartoon Network addon on Kodi


6. Select File manager.

Step 6 Installing Cartoon Network on Kodi


7. Click Add source.

Step 7 Installing Cartoon Network addon on Kodi


8. Click on <None>.

Step 8 Installing Cartoon Network addon on Kodi


9. Type exactly: http://revelationmedia.tk/blamo/

Step 9 Installing Cartoon Network addon on Kodi


10. Click on OK.

Step 10 Installing Cartoon Network addon on Kodi


11. Select enter a name for this media source.

Step 11 Installing Cartoon Network addon on Kodi


12. Name is Cartoon Network (this part isn’t critical as long as you remember the name).

Step 12 Installing Cartoon Network addon on Kodi


13. Click on OK.

Step 13 Installing Cartoon Network addon on Kodi


14. Click on OK.

Step 14 Installing Cartoon Network addon on Kodi


15. Take one step back and click on Add-ons.

Step 15 Installing Cartoon Network addon on Kodi


16. Select install from zip file.

Step 16 Installing Cartoon Network addon on Kodi


17. Click on Cartoon Network (or whatever you named the source).

Step 17 Installing Cartoon Network addon on Kodi


18. Click on repository.blamorepo-1.1.8.zip

Step 18 Installing Cartoon Network addon on Kodi


19. Select on Install from repository.

Step 19 Installing Cartoon Network addon on Kodi


20. Click on Blamo Repo Reborn

Step 20 Installing Cartoon Network addon on Kodi


21. Pick Video add-ons.

Step 21 Installing Cartoon Network addon on Kodi


22. Select Cartoon Network again.

Step 22 Installing Cartoon Network addon on Kodi


23. Click on Install.

Step 23 Installing Cartoon Network addon on Kodi


24. Select  Version 1.0.2 Blamo Repo Reborn

Step 24 Installing Cartoon Network addon on Kodi


25. Select OK after reviewing the add-ons that will be installed.

Step 25 Installing Cartoon Network addon on Kodi


26. You should see a popup in the upper right corner saying Cartoon Network has installed. There will actually be multiple popups for the various components.

Step 26 Installing Cartoon Network addon on Kodi


27. Click on Open to start the Cartoon Network add-on.

Step 27 Installing Cartoon Network addon on Kodi

Alternatives

The best way to ensure you get uninterrupted entertainment is by always having a good back up because of unforeseen issues that may arise. We highly recommend that you only get your content from trusted and reliable sources. Having said that, we believe that the following add-ons have similar content with the Cartoon Network add-on and here they are:

  • Southpark Add-on
  • Simpsons World Add-on
  • Youtube Add-on
  • Iplayer WWW Add-on
  • Shout Factory TV
  • Japanese Animated Film Classic Add-on

These add-ons can be found under the official Kodi repository. Also, the Jsergio Repository offers content that mainly focuses on cartoons. Lastly, from the Blamo repository, we also have the Chocolate Salty Ball add-on that can be viewed as a good alternative to this one.


Common Errors

These are some of the things that may cause an issue when installing the Cartoon Network Add-on:

  1.    Unable to connect to URL/Download

Having a hard time downloading The Cartoon Network Add-on? This can only mean that the repository is incorrect, so please check if you have typed in the correct URL. Also, you make sure that you have installed the correct repository. Checking your internet connection for stability can also help and make sure that you are protected by a VPN. Your ISP constantly monitors your activity and may block certain websites from being accessed. To fix this, use a VPN to make your connection encrypted and anonymous so that your tracks will be covered. Check here for the best VPN deal.


  1.     Script Error

This error can occur maybe because of how Kodi was installed on your device. Follow the proper steps on how to install Kodi to avoid this type of issue. If the issue persists, you can proceed in reinstalling the add-on. If it should persist further, there may be a need to uninstall and reinstall the whole Kodi app itself.


  1.     Kodi Check Log Error

This occurs when your media cache is full. We can prevent this by emptying your cache and making sure that it gets cleaned on a regular basis. Cache build is quite common nowadays because it is one way of making our streaming experience smoother.


  1.     Source not working/slow/frozen

The Cartoon Network Add-on does not keep any of the content on its servers, these are all coursed through 3rd party sites. Wait for the source to load up to 15 seconds and then you can try other suggestions. For other solutions please take time to read our in-depth guide linked above.


Grab your subscription now!

Click here to get the lowest price on Surfshark through our exclusive limited-time offer.


How to Install Surfshark VPN on Firestick

If your Firestick still has the older interface, read this article to learn how to update it: Update Firestick Interface.

Follow our screenshots below to install the SurfShark VPN app on your Fire TV stick.

1. Go to the Home screen of your Firestick.

step 1 Install Surfshark VPN on Firestick


2. Navigate towards the Find tab. Press the Search button from the resulting dropdown.

step 2 Install Surfshark VPN on Firestick


3. Type in the keyword of SurfShark and select from the suggestions that will appear.

step 3 Install Surfshark VPN on Firestick


4. Click the official SurfShark icon from your search results.

step 4 Install Surfshark VPN on Firestick


5. Press the Download (You own it) button.

step 5 Install Surfshark VPN on Firestick


6. The SurfShark VPN installer will download on your device.

step 6 Install Surfshark VPN on Firestick


7. SurfShark VPN’s app will automatically install itself on your Fire TV stick.

step 7 Install Surfshark VPN on Firestick


8. Press the Open button after completing SurfShark VPN’s installation process.

step 8 Install Surfshark VPN on Firestick


9. Please wait for the SurfShark VPN to load its user interface.

step 9 Install Surfshark VPN on Firestick


10. You can now log in with your SurfShark VPN account credentials.

step 10 Install Surfshark VPN on Firestick

Learn more about Surfshark and Grab the Best Surfshark Deal Now!


Install Surfshark on Firestick

Best Surfshark Deal


Other VPNs to Consider

NordVPN (Best for Streaming)

Best Features

  • 5000+ Server in 50+ Countries 
  • Military-Grade Encryption
  • Fast Connection Speed
  • Suitable to a lot of devices
  • No-Log Policy

Prices
  • Complete $5.89 per month (64% Discount)
  • Plus $4.59 per month (56% Discount)
  • Standard $3.69 per month (55% Discount)

Best Features

  • 750+ High-speed VPN Servers in 43 Locations
  • Military-Grade Encryption
  • Fastest HD Streaming and Gaming
  • 30-Day Money-Back Guarantee
  • Unlimited Data & Devices
  • No-Log Policy

Prices
  • 3 Years $1.99 per month (82% Discount)
  • 1 Years $3.29 per month (70% Discount)
  • 1 Month $10.99 per month

IPVanish VPN (Most Secure)

Best Features

  • 1200+ Servers in 60+ Countries around the world
  • Unlimited Connections
  • No-Log Policy
  • Top Notch Military-Grade VPN Protocols and Encryptions
  • 100% Safe and Secured
  • Most Trusted VPN
  • Best VPN for Firestick
  • 30-Day Money-Back Guarantee

Prices
  • Yearly $3.99 per month (63% Discount) – 30 days risk free + Ransomware & Malware Protection
  • Quarterly $5.32 per month (51% Discount)
  • Monthly $10.99 per month


For more VPN discounts, go to ReviewVPN Deals and purchase the best VPN for you.


Conclusion

There are already a lot of other add-ons that offer cartoons, but not a lot of add-ons are there that focus on cartoons. This add-on will be very helpful to you when it comes to dealing with your kids. Also, it can help you spend more quality time with them by watching the same things as they do. We hope that this guide will be able to help you. Should you have questions or queries, feel free to contact us here at our website or any of our other social media platforms. Thank you and happy watching!

2