Overview
Venom Kodi Addon is currently unavailable for installation. The Kodi repo for Venom is not working anymore. We will try to see if it will be available in some other repositories.
If you have Venom Kodi Addon installed in your Kodi, it will likely to still work until became outdated.
For alternatives, please see the Best Kodi Addons and What Builds and Addons Working on Kodi 19.5.

Venom Kodi Addon

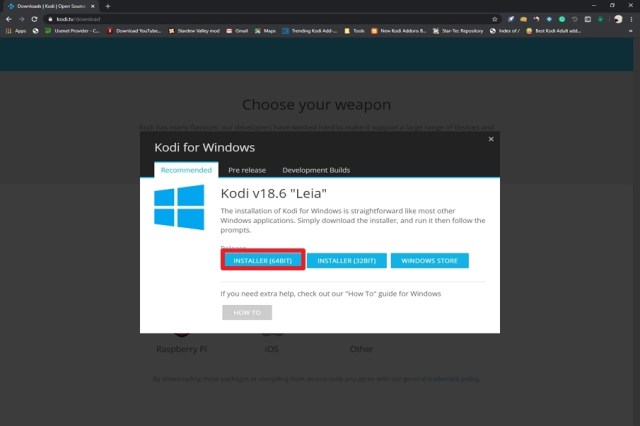
This article will help you install the Venom Kodi Addon on your firestick device.
Venom build has gained popularity in 2019 as being a super-fast cut-down version fork of Exodus. A great build for those using the Amazon Fire Stick or another low RAM device that needs cut-down add ons to work optimally.
What is Kodi?

Kodi was first released in 2002, as a free piece of software put together by hobbyist coders to allow media to be played on the original Xbox. Since then the software has been downloaded tens of millions of times and has become one of the most popular all-in-one pieces of media software.
Kodi has become popular because it can play almost any type of media file and has a ten-foot user interface that allows any add-on or builds to be resized for TV effectively and enables interaction with a regular remote control.
Kodi is completely legal but also features an unofficial library of thousands of add-ons that allow users to access the latest music, films, TV shows, and live TV for free.

What is an Add On?
A Kodi add on is an additional application that gives you added functionality. These add ons serve a specific function like accessing movies and tv shows, live TV or streaming music.
There are thousands of add ons available through Kodi’s unofficial library and if you can think of a type of media you want to access, there’s an add on for it.
You can search and install add ons directly through your Kodi application.
What is Venom?
Venom is a fork of the Exodus add-on. It’s gained popularity for being snappy, regularly updated, and has a wide range of features.
Features
- Quick to load and search
- Easy to navigate menu
- TV Shows and Films
- Music TV and Videos
- Fringe TV
- Recommended section
- Responsive
- Real Debrid compatible
- Trakt.TV integrated
- Live TV Channels
- Access to Open Scrapers scraper set to help find the best links
- Cached torrents are supported
- Up next function
- Kids TV
- Additional features have been cut to reduce bloat
YOUR INTERNET ACTIVITY IS BEING WATCHED
ReviewVPN cannot attest to the legality, security and privacy of the applications discussed on this site. It is highly recommended that you use a VPN service while streaming or using Kodi.
Currently, your IP 216.73.217.169 is visible to everyone and your Browser is being tracked by Advertisers & ISP Provider.
Here are the main reasons why you must use a VPN:
- Your activities are hidden from your ISP, the government, and from the apps you are using.
- You can access additional movies and TV streams.
- ISP attempts to throttle are thrwarted thus reducing buffering issues.
- Geographically restricted content like Netflix and Hulu can be unblocked.
A VPN works be replacing your ISP-assigned IP address and creating an encrypted tunnel. We recommend the no log service offered by IPVanish. It works well on a Firestick and offers the fastest possible speeds.
How to Install Venom Kodi Addon

Use the following steps to get Venom up and running on your Kodi application. We always recommend that you have a working VPN prior to running Kodi or any of the add ons may not work without it
- Open up Kodi and click on the gear icon in the top left-hand corner
- Click on System
- Turn on the toggle next to Unknown sources
- Go back to the previous screen and click on File Manager
- Click add source
- Click “Add None”
- You should see a pop up screen which says “Enter the paths or browse for the media locations” In the URL bar type the following exactly: https://123venom.github.io/ (Sometimes URL’s change to mirror sites if they are blocked, you can find the newest mirror site by typing in the URL we have given + “mirror site”
- Give the source a recognizable name like Venom, as you will need it later
- Click on Add ons then install from .zip file
- Click on your Venom file and it will run through the installation process
- Now click on install file from repository
- Click the Venom Repository then click video add ons
- Click install and you can also install any additional add ons
- You can now go back to the original home screen and when you click add ons you should see the Venom icon
How to Install Venom Kodi Addon with Screenshots
- From the home screen, select the cogwheel at the upper left.
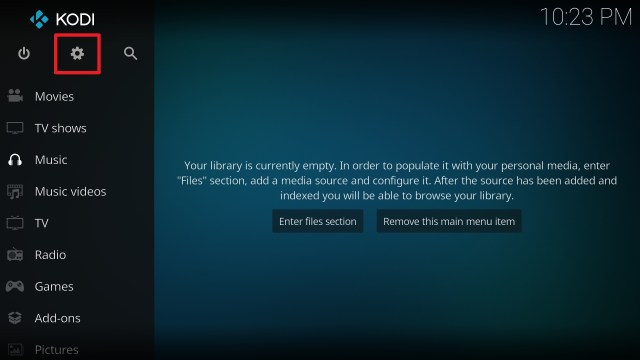
2. Select System in the bottom right corner.

3. Select Add-ons on the left side of the screen.

4. Select Unknown sources.

5. Click Yes to allow unknown sources.

6. Select File manager.

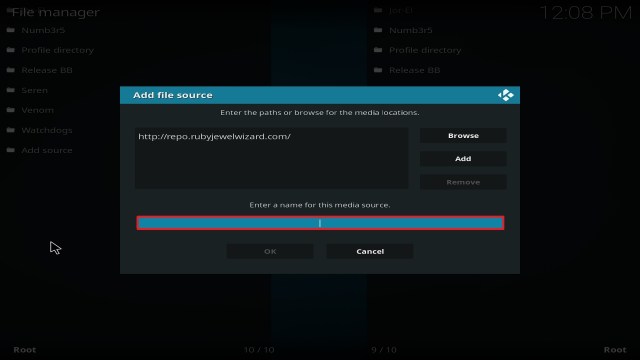
7. Click Add source.

8. Click on <None>.

9. Type exactly: https://123venom.github.io/

10. Click on OK.

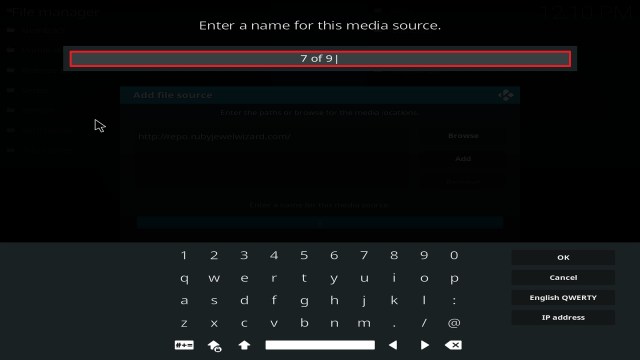
11. Select enter a name for this media source.

12. Name is Venom (this part isn’t critical as long as you remember the name).

13. Click on OK.

14. Click on OK.

15. Take one step back and click on Add-ons.

16. Select install from zip file.

17. Click on Venom (or whatever you named the source).

18. Click on repository.venom-1.6.zip

19. Select on Install from repository.

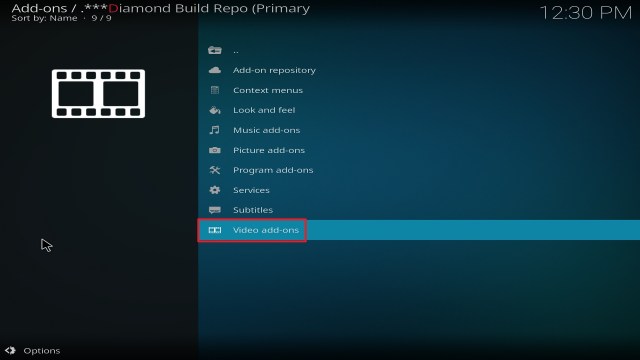
20. Click on Venom Repo.

21. Pick Video add-ons.

22. Select Venom again.

23. Click on Install.

24. Select OK after reviewing the add-ons that will be installed.

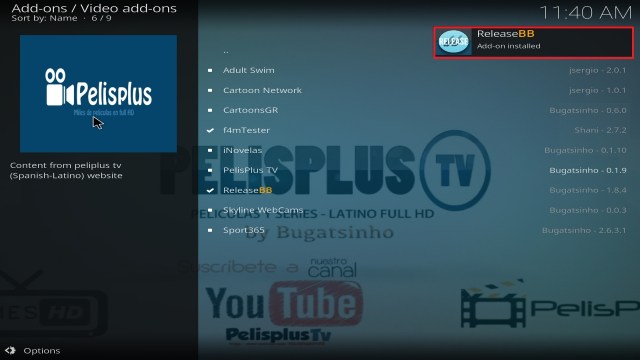
25. You should see a popup in the upper right corner saying Venom has been installed. There will actually be multiple popups for the various components.

26. Click on Open to start the Venom add-on.


FAQs
Is it Safe to Use?
Venom is still relatively new but has gained popularity quickly, which is generally a good sign that the add-on is safe and stable.
We always recommend that you install it only from the official library rather than a third-party server or library. There have been plenty of stories of add ons which are then adapted with malware or viruses.
If you are unsure of the source of your download, scan it first with a program like Malwarebytes.
Is it Legal or Grey?
Venom is in a grey area. A lot of add ons avoid being banned entirely because they act as a platform between users and torrent platforms. They don’t host the content themselves.
Having said if you are using Venom you do so knowing full well that most of the content you watch won’t have been distributed legally.
Should I Use This App With a VPN?

You should always use Venom with a VPN. Without it you may find that Venom and in fact, many other popular addons just won’t work.
Kodi addons are high on the target list for large media companies and Internet Service Providers. Their IPs will be blocked, and if you try to connect to them from an unencrypted request you won’t be able to access their content.
A Virtual Private Network works by encrypting your requests from your device through your ISP and to your VPN’s DNS Server. Your ISP would normally be able to see where your traffic is going. But once encrypted by your VPN using unbreakable 256-bit AES encryption, all they can see is your traffics endpoint at the VPN’s DNS server.
If your ISP can’t tell where your traffic is going, then they have no ground to block it. Your data just looks like normally secured data packets.
A VPN allows you to maintain anonymity and privacy online and gives you the freedom to watch restricted content. If you want to know more about this VPN, kindly read our Surfshark Review.
Here are the reasons why it is our VPN of choice:
- It bypasses restrictions and geo-blocks to let you access any restricted content.
- This VPN service offers 3,200 VPN servers in 65 different countries.
- Military-grade AES-256 encryption adheres to FIPS (Federal Information Processing Standards), which controls how sensitive data is handled.
- It adheres to a strict no-log policy.
- By default, DNS Leak Protection is enabled.
- There are no bandwidth restrictions, so you can use your VPN connection at maximum speed without any throttling.
- It can secure unlimited devices and works on all of them.
- Customer service is available around the clock.
- More content is available, and you can even unblock Netflix and other platforms.
- Supports peer-to-peer file sharing, making it suitable for torrenting.
Click here to get the lowest price on Surfshark through our exclusive limited-time offer.
How to Install Surfshark VPN on Firestick
If your Firestick still has the older interface, read this article to learn how to update it: Update Firestick Interface.
1. Go to the Home screen of your Firestick.

2. Navigate towards the Find tab. Press the Search button from the resulting dropdown.

3. Type in the keyword of SurfShark and select from the suggestions that will appear.

4. Click the official SurfShark icon from your search results.

5. Press the Download (You own it) button.

6. The SurfShark VPN installer will download on your device.

7. SurfShark VPN’s app will automatically install itself on your Fire TV stick.

8. Press the Open button after completing SurfShark VPN’s installation process.

9. Please wait for the SurfShark VPN to load its user interface.

10. You can now log in with your SurfShark VPN account credentials.

Learn more about Surfshark and Grab the Best Surfshark Deal Now!


For more VPN discounts, go to ReviewVPN Deals and purchase the best VPN for you.
FAQs
Is it Free?
Yes
When Was It Released?
Venom was released in 2019
Best Alternatives
There are so many good add ons out there, many of which are older than Venom and still stable like:
- Destiny of Deathstar
- Yoda
- Exodus Redux
- Deceit
- 7 of 9
Add ons do have a habit of going down for periods of time, so we recommend you have a few installed so you always have a contingency plan.
Our Opinion
Venom is a really nice add-on that is lightweight and snappy. The developers have really concentrated on making it as responsive as possible and cutting out bloated features which can slow down your user experience.
Venom is a great add-on for those who want to keep it simple and just use the basics. You can also download additional features. You can also increase its functionality by synchronizing it with your Real Debrid account which allows you to access high-quality streams.