Galaxy Kodi Video Addon
Quick Navigation
Source: http://theuforepo.us/repo
People often find themselves complaining about paying for a cable subscription that is way too expensive. Come to think of it who would want to pay for $150 when there is an alternative at a fraction of the cost? This is where Kodi in all its gloriousness comes into play.

For some years now, Kodi has helped a lot of people in viewing high-quality content that doesn’t cost anything at all and with the help of add-ons the entertainment experience has evolved as well. One of the best add-ons around is Galaxy Kodi Add-on and a lot of users prefer it due to its versatile nature.
Galaxy Kodi Video Add-on is a fork of the most popular and successful Exodus/Covenant add-on. It provides an extensive array of content that will make most Kodi users find sufficient to their liking. You will be able to stream Movies, TV Shows, Channels, Documentaries, and a whole lot more with this add-on. It is a multi-source add-on that has a variety of purposes.

Features
- High-Quality Video
- Information on link providers
- Descriptive summary for each title
- Very simple and easy UI
Installation Guide
- Launch Kodi on your device
- Open the “Gear Icon” and choose “System”
- Select the add-ons menu, turn on the “Unknown Sources” by clicking “yes”
- Go back to the “systems” page and choose “File Manager”
- Choose Add source and select “none”
- Go to http://theuforepo.us/repo/
- Highlight the source and rename it to “UFO” or any name you would like to use to identify this particular source and click “ok”
- Go back to the System Screen and click “Add-ons”
- Choose “Install Zip File” and choose “UFO” or whatever you renamed the file.
- Choose the zip file URL– repository.ufo-repo.zip
- Wait for the notification “UFO Build Add-on Repo Installed” to appear.
- Click on “Install Repository”
- Select “UFO Repository”
- Open “Video Add-ons” and Choose “Galaxy” and “Install”
- Select “Ok” when a notification “the following add-ons will be installed” appears and wait for Galaxy Add-on to install
- Once the add-on is installed go back to the home screen and select “add-ons”
- Choose “Video add-ons” and select “Galaxy”
- There you go, Galaxy is now installed.
YOUR INTERNET ACTIVITY IS BEING WATCHED
ReviewVPN cannot attest to the legality, security and privacy of the applications discussed on this site. It is highly recommended that you use a VPN service while streaming or using Kodi.
Currently, your IP 82.38.180.56 is visible to everyone and your Browser is being tracked by Advertisers & ISP Provider.
Here are the main reasons why you must use a VPN:
- Your activities are hidden from your ISP, the government, and from the apps you are using.
- You can access additional movies and TV streams.
- ISP attempts to throttle are thrwarted thus reducing buffering issues.
- Geographically restricted content like Netflix and Hulu can be unblocked.
A VPN works be replacing your ISP-assigned IP address and creating an encrypted tunnel. We recommend the no log service offered by IPVanish. It works well on a Firestick and offers the fastest possible speeds.
How to Install the Galaxy on Kodi with Screenshots
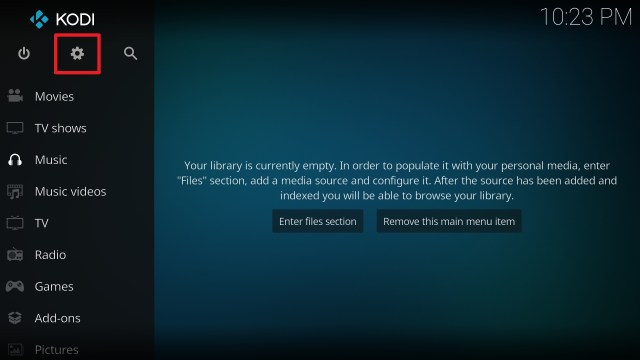
1. From the home screen, select the cogwheel at the upper left.
2. Select System in the bottom right corner.

3. Select Add-ons on the left side of the screen.

4. Select Unknown sources.

5. Click Yes to allow unknown sources.

6. Select File manager.

7. Click Add source.

8. Click on <None>.

9. Type exactly: http://theuforepo.us/repo

10. Click on OK.

11. Select enter a name for this media source.

12. Name is Galaxy (this part isn’t critical as long as you remember the name).

13. Click on OK.

14. Click on OK.

15. Take one step back and click on Add-ons.

16. Select install from zip file.

17. Click on Galaxy (or whatever you named the source).

18. Click on repository.ufo-repo-1.000.000.zip

19. Select on Install from repository.

20. Click on UFO Repo.

21. Pick Video add-ons.

22. Select Galaxy again.

23. Click on Install.

24. Select OK after reviewing the add-ons that will be installed.

25. You should see a popup in the upper right corner saying Galaxy has installed. There will actually be multiple popups for the various components.

26. Click on Open to start Galaxy add-on.

Alternatives
A good back-up plan is always desired because you will never know if an issue suddenly emerges and that might leave you hanging. We always recommend that you secure yourself a secondary option which you can obtain from trusted sources if ever the need arises. Although we find plenty of other add-ons to choose from to substitute Galaxy add on, the following add-ons have very similar content and function like this one. Here they are:
- Exodus
- Exodus Redux
- Primal
- Covenant
These add-ons can be used as a replacement if and when the need arises. But all-in-all, Galaxy will work out just fine.
Common errors
These are some of the things that may cause an issue when installing Galaxy Add-on:
If you are having difficulties downloading the Galaxy add-on this may mean that the repository is unstable and that the IP may be unavailable. It is also worth checking out if you have typed the correct URL that you have downloaded Wolf Pack from the right repository. Also, make sure that you have a stable internet connection and that you are secured by a VPN. If your country has stricter rules regarding censorship, you may find that it is blocked because it may contain adult content and that it is collected illegally. Your ISP constantly monitors your activity and may block certain websites from being accessed. To fix this, use a VPN to make your connection encrypted and anonymous so that your tracks will be covered. Check here for the best VPN deal.
This error occurs due to the add-on itself or on the manner Kodi has been installed. Make sure that you have installed everything properly. If this problem persists, try reinstalling the add-on or there may be a need to update or reinstall Kodi. To figure out how to do this and other fixes read our in-depth guide linked above.
Check Log Errors usually happen often as you use Kodi until you get familiar with it. This usually happens when your media cache is full. Your device will always cache a clip every time you watch media to allow faster loading time. In the long run, this cache gets full thus creating this issue. An in-depth guide on how to empty your cache is provided at the link above.
Galaxy add-on does not store any of the content on its servers, these are all accumulated through 3rd party sites. Give the source up to 15 seconds to load and then you can try other suggestions. For other solutions please take time to read our in-depth guide linked above.
Do I need a VPN?
Whenever you stream using third-party add-ons, it is much better if you are using a Virtual Private Network to ensure your safety. Having a VPN is like having an online companion that will ensure your safety and privacy while streaming on these services. One of the best and most recommended VPNs is Surfshark. As you connected to this VOPn it will automatically hide all of your online activities and keep you anonymous. The good thing is, this VPN also ensures that you are safe from any threats and allow you to access any content that you want.
Read our Surfshark Review if you want to learn more about this VPN.
Here’s are the reasons why it is our VPN of choice:
- It bypasses restrictions and geo-blocks to let you access any restricted content.
- This VPN service offers over 3200+ servers in 65 countries.
- Military-grade AES-256 encryption adheres to FIPS (Federal Information Processing Standards), which control how sensitive data is handled.
- It adheres to a strict no-log policy.
- By default, DNS Leak Protection is enabled.
- There are no bandwidth restrictions, so you can use your VPN connection at maximum speed without any throttling.
- It can secure an unlimited number of devices and works on all of them.
- Customer service is available around the clock.
- More content is available, and you can even unblock Netflix and other platforms.
- Supports peer-to-peer file sharing, making it suitable for torrenting.
Grab your subscription now!
Click here to get the lowest price on Surfshark through our exclusive limited-time offer.
How to Install Surfshark VPN on Firestick
If your Firestick still has the older interface, read this article to learn how to update it: Update Firestick Interface.
Follow our screenshots below to install the SurfShark VPN app on your Fire TV stick.
1. Go to the Home screen of your Firestick.

2. Navigate towards the Find tab. Press the Search button from the resulting dropdown.

3. Type in the keyword of SurfShark and select from the suggestions that will appear.

4. Click the official SurfShark icon from your search results.

5. Press the Download (You own it) button.

6. The SurfShark VPN installer will download on your device.

7. SurfShark VPN’s app will automatically install itself on your Fire TV stick.

8. Press the Open button after completing SurfShark VPN’s installation process.

9. Please wait for the SurfShark VPN to load its user interface.

10. You can now log in with your SurfShark VPN account credentials.

Learn more about Surfshark and Grab the Best Surfshark Deal Now!
Install Surfshark on Firestick


For more VPN discounts, go to ReviewVPN Deals and purchase the best VPN for you.
Click here to get the lowest price on Surfshark through our exclusive limited-time offer.
Conclusion
Galaxy Kodi Video Add-on is a very useful add-on in terms of the content that it has to offer. It provides a great number of high-quality streaming links that you can enjoy. It is also a good choice because the easy user interface that it has will be very helpful in searching for the content that you wish to see. Although there are more updated add-ons compared to the Galaxy add-on, this one has endured and is still highly functional compared to the old and ancient ones. We hope that this guide enlightens you and helps you with your Kodi experience. Questions and queries are highly entertained so please do not be afraid to ask or suggest a comment here on our website and our other social media platforms. Thank you and have a great day ahead!


