Genesis Kodi Addon

Source: http://kodiuk.tv/repo
Genesis is one of the most well know Kodi addons, and continues to be active but has since been replaced with a newer version of the add on by the famous team Lambda who have since released Exodus, which has been forked to make probably the best add on for Kodi in 2019 Exodus Redux.
Note: Use Kodil Repo, not working on KodiUKTV Repo

However in 2018, the original Genesis team updated the add on, so it’s back alive and kicking. Renaming the add on in Genesis Reborn.
In 2019, access to Genesis Reborn is patchy at best, but the original Genesis has returned new and updated. Exodus Redux is also a really good alternative if you are looking for a great option for watching movies and TV Shows.
Genesis used to be one of the best add ons for accessing movies and TV shows. Before it went dark, Genesis has received 5 major updates and was at the cutting edge of streaming and cord cutting in 2015.

Common Errors
These are the most common errors you might come across with Genesis:
- Could not connect to URL/Download: Genesis has been up and down frequently over the past 4 years, and can’t be counted on as the most reliable add on. Check that you have entered the right URL and you are pulling from the well-known Kodi UK repository. Also try the link a few times, just in case there is a glitch with a server. You can try the next day, or find a more in-depth fixes guide linked above.
- Source not working/slow/frozen: When Genesis 5.0 was released there were a lot of reported problems with the streams. The reason being was that lambda has set the timeout for 40 seconds, you can change this down to as low as 15 seconds. It’s important to understand that streaming content on Kodi is not like TV. As well as reloading the link and trying an alternative. Also, a VPN will eliminate the chances of your IP being blocked by your internet provider. Check here for the best VPN deal. For more fixes read our guide linked above.
- Kodi check log error: A Kodi check log error is nothing to worry about. This has no relation to a corrupted script, or a missing dependency, and will only happen once you have installed Genesis and are streaming content within the add on. A check log error in most cases simply means that your media cache is full and needs to be emptied. Just like your web browser, Kodi will cache snippets of content, to make loading instant the next time you try to watch it. Over time this cache fills up. To learn how to empty your cache, download helpful system tools, and more read our guide linked above.
Review
The return of Genesis in 2019 was a welcome surprise. After Genesis Reborn went dark in 2018, most people assumed that was the last we would hear of it.
Genesis truly was cutting edge in 2015. You could sort by year, search shows by channel, had a TV calendar, and download content, and all of those features have stayed and been featured in the new Genesis.
A great add on, but probably not better than Exodus Redux and some of the later add ons that lambda developed.
Still a great back up to have.
Categories include:
- TV Shows
- Movies
- Channels
- My genesis
- Latest Movies
- Latest Episodes
- Tools
- Search
YOUR INTERNET ACTIVITY IS BEING WATCHED
ReviewVPN cannot attest to the legality, security and privacy of the applications discussed on this site. It is highly recommended that you use a VPN service while streaming or using Kodi.
Currently, your IP 216.73.217.1 is visible to everyone and your Browser is being tracked by Advertisers & ISP Provider.
Here are the main reasons why you must use a VPN:
- Your activities are hidden from your ISP, the government, and from the apps you are using.
- You can access additional movies and TV streams.
- ISP attempts to throttle are thrwarted thus reducing buffering issues.
- Geographically restricted content like Netflix and Hulu can be unblocked.
A VPN works be replacing your ISP-assigned IP address and creating an encrypted tunnel. We recommend the no log service offered by IPVanish. It works well on a Firestick and offers the fastest possible speeds.
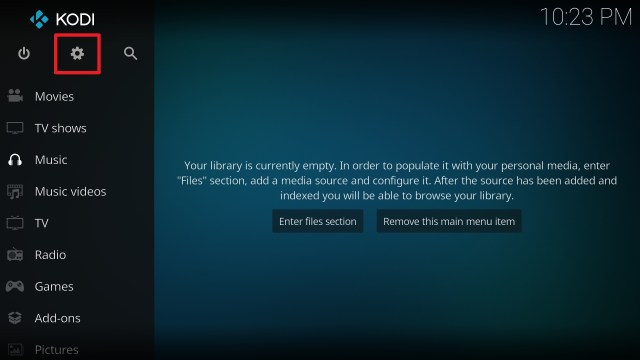
How to Install Genesis Addon on Kodi with Screenshots
- From the home screen, select the cogwheel at the upper left.
2. Select System in the bottom right corner.

3. Select Add-ons on the left side of the screen.

4. Select Unknown sources.

5. Click Yes to allow unknown sources.

6. Select File manager.

7. Click Add source.

8. Click on <None>.

9. Type exactly: http://kodiuk.tv/repo/

10. Click on OK.

11. Select enter a name for this media source.

12. Name is Genesis (this part isn’t critical as long as you remember the name).

13. Click on OK.

14. Click on OK.

15. Take one step back and click on Add-ons.

16. Select install from zip file.

17. Click on Genesis (or whatever you named the source).

18. Click on repository.kodiuktv-1.1.2.zip.

19. Select on Install from repository.

20. Click on KodiUKTV Repo

21. Pick Video add-ons.

22. Select Genesis again.

23. Click on Install.

24. Select Version 2017.11.04

25. Select OK after reviewing the add-ons that will be installed.

26. You should see a popup in the upper right corner saying Genesis has installed. There will actually be multiple popups for the various components.

27. Click on Open to start the Genesis add-on.

Install Surfshark on Firestick
Legal Disclaimer: ReviewVPN.com does not encourage or endorse any illegal activity involved in the usage of services and applications referenced on this site. We do not verify the licensing agreements of services. The end-user is wholly responsible for ensuring that any media accessed through these services does not violate copyright and/or licensing laws. ReviewVPN does not promote, link to, or receive compensation from any Apps and IPTV services.
How to Install Surfshark VPN on Firestick
If your Firestick still has the older interface, read this article to learn how to update it: Update Firestick Interface.
You can download Surfshark directly from the Amazon App store. It will be easy for you to find Surfshark with your Firestick’s Find feature. Refer to our screenshots below.
1. Go to the Home screen of your Firestick.

2. Navigate towards the Find tab. Press the Search button from the resulting dropdown.

3. Type in the keyword of SurfShark and select from the suggestions that will appear.

4. Click the official SurfShark icon from your search results.

5. Press the Download (You own it) button.

6. The SurfShark VPN installer will download on your device.

7. SurfShark VPN’s app will automatically install itself on your Fire TV stick.

8. Press the Open button after completing SurfShark VPN’s installation process.

9. Please wait for the SurfShark VPN to load its user interface.

10. You can now log in with your SurfShark VPN account credentials.

Learn more about Surfshark and Grab the Best Surfshark Deal Now!
Install Surfshark on Firestick


For more VPN discounts, go to ReviewVPN Deals and purchase the best VPN for you.
Click here to get the lowest price on Surfshark through our exclusive limited-time offer.


